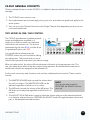
1
CS-DUO USER GUIDE
Version 1.2
November 2015
1266 Park Road
Chanhassen, MN 55317
952-401-7700
[email protected]
www.digitalaudio.com
SAFETY INSTRUCTIONS
TO REDUCE THE RISK OF ELECTRIC SHOCK, DO NOT REMOVE COVER. NO USER SERVICEABLE
PARTS INSIDE. CONTACT DIGITAL AUDIO LABS FOR SERVICING.
The lightning flash with arrowhead symbol, within an equilateral triangle, is intended to alert the
user to the presence of uninsulated and/or potentially dangerous voltage within the products
enclosure that may be of sufficient magnitude to constitute a risk of electric shock to persons.
The exclamation point within an equilateral triangle is intended to alert the user to the presence
of important operating and maintenance (servicing) instructions in the literature accompanying
the appliance.
POWER CORD NOTICE FOR INTERNATIONAL OPERATION
Please call Digital Audio Labs Support at 952-401-7700.
IMPORTANT SAFETY INSTRUCTIONS
1.
2.
3.
4.
5.
6.
Read and understand this entire manual.
Keep this manual available for reference.
Heed all warnings and precautions in this manual and notices marked on the product.
Do not use this product near water or damp environments.
Do not block any ventilation openings. Install in accordance with the manufacturer’s instructions.
Provide for proper airflow around product. Do not install near products that produce high levels
of heat. Do not expose the unit to direct sun light or heating units as the internal components’
temperature may rise and shorten the life of the components.
7. Do not defeat the safety purpose of the polarized or grounding-type plug. A polarized plug has
two blades with one wider than the other. A grounding type plug has two blades and a third
grounding prong.
8. Protect the power cord from being walked on or pinched particularly at plugs, convenience
receptacles, and the point where they connect to the product. Do not use the unit if the electrical
power cord is frayed or broken.
9. Only use attachments/accessories specified by the manufacturer.
10.Unplug this product during lightning storms or when unused for long periods of time.
11.Refer all servicing to qualified service personnel. There are no user serviceable components inside
the product.
12.The product shall not be exposed to moisture. Do not touch the unit with wet hands. Do not
handle the unit or power cord when your hands are wet or damp.
13.The product should be connected to a power supply only of the type described in the operating
instructions or as marked on the product.
CARE
• From time to time you should wipe off the front and side panels and the cabinet with a dry soft
cloth. Do not use rough material, thinners, alcohol or other chemical solvents or cloths since this
may damage the finish or remove the panel lettering.
• The Livemix system is capable of delivering high levels of volume. Please use caution with
volume levels, listen with the lowest possible volume for proper operation and avoid exposure to
prolonged high volume levels.
• The manufacturer cannot be held responsible for damages caused to persons, personal
possessions, or data due to an improper or missing ground connection.
LIVEMIX CS-DUO
DIGITAL AUDIO LABS LIMITED WARRANTY
Digital Audio Labs warrants their products against defects in material and workmanship for a period of two
years from date of purchase. During this period, Digital Audio Labs will, at its option, repair the defective unit
or replace it with a new or rebuilt one.
The warranty does NOT cover:
• Damage due to abuse, misuse, or accident.
• Damage due to operation contrary to the instructions in the product instruction manual.
• Units on which the product serial number has been removed or altered.
• Units that have been serviced by unauthorized personnel.
All implied warranties, including warranties on merchantability and fitness, are limited in time to the length of
this warranty. Some states do not allow time limitations on implied warranties, so this limitation may not apply
to you. Digital Audio Labs’ liability is limited to the repair or replacement of its product. Digital Audio Labs
shall in no way be held liable for incidental or consequential damages resulting from the use of their product
or its software, including, without limitation, damages from loss of business profits, business interruption,
loss of business information or other pecuniary loss. Some states do not allow the exclusion or limitation of
incidental or consequential damages, so the above limitation or exclusion may not apply to you.
REPAIR POLICY
Please do not return the product without obtaining an RMA number first. Contact Digital Audio Labs at
[email protected] to acquire an RMA number. Do not return the product to the place of purchase.
Please write the RMA number on the outside of the shipping carton. Any product sent to us without a valid
RMA number will be refused. Include the following with the product: a brief description of the problem, your
name, return shipping address, phone number and the RMA number. Do not include any accessories. DAL
is not responsible for any damage to or loss of the product during transit. We recommend that customers
obtain a receipt and tracking number for all packages shipped to us. Turnaround time on repairs is generally
ten business days. If you live outside of the United States, please contact your local distributor for warranty
service.
Please return product to:
Digital Audio Labs
Attn: RMA Number
1266 Park Road
Chanhassen, MN 55317
USA
WARRANTY SERVICE
You will be required to pay the shipping charges when you ship your product to DAL. DAL will pay for return
shipping via UPS ground. We reserve the right to inspect any product that may be the subject of any warranty
claim before repair is carried out. For warranty service, we may require proof of the original date of purchase
if you have not registered your product with DAL. Final determination of warranty coverage lies solely with
Digital Audio Labs.
NON-WARRANTY SERVICE
If it is determined that the product does not meet the terms of our warranty, you will be billed for labor,
materials, return freight and insurance. There is a $50 USD minimum charge for materials and labor.
Appropriate shipping charges will be applied. We require payment in advance of repair by credit card; we
accept Visa and Master Card. In the event the charges are over the minimum charge, DAL will contact you
and inform you of the cost of the repair before any work is completed.
LIVEMIX CS-DUO
1
CONTENTS
SAFETY INSTRUCTIONS.............................................................................................II
IMPORTANT SAFETY INSTRUCTIONS.........................................................II
CARE................................................................................................................II
DIGITAL AUDIO LABS LIMITED WARRANTY............................................................1
REPAIR POLICY...............................................................................................1
WARRANTY SERVICE.....................................................................................1
NON-WARRANTY SERVICE..........................................................................1
CS-DUO FEATURE LIST...............................................................................................4
CS-DUO PERSONAL MIXER........................................................................................5
CONTENTS OF BOX...................................................................................................5
ANATOMY OF THE CS-DUO......................................................................................6
SETUP AND OPERATION............................................................................................8
SETUP DIAGRAMS.......................................................................................................8
CONNECTING THE CS-DUO TO THE MIX-16/32*.....................................8
CONNECTING HEADPHONES OR MONITORS TO THE CS-DUO..........8
CS-DUO GENERAL CONCEPTS.................................................................................9
TWO MIXERS IN ONE: TAKE CONTROL.....................................................9
LOCAL VS. GLOBAL.....................................................................................10
CHANNEL OVERVIEW VS. SINGLE CHANNEL VIEW...............................10
GETTING STARTED WITH THE CS-DUO.................................................................11
THE OVERVIEW SCREEN.............................................................................11
SINGLE CHANNEL VIEW...........................................................................................12
ACCESSING THE SINGLE CHANNEL VIEW..............................................12
SINGLE CHANNEL VIEW SCREEN.............................................................12
NAMING A CHANNEL.................................................................................13
CREATING A PERSONAL MONITOR MIX...............................................................14
TIPS FOR STARTING YOUR PERSONAL MIX.............................................14
GROUPS AND THE ME GROUP...............................................................................15
ADJUSTING THE VOLUME OF A SINGLE CHANNEL IN A GROUP.......16
LOADING & SAVING A PERSONAL MIX.................................................................17
ADVANCED MIXING - SINGLE CHANNEL VIEW....................................................18
ACCESSING PRESETS AND EFFECTS.......................................................18
SELECTING A PRESET.................................................................................19
ADJUSTING THE CHANNEL EQ................................................................20
ADJUSTING THE CHANNEL HIGH PASS FILTER (HPF)............................21
ADJUSTING THE CHANNEL DYNAMICS..................................................22
LIVEMIX CS-DUO
ACCESSORY CHANNELS..........................................................................................23
AMBIENT MICROPHONE............................................................................23
INTERCOM....................................................................................................23
AUX INPUT....................................................................................................24
METRONOME..............................................................................................25
MIX TOOLS.................................................................................................................26
MIX OUTPUT SETTINGS............................................................................................27
MASTER EQ..................................................................................................27
HIGH PASS FILTER (HPF) SETTINGS: .........................................................28
MASTER DYNAMICS....................................................................................29
MASTER REVERB..........................................................................................29
MASTER OUTPUT.........................................................................................30
MIRRORMIX................................................................................................................31
USING THE CS-DUO WITH A SINGLE PERFORMER................................32
GLOBAL SETTINGS...................................................................................................33
LOADING & SAVING A GLOBAL TEMPLATE............................................34
MIX-16/32 USB MIX ASSIGN.......................................................................35
INPUT SELECT AND DIGITAL CONFIGURATION.....................................35
DA-816 MIX ASSIGN....................................................................................36
DANTE NETWORK CHANNEL SETUP ....................................................................38
AUTO ASSIGN DANTE CHANNELS 1-24..................................................38
MANUALLY ASSIGNING DANTE CHANNELS .........................................38
DEVICE/CHANNEL VIEW TOGGLE............................................................39
IMPORT DANTE NAMES.............................................................................39
SAVING DANTE CHANNEL DATA..............................................................39
SETTING THE GLOBAL CLOCK..................................................................40
LIVEMIX VERSION INFO .............................................................................40
LIVEMIX FIRMWARE INSTRUCTIONS......................................................................41
CS-DUO UPDATE INSTRUCTIONS.............................................................41
CS-DUO FIRMWARE UPDATE TROUBLESHOOTING..............................41
MIX-16/32 UPDATE INSTRUCTIONS..........................................................42
FOOTSWITCH CONNECTOR...................................................................................43
SETTING UP THE FP-2 FOOT PEDAL.........................................................43
OPERATION OF THE FP-2...........................................................................43
INCORPORATING THE CS-DUO INTO YOUR STAGE SETUP .............................44
LIVEMIX SYSTEM EXAMPLES....................................................................................45
TROUBLESHOOTING................................................................................................46
APPENDIX...................................................................................................................48
PRESET EFFECTS LIST.................................................................................48
LIVEMIX SUPPORT.....................................................................................................49
TECHNICAL SPECIFICATIONS.................................................................................49
LIVEMIX CS-DUO
CS-DUO FEATURE LIST
Feature
Benefit
12-channel overview on LCD touchscreen
Quick and easy identification of channels
Color LCD Touch Screen
Informative displays with direct interaction
Illuminated channel and buttons
Quick identification of currently selected channel
Custom channel naming
Select instrument or singer by custom name instead of by
channel number
Continuous rotary/push switch knobs (3 per mix)
Quick and easy adjustment of different settings
Built-in metronome
Provides a common tempo and timing reference for all
users
ME group plus 4 additional channel groups
Allows for quick volume adjustment of logical groups of
instruments such as drums, background vocals, etc.
Optional foot pedal for hands-free mixing
Adjust volume of individual monitor mix channels, while
keeping your hands on your instrument at all times
Two discreet mixes per controller
Allows the monitor mixer to be shared by two users,
saving money, cabling, and stage space
Built-in stereo ambient microphones
Allows the ambient sound of the stage and audience to
be included in your personal mix
Built-in Intercom
Easy communication with the other ensemble members
on the stage
Auxiliary input for sharing audio from phones, laptops, Audition a song from a connected digital audio player,
metronomes
play to tracks, or use advanced metronome features
Power and audio over single network cable
Single-cable interface reduces stage mess and clutter,
simplifies setup at each performance
24 channels of input audio
Craft a custom mix from a wide variety of individual
instrument and vocal sources
EQ & Compression presets on every channel
Tone controls allow you to improve the sound of individual
parts of your mix
EQ, Compression & Reverb on the master output
Fine tune the overall sound of your mix
MirrorMix® remote mixing
Experienced users can connect to a remote mixer and
hear what the remote user is hearing and tailor a mix
accordingly
Save/Load individual mixes to/from USB
Allows users to bring their previously perfected mixes to
new systems and venues
High gain headphone amplifier
Provides clean, great-sounding audio quality
Mute and Solo on each channel
Check the sound of an individual instrument, as well as
eliminate it from the mix
Stereo mix output to USB on MIX-16/32 for recording
Connect to a computer and record a stereo mix from one
of the attached CS-DUOs
Option to link A and B mixes
Allows both sets of knobs to control the same mix for
instances where CS-DUO is used for a single perfomer
¼” balanced mono output option
Allows output to powered floor monitors
LIVEMIX CS-DUO
4
CS-DUO PERSONAL MIXER
The CS-DUO performs the following functions:
•
•
•
•
Receives audio data from the MIX-16/32
Provides two separate mixes each with headphone outputs
Provides an easy to use and powerful set of controls
Provides stereo headphone amplification or mono output of personal mixes
CONTENTS OF BOX
The CS-DUO contains the following pieces inside the box:
• CS-DUO unit
LIVEMIX CS-DUO
5
ANATOMY OF THE CS-DUO
MIX B OUT
PUSH TO SETUP
MASTER OUT
PUSH TO SETUP
MASTER OUT
PUSH TO SETUP
ME & GROUP
PUSH TO SETUP
ME & GROUP
USB
CS PORT
MIX A HEADPHONES
FOOTSWITCH
AUX IN
TOP SURFACE
1. CONTROL BUTTON: Each CS-DUO can create two
mixes, an A mix and a B mix. PRESS the CONTROL
button to take control of the CS-DUO and adjust your
personal mix. You will know which mix is being adjusted
by the color of the touchscreen and illuminated buttons.
The A mix is blue and the B mix is red. Become familiar
with the color of your mix so that you always know if
you are in control.
MIX A OUT
MIX B HEADPHONES
NOTE:
The touchscreen on the CS-DUO
is resistive not capacitive. It may
require a bit more pressure than you
are used to. One of the advantages
of this kind of screen is that you can
use guitar picks, styluses, or other
firm objects to interact.
2. COLOR TOUCHSCREEN: The color touchscreen allows
you to interact with the user interface by touching the
screen directly. The color screen will automatically update to reflect the changes made with
knobs and buttons.
3. MASTER VOLUME: ROTATE this control to adjust the overall level of each mix. The master
volume affects both the level of the headphone output and volume of the rear panel output.
The master volume can be adjusted at any time, regardless of what mix is in control. PRESS this
control to access the Master Output settings.
LIVEMIX CS-DUO
6
4. ME KNOB: The ME knob adjusts the volume of the
assigned ME group. Pressing the ME knob will allow
you to configure which specific combination of channels
make up the ME group. See the section “Group and
ME” for more details.
5. ADJUST VOLUME & PAN KNOB: This knob adjusts
the volume, as well as the left-right stereo panning, for
any selected channel. On the Channel Overview, PRESS
the knob to toggle between volume and pan. When
adjusting the volume or pan, a pop up will appear
on the touchscreen to give you a larger visual of the
volume or pan level. On other screens, pressing this
knob will cycle through selectable options
A MORE PERSONAL MIX
The ME group allows you to select
which channels represent you. If
you are singing and playing guitar,
it may be your vocal and guitar
channels. If you are a drummer, it
may be all your drums. Vocalists
may just have one channel. The
ME group ensures quick access to
your volume relative to the overall
mix.
6. CHANNEL SELECT BUTTONS: This group of buttons allows you to select any of the 24 audio
channels. During a performance, it may be easier to select a channel with a button than with the
touchscreen, particularly if you know which channel you want to adjust.
BACK PANEL
7. CS PORT: This connects to one of the Control Surface Ports on the MIX-16/32 unit and supplies
audio data and power to the CS-DUO.
8. USB PORT: The USB port allows you to load and save personal mixes. It is also used for
updating the personal mixer. See the section “Loading/Saving a Personal Mix” for more details.
9. MIX A OUTPUT: This ¼” jack is one of the two outputs for the A mix. This can be configured
for either stereo or balanced mono operation. See the section “Master Output” for more
details.
10.MIX B OUTPUT: This ¼” jack is one of the two outputs for the B mix. This can be configured for
either stereo or balanced mono operation. See the section “Master Output” for more details.
11.FOOT SWITCH CONNECTOR: Connect the optional Livemix foot switch to this port allowing
hands-free mix control. See the section “Foot switch Connector” for more details.
12.AMBIENT MICROPHONES: These ports house the built-in ambient microphones. The ambient
stage signal can be added to your personal monitor mix
FRONT PANEL
13.MIX A HEADPHONES: Connect your headphones to this ⅛” connector to listen to the A mix.
If the system is configured for mono output (see Master Output section), this will be mono.
14.MIX B HEADPHONES: Connect your headphones to this ⅛” connector to listen to the B mix. If
the system is configured for mono output (see Master Output section), this will be mono.
15.AUXILIARY INPUT: This ⅛” unbalanced stereo input allows you to connect an auxiliary audio
device, such as a portable music player, phone, laptop or metronome. The audio from the
auxiliary device can be shared with other CS-DUOs, which can be useful for playing along to
pre-recorded music while learning a new song.
LIVEMIX CS-DUO
7
DANTE ENABLED MIXER/SNAKE/INTERFACE
GIGABIT NETWORK SWITCH
SETUP AND OPERATION
DANTE ENABLED MIXER/SNAKE/INTERFACE
Setting up the CS-DUO is as simple as connecting a CAT5 or CAT6 network cable from the CS-DUO
to an available port on the MIX-16/32.
GIGABIT NETWORK SWITCH
CAT5/CAT6
CAT5/CAT6
Once connected, turn on the MIX-16/32. This supplies power and audio data to the CS-DUO. The
system will require some basic setup, this is performed on the CS-DUO. See the Global Setup
MIX-16
CAT5/CAT6
section for details.
CAT5/CAT6
LIVEMIX
DATA OUT
LINK/ACT
MIX-16
SETUP DIAGRAMS
LM-DANTE-EXP
DANTE
NETWORK
STEREO MIXES 17-32 (MIX-32 ONLY)
LIVEMIX
DATA OUT
1G
24VDC
3.75A
Dante™ is a trademark of Audinate Pty Ltd.
LIVEMIX
DATA IN
LIVEMIX
DATA OUT
LM-DANTE-EXP
DANTE
NETWORK
STEREO MIXES 17-32 (MIX-32 ONLY)
LIVEMIX
DATA IN
LIVEMIX
DATA OUT
STEREO MIXES 1-16
STEREO MIXES 1-16
24VDC
3.75A
CONNECTING THE CS-DUO TO THE MIX-16/32*
LINK/ACT
1
2
3
4
5
6
7
1G
Dante™ is a trademark of Audinate Pty Ltd.
8
MIX-16
1
2
CAT5/CAT6
PUSH TO SETUP
MASTER OUT
PUSH TO SETUP
ME & GROUP
PUSH TO SETUP
MASTER OUT
CAT5/CAT6
PUSH TO SETUP
ME & GROUP
PUSH TO SETUP
MASTER OUT
PUSH TO SETUP
MASTER OUT
PUSH TO SETUP
ME & GROUP
PUSH TO SETUP
ME & GROUP
3
4
5
6
7
8
MIX-16
PUSH TO SETUP
MASTER OUT
PUSH TO SETUP
MASTER OUT
PUSH TO SETUP
MASTER OUT
PUSH TO SETUP
MASTER OUT
PUSH TO SETUP
MASTER OUT
PUSH TO SETUP
MASTER OUT
PUSH TO SETUP
ME & GROUP
PUSH TO SETUP
ME & GROUP
PUSH TO SETUP
ME & GROUP
PUSH TO SETUP
ME & GROUP
PUSH TO SETUP
ME & GROUP
PUSH TO SETUP
ME & GROUP
PUSH TO SETUP
MASTER OUT
PUSH TO SETUP
MASTER OUT
PUSH TO SETUP
MASTER OUT
PUSH TO SETUP
MASTER OUT
PUSH TO SETUP
MASTER OUT
PUSH TO SETUP
MASTER OUT
PUSH TO SETUP
ME & GROUP
PUSH TO SETUP
ME & GROUP
PUSH TO SETUP
ME & GROUP
PUSH TO SETUP
ME & GROUP
PUSH TO SETUP
ME & GROUP
PUSH TO SETUP
ME & GROUP
* MIX-16 pictured
CONNECTING HEADPHONES OR MONITORS TO THE CS-DUO
MIX B OUT
MIX B OUT
MIX A HEADPHONES
MIX A HEADPHONES
LIVEMIX CS-DUO
AUX IN
AUX IN
USB
USB
CS PORT
CS PORT
FOOTSWITCH
FOOTSWITCH
MIX A OUT
MIX A OUT
MIX B HEADPHONES
MIX B HEADPHONES
8
CS-DUO GENERAL CONCEPTS
To best understand how to use the CS-DUO, it is helpful to become familiar with some important
concepts.
1. The CS-DUO is two mixers in one.
2. Some adjustments are local and apply only to your mix, and others are global and apply to the
entire system.
3. Your can mix in the Channel Overview or the Single Channel View depending on what you are
most comfortable with.
PUSH TO SETUP
MASTER OUT
PUSH TO SETUP
MASTER OUT
PUSH TO SETUP
ME & GROUP
PUSH TO SETUP
ME & GROUP
TWO MIXERS IN ONE: TAKE CONTROL
The CS-DUO provides two complete personal
mixers and headphone amplifiers in a
single unit so that two users can create and
control their own monitor mix. The A mix is
represented by the color BLUE, and the B mix
is represented by the color RED.
It is a good habit to always press the
CONTROL button for your mix before making
any adjustments. This ensures that you are in
control of the personal mixer when you make a change.
MIX B OUT
USB
CS PORT
FOOTSWITCH
MIX A OUT
When you take control, the colors of the touchscreen will switch to the appropriate color. This
way, you always know which of the two mixes is being adjusted. All channel select buttons and
touchscreen controls are assigned to the selected mix.
For the most commonly used functions, each mix has a dedicated set of controls. These controls
include:
MIX A HEADPHONES
1. The MASTER VOLUME knob controls the volume level
for each mix output. The MASTER VOLUME can be
adjusted regardless of which mix is in control.
2. The ME knob controls the volume of the ME group. The
ME knob can be adjusted regardless of which mix is in
control.
AUX IN
MIX B HEADPHONES
NOTE:
You can also take control by
ROTATING the ADJUST knob for
your mix.
3. The ADJUST VOL & PAN knob is used to adjust the volume and pan of the selected channel
or to adjust a selected function. PRESSING the ADJUST knob will toggle between volume and
pan, or tab between selected functions.
LIVEMIX CS-DUO
9
LOCAL VS. GLOBAL
Each CS-DUO can make changes to a personal mix or be used to make changes that effect the
entire system. Local changes are those that apply to your personal mix only. These include:
• Volume and pan adjustments
• Master output effects (effects applied to your overall stereo mix)
Global changes not only affect your CS-DUO but also the other CS-DUO units in the system.
Examples of global changes would include:
• Adjusting the system time
• Changing the channel effects
• Naming a channel
The global menu items (accessible from the Mix Tools tab on the
touchscreen) will appear purple, indicating that changes made
are global in nature. The exception to this is the channel effects.
These will still appear in the color of the selected mix. This is
explained in the Channel Effects section.
NOTE:
Before making a change to
the channel effects, you will
be prompted with a message
reminding you that the
changes are global.
CHANNEL OVERVIEW VS. SINGLE CHANNEL VIEW
Livemix provides two viewing options for creating or adjusting
a mix. We recommend that you use the Channel Overview for
mixing as it allows you to quickly identify which channels you
want to adjust. The Single Channel View provides additional
functions like mute and solo, but as the title suggests, only shows
one channel at a time.
To access the Single Channel View from the Channel Overview,
LONG PRESS the channel name on the touchscreen or the
corresponding hardware button.
CHANNEL OVERVIEW
To exit the Single Channel View, press the X in the upper right
corner.
SINGLE CHANNEL VIEW
LIVEMIX CS-DUO
10
GETTING STARTED WITH THE CS-DUO
THE OVERVIEW SCREEN
The default view when the CS-DUO is powered up is the Channel Overview. Each channel in the
overview screen shows the following information:
1. CHANNEL NUMBER: This is the number of the audio channel on the network. The Livemix
system allows up to 24 input channels.
2. CHANNEL NAME: This is the custom channel name. See Naming a Channel in the next section
for details.
3. SIGNAL LEVEL INDICATOR: This small colored square serves as a signal level meter for the
channel. It is colored gray if no signal is present, then illuminates in green, yellow, and finally red
as the signal increases in level. Turn down your source volume if you see red.
4. VOLUME LEVEL: This horizontal strip shows the current volume level of the channel
5. PAN LEVEL (NOT SHOWN): The volume strip switches to pan by pressing the ADJUST knob.
6. SHOW 13-24: PRESS this button to switch the Channel Overview display to channels 13-24.
PRESS it again to switch back to channels 1-12.
7. ACCESSORY CHANNELS: PRESS this button to view the Accessory Channels screen, where
you can adjust levels for other audio sources such as the built-in intercom, metronome, ambient
microphones, and the auxiliary input. See the “Accessory Channels” section for more details.
8. MIX TOOLS: PRESS this button to go to the Mix Tools page, where you can perform other
advanced mixing functions. See the Mix Tools section for more details.
LIVEMIX CS-DUO
11
SINGLE CHANNEL VIEW
ACCESSING THE SINGLE CHANNEL VIEW
The Single Channel view provides additional mixing features and provides access to the deeper
controls of the Livemix system like channel effects. You can switch to the Single Channel View three
different ways:
• LONG PRESS the desired channel hardware button
• LONG PRESS the desired channel on the touchscreen
• PRESS Mix Tools from the Channel Overview and select the Single Channel View menu option.
SINGLE CHANNEL VIEW SCREEN
1. CHANNEL NUMBER/NAME: This field shows
channel number and name. LONG PRESS to
navigate to the channel name entry screen.
Changing the channel name is a Global Change.
See the section “Naming a Channel” for more
details.
2. EQ/DYNAMICS PRESET: LONG PRESS the EQ
& Dynamics Preset button to navigate to the
screen where you can select a preset that adjusts
EQ and dynamics for the current channel.
Changing the preset or other Channel Effect
settings are Global Changes. See the section
“Selecting an EQ / Dynamics Preset” for more
details.
3. MUTE BUTTON: PRESS the Mute button to silence the channel in a mix. When a channel is
muted, a red bar will illuminate in the top right of the touchscreen.
4. SOLO BUTTON: PRESS the Solo button to silence all non-soloed channels in a mix. When a
channel is soloed, a yellow bar will illuminate in the top right of the touchscreen.
5. GROUP INDICATOR (IF SELECTED CHANNEL IS IN AN ACTIVE GROUP): If the selected
channel is in a group, the Group button will display which group the channel is in. If the selected
channel is not in a group this button will not be displayed.
6. VOLUME AND PAN DISPLAY: Shows the volume level and pan position of the selected
channel.
7. PREVIOUS/NEXT CHANNEL: Go to the next or previous channel.
8. EXIT BUTTON: PRESS this button to exit the Single Channel View and return to the Channel
Overview.
See the section “Advanced Monitor Mixing with the Single Channel View Screen” for more details
on using this screen to control your personal monitor mix.
LIVEMIX CS-DUO
12
NAMING A CHANNEL
You can assign custom channel names to each of the 24 incoming
audio channels. Channel names are displayed in both the Channel
Overview screen and the Single Channel View screen.
To assign a name to a selected channel:
.
• Navigate to the Single Channel View screen for the desired
channel
• LONG PRESS the channel number display at the top of the
screen
• PRESS the letters on the on-screen keyboard to enter the
desired channel name. Use the uppercase, number and
special character buttons and delete keys as needed
• When you have finished naming a channel, use the Next
Channel and Previous Channel buttons to move to a
different channel
• When you have finished naming channels, PRESS the
Done button in the lower right hand corner
NOTE:
Channel names are a global setting, which means that when you name the channels
on your unit, the channel names will automatically be sent to all the CS-DUO units on
the network. You do not need to repeat the naming procedure for all the units on the
network.
LIVEMIX CS-DUO
13
CREATING A PERSONAL MONITOR MIX
Creating a personal mix while on the Channel Overview screen is easy.
1. PRESS the CONTROL button to take control of the mix.
2. PRESS the hardware channel select button or select the channel directly on the touchscreen.
3. ROTATE the ADJUST knob to raise or lower the volume of the channel you have just selected.
4. PRESS the ADJUST knob to switch to pan mode. ROTATE the knob to adjust the left-right
panning of the selected channel. PRESS the ADJUST knob again to switch back to volume
mode.
5. Repeat steps 2-4 for all other channels you wish to adjust.
TIPS FOR STARTING YOUR PERSONAL MIX
• START AT ZERO - Load MIX 23 for a staring point and set your master volume to 50-80%.
• ADD TIMING REFERENCE - Mix the channels that determine the tempo and timing. This
will often be the drums. Start with Kick in the center and add snare and hi-hats panned off
center. You don’t need all the drums, start with these three.
• ADD PITCH REFERENCE - Mix the channels you need for pitch reference. Limit this to 1
or 2 channels like a piano or acoustic guitar. These will ensure your are singing or playing
the right notes. Move them off center to create space.
• ADD THE LEADER - This will often be the lead vocal, this helps you hear where the song
is going.
• ADD YOU - Bring up “you” so that you can hear yourself, but don’t overpower the rest of
the mix.
• ADD THE REST - Add other channels at lower levels and pan to the left or right to create
space. Try not to have any channels panned to the same location. It may help to pan based
on where the instruments are on stage, though this isn’t always practical.
• REVERB OR AMBIENT MICS - After mixing, choose either Reverb or Ambient Mics to
“open up” the mix. For Reverb, press the Master Volume knob and select a type. For
Ambient Mics, adjust level on the Accessory Channel screen. Add slowly so the mix
doesn’t clutter.
You don’t need to hear everything! Some instruments are not essential to your performance
and can be reduced in the mix making space for the important channels.
LIVEMIX CS-DUO
14
GROUPS AND THE ME GROUP
It is often advantageous to group channels together
so you can make volume adjustments to all the
channels in the group at once. The most common
channels to group are drums, stereo instruments (like
keyboards), and background vocals.
The CS-DUO allows you to create up to five groups,
including the ME group, which differs from other
groups in that it has a dedicated knob. This way, you
can select which channels represent you (perhaps it
is one channel, or it could be many) so that you can
adjust your own volume with the ME knob.
CONFIGURE A GROUP
1. PRESS the ME knob that corresponds to your mix.
2. PRESS the channels that you wish to group. You
can use the touchscreen or the channel keys. To
see additional channels, press the Show 13-24
button.
3. PRESS the X to exit, or press Show Next Group to
setup additional groups and repeat step 2.
ADJUSTING THE VOLUME OF A GROUP
To adjust the volume of a group, select any one of the
channels in the group. Multiple channel keys will be
illuminated indicating multiple channels are selected.
On the touchscreen, the selected channels will be gray.
The Active Channel will have a white outline.
Use the ADJUST knob to change the volume of the
selected group.
ADJUSTING THE VOLUME OF THE ME GROUP
To adjust the volume of the ME group, ROTATE the
ME knob.
LIVEMIX CS-DUO
NOTE:
Groups only affect the volume
adjustments. Pan adjustments will still
be adjusted separately.
Although the channels are selected as
a group the active channel is indicated
by a white outline. Volume adjustments
affect the whole group, pan adjustments
only affect the Active Channel.
NOTE:
A channel can only be in one group at a
time. If you attempt to group a channel
that is part of another group, the CSDUO will ask you to verify that you want
to move that channel to the new group.
15
ADJUSTING THE VOLUME OF A SINGLE CHANNEL IN A GROUP
ADJUSTING THE VOLUME OF A SINGLE
CHANNEL IN A GROUP FROM THE CHANNEL
OVERVIEW
When you select a channel that is in a group from the
Channel Overview, all the channels in the group will be
selected, but the channel you selected will be active,
as indicated by a white outline on the touchscreen. To
adjust the volume of a single channel in a group:
1. Select the channel you wish to adjust.
2. LONG PRESS the ADJUST knob to temporarily
remove the channel from the group. The active
channel will flash.
ACTIVE vs. SELECTED:
When selecting a channel that is part
of a group, the channel you press will
be “active”. The other channels in the
group will also highlight to indicate they
are a part of the group. They will be
selected, but only one channel at a time
can be active.
Active channels and functions will always
have a white outline.
3. Use the ADJUST knob to adjust the volume of the channel.
4. PRESS the ADJUST knob to return the channel to the group.
ADJUSTING THE VOLUME OF A SINGLE CHANNEL IN A GROUP FROM THE SINGLE
CHANNEL VIEW
When a channel is in a group, the Single Channel View will indicate which group it is in with a light
blue button. To temporarily remove an Active Channel from a group:
1. LONG PRESS the blue group button. It will start flashing.
2. Use the ADJUST knob to adjust the volume of the channel
3. PRESS the flashing group button to return the channel to the group.
LIVEMIX CS-DUO
16
LOADING & SAVING A PERSONAL MIX
Now that you have made some adjustments to your mix, it is a
good practice to save your work. The Livemix system allows you
to save and load several versions of your personal mixes. Saving
your mix allows you to recall it when necessary, reducing the
amount of time it takes to create a mix. The CS-DUO allows you
to save your mix to one of 24 internal save slots or up to 24 save
slots on an external USB device.
TO SAVE A PERSONAL MIX:
1. PRESS Mix Tools from the Channel Overview.
2. PRESS the Load/Save Personal Mix button.
3. SELECT a slot to save your mix. PRESS the Slots 13-24
button to access additional save locations.
4. PRESS Save Selected Personal Mix.
5. PRESS Yes to confirm.
6. ENTER a name for the mix. Each mix name can contain 12
characters. Name the mix as descriptive as possible since
other users may mix on the same CS-DUO.
7. PRESS Done.
NOTE
If you have made changes
to your mix, you will see an
asterisk (*) by the mix name
on the load/save personal
mix button in the MIX Tools
menu.
8. PRESS X to Exit to the Channel Overview.
To save a mix to a USB device, insert a USB flash drive into the
slot on the back of the CS-DUO. When the device is recognized,
the USB Storage button will appear on the Load/Save screen.
Press the USB Storage button and follow steps 3-8 above.
TO LOAD A PERSONAL MIX:
1. PRESS Mix Tools from the Channel Overview.
2. PRESS the “Load / Save Personal Mix” button.
3. SELECT a mix to load. PRESS the Slots 13-24 button to
access additional saved mixes.
4. PRESS Load Selected Personal Mix.
5. PRESS X to Exit to the Channel Overview.
To load a mix from a USB device, insert a USB flash drive into the
USB slot on the back of the CS-DUO. When the USB device is
recognized, the USB Storage button will appear on the Load/Save
screen. Press the USB Storage button and follow steps 3-5 above.
LIVEMIX CS-DUO
WARNING:
When a personal mix is
loaded, it replaces the
current mix. If you wish to
save the current mix, you
must do so before loading
another mix.
17
ADVANCED MIXING - SINGLE
CHANNEL VIEW
The majority of your mixing can be performed in the
Channel Overview screen, however, Livemix provides
a number of professional tools that can be used to
help create a better mix. These features are accessed
from the Single Channel View.
MUTE BUTTON
PRESS the Mute button to silence the channel in
a mix. When a channel is muted, a red bar will
illuminate in the top right of the touchscreen as an
indication that there is a muted channel. A MUTE icon
will also be visible in the Channel Overview for the
muted channel.
SOLO BUTTON
PRESS the Solo button to silence all non-soloed
channels in a mix. When a channel is soloed, a yellow
bar will illuminate in the top right of the touchscreen. A
SOLO icon will also be visible in the Channel Overview
for the soloed channel.
NOTE:
The Mute and Solo functions apply to
groups as well. If a channel is in a group
and you press mute, it will mute the
entire group.
GROUP INDICATOR (IF SELECTED CHANNEL IS IN AN ACTIVE GROUP)
If the selected channel is in a group, the Group button will display which group the channel is in. If
the selected channel is not in a group this button will not be displayed.
You can temporarily remove a channel from its group by performing a LONG PRESS on the Group
button. Once the Group button flashes, you can make adjustments to the volume of the channel.
PRESS the Group button again to place the channel back in the group.
ACCESSING PRESETS AND EFFECTS
The Single Channel View is the gateway to deeper
channel configuration. LONG PRESS on the EQ &
Dynamics button to access these deeper functions.
Before you make any changes to the Channel effects,
you will be prompted with a screen reminding you that
these changes are Global in nature and will affect what
every mix in the system hears. You must press Continue
to access the Channel effect settings.
LIVEMIX CS-DUO
WARNING:
Changes made to individual channel
effects are Global in nature and will
be heard across the whole system.
Channel effect changes will be saved in
the Global Template.
18
SELECTING A PRESET
The CS-DUO allows you to select from a list of equalization and dynamics presets that enhance the
sound of the selected channel. These presets are generic so be sure to use your ears to determine if
a preset works for the selected channel.
Note that the enhancements to the different audio channels are a global change, not a local one.
This means that any processing presets that you (or anyone else on the network) apply to a channel,
will be heard by everyone on the network.
TO SELECT AN EQ / DYNAMICS PRESET:
1. LONG PRESS the EQ & Dynamics Preset button.
2. PRESS continue on the warning screen.
3. ROTATE the ADJUST knob to select a preset
4. PRESS the X to return to the Single Channel
View.
In the channel preset screen, you are presented
with a list of useful presets, organized by different
instruments. Each preset is custom designed to apply
equalization and dynamics adjustments that complement the specific instrument the preset is named
after.
While on the Channel Preset screen, you can also PRESS the Previous Channel and Next Channel
buttons to quickly navigate to other audio channels, and then select a preset to apply to them in the
same fashion.
Using this method, you can quickly and easily apply processing presets to all the channels, as
needed.
LIVEMIX CS-DUO
19
ADJUSTING THE CHANNEL EQ
This 3-band EQ can be used to tailor the overall sound of the
selected channel. The Channel EQ is a powerful tool, it is best to
make small adjustments and continually listen to make sure that
the changes enhance the source or make it fit better in the mix.
TO ADJUST THE LEVEL OF THE THREE EQ BANDS:
1. While still on the EQ & Dynamics Preset screen, PRESS the
Channel EQ button.
2. PRESS one of the three bands to adjust.
3. ROTATE the ADJUST knob to cut or boost the band.
TO ADJUST THE FREQUENCY OF THE THREE EQ BANDS:
1. LONG PRESS one of the EQ bands.
2. ROTATE the ADJUST knob to change the center frequency
of the EQ curve.
You can also PRESS the ADJUST knob to tab through the EQ
bands for both the boost/cut and frequency modes.
FOR THE TECHNICALLY INCLINED:
The EQ for the high and lower are shelving with a Q of 0.707. The mid is peak/dip with
a Q of 1.5.
LIVEMIX CS-DUO
20
ADJUSTING THE CHANNEL HIGH PASS FILTER (HPF)
The High Pass Filter allows you to roll off some of the low frequencies that can lead to muddy
sounding mixes. As a rule of thumb, it is a good idea to have a
HPF on most tracks that do not contribute to the low end of the
mix.
To access the High Pass Filter, PRESS the HPF Settings button
from the Channel EQ screen.
PRESS one of the five HPF frequency choices:
• OFF: HPF bypassed.
• 40Hz: 40Hz or lower will be filtered out. This setting is good
for most instruments.
• 80Hz: 80Hz or lower will be filtered out. This setting will cut
out some 60Hz hum and noise, good for male vocals.
• 150Hz: 150Hz or lower will be filtered out. This is another
good setting for cutting hum. It is also good for many
stringed instruments.
• 250Hz: 250Hz or lower will be filtered out. This is a good
setting for higher pitched instruments and female vocals.
LIVEMIX CS-DUO
NOTE:
The Channel EQ and HPF
Settings share a page tab.
When on the Channel EQ
page, the HPF Settings
tab will be visible. When
on the HPF Settings page,
the Channel EQ tab will be
visible.
21
ADJUSTING THE CHANNEL DYNAMICS
Dynamics are the amount of difference, or the dynamic range between the softest sound you hear in
your mix, and the loudest. To even out the dynamics in a mix, a tool called a compressor is used.
To access the compressor, press the Channel Dynamics button. The compressor has two controls,
one is the amount of compression applied to the channel, the second is the type.
ROTATE the ADJUST knob to adjust the amount of
compression applied to the mix.
PRESS any of the 4 buttons at the bottom of the
screen to select how much compression you want.
1. OFF: Compressor bypassed.
2. LIGHT/MEDIUM/HEAVY: Differing amounts
of compression will be applied to the dynamic
range of your mix. Try each setting and see which
one sounds best
LIVEMIX CS-DUO
22
ACCESSORY CHANNELS
In addition to the 24 channels of audio, Livemix provides four accessory channels.
To access the four accessory channels, PRESS the Accessory Channels button at the bottom of the
Channel Overview screen.
Each of the accessory channels can be blended into your mix exactly the same as any other channel.
Some of the Accessory Channels offer additional features through their respective Single Channel
View screens.
AMBIENT MICROPHONE
Ambient noise is the sound of the stage and room around you.
The CS-DUO has two built-in microphones for adding some of
the ambient noise back into your mix. This is useful when using
headphones or in-ear monitors as it is easy to feel “closed off”
due to the sealed nature of those monitoring systems. Adding
ambient sound is not really necessary when using a stage monitor
speaker, because you can already hear the sound of the stage
around you.
NOTE:
If you find you are playing
with one in-ear monitor in
and the other out, adjust
the level of ambient noise in
your mix. Playing with one inear monitor out is dangerous
to your hearing.
By adding in some of the ambient sound of the stage and
audience, you can make your in-ear mix sound much more natural, because you are hearing the
sound of the audience and the reverberation of the hall you are performing in.
INTERCOM
PUSH TO SETUP
MASTER OUT
PUSH TO SETUP
MASTER OUT
PUSH TO SETUP
ME & GROUP
PUSH TO SETUP
ME & GROUP
The Livemix system contains
a built-in intercom that allows
performers to communicate
with each other.
To use the Intercom, first
adjust the volume level of the
Intercom on the Accessory
Channels page. This allows
you to hear other performers
when they activate the
Intercom button.
To communicate to other performers, LONG PRESS and HOLD the CONTROL button on the CSMIX B OUT
USB
PORT
A OUT
DUO. You can now speak and the microphones
in
the CSCS-DUO
will pick upFOOTSWITCH
your voice MIX
and
transmit it
to all the other CS-DUOs on the network. When done talking, release the CONTROL button.
If someone has trouble hearing you, make sure they have the Intercom channel on their own mix
turned up. Also, the ambient microphones are on the CS-DUO so make sure you talk towards the
CS-DUO unit.
LIVEMIX CS-DUO
MIX A HEADPHONES
AUX IN
MIX B HEADPHONES
23
AUX INPUT
This is the signal from any audio source feeding the ⅛” Aux In connector located on the front
panel of the CS-DUO. You can adjust the amount of the Aux In signal that you hear, combined with
your 24-channel mix–handy for practicing a song or phrase, or even for external metronome use.
In addition to the standard volume and pan options, the Aux Input has two other functions
accessible via the Single Channel View.
SHARE AUX
The Share Aux button allows you to share your
Auxiliary Input with other CS-DUOs in the system.
When Share Aux is not selected, only you will hear
the audio on your Auxiliary Input. This is useful for a
local click track or guide track.
When Share Aux is selected, you share the audio
on your Auxiliary Input with anyone who has their
Monitor All Aux button selected. You can use this to
let everyone hear (and play along with) a song on
your phone or media device. Just make sure they
select Monitor All Aux and turn up their Aux Input
volume.
MONITOR ALL AUX
The Monitor All Aux button allows you to hear other Auxiliary
inputs that are being shared. Leave this unselected if you do not
want to hear other Auxiliary inputs.
LIVEMIX CS-DUO
NOTE:
The Share Aux and Monitor
All Aux buttons are selected
by default. This makes it easy
to share songs. If someone
doesnt hear the track being
shared, first make sure
their AUX INPUT volume is
turned up, then make sure
the appropiate buttons are
selected.
24
METRONOME
The CS-DUO contains an internal metronome that can be used to keep everyone at the same tempo
throughout a song. When the Metronome is activated, everyone can hear the click track as long as
the Metronome volume is turned up in their mix.
In addition to the standard volume and pan options, the
Metronome configuration is accessible via the Single Channel
View.
BPM (BEATS PER MINUTE)
BPM displays the current tempo.The quickest way to set a tempo
is to PRESS the BPM button and use the ADJUST knob to dial in
a tempo.
MET ON/OFF BUTTON
The Met On/Off button turns the metronome off and on.
MET SETUP BUTTON
PRESS the Met Setup button to access the setup for the Metronome.
SETTING UP THE METRONOME
The internal metronome has a number of options that can be
accessed by pressing the Met Setup button.
1. BPM: Press BPM to adjust the tempo of the metronome. Use
the ADJUST knob to change the tempo.
2. BEATS PER MEASURE: PRESS the Beats per Measure button
to cycle through the options for number of beats in each
measure.
3. BEAT DIVISIONS: PRESS the Beat Divisions button to cycle
through the options for dividing each beat. Beat divisions are played with a different click tone.
4. BEAT ACCENT: PRESS the Beat Accent button to accent the downbeat of each measure with a
different click tone.
5. Beat Presets: PRESS one of the predetermined tempo buttons to instantly change to that
MORE ABOUT THE METRONOME
• The Metronome signal is global, so if a user starts metronome playback, everyone will hear it if
the metronome volume is turned up for their CS-DUO unit.
• The Metronome can be changed by any CS-DUO user on the network.
• If you need more robust Metronome control than is offered by the internal metronome, you
can use the CS-DUO’s AUX IN connector with an external hardware metronome.
LIVEMIX CS-DUO
25
MIX TOOLS
The CS-DUO contains additional features and
configuration options. To navigate to the Mix Tools
screen, PRESS the Mix Tools button located at the
bottom right of the Channel Overview screen.
SINGLE CHANNEL VIEW
This provides an alternate way to get to the Single
Channel View. It is the same as performing a
LONG PRESS on a channel key or a channel in the
touchscreen.
MIX OUTPUT SETTINGS
The Mix Output Settings are options pertaining to the
two channel stereo or single channel mono mix that is
output from the CS-DUO. Another way to access these
options is to PRESS the Master Volume Knob.
GROUP & ME SETUP
This provides an alternate way to get to the Group Setup. It is the same as pressing the ME knob.
MIRRORMIX®
MirrorMix remote mixing allows any CS-DUO in the system to control and listen to any other
personal mix in the system. This advanced feature is described in detail in the MirrorMix section.
GLOBAL SETUP
The Global Setup provides options to set up the overall system. The Global Setup options are
described in detail in the Global Setup section.
LOAD / SAVE PERSONAL MIX
See the Loading & Saving a Personal Mix section for details.
LIVEMIX CS-DUO
26
MIX OUTPUT SETTINGS
This screen allows you to make adjustments to the master output. The Mix Output settings are saved
with your mix when you save to the internal memory or USB drive.
MASTER EQ
The Master EQ is a three band EQ that can help to shape the
overall master output. It does not have the granularity of the
Channel EQ and is designed to make subtle overall tonal changes.
HPF SETTINGS
The High Pass Filter settings allow you to roll off the lower
frequencies resulting in a less muddy overall mix.
MASTER DYNAMICS
The Master Dynamics allow you to apply compression to the
overall mix.
NOTE:
The Master EQ and HPF
Settings share a page tab.
When on the Master EQ
page, the HPF Settings tab
will be visible. When on
the HPF Settings page, the
Master EQ tab will be visible.
MASTER REVERB
Master Reverb allows you to apply a reverberation effect to your stereo mix, in order to make it
sound more natural and mimic the effects of a natural acoustic environment.
MASTER OUTPUT
The Master Output page is where you will assign the output options of the CS-DUO, and set some
important system and ear protection settings.
MASTER EQ
This 3-band EQ can be used to tailor the overall
sound of the monitor mix that you hear; you can
adjust the mix to sound brighter, fuller, have more
or less mid-range, etc. The Master EQ is designed
to be subtle in its application. For shaping individual
channel tone, use the Channel EQ.
To adjust any of the three EQ bands, PRESS the
desired band on the screen (it will turn gray to
indicate it is Active), then ROTATE the ADJUST knob
to boost or cut the selected band.
You can also PRESS the ADJUST knob to quickly cycle
selection among the three bands.
FOR THE TECHNICALLY INCLINED:
The mid Q on the Master EQ differs slightly from the Channel EQ. The mid is peak/dip
with a Q of 1.2. The high and low are the same as the channel EQ.
LIVEMIX CS-DUO
27
HIGH PASS FILTER (HPF) SETTINGS:
A high-pass filter is a special type of EQ that lets the
high-frequencies pass through your mix unaffected,
but filters away the low frequencies. A high-pass filter
can is a very useful feature in a monitor mixer, for
different scenarios:
• Makes your personal mix sound more clear and
intelligible, because it generally reduces the lowend rumble that can make things hard to hear.
• Some examples of monitoring equipment that
may benefit would include in-ear monitors or
headphones that have too high a bass-response,
inexpensive stage monitors that may have
muffled sounding audio, or any connected stage monitor that uses a smaller diameter speaker
that struggles and distorts when attempting to play very low frequencies.
By only sending the stage monitor or headphones the frequencies they can handle well, and
filtering out the lower frequencies that are below their advertised frequency response, your monitors
can work more efficiently, and not strain trying to reproduce frequencies they are not meant to
reproduce.
You may also find that applying a 80Hz to 120Hz High Pass Filter to floor monitors with help clean up
your master audience mix.
PRESS one of the four HPF frequency choices on the screen to select the specific HPF frequency that
sounds best to you. Choices include:
1. OFF: No High-Pass filter is applied and your mix will pass through the full frequency range.
2. 40Hz: Only the very lowest frequencies, 40Hz or lower, will be filtered out
3. 80Hz: A larger amount of lower frequencies, 80Hz or lower, will be filtered out
4. 120Hz: The largest amount of lowest frequencies, everything from 120Hz or lower, will be
filtered out
LIVEMIX CS-DUO
28
MASTER DYNAMICS
Dynamics are the amount of difference, or the
dynamic range, between the softest sound you hear
in your mix and the loudest. To even out the dynamics
in a mix, a tool called a compressor is used.
PRESS any of the 4 buttons at the bottom of the
screen to select the type of compression you want.
• OFF: Compressor bypassed.
• LIGHT/MEDIUM/HEAVY: Differing amounts
of compression will be applied to the dynamic
range of your mix. Try each setting and see which
one sounds best
ROTATE the ADJUST knob to adjust the amount of compression applied to the mix.
MASTER REVERB
When you hear instruments in an acoustic space such
as a concert hall, theater or stadium, you are always
hearing the natural reverberation of the environment.
The CS-DUO allows you to apply a reverberation
effect (reverb) to your stereo mix, in order to make it
sound more natural and mimic these effects.
PRESS any of the four buttons at the bottom of the
screen to select how heavy of a reverb effect you want
to apply to your stereo mix.
• OFF: Reverb bypassed.
• SMALL ROOM/MEDIUM ROOM/LARGE
ROOM: The reverb effect will become heavier and denser sounding as the selected room gets
larger. Experiment with different settings to see what sounds best to you.
ROTATE the ADJUST knob to fine tune the amount of reverb applied to the mix.
LIVEMIX CS-DUO
29
MASTER OUTPUT
The Master Output page allows you to select the
type of output you will be using (headphones or floor
monitor), as well as adjust some settings that pertain to
the overall volume of your mix.
HEADPHONES STEREO VS. BALANCED MONO
This setting affects how the ⅛” jack (on the front of the
unit) and the ¼” jack (on the back of the unit) output
audio. The jacks on the CS-DUO can be configured for
a Stereo or a Mono mix.
If you will be using headphones or in-ear monitors,
select the Headphones Stereo button.
If you will be sending the output of the CS-DUO to floor monitors,
select the Balanced Mono button.
VOLUME LIMIT
The headphone amplifier on the CS-DUO is a high performance
amplifier and is capable of reproducing really loud sounds. To
protect your hearing, the Volume Limit reduces the amount of
overall volume available with the Master Volume knob. By turning
down the Volume Limit, you ensure that even at a maximum
Master Volume, you are listening at safe levels.
The Volume Limit will not affect the sound of your mix, it is
completely transparent.
PEAK LIMITER
The Peak Limiter is a form of compressor that sets a hard limit and
stops sounds from exceeding that limit. This function will protect
the system and your ears from overly loud transients or other loud
audio levels. Unlike the Volume Limit function, the Peak Limiter
can affect the sound of your mix.
NOTE:
If using Livemix in Balanced
Mono, the Intercom
and Ambient Mics will
be turned off. This is to
prevent feedback and team
communications from being
heard through floor wedges.
NOTE:
When the mix is set to
Balanced Mono, BOTH the
front and back audio jacks
will be set to mono. The
channel panning control
will still allow you to make
adjustments but the left and
right channels will be output
in mono.
Technically, for the mono
signal to be balanced, the
CS-DUO outputs a mono
signal to the Tip of the TRS
connector, and its inverted
mono signal to the ring.
This creates a fully balanced
mono output.
LIVEMIX CS-DUO
30
MIRRORMIX
MirrorMix allows you to hear and adjust another personal mix in the system. This allows more
experienced users to aid others when necessary. It is a great tool for a front of house engineer or for
training performers on personal mixing.
PRIMARY
LINK/ACT
LM-DANTE-EXP
SECONDARY
1G
LINK/ACT
1G
Dante™ is a trademark of Audinate Pty Ltd.
1
2
3
4
5
6
7
8
9
10
11
12
13
14
15
16
MIX-32
To connect to another mix, you will need to know the
Port Number of that
mix or the name of the mix that
MIX-16/32
is loaded on the remote CS-DUO. The port number
is derived from the port each CS-DUO is plugged
into on the MIX-16/32. If the remote unit has loaded
a mix, the mix name will also display in the MirrorMix
Port selection box.
LIVEMIX
DATA OUT
STEREO MIXES 17-32 (MIX-32 ONLY)
LIVEMIX
DATA OUT
STEREO MIXES 1-16
LIVEMIX
DATA IN
24VDC
3.75A
• MIX A (blue) will have an “A” after the port
number, and be colored blue in the MirrorMix
selection box.
• MIX B (red) will have a “B” after the port number
and be colored red in the MirrorMix selection
box.
TIP: The mix name and port number are visible from
the Mix Tools screen of the remote unit. You may
need the performer to let you know what port they
are connected to with the intercom.
TO CONNECT TO ANOTHER CS-DUO:
• PRESS the MirrorMix button from the Mix Tools
menu
• PRESS the button of the port/mix you wish to
MirrorMix.
• When you see an orange colored Channel
Overview, you will know you are mixing a remote
mix. At this point, you will hear the remote mix
and can make adjustments accordingly.
• You can also LOAD a mix to the remote CS-DUO.
This will load from your local CS-DUO (or
connected USB flash drive).
• To exit MirrorMix, press the X in the lower right of
the Channel Overview.
LIVEMIX CS-DUO
NOTE:
While you can load a mix to a remote
CS-DUO, you cannot save a mix
remotely. Once you have created a
remote mix, it is advisable for the remote
user to save their mix.
31
USING THE CS-DUO WITH A SINGLE PERFORMER
In certain cases, the CS-DUO will be used by only a single
perfomer. The “A” and “B” mixes can be linked so that
both sets of knobs control the “A” mix.
To link the “A” and “B” mixes:
1. SELECT the “A” MIX
2. LONG PRESS both Master Volume knobs
3. Confirm that you want to group the contols
To unlink the mixes, LONG PRESS on both Master
Volume knobs and confirm that you want to ungroup the
sides.
NOTE:
Linking the two mixes will not save
with your mix. You will have to re-link
each time you power on the CS-DUO.
LIVEMIX CS-DUO
32
GLOBAL SETTINGS
The Livemix system is setup on the CS-DUO. To enter the Global Settings, PRESS the Global Setup
button on the Mix Tools Page. From this screen you can:
LOAD AND SAVE A GLOBAL TEMPLATE
The Global Template contains all the channel names,
global settings, and channel effect information for the
whole system. You can save all these parameters for
quick recall at a later session.
INPUT SELECT AND DIGITAL CONFIGURATION (IF
LM-DANTE-EXP INSTALLED)
If a LM-DANTE-EXP is installed, this option will
appear. This function selects analog or digital input
and assigns devices and channels in a digital network.
ASSIGN A MIX TO RECORD VIA
MIX-16/32 USB PORT
The MIX-16/32 has a USB port and will show up as a
sound device when plugged into a computer. You can
record the output of any single CS-DUO in the system.
DA-816 MIX ASSIGN
The DA-816 is an output box for sending personal
mixes to external devices like wireless in-ear monitors.
If you have a DA-816 connected, this function will
allow you to assign personal mixes from CS-DUOs to
the DA-816 outputs.
NOTE:
As a reminder that you are adjusting
global settings that will affect all mixes,
the Global Setup screens are colored
purple.
SET GLOBAL CLOCK
This function sets the time for the entire system.
LIVEMIX VERSION INFO
This function displays firmware version information.
LIVEMIX CS-DUO
33
LOADING & SAVING A GLOBAL TEMPLATE
The Load/Save Global Template functions the same as loading
and saving a personal mix. Saving your Global Template allows
you to recall it when necessary, reducing the amount of time it
takes to setup the system.
Each Livemix system contains 24 internal save slots and also
allows up to 24 save slots on an external USB device. These are
different from the personal mix slots.
TO SAVE A GLOBAL TEMPLATE:
1. PRESS Global Template Load /Save.
2. SELECT a slot to save your template. PRESS the Slots 13-24
button to access additional save locations.
3. PRESS Save Selected Channel Setup.
4. PRESS Yes to confirm.
5. ENTER a name for the template.
6. PRESS Done.
7. PRESS X to Exit to the Channel Overview
To save a template to a USB device, insert a USB flash drive into
the USB slot on the back of the CS-DUO. When a USB device
is recognized, the USB Storage button will appear on the Load/
Save screen. Press the USB Storage button and follow steps 2-7
above.
TO LOAD A GLOBAL TEMPLATE:
1. PRESS Global Template Load /Save.
2. SELECT a template to load. PRESS the Slots 13-24 button to
access additional saved templates.
3. PRESS Load Selected Channel Setup.
4. PRESS X to Exit to the Channel Overview.
WARNING:
Slot 24 contains a default
template that zeros out all
channel name and effect
settings. This slot can be
overwritten so use caution
when saving to slot 24.
To load a template from a USB device, insert a USB flash drive
into the USB slot on the back of the CS-DUO. When a USB
device is recognized, the USB Storage button will appear on the
Load/Save screen. Press the USB Storage button and follow steps 2-4 above.
LIVEMIX CS-DUO
34
MIX-16/32 USB MIX ASSIGN
The Livemix system allows you to output the stereo
mix from any CS-DUO, using the MIX-16/32 USB port.
The assign screen tells the system which CS-DUO’s
mix to send to the MIX-16/32 USB port.
1. Decide which CS-DUO in the system will provide
the master output to be recorded.
2. PRESS the MIX-16/32 USB Mix Assign button.
3. You will see a message that says “Send your mix
to the MIX-16/32 USB record port?” PRESS “Yes”
to proceed or “No” to cancel
The stereo mix from that CS-DUO will be sent to the USB port of the MIX-16/32. You can then
connect a Windows PC or Apple OS X computer and record the stereo signal into your audio
recording software of choice.
INPUT SELECT AND DIGITAL
CONFIGURATION
If the LM-DANTE-EXP option card is installed in the
MIX-16/32, the Input Select and Digital Configuration
button will be visible. This function will prepare the
system to accept audio from the AD-24, or the Dante
Network.
1. From the Global Setup page, PRESS the Input
Select and Digital Configuration button.
2. You will be prompted with a warning. PRESS the
Continue button to continue.
3. PRESS the Input Source Select button.
4. SELECT AD-24 for analog inputs or Dante Inputs to recieve audio from the Dante Network.
5. PRESS the Confirm Selection button.
LIVEMIX CS-DUO
35
DA-816 MIX ASSIGN
PRESS the DA-16 Mix Assign button to enter the DA-816 setup screens. Please note, you can enter
these screens even if you do not have a DA-816 connected. Assignments will be saved with the
Global Template.
A CS-DUO must be plugged into a MIX-16/32 port
to send audio to an external device. If a mix that is
assigned to a DA-816 output is physically disconnected
or not present the output will not send audio.
ASSIGNING A MIX TO A DA-816 OUTPUT
The 8 purple slots represent the available outputs.
When a mix is assigned to one or more of the outputs,
the Control Surface Port and mix name (if available) will
be visible in the slot.
1. From the Select DA-816 Output screen, select an
output you wish to assign (image 1).
2. The screen will change to display the MIX-16/32
Control Surface ports (image 2). Each slot is
labeled with the loaded mix name (1) and control
surface port identification (2). If a mixed isn’t
loaded, the mix name section will be blank (3). It
is possible to assign Control Surface Ports even
if CS-DUOs are not connected. Please note that
audio will not be present on that output.
image 1
You do not need to have a mix loaded to assign
that mix to a DA-816 output, but it is a good idea
to name/save the mixes for easier identification.
3. Select a Control Surface Port to assign to the
desired DA-816 output.
4. You will now see the assignment in the DA-816
Output screen.
image 2
If you are using two DA-816’s, you will be able to
select the outputs on the first or second DA-816. The
selected DA-816 will have a white border (image 3).
UNASSIGN AN OUTPUT
To unassign a previously assigned output, simply:
1. Select the DA-816 Output from the DA-816
Output screen.
2. PRESS the Unassign Output button.
3. The Output is now unassigned.
LIVEMIX CS-DUO
image 3
36
USING THE OUTPUT ID FEATURE
The Output ID feature sends a test tone to the
selected DA-816 Output. This allows you to verify
that the desired external device is connected to the
selected output.
1. PRESS the Output ID button. The Output ID
button will flash.
2. Select one or more Output Slots. When selected,
the slot will turn gray with a white border.
3. When an Output Slot is selected, the
corresponding LED on the front of the DA-816
will flash and a test tone will sound.
4. PRESS the Output ID button again to exit this
mode. The Output ID button will stop flashing.
NOTE:
Observe the VU meters on the connected wireless transmitters or devices. The DA-816 plays
audible tone beeps in this mode to confirm the intended signal chain is setup properly.
The Output ID is a great way to:
• Quickly ensure musicians are given the correct wireless bodypacks and are assigned to the
correct CS-DUO’s on stage.
• Test which device is connected to the DA-816 outputs.
• Verify proper connection from DA-816 to external devices.
LIVEMIX CS-DUO
37
DANTE NETWORK CHANNEL SETUP
Configuring Livemix for use with a Dante network can be performed with any CS-DUO personal mixer in the system. You can also use the Dante Controller software provided by Audinate on a
Windows or Mac OS X computer. Consult the user manual of your other Dante enabled devices for
information on how each device will transmit/publish channels to the Dante network.
AUTO ASSIGN DANTE CHANNELS 1-24
With the Dante Channel Setup on the Livemix CS-DUO, it is easy to assign the first 24 networked
channels of any Dante device.
1. From the Global Setup page, PRESS the Input Select and Digital Configuration button.
2. You will be prompted with a warning. PRESS the Continue button to continue.
3. PRESS the Dante Channel Setup button.
4. PRESS the Import Dante 1-24 button. The button will flash to indicate the import feature is
active.
5. Turn the ADJUST knob to select a device on the Dante network.
6. PRESS the ADJUST knob to confirm device selection.
Your Livemix system will now be subscribed to the first 24 channels of the chosen Dante device.
MANUALLY ASSIGNING DANTE CHANNELS
You may want to manually subscribe to channels on a Dante network. Using the manual assign
feature will allow you to connect to multiple devices, or to change the order of connected devices,
for example, connecting Dante transmitter channel 24 from a console to channel 4 on the Livemix
personal monitor system.
1. From the Global Setup page, PRESS Input Select and Digital Configuration.
2. You will be prompted with a warning. PRESS the Continue button to continue.
3. PRESS Dante Channel Setup to enter the Dante setup configuration screen.
4. PRESS a Channel to assign to a Dante channel. A popup will appear on the bottom of the
window.
5. Select a Device by rotating the ADJUST knob. PRESS the ADJUST knob to accept a selected
device. If you have previously assigned a device to this channel, the selector may be on channel
select, if so, PRESS the ADJUST knob to change to the device selector.
6. Select a Channel on the selected device by rotating the ADJUST knob. After a few second, the
highlighted channel will be automatically selected.
7. Repeat steps 5-7 as necessary. Press the Slots 13-24 button to access additional channels.
8. PRESS the Accept Assignments button to accept the assigned channels.
LIVEMIX CS-DUO
38
DEVICE/CHANNEL VIEW TOGGLE
The Show Device/Show Channels button toggles what information is visible in each channel cell.
By default, the names of the assigned channels are visible. PRESS the Show Devices button to see
which devices are assigned to each Livemix channel. To go back to viewing the channels, PRESS the
Show Channels to toggle it to the Show Devices view.
IMPORT DANTE NAMES
If you are using Livemix with an existing system that has published “Channel Labels” to the network,
you can use those same labels as the Livemix channel names that appear in the Channel Overview
and Single Channel View.
To import Channel Labels from the Dante network:
1. PRESS the Global Setup button from the Mix Tools
menu.
2. PRESS the Input Select and Digital Configuration
button.
3. You will be prompted with a warning. PRESS the
Continue button to continue.
4. PRESS the Import Dante Names button.
5. PRESS the Yes button to copy the Dante Channel
names to the Livemix channel names.
SAVING DANTE CHANNEL DATA
To ensure that Dante channel setup and names are
saved, Save a Global Template after changes are made.
Instructions for Saving a Global Template are in the
Livemix CS-DUO User Guide.
LIVEMIX CS-DUO
NOTE:
Not all Dante network devices use
channel labels. Some only publish the
number of the channel.
39
SETTING THE GLOBAL CLOCK
PRESS the Set Global Clock button to bring up the
Global Clock setup page.
This screen allows you to set the time of day, as well
as the calendar date, for the system.
• PRESS any of the six time/date fields to adjust it,
or alternatively PRESS the ADJUST knob to cycle
through the six fields.
• The selected field will turn gray; you can then
ROTATE the ADJUST knob to change the value
of that field.
• PRESS the “X” button when you are finished
adjusting the date and time
The date and time data will be written to any mixes or templates saved to a USB flash drive.
LIVEMIX VERSION INFO
PRESS the Livemix Version Info button to bring up a
page that displays the firmware versions for the CSDUO, MIX-16/32, and Dante option card.
The firmware on the CS-DUO, MIX-16/32 and Dante
option card are user updateable. To find out if your
Livemix system needs an update, you can check the
current firmware versions at http://www.digitalaudio.
com/support.
The CS-DUO firmware is for the local personal mixer.
The MIX-16/32 and Dante option card information
is for the system. Each CS-DUO will require its own
firmware update.
You may initiate a firmware update by pressing
the “Update CS-DUO Firmware” button. Detailed
firmware update information is in the Livemix Firmware
Update section of this manual.
LIVEMIX CS-DUO
NOTE:
If your CS-DUO firmware is older than
version 1.27, you will not see this
option. Proceed to the Updating Livemix
Firmware section of this manual for
instuctions for updating the firmware.
40
LIVEMIX FIRMWARE INSTRUCTIONS
Firmware updates add features and ensure compatibility with all parts of the Livemix system.
Checking the firmware version of your Livemix system is detailed in the “Livemix Version Info”
section of this manual. To find out if your Livemix system has the most current version, check the
latest version at http://www.digitalaudio.com/support and compare it to the firmware reported by
the CS-DUO Livemix Version Info screen.
PREPARING A USB FLASH DRIVE
To update the CS-DUO, you will need a USB flash drive that has been FAT formated. Other file
systems will not work.
CS-DUO UPDATE INSTRUCTIONS
TO UPDATE THE FIRMWARE OF THE CS-DUO:
1. Download the latest firmware from http://www.digitalaudio.com/support.
2. Unzip the firmware zip file and copy the LMUPDATE folder to the root directory of a USB flash
drive. Please make sure the LMUPDATE folder is not in another folder.
3. Insert the FAT formatted USB flash drive into the USB port on the back of the CS-DUO. The
CS-DUO will automatically start the firmware update process and present you with a pop up
display.
4. Press YES to begin the update. If you do not want to update the firmware, press NO. Once the
firmware update has started, make sure you do not turn off the power to the CS-DUO or MIX16/32 as it may damage the CS-DUO.
5. When prompted, remove the USB flash drive from the CS-DUO.
6. The CS-DUO will now update. When the update is complete, the CS-DUO will reboot.
You will need to perform this update on each CS-DUO in the system for maximum compatibility and
consistency.
CS-DUO FIRMWARE UPDATE TROUBLESHOOTING
If the firmware update process doesn’t start after following the steps above, you can enter firmware
update mode by doing the following:
• Unplug the network cable to turn the CS-DUO off.
• Insert the USB drive with the firmware file downloaded per the instructions in steps 1 and 2
above.
• PRESS and HOLD the A and B buttons on CS-DUO. Continue to HOLD the A and B buttons and
reconnect the network cable to power the CS-DUO on.
• Follow firmware update instructions on the screen.
LIVEMIX CS-DUO
41
MIX-16/32 UPDATE INSTRUCTIONS
The MIX-16/32 can be updated with a CS-DUO or a PC application. You can update with a CS-DUO
if:
• The MIX-16/32 serial number is greater than 12-02-01030
• The MIX-16/32 firmware is 1.01 or above
• The CS-DUO firmware is 1.31 or above
If your MIX-16/32 does not meet the criteria above, it can be updated with a Windows PC
application. In most cases, this will bring your MIX-16/32 up to date and subsequent updates can be
performed with the CS-DUO. For reference, both methods are listed below.
TO UPDATE THE FIRMWARE OF THE MIX-16/32 WITH THE PC APPLICATION:
1. Update all CS-DUO’s to the latest version per the instructions above.
2. Download the MIX-16/32 Update Application from http://www.digitalaudio.com/support.
3. Connect the USB port on the MIX-16/32 to a Windows computer.
4. Wait for the MIX-16/32 drivers to fully install.
5. Run the MIX-16/32 Update Application. A second set of drivers will be installed at the start of
this process and may take a few minutes. Once the updater has started, a progress bar will show
the progress. Do not turn off the power until the update is complete or you may damage the
unit
6. Press the Finish button.
7. Disconnect the MIX-16/32 from the PC and verify that the update was successful by checking
the firmware version with the CS-DUO.
TO UPDATE THE MIX-16/32 WITH A CS-DUO:
1. Download the latest firmware from
http://www.digitalaudio.com/support.
2. Unzip the firmware zip file and copy the LMUPDATE folder to
the root directory of a USB flash drive. Please make sure the
LMUPDATE folder is not in another folder.
3. Go to the Livemix Version Info screen by pressing Mix Tools,
then Global Setup, then Livemix Version Info.
4. Press the “Update MIX-16/32 Firmware” button.
5. On the confirmation screen, Press YES to begin the update. If
you do not want to update, press NO.
6. Insert the flash drive that contains the update when
prompted. Press CONTINUE to start or EXIT to cancel. Once
the firmware update has started, make sure you do not turn
off the power to the MIX-16/32 or you may damage the unit.
NOTE:
Some updates take a while
to complete. If updating the
MIX-16/32 from the CS-DUO,
it works best to have only the
CS-DUO you are using to update
connected to the system.
If updating with the CS-DUO does not work, please use the PC Application.
LIVEMIX CS-DUO
42
FOOTSWITCH CONNECTOR
The ¼” connector on the CS-DUO rear panel allows connection
of an optional foot pedal accessory. The FP-2 foot pedal allows
you to adjust mix settings or activate the intercom on your CSDUO while keeping your hands on your instruments.
SETTING UP THE FP-2 FOOT PEDAL
NOTE:
The only foot pedal that will
function with the CS-DUO is
the Livemix FP-2. Third party
footswitches will not work.
The FP-2 is available from your
authorized Digital Audio Labs
dealer.
1. IN: Connect a ¼” TRS cable to the foot pedal jack on the
CS-DUO. Make sure the cable is a TRS and has Tip, Ring,
and Sleeve. A standard TS or guitar cable will not work with
the FP-2.
2. A/B Switch: Set this switch to ‘A’ to control MIX A or ‘B’ to control MIX B.
3. THRU: The THRU connector allows you to connect two foot pedals to one CS-DUO, one for MIX
A and one for MIX B. Use a TRS cable to connect the first pedal to the second pedal and assign
the A/B switches accordingly.
OPERATION OF THE FP-2
The FP-2 foot pedal is simple to use. Each function is controlled by either a TAP or a HOLD on one
of the buttons. A TAP is a short press, less than 1 sec in duration. A HOLD is a long press lasting
more than a second.
1. TAP BUTTON 1: A short tap on button 1 will select the next channel on the CS-DUO. When you
reach channel 24 it will select the Accessory Channels then cycle back to channel 1.
2. HOLD BUTTON 1: A long press on button 1 will return you to the ME Group. A second long
press will select channel 1. If a ME Group is not set up, holding button 1 will return you to
channel 1.
3. TAP BUTTON 2: A short tap on button 2 will turn up the volume of the selected channel.
4. HOLD BUTTON 2: A long press on button 2 will reduce the volume of the selected channel.
The volume of the selected channel will continue to reduce as long as button 2 is held.
5. HOLD BUTTON 1 & BUTTON 2: A long press on both buttons simultaneously will activate
the intercom feature of the CS-DUO. You will need to hold both buttons down for a full second
before the intercom activates. The intercom will remain active until the buttons are released.
LIVEMIX CS-DUO
43
INCORPORATING THE CS-DUO INTO YOUR STAGE SETUP
The CS-DUO has been designed to easily integrate into a variety of different stage setups. The
following are some examples of how you can position your unit in order to easily view the color
screen and work with the controls.
MICROPHONE STAND MOUNTING
The MT-1 mic-stand mount is dual position. When it is attached to the bottom of your CS-DUO, it
can be attached to either the top of any standard microphone stand or to the vertical post. The MT-1
dual position microphone stand mount is available from your Livemix dealer.
TABLETOP USE
In some situations, you may wish to place your CS-DUO on a small table located on the stage. The
CS-DUO’s metal enclosure gives it a solid weight, ensuring that the unit will not be easily moved or
pulled off of any surface that it is placed on.
LONG ETHERNET CABLES
The CS-DUO receives both its audio data and power from a single network cable. Any CAT 5,
CAT 5e, or CAT 6 cable will work with the CS-DUO.
Note that your CS-DUO may be located a fair distance from the MIX-16/32 that it is connected to,
so you may need a network cable that is somewhat longer than the ones sold at a typical office
or computer store. Consult your Pro Audio dealer for options of
network cables designed for the modern Pro Audio landscape, as
NOTE:
they will use stage-critical features such as a longer length, more
It is recommended that
flexible and coilable cabling, and more rugged RJ-45 connectors.
you connect the CS-DUO
directly to the MIX-16/32
The longest cable supported by the CS-DUO is 100 feet.
without any couplers,
splitters, or hubs in
between. Livemix may not
function properly or at all
with hubs and splitters.
IMPORTANT NOTE:
While Livemix Data is transmitted over standard network cables, it is not in the format that a
network can read. For this reason, each CS-DUO needs to connect directly to the MIX-16/32. Do
not use splitters, couplers, or hubs between the CS-DUO and the MIX-16/32.
DO NOT CONNECT THE CS-DUO INTO AN ETHERNET NETWORK. THIS COULD DAMAGE
YOUR CS-DUO.
LIVEMIX CS-DUO
44
LIVEMIX SYSTEM EXAMPLES
A Livemix system requires either an analog (AD-24) or digital input (option card), the MIX-16/32
central mixer, and at least one CS-DUO personal mixer. Below are some examples of what a basic
system may look like.
ANALOG INPUT SYSTEM
1 x AD-24 Analog Input Rack Unit
1 x MIX-16 Central Mixer
4 x CS-DUO Dual Mix Personal Mixers
4 x MT-1 Dual Position Mounts
1 x CBL-CAT6-100 Shielded CAT6 Cable 100’ **
4 x CBL-CAT6-50 Shielded CAT6 Cable 50’
DIGITAL INPUT SYSTEM
1 x MIX-16 Central Mixer
1 x LM-DANTE-EXP Dante option card
4 x CS-DUO Dual Mix Personal Mixers
4 x MT-1 Dual Position Mounts
1 x CBL-CAT6-100 Shielded CAT6 Cable 100’ **
4 x CBL-CAT6-50 Shielded CAT6 Cable 50’
**Shielded cable between AD-24 and MIX-16/32 is required. CAT6 is not required, CAT5 is acceptable.
ANALOG OR DIGITAL?
Users taking their audio from an analog source will use the AD-24. Using the TRS or DB-25 inputs,
audio from the source is made available to the Livemix system.
Users with taking their audio from a digital source will use the Option Card (LM-DANTE-EXP). This is
an option card that is installed in the MIX-16/32 and allows the Livemix system to receive audio from
a digital device or network.
CONTROL SURFACE
Livemix needs at least one connected personal mixer to make a mix. Each Livemix CS-DUO personal
mixer connects via CAT5/CAT6 cable to one of the ports of the MIX-16/32. Using various controls on
the unit, two users can each create their own custom mix, which is then output to headphones, in-ear
monitors or stage monitors, right from the CS-DUO unit.
LIVEMIX CS-DUO
45
TROUBLESHOOTING
MY CS-DUO UNIT IS NOT POWERING ON.
Make sure that your CS-DUO unit is connected, with a standard network cable, to an output on
your MIX-16/32 unit. The green light on the CS PORT will illuminate when power is connected
and the yellow light will illuminate when there is a problem receiving information from the MIX16/32.
Make sure that your MIX-16/32 is powered on.
I DO NOT HEAR ANY SOUND COMING OUT OF MY HEADPHONES OR STAGE MONITOR.
Check and make sure that the master volume knob for your mix is turned up. Also ensure that the
volume levels on each channel are appropriate.
I DO NOT HEAR ANY SOUND FROM MY MEDIA PLAYER CONNECTED TO THE AUX INPUT.
From the Accessory Channels screen, make sure the volume for the Aux Input source is turned up.
I DO NOT HEAR ANY SOUND FROM A SPECIFIC CHANNEL IN MY MIX.
Make sure that the channel is not muted. If it is muted, you will see a red mute label next to the
channel name on the overview screen.
Verify that the channel is connected properly to the AD-24 or configured properly if using the
Dante Option Card.
I AM ADJUSTING THE PANNING BUT EVERYTHING STILL SOUNDS MONO.
Go to Mix Tools/Stereo Mix Settings/Master Output and make sure that your CS-DUO unit is set
to Headphones Stereo and not Balanced Mono.
MY PERSONAL MIX SOUNDS DRY AND CLINICAL. I DON’T FEEL ANY CONNECTION WITH
THE OTHER MUSICIANS OR THE AUDIENCE.
From the Accessory Channels screen, select the Ambient Mic channel and then ROTATE the
ADJUST knob to add some ambient sound to your mix.
You might also try adding some reverb by pressing the Master Volume knob and selecting Master
Reverb.
I CAN’T HEAR THE AMBIENT MIC OR INTERCOM.
Make sure the CS-DUO is not set to Balanced Mono mode. In Balanced Mono mode, the ambient
mics and intercom are turned off to reduce feedback. It also keeps the intercom out of the floor
wedges.
MY “B” SIDE DOESN’T SEEM TO BE WORKING.
The CS-DUO might be in the Linked Mode. PRESS and HOLD both Master Volume knobs to exit
the Linked Mode.
LIVEMIX CS-DUO
46
THERE IS A CLICKING OR POPPING SOUND IN THE CS-DUO OUTPUTS.
Audible clicking and popping is usually an issue with the digital clock. If you are using Livemix
with a Dante network, make sure that your console or Dante device is set to be the master and
Livemix is set to slave. This can be done through the Dante controller on a Windows PC or Apple
computer.
I DON’T HEAR ANY CHANNELS.
Make sure you have the correct input device selected. In the Global Setup menu, select “Input
Select and Digital Configuration” then “Input Source Select” and verify that the correct input
option is selected.
SOMETHING IS ODD WITH MY CHANNELS OR I CAN’T HEAR CHANNELS.
Please make sure there are no cable couplers, hubs, switches, or splitters between the CS-DUO
and MIX-16/32.
Check the network cable connecting the CS-DUO to the MIX-16/32. If it was poorly constructed
or there is a break in the cable, you may not be getting the proper data to the CS-DUO.
LIVEMIX CS-DUO
47
APPENDIX
PRESET EFFECTS LIST
1
2
3
4
5
6
7
8
9
10
11
12
13
14
15
16
17
18
19
20
21
22
23
24
25
26
27
28
29
30
31
32
DRUMS: ROCK KICK
DRUMS: JAZZ KICK
DRUMS: ROCK SNARE
DRUMS: JAZZ SNARE
DRUMS: TOM LOW
DRUMS: TOM MID
DRUMS: TOM HIGH
DRUMS: OVERHEAD ROCK
DRUMS: OVERHEAD JAZZ
DRUMS: HIGH HAT
BASS: ELECTRIC FINGER
BASS: ELECTRIC PICK
BASS: ELECTRIC SLAP
BASS: UPRIGHT
GUITAR: ELECTRIC LEAD
GUITAR: ELECTRIC RHYTHM
GUITAR: ACOUSTIC
KEYS: ACOUSTIC PIANO
KEYS: ELECTRIC PIANO
KEYS: SYNTH
HORNS: TRUMPET
HORNS: TROMBONE
HORNS: SAX
STRINGS: VIOLIN
STRINGS: CELLO
PERCUSSION: BONGO/CONGA
VOX: MALE LEAD
VOX: MALE BACKGROUND
VOX: FEMALE LEAD
VOX: FEMALE BACKGROUND
VOX: MALE SPEECH
VOX: FEMALE SPEECH
LIVEMIX CS-DUO
48
LIVEMIX SUPPORT
Phone Support: Toll Free:
Email Support: Website:
952-401-7700
844-DAL-INFO
[email protected]
www.digitalaudio.com/support
DIGITAL AUDIO LABS
1266 Park Rd
Chanhassen, MN 55317
TECHNICAL SPECIFICATIONS
CS-DUO
@22Ω
200mW @ 1% THD+N
100mW @ .03% THD +N
@32Ω
Output Power & THD+N
250mW @ 1% THD+N
100mW @ .014% THD +N
@64Ω
250mW @ 1% THD+N
100mW @ .005% THD +N
@300Ω
130mW @ 1% THD+N
100mW @ .003% THD +N
Frequency Response
20Hz-22KHz ± 3dB
S/N Ratio
103dB
Input Impedance(aux in)
7.5KΩ
Crosstalk(Left to Right)
-103 dB
Max Cable length from Mix16
100 Feet
Filter Q
High pass and Low pass .707
Peak/Dip
Filter Cut/Boost Amount
± 6dB
Ambient Mic Gain
25dB
LIVEMIX CS-DUO
1.5
49
LIVEMIX SYSTEM SPECIFICATIONS
.03% (100mW, 22Ω Load)
THD+N
(18 dBu 1KHz input)
.014% (100mW, into 32Ω Load )
.005% (100mW into 64Ω ohms)
.003% (100mW into 300Ω)
S/N Ratio
103dB
Frequency Response
20Hz-22KHz ± 3dB
Crosstalk (Left to Right)
-103 dB
Latency
1.5 mS
LIVEMIX CS-DUO
50
® & © 2014-2015 Digital Audio Labs.
Audinate®, the Audinate logo and Dante are trademarks of Audinate Pty Ltd.
Livemix is a registered trademark of Digital Audio Labs.
Patents pending.