1
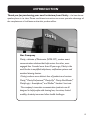
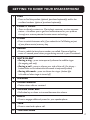
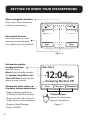
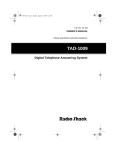
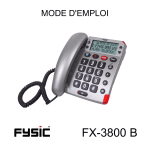
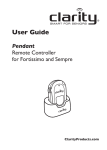
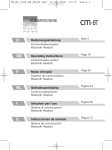
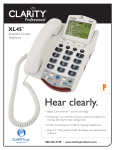
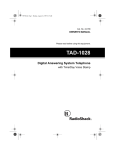
User Guide
Fortissimo
Extra Loud Remote Controlled
Speakerphone (with optional pendant)
Some models available
with Answering Machine
ClarityProducts.com
TABLE OF CONTENTS
Safety Instructions....................................................................................................................................4
Battery Instructions.................................................................................................................................7
Care and Maintenance.............................................................................................................................9
Technical Specifications......................................................................................................................... 11
Clarity Logic.............................................................................................................................................12
About Clarity...........................................................................................................................................13
Package Contents...................................................................................................................................14
Installation.................................................................................................................................................15
Getting to know your Fortissimo Speakerphone..........................................................................16
Using your Speakerphone.....................................................................................................................21
Menu Operations................................................................................................................................... 25
Phone Operations................................................................................................................................. 40
Troubleshooting..................................................................................................................................... 43
FCC Requirements and Regulations................................................................................................. 49
Warranty and Service............................................................................................................................53
IMPORTANT SAFETY INSTRUCTIONS
To prevent severe injury and loss of life/property,
read this section carefully before using the product to ensure
proper and safe operation of your product.
WARNINGS
Power connection
• Use only the power source marked on the product.
•Do not overload power outlets and extension cords. This can result in the risk of fire
or electric shock.
•Completely insert the AC adapter/power plug into the power outlet. Failure to do so
may cause electric shock and/or excessive hear resulting in a fire.
•Regularly remove any dust, etc. from the AD adapter/power plug by pulling it from the
power outlet, then wiping with a dry cloth. Accumulated dust may cause an insulation
defect from moisture, etc. resulting in a fire.
•Unplug the product from power outlets if it emits smoke, and abnormal smell,
or makes an unusual noise. These conditions can cause fire or electric shock.
Confirm that smoke has stopped emitting and contact the Clarity Customer
Service at 800-426-3738.
•Unplug from power outlets and never touch the inside of the product if its casing has
been broken open.
• Never touch the plug with wet hands. Danger of electric shock exists.
Installation
•To prevent the risk of fire or electrical shock, do not expose the product to rain or
any type of moisture.
•Do not place or use this product near automatically controlled devices such as automatic doors and fire alarms. Radio waves emitted from this product may cause such
devices to malfunction resulting in an accident.
SAVE THESE INSTRUCTIONS
4
IMPORTANT SAFETY INSTRUCTIONS
•Do not allow the AC adaptor or telephone line cord to be excessively pulled, bent or
placed under heavy objects.
Operating safeguards
•Unplug the product from power outlets before cleaning. Do not use liquid or
aerosol cleaners.
• Do not disassemble the product.
•Do not spill liquids (detergents, cleansers, etc.) onto the telephone line cord plug,
or allow it to become wet at all. This may cause a fire. If the telephone line cord plug
becomes wet, immediately pull it from the telephone wall jack, and do not use.
Medical
•Consult the manufacturer of any personal medical devices, such as pacemakers or
hearing aids, to determine if they are adequately shielded from external RF (radio
frequency) energy. (The product operates in the frequency range of 1.92 GHz to
1.93 GHz, and the RF transmission power is 115 mW (max.).)Do not disassemble
the product.
•Do not use the product in health care facilities if any regulations posted in the area
instruct you not to do so. Hospitals or health care facilities may be using equipment
that could be sensitive to external RF energy.
SAVE THESE INSTRUCTIONS
5
IMPORTANT SAFETY INSTRUCTIONS
WARNINGS
Installation and location
• Never install telephone wiring during an electrical storm.
•Never install telephone line jacks in wet locations unless the jack is specifically
designed for wet locations.
•Never touch uninsulated telephone wires or terminals unless the telephone line has
been disconnected at the network interface.
• Use caution when installing or modifying telephone lines.
•The AC adaptor is used as the main disconnect device. Ensure that the AC outlet is
installed near the product and is easily accessible.
• This product is unable to make calls when there is a power failure (unless backup
batteries have been installed and are fully charged).
When using your product, basic safety precautions should always
be followed to reduce the risk of fire, electric shock, and injury to
persons, including the following:
•Do not use this product near water for example, near a bathtub, washbowl, kitchen
sink, or laundry tub, in a wet basement or near a swimming pool.
•Avoid using a telephone (other than a cordless type) during an electrical storm.
There may be a remote risk of electric shock from lightning.
• Do not use the telephone to report a gas leak in the vicinity of the leak.
•Use only the power cord and batteries indicated in this manual. Do not dispose
of batteries in a fire. They may explode. Check with local codes for possible
disposal instructions.
SAVE THESE INSTRUCTIONS
6
IMPORTANT BATTERY SAFETY INSTRUCTIONS
• Do not mix old and new batteries.
•Do not open or mutilate the batteries. Released electrolyte from the batteries is
corrosive and may cause burns or injury to the eyes and skin. The electrolyte is toxic
and may be harmful if swallowed.
•Exercise care when handling the batteries. Do not allow conductive materials such as
rings, bracelets, or keys to touch the batteries, otherwise a short circuit may cause
the batteries and/or the conductive material to overheat and cause burns.
•Charge the batteries (optional) identified for use with this product only, in accordance
with the instructions and limitations specified in this manual.
•Only use a compatible base unit (or charger) to charge the batteries. Do not tamper
with the unit (or charger). Failure to follow these instructions may cause the batteries
to swell or explode.
The base batteries are optional (for backup only). If you choose to install backup
batteries, use rechargeable batteries ONLY. The backup b atteries should be
AA, NiMH, rechargeable only, rated 2500mAh. They must be fully charged for 3 days
before using the backup batteries (before using the phone without the power adapter,
during a power outage).
The backup batteries ensure the functionality of your unit for 3-4 hours in case of a
power outage.
To install batteries in the base:
1.Turn the unit over and open battery compartment door.
2.Install batteries according to the polarity shown inside the battery compartment.
3.Close the battery compartment.
WARNING: USE RECHARGEABLE BATTERIES ONLY.
DO NOT USE ALKALINE BATTERIES!
CAUTION: RISK OF EXPLOSION IF BATTERY IS REPLACED
BY INCORRECT TYPE. DISPOSE OF USED BATTERIES
ACCORDING TO THE INSTRUCTIONS.
SAVE THESE INSTRUCTIONS
7
IMPORTANT BATTERY SAFETY INSTRUCTIONS
WARNING: Dispose of used batteries according to the instructions.
•Do not dispose of the battery in a fire as it may explode. Check with local codes for
possible special disposal instructions.
• Do not open or mutilate the battery. Released electrolyte is corrosive and may cause damage to the eyes and skin. It may be toxic if swallowed.
•Exercise care in handling batteries in order not to short the battery with conducting materials such as rings, bracelets and keys. The battery or conduction material may over-heat and cause burns.
•Remove batteries when they are discharged and when the equipment will not be
used for an extended period of time. Dispose of batteries according to local environ-
mental laws.
• Do not disassemble, heat, crush, deform or puncture batteries.
• Do not attempt to charge non-rechargeable batteries.
• Keep batteries out of the reach of children.
SAVE THESE INSTRUCTIONS
8
CARE AND MAINTENANCE
FOR BEST PERFORMANCE
Base unit location/avoiding noise
The base unit and other compatible Clarity
units use radio waves to communicate
with each other.
•For maximum coverage and noisefree communications, place your base
unit at a convenient, high, and central
location with no obstructions between
the handset and base unit in an indoor
environment.
a. away from electronic appliances such as TVs, radios, personal computers, wireless devices, or other phones.
b.facing away from radio frequency
transmitters, such as external antennas of mobile phone cell stations.
(Avoid putting the base unit on a bay
window or near a window.)
• Coverage and voice quality depends on the local environmental conditions.
•If the reception for a base unit location
is not satisfactory, move the base unit to
another location for better reception.
Environment
•Keep the product away from electrical
noise generating devices, such as fluorescent lamps and motors.
•The product should be kept free from
excessive smoke, dust, high temperature, and vibration.
• The product should not be exposed to direct sunlight.
• Do not place heavy objects on top of the product.
•When you leave the product unused for
along period of time, unplug the product
from the power outlet.
•The product should be kept away from
heat sources such as heaters, kitchen
stoves, etc. It should not be placed in
rooms where the temperature is less
than 0 °C (32 °F) or greater than 40 °C
(104 °F). Damp basements should also
be avoided.
•The maximum calling distance may be
shortened when the product is used
in the following places: Near obstacles
such shills, tunnels, underground, near
metal objects such as wire fences, etc.
•Operating the product near electrical
appliances may cause interference. Move
away from the electrical appliances.
Routine care
• Wipe the outer surface of the product with a soft moist cloth.
• Do not use benzene, thinner, or any abrasive powder.
9
CARE AND MAINTENANCE
Notice for product disposal,
transfer, or return
•This product can store your private/
confidential information. To protect
your privacy/confidentiality, we recommend that you erase information such
as phonebook or caller list from the
memory before you dispose of, transfer,
or return the product.
•This product is designed for use in the
United States of America and Canada.
Sale or use of this product in other
countries may violate local laws.
10
TECHNICAL SPECIFICATIONS
Dimensions:
10.197 in. x 6.299 in. x 5.118 in.
Weight: 32.275 oz. (without AC adapter
Standard: DECT 6.0 (Digital Enhanced
Cordless Telecommunications 6.0)
Bluetooth wireless technology 2.0
Frequency range: 1.92 GHz to
1.93 GHz (DECT)
2.402 GHz to 2.48 GHz (Bluetooth)
RF transmission power:
100 mW (MAX)
Power specifications: AC Adapter
Input: 100V-240V AC, 50-60Hz
Output: 12V DC, 1.5A
Use ONLY the power adapter supplied
with your unit; using a different adapter
may render your unit unusable and voids
the warranty.
Power consumption: Standby: 0.54W
Maximum: 15W
Battery information: Use ONLY
rechargeable batteries, NiMH, AA,
2500mAh
Charge time: 56 hours
(from discharged to fully charged)
Note: The batteries are charging while
your phone is powered by the power adapter
supplied with your unit.
Use ONLY the power adapter supplied
with your unit; using a different adapter
may render your unit unusable and voids
the warranty).
Standby time: Approx. 24 hours.
Talk time:
Fortissimo: Approx. 4 hours
Pendant: Approx. 4 hours
(Optional – purchased separately)
Operating conditions: 32 °F – 104 °F,
20 % – 80 % relative air humidity (dry)
11
CLARITY LOGIC TM
Introduction to Clarity Logic
ClarityLogic is the name of our simplified and easy-to-use customer support service.
While talking to a Clarity representative, the telephone sends information such as its
model name and settings to Clarity. The representative is immediately aware of the type
and current settings of the phone. This will allow any troubleshooting call to be quick
and simple, helping you find exactly what you are looking for. Just call 1-877-LOGIC24
(1-877-564-4224) to find out how Clarity is there to make life easier.
ClarityLogic® Memory Dial
For your convenience, Clarity has pre-programmed the customer support number into
your phone’s blue ClarityLogic button.
Note: ClarityLogic has been designed to work with the Plain Old Telephone Service (POTS).
If your phone service is provided by a broadband service provider, ClarityLogic may not work.
ONLY CLARITYLOGIC MAY BE DISABLED. ALL OTHER FEATURES WORK AS DESCRIBED
IN THIS USER GUIDE.
12
INTRODUCTION
Thank you for purchasing your new Fortissimo from Clarity – the best homespeakerphone in its class. Please read these instructions to ensure you take advantage of
the complete set of rich features that this product offers.
Our Company
Clarity, a division of Plantronics (NYSE: PLT), creates smart
communication solutions that help seniors live richer, more
engaged lives. Founded more than 40 years ago, Clarity is the
world leader in amplified telephones, notification systems and
assistive listening devices.
Clarity produces seven distinct lines of products and services:
Clarity,® Clarity Professional,® ClarityLife,™ Clarity AlertMaster,®
ClarityLogic,™ Ameriphone,® and Walker ® handset / test sets.
The company’s innovative communication products are all
designed to help people with hearing loss, low vision, limited
mobility, dexterity issues and other health challenges.
13
PACKAGE CONTENTS
User Guide
Fortissimo
Extra Loud Remote Controlled
Speakerphone (with optional pendant)
Some models available
with Answering Machine
Fortissimo Speakerphone
ClarityProducts.com
User Guide and
Quick Start Guide
Phone cord
AC Power Adapter
Recommended Accessories (Optional purchase)
•XLC3.5HSB Expandable Handset (59524.000)
•Voyager Pro+ Bluetooth Headset (84100.01)
• AS100 Air Switch (61563.000)
•Fortissimo Pendant w/built-in mic (58270.002)
•PS500 Pillow Switch (61561.000)
14
INSTALLATION
Your product comes assembled as you take it out of the box. However, you will need to
connect the power and phonecord, and install six (6) AA NiMH re-chargeable batteries
if you desire battery-power back-up in case of power failure. (Optional – batteries
not included).
Connecting the Power
and Phone cord
Step 1: Locate an electrical outlet (1)
close to a phone outlet in your home.
Step 2: Pull the ends of the phone cord
to untangle the cord; plug the free end of
the phone cord into the phone outlet (2).
Step 3: Pull the ends of the power cord
to untangle the cord; plug the power
supply in the electrical outlet (3).
Battery Installation (Optional)
Step 1: Slide the battery compartment
cover upward to remove.
Step 2: Insert six (6) AA NiMH
rechargeable batteries as shown. Match
the (+) and (-) terminals of individual
batteries with the corresponding
(+) and (-) connections located within
the battery compartment.
2
3
1
1
2
Step 3: Slide the battery compartment
cover back into position to complete the
battery installation.
3
15
GETTING TO KNOW YOUR SPEAKERPHONE
Please take a moment to review your new product and its features.
There are two versions of this product – with and without an answering machine.
Please check the label on your product to find out which version you own.
This user guide applies to both versions. If your unit does not have an answering
machine, ignore references to this feature during the review of this user guide.
1
2
11
3
4
5
6
7
12
8
9
16
10
GETTING TO KNOW YOUR SPEAKERPHONE
1 FIND
•Press to find the pendant (optional, purchased separately) and/or the cordless handsets. (optional, purchased separately)
2 CLARITY LOGIC
•Press to directly contact our ClarityLogic customer service represen-
tatives – this allows you to get first rate assistance for your product through our custom patented remote access technology.
3 FLASH
• Press to switch between calls (if you subscribe to Call Waiting as part
of your phone service) memory key.
4 REDIAL
• Press to redial the last phone number you called. Press and hold to enter a 2-second pause when programming records in your Phonebook.
5 MUTE/SILENT
• During a ring – press to temporarily silence the audible ringer.
(for ongoing calls only)
• During a call – press to silence your side of the call. (for privacy –
button blinks red to indicate that the sound is temporarily muted)
• During idle mode – press to silence the ringer. (button light
is lit solid red when ringer is turned off)
6
SPEAKER
7
VISUAL RINGER
• Flashes when calls are received.
8
VOLUME CONTROL
• Roll wheel up or down to increase/decrease the volume.
9
BOOST
• Press to engage additional power for your speakerphone.
10 TALK
• Press to start/end a phone call.
11 TOUCHSCREEN
17
GETTING TO KNOW YOUR SPEAKERPHONE
12 NUMERIC KEYPAD
13 SWITCHES (3.5mm)
• Plug in corded remote switches (optional, purchased separately) to
allow specialized functionality with specialized custom switches.
14 NECKLOOP PORT (3.5mm)
• Plug in a neckloop. (CE-30 – optional purchased separately)
15 HEADSET PORT (2.5mm)
•Plug in a headset. (M155 – optional, purchased separately)
16 BEDSHAKER PORT (3.5mm)
•Plug in a bed shaker (C-2210 – optional, purchased separately) – vibrates when the phone rings, for additional ringing signaling.
17 POWER PORT (3.5mm)
•Plug in AC power adapter. (provided)
18 LINE PORT
•Plug in phonecord. (provided)
19 BATTERY COMPARTMENT
• Use 6 AA rechargeable batteries to ensure continuous functionality in case of a power outage. (see battery safety section)
13
14 15 16 17 18
19
18
GETTING TO KNOW YOUR SPEAKERPHONE
Your touch screen has virtual buttons that will assist you with the simple functionality
of this product.
General directions for navigating the menus
and screens of your display (See Figure 1)
•At any time during the navigation through the menus and settings, press Flash to return to the idle screen.
•Use the on-screen arrow buttons for scrolling Up/Down through the menu options.
Located in the upper left and right corner of the LCD menu screen.
•Use the on-screen “Back” button (located in the lower left corner of LCD menu screen) to return to the previous level in the settings menu.
•Use the on-screen Save button to save your settings; to exit without saving, use Back to discard changes, and return to previous screen.
In standby mode, your Fortissimo displays the following information
on its screen (See Figure 2)
•Status of Answering Machine: (ON or OFF) If phone line is not plugged into
the unit: (No Line) Alternating with status of answering machine.
•Date/Time: Must be manually set in the Menu (see below) to accurately keep the time of your answering machine messages)
•Menu button: Access the settings for your speakerphone.
•Messages button: Easily access the messages left on your answering machine if your model is equipped with the answering machine option. If your model does not have this option then the “Messages” button will not appear on the screen.
•Phonebook button: Easily access the memory locations for your most often dialed phone numbers.
19
GETTING TO KNOW YOUR SPEAKERPHONE
Menu navigation buttons
(Press Up or Down buttons to
scroll the menu listings.)
Delete
Up
Prev
Functional buttons
Use these buttons to make
selections, move backward,
save, delete, and other functions.
Down
Next
Back
Save
Select
(Figure 1)
Automatic update
of date and time
(with CID service)
Note: Must be initially set within
the System Setup Menu, Set
Time/Set Date in order for this
feature to work correctly.
Automatic alert status
of phone system operations
•Status of Answering Machine (ON/OFF) (Optional purchase)
•Phone line status (No Line) will display if phone cord not attached.
•Display of New Messages
•Ringer ON/OFF
20
Mon Nov 5
12:04pm
Answering Machine Off
Menu
Messages
Phonebook
Touch buttons
Access the virtual menu
features of the phone.
(Figure 2)
USING YOUR SPEAKERPHONE
MAKING CALLS
There are four methods for making an
external call using your speakerphone.
Preparatory dialing, Direct dialing, Phonebook dialing, and dialing from redial list.
the main screen (Figure 4) to access the
phonebook directory. Press the “Next”
or “Previous” button (Figure 5) to find the
phonebook number you wish to dial, then
press the “TALK” button. (Figure 3)
Preparatory dialing
Enter the phone number using the numeric
keypad then press the “TALK” button.
(Figure 3)
Prev
Delete
Next
Add/Edit
Play
Clarity
Back
Figure 5
Dialing from Redial List
Figure 3
Direct dialing
Press the “TALK” button then manually
dial the number using the numeric keypad.
(Figure 3)
Press the “Redial” button (Figure 6) to the
left of the menu screen, then select the
number to redial from the list by using the
“Next” or “Previous” buttons, (Figure 7)
then press the “TALK” button. (Figure 1)
Phonebook dialing
Press the “Phonebook” menu button on
Answering Machine Off
Menu
Messages
Phonebook
Figure 6
Figure 4
21
USING YOUR SPEAKERPHONE
RECEIVING CALLS
Prev
Delete
Next
11/5 1:06pm
Answer a call
When there is an incoming call, the Visual
Ringer will blink, and the ring tone will
sound. (Figure 9)
Clarity
800-426-3738
Back
Save
Figure 7
Call timer
Your speakerphone automatically times
the duration of every call. During the call
the timer (Figure 8) will display the call
duration in hours, minutes, and seconds.
After the call is made, a “Talk Time”
screen will display the total call time.
When a call is incoming, the menu screen
will display “Ringing”.
Note: To disable the audible ringer, press
MUTE/SILENT.
BOOST
Clarity
Upon connection, the menu screen will
display call information. (Figure 10-11)
800-426-3738
0:01:05
Caller List
Figure 9
Tone 4
Phonebook
Ringing...
Figure 8
Figure 10
22
USING YOUR SPEAKERPHONE
9/28 2:00pm
WIRELESS CALLER
800-426-3738
Figure 11
Figure 12
To answer and connect the call press the
“TALK” button. Note: You must set “Auto
Answer” to ON in the “Advanced Menu” for
the call to be answered automatically.
Note: You must subscribe to Caller ID
services with your phone service provider in
order for additional Caller ID information to
be displayed.
Tone 4
During a call
Use the volume wheel (Figure 12) and the
on-screen Tone button (Figure 13) to best
adjust the audio experience during a
phone call.
Press the Tone button on the screen; you
will see the current tone setting as a
graph. While the graph is displayed on
your screen, press the Tone button again
to toggle through the available tone settings (there are 4 settings on this unit).
When the audio adjustment best fits your
needs, allow the unit to revert to the
previous screen.
Adjust the volume of the incoming voice
using the wheel – roll up to increase the
Figure 13
volume, roll down to decrease the volume.
As you move the wheel to increase the
loudness, you will see three different
colors on the screen. As you reach the
red section (loudest), you will briefly see
a message displayed on your screen, “Use
within 3 feet OR use optional pendant”.
This message advises you that, when the
loudness of your unit is in the highest setting (red section), you should be within 3
feet from the unit for best performance
for the person with whom you are talking.
23
USING YOUR SPEAKERPHONE
During a call - using the pendant
Alternatively, you can use a pendant (optional), which allows you to be as far away
from the unit as you need to be (while still
being able to hear the incoming voice).
To use a pendant with your unit during a
call – allowing you to use it at maximum
volume while being farther away from
Fortissimo:
1. Start a call from Fortissimo (by dialing
out or by answering a call from the main
unit)
2. Press the button on the pendant to enable the pendant’s microphone; you will
see the text PD displayed on the screen;
this means that the microphone on the
pendant is active, which allows you to
be farther away from the unit. If the
active microphone is on the pendant,
your pendant’s green light will be solid.
3. To transfer the call back to Fortissimo,
press the TALK button; the text PD will
be removed from your screen.
4. To transfer the call again to the pendant,
press the button on the pendant again.
5. The call is terminated from the device
with the active microphone; if the active
microphone is on the pendant, press the
button on the pendant to end the call; if
the active microphone is on Fortissimo,
press the TALK button to end the call.
Note: If you are using your pendant to
dial out from the Phonebook (in pendant
24
mode), the default active microphone is on
the pendant.
If you are using a pendant, you can remotely adjust the volume of your unit
using the wheel on the pendant.
The outstanding audio performance of
your speakerphone provides you with the
best experience, offering an extensive
range for loudness and tonality to ensure
that your call is clear and powerful.
As optional alternatives, you can use a
headset, a neckloop, a spare cordless
handset or a pendant (all optional accessories, purchased separately) to extend
the audio capabilities of your product.that
your modem is connected to.
End a call
During a call you can press the “TALK”
button to end the call.
Note: During a call you can press the
“Flash” button to switch between calls.
However, you must subscribe to Call
Waiting as part of your phone service.
MENU OPERATIONS
MENU
(See pages 27–30 for illustrated menu descriptions)
CALLER LIST
(“No records” if empty)
ANSWERING MACHINE
(If your model has this feature)
14 minutes of total recording time, each message can be up to 2-minutes long.
• Answer On/Off
– Default state is ON.
• Outgoing Message (OGM)
Play OGM
– Playing OGM? (Stop/Replay)
Record OGM
– Record OGM? (No/Yes)
Please record after the tone (beep) start recording your OGM
– “Recording OGM” – (End) – press end to finish recording
Select OGM
– Default OGM (Save/Back)
Recorded OGM
– Becomes selected when OGM is recorded by user.
Erase OGM (No/Yes)
•Ring Number
– Select from 3 – 8 Rings
and Toll Saver
•Security PIN
– Enter old PIN to change.
– Default PIN (123)
VOICE ASSIST
• Talking Keypad (On/Off)
– Default state is OFF.
– Pronounces the digits when
dialing the number to make an outgoing call.
• Talking CID (On/Off)
– Default state is OFF.
–Pronounces the digits of the
number calling you – you will hear
“Call from (digits of incoming phone
number).
Note: this feature is active only if
you have CID with your phone service. Purchased separately from your
phone service provider.
• Talking Volume (Low/Medium/High)
BOOST OVERRIDE (On/Off)
– Default state is OFF.
– Press BOOST button to increase sound amplification into extra loud range.
VISUAL RINGER (On/Off)
– Default state is ON.
ADVANCED MENU
• Phonebook Order
– Alphabetical: Show order of
records in alphabetical order.
(by first name)
– Priority: Show order of records in
the order of the priority assigned in
25
MENU OPERATIONS
MENU
(See page 30 for illustrated menu descriptions)
their entry details; this helps with
moving your most important entries to the top of the list, regardless of the alphabetical order.
• Backlight Timeout
– Select 30 seconds – or 1 minute up
to 30 minutes. Dims the screen to extend the lifetime of the product.
• Auto Answer (On/Off)
– Default state is OFF.
–If it is On, the phone answers the
calls from the phone numbers
associated with entries in the
phonebook that have this
feature enabled.
• Auto Hang Up (On/Off)
– Default state is OFF.
–Phone hangs up automatically if
during a call silence or dial tone
is detected.
• Voice Answer (On/Off)
– Default state is OFF.
– If this feature is on, you can
say “Hello” to answer the call.
Note: You cannot enable this fea-
26
ture if Talking CID is enabled, as the phone will “speak” the incoming CID information between the rings and
it will not be able to differentiate between the Talking CID voice and your voice.
MENU OPERATIONS
Mon Nov 5
12:04pm
Note: Use the Up/Down
buttons to scroll through
menu listings.
Answering Machine Off
Menu
Messages
Up
Down
Phonebook
Main Menu/Caller List
Up
Down
No Records
MENU
Caller List
Answering Machine
Voice Assist
Boost Override
Visual Ringer
Advanced Menu
System Setup
Back
Back
Save
Prev
Delete
Next
11/15 2:42pm
Clarity
800-426-3738
Select
Back
Save
Format
Main Menu/Answering Machine (If your model has this feature)
Up
Down
MENU
Caller List
Answering Machine
Voice Assist
Boost Override
Visual Ringer
Advanced Menu
System Setup
Back
Select
Up
Down
ANSWERING MACHINE
Answer On/Off
Outgoing Message
Ring Number
Security PIN
Back
Select
Select ON or OFF
27
MENU OPERATIONS
Main Menu/Answering Machine
Up
Down
OUTGOING MESSAGE (OGM)
Play OGM
Record OGM
Select OGM
Erase OGM
Back
Select
Up
Down
Playing OGM
Stop
Up
Replay
Down
Record OGM
Yes
No
Up
Down
Select OGM
Default OGM
Recorded OGM
Stop
Replay
Erase
Recorded OGM
No
28
Yes
MENU OPERATIONS
Main Menu/Answering Machine
Up
Down
RING NUMBER
3 Rings
4 Rings
5 Rings
6 Rings
7 Rings
8 Rings
Toll Saver
Select 3–8 ring tones,
or Toll Saver
Back
Select
Up
Down
Enter Old PIN
SECURITY PIN
Back
Select
Back
Main Menu/Voice Assist
Up
Down
Up
MENU
VOICE ASSIST
Talking Keypad
Talking CID
Talking Volume
Caller List
Answering Machine
Voice Assist
Boost Override
Visual Ringer
Advanced Menu
System Setup
Back
Down
Back
Select
Select
Select ON or OFF
Select Low / Medium / High
29
MENU OPERATIONS
Main Menu/Boost Override/Visual Ringer
Up
Down
MENU
Caller List
Answering Machine
Voice Assist
Boost Override
Visual Ringer
Advanced Menu
System Setup
Back
Select ON or OFF
Select
Main Menu/Advanced Menu
Up
Down
MENU
Caller List
Answering Machine
Voice Assist
Boost Override
Visual Ringer
Advanced Menu
System Setup
Back
Up
Select
Down
ADVANCED MENU
Phonebook Order
Backlight Timeout
Auto Answer
Auto Hang Up
Voice Answer
Back
30
Select Alphabetical or Priority
Select from 30 secs to 30 mins
Select ON or OFF
Save
MENU OPERATIONS
MENU
(See pages 33-34 for illustrated menu descriptions)
SYSTEM SETUP
• Register
Use this feature to pair your Fortissimo
with other compatible DECT6.0 devices.
(Clarity XLC3.5HS/HSB handset –
sold separately)
Alternatively, you can start registration mode by pressing and holding down the FIND button – until your screen displays “Registering…”.
– Register (Deregister)
– Bluetooth (Pair/Unpair/Connect)
Use to pair/connect with Bluetooth
headsets. (we recommend PLT
headset model Voyager Pro)
enabled, you will not hear the keypad
tones even if this feature is on.
•Set Time
–Use keypad and on-screen buttons
to set your local time.
Press Save on your screen to save
your settings.
•Set Date
– Use keypad to set the date.
Press Save on your screen to save your settings.
Note: If you have the CID enabled
with your phone service provider, the
time and day/month transmitted with
your CID records overrides the manually set time/day/month. You still need
–Language (English/French/Spanish)
to manually set the year to have an
Display language – for displayed text accurate time stamp for your answeron your screen.
ing machine messages.
Voice language – for your talking
keypad.
•Ringer Style
– Select from four (4) ringer tones.
•Ringer Volume
– Use Lo/Hi on-screen buttons to turn the ringer volume down or up.
Note: You can also adjust the ringer
volume by using the volume wheel in
idle mode.
•Keypad Tone (On/Off)
–Note: If you have talking keypad
• Tone/Pulse (Tone/Pulse)
• Switches
If switches are attached to the unit, you can assign (5) different functions for
each switch.
– Switch 1
– Switch 2 (same as Switch 1)
– Switch 3 (same as Switch 1)
1. Pendant Mode
This feature allows you to use a switch to enable the pendant mode for dialing from the phonebook.
31
MENU OPERATIONS
MENU
(See pages 33-34 for illustrated menu descriptions)
2.Play Messages
This feature allows you to use the switch to play the answering machine messages; subsequent activation of the switch skips to the next message
3.Warning Message (Play/Record/Erase)
This feature enables the phone to play
a warning when the switch is activated.
(Warning can be recorded following the
steps below under Warning Message
Features.)
Warning Message Settings: – Select Play: “Playing Warning
Message” (Select Stop)
– “Record Warning Message?”
(Select Yes)
– Please record after the
tone. (beep)
– “Recording Warning Message”
(Select End)
– Erase “Erase Warning Message?” (Select Yes or No)
4.Dial out (Message or Number)
This feature enables the phone to dial
out a preset phone number and to
play a message. (Number and message
are set following the steps below –
under Dial Out Settings.)
32
Dial Out Message Settings:
– Play: “Playing Dial Out Message” (Select Stop)
– Record: “Record Dial Out
Message?” (Select Yes or No)
– Erase: “Erase Dial Out
Message?” (Select Yes or No)
Dial Out Number Settings:
–Edit Dial Out Number: Enter
number and select Save, or edit by
selecting “Backspace”. Or
select “Back” to return to the previous menu.
5.Vocalyst (Subscription only service)
This feature calls the Vocalyst phone number and allows you to use the Vocalyst features.
MENU OPERATIONS
Main Menu/System Setup
Up
Down
Select Register or Deregister
SYSTEM SETUP
Select Pair/Unpair or Connect
Register
Bluetooth
Language
Ringer Style
Ringer Volume
Keypad Tone
Set Time
Set Date
Tone/Pulse
Switches
Warning Message
Dial Out
Select Display or Voice
English/French/Spanish
Back
Select Tones 1–4
Custom Select LO to HI
Select On/Off
12/24 Hr
am/pm
Hour & Minute
02:20pm
Select
Back
Up
Down
SWITCHES
Switch 1
Switch 2
Switch 3
Back
Select
Save
Select Tone or Pulse
Down
Pendant mode
Play Messages
Play Warning
Dial Out
Vocalyst
Back
Date
11/05/12
MM DD YY
Back
Up
Save
Note: You can assign one of these
5 functions to each switch that you
plug into the back of your unit.
Select
33
MENU OPERATIONS
Main Menu/System Setup
Up
Down
Select Yes or No
SYSTEM SETUP
Register
Bluetooth
Language
Ringer Style
Ringer Volume
Keypad Tone
Set Time
Set Date
Tone/Pulse
Switches
Warning Message
Dial Out
Back
Up
Down
WARNING MESSAGE
Play
Record
Erase
Talking Volume
Back
Select
Select Low / Medium / High
Select Yes or No
Select
Record
Warning Message?
No
Down
Up
DIAL OUT
Message
Number
Stop
Replay
Up
Down
DIAL OUT MESSAGE
Stop
34
Play
Record
Erase
Replay
Enter Dial Out Number:
800-426-3738
Back
Save
Backspace
Yes
MENU OPERATIONS
PHONEBOOK
Mon Nov 5
12:04pm
Answering Machine Off
Menu
Messages
Phonebook
Figure 14
The phonebook can hold up to 100 entries.
The name can be up to 26 characters (including spaces), and the number can be up
to 60 digits. (See Figures 14–15)
• Press Phonebook button
The screen displays “Phonebook Empty”,
then it shows “Add Phonebook Record?”
with two buttons – Yes and No.
Select Yes.
Enter Phonebook Number
– (Enter digits) – Click Save
– Enter Phonebook Name
– Enter letters (use keypad) to spell name. Click Save.
– Additional Features: Skip/Add/Back,
Skip/Phonebook and Record Saved.
Note: Default state of phonbook listing
order is “Alphabetical”.
Priority #1
–Displayed on the phonebook record.
Phone will assign default priority
numbers to the saved records as
they are added to the phonebook;
to change the priority numbers,
choose “Add” when Additional
Features screen is displayed, or
edit the record after it is saved.
(See Below)
Add
–Features to be added are: priority number, set to auto answer, record
voice tag.
Edit Priority Number (can be 1 only)
–The Priority Number cannot
exceed the number of records
in your phonebook.
Note: This feature allows for the
records to be displayed in your
phonebook in the order of the
priority number.
Set to Auto Answer? (Yes/No)
–This feature allows the phone to
automatically answer when it
receives a call from this number.
Note: This feature is active only if you have
CID with your phone service – purchased
separately from your phone service provider.
Note: You have to set the Auto Answer
feature in the Menu/Advanced Menu to On –
follow directions in the Menu section.
35
MENU OPERATIONS
PHONEBOOK
1
Add Phonebook
Record?
No
Add Phonebook Record, Figure 15
2
3
Enter Phonebook Number:
Enter Phonebook Name:
Clarity
800-426-3738
Yes
Back
Save
Back
Backspace
Save
Backspace
4
Skip
Additional
Features
Edit
4a
4b
Enter Priority Number:
Back
Set To
Auto Answer
(Can be 1 only)
1
5
Back
Phonebook
Record
Saved
Save
Backspace
No
4d
4c
Record
Voice Tag?
No
Please Record
After The Tone
Yes
4f
4e
Recording
Voice Tag
End
36
Yes
Phonebook Record
Saved with
Voice Tag
MENU OPERATIONS
Record Voice Tag? (yes/no)
–If a voice tag is associated with your
phonebook record, then this voice tag
will replace the voice digits during the
Talking CID feature when there is an
incoming call from this phone number.
For example: if the phonebook number for the record is 123-456-7890,
and the voice tag associated with
this phonebook record is Mom, the
speakerphone will pronounce “Call
from Mom” if there is an incoming call
from this phone number (instead of
“Call from 123-456-7890”).
To review/edit, navigate your saved
records by using the Prev/Next buttons on
your screen (upper left/right corners).
Note: This feature works only when the
Talking CID feature is activated.
Figure 16
Note: This feature is active only if you have
CID with your phone service – purchased
separately from your phone service provider.
– Select Yes
– Please record after the tone (beep)
– “Recording Voice Tag” – (End)
– “Phonebook recorded with voice tag”
Note: A Play button is added to the main
screen for the phonebook record.
– Select No
– “Phonebook record saved”
If you have phonebook records saved in
your phonebook, press the on-screen
Phonebook button to enter your phonebook. Here you can review your saved
records, edit them, or dial out from
your phonebook.
PHONEBOOK MENU BUTTON
Prev
Delete
Next
Clarity
Auto Answer
Back
Priority #1
Add/Edit
Play
On screen information (Figure 16)
– Name / Priority number
– Number / Auto answer
– Delete button: Press to delete the displayed record.
– Back: Press to exit the phonebook records menu.
–Add/Edit: Press to add another phonebook record, or to edit the displayed
record; you will be asked to make a
choice in the next screen.
–Play (lower right corner): Will be displayed only if the record has a voice
tag associated with it.
– Add/Edit: Press the button for the
action you wish to pursue.
Add – to add a new phonebook record.
Edit – to edit the currently dis played record.
37
MENU OPERATIONS
MESSAGES
Available only if your model is equipped with
the Answering Machine feature.
Press on-screen “Messages” button
(Figure 17) to access the answering machine messages. You can review/delete
your messages as needed.
Monday Nov 5
12:04pm
Menu
Messages
Phonebook
Figure 17
If you have new messages the “Messages”
button will blink yellow. Press button to
review, play, or delete the message.
(Figure 18)
Monday Nov 5
12:04pm
Menu
Figure 18
38
Messages
Phonebook
To play messages, Press the Play button;
the screen briefly displays the number of
new and old messages recorded by the
answering machine. (Figure 19) The newest
message starts playing; during playback
you have the option to stop the playback,
to delete the message, or to press Next
to skip to the next message. The screen
shows the time/date of the message.
Prev
Message
1
Delete
Play
Next
Friday
Nov 5
2:07pm
Back
Figure 19
If there are no new messages, press the
on-screen Messages button; the screen
briefly displays the number of old messages. The screen shows the details of
the last message recorded; press Play
to review – follow on-screen buttons to
delete/skip to next/previous message,
or Back to exit the Messages menu.
MENU OPERATIONS
CALLER LIST
Your phone saves the last 30 incoming calls
placed to your phone number.
This list shows the details of the incoming calls (Figure 20) – available only
if your phone service has the Caller ID
feature enabled. (Purchased from your
phone service provider).
Prev
Next
9/28 2:42pm
Clarity
423-426-3738
Back
Dial
Format
Figure 20
During an incoming call, the screen
displays the phone number and name of
the person calling you. These details are
saved (along with the time and date of
call) in your Caller List.
To review the Caller List, press “Menu”
and then “Select” to review the list of the
received calls.
To navigate between records, press
Prev/Next (upper left and right corners
on your screen).
Caller List Record
Name
As transmitted by your phone
service provider.
Note: some names are not transmitted; they can be displayed as “unknown”
or similar.
Note: If the caller number is saved in your
phonebook the name will be displayed when
a call is received from that number.
Number
Often received as 10-digit format: area
code + local phone number)
Time
– Set hour and minute. Format: 11: 30
– Select 12 or 24 Hr
– Select am or pm
Date
– Set month, day and year.
Format: MM DD YY
Format button
Toggles the number format between 7 digits/10 digits/11 digits – to adjust according
to your local dialing requirements; when
the dialing format is correct, press the
Talk button to call back the phone number
displayed on the screen.
Save button
To save the number into your Phonebook;
you will have the option to edit the name
and/or number, as well as add the extra
features available on this speakerphone.
We recommend you set the format of the
phone number before saving the record to
the phonebook.
39
PHONE OPERATIONS
BLUETOOTH FUNCTIONALITY
During a call:
Your speakerphone can be paired with
a Bluetooth headdset – locate the user
guide for your headset to review the
method of activating the pairing mode
on your headset.
If the call is in progress on your speakerphone, the screen displays a button (in
the upper right corner) named “BTHeadset”; press this button to transfer the
call to your headset (button changes
to “Speaker”).
To pair a headset with your
speakerphone:
Put your headset in pairing mode; set the
headset near the speakerphone.
Go to the Bluetooth menu option, and
select “Pair”; the screen shows “Pairing…”
during the process.
The screen shows “Pairing successful”,
then returns to the idle screen; the text
“BT” is now added to the idle screen to
show the active Bluetooth connection.
To unpair the headset from your speakerphone, follow the steps to access the
Bluetooth menu, then choose “Unpair”.
Some headsets require unpairing from a
previous device in order to be able to pair
to a new device.
Bluetooth Call Scenarios:
Incoming call:
You can answer a call from your headset
by pressing the Call/End button on
your headset, or from the speakerphone by pressing the TALK button on
the speakerphone.
40
If the call is in progress in your headset,
press the “Speaker” button in the upper
right corner or the Call/End button on
your headset to transfer the call to your
speakerphone.
To end the call:
If the call is in progress in your headset,
press the Call/End button on your headset
to end the call.
If the call is in progress on your speakerphone, press the Talk button or the onscreen Speaker button to end the call.
To place a call:
Press Call/End button on your headset;
you will hear the dial tone in your headset;
dial the number using the numeric dial pad
on your speakerphone
Start the call on your speakerphone and
then transfer the call to your headset (if
desired) by pressing the Call/End button
your headset or by pressing the onscreen BTHeadset. (Upper right corner
on your screen)
If the headset is out of the range of your
Fortissimo, the unit will beep and the
BT icon on the screen is turned off; to
PHONE OPERATIONS
reconnect a headset that was previously
paired with your speakerphone, follow
the steps to the Bluetooth menu, then
choose “Connect”.
Note: Some headsets will automatically
reconnect to your Fortissimo when they are
close to it; you will hear a beep and the BT
icon will be displayed on your screen.
Note: Only one headset can be paired with
your speakerphone at any given time. To pair
a new headset, use the “Pair” feature on
your speakerphone.
Register a pendant or a spare
cordless handset
Optional, purchased separately); you can
have up to 4 devices connected to your
speakerphone:
– 4 spare handsets (XLC3.5HS)
maximum
– 1 pendant + 3 (up to) spare handsets
– 2 pendants + 2 (up to) spare handsets
Place your pendant or handset in registration mode, and then start the registration
mode on your speakerphone.
To start registration mode on the pendant,
press and hold the button on the pendant
until you hear the third beep; release
the button. The green/red lights will be
flashing. Allow the registration process to
complete, as it takes a few minutes.
ing to its user guide. You can page your
handset by pressing the Page button on
your speakerphone.
Pendant: you can use your pendant
to access additional features for
your speakerphone.
Pendant features
(Optional – purchased separately)
Your pendant has several unique features
that enhance the functionality of your
speakerphone. You can have two pendants registered to your speakerphone;
however, only one pendant will be active
at one time (while the other is charging in
its charger).
Pendant mode
– Works with your Phonebook (for
better performance, set your Phone
book to Priority mode).
Press pendant button
–Screen displays your phonebook
records (in priority mode – if set);
each record is displayed for 3 seconds,
accompanied by a “beep”.
When the record that you wish to call is
displayed, press the pendant button again;
the phone dials out the phone number for
that record.
To end the call, press the pendant
button again.
Handset: you can use your handset for
privacy; the handset can be used accord41
PHONE OPERATIONS
NOTES:
1.Your pendant is equipped with a head
phone/neckloop jack; use headphones/
neckloop to add privacy for your call;
when headphones are used, the speakerphone speaker is disabled.
2.Your pendant is equipped with a local
microphone, to ensure your voice is
transmitted properly during a call.
3.Your pendant is equipped with a volume
control that controls the volume of the
speakerphone audio.
4.Your pendant is equipped with a switch
jack – use an external switch (3.5mm
plug, purchased separately) to replace
the button on your pendant.
5.Your pendant has additional modes
that can be enabled (to be activated by
press-and-hold the pendant button for 3
seconds); you can only choose one option at a time. (Both cannot be active at
the same time.)
Sick bell mode
– Default setting is ON.
–This enables your pendant to transmit
a message towards the speakerphone.
(In case it is in a different location)
– Press and hold the button on your pendant for 3 seconds, then say “I
need help” (or any type of voice
messages) to transmit this message
to the speakerphone. Anyone in the
42
vicinity of the speakerphone can hear
your message and provide the help
you need.
Note: This mode does NOT enable a twoway conversation; it is for the wearer of the
pendant to transmit a message towards the
person near the speakerphone.
Note: You cannot use the “Sick Bell” or
“Quick Dial” modes if you use a switch
plugged into your pendant.
Quick Dial mode
– Default setting is ON.
–If a pendant is registered to your
speakerphone, one of the Phonebook
records can be set as your “Quick
Access” contact. (This is part of the
Additional Features associated with
your phonebook records – accessible
during Edit or Add modes for your
phonebook records).
–Press and hold the pendant button for
3 seconds to activate this mode.
The speakerphone dials out the phonebook record associated with the “Quick
Dial” feature; upon answering the call, you
can start a conversation with the contact
in your phonebook that is associated with
this feature; press the button again to end
the conversation.
In case you are unable to end the call, the
person contacted via this feature can end
the conversation by pressing twice the “5”
key on their phone.
TROUBLESHOOTING
Note: If you still have difficulties after following the instructions in this section, disconnect
the AC adapter from the Fortissimo speakerphone, then reconnect. If you are using an
(optional) handset/s, remove and reinsert the batteries in the handset.
I cannot hear a dial tone.
• Make sure the AC adapter is connected properly.
• Confirm that the tlephone line cord is connected properly.
•Disconnect the speakerphone base unit from the telephone line cord and connect
the line to a known working telephone. If the working telephone operates properly,
contact our service personnel to have the unit repaired. If the working telephone does
not operate properly, contact your telephone service provider.
The display is in a language I cannot read.
• Change the display language.
•Press the “Menu” button on the LCD screen. Press the “Down” arrow button to
scroll to “System Setup”. Then select “Language”, then “Display”. Select your language
from the three (3) options available. (English, French, Spanish)
Noise is heard — sound cuts in and out.
• You are using the handset or base unit in an area with high electrical interference.
• Move closer to the base unit.
•If you use a DSL/ADSL service, we recommend connecting a DSL/ADSL filter between
the base unit and the telephone line jack. Contact your DSL/ADSL provider for details.
The base unit does not ring.
•Check the main LCD screen. If “Ringer Off” is displayed, then the silent/mute feature
is active. Also check the “MUTE/SILENT” button light. If it is ON “red”, press the
button to turn the light OFF which activates the ringer function.
I cannot make a call using the landline.
• The dialing mode may be set incorrectly.
•Change the setting by pressing the “Menu” button on the LCD screen. Then press the
“Down” arrow button to scroll to “System Setup”. Select “Tone/Pulse”. Then select
either the tone or pulse option as required or supported by your phone service.
43
TROUBLESHOOTING
I cannot make long distance calls.
• Confirm that you have long distance service.
Caller information is not displayed.
•You must subscribe to Caller ID service. Contact your telephone service provider
for details.
•If your unit is connected to any additional telephone equipment such as a Caller ID box
or cordless telephone line jack, plug the unit directly into the wall jack.
•If you use a DSL/ADSL service, we recommend connecting a DSL/ADSL filter between
the base unit and the telephone line jack. Contact your DSL/ADSL provider for details.
•The name display service for landline calls may not be available in some areas. Contact
your telephone service provider for details.
•Other telephone equipment may be interfering with this unit. Disconnect the other
equipment and try again.
Caller information is displayed or announced late.
•Depending on your service provider, the unit may display or announce the caller’s
information at the second ring or later.
• Move closer to the base unit.
Caller information is not announced.
•The ringer volume is turned off. Adjust it by pressing the “Menu” button on the LCD
screen. Then press the “Down” arrow button to scroll to “System Setup”. Then select
“Ringer Volume”. Adjust the volume from “Lo” to “Hi” as needed.
•The talking Caller ID feature is turned off. Turn it ON. Change the setting by pressing
the “Menu” button on the LCD screen. Then press the “Down” arrow button to scroll
to “Voice Assist”. Select “Talking CID”, select ON and press “Save”.
•Your unit does not announce caller information if the base unit or two or more handsets are on a call, or a headset is in use.
44
TROUBLESHOOTING
I cannot dial the phone number edited in the caller list.
•The phone number you dialed might have been edited incorrectly. For example,
the long distance “1” or the area code is missing. Edit the phone number with
another pattern.
Time on the unit has shifted.
•Incorrect time information from incoming Caller ID changes the time. To correct,
reset the time and date using “System Setup” menu – “Set Time” – “Set Date”.
The second caller’s information is not displayed during an outside call.
•In order to use Caller ID, Call Waiting, or Call aiting Caller ID (CWID), you must first
contact your service provider and subscribe to the desired service.
•After subscribing, you may need to contact your service provider again to activate this
specific service, even if you already subscribed to both Caller ID and Call Waiting with
Caller ID services (CWID).
I cannot have a conversation using the headset.
•Your Bluetooth headset is not registered. Register it by pressing the “Menu” button
on the LCD screen. Then press the “Down” arrow button to scroll to “Register”, then
select Register to complete the process.
• Turn your headset OFF, then turn it ON and try again.
Noise is heard during a call on the headset.
•A Bluetooth headset can communicate with the base unit within a range of approximately 33 feet. The connection may be subject to interference from obstructions such
as walls or electronic devices. Move closer to the base unit.
I cannot connect my headset to the base unit.
• Confirm that your headset is turned on.
•If your headset is already connected to another Bluetooth device such as your cellular
phone, disconnect the headset from your cellular phone, then perform the connecting
procedure from the base unit.
45
TROUBLESHOOTING
•The headset has not been registered to the base unit. Register it by pressing the
“Menu” button on the LCD screen. Then press the “Down” arrow button to scroll to
“Register”, then select Register to complete the process.
Some headset enhanced features are not available.
•The base unit does not support enhanced features such as Last number redial
or Call reject.
An error tone is heard when I try to program the Bluetooth feature.
•The Bluetooth feature cannot be accessed immediately after connecting the AC
adapter to the base unit. Wait a few seconds and try again.
•The headset has not connected to the base unit yet even though you performed the
connecting procedure. Wait a few seconds and try again.
The unit does not record new messages.
•The answering system is turned OFF. Turn it ON by pressing the “Menu” button
on the LCD screen. Then press the “Down” arrow button to scroll to “Answering
Machine”, then select “Answer On/Off”– complete the process by selecting “ON”.
•The message memory is full. Erase unnecessary messages by pressing the “Messages”
button on the LCD screen. Then scroll through your messages, and press the
“Delete” button for the message/s you wish to delete.
•If you subscribe to a voice mail service, messages are recorded by your service
provider, not your telephone. Change the unit’s number of rings setting or contact
your service provider.
I cannot operate the answering machine remotely.
•To remotely access your answering machine, call the phone number for your
Fortissimo. When the Outgoing Message starts playing, enter the system pin (123)
and follow the voice prompts for the unit, to play/delete messages on the unit.
46
TROUBLESHOOTING
Unable to access Automated Systems
•Automated systems used by banks, long distance voicemail and other applications
require that a phone be set to “Tone” dialing. Confirm that the “Tone/Pulse” setting
is set to “Tone”.
Poor audio quality.
•The base unit may be too close to electrical appliances, reinforced concrete walls or
metal door frames. Move the base to another location.
My unit answers the calls without any action on my part.
•Your unit is set up in Auto Answer mode because you added this feature to at least
one phonebook record. To turn this feature off, go to Menu/Advanced Menu/Auto
Answer and change the setting to Off.
I have Voice Answer turned on, but the feature does not work.
•The Voice Answer feature does not work if Talking CID is enabled. To disable Talking
CID, go to Menu/Voice Assist and turn off the Talking CID feature.
When I am on a call, the other party does not hear me very well,
or says my voice breaks up.
•The volume level on your speakerphone is in the red zone. In this setting, you should
move closer to the unit (within 3 ft), or use it with the pendant (optional, purchased
separately) to ensure best audio experience for both you and the other party on the
call. Alternatively, you can lower the speakerphone volume (in the yellow or green
sections on your screen) if the distance between you and the unit is greater than 3 ft.
All my switches call Vocalyst when activated.
•You have to assign the desired function to each switch in the Menu. Go to
Menu/System Setup/Switches and assign a function to each switch, from the list
of available functions.
47
TROUBLESHOOTING
When I use a pendant, my phonebook records are shown in alphabetical
order, but I assigned priority levels to each record.
•Your phonebook is shown in alphabetical by default; go to Menu/Advanced Menu/
Phonebook order and change to Priority.
I turned both the Sick Bell feature and the Quick Dial feature to on,
but one of them doesn’t work.
•You can’t have both features active at the same time. You need to pick one to be
active, and make sure that the other is set to off.
48
FCC REQUIREMENTS AND REGULATIONS
PART 68 OF FCC RULES
INFORMATION
This equipment complies with Part 68
of the FCC rules and the requirements
adopted by the ACTA. On the bottom
of this equipment is a label that contains,
among other information, a product identifier in the format US:ACJ----------.
If requested, this number must be provided to the telephone company.
•Registration No.............(found on the bottom of the unit)
•Ringer Equivalence No. (REN).......0.1B
A plug and jack used to connect this
equipment to the premises wiring and
telephone network must comply with the
applicable FCC Part 68 rules and requirements adopted by the ACTA. A compliant telephone cord and modular plug is
provided with the product. It is designed
to be connected to a compatible modular
jack that is also compliant.
The REN is used to determine the number
of devices that may be connected to a
telephone line. Excessive RENs on a telephone line may result in the devices not
ringing in response to an incoming call. In
most but not all areas, the sum of RENs
should not exceed five (5.0). To be certain
of the number of devices that may be
connected to a line, as determined by the
total RENs, contact the local telephone
company. For products approved after
July 23, 2001, the REN for the product is
part of the product identifier that has the
format US:AAAEQ##TXXXX. The digits
represented by ## are the REN without a
decimal point (e.g., 03 is a REN of 0.3).
If this equipment causes harm to the telephone network, the telephone company
will notify you in advance that temporary
discontinuance of service may be required.
But if advance notice isn’t practical, the
telephone company will notify the customer as soon as possible. Also, you will
be advised of your right to file a complaint
with the FCC if you believe it is necessary.
The telephone company may make changes in its facilities, equipment, operations or
procedures that could affect the operation of the equipment. If this happens the
telephone company will provide advance
notice in order for you to make necessary
modifications to maintain uninterrupted
service. If trouble is experienced with this
equipment, for repair or warranty information, please contact a Factory Service
Center or other Authorized Servicer.
If the equipment is causing harm to the
telephone network, the telephone company may request that you disconnect the
equipment until the problem is resolved.
Connection to party line service is
subject to state tariffs. Contact the state
public utility commission, public service
commission or corporation commission
for information.
49
FCC REQUIREMENTS AND REGULATIONS
If your home has specially wired alarm
equipment connected to the telephone
line, ensure the installation of this equipment does not disable your alarm equipment. If you have questions about what
will disable alarm equipment, consult your
telephone company or a qualified installer.
This equipment is hearing aid compatible
as defined by the FCC in 47 CFR
Section 68.316.
When you hold the phone to your ear,
noise might be heard in your Hearing Aid.
Some Hearing Aids are not adequately
shielded from external RF (radio frequency) energy. If noise occurs, use an
optional headset accessory or the speakerphone option (if applicable) when using
this phone. Consult with your audiologist
or Hearing Aid manufacturer about the
availability of Hearing Aids which provide
adequate shielding to RF energy commonly
emitted by digital devices.
WHEN PROGRAMMING
EMERGENCY NUMBERS AND
(OR) MAKING TEST CALLS TO
EMERGENCY NUMBERS:
1.Remain on the line and briefly explain to
the dispatcher the reason for the call.
2.Perform such activities in the offpeak hours, such as early morning or
late evenings.
50
PART 15 OF FCC RULES
INFORMATION
This device complies with Part 15 of the
FCC Rules. Operation is subject to the
following two conditions:(1) This device
may not cause harmful interference, and
(2) this device must accept any interference received, including interference that
may cause undesired operation. Privacy of
communications may not be ensured when
using this phone.
CAUTION: Any changes or modifications not expressly approved by the party
responsible for compliance could void the
user’s authority to operate this device.
NOTE: This equipment has been tested
and found to comply with the limits for a
Class B digital device, pursuant to Part 15
of the FCC Rules. These limits are designed to provide reasonable protection
against harmful interference in a residential
installation. This equipment generates,
uses, and can radiate radio frequency
energy and, if not installed and used in
accordance with the instructions, may
cause harmful interference to radio
communications. However, there is no
guarantee that interference will not occur
in a particular installation. If this equipment does cause harmful interference to
radio or television reception, which can be
determined by turning the equipment off
FCC REQUIREMENTS AND REGULATIONS
and on, the user is encouraged to try to
correct the interference by one or more
of the following measures:
•This product may not be collocated or
operated in conjunction with any other
antenna or transmitter.
– Reorient or relocate the
receiving antenna.
•The handset may be carried and operated with only the specific provided
belt-clip. Other non-tested belt-clips or
similar body-worn accessories may not
comply and must be avoided.
– Increase the separation between the equipment and receiver.
– Connect the equipment into an outlet on a circuit different from that to which Notice
the receiver is connected.
FCC ID can be found inside the
– Consult the dealer or an experienced battery compartment or on the bottom
radio/TV technician for help.
of the units.
Some cordless telephones operate at
This product meets the
frequencies that may cause interference
applicable Industry Canada
to nearby TVs and VCRs. To minimize or
technical specifications
prevent such interference, the base of the
Before installing this equipment, users
cordless telephone should not be placed
should ensure that it is permissible to be
near or on top of a TV or VCR. If interconnected to the facilities of the local teleference is experienced, move the cordless
communications company. The equipment
telephone further away from the TV or
must also be installed using an acceptable
VCR. This will often reduce or eliminate
method of connection. In some cases, the
interference.
company’s inside wiring associated with
FCC RF Exposure Warning:
a single line individual service may be extended by means of a certified connector
•This product complies with FCC
assembly (telephone extension cord).
radiation exposure limits set forth for
an uncontrolled environment.
The customer should be aware that
compliance with the above conditions
•To comply with FCC RF exposure
may not prevent degradation of service in
requirements, the base unit must be
some situations.
installed and operated 20 cm (8 inches)
or more between the product and all
person’s body (excluding extremities of
hands, wrist and feet).
51
FCC REQUIREMENTS AND REGULATIONS
Users should ensure for their own protection that the electrical ground connections
of the power utility, telephone lines and
internal metallic water pipe system, if
present, are connected together. This
precaution may be particularly important
in rural areas.
WARNING: Users should not attempt
to make such connections themselves,
but should contact the appropriate
electric inspection authority, or electrician, as appropriate.
The Ringer Equivalence Number is an
indication of the maximum number of
terminals allowed to be connected to a
telephone interface. The termination on
an interface may consist of any combination of devices subject only to the requirement that the sum of the Ringer Equivalence Numbers of all the devices does not
exceed five (5.0).
This Class B digital apparatus complies
with Canadian ICES-003. [The term “IC:”
before the certification/registration number only signifies that the Industry Canada
technical specifications were met.]
52
WARRANTY AND SERVICE
Incidental or Consequential
Damages:
Neither Clarity nor your retailer dealer
or selling distributors has any responsibility for any incidental or consequential
damages including without limitation,
commercial loss or profit, or for any incidental expenses, expenses, loss of time, or
inconvenience. Some states do not allow
exclusion or limitation of incidental or
consequential damage, so the above limitation or exclusion may not apply to you.
Other Legal Rights: This warranty
gives you specific legal rights and you may
also have other rights which vary from
state to state.
To obtain warranty service, please prepay shipment and return the unit to the
appropriate facility listed below.
Clarity Service Center
6131 Preservation Drive
Chattanooga, Tennessee 37416
Tel: 423-629-3500 or 800-426-3738
Fax: 423-622-7646 or 800-325-8871
Plantronics Service Centre
151 Hymus
Point Claire, Quebec H9R 1E9
Tel: 800-540-8363 or 514-956-8363
Fax: 514-956-1825
53
Clarity, a Division of Plantronics, Inc.
6131 Preservation Drive
Chattanooga,TN 37416
Tel: 800-426-3738 Fax: 800-325-8871
E-mail: [email protected]
Website: www.clarityproducts.com
©2012 Clarity, a Division of Plantronics, Inc.All rights reserved. Clarity, Clarity Logic,
Smart for Seniors, and Fortissimo are trademarks or registered trademarks of Plantronics, Inc.
Rev. A (11-12)
Printed in USA