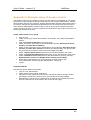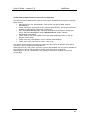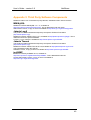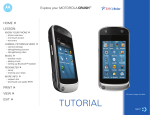
1
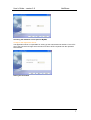
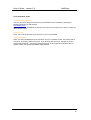
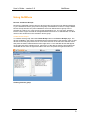
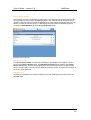
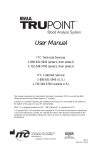
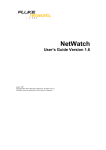
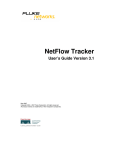
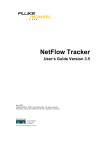
NetWhere
User’s Guide Version 2.0
June 2007
Copyright 2005 - 2007 Fluke Corporation. All rights reserved.
All product names are trademarks of their respective companies.
w.flukenetworks.com
User’s Guide – version 2.0
NetWhere
Software License Agreement
Schedule
Support Services
1.
Support Hours
The Support Hours during which Fluke shall supply the Support Services shall be between 9.30am and
5pm on Working Days.
2.
Support Services
Fluke shall provide You during the Support Hours with:
2.1.
technical advice and assistance by telephone, facsimile, e-mail or other electronic means as
shall be necessary to resolve your difficulties and queries in relation to the Product and the Updates
which You may require;
2.2.
an error correction and problem solving service as follows:
if You shall discover that the then current supported version of Product fails to conform with any part of
the description of the Product provided to you by Fluke then Fluke, on receiving notification of the error,
shall use its reasonable endeavours to:
2.2.1
diagnose and resolve the reported error or problem; and
provide the required solution to remedy or correct the error or problem; and
2.2.3
provide You with all assistance reasonably required by You to enable You to implement the
error correction supplied as soon as possible; and
2.2.4
correct errors by “fix” where Fluke, in its sole discretion, considers such to be appropriate.
2.3
Response times to technical advice and assistance queries and reported errors and problems
are set out in clause 3 below.
2.4
Remote connection support shall only be provided by Fluke in the event that telephone, fax or
email support does not resolve a problem.
3.
Response Times
3.1
In the event of any problem arising in relation to the Product’s installation and functioning,
Fluke shall respond within 8 Support Hours after the logging of such an incident by You provided that
the incident was logged by You during normal Support Hours. Fluke shall in turn endeavour to resolve
the problem as soon as possible.
4.
Exceptions to Support Services
4.1
The Support Services described in clause 2 of this Schedule shall not include service in
respect of:
4.1.1
defects or errors resulting from any modifications of the Product or Updates made by any
person other than Fluke;
4.1.2
incorrect use of the Product or Updates or operator error;
4.1.3
any fault in Your hardware, computer equipment or in any programs used in conjunction with
the Product or Updates; or
4.1.4
defects or errors caused by the use of the Product or Updates on or with equipment or
programs not approved by Fluke.
2
User’s Guide – version 2.0
NetWhere
Contents
NETWHERE MANUAL
5
Introduction
5
What is NetWhere?
5
Features and Benefits
5
INSTALLATION
6
Minimum System Requirements
6
Pre-installation Checks
6
Installation on Microsoft Windows™
6
Post-installation Tasks
8
USING NETWHERE
Devices and Device Groups
9
9
Searching
12
Managing Devices
16
SWITCH REPORTING
18
Introduction
18
Uplinks
19
Free Ports
20
Newly Used Ports
21
Roaming End Devices
22
New End Devices
22
End Device History
23
IP address history
24
Port History
25
Advanced
27
CONFIGURATION MANAGEMENT
28
3
User’s Guide – version 2.0
NetWhere
Introduction
28
Configuration Management Settings
28
Manage Configuration Archive schedule
30
Browse Configuration Archive
30
SYSTEM ADMINISTRATION
32
Users and User Groups
32
User Access Control
34
APPENDIX 1: THE NETWHERE XML SCHEMA
37
The XML Schema
37
The XML Schema (cont’d)
38
Sample Import Document
39
APPENDIX 2: EXAMPLE SETUP OF ACCESS CONTROL
40
Create ‘administrators’ user group
40
Populate Database
40
Create Network Administrators and Level One Operators
41
APPENDIX 3: THIRD PARTY SOFTWARE COMPONENTS
42
REFERENCES
43
4
User’s Guide – version 2.0
NetWhere
NetWhere Manual
Introduction
This document is the user manual for NetWhere, a network management software product
designed to provide easy access to all resources in the managed network.
This manual is regularly updated. Visit http://www.crannog-software.com to download the
latest version.
What is NetWhere?
Netwhere is primarily a powerful database kept up to date by monitoring the managed
devices through SNMP. The user interface presents this information in an intuitive and easy
to use fashion.
Features and Benefits
•
•
•
•
•
•
Searchable Database allows an operator to find a particular device or group among
hundreds.
Web-based front end allows users anywhere on the network to use the system.
Switch Port Connectivity shows which hosts are connected to the ports of a switch.
Security and User Access Control, the system administrator can restrict a user group
to a subset of the network managed by the system or a subset of the features offered
by Netwhere.
Cisco Configuration Management, the running configurations of (supported) Cisco
equipment are archived on a configurable schedule to allow an operator to access
them later.
Straightforward installation and configuration.
5
User’s Guide – version 2.0
NetWhere
Installation
Minimum System Requirements
The type of system required to run NetWhere depends on the number of devices to be
managed. The following requirements are a guideline; the only way to determine your
requirements is by testing the software’s performance in your network environment.
•
•
•
•
3.2Ghz Xeon processor.
2Gb RAM, although performance will increase with the amount of RAM available for
the disk cache and database buffers.
2 * 80 Gb SATA 7200rpm+ disks (raid 1) Provides mirroring.
Windows 2003 server.
Pre-installation Checks
Before installing, there are a few things you need to check:
• NetWhere puts a heavy load on the system. It is strongly recommended that you
install it on a dedicated server.
• You must be logged in as an administrator in order to install the software.
• NetWhere contains an embedded web server. Web servers normally run on port 80,
but this may be in use by another web server on your system. You can choose a
different port during installation or disable other web servers prior to installation if you
wish.
• Open firewall on ports 69(tftp), 80 (or chosen http port), 8002 (or chosen SNMP
response port)
• Port mapping from port 69 on router to port 69 on NetWhere server.
Installation on Microsoft Windows™
Installation is straightforward and should take no more than a few minutes. If you received
NetWhere on CD the setup program should start automatically. If not, simply open the CD
drive in My Computer and double-click “setup.exe”. If you downloaded the software simply
double-click the file you downloaded. Installation involves several steps. At each step, you
can click the “Next >” button to accept the default choices and continue.
Enter Root Password
The software comes with a default user, the root user, who has access to all features and all
devices managed in the system. It is therefore very important to choose a good password
which will be very hard to guess.
MySQL database access port
The MySql packaged with Netwhere can be run on a machine with other installations provided
the port selected does not conflict any other software running on the target machine. The third
screen on the installation wizard allows the installer to choose the database access port.
6
User’s Guide – version 2.0
NetWhere
Choosing the database access port for MySQL
Configure Web Application Server
The application server is responsible for serving up the web based user interface. The HTTP
port is the port which through which the server receives HTTP requests from the operators
web browser.
Setting the HTTP Port
7
User’s Guide – version 2.0
NetWhere
Post-installation Tasks
Access the web front-end
You can access the web front-end from any workstation on the network by opening the
following address in a web browser:
http://address:port
Where “address” is the address of the server and “port” is the http port you chose, or 80 if you
didn’t choose a port.
Login as Root
Enter “root” and the password you chose in fro root in the installer
Install your licence
When you start up NetWhere for the first time, it runs in evaluation mode. This means that it
will run for seven days without a licence. If you already have a licence, navigate to home >
system administration > licensing to apply the licence. If you require an evaluation licence,
please contact your Crannog Software representative.
8
User’s Guide – version 2.0
NetWhere
Using NetWhere
Devices and Device Groups
Devices are managed in device groups, device groups can serve as user defined categories
e.g. the ‘backbone’ device group can be the group of all backbone routers in a large network.
Device Groups enhance the power NetWhere since user defined device groups can be
specified in a search or in user access control specifications e.g. one can enter ‘backbone’
into the search engine and find all managed backbone devices or an administrator can allow
users to view all devices in the ‘backbone’ device group.
Create Device Groups
To create a device group select the Create Group button in the Device Groups page. The
devices available in the system are listed down the left hand side of the selection menu to add
devices to the new group select one or more of the devices on the left of the selection menu
and press the button marked with the left-to-right arrow >. The selected devices will appear
on the right side of the selection menu, remove any of the devices from the group select the
unwanted devices from the right hand side of the menu and press the right-to-left arrow <.
Creating a device group
9
User’s Guide – version 2.0
NetWhere
Browse Device Groups
The browser can be accessed from the main menu. The device group browser lists all of the
device groups for which a user has View privileges. The contents of a device group can be
viewed by selecting the icon beside the desired group. With sufficient privileges, the user can
edit the contents of a device group i.e. add/remove devices to/from the selected group by
pressing the Edit Members tab in the Group Properties page.
Browsing device groups
Edit Device Groups
The Device Group Editor is reached by selecting the group editor icon beside the device
group on the Device Groups page. The Edit Device Group page is similar to the Create
Device Group page, devices can be added to or removed from the group, the group name
can be changed and a comment can be added to the device group. To commit the changes to
the device group press ok.
Adding Devices
Devices can be added to the system singularly or in bulk. Adding devices is done from the
Devices page.
10
User’s Guide – version 2.0
NetWhere
Add a device
Select the Add Device button from the Devices page. The Add Device page has fields
required for managing a device over SNMP. The fields of particular importance are the IP
Address and the Read and Write community strings. The name and comments fields are
optional. The purpose of name field is to enable a user to specify a user-friendly name for the
device. If the name field is left blank it will be filled in by NetWhere with the system name on
the device itself. The comments field allows users to attach notes to a device the use of this
field is discretionary it could be used as description of the device.
The device can also be added to one or more groups using the selection boxes on this page.
Adding a device
11
User’s Guide – version 2.0
NetWhere
Import (Add Devices in Bulk)
Devices can be added to the system by specifying their details in an XML file and uploading
the file to the NetWhere server. The format of the XML file must adhere to the schema
specified in Appendix 1: The NetWhere XML schema.
Follow the steps below to import devices to the system
• Select the Import Devices button from the Devices page
• Press the Browse button
• Choose the xml file to upload and press open
• Press the Import button
The results of the import will show whether the groups and devices specified in the xml
document were added
Importing Devices
Searching
A key feature of NetWhere is its searching capability. There are three types of search result in
NetWhere: Managed Devices, Interfaces and End Devices. When a search is requested, all
available results are presented in each of these categories.
12
User’s Guide – version 2.0
NetWhere
Searching for Managed Devices
The device search finds devices registered in the system. The search tries to match the text
entered by the user on any device whose fields match any of the following categories
• Device name – user defined name for the device/or system name if not specified
• Device comments – any note attached to the device record
• Device IP Address – IP address through which the device is managed
• Device Description – the system description on the device
• Device Location – the system location on the device
• Contact – a contact name for the device
• Device Group Name – any device group of whose name matches the query string
entered by the user
• Device Group Comment – any device in a group whose comment matches the
query string entered by the user.
Managed device search results
13
User’s Guide – version 2.0
NetWhere
Searching for Interfaces
The interface search will find all interfaces on any managed device whose interface name,
interface description or interface physical address matches the query string entered by
the user.
Interface Search results
14
User’s Guide – version 2.0
NetWhere
Searching for End Devices
The end device search will find all end devices attached to any switch managed by the
system whose hostname, IP Address, MAC Address or description matches the query
string entered by the user.
End Device Search Results
15
User’s Guide – version 2.0
NetWhere
Managing Devices
The Device Details page can be reached by selecting a device from the Devices page,
selecting a device from a device group or selecting a device from the managed device search
results. The Device details page shows the interfaces on the device and their status.
NetWhere makes a distinction between switches and other devices, a switch will be shown
with all of its interfaces and all devices attached to the switch ports where as a router will be
shown with all of its interfaces and the IP Addresses associated with the interfaces.
Device view page
Resetting Interfaces
In both the switch and router views a privileged operator can enable/disable interfaces which
have that feature associated with it. The enable and disable buttons are respectively shown
as up and down arrows at the right-most column on the interface table. Pressing the
enable/disable button will not have immediate visual impact on the user interface, it can take
up to 30 seconds for the status of the interface to change on the users view of the device.
Caution: Disabling an interface can render its device unreachable from NetWhere if the
interface selected is the one that NetWhere uses to manage the device. In this scenario
NetWhere will not be able to contact the device to bring that interface back up. It is for this
reason that great care should be taken when using the feature. Only ever provide the
minimum required access to this feature.
Resetting Interfaces
By pressing the Edit button in the Device Details page the settings for a device can be
configured. The fields described in the ‘
16
User’s Guide – version 2.0
NetWhere
Add a device’ section can be edited here. The interfaces for which the reset feature is
enabled can be set here. To enable reset on interfaces simply select those interfaces for
which the reset feature is desired and select the Enable Interface Reset option on the Select
Operation control. Pressing OK will commit the changes to the system and Cancel will
discard all new settings and return the browser to the Device View page.
Editing a device
17
User’s Guide – version 2.0
NetWhere
Switch Reporting
Introduction
The switch reporting in NetWhere provides the user with valuable information on the
whereabouts of end devices on the network and the port usage of switches. It does this by
taking a snapshot of the entire network every half an hour (this may be increased or reduced
by the user. See registry settings section). From the database, the following reports can be
generated:
•
•
•
•
•
•
•
•
Uplinks – Tracks multiple addresses visible on one switch port
Free Ports – Capacity report showing unused switch ports
Newly Used Ports – Capacity / security report showing recently used ports that were
unused
Roaming End Devices – Security report showing end-devices (by MAC address)
that have changed location, IP address or hostname.
New End Devices – Capacity / security report showing new end-devices recently
found on the network
End-Device History - Forensics security report on the past movements and address
assignments of an End-Device on the network, identified by its MAC address.
IP Address History – Forensics report on the past movements and address
assignments of an IP address.
Port History – Full connectivity history of a switch port.
18
User’s Guide – version 2.0
NetWhere
Uplinks
A switch port that has more than one end-device connected to it is deemed to be an Uplink
Port. For capacity planning, engineering and security, it is important to know where your
uplink ports are and how busy they are. The user may filter out certain results so he can only
see uplinks of a certain size using the controls at the top of the report. For example, users
with VoIP phones that have built-in hubs will see multiple devices on a single switch-port
when a PC or other network device is plugged into the phone. Filtering the count value will
remove these items from the report.
Report Details
•
•
•
•
•
Device Name - The device the uplink is on, this may be selected to go to the device
view of that device.
Interface name - This may be selected to view the history page for that interface.
Extended Description of the interface
Host Count - The number of end devices connected to that interface.
If you have switch forensics permission, click the magnifying glass icon beside an
uplink to see a list of all the end devices currently connected to that interface.
To view the uplink interface on only one switch, navigate to home > switch reports > switches.
Uplink reports page
19
User’s Guide – version 2.0
NetWhere
Free Ports
The Free Ports report shows all the currently unused ports in the system. Using this report,
an administrator can quickly identify where new hardware can be added on the network.
Using the control at the top of the report the user may filter the report to only show ports
which have been unused for at least a stated number of days.
Report Details
•
•
•
•
Name and IP Address of the switch containing the unused port - These can be
selected to bring you to the device view page for that device.
Switch Up-time - Shows when the switch was last rebooted.
Interface Name of the unused port - This can be selected to go to the interface
history page for that interface.
Extended Description of the unused port - Shows how long the interface has been
free for or “never used” if it has not been used since NetWhere has been installed.
To view unused ports on a single switch, navigate to home > switch reports > switches.
Free ports on managed switches
20
User’s Guide – version 2.0
NetWhere
Newly Used Ports
The Newly Used Ports report shows ports which have recently been in use but were
previously unused. Using the controls at the top of the page the user can filter the report to
show ports that have been used at some stage in the last x amount of days which were
previously down for the entire y amount of days before that.
Report Details
•
•
•
•
•
Device Name and IP Address of the switch – This can be selected to bring you to
the device view page.
Interface Name - This can be selected to bring you to the interface history page.
Extended Description of the interface.
Used Since – The time when the switch port changed from “unused” to “newly used”.
Session History – Click on the magnifying glass icon in the right hand column to
view a report of the session history of that port
To view newly used ports on one switch only, navigate to home > switch reports > switches.
Newly used ports
21
User’s Guide – version 2.0
NetWhere
Roaming End Devices
(Requires Switch Forensics Permission)
A major security feature in NetWhere is the ability to track devices that have changed
location, IP address and/or hostname. Any of these changes should be subject to scrutiny as
they may constitute a breach of your network policy.
This report shows end devices which have been assigned more than one IP address or have
appeared on more than one interface in a certain amount of time. Using the controls at the top
of the report the user can specify the number of IP addresses assigned to the end device, the
number of interfaces the end device has appeared on and how long ago to consider. The
search returns end devices which satisfy either of the parameters. The roaming end device
report shows the MAC address of the roaming end device, the number of IP addresses
assigned to the end device and the number of ports visited by the end device. Click on the
MAC address entry to see a detailed End-Device report showing the details of assigned
addresses and locations.
Roaming End Devices
New End Devices
Another useful report in the security and capacity planning fields is the New End Devices
report. This highlights the devices that have recently appeared on the system. The
administrator should be interested in these new devices and should identify if they are
authorised devices (capacity planning) or if they are clandestine devices that may constitute a
security breach (security).
Using the controls at the top of the report specify the time span for which to run the newdevice search.
22
User’s Guide – version 2.0
NetWhere
Report Details
•
•
•
•
•
MAC Address – The hardware address of the newly discovered end-devices. Click
on this to see a detailed history of the address assignments and locations of the
device.
IP Address – The IP address assigned to the new device. Click this to see a full
history of assignments for that IP address.
Hostname – The assigned host name of the end device.
Appeared At – The time at which the device was first seen on the network.
Comment - An administrator-specified comment on the end-device. Use this feature
to flag suspect devices on the network or to simply identify them. The comment can
be searched for easy retrieval.
New End Devices
End Device History
The End Device History report gives a full forensic view of the connectivity and address
assignment behaviour of that device on the network over time. There are two main sections to
this report, dealing with the connectivity history and the IP and hostname assignment history,
respectively.
Report Header Details
First Seen – The first time the device was detected on the network by NetWhere.
Last Seen – The most recent detection of the device on the network
Host Count Greater than – The report will omit any interfaces from the connectivity history
where the host count is greater than that specified here. This will remove uplink ports from the
report. Normally, this value should be set to 1 or 2, depending on whether or not each host
has an exclusive connection to a switch port.
Comment – User-specified comment for that device (linked to the MAC address). This can be
edited by any user with the relevant security permission.
23
User’s Guide – version 2.0
NetWhere
Connectivity History Details
Expand icon – the icon on the left hand side of each row. If a device has appeared and
disappeared on a single interface, it is shown as one item on this list until the “expand” button
is clicked, when the individual connections are listed with their start and end times.
Start Time – The start time of the connection
End Time – The end time of the connection or “-“, if the connection is still active.
Device Name & IP Address – Name and address of the managed device to which this end
device is connected.
Interface Name – The interface to which the device was connected
Hosts – The total number of network hosts sharing that interface. This indicates whether the
connection is direct or via an uplink.
IP & Hostname Assignment Details
IP Address – The Assigned IP address
HostName – The name resolution of that IP address to hostname at the time of detection.
First Seen / Last Seen – The times between which the IP address and hostname were
assigned to the device.
Use the Results Per Page to adjust the item count for each of the report sections. Click the
collapse/expand icons on the right-hand-side of the title bars to hide or show either of the two
sections.
End Device History
IP address history
Use this report to see the history of an IP address on the network. There are also two
sections in this report. The connectivity history shows the history of the IP address and any
movements it has made on the network. The second section is of particular interest to
security, as it shows changing IP address and hostname assignments. Any network, apart
from DHCP setups with a short or no address lease, should have static host-to-IP
assignments. A changing IP address may be a sign of an attempted security breach.
24
User’s Guide – version 2.0
NetWhere
Report Header Details
First Seen / Last Seen – the times between which the IP address has been detected on the
network.
Connectivity History Details
Expand icon – the icon on the left hand side of each row. If a device has appeared and
disappeared on a single interface, it is shown as one item on this list until the “expand” button
is clicked, when the individual connections are listed with their start and end times.
Start Time / End Time – The start and end times for that specific connection.
Device Name / IP Address – Name and address of the managed device to which this end
device is connected.
Interface Name – The interface to which the IP address was connected
Hosts – The total number of addresses seen on this port. This figure indicates whether or not
the interface is an uplink.
MAC & Hostname Assignments Details
MAC Address / Host Name - The MAC Address and hostname assignments detected.
First Seen / Last Seen – The first and last times the above assignment was detected.
IP address history
Port History
Another view of the connectivity history, this is simply a view of everything that has been
connected into a particular switch port over time. This easily translates to “who has been
sitting at that desk connecting to the network” and can provide a powerful security tool in
tracing user movements.
Report Details
Start Time / End Time– The time the connection began and ended. End time is shown as ““if the connection is still active.
End Device MAC /IP / Hostname – Details of the end device connected to the port (single
host connections only… see below)
Host Count Range – the maximum and minimum number of hosts connected to this port.
25
User’s Guide – version 2.0
NetWhere
If more than one host has been connected, the port is an uplink and the End Device MAC, IP
address or hostname are not shown on the line. To get the details of all hosts connected, click
the magnifying glass icon for a detailed Session History, shown below.
Port History
Session History on a port
26
User’s Guide – version 2.0
NetWhere
Advanced
Registry Settings
Note: Only experienced administrators should attempt to edit the registry. Editing the registry
can result in irreparable damage and an un-bootable computer if care is not taken. Always
take a backup of your system before performing these changes.
Netwhere’s switch reporting module uses some registry settings to set variables like scan
frequency and how long data is kept. If the user needs to these settings can be changed.
Before attempting to change registry settings make a back up of all the current settings. After
changing registry settings you must restart the netwhere service for the changes to take
effect. The values in the registry are given in milli seconds. So the following shows how you
would calculate 30 days:
30 days * 24 hours * 60 mins * 60 secs * 1000 ms = 2592000000 ms
To navigate to the Netwhere registry settings:
1. Click Start | Run and type in Regedit to open the Windows Registry Editor.
2. Navigate to and expand the HKEY_LOCAL_MACHINE | SOFTWARE | JavaSoft |
Prefs | com | crannogsoftware | netwhere
The following keys are of interest in the switch forensics folder.
1. historicsessiondataageout – This key determines the storage period for
connectivity data. By default it is set to 30 days. If you wish to keep data for longer
you may increase this value. This will result in NetWhere taking up more disk space.
Reducing this value will free up disk space.
2. datapurgeperiod – This value determines how often data that has aged out is
purged. By default it is set to every 24 hours.
3. switchscanperiod – This value determines how often NetWhere scans all the
switches in the system. By default it is set to every 30 minutes. Decreasing this value
will make the scans run more often so the data will be more accurate however the
amount of disk space needed will increase. Increasing this value will make the scans
run less often and reduce the disk space needed.
The following keys are of interest in the maciphostservice folder:
1. cachepurgeperiod – This determines how often MAC to IP to hostname associations
that have aged out are purged. By default it is set to every 6 hours.
2. ipaddressageout – This determines how often MAC to IP to hostname associations
are stored for. By default this is set to 30 days. If you wish to keep data for longer you
may increase this value. This will result in NetWhere taking up more disk space.
Reducing this value will free up disk space.
3. macageout - This determines how often MAC addresses are stored for. By default
this is set to 30 days. If you wish to keep data for longer you may increase this value.
This will result in NetWhere taking up more disk space. Reducing this value will free
up disk space.
27
User’s Guide – version 2.0
NetWhere
Configuration Management
Introduction
The configuration management functionality allows the user to download the configuration of
their devices at scheduled times or on demand. This functionality is only available on devices
that support the CISCO-CONFIG-COPY-MIB. This MIB is not supported on Catalyst
Switches. You must also be logged in as a user with configuration management permission to
access this functionality.
To enable or disable Configuration Management
By default, the configuration management feature is disabled in NetWhere. To enable the
feature follow these steps. Note that care must be taken when modifying registry settings.
Making the wrong changes could render your system unusable. Always make a full backup
before performing any registry changes.
• Stop the NetWhere service
• In Regedit, open the key:
HKEY_LOCAL_MACHINE\SOFTWARE\JavaSoft\Prefs\com\crannogsoftware\netwhe
re\tftp
• To enable the config management feature, set “enabled” to 1. To disable, set it to 0.
• If required, the TFTP port number can be set to a custom value in the same key
• Start the NetWhere service
Configuration Management Settings
To access the Configuration Management Settings page browse to home > configuration
management > settings. You will be presented with the list of managed devices in your
system that supports the configuration management functionality. To enable configuration
management on a device select the checkbox beside that device and select Enable Selected
from the dropdown list. You must also enter a valid tftp server for that device. Then select the
Save button at the bottom of the page.
28
User’s Guide – version 2.0
NetWhere
Editing Configuration management settings
29
User’s Guide – version 2.0
NetWhere
Manage Configuration Archive schedule
To access the configuration management archive schedule navigate to home > configuration
management > schedule. The archive schedule sets the times that the devices you have
enabled configuration management on upload their configurations. You must first select the
Enable Schedule checkbox. This must be selected if you want devices to upload their
configurations. Then select the time and as many days as you would like to get the
configurations from devices. Select the Ok button to save.
Setting the configuration archive schedule
Browse Configuration Archive
To access the Configuration archive browser navigate to home > configuration management
> browse configuration archives. This section allows you to access the configuration archives
in a number of ways, selected in the Search Method drop-down:
• Find All Configs – Search for every configuration that has been downloaded.
• Select Single Day – Search for configurations downloaded on a specified day
• Configs From Date – Retrieve configurations downloaded after a specified day
• Configs to Date – Retrieve configurations downloaded before a specified day
• Configs in Range – Find configurations downloaded between two dates
30
User’s Guide – version 2.0
NetWhere
Once the search method is selected and dates specified, where applicable, the results will
appear in the search results section with the download date and time for each. Select the
checkbox beside the configs you wish to view and select View Configurations from the dropdown box. The list of devices that uploaded their configs on this date will then appear in the
configurations section. Select the device name to view the configuration for that device.
Browsing the configuration archives
31
User’s Guide – version 2.0
NetWhere
System Administration
Users and User Groups
Just like devices the users of a system are managed in groups. User groups are defined by
privileged users, the names of the groups and can reflect the organizational structure of the IT
department e.g. ‘administrators’, ‘first level operators’ etc. The same benefits of grouping
users apply here since an administrator can grant/revoke privileges to groups of users. The
power of this feature becomes apparent when a new employee joins the IT department as a
first level operator, in this case the administrator creates a new user for the employee and
adds the user to the ‘first level operator group’. The overhead of defining permissions for
individual users is avoided by using user groups.
Create User Group
•
•
•
•
Select the New Group button from the User Groups window
Enter a name for the new user group
Select (if required) users to add to the new group
Press OK
Browse User Groups
The browser can be accessed from the System administration> users and groups menu. The
user group browser lists all of the user groups for which a user has view privileges. The
contents of a user group can be viewed by selecting the properties icon beside the group. If a
user has sufficient privileges the user can edit the contents of a user group i.e. add/remove
devices to/from the selected group by pressing the properties icon beside the group to edit
Browsing user groups
32
User’s Guide – version 2.0
NetWhere
Edit User Groups
The user group editor is reached by selecting the properties icon beside the user group to
edit. Users can be added to or removed from the group. If you have permission you may edit
the permissions this user group has and in the Security tab edit the users and user groups
who have permissions on this user group. To commit the changes to the user group press
Ok.
Editing user groups
33
User’s Guide – version 2.0
NetWhere
Adding Users
Select the New User button from the User’s page. Enter the user name and a password. If
you wish you may also add the user to a group.
Creating a user
User Access Control
NetWhere has a highly granular access control system which prevents users without sufficient
privileges from getting access to managed devices or features on the system. Privileges are
granted to user groups and users.
There are eight permission types:
• Device addition - allows users to add new devices into the system
• Device group creation - allows users to add new device groups into the system
• User creation - allows users to add new users into the system
• User group creation - allows the user to add user groups into the system
• System Administration Permission - allows users to change settings of the
NetWhere software
• Configuration Management Permission - allows users to view and retrieve device
configurations stored in the system
• Switch forensics - allows the user to see the activity of end devices on the network
• Switch Forensics with editing - allows users to see and track end devices on the
network and also to edit the comments associated with them
The following sections describe how to setup access control from scratch, however Appendix
2: Example setup of access control shows how to setup a simple access control system to
illustrate the features of Netwhere’s access control system.
Browsing and Managing Permissions
To view the permissions granted to a user group/User:
34
User’s Guide – version 2.0
NetWhere
1. Select the Properties icon beside the user group/User in the user group’s/User’s
page.
2. Select the Permissions tab. A table with the permission names are displayed.
3. Select permissions and click Remove Selected to delete permissions
4. Create new permissions by selecting permissions and clicking Add Permission
Editing user permissions
35
User’s Guide – version 2.0
NetWhere
Granting Permissions
New permissions are granted to user groups/users by pressing the Add Permission button in
the Permissions tab on the User group editor/User Editor page. The required permission
type must be selected followed by pressing Create. This will return the browser to the
Browse Permissions page with the new permission added to the list.
Selecting user permissions
Security
There is a Security tab in the properties page for four items: Users, User groups, Devices
and Device Groups. In this security tab you specify which users/user groups have
permissions on this item.
The different levels of permissions are:
• View- allows the user/user group to see this item in the system
• Edit - allows the user/user group to edit this item in the system
• Delete - allows the user/user group to delete this item from the system
• Read Permissions - allows the user/user group to view the permissions and security
tab of this item
• Change Permissions - allows the user/user group to edit the permissions in the
permissions and security tab for this item
36
User’s Guide – version 2.0
NetWhere
Appendix 1: The NetWhere XML schema
The NetWhere xml schema governs the structure and format an import file must have
when importing devices into NetWhere. A listing of the schema follows:
The XML Schema
<?xml version="1.0" encoding="UTF-8"?>
<xsd:schema xmlns:xsd="http://www.w3.org/2001/XMLSchema"
xmlns:n="csw:3n21"
targetNamespace="csw:3n21" >
<xsd:element name="deviceSet"
type="n:DeviceSet"/>
<xsd:complexType name="DeviceSet">
<xsd:sequence>
<xsd:element
name="group"
type="xsd:string"
minOccurs="1"
maxOccurs="100"/>
<xsd:element
name="device"
type="n:Device"
minOccurs="0"
maxOccurs="100"/>
</xsd:sequence>
</xsd:complexType>
<xsd:complexType name="Device">
<xsd:sequence>
<xsd:element
name="name"
minOccurs="0"
type="n:Name"/>
<xsd:element
name="description"
minOccurs="0"
type="n:Description"/>
<xsd:element
name="ipaddress"
type="n:IPAddress"/>
<xsd:element
name="readCommunityString"
default="public"
type="xsd:string"/>
<xsd:element
name="writeCommunityString"
default="private"
type="xsd:string"/>
<xsd:element
name="snmpVersion"
default="2"
type="n:SNMPVersion"/>
</xsd:sequence>
</xsd:complexType>
<xsd:simpleType
name="Name">
<xsd:restriction
base="xsd:string">
<xsd:maxLength value="50"/>
</xsd:restriction>
</xsd:simpleType>
37
User’s Guide – version 2.0
NetWhere
The XML Schema (cont’d)
<xsd:simpleType name="Description">
<xsd:restriction base="xsd:string">
<xsd:maxLength value="255"/>
<xsd:pattern value="([a-z]|[0-9]|[A-Z]|\s)*"/>
</xsd:restriction>
</xsd:simpleType>
<xsd:simpleType name="IPAddress">
<xsd:restriction base="xsd:string">
<xsd:pattern value="((1?[0-9]?[0-9])|(2[0-5][0-9])).((1?[09]?[0-9])|(2[0-5][0-9])).((1?[0-9]?[0-9])|(2[0-5][0-9])).((1?[0-9]?[0-9])|(2[0-5][09]))"/>
</xsd:restriction>
</xsd:simpleType>
<xsd:simpleType name="SNMPVersion">
<xsd:restriction base="xsd:integer">
<xsd:minInclusive value="1"/>
<xsd:maxInclusive value="2"/>
</xsd:restriction>
</xsd:simpleType>
</xsd:schema>
For an import document to be valid at least one device group name must be specified, the
device groups listed will be the device groups to which the devices specified in the document
will be added. NetWhere will create device groups for each device group specified if those
groups do not already exist in the system. There is an upper limit of one hundred device
groups which can be specified in an import document.
Following the device group specifications are the device specifications, there is a limit of one
hundred devices per import document. For a device spec to be valid an ip address, a read
and write community string and an SNMP version must be entered. A device name and
description are optional. The schema also supplies default values for read and write
community strings and SNMP version as ‘public’, ‘private’ and ‘2’ respectively.
38
User’s Guide – version 2.0
NetWhere
Sample Import Document
The following is an example of a valid import document:
<?xml version="1.0"?>
<d:deviceSet xmlns:xsi='http://www.w3.org/2001/XMLSchema-instance'
xsi:schemaLocation="csw:3n21
http://www.3n21.com/3n21/devices.xsd"
xmlns:d="csw:3n21">
<group>All Devices</group>
<device>
<name>My Device</name>
<description>My Device description</description>
<ipaddress>10.1.1.1</ipaddress>
<readCommunityString>public</readCommunityString>
<writeCommunityString>private</writeCommunityString>
<snmpVersion>2</snmpVersion>
</device>
<device>
<ipaddress>10.1.1.2</ipaddress>
<readCommunityString/>
<writeCommunityString/>
<snmpVersion/>
</device>
</d:deviceSet>
39
User’s Guide – version 2.0
NetWhere
Appendix 2: Example setup of access control
The following steps are an example of how the security features of NetWhere be can used to
good effect. In this example we will have three types of user, system administrators, network
administrators and level one operators. System administrators should be able to add users to
the system, manage their permissions and add devices to the system and control access to
them. Network Administrators should be able to see all devices in the system and perform
certain operations on them. Level one operators should be able to see certain devices but not
perform any operations on them.
Create ‘administrators’ user group
•
•
•
•
•
•
•
•
•
•
Login as root.
Create a user group called ‘administrators’ as outlined in the system administration
section.
Open the Permission Browser for the new group.
Create new device permission for the administrator selecting Allow Device Group
Creation and Allow Device Addition.
Create a User Permission for the ‘administrators’ group selecting Allow User Group
Creation and Allow User Creation and select the ‘administrators’ user group under
the group specific permission section and select View. Press OK.
Create a System Administration permission for the administrators user group
Create a Configuration Management permission for the ‘administrators’ user group.
Create a Switch Forensics permission for the administrators group by selecting
Enable Switch Forensics and Enable Switch Forensics with editing.
Now that the administrators user group has been created create a user
‘test_administrator’ and add it to the ‘administrators’ user group.
Logout.
Populate Database
Now devices can be added to the system.
• Login as ‘test_administrator’.
• Create a device group called ‘All Devices’.
• Add devices to the system as outlined in the ‘Devices and Device Groups’ section
selecting the ‘All Devices’ group to which the new devices should be added.
• Alternatively an xml file can be created which contains all of the details of all of the
devices to add and can be imported in the ‘Import devices’ page.
40
User’s Guide – version 2.0
NetWhere
Create Network Administrators and Level One Operators
Now that devices are added to the system, users need to be added to the system to manage
these devices.
• Still logged in as ‘test_administrator’ create a new user group called ‘network
administrators’.
• Assign new device permission for the ‘network administrators’, these users should be
allowed to create device groups (but not devices).
• Go to the Device Groups page. Select the properties icon beside the ‘All Devices’
group. Select the Security tab. Select Add Permission. Select ‘network
administrators’ and View.
• Create another user group called ‘level1’ and assign View permission on the ‘All
Devices’ device group.
• Create user ‘test_networkadmin’ for the ‘network administrators’.
• Create users ‘test_level1’ for the ‘level1’ user group.
The effects of these steps is best seen by logging into the system as different users (being
members of one of the groups created above).
When logged in as a ‘test_level1’ most of the menus are disabled, the only menus available to
this operator are the devices and device groups menu items in the main menu.
When logged in as ‘test_networkadmin’ the create group button is enabled in the device
groups page.
41
User’s Guide – version 2.0
NetWhere
Appendix 3: Third Party Software Components
NetWhere makes use of several third party libraries, distributed under various licenses.
MM.MySQL
NetWhere includes MM.MySQL v 4.1.11, available at
http://sourceforge.net/projects/mmmysql/. This is distributed under the lesser
GNU Public License, a copy of which is available at http://www.gnu.org/licenses/lgpl.html.
Jakarta Log4j
This product includes software developed by the Apache Software Foundation
(http://www.apache.org/).
NetWhere includes Jakarta Log4j v1.2.9, available at http://jakarta.apache.org/log4j/. This is
distributed under the Apache Software
License, a copy of which is available at http://www.apache.org/LICENSE.
Jakarta Tomcat
This product includes software developed by the Apache Software Foundation
(http://www.apache.org/).
NetWhere includes Jakarta Tomcat v5.0.28, available at http://jakarta.apache.org/tomcat/.
This is distributed under the Apache
Software License, a copy of which is available at http://www.apache.org/LICENSE.
joeSNMP
NetWhere includes joeSNMP v0.2.6, available at
http://www.opennms.org/files/releases/joeSNMP/. This is distributed under the
Lesser GNU Public License, a copy of which is available at
http://www.gnu.org/licenses/lgpl.html.
42
User’s Guide – version 2.0
NetWhere
References
XML Schema Primer http://www.w3.org/TR/xmlschema-0/#Intro
43