1
Version 13
Installation under Windows
This document applies to Adabas D Version 13 and to all subsequent releases.
Specifications contained herein are subject to change and these changes will be reported in subsequent
release notes or new editions.
© Copyright Software AG 2004
All rights reserved.
The name Software AG and/or all Software AG product names are either trademarks or registered
trademarks of Software AG. Other company and product names mentioned herein may be trademarks of
their respective owners.
Adabas D: Installation under Windows
Installation under Windows
Table of Contents
Installation under Windows .
.
.
.
.
.
.
.
.
.
Installation under Windows .
.
.
.
.
.
.
.
.
.
Introduction .
.
.
.
.
.
.
.
.
.
.
.
.
.
Introduction
.
.
.
.
.
.
.
.
.
.
.
.
.
Adabas Documentation .
.
.
.
.
.
.
.
.
.
.
Adabas Documentation .
.
.
.
.
.
.
.
.
.
.
Version Information .
.
.
.
.
.
.
.
.
.
.
Installing and Setting Up Adabas D .
.
.
.
.
.
.
.
Installing and Setting Up Adabas D .
.
.
.
.
.
.
.
Installation Package .
.
.
.
.
.
.
.
.
.
.
Product Version Numbers .
.
.
.
.
.
.
.
.
.
First Installation .
.
.
.
.
.
.
.
.
.
.
.
Step 1: Creating the Database Administrator .
.
.
.
.
Step 2: Logging in as the Database Administrator .
.
.
.
Step 3: Checking System Resources .
.
.
.
.
.
.
Step 4: Installing the Adabas Software
.
.
.
.
.
.
Step 5: Reading the README Files .
.
.
.
.
.
.
Step 6: Defining the Optional Environment Variables .
.
.
Step 7: Setting Access Rights
.
.
.
.
.
.
.
.
Step 8: Installing the SERVERDB
.
.
.
.
.
.
.
Step 9: Verifying the First Installation
.
.
.
.
.
.
Step 10: Creating a Data Source in the ODBC Driver .
.
.
Step 11: Demo .
.
.
.
.
.
.
.
.
.
.
.
Update Installation .
.
.
.
.
.
.
.
.
.
.
Step 1: Checking System Resources .
.
.
.
.
.
.
Step 2: Stopping the SERVERDB And All Other Adabas Programs
Step 3: Saving an Existing Adabas Version
.
.
.
.
.
Step 4: Installing the Software .
.
.
.
.
.
.
.
Step 5: Reading the README Files .
.
.
.
.
.
.
Step 6: Checking the Parameters .
.
.
.
.
.
.
.
Step 7: Restarting the SERVERDB .
.
.
.
.
.
.
Step 8: Updating the System Tables .
.
.
.
.
.
.
Step 9: Verifying the Update Installation .
.
.
.
.
.
Step 10: Saving the SERVERDB .
.
.
.
.
.
.
.
Supporting National Special Characters (ASCII) .
.
.
.
.
Supporting National Special Characters (ASCII)
.
.
.
.
.
Sorting National Special Characters
.
.
.
.
.
.
.
Appendix A - Keyboard Layout .
.
.
.
.
.
.
.
.
Appendix A - Keyboard Layout .
.
.
.
.
.
.
.
.
Keyboard Layouts of the Adabas Tools .
.
.
.
.
.
.
Appendix B - Character Set ISO 8859/1.2 .
.
.
.
.
.
.
Appendix B - Character Set ISO 8859/1.2 .
.
.
.
.
.
.
.
.
.
.
.
.
.
.
.
.
.
.
.
.
.
.
.
.
.
.
.
.
.
.
.
.
.
.
.
.
.
.
.
.
.
.
.
.
.
.
.
.
.
.
.
.
.
.
.
.
.
.
.
.
.
.
.
.
.
.
.
.
.
.
.
.
.
.
.
.
.
.
.
.
.
.
.
.
.
.
.
.
.
.
.
.
.
.
.
.
.
.
.
.
.
.
.
.
.
.
.
.
.
.
.
.
.
.
.
.
.
.
.
.
.
.
.
.
.
.
.
.
.
.
.
.
.
.
.
.
.
.
.
.
.
.
.
.
.
.
.
.
.
.
.
.
.
.
.
.
.
.
.
.
.
.
.
.
.
.
.
.
.
.
.
.
.
.
.
.
.
.
.
.
.
.
.
.
.
.
.
.
.
.
.
.
.
.
.
.
.
.
.
.
.
.
.
.
.
.
.
.
.
.
.
.
.
.
.
.
.
.
.
.
.
.
.
.
.
.
.
.
.
.
.
.
.
.
.
.
.
.
.
.
.
.
.
.
.
.
.
.
.
.
.
.
.
.
.
.
.
.
1
1
2
2
3
3
4
5
5
5
5
6
6
6
7
8
11
11
11
12
12
13
14
15
15
15
15
15
15
15
15
15
15
16
17
17
17
18
18
18
19
19
i
Adabas D: Installation under Windows
Installation under Windows
Installation under Windows
Introduction
Adabas Documentation
Installing and Setting Up Adabas D
Supporting National Special Characters (ASCII)
Appendix A - Keyboard Layout
Appendix B - Character Set ISO 8859/1.2
1
Introduction
Adabas D: Installation under Windows
Introduction
This manual describes the platform specific installation steps of the Software AG database system Adabas
D on Windows
Windows means both the server version and the workstation version.
Platform-independent steps of installation are described in the "Control" manual.
Adabas can be installed as several instances on a Windows system. Each instance is called a SERVERDB.
2
Adabas D: Installation under Windows
Adabas Documentation
Adabas Documentation
The Adabas documentation is available in English and German. It is provided on CD-ROM in both
"MS-Word 7.0 for Windows" format and "HTML" format.
The following documents are available:
Concepts and Facilities
Questions and Answers
Tutorial
Getting Started
Installation under Unix
Installation under Windows
User Manual Unix
User Manual Windows
User Manual ODBC
User Manual Internet
Query
GUI Query
Load
Control
Domain
AccessPlus
SQL-PL
C/C++ Precompiler
Cobol Precompiler
Reference
Reference/Oracle
Messages and Codes
3
Adabas Documentation
Adabas D: Installation under Windows
Version Information
Current information about the loaded Adabas version is provided in the files in the Adabas directory
(%DBROOT%). These files describe the modifications made to the previous version, as well as open and
fixed errors.
They are readable files in ASCII format.
4
Adabas D: Installation under Windows
Installing and Setting Up Adabas D
Installing and Setting Up Adabas D
This section contains information for installing and setting up Adabas D, independent of the Windows
platform used.
The time required for installation is a half man-day for the system administrator.
This chapter covers the following topics:
Installation Package
Product Version Numbers
First Installation
Update Installation
Installation Package
The installation package of Adabas D is available on ISO 9660 CD-ROM. The CD-ROM contains a
complete directory structure where product and platform are clearly denoted.
On a separate medium, usually a floppy disk, a licence file is provided.
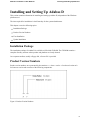
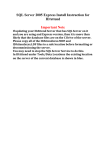
Product Version Numbers
Product version numbers are represented by the notation v n , where v can be v for released version or b
for beta-test version and n consists of the following components:
Figure 1: Product Version Numbers
5
Installing and Setting Up Adabas D
Adabas D: Installation under Windows
First Installation
The following is a summary of the steps required to set up and install Adabas:
Step 1:Creating the database administrator .
Step 2:Logging in as the database administrator .
Step 3:Checking System Resources.
Step 4:Installing the Adabas software.
Step 5:Reading the README files.
Step 6:Defining the optional environment variables.
Step 7:Setting access rights .
Step 8:Installing the SERVERDB.
Step 9:Verifying the first installation.
Step 10:Creating a data source in the ODBC driver.
Step 11:Demo (optional).
Note:
The Adabas software provided is the same for all Windows platforms . The operating systems are
distinguished at runtime.
Step 1: Creating the Database Administrator
To perform the steps described in this section, use the "User Manager" program in the "Administrative
Tools" folder.
-Use the "User / New User" menu item to define the database administrator, e.g. "sag", to which all of the
Software AG products installed at your site belong. The user "sag" must belong to the group of
administrators. The user "sag" defines new databases. Services in Windows can only be installed by
administrators.
-Define the "Adabas Operators" usergroup. This group administers existing databases without having
administrator privileges. An administrator can convey owner rights to himself for each directory and each
file on a computer, thus receiving full control over the Windows system. The "Adabas Operators" group
should only be able to administer the database. The user "sag" can also administer the database.
-All users obtain the right to use Adabas programs by default. This right can be restricted, if necessary.
Step 2: Logging in as the Database Administrator
Log in as the database administrator, e.g. "sag".
6
Adabas D: Installation under Windows
Installing and Setting Up Adabas D
Step 3: Checking System Resources
Disk Space
On the available hard disks, there must be sufficient space for the SERVERDB, the Adabas software, and
the diagnose files:
- Adabas software ("Standart setup")
ca. 180 MB
- SERVERDB
at least 20 MB
- diagnose files
ca. 2 MB
The minimum size of the SERVERDB results from one data devspace (12 MB) and one log devspace (8
MB) when using log mode SINGLE or DEMO.
System Parameters
The Adabas kernel of a started SERVERDB needs the following system resources: message queues,
shared memory segments, and semaphores.
The number and size of these system resources depend on the SERVERDB configuration (e.g., the
number of users).
The configuration of the SERVERDB is described by a parameter file. The required system resources are
calculated from these parameters.
Adabas Software Directory Structure Overview
The following essential files and subdirectories are created in the Adabas software directory (DBROOT)
(if selected during installation):
7
Installing and Setting Up Adabas D
Adabas D: Installation under Windows
%DBROOT%\READ*.* Text files containing information about the current version
in English or German.
%DBROOT%\AccessPl AccessPlus files.
%DBROOT%\bin
User commands for the Adabas programs.
%DBROOT%\config
Contains the parameter files of the individual databases.
%DBROOT%\demo\eng Demonstration programs for Load, ODBC, JDBC, and
precompilers with explanations in English
(analogously: "%DBROOT%\demo\deu" with explanations
in German)
%DBROOT%\demo\Setup Installation files containing the data for the demonstration
programs
%DBROOT%\env
Messages and HELP files. (Note: No MS help format!)
%DBROOT%\incl
Precompiler include files.
%DBROOT%\lib
Libraries for the precompilers.
%DBROOT%\misc
Analysis tools.
%DBROOT%\pgm
Executable programs, analysis tools, precompilers.
%DBROOT%\Tcl
Files used by the TK/Tcl components
%DBROOT%\wrk
Default directory where RUNDIRECTORY will be
created. The RUNDIRECTORY keeps the diagnose files.
%DBROOT%\WRK\MYDB
Rundirectory of the provided MYDB ServerDB
Step 4: Installing the Adabas Software
Setup Program
Under Windows the installation of the Adabas software is done by the database administrator, e.g. "sag".
This user must belong to the group of administrators. The setup program is only available in English.
To install the software, proceed as follows:
1. Start "setup.exe".
Insert the installation CD and call "setup.exe" according to the CPU type using the File Manager.
2. "Welcome" dialog.
Click on the "Next" button to terminate the welcome dialog.
8
Adabas D: Installation under Windows
Installing and Setting Up Adabas D
3. "Software AG Licensing Agreement" dialog.
Read the license agreement (using the scrollbar).
Click on the "Yes" button to accept it.
4. "Previous Adabas D DB Information" dialog
The installation program checks your computer and displays information about already existing
Adabas D ServerDB(s), if available.
5. "Customer Information" dialog
Enter your customer information and click on the “Next” button.
6. "Setup Type" dialog.
Select "Standard Setup", "Clients Setup", "ODBC Only" or " Runtime Only" from the options.
"Standard Setup" is the default for the database server containing most common Adabas components,
such as the database kernel and the Adabas clients.
"Clients Setup" contains the Adabas clients, such as Query and Domain.
"ODBC Only" contains the ODBC Driver, no clients.
"Runtime Only" contains the database kernel and control. Clients will not be installed.
7. "Custom Setup" dialog.
If you have selected "Standard Setup" or "Clients Setup", then the "Custom Setup" dialog is opened.
In this dialog you can select lower level sub-components.
If you do not need one or more of the components provided (such as Demo, WebDB or the MYDB
sample ServerDB), then deselect the corresponding component by selecting “This feature will not be
available” in corresponding drop-down box.
To select a component, choose “This feature will be installed on local hard drive” in corresponding
drop-down box.
In this dialog you can change also target location directories for selected Adabas components.
8. Specifying the location of the license file.
If you have selected to install the “Runtime” component, then installation program offers to select the
license file.
Use the "Browse" button to specify the license file.
9
Installing and Setting Up Adabas D
Adabas D: Installation under Windows
Warning:
If no license file (available at Software AG Darmstadt) can be
found at the specified location, an Adabas D version restricted
with regard to the number of users, amount of data, and number
of CPUs but with full functionality can be installed. These
restrictions can be removed by providing a license file at a later
time.
9. "Ready to Install the Program" dialog
Click on “Install” button to start installing the software.
10. Click on “Finish” in “InstallShield Wizard Completed” dialog to finish the installation.
Manually Deactivating/Activating Remote SQL
If TCP/IP is no longer available (for example, because it was deinstalled or does not work correctly),
REMOTE SQL must be deactivated in order that work with Adabas can be continued. To do this, the
following steps must be performed:
1. Terminate all active SERVERDBs.
All SERVERDBs started on the computer must be shut down and stopped if this has not been done
yet (Control: Shutdown / Offline). Afterwards, Control must be left (Exit).
2. Stop the Remote SQL Server (Control: Options / Remote SQL Server / Stop).
3. Terminate all running Adabas programs.
4. Copy file %DBROOT%\pgm\sqltcpn.dll to Windows System32 folder (usually:
“c:\Winnt\system32”) and rename it to sqltcp.dll (overwrite existing file).
Now REMOTE SQL is deactivated. You can only access local SERVERDBs.
To activate REMOTE SQL at a later point in time (e.g., for a later installation of TCP/IP), do the
following:
1. Install the TCP/IP software.
2. Terminate all active SERVERDBs.
All SERVERDBs started on the computer must be shut down and stopped if this has not been done
yet (Control: Shutdown / Offline).
3. Afterwards, Control must be left (Exit).
4. Terminate all running Adabas programs.
5. Copy file %DBROOT%\pgm\sqltcp1.dll to Windows System32 folder (usually:
“c:\Winnt\system32”) and rename it to sqltcp.dll (overwrite existing file).
10
Adabas D: Installation under Windows
Installing and Setting Up Adabas D
6. Start the Remote SQL Server (Control: Options / Remote SQL Server / Start).
REMOTE SQL is activated now, enabling you to access either local or remote SERVERDBs.
Step 5: Reading the README Files
If README files are included, read them before proceeding.
Step 6: Defining the Optional Environment Variables
%SERVERDB%=... SERVERDB denotes the name of the SERVERDB.
%DBCHARSET%=... DBCHARSET must be set to IBM437_Ger in order that the Adabas tool
Xload represents the German umlauts correctly.
SERVERDB (in Adabas 6.1.1: %DBNAME%) and DBCHARSET can be set for the whole system, for a
specific user or session, because these variables are only relevant to applications, not to the Adabas
database kernel.
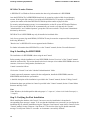
Step 7: Setting Access Rights
%DBROOT%
System Full Control
Administrators Full Control
Adabas Operators Full Control
Everyone Read
%DBROOT%\config
System Full Control
Administrators Full Control
Adabas Operators Full Control
Setting Optional Environment Variables
%DBCONFIG% DBCONFIG denotes the directory where the current configuration files of the
SERVERDBs are located (default: %DBROOT%).
%DBWORK%
DBWORK denotes the directory where the work files of the SERVERDBs are
located (default: "%DBROOT%).
The subdirectory "%DBWORK%/wrk" is the default directory for the
RUNDIRECTORY (containing the work directories of the SERVERDBs); the
subdirectory "%DBWORK%/config" is the default directory for the
BACKUPDIRECTORY (containing copies of the parameter files of the
SERVERDBs).
11
Installing and Setting Up Adabas D
Adabas D: Installation under Windows
DEVSPACEs under Windows
A DEVSPACE is a Windows file that contains the data or log information of a SERVERDB.
One data DEVSPACE of a SERVERDB should only be created on a physical disk for performance
reasons. If the logical disk consists of several physical DEVSPACEs, for example, as with RAID-5
systems, the number of the data DEVSPACEs should equal the number of physical disks.
For security and performance reasons, it is recommended to use the file system NTFS under Windows.
The access rights on the DEVSPACEs are automatically set in such a way that only the "System",
"Administrators", and "Adabas Operators" groups have full access to them. This prevents unintentional
deletions by other users.
DEVSPACEs of a SERVERDB may only be installed on local hard disks.
Only for test systems (log mode DEMO), DEVSPACEs may be created as compressed files (compression
done using Windows).
"Raw devices" as DEVSPACEs are not supported under Windows.
For further information about DEVSPACEs, see the "Control" manual, Section "Serverdb Structure".
Step 8: Installing the SERVERDB
The installation of a SERVERDB is done using the tool Control.
Before starting with the installation of a new SERVERDB, Section "Overview" of the "Control" manual
should be read carefully. This section describes the basic concepts of an Adabas SERVERDB as there are:
structure, client-server configuration, distribution, etc.
Control is started as follows:
Click on the "Control" icon in the "Adabas D Administration" folder.
Control requests all parameters required for the configuration, installs the SERVERDB, starts the
SERVERDB, and installs the system tables.
A detailed description of the installation is provided in the "Control" manual, Section "Calling Control" .
Information about user guidance in Control is provided in the "Control" manual, Section "Control Menu
Structure and Help Texts".
Note:
Under Windows, the default path for addressing tapes is "\\.\tape<n>", where n is 0 for the first tape (i.e.,
"\\.\tape0").
Step 9: Verifying the First Installation
While installing the database with Control, if an error occurs, the installation is aborted and a
corresponding error message is output. To be sure that the installation was successful, you can display the
installation log file after the installation using the "Diagnose / Inst Protocol" menu item in Control (see the
"Control" manual, Section "Diagnose / Inst Protocol"). The last line of the log file should contain the
message "Load System Tables to <serverdb> on <hostname> successfully finished".
12
Adabas D: Installation under Windows
Installing and Setting Up Adabas D
Step 10: Creating a Data Source in the ODBC Driver
To be able to work with the QueryPlus or AccessPlus tool, a data source must have been created in the
ODBC Manager.
A data source is created as follows:
1.Start the ODBC administrator in the "Adabas D Administration" folder.
2.To create a new ODBC data source for Adabas, click on the Add button. A window with a list of the
installed ODBC drivers appears.
3.Select the "Adabas D" entry from the "Installed ODBC Drivers" list. Click on OK. The "Adabas ODBC
Setup" window appears.
In this window, the following parameters must be filled in:
Data Source A unique name for the data source. This can be the name of the
Name :
Adabas database (SERVERDB) or a synonym for it, e.g.,
"CustomerDB".
Description
:
A comment to describe the database may be entered, e.g., "Berlin
Customer Database". You are free to fill in this field or not.
Serverdb :
Enter the database name (SERVERDB), e.g., "DB10".
Servernode : Enter the node name of the database server (SERVERNODE), e.g.,
"dbserver1".
All parameters required must be filled in before you can click the OK button to save the settings.
The newly installed Adabas data source then appears in the "Data Sources (Driver)" list of the ODBC
administrator. The name of the ODBC driver, "Adabas D", is indicated after the name of the data source,
enclosed in parentheses.
Repeat Step 2 to create more data sources for Adabas databases (SERVERDBs).
After successful installation of data sources for all SERVERDBs, select Close to leave the ODBC
administrator.
Notes: The ODBC administrator can be called up any time subsequent to the installation to change the
settings or to configure entries for additional SERVERDBs. Double-click on the "ODBC Administrator"
program icon in the Adabas program group to start the ODBC administrator.
To change options, select the corresponding Adabas data source (DataSource) and click on Setup...
To configure a new Adabas data source , e.g., for another SERVERDB, proceed as described for Step 2.
To delete a data source no longer needed, select it in the list of data sources and click on Delete .
13
Installing and Setting Up Adabas D
Adabas D: Installation under Windows
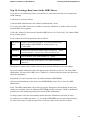
Step 11: Demo
With each Adabas version, demonstration files are distributed. A description of their installation and usage
in English is contained in the "EREADME.txt" file in the "%DBROOT%\demo\eng"directory (in German
in the "README.txt" file in the "%DBROOT%\demo\deu" directory).
The following users and tables are predefined in the provided ’MYDB’ ServerDB. So you can work
immediately with the demonstration database after rebooting.
User names and passwords in the English version of the demo:
User name
Password
NorthWind sample:
EDEMO
EDEMO
SQLTRAVEL sample:
SQLTRAVEL00
TRAVEL00
SQLTRAVEL10
TRAVEL10
SQLTRAVEL20
TRAVEL20
WEBDEMO
WEBDEMO
WebDB sample:
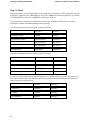
User names and passwords in the German version of the demo:
User name
Password
Nordwind sample:
DEMO
DEMO
SQLREISEN sample:
SQLREISEN00
REISEN00
SQLREISEN10
REISEN10
SQLREISEN20
REISEN20
For specific database administration and operating tasks (e.g. doing a backup), you may need to know the
user names and passwords of the following special users (please read the documentation first before you
start to work as one of those users):
User name
Password
Control User
CONTROL
ADABAs
SYSDBA
ADABAS
ADABAS
User DOMAIN
DOMAIN
ADABAS
14
Adabas D: Installation under Windows
Installing and Setting Up Adabas D
Update Installation
Step 1: Checking System Resources
Check disk space requirements as described in Section "First Installation".
Step 2: Stopping the SERVERDB And All Other Adabas Programs
Stop the SERVERDB with the Control "Shutdown / Offline" menu item (see the "Control" manual,
Section "Operating / Shutdown").
Terminate all running Adabas programs.
Step 3: Saving an Existing Adabas Version
Save the existing version of Adabas (indispensable).
When doing so, think of %DBROOT%\CONFIG!
Step 4: Installing the Software
Install the software from CD-ROM using the "setup.exe".
Step 5: Reading the README Files
If README files are included, read them before proceeding.
Step 6: Checking the Parameters
Check and, if necessary, update the parameters of the embedding in the operating system with the Control
"Alter Parameters" menu item (see the "Control" manual, Section "Configuration / Alter Parameters").
Step 7: Restarting the SERVERDB
Restart the SERVERDB with the Control "Restart" menu item (see the "Control" manual, Section
"Operating / Restart").
Step 8: Updating the System Tables
Install the system tables with the Control "Load Systables" menu item (see the "Control" manual, Section
"Configuration / Load System Tables").
Step 9: Verifying the Update Installation
Verify the installation with the Control "Diagnose / Inst Protocol" menu item; message: "Load System
Tables to <serverdb> on <hostname> successfully finished" (see the "Control" manual, Section "Diagnose
/ Inst Protocol").
15
Installing and Setting Up Adabas D
Adabas D: Installation under Windows
Step 10: Saving the SERVERDB
After a successful update installation, perform a complete save of the SERVERDB using the Control
"Backup / Save / Data" menu item (see the "Control" manual, Section "Backup / Save / Data").
16
Adabas D: Installation under Windows
Supporting National Special Characters (ASCII)
Supporting National Special Characters
(ASCII)
The following procedure can be chosen if national special characters (such as the German umlauts) are to
be used that are contained in the ASCII code.
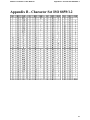
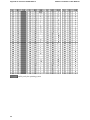
All ASCII data is internally stored according to ISO 8859/1.2. The corresponding code table can be found
in "Appendix B - Character Set ISO 8859/1.2".
The following is true for the input, output, and sort of national special characters:
-DBCHARSET must be set to IBM437_Ger in order that the Adabas tool Xload represents the German
umlauts correctly. Other tools, such as QueryPlus and Domain, do not need this environment variable.
-In the Adabas database, characters or character strings are sorted according to the code ISO 8859/1.2; i.e.,
if national special characters in a sorted output are to be ordered in a way different from this code, then a
language-specific table for the mapping of codes must be defined for this purpose (see Section "Sorting
National Special Characters").
This chapter covers the following topics:
Sorting National Special Characters
Sorting National Special Characters
As Adabas uses the ISO 8859/1.2 code for a sort of the alphanumeric characters or character strings, and
as national specific characters in this code follow all the other "normal" alphanumeric characters,
character strings containing the national special characters would be output at the wrong place according
to the usual conventions. The word "Änderung", e.g., would be output after the word "Zeichenkette", or
"Größe" after "Grund".
This effect can be resolved using a table for the mapping of codes, MAPCHAR SET (see the "Control"
manual, Section "Configuration / Alter Parameters / Mapchar Set"), that ensures a correct sort. In this
MAPCHAR SET, another notation can be assigned to the national special characters in such a way that
these will be arranged in the desired order when being sorted (see the "Reference" manual, Section
"Common Elements, <string function>"). For example, if the alternative notation "A" is assigned to the
character "Ä", and the function "mapchar" is applied to the sort criterion when reading from the database,
the word "Änderung" will be output before the word "Anfang".
Adabas also uses MAPCHAR SETs to support the NLS sort as known from ORACLE.
17
Appendix A - Keyboard Layout
Adabas D: Installation under Windows
Appendix A - Keyboard Layout
This chapter covers the following topics:
Keyboard Layouts of the Adabas Tools
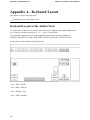
Keyboard Layouts of the Adabas Tools
To use the tools of Adabas, the user needs some special keys in addition to the standard alphanumeric
keys. These keys are the function keys F1 , F2 , ... up to F12 and ENTER .
For comfortable operation, the tools support additional function keys; the most important are:
INSERT CHAR, DELETE CHAR, CMD, INSERT LINE, DELETE LINE, DELETE TO EOL .
Keyboard Layout under Windows (MF2 Keyboard)
<Ctrl> <INS>:<INS-B>
<Ctrl> <DEL>:<DEL-B>
<Ctrl> <HOME>:<Top>
<Ctrl> <END>:<Bottom>
18
Adabas D: Installation under Windows
Appendix B - Character Set ISO 8859/1.2
Appendix B - Character Set ISO 8859/1.2
19
Appendix B - Character Set ISO 8859/1.2
possibly set by the operating system
20
Adabas D: Installation under Windows