1
Version 13
Access Plus
This document applies to Adabas D Version 13 and to all subsequent releases.
Specifications contained herein are subject to change and these changes will be reported in subsequent
release notes or new editions.
© Copyright Software AG 2004
All rights reserved.
The name Software AG and/or all Software AG product names are either trademarks or registered
trademarks of Software AG. Other company and product names mentioned herein may be trademarks of
their respective owners.
Adabas D: Access Plus
AccessPlus
Table of Contents
AccessPlus .
.
.
.
.
.
.
.
.
.
.
AccessPlus
.
.
.
.
.
.
.
.
.
.
Introduction .
.
.
.
.
.
.
.
.
.
.
Introduction
.
.
.
.
.
.
.
.
.
.
Installing AccessPlus .
.
.
.
.
.
.
.
.
Installing AccessPlus
.
.
.
.
.
.
.
.
Requirements
.
.
.
.
.
.
.
.
.
Starting AccessPlus .
.
.
.
.
.
.
.
Connecting to the Database
.
.
.
.
.
.
The Attaching Wizard .
.
.
.
.
.
.
.
The Attaching Wizard .
.
.
.
.
.
.
.
Setting the Options .
.
.
.
.
.
.
.
Selecting the Tables to be Attached .
.
.
.
.
Attaching the Tables .
.
.
.
.
.
.
.
The Upsizing Wizard .
.
.
.
.
.
.
.
.
The Upsizing Wizard
.
.
.
.
.
.
.
.
Upsizing
.
.
.
.
.
.
.
.
.
.
Scenario .
.
.
.
.
.
.
.
.
.
.
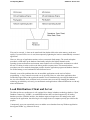
Limitations of Monolithic Applications .
.
.
.
Load Distribution: Client and Server
.
.
.
.
Advantages of a Client/Server Architecture .
.
.
Preparations .
.
.
.
.
.
.
.
.
.
Backing up the Microsoft Access Database .
.
.
Selecting a Microsoft Access Database .
.
.
.
Exporting Microsoft Access Tables to Adabas .
.
Setting the Options .
.
.
.
.
.
.
.
Selecting the Tables .
.
.
.
.
.
.
.
Converting Identifiers .
.
.
.
.
.
.
.
Migrating the Tables .
.
.
.
.
.
.
.
The Upsizing Report .
.
.
.
.
.
.
.
Verifying the Success of Migration .
.
.
.
.
Problems That Can Occur During the Migration Process
What You Can Expect from Upsizing .
.
.
.
.
What You Can Expect from Upsizing .
.
.
.
.
Which Applications Benefit from Upsizing .
.
.
What Difficulties You Can Expect .
.
.
.
.
SQL and Jet Engine .
.
.
.
.
.
.
.
.
SQL and Jet Engine .
.
.
.
.
.
.
.
.
Applications Using the Jet Engine .
.
.
.
.
Applications without Jet Engine
.
.
.
.
.
Programming the ODBC API
.
.
.
.
.
Programming with the RDO Data Model .
.
.
Only a Preliminary Step .
.
.
.
.
.
.
.
Only a Preliminary Step .
.
.
.
.
.
.
.
.
.
.
.
.
.
.
.
.
.
.
.
.
.
.
.
.
.
.
.
.
.
.
.
.
.
.
.
.
.
.
.
.
.
.
.
.
.
.
.
.
.
.
.
.
.
.
.
.
.
.
.
.
.
.
.
.
.
.
.
.
.
.
.
.
.
.
.
.
.
.
.
.
.
.
.
.
.
.
.
.
.
.
.
.
.
.
.
.
.
.
.
.
.
.
.
.
.
.
.
.
.
.
.
.
.
.
.
.
.
.
.
.
.
.
.
.
.
.
.
.
.
.
.
.
.
.
.
.
.
.
.
.
.
.
.
.
.
.
.
.
.
.
.
.
.
.
.
.
.
.
.
.
.
.
.
.
.
.
.
.
.
.
.
.
.
.
.
.
.
.
.
.
.
.
.
.
.
.
.
.
.
.
.
.
.
.
.
.
.
.
.
.
.
.
.
.
.
.
.
.
.
.
.
.
.
.
.
.
.
.
.
.
.
.
.
.
.
.
.
.
.
.
.
.
.
.
.
.
.
.
.
.
.
.
.
.
.
.
.
.
.
.
.
.
.
.
.
.
.
.
.
.
.
.
.
.
.
.
.
.
.
.
.
.
.
.
.
.
.
.
.
.
.
.
.
.
.
.
.
.
.
.
.
.
.
.
.
.
.
.
.
.
.
.
.
.
.
.
.
.
.
.
.
.
.
.
.
.
.
.
.
.
.
.
.
.
.
.
.
.
.
.
.
.
.
.
.
.
.
.
.
.
.
.
.
.
.
.
.
.
.
.
.
.
.
.
.
.
.
.
.
.
.
.
.
.
.
.
.
.
.
.
.
.
.
.
.
.
.
.
.
.
.
.
.
.
.
.
.
.
.
.
.
.
.
.
.
.
.
.
.
.
.
.
.
1
1
2
2
3
3
4
4
5
6
6
6
7
7
8
8
8
9
9
10
11
12
13
13
13
14
16
17
18
19
19
22
24
24
24
25
27
27
31
33
33
35
36
36
i
Adabas D: Access Plus
AccessPlus
AccessPlus
Introduction
Installing AccessPlus
The Attaching Wizard
The Upsizing Wizard
What You Can Expect from Upsizing
SQL and Jet Engine
Only a Preliminary Step
1
Introduction
Adabas D: Access Plus
Introduction
Adabas AccessPlus is an add-in library for Microsoft. AccessPlus contains two wizards, the Adabas D
Attaching Wizard and the Adabas D Upsizing Wizard , which make it considerably easier to attach
Adabas tables to Access databases and to migrate existing Access tables to Adabas.
For explanations of how to work with the Attaching Wizard and the Upsizing Wizard, see Sections "The
Attaching Wizard" and "The Upsizing Wizard".
Three different Adabas AccessPlus versions are distributed in order to support the different Access
versions such as Microsoft Access 2.0 (16 bits), Microsoft Access 95 (32 bits), and Microsoft Access 97
(32 bits). These versions are identical in their functionality. They operate on all databases of Adabas D if
an ODBC driver has been installed.
The user guidance texts within the Upsizing Wizard always appear in English even if you installed another
localized version of Microsoft Access or Microsoft Windows.
2
Adabas D: Access Plus
Installing AccessPlus
Installing AccessPlus
Before you can work with AccessPlus, you must install it in Microsoft Access as an add-in. This can be
done using the Microsoft Access Add-in Manager. If you did not select the Add-in Manager when
installing Access, use your Microsoft disks or CD to install it.
Installation Using the Add-in Manager
1. To start the Microsoft Access Add-in Manager, choose Add-ins from the File menu, followed by the
Add-in Manager item. The Add-in Manager displays a list of all the add-ins (libraries) in your
Microsoft Access directory.
2. To install AccessPlus as an add-in, click the Add New button. Microsoft Access displays the Add
New Library Dialog. Change to the Adabas installation directory, and select the AccessPl
subdirectory. According to the Access version used, load the ACCESSPL.MDA file from the
subdireectory 2.0 (for the 16-bit version), or 7.0 (for the Office 95 version), or 8.0 (for the Office 97
version). Click the Ok button.
Microsoft Access then copies the add-in library to your Microsoft Access directory and inserts a new
item in the list of available add-ins.
3. Once AccessPlus is installed, click the Close button.
A message appears, telling you that you must restart Microsoft Access before the AccessPlus option
will appear in the Add-in menu.
See also: "Using the Add-in Manager to Install Add-in" in Chapter 15 of the Microsoft Access
manual entitled "Building Applications".
If the Add-in Manager is not made available to you, you must make the necessary changes to the
MSACC20.INI file manually.
Installation Without the Add-in Manager
1. Copy the ACCESSPL.MDA file from the Adabas installation directory to your Microsoft Access 2.0
directory.
2. Load the MSACC20.INI file in an editor. This file is located in the Windows directory.
3. Enter the following line in the [Menu Add-Ins] section:
Adabas
AccessPlus==Adabas_D_AccessPlus()
4. Enter the following line in the [Libraries] section:
accesspl.mda=rw
5. Save the MSACC20.INI file, and exit the editor.
3
Installing AccessPlus
Adabas D: Access Plus
The next time you call Microsoft Access, Adabas D Access Plus should appear in the Add-ins menu.
This chapter covers the following topics:
Requirements
Starting AccessPlus
Connecting to the Database
Requirements
AccessPlus places the following requirements on the server and client:
Server
Adabas D Database Version 12
Client
Adabas AccessPlus
Adabas OBDC driver
ODBC data source
Microsoft Access Version 2, Version 7 (Office 95), or Version 8 (Office 97)
Microsoft Access Service Pack (recommended)
To find out how to install the Adabas ODBC driver, see the "Installation under Windows" manual. To find
out how to create an ODBC data source, see the "User Manual ODBC".
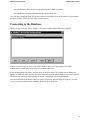
Starting AccessPlus
To start AccessPlus, proceed as follows:
1. Open the Microsoft Access database to which you wish to attach the Adabas tables or from which
you wish to migrate Microsoft Access tables to Adabas.
If you wish to use the Upsizing Wizard, you should activate the Exclusive-option when you open the
database to ensure that your database cannot be changed by other users during the migration process.
2. 2.To start AccessPlus choose Adabas D AccessPlus from the Add-ins menu.
In the screen displayed then, you can call either the Attaching Wizard or the Upsizing Wizard by
clicking on the corresponding button.
You can move from one dialog box to another using the Next> and <Back buttons. Once you have
made a selection in a dialog box, click the Next> button to branch to the next dialog box. The <Back
button takes you back to the previous dialog box.
4
Adabas D: Access Plus
Installing AccessPlus
The Cancel button cancels all processing and terminates Adabas AccessPlus.
The Help button calls help information for the relevant dialog box.
Once you have completed all the dialog boxes and have reached the last box, the Attach or Upsize button
becomes available, which you can click to start the process.
Connecting to the Database
When you start one of the Adabas wizards, a list of the available Adabas data sources appears.
If there is no data source for the desired Adabas database, click on the New button. The ODBC
Administrator is called and you can create a new ODBC data source .
Select the appropriate data source, and then click on the Next button. The Adabas connect dialog box
appears, in which you must enter the user name and password of the Adabas database user. Once you have
confirmed your entries by clicking on the Ok button, a connection is set up to the database.
Once the connection to the database has been set up successfully, the next dialog box appears, in which
you can set various options for the Attaching Wizard or Upsizing Wizard.
5
The Attaching Wizard
Adabas D: Access Plus
The Attaching Wizard
The Attaching Wizard provides you with a simple and convenient means of selecting tables from an
Adabas database and attaching them to a Microsoft Access database. You can reduce the length of the list
of Adabas tables by specifying a search pattern, and you can view the definition of an individual table
before attaching it.
This chapter covers the following topics:
Setting the Options
Selecting the Tables to be Attached
Attaching the Tables
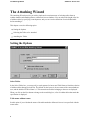
Setting the Options
Select Tables
In the Select Tables box, you can specify a search pattern for Owner and Table Name to limit the selection
of Adabas tables that appear in the list. The default for the Owner is the user name of the current database
user, and the default for Table Name is *. This means that all tables belonging to the user are displayed.
When you click on the Next button to change to the next dialog box, a list of Adabas tables that match the
specification is displayed.
Table name without owner
Set this option if you wish that the name of the table attached to Microsoft Access is not prefixed with the
owner name.
6
Adabas D: Access Plus
The Attaching Wizard
Save login ID and password locally
Select Save login ID and password locally if you do not wish to be asked for the user parameters when
you first open the table in a new Microsoft Access session. In this way, Microsoft Access saves the user
name and the password for the attached table and automatically uses it to set up the connection to the
Adabas database.
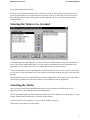
Selecting the Tables to be Attached
On the left-hand side of the dialog box you will find the list of Adabas tables to which you currently have
access. Enter all the Adabas tables that you wish to attach to your Microsoft Access application on the
right-hand side. You must select at least one Adabas table in order to start the process.
Use the arrow buttons to move individual tables or all tables from the list on the left to the list on the right
or vice versa. Use the Add button to move the currently selected entry from the list on the left to the list on
the right.
The Info button lets you view the definition of a selected Adabas table. This is useful if you wish to know
what fields are contained in a table before linking it to your Microsoft Access application.
Attaching the Tables
Once you have selected all the ABABAS tables that you wish to attach to your Microsoft Access
application, click on the Attach button to start attaching them.
The selected Adabas tables are then attached to the Microsoft Access database one after the other. A status
window indicates which Adabas table is currently being attached.
Once the tables have been attached, you can use them in Microsoft Access.
Click on the Close button to exit AccessPlus.
7
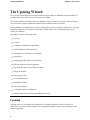
The Upsizing Wizard
Adabas D: Access Plus
The Upsizing Wizard
The Upsizing Wizard allows you to migrate Microsoft Access tables to ABABAS. Various attributes of
the Microsoft Access tables can also be transferred to Adabas.
You can also modify your Microsoft Access database in such a way that your queries, forms and reports
are based on the exported Adabas tables instead of the local Microsoft Access tables.
These guidelines are intended for users whose existing Microsoft Access database application is no longer
powerful enough due to an increase in the number of users and the size of the database and who are
looking for a solution.
This chapter covers the following topics:
Upsizing
Scenario
Limitations of Monolithic Applications
Load Distribution: Client and Server
Advantages of a Client/Server Architecture
Preparations
Backing up the Microsoft Access Database
Selecting a Microsoft Access Database
Exporting Microsoft Access Tables to Adabas
Setting the Options
Selecting the Tables
Converting Identifiers
Migrating the Tables
The Upsizing Report
Verifying the Success of Migration
Problems That Can Occur During the Migration Process
Upsizing
Upsizing allows you to distribute the components of a database application within a client/server
architecture so as to take full advantage of your configuration and thus improve the performance of the
database application.
8
Adabas D: Access Plus
The Upsizing Wizard
Scenario
This scenario has as its starting point an expanded database application based on Microsoft Access, the
database product from Microsoft. As a result of the support provided by Microsoft Access for generating
tables, queries, input screens and printed reports, applications that started out as single-user solutions for
one or only a small number of users often expand and grow on the functional level. Applications of this
type provide the best support for the user group within which (and out of which) they are created, since
they are precisely tailored to meet the group’s specific needs. When they reach a certain size and exceed
Microsoft Access’s quantity schedule, however, technical difficulties can arise that make their usefulness
questionable.
Such applications are characteristically designed to scan and update the data sets on the computer on
which the user enters data and performs queries. Although these functions are divided between two
different programs, it is essential that both programs be running on the same computer. For this reason, the
organization of such applications can be described as monolithic , i.e. blocklike (as opposed to distributed
or client/server applications).
Limitations of Monolithic Applications
The file or files in which the data sets are stored can be located on the hard disk(s) of the same computer
or of another computer in the network (e.g. on a file server ).
9
The Upsizing Wizard
Adabas D: Access Plus
Files can be accessed, i.e. data can be transferred from the hard disk to the main memory, much more
rapidly if a powerful file server is used, thus temporarily lightening the load on a monolithically structured
application.
However, this type of application continues to have a structural disadvantage: The search and update
procedures, which make up the database functionality and place the highest demands on the
operating-system and hardware environment, must continue to be executed on the workstation on which
the user is working in order to achieve the fastest possible response times. This means that these
procedures can never match the throughput possible when the application program and database function
are divided among several workstations and a dedicated server.
Naturally, some of the problems that arise in monolithic applications are the result of inferior
programming, i.e. they cannot be corrected even by upsizing. However, when these applications have
reached their upper limits with regard to the number of users simultaneously accessing the database and
the size of the database, their usefulness has by no means come to an end. By changing the database
technology on which they are based, you can maintain such applications without modification or with only
minor modifications.
Load Distribution: Client and Server
The Microsoft Access architecture is well equipped for a change in database technology thanks to "Open
Database Connectivity" (ODBC) , an established interface that is used and supported by all leading
database providers. With this interface, the database engine no longer has to be running on the same
computer as the application, thus allowing it to be swapped out to a computer specially provided for this
purpose.
Consequently, users can conveniently access an Adabas server database from any Windows application
that supports ODBC (e.g. Microsoft Access).
10
Adabas D: Access Plus
The Upsizing Wizard
Using development tools such as Visual Basic or Powerbuilder, programmers can generate Windows
applications that use the ODBC functions for accessing the database.
For a description of known restrictions and special characteristics of Windows applications or
development tools that have been tested in conjunction with the Adabas ODBC driver , see the "User
Manual ODBC". Keep these restrictions in mind in order to achieve the best possible link between the
relevant ODBC application and Adabas.
Dividing the application between two different computers is called upsizing , since it increases the power
of the database by a quantum leap. One of the parts created – the existing Microsoft Access application –
is referred to in this context as the client; the other part, which manages the data in the tables, performs
queries and updates data hidden from the user, is the server. When the two parts run on different
computers, this is called a client/server application or a client/server architecture .
An ODBC interface is not required for dividing an application between a client and server; other variants
are also conceivable and can be quite useful. However, no other distribution permits migration without
modifying the application or modifying it only slightly. This is an important advantage when migrating
applications that are overly complex or whose source text is unavailable or cannot be edited.
Advantages of a Client/Server Architecture
The following are most important advantages of a client/server architecture:
It reduces the load on the workstation on which the application is running because queries are
processed, tables are scanned, etc., on another computer that is specially equipped for these
operations.
11
The Upsizing Wizard
Adabas D: Access Plus
It reduces the load on the network because only the result of a search is transported to the workstation
and not all the data that was scanned.
As the scope of the database grows, the workstations do not have to be equipped with additional
disks or memory. These changes affect only the computer on which the server database runs.
Migration to a client/server architecture can significantly improve the performance of an application
without requiring that workstations on which the client is executed be modified. Certain requirements for
multi-user operation, such as the selective locking of individual data rows , only become possible when
Adabas is used as a server database.
Using Adabas as a server database opens up the application to multiple users and large amounts of data.
You are provided with all the options available with a professional database management system with
regard to availability, scalability, permissions, support for data backup and many other features.
Preparations
Before you can migrate a Microsoft Access database, you need an Adabas database user and an ODBC
data source. You should make a backup copy of the Microsoft Access database.
Creating a User
To migrate tables from a Microsoft Access database, the corresponding Adabas database must contain a
user to whom the tables exported from Microsoft Access can be assigned. In other words, this user will be
the owner of the migrated tables.
The user must have the access rights of a DBA and must also be authorized to open several database
sessions simultaneously (NOT EXCLUSIVE option) . The maximum disk space available to this user,
which is defined by means of the PERMLIMIT value, must be enough to accommodate the data.
The user should be given the name of the Microsoft Access database or of the application, because this
will facilitate the common backup, export and authorization of all tables belonging to an application.
If there is as yet no such database user, you can create one using Adabas Domain. However, you can also
issue a CREATE USER statement from Microsoft Access by means of an SQL Pass-Through Query .
Example:
CREATE USER nwind PASSWORD secret DBA NOT EXCLUSIVE
For more information, see Section "Authorization, <create user statement>" in the "Reference" manual.
Creating an ODBC Data Source
Make sure that you have created an ODBC data source for the Adabas database to which you wish to
migrate Microsoft Access tables.
To create an ODBC data source, use the ODBC Administrator. You will find more information on
creating a data source for an Adabas database in the "User Manual ODBC".
12
Adabas D: Access Plus
The Upsizing Wizard
Backing up the Microsoft Access Database
Before migrating your Microsoft Access database, you should make a backup copy. The Upsizing Wizard
does not delete any data or objects from your Microsoft Access database, but tables are renamed if
necessary.
Selecting a Microsoft Access Database
Only Microsoft Access tables can be migrated using the Upsizing Wizard. Some Microsoft Access
applications use two databases; the tables are contained in one database (the back end) and queries, forms,
reports, macros and modules in the other (the front end). The tables from the back end are attached to the
front end. Since the Upsizing Wizard ignores attached tables, you must use the back-end database.
The selection of the Microsoft Access tables that you wish to export to Adabas has a decisive influence on
the performance of your application.
A good Microsoft Access client/server application consists of a mixture of local tables and tables in the
server database. As a general rule, tables that are seldom modified should be kept in the local database and
tables that are often modified or are accessed by a large number of users should be exported.
Exporting Microsoft Access Tables to Adabas
This section provides a general description of the procedure for exporting Microsoft Access Tables to
Adabas. Subsequent sections will take you through the individual screens involved in the migration
process. When you click on the Upsizing Wizard button, the following occurs:
1. The Upsizing Wizard analyzes the local database, its tables, the attributes and indexes of these tables,
and the relationships between tables (if any were previously assigned by means of Edit /
Relationships).
2. You are informed of any changes that need to be made to critical identifiers (identifiers containing
characters that are not allowed in the Adabas database) and must decide whether to initiate the export
operation.
3. The Upsizing Wizard automatically creates a mirror image of each individual table and its indexes in
the server database. If any default values, validation rules or required options were defined for table
fields, they are also transferred to the target table. When this procedure has been completed and if the
Structure only, no data field was not selected beforehand, the table in the server database is filled
with the contents of the local table. In the final step, the local table is assigned its original name with
the extension "_local", e.g. a table with the name Customers would be named Customers_local after
upsizing. The local tables are then no longer needed and can be manually deleted from the database
once you have determined that the migration process was successful.
4. If the Attach exported tables field was selected when the migration process was initiated, the tables in
the server database are automatically attached to the Microsoft Access database. In order to permit
the attached tables to be addressed under their original names, the Upsizing Wizard generates a query
with the original table name for each table attached. Since queries and tables for Microsoft Access
applications are normally indistinguishable, this makes the swapping out of tables to the server
database transparent for the application.
13
The Upsizing Wizard
Adabas D: Access Plus
For a description of the individual steps in detail and in conjunction with the screens, see below.
Setting the Options
Export Options
If you wish to export only the table structure without the data, select Structure only, no data .
To export table attributes, select one or more of the following options:
- Primary Keys
- Default Values
- Indexes
- Validation Rules
- Relationships
- Required Options
After the Microsoft Access tables have been exported, an attempt is made to reproduce these attributes in
the newly created Adabas tables.
If you wish to export the relationships (table relationships) , you must export all the tables involved in a
relationship.
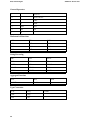
Some of the Microsoft Access attributes have different names in Adabas. The following list indicates the
names of the Microsoft Access attributes in Adabas:
14
Adabas D: Access Plus
The Upsizing Wizard
Microsoft Access
Adabas
Primary Key
Primary Key
Index
Index
Relationship
Referential Constraint or Foreign Key
Default Value
Default Value
Validation Rule
Constraint
Required Option
NOT NULL Attribute
The Adabas attributes are created using the Adabas Data Definition Language (DDL) .
The following list shows the SQL statements that are used to create the corresponding attributes:
Primary Key
ALTER TABLE <table name>
ADD PRIMARY KEY (<column name>, ...)
Index
CREATE [UNIQUE] INDEX <index name>
ON <table name> (<column name>, ... )
Relation
ALTER TABLE <table name>
FOREIGN KEY (<referencing column>, ...)
REFERENCE <referenced table>
[ON DELETE CASCADE]
Default Value
ALTER TABLE <table name>
ADD DEFAULT <default value>
Validation Rule
ALTER TABLE <table name>
ADD CONSTRAINT <constraint name>
CHECK <search condition>
Required Option
ALTER TABLE <table name>
COLUMN <column name>
NOT NULL
See also Section "Data Definition", in the "Reference" manual.
If an SQL statement cannot be executed during the migration process because, for example, it could not be
created correctly, it is displayed in a dialog box.
15
The Upsizing Wizard
Adabas D: Access Plus
You can then either correct the SQL statement and execute it again (using the Execute button), or you can
skip it (using the Skip button).
Attach Options
If you do not wish to attach the exported tables to your Microsoft Access database, clear the Attach
exported tables check box.
If the tables are already available in the server database, for example, because an attempt to export them
was not satisfactory, you can select Overwrite existing server tables to obtain that these tables are replaced
without a comment. You can also select this option later during the migration process.
Select Save login ID and password locally if you wish to save your user name and password for the
attached tables.
More Options
Uppercase Identifiers
Set this option if all identifiers (table names, field names) of the exported tables are to appear in
uppercases in the Adabas database.
Maximal Identifier Length
You can use this option to specify the maximum length of the identifiers for the exported tables in the
Adabas database.
Set Adabas D Comments
When this option is set, the descriptions of tables or fields are stored as comments in the Adabas system
tables.
Skip All Errors
Set this option if you do not wish that Adabas AccessPlus stops at each error to ask you to correct the SQL
statement.
Selecting the Tables
The selection of the Microsoft Access tables that you wish to export to Adabas has a decisive influence on
the performance of your application.
A good Microsoft Access client/server application consists of a mixture of local tables and tables in the
server database. As a general rule, tables that are seldom modified should be kept in the local database and
tables that are often modified or are accessed by a large number of users should be exported.
Note : Tables previously migrated and renamed by the Upsizing Wizard do not appear in the list of
available tables. You can alter this by giving the tables the suffix "_local" before starting the Upsizing
Wizard .
16
Adabas D: Access Plus
The Upsizing Wizard
On the left-hand side of the dialog box you will find the list of Microsoft Access tables. Enter all the
Microsoft Access tables that you wish to export to Adabas on the right-hand side. You must select at least
one Microsoft Access table to start the migration process.
Use the arrow buttons to move individual tables or all tables from the list on the left to the list on the right
or vice versa. Use the Add button to move the currently selected entry from the list on the left to the list on
the right.
The Info button lets you view the definition of a selected Microsoft Access table. This is useful if you
wish to know what fields are contained in a table before you export it to Adabas.
Once you have finished your selection, click on the Next button.
Converting Identifiers
In the Microsoft Access tables that you have selected, the system checks the identifiers (table names, field
names) to determine whether they are valid ODBC identifiers. If not, they are automatically converted to
valid ODBC identifiers.
A valid ODBC identifier can contain uppercase and lowercase letters (A-Z, a-z), digits (0-9) and the
underline character. All identifiers must begin with a letter.
In addition, the identifiers are adapted to whatever options are set, e.g. they might be converted to
uppercase letters and shortened to the maximum length selected.
If the conversion procedure results in duplicate identifiers, these identifiers are numbered consecutively.
Example:
17
The Upsizing Wizard
Adabas D: Access Plus
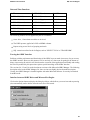
Selected Options
Uppercase Identifiers:
Yes
Max Identifier Length:
18
Original identifier
Converted identifier
’Employee Telephone Office’
’EMPLOYEE_TELEPHON1’
’Employee Telephone Private’
’EMPLOYEE_TELEPHON2’
The next screen lists all the identifiers and conversions that apply to the selected Microsoft Access tables.
If desired, this screen allows you to modify the converted identifiers to meet your own requirements.
The first column indicates whether the name is a table name or a field name. The second column specifies
the original name. The third column (check box) indicates whether or not the identifier has been modified
by Adabas AccessPlus; the fourth column displays any newly converted names.
The table is structured so that one table name is displayed at the top and below it are the names of the
fields belonging to the table.
The selection box at the top allows you to move directly to a specific table.
When you have finished editing the identifiers, you can begin migrating the Microsoft Access tables by
clicking on the Upsize button.
Migrating the Tables
Once you have selected the Microsoft Access tables and adapted the identifiers, if necessary, click on the
Upsize button to start the migration process.
The following steps are then executed:
18
Adabas D: Access Plus
The Upsizing Wizard
The selected Microsoft Access tables are exported to Adabas one after the other. If a table already
exists in Adabas, you are asked whether or not you wish to overwrite this table.
The selected attributes of the Microsoft Access tables are created in Adabas by means of DDL. If an
error occurs, you can correct the corresponding SQL statement (see Section, "Setting the Options").
If the Attach exported tables option was not selected, the upsizing process terminates here.
Otherwise, the tables migrated to Adabas are attached to the Microsoft Access database. All the
exported Microsoft Access tables are first renamed. The new name of a table is obtained by adding
the suffix "_local" to the previous name. The names of exported tables or individual field names may
have to be modified when they are created in Adabas because, for example, they contain invalid
special characters. In this case, the name of the attached table receives the suffix "_remote" and an
"aliasing query" is automatically generated with the original table name and field name.
The Adabas tables are attached to the Microsoft Access database one after the other. A status window
indicates which Adabas table is currently being attached.
On completion of the migration process, the number of exported Adabas tables and the number of
exported tables that were attached to the Microsoft Access database are displayed.
The result of the migration process is given in an upsizing report. Click on the Report button to view or
print out the upsizing report, or the Close button to exit Adabas AccessPlus.
The Upsizing Report
The upsizing report contains information on the migration process. It indicates the Adabas database to
which the tables were transferred, the options that were set and the Microsoft Access tables that were
exported.
For each table, it indicates the table’s new name (if any), whether an "aliasing query" was generated, and
which attributes were exported.
In addition, the converted column names and data types and the attributes that could be created for
individual columns are also displayed for each table.
Verifying the Success of Migration
In most cases, you can start up your usual Microsoft Access application immediately after the migration
process is completed. Run through the usual tables and queries in order to determine whether the existing
functionality was retained beyond the migration process.
Updating ported tables
You should now check whether Microsoft Access allows the ported tables to be updated. If not, you
should make sure that a unique index to the tables to be updated has been defined.
A table attached to Microsoft Access can be updated only if it has a unique index. Although the Upsizing
Wizard ports an existing unique index, it does not generate an index to the exported table if none was
defined.
19
The Upsizing Wizard
Adabas D: Access Plus
You can define a unique index using, for example, Adabas Domain. However, you can also issue a
CREATE UNIQUE INDEX statement from Microsoft Access by means of an SQL Pass-Through Query .
For more information, see Section, "Data Definition, <create index statement>" in the "Reference"
manual.
Case-sensitive Text Comparison
If you perform queries whose WHERE condition is based on text comparison or issue
"Recordset.Findfirst" statements that access a text field and you discover that data rows are no longer
found that were found before migration, the problem may be related to the handling of uppercase and
lowercase letters when the Adabas database performs a text comparison. The default method used for text
comparison in a Microsoft Access database is not case-sensitive in contrast to an Adabas database.
To prevent Adabas from distinguishing between uppercase and lowercase letters, in the SQL statement,
simply base the comparison on the result of the UCASE function, applied to the column contents, instead
of basing it on the column contents.
Example:
SELECT Cust_no FROM Customer
WHERE Cust_name="MILLER"
and it also returned the customer number of the customer "Miller", the following minor modification must
be made following migration:
SELECT Cust_no FROM Customer
WHERE UCASE(Cust_name)="MILLER"
The UCASE function instructs the Adabas server database to convert the contents of each cell in this
column to uppercase letters before performing the comparison; i.e., it now follows the same procedure that
was formerly executed automatically by Microsoft Access without your intervention. Naturally, the other
value in the comparison must also be written in uppercase letters. This can be achieved, for example, by
again inserting the UCASE function before the other column name as well (if the application is comparing
two columns) or by changing this value to uppercase letters beforehand (if a fixed value is being
compared).
20
Adabas D: Access Plus
The Upsizing Wizard
If you originally generated the query in the Microsoft Access Select Query window as in this example,
you can also easily modify it there:
21
The Upsizing Wizard
Adabas D: Access Plus
As in this example, you can prevent the column contents from being output in uppercase letters and
reinsert the column in the query as it was originally written.
You also have the option of using an Adabas extension of the LIKE predicate , which is somewhat more
efficient than the method described above. Using a "match element" , you can specify a number of
characters that are to be handled identically for each character position, e.g.:
SELECT * FROM Customer
WHERE Cust_name LIKE ’(mM)(üÜ)(lL)(lL)(eE)(rR)’
For more information on this variant, see the description of the LIKE predicate in Section "Basic
Elements, <like predicate>" in the "Reference" manual.
Unsatisfactory Performance
If you find that upsizing was successful but performance did not improve as you had expected, look for
the possible causes as follows:
Are the application and server database running on the same computer? If yes, you have shown that
upsizing was successful but are not yet enjoying the advantages of a client/server architecture
because loads are not being distributed to more than one computer. If this is the case, you can expect
even worse performance since the computer is additionally loaded down by another program – the
server database – running simultaneously. Take the next step as soon as possible and move the server
database to another dedicated computer in the network.
If, despite a distribution in the network, performance is worse (or did not improve as expected), the
problem is often related to the way in which the application accesses the database. You can
sometimes eliminate this problem by making minor changes to the application. Refer to Section
"Which Applications Benefit from Upsizing" in order to find out why your application is not
benefiting.
Problems That Can Occur During the Migration Process
Between all databases, "cultural" differences exist; this means that you must adapt the application or
database when you change databases.
The Upsizing Wizard itself takes care of these differences and performs conversions where necessary.
However, sometimes the Upsizing Wizard may not be able to proceed without your assistance. Depending
on the syntactical differences between Microsoft Access and Adabas, it may be necessary for you to
participate in the conversion of default values and validation rules.
Certain initialization constants and functions are not automatically transferred. In this case, the Upsizing
Wizard opens a window containing the DDL expression that was used when attempting to transfer this
initialization to the table in the server database.
For the complete list of functions provided in Adabas, their syntax and notation, refer to the "Reference"
manuals.
Microsoft Access and the Adabas server database do not use the same syntax for time/date constants .
22
Adabas D: Access Plus
The Upsizing Wizard
If you would like to initialize a column with a date constant and meet up with a specific error message
during the migration process, change the time constant at the end of the ALTER TABLE statement from
the Microsoft Access format to the Adabas format "YYYY-MM-DD-HH:mm:ss". For example:
’1990-01-01-00:00:00’
Unlike Microsoft Access, Adabas always requires that you specify the date and time in a TIMESTAMP
column (date/time column). If the date alone is always specified in a column, the "Date" data type must be
used for this column. If necessary, the user must make this change after the migration process is
completed.
23
What You Can Expect from Upsizing
Adabas D: Access Plus
What You Can Expect from Upsizing
If you are dissatisfied with the performance of a Microsoft Access database application that originally
functioned well with a smaller volume of data, you can expect an improvement when you distribute it to a
client and server. In such cases, a bottleneck is most likely due to the throughput of the local Microsoft Jet
Engine. A database server that runs on a dedicated server computer and fully exploits its resources and
operating system distributes the load more efficiently and is better equipped to handle a high volume of
data and a large number of users.
If, however, you are dissatisfied with the waiting time during which Access is being started, upsizing is
not the solution to your current problem. In order to continue using the application, you must also
continue to use Microsoft Access since the Access database contains not only the module code but also all
screens and any existing macros. You can attempt to speed up Microsoft Access 2.0 by preventing the
Wizards from being loaded when the program is started and increasing the memory cache from the preset
value of 512 KB to around 2 MB. This is done by changing the relevant settings in the MSACC20.INI
initialization file located in the directory in which Microsoft Access 2.0 is installed. You also have the
option of further upgrading the workstations or rewriting the application, e.g. in Microsoft Visual Basic,
thus slightly reducing the resource requirements placed on an Access application.
The minimum requirements for computers on which the client can execute a database application are
constantly growing. As of mid-1996, if you plan to run a number of Microsoft Office products
simultaneously under Windows or if you or the programs used utilize "Object Linking and Embedding"
(OLE), your workstation should be a PC with a Pentium processor, a minimum clock rate of 100 MHz and
at least 32 MB of main memory. For example, if the server database is to be accessed on the workstation
only by a Visual Basic 3.0 program and if no other Microsoft Office applications or similar
resource-intensive applications from other manufacturers are to be run simultaneously, you can use a
workstation with half the memory specified above, or even a quarter.
This chapter covers the following topics:
Which Applications Benefit from Upsizing
What Difficulties You Can Expect
Which Applications Benefit from Upsizing
Some jobs performed by the client can easily be taken over by the server; other jobs can result in
additional outlay if they have to be performed by the server. If you have an adequate server configuration,
you can be confident that the server database will have no trouble adding and updating data rows, partially
updating indexes, scanning indexes and, within certain limits, scanning entire table columns.
Bottlenecks can also occur in a server database when large tables are copied, when queries are issued that
duplicate one or more tables or attach a large number of joins to a large number of hits, and when a large
number of users simultaneously access and lock data rows in a small number of tables.
Consequently, upsizing is beneficial to applications that edit a specific segment of the database that is
relatively static or applications that mainly add new data rows to the database. Applications that search a
large data set and expect to obtain manageable result sets for local editing take particular advantage of the
strengths of client/server computing.
24
Adabas D: Access Plus
What You Can Expect from Upsizing
The database can perform many functions without having to transfer the relevant data rows to the
application program. Here are two examples:
If the application needs to know the number of data rows to which a specific criterion applies, it can use
an appropriate SELECT statement and then query the number of data rows in the result set. However, it is
more economical to use the COUNT aggregate function directly in order to obtain the number. If it is
more important to know whether a result set is empty or not than to know the exact number of rows
contained in the result set, it is better to use the original SELECT statement. This statement only checks
whether the number of result rows is greater or less than 0 (The number can be -1 if the size of the result
set has not yet been determine; the value 0 indicates an empty result set). Subsequent calls of MoveLast(),
GetFirst(), or GetNext() actually build larger result sets, causing wainting times.
A wide range of processing times can also be achieved when updating data rows. Using a SELECT
statement , the application can create a dynaset containing the data rows to be updated and update them
one after the other using the edit method. However, it is better to formulate an appropriate UPDATE
statement immediately in order to allow the server database to perform the updates. This is a clever way to
prevent the data rows that are to be updated from being transferred to the database.
What Difficulties You Can Expect
Some table attributes cannot simply be transferred from a Microsoft Access table to an Adabas table.
Case-Sensitive Treatment of Identifiers : Unlike Microsoft Access and the Jet Engine, Adabas always
distinguishes between uppercase and lowercase letters in the identifiers for database names, table names,
column names, index names, etc. This poses no problem as long as you access Adabas tables by means of
the "aliasing queries" created by the Upsizing Wizard. And this is definitely an option, since it has no
adverse effect on performance. However, if you wish to access the attached tables directly you must, for
example, use the column names just as they are displayed in the Access Table Window- Design View or
in the relevant window of the Adabas tool Domain.
Permissions
Permissions that you have assigned within Microsoft Access must first be transferred to the Adabas
database so that accesses there will be subjected to these rules. Following migration, the Adabas user that
you specified when connecting to the database is the owner of the exported tables and, thus, has all
permissions.
If you are connected as this user, you can grant privileges to other users for specific tables. For more
information, see Section, "Authorization, <grant statement>" in the "Reference" manual.
Counter Fields
After the table has been transferred to an Adabas server database, counter or autovalue columns are not
automatically initialized with a unique value when a new data row is created. The columns in a newly
created data row are initialized in Adabas by means of an insert trigger .
An insert trigger is a short program that the server database executes when creating a data row. The trigger
procedure is created by the user after upsizing since it cannot be inserted automatically. For more
information on this procedure, see the "SQL-PL" manual.
25
What You Can Expect from Upsizing
Adabas D: Access Plus
Validation Text
After the table has been transferred to a server database, if you have entered validation texts , these texts
will not be output automatically when the validation rules are violated. Instead, less specific messages are
output.
Cascade Update-Related Fields
If you selected Cascade Update-Related Fields under the Relationships option as a rule for referential
integrity in Microsoft Access, this attribute is not automatically emulated in the server database. The
cascading of update-related fields is implemented in Adabas by means of an update trigger (see above:
Counter Fields).
Default Values
Default values and values that are inserted in a new data row by means of an insert trigger are not visible
when first created and do not become visible until the data row is reselected. The data row is
automatically reselected if it was created with a column containing a value that is unique within the table
and that was used for recreating the application program.
Performance
If performance does not meet your expectations after upsizing; i.e., the application functions but requires
too much time for simple procedures, check the application for the following characteristics and modify
the application if any of these characteristics apply:
The application updates or examines the data rows in a loop in that it issues an SQL statement at each
loop pass. Remedy : If the application uses a "Recordset.Findfirst" statement in the loop, find out
how you can select the record set in one step in the correct order, for example by inserting an
appropriate ORDER BY clause in the SELECT statement . If this is not possible or also takes too
much time, set an index to the necessary sequence criterion.
In an SQL statement, the application applies a function to a large number of data rows that Adabas
cannot execute because Adabas either does not know this function or does not know it under this
name. Although this does not result in an error, each field to be updated is transferred to the client via
the network, manipulated locally by the function and returned to the database. Remedy : Refer to the
"Reference" manual to find the name of the function in Adabas.
The application accesses both local tables and tables located in the server database within the same
SQL statement. Such a statement cannot be processed by the server database alone nor can it be
processed exclusively on the local level. The Jet Engine suitably resolves this statement and, after
transferring the necessary data from the server database to the workstation, executes it. If the result of
the statement is an updating of the data in the server database, following the update procedure the
data is transferred from the workstation back to the server database. Depending on the size of the
transfer, this procedure may take the form of noticeably poor performance. Remedy : Reduce the
frequency of comparisons between local tables and tables in the server database. As far as possible,
formulate SQL comparison statements so that the resulting data flow between the workstation and
server database clearly emerges from it. Do not blindly trust the Jet Engine to discover the best
strategy for you. Transfer only what is necessary, i.e. the updated data between the local tables and
the tables in the server database.
26
Adabas D: Access Plus
SQL and Jet Engine
SQL and Jet Engine
Introduction
When you formulate a query on a database, it can be handled either locally on the workstation or remotely
on another computer or partially on both locations. On the local workstation, the Jet Engine handles the
query. On the remote computer, the server database handles the processing .
The differences between local query processing and remote processing on the server must be taken into
account when designing the application to ensure that a client/server database application works
satisfactorily. This section explains the main differences, lists functions that are unknown to the server
database and shows how operations at the ODBC interface can be traced.
Functionality Distribution Between Client and Server
When the application sends a query to the database, the Jet Engine checks whether the query can be
processed by the server database alone. If this is possible, the query is passed to the server database which
returns a result set and/or a message whether the query was successful or not. This is the simplest and less
costly way to obtain the result.
The Jet Engine finds out on its own whether the query contains traps that make it impossible to the server
database to execute the query without outside help. This happens always when the query contains
references to functions or objects that cannot be resolved by the server database. As such a query requires
the cooperation of several instances, it will always need more time than a query that can be executed by
the server database alone. Therefore it is useful to familiarize oneself with the capabilities of the server
database before designing an application and to formulate a query that uses these capabilities. Do not rely
upon the Jet Engine that it transforms a query appropriately before executing it - it does it, but the loss in
performance can be significant.
When formulating a query, your goal should be to simplify it to such an extent that the Jet Engine can pass
it to the server database as it is. Section "Tracing the ODBC Interface" below describes how you can find
out that your efforts have been successful.
If you keep the following rules in mind, you can already relieve the Jet Engine:
If your query accesses tables or views from multiple data sources (e.g. local tables and joined tables),
the Jet Engine must perform at least a part of the query locally on the workstation.
If a query contains a function that is unknown or whose name is unknown to the server database, the
Jet Engine must perform the parameter of the function locally.
Unsupported Operators and Functions
When the Jet Engine receives a query for execution, it uses the "SQLGetInfo"" function of the ODBC
driver to ask for the facilities available on the server database. When the Jet Engine encounters a function
or an operator that is unknown to the server database, then it performs this part of the statement locally.
When you use the following functions and operators in queries, you should ensure that they are supported
by the server database or find out how they are called there.
27
SQL and Jet Engine
Adabas D: Access Plus
General Operators
=
-
IS NULL
<>
*
IS NOT NULL
<
/
LIKE
>
&
MOD
<=
AND
NOT
>=
DIV
OR
+
IN
Mathematical Functions
ABS
FIX
SGN
ATN
INT
SIN
COS
LOG
SQR
EXP
RND
TAN
ASC
LEFT
SPACE
CHR
LEN
STR
INSTR
MID
STRING
LCASE
RTRIM
TRIM
LTRIM
RIGHT
UCASE
String Processing
Aggregate Functions
AVG
MIN
COUNT
MAX
SUM
Type Conversion
CCur
CLng
CDbl
CSng
CInt
CStr
28
CVDate
Adabas D: Access Plus
SQL and Jet Engine
Date and Time Functions
DATE
DATEPART(’ww’)
MONTH
DATEPART(’ddd’)
DATEPART(’www’)
NOW
DATEPART(’hhh’)
DATEPART(’yyy’)
SECOND
DATEPART(’mmm’)
DATEPART(’yyyy’)
TIME
DATEPART(’nnn’)
DAY
WEEKDAY
DATEPART(’qqq’)
HOUR
YEAR
DATEPART(’sss’)
MINUTE
The following features are not supported by the server database:
Outer Joins , if more than two tables are involved.
The LIKE operator, applied to LONG or MEMO columns.
Reports using several levels of grouping and totals.
SQL extensions realized in the Jet Engine, such as "SELECT TOP n" or "TRANSFORM".
Tracing the ODBC Interface
Problems with the performance and functioning of the ODBC layer can make it necessary for you to trace
the ODBC interface. However, this measure is to be used only as a last resort for getting to the bottom of
things, since tracing all activities will slow down the execution of the application considerably and reading
the trace file produced by this procedure requires special knowledge of the ODBC interface.
The versions 2.0, 2.5 and 3.0 are the best known versions of the Microsoft ODBC Manager. The following
description refers to the ODBC Manager 2.0; later versions can slightly deviate from this description.
Usually, the ODBC Manager is installed together with other Microsoft Software. It can only be obtained
from Microsoft.
Interface between ODBC Driver and Microsoft Jet Engine
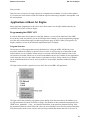
Click on the Options button to display the dialog box below, which allows you to activate and stop tracing
(also automatically) and to define where the trace file will be stored.
29
SQL and Jet Engine
Adabas D: Access Plus
The main difficulty in interpreting the trace file is in separating the essential from the irrelevant. Many
functions are "negotiated" between the Jet Engine and ODBC driver; i.e., the Jet Engine calls a function
and receives an error code on the basis of which it decides to follow a different strategy. This dialog is
also part of the trace but not important for execution. The list of functions that can be called by the ODBC
driver and their meanings are provided below and should help you to interpret the trace file .
SQLExecDirect:
The application performs a non-parameterized query.
<SQL statement>
SQLPrepare:
The application prepares a parameterized query.
<SQL statement>
SQLExecute:
The application performs a prepared, parameterized query.
(PARAMETERIZED
QUERY)
SQLExecute:
The application passes a data row that is clearly identified by
the bookmark to the workstation.
(GOTO
BOOKMARK)
SQLExecute:
The application passes several data rows to the workstation;
each data row is defined by a bookmark.
(MULTI-RECORD
FETCH)
SQLExecute:
(MEMO FETCH)
SQLExecute:
(GRAPHIC
FETCH)
SQLExecute:
(RECORD-FIXUP
SEEK)
SQLExecute:
The application passes the content of a LONG or MEMO
column field to the workstation; each field is clearly
identified by a bookmark.
The application passes the content of a LONG or MEMO
column field to the workstation; each field is clearly
identified by a bookmark.
The application passes the content of a data row identified by
any key to the workstation (This key need not be the
bookmark key).
The aplication deletes a single data row identified by a
bookmark.
(UPDATE)
SQLExecute:
(DELETE)
30
The application deletes a single data row identified by a
bookmark.
Adabas D: Access Plus
SQLExecute:
SQL and Jet Engine
The application inserts a new single data row in a dynaset.
(INSERT)
(SELECT INTO
insert)
The application inserts a new single data row in export mode.
This chapter covers the following topics:
Applications Using the Jet Engine
Applications without Jet Engine
Applications Using the Jet Engine
Some users find that the intelligence added to their database application by the Jet Engine is more of a
hindrance than a help. This criticism is justified since the Jet Engine’s optimizations take a certain amount
of time for each statement. However, the user benefits in a variety of concrete ways:
1. The Jet Engine optimizes SQL statements that were not well formulated by the application
programmer and usually returns its results more rapidly than if there were no optimization.
2. The Jet Engine reformulates SQL statements that are not adapted to the capabilities of the specific
server database so that they can be executed by this server database and takes over jobs that the
server database cannot perform.
3. In the case of SQL statements that use tables from several data sources within one join, the Jet
Engine resolves these statements, optimizes them and transfers the parts to the relevant server
databases for execution or executes the necessary jobs itself on a local Microsoft Access database
(MDB). Following execution, the Jet Engine puts the pieces of the puzzle back together and returns
the result to the application.
Consequently, users will often want to work with the Jet Engine because to do without it would require
making major changes to an existing application or would increase programming effort to a degree that
would be disproportionate to the value of the solution. Sometimes, however, small changes can already
result in a significant improvement in performance.
Before reading a few tips, you should be aware of certain limits: Initially, the response time increases
linearly and later on increases exponentially with the size of the result set. Bound controls respond
differently to large data sets, with responses ranging all the way to aborting the program and issuing an
error message. The mathematical limit for using bound controls is formed by the range of values for the
list index (up to 32767); depending on the concrete volume of data, however, memory management
already sets a lower limit.
What Is a Large Result Set?
When you issue an SQL query, a larger or smaller set of data is returned in the result for each individual
data row (see below under "Snapshot or Dynaset?") before the query has been fully processed and the time
is up.
31
SQL and Jet Engine
Adabas D: Access Plus
Therefore, it would be a good idea to calculate the size of the result sets beforehand. A result set of 1500
data rows is already considered to be "large". Try to obtain small data sets. As far as possible, avoid
accessing whole tables by using a SELECT statement without a WHERE clause , a "Database.OpenTable"
(in VB 3.0) or a "Database.CreateRecordset" with the "dbOpenTable" parameter (in VB 4.0 or, similarly,
in VBA in Microsoft Access). In an SQL statement, address only those columns that you will later need.
From your experience with other applications, you already know that response times basically depend on
the RAM (or main memory). The more free RAM you have available, the more fluently the system can
toggle between programs and the better the applications can respond. In the same way, a database
application can perform better when it attempts to maintain simultaneous access to as few data rows as
possible. In each individual data row, only the fields that are required should appear in a SELECT
statement. Although "SELECT *" is quickly written, the subsequent results for the application are much
slower and can have a significant impact on performance. Consider making MEMO (or LONG) fields
visible only on request.
When is it Advisable to Fill in Lists and Combo Boxes?
On a form, avoid using several combo boxes with a large number of entries that are filled from a data
control or from the program with an SQL query. If you are using Visual Basic or VBA for Microsoft
Access, if at all possible do not insert lists or combo boxes until they are to be used.
If this is not possible, try not to insert these activities in the Form_Load subroutine but wait at least until
the Form_Activate subroutine . If you decide in favor of the latter option, use a flag variable to prevent
initialization from being performed more than once (Form_Activate is called almost every time if the
focus is set to the form). Afterwards, call Do_Events one or more times to ensure that before the
initializations take place, the form is drawn, initially with empty controls.
Specific ways of programming are a question of taste. The example below is only a suggestion for
structuring Form_Activate:
Private Sub Form_Activate()
Static active As Integer
If active Then Exit Sub
active = True
DoEvents: DoEvents: DoEvents:
’ ...
’ Initializations ...
’ ...
’ In the end set focus to first entry
MyControl.SetFocus
End Sub
Snapshot or Dynaset?
You were already warned above about accessing entire tables. It is more difficult to know when to use
dynasets and when it is more convenient to use snapshots . Although snapshots are generally faster (and
therefore have the restriction that they cannot be updated), which is also the case for moderately sized
result sets (up to one- or two-thousand data rows), dynasets have a more intelligent strategy for highly
extensive result sets because they contain only a keyset (i.e., the unique index for each data row that is
used to retrieve the entire data row only as necessary) of the result and not the complete data rows.
Nevertheless, do not expect miracles with regard to performance when using dynasets. Time
measurements have shown that the strategic advantage of dynasets is not apparent unless they are used for
volumes of data for which users have already found the response time to be an inconvenience (more than
32
Adabas D: Access Plus
SQL and Jet Engine
thirty seconds).
Therefore, base your choice of using a dynaset or a snapshot only on whether you wish to allow updates.
If you must work with volumes of data for which the response time using a snapshot is unacceptable, read
the sections below.
Applications without Jet Engine
Many application programmers wish to have more direct control over the SQL database than they do
when they have to pass via the Jet Engine.
Programming the ODBC API
In order to obtain more direct control over the SQL database, you can call the functions of the ODBC
driver directly in the relevant DLL just as the Jet Engine does normally. As for the programming language
used, the only restrictions that apply are those that generally apply for DLLs. When you bypass the Jet
Engine, naturally you lose all the functions implemented by the Jet Engine
Program Structure
The structure of a VB program that accesses the database by calling the ODBC API directly is not
necessarily made more complex by this fact. However, there is no longer any use of data controls and
bound controls, nor can a number of data sources be accessed within one SQL statement. None of the
conveniences associated with the use of record-set and database objects are available in such applications.
At the same time, however, their main memory requirements are lower, dialog with the server database
can be controlled much more closely, and it is possible to execute SQL statements without becoming
blocked.
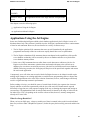
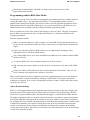
The figure below provides a general overview of the flow of an ODBC API application:
The figure shows that, following a preparatory phase during which the connection to the database is set
up, SQL statements are placed in a buffer as strings. The statement is then examined and prepared by the
ODBC driver, parameters – if any – are identified and buffers are prepared for parameter passing. Once
the parameter buffers have been filled with values, the server database can execute the prepared statement.
Execution usually results in one or more result sets being returned that contain data rows or an error. In
33
SQL and Jet Engine
Adabas D: Access Plus
contrast to access via the Jet Engine, execution of the statement does not yet transfer any data rows to the
application program, since this is the responsibility of the application (as is any optimization associated
with it).
Column Binding, Extended Fetch
The application asks the server database for data rows from the result set either one at a time or in blocks
(extended fetch) . Afterwards, the columns of the data rows can be accessed. The API also provides the
option of binding local variables to the individual columns before the result set is accessed so that these
columns will be filled with values directly when the ODBC driver fetches the data row(s) (column
binding) . It is recommended that you take advantage of this option since it not only saves time but also
avoids superfluous program lines.
System Tables
Naturally, this type of application can also suffer from poor performance as a result of unwise
programming. It is still generally advisable to address only the columns and data rows in an SQL
statement that are actually needed. If the application accesses system tables (lists of all tables, indexes,
views, users, etc.), keep in mind that in a larger database, these lists can take on considerable dimensions.
Therefore, once you have requested the necessary information, you should maintain it locally.
Required Declarations
If you decide to use the ODBC API, you will need several files containing the declarations of the
functions that form the API. Although it is possible to implement these definitions yourself using the right
documentation, it is also cumbersome. Fortunately, however, these files already exist as a component of
the ODBC SDK (Software Development Kit) Version 2.0, which must be purchased separately from
Microsoft Support:
odbcor_g.bi
Constants used by the core functions
odbcor_m.bi Declarations of core functions
odbext_g.bi
Constants required for the "extended ODBC functions"
odbext_m.bi Function declarations required for the "extended ODBC functions"
Aids to Decision-making
Use of the ODBC API does not automatically determine that you will use a specific database; instead, it
leaves this decision open until you need to utilize specific characteristics of the server database. There is a
number of good reasons for deciding in favor of the ODBC API when designing an application and for
rejecting the more convenient alternative, Jet Engine and DAO.
The application must make do with a small amount of main memory .
Performance is unsatisfactory, even though the server database quickly executes the application’s
SQL statements.
The application must utilize characteristics of the server database that are not accepted by the Jet
Engine even with SQL_Passthrough (e.g. passing of parameters to stored procedures, multiple result
sets).
34
Adabas D: Access Plus
SQL and Jet Engine
Knowledge of embedded SQL and ODBC can make it easier to decide in favor of the
higher-performance interface.
Programming with the RDO Data Model
The Enterprise version of the Visual Basic 4.0 programming environment provides a valuable alternative
to using the ODBC API, i.e. the remote data object (RDO) . This programming model, which is in
addition to the existing DAO interface, was created in order to provide application programmers with a
lightweight alternative to the ODBC API that allow you to access characteristics and options of server
databases that are not compatible with the Jet Engine and DAO programming model.
RDO is available only in the 32-bit variant of the Enterprise version of VB 4.0. Therefore, no programs
that use RDO can be generated for the 16-bit Microsoft Windows 3.1 and Microsoft Windows for
Workgroups platforms.
RDO has important benefits:
RDO is an extremely thin layer ("object wrapper") over the ODBC interface that has practically no
adverse effects on performance. RDO does require some memory, but significantly less than the Jet
Engine.
There is one data control that uses RDO, which serves to supplement the advantages of this
lightweight interface with all the bound controls.
Any existing ODBC driver can be used with RDO because RDO does not extend the defined ODBC
interface (Level II).
As with the ODBC API, all server database options can be fully exploited.
SQL statements that return a number of result sets can be executed more easily than via the ODBC
API.
Unlike other libraries, RDO follows the object-oriented approach of Visual Basic. Thus, the "For
Each" statement can be applied to the columns of a result set.
Many useful characteristics that are familiar from the DAO programming model (record sets, databases,
etc.) can be found in a similar form in RDO, making the "culture shock" with regard to well-known
techniques less apparent. Thus, it offers corresponding collections of tables, columns and result sets that
can be accessed as usual.
Aids to Decision-making
RDO is a useful programming model for applications that do not necessarily require the Jet Engine and
justify the greater effort required because of their degree of usefulness. SQL programming in SQL-PL,
which serves to generate DB procedures, DB functions and triggers, is also based on the RDO interface.
The higher programming effort as compared to the DAO interface is rewarded by improved performance.
Professional applications that exploit the possibilities of the server database beyond what is permitted by
the Jet Engine also rely on ODBC API programming or on the RDO programming model. Another benefit
in addition to performance is the option of storing procedures on the server database that encapsulate
multiple processing steps for the purpose of permanently modeling business transactions and taking
security aspects into account. The necessity of leaving the convenient abstraction level of the DAO model
is made more acceptable by RDO.
35
Only a Preliminary Step
Adabas D: Access Plus
Only a Preliminary Step
Automatic upsizing is only a preliminary step that creates a foundation on which to build. Although
upsizing quickly and easily provides you with the advantages of a client/server architecture, optimal
utilization of a server database such as Adabas requires that existing Access applications be revised.
36