1
)
Writer's Workshop
User's Manual
)
')
Berkeley Softworks
2150 Shattuck Avenue
Berkeley, California 94704
Update Policy
To participate in Berkeley Softworks' update service, fill out and return the Writer's
Workshop Registration card found at the back of the manual. Registered users will be
sent notices outlining the procedure for obtaining updates and revisions.
Warranty
(
Berkeley Softworks warrants that this product is free from defects in materials and
workmanship under normal use for a period of ninety (90) days from the date of
purchase. If a defect occurs during this period, you may return your disk to Berkeley
Softworks or its authorized dealer, along with a dated proof of purchase, where it will
be replaced free of charge.
There are no other warranties, express or implied regarding the disk and related
materials, their fitness for any purpose, their quality or merchantability. Berkeley
Softworks shall not be liable for any incidental, consequential, or direct damage
resulting from the breach of any express or implied warranty, including damage to
property.
GEOS, diskTurbo, deskTop, Writer's Workshop, geoWrite, geoPaint, geoLaser,
geoMerge, Text Grabber, geoDex, geoFile are (C) Copyright Berkeley Softworks,
1985, 1986.
LaserWriter IS a trademark of Apple Computer, Inc. PaperClip is (C) Copyright
Batteries Included Easy Script is (C) Commodore Electronics Ltd. 1984 SpeedScript
is (C) COMPUTE! Publication's Inc. 1985
C
License
This manual and software are copyrighted by Berkeley Soft works and are intended for
use on a single machine. You may not copy this manual or software whole or in
part, except in the normal use of the software or to make a backup copy. You may
not make copies to lend, rent or lease to others. You may transfer this program and
license it to another if (1) all of the materials purchased (including backup copies)
are sold, given or loaned to another person and (2) the transferee agrees to be bound
by all the terms and conditions of this agreement.
The software program(s) and manual in this package are provided "as is" without
warranty of any kind, either express or implied, including, but not limited to the
implied warranties of merchantability or fitness for a particular purpose.
Manual by: John Miller and Tony Requist
Writer's Workshop Design Team: Dave Durran, Chris Hawley,
Clayton Jung, Tony Requist
Printed 10/86
(
Writer's Workshop
User's Manual
For customer service call:
(415) 644-0890
9am-5pm Pacific Time
Berkeley Softworks
2150 Shattuck Avenue
Berkeley, California 94704
Table of Contents
Chapter 1: Before You Begin
Make a Backup Copy
1-2
Chapter 2: geoWrite 2.0
The geoWrite Screen
Entering geoWrite
Enter Text
Moving the Writing Window
Editing the Document
Formatting
Use Different Fonts and Styles
Using Headers and Footers
Search For and Replace Text
Keyboard Shortcuts
Editing Tips
Use Graphics From geoPaint
Use Text From Other Documents
Print Your Document
Leaving geoWrite
2-2
2-3
2-5
2-8
2-9
2-12
2-14
2-15
2-17
2-19
2-21
2-22
2-23
2-24
2-26
Chapter 3: geoMerge
Entering geoMerge
Using geoMerge-a Quick Tutorial
Enter Merge Data Manually
Making Merge Document Forms
Using Merge Data Files
Create Merge Data Files With geoWrite
,
3-2
3-3
3-4
3-7
3-10
3-11
Chapter 4: Text Grabber
Entering Text Grabber
Using Text Grabber
Exiting Text Grabber
4-2
4-3
4-8
Chapter 5: geoLaser
Connecting your Computer to the LaserWriter
Entering geoLaser
Using geoLaser
How Files Are Printed
5-2
5-2
5-3
5-5
Chapter 6: New deskTop and Drivers
New GEOS deskTop
New Printer and Input Drivers
Index
6-2
6-3
7-1
Welconle to Writer's Workshop
Writer's Workshop expands the "whole new world" created by GEOS (Graphic
Environment Operating System). This manual is divided into six chapters.
1. Before You Begin: instructs you on installing and making a backup copy of
your original Writer's Workshop disk.
2.
geoWrite 2.0: an enhanced version of the basic geoWrite word processor.
3. geoMerge: a mail merge program allowing you to print out customized form
letters.
4. Text Grabber: an application that reads files from other Commodore word
processors and converts them into gcoWrite fonnat.
5. geoLaser: an application enabling you to print geoWrite files on the Apple
LaserWriterTM printer.
6. New deskTop and Drivers: a new GEOS deskTop, new printer and input
drivers.
Commodore 64 is a registered trademark of Commodore Electronics Ltd.
Conmwdore 128 is a trademark of Commodore Electronics Ltd.
I
Chapter 1: Before You Begin
Before you start to usc Writer's Workshop, follow these directions. This
chapter walks you through inst811ing Writer's Workshop on your GEOS system,
making a backup of your Writer's Workshop disk, and making work disks.
1-1
Before You Begin
Before you Begin ...
Install Writer's Workshop"
Make a Backup Copy !!
Make A Work Disk !!
Here's How ...
1. Boot your GEOS boot disk as described in your GEOS manual.
2. Close your GEOS boot disk.
3. Insert the Writer's Workshop disk in the disk drive and open it.
4. Open the file geoWrite by clicking on the geoWrite icon and selecting open
from the file menu, or by double clicking on the geoWrite icon.
The
geoWrite 2.0 scrcen will appear with a dialog box on top of it.
5. Select Quit to return to the deskTop.
6. Open the file geoMerge by clicking on the geoMerge icon and selecting open
from the file menu, or by double clicking on the geoMerge icon.
The
geoMerge screen will appear with a dialog box on top of it.
7. Select Quit to return to the deskTop.
8. Close the Writer's Workshop disk and place a write protect tab on it.
9. Usc the BACKUP or DISK COPY program supplied on your GEOS disk to
make a backup copy of Writer's Workshop. Put this backup copy in a safe
place. If you ever have difficulty with your original Writer's Workshop disk,
use this backup disk.
Before You Begin
1-2
Writer's Workshop is now installed on your GEOS system. Now you need to
make a work disk (work disks are fully described in your GEOS manual). There
are several ways to make work disks for using Writer's Workshop:
o Use the BACKUP or DISK COpy program supplied on your GEOS disk. This
produces a copy of the entire Writer's Workshop disk.
o Use the deskTop to format a new disk and to move the files from Writer's
Workshop onto this new disk. This method allows you to have just the files
you need on a work disk.
You are now ready to use Writer's Workshop!
1-3
Before You Begin
Chapter 2: geoWrite 2.0
I
This chapter covers geoWrite 2.0, an enhanced version of the basic geoWrite word
processor. If you have used geoWrite on your GEOS disk, you will be able to
skim through much of this manual, concentrating on the many added features of
geoWrite 2.0, including:
D
D
D
D
D
D
D
D
D
D
D
D
D
format each paragraph individually
center, right and full justification
single, one and a half, and double spacing
decimal tabs
move around a document using cursor keys
selection of up to a whole page of text
double clicking to select a word
superscript and subscript
print in high, draft or NLQ modes
print part of a document
headers and footers
put the page number, time and/or date into the header or footer
search and replace
2-1
geoWrite 2.0
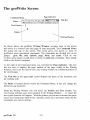
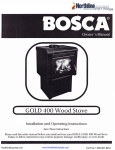
The geoWrite Screen
Page Indicator
/
C omman d Menu"
l
2
l~T. tENTER [J IlIGIlT 0 FULL [J
Text Cursor
!
l
qeos file edit options i pClqe font style
Ru~r
II
I
I1~
3
•
. . JlISnmllTIDN
term poper
~-
Title Bar
•
LINt 51'RtINr:i'" 1. 1:.1: 0 2: 0
\
pOinterY
l
Writing Window
--------
As shown above, the geoWrite Writing Window occupies most of the screen
and serves as a window into each page of your document. The Command Menu
lies across the top of the screen. This menu gives you access to some of
geoWrite's more specialized commands. The commands are divided into seven
groups:
geos, file, edit, options, page, fonts, and styles. Click on one
of these menu names to pull down a menu of additional commands. Then simply
click on the desired command.
To the right of the Command menu you will find the Page Indicator. This box
has two uses; it displays the page number of the page visible in the Writing
Window, and it can be used to move the writing window to a different portion of
the current page.
The Title Bar in the upper-right comer displays the name of the document you
are working with.
The Ruler is located directly below the Command Menu. It lets you change the
format of your document.
Inside the Writing Window you will notice the Pointer and Text Cursor. The
Text Cursor indicates your active position in the Writing Window - - i.e where the
next typed character will appear. With the pointer you can move around the entire
screen area (using your input device--joystick, mouse etc.) and select (click on) the
commands you want to activate.
geoWrite 2.0
2-2
Entering geo Write
If you have not already done so, read Chapter 2 of your GEOS manual, "GEOS
Training Camp".
Enter geoWrite from the deskTop
When you are on the deskTop, there are two ways to enter geoWrite. You can
select the geoWrite icon from the Disk Notepad, and then select open from the file
menu, or you can double-click on the geoWrite icon. In both cases, geoWrite will
load and display a dialog box on a blank screen. It will contain three options:
Create document, Open document, and Quit. Select one.
geoWrite Create/Open/Quit Dialog Box
Create a Document
Select Create to create a new geoWrite document. A second dialog box will
appear displaying the name of the currently opened disk, and asking you to enter a
new filename. Enter a name for your new document and press RETURN.
If you have installed two disk drives, and would rather create the document on the
disk in the other disk drive, click on Drive. This will activate the other disk.
Enter a name for your new document and press RETURN. If you are creating a
file on the drive that does not contain geoWrite, a Disk box will appear. Clicking
on it allows you to insert a new disk into the disk drive, and to create a file on it.
2-3
geoWrite 2.0
Open a Document
Select Open to open an existing document on the disk. A seeond dialog box will
appear displaying the name of the currently opened disk and a list of the first five
geoWrite documents on that disk. If there are more than five documents on the
disk, click on the lower scroll arrow at the bottom of the box. Each time you
activate this scroll arrow, another document name will scroll into view. Highlight
the document you desire by clicking on its name once. Click on Open to open
that document.
If you have installed two disk drives, and would rather open a document on the disk
in the other disk drive, select Drive. This will activate the other disk. Click on
the document name (it will appear in reverse video), and select Open to open the
document. If you are opening a file on the drive that does not contain geoWrite, a
Disk box will appear. Clicking on it allows you to insert a new disk and open a
file there.
NOTE: Only the first 15 documents can be displayed in the open dialog box
window. It is unlikely you will have more than this on a single 1541 disk. If you
do, you will have to rearrange the files on the deskTop to be able to access later
files through the Open dialog box window.
Quit
Select this option to exit geoWrite and return to the deskTop.
Open an Existing Document From the deskTop
Once you have created a document, you ean open it by clicking on the document
icon in the Disk Notepad and selecling open from the file menu. Or you can
double-click on the document icon. Either procedure will automatically load
geoWrite and then open your document.
Open files from an earlier version of geoWrite
If you have files created with the geoWrite that came with your GEOS disk, they
will automatically be converted to geoWrite 2.0 files when they are opened. A
dialog box will appear telling you that the file is being converted.
Rename a Document
You can rename the document you are working with by selecting rename from
the file menu (the document must already be open). Enter the new filename into
the dialog box and press RETURN.
geoWrite 2.0
2-4
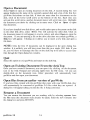
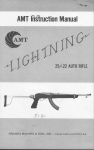
Enter Text
To enter text into your document, simply start typing. What you type will appear
in the Writing Window at the location of the text cursor. To change the position
of the text cursor, move the pointer to another location and click. The cursor will
be repositioned on that point. If you click the pointer past the last character
currently in the document, the cursor will appear after that character. The pointer
can also be moved using the cursor keys (located in the lower righthand side of the
Commodore keyboard)--see "Keyboard Shortcuts," later in this chapter.
qeos : file: edit ~ options.: pINe: font : ~~I~le
,-l2
fi
r~
I~
d:?T. crNTEIlb P.HiNTO TIILLO
+-JU5T1rICRTION
p':J~,er ~
telTil
~I'-'-'-'.E
LINE
5~A(ING-+
Almost a hundled diffelent elements
1_ t!<o 20
I
Entering text into the Writing Window
Using the DEL Key (Delete)
When you make a mistake typing, you can delete one or more characters on the
line by using the DEL key on the keyboard. This moves the Text Cursor
backwards on the line, deleting characters as it goes.
2-5
geoWrite 2.0
Writing Window and Document Dimensions
The Ruler at the top of the Writing Window starts at 1.2 inches on the initial
screen and spans to 5.2 inches. If you move the pointer to the right edge of the
Writing Window, the screen will instantly shift to display the right two-thirds of
the document. The left visable edge of the ruler, when on the right side of the
document, is 3.2 inches and the right edge of the ruler is 7.2 inches. The total span
of the writing area on a geo Write document is from 1.2 inches on the left side to
7.2 inches on the right side or 6 inches total - - there are minimum margins of 1.2
inches on the left and 1.3 inches on the right.
NOTE: The document dimensions described here are based on a print resolution
of 80 dots/inch . If your printer has a different resolution, the dimensions will be
slightly different.
Word-VVraparound
If you reach the right margin of the page while typing a word, geoWrite will pick
up the entire word and move it to the beginning of the next line and allow you to
continue typing. In most word processing using geoWrite you should let the word
wrap create the new lines within paragraphs, rather than pressing RETURN. If you
follow this guideline, paragraphs will automatically reformat when you delete
words or sentences.
End a Paragraph
To end the paragraph you are currently typing, simply press the RETURN key on
the keyboard. This moves the Text Cursor to the start of the next line.
Use Tabs
geoWrite allows you to set several tab-stop positions across the width of your
document. Once you have set these tab positions as described in Setting Tab
Stops, you can use them to format your document. To skip to a tab position as
you are entering text, simply press CTRL-I. The Text Cursor will advance to the
tab position.
NOTE: The C-64 keyboard docs not have a tab key . A tab is entered with a
CTRL-I. This is done by holding the CTRL key down and striking the letter 1.
geoWrite 2.0
2-6
Insert a Page Break
geoWrite allows you to insert a page break at any point in your document. The
text immediately following a page break will appear on the top of the next page.
To insert a page break select page break from the page menu.
Delete a Page Break
To delete a page break, position the text cursor at the top left of the page
following the page break. Press DEL. A dialog box will ask if you want to delete
the last character of the preceding page. Select OK. The page break will be deleted
and the cursor will appear at the bottom of the previous page.
Preview Page
Since the standard geoWrite Writing Window only allows you to view a portion
of one page at a time, you may use Preview Page to get a full-screen preview
of a page. Activate preview under the file menu. Preview is especially useful
since it allows you to make decisions about the overall placement and proportions
of a page. Once you have examined the page preview, click on Ok in the dialog
box in the lower lefthand corner of the screen.
2-7
geoWrite 2.0
Moving the Writing Window
Since the Writing Window displays only a portion of one of the pages of your
document, you will often want to move the window in order to view a particular
portion of the document.
Move Within the Current Page
There are several ways to move the Writing Window within the current page. The
first method is a side-effect of entering text. As you type in a paragraph, the
Writing Window will alternately display the left and right sides of the page,
scrolling down the page to supply new lines. You can also scroll the Writing
Window by moving the pointer to the top or bottom of the screen. This method
of moving scrolls the Writing Window one line at a time.
Use The Page Indicater
You can also use the Page Indicator to move the Writing Window. The Page
Indicator box itself represents the size of a page and the small square inside the box
represents the area of the page visible in the Writing Window. To change the
location of the Writing Window, click once inside the Page Indicator. The small
square representing the Writing window will become attached to the pointer. Move
the square to the portion of the page you wish to view and click. That section will
appear in the Writing Window.
Move Forward or Backward One Page
To move the Writing Window forward or backward one page, select either next
page or previous page from the page menu.
Move to Any Page
To move the Writing Window to any particular page within your document, select
goto page from the page menu. Enter the page number in the dialog box that
appears and press RETURN.
geoWrite 2.0
2-8
Editing the Document
Insert Text
Inserting text into your document is similar to entering text: simply point to
where you want to add text and click once to position the Text Cursor at that spot.
Now you may begin typing on the keyboard.
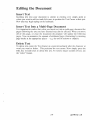
Insert Text Into a Multi-Page Document
It is important to realize that when you insert text into a multi-page document the
pages following the text you have inserted may also be affected. When you move
off of this page, or close the document the program will update the following
pages. You can minimize the amount of additional page reformatting by inserting
page breaks at the appropriate places - - e.g. the end of sections or chapters.
Delete Text
To delete text, point the Text Cursor at a point immediately after the character or
word you want to delete. This positions the text cursor. Now simply press the
DEL key several times to delete this text. To remove larger sections of text, llse
the "select" feature.
2-9
geoWrite 2.0
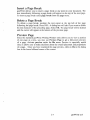
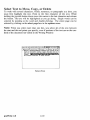
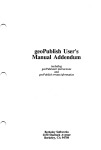
Select Text to Move, Copy, or Delete
To work with several characters, words, sentences, or paragraphs at a time, you
must first highlight this text. Point to the first character of the text. While
holding the joystick button down move the cursor to the last character and release
the button. The text will be highlighted as you go along. Single words can be
selected by pointing at the word and double-clicking. The entire page can be
selected by clicking on the select page box in the options menu.
Note: When you select more than one line, you select all of the text between
the start and the end points you specify, even if portions of the text are on the onethird of the document not visible in the Writing Window.
qeos file! edit : oplions : p<1qe : font l st41ej't r~ term p\lpe( ~
2.
:::
...
L~T. CENTUtl RIGHTO FllLLO +-JU5TlnCATION
s
Lt~IE SPRCING .. 1. 1:(0 20
Almost a hund,ed diffelent elements ale p,e sent in the
much of the ealth' s sUlface, and in the thin veil of at
~~I~~!:~' 0i§~,!i,Ed0W.i~.i~~_i{iit~!l.,::rte(J~;§Xi'
the plinciple molecules of living flJsterns.
Select Text
geoWrite 2.0
2-10
Options Involving Selected Text
You may perfonn several different operations on a selected block of texl:
o Replace Selected Text:
To replace the highlighted text with new text, enter the new text on the keyboard.
The highlighted text will disappear and the new text will be inserted .
o Delete Selected Text:
To delete the selected text, simply press the DEL key once.
o Change the Font or Style of Selected Text:
You may change the Type Face or Style of the text you have selected. (See
Using Different Fonts and Styles later in this chapter for instructions.)
o Cutting Selected Text for Moving or Copying:
In order to move or copy text from one section of your document to another you
must "cut" or "copy" it from its current position and "paste" it into the new
position. To cut the selected text out of the document, select cut from the edit
menu. geoWrite will remove the selected text and place it in the Text Scrap. The
copy command also places the selected text in the Text Scrap, but will not remove
it [rom the document.
Paste Text into the Docmnent
Position the Text Cursor where you want to paste the text. Select paste from the
edit mode and text [rom its sub-menu. geoWrite will insert the contents of the
Text Scrap where the Text Cursor is positioned.
2-11
geoWrite 2.0
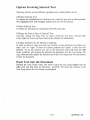
Formatting
The Ruler
Using the ruler you can change the margins, tab positions, justification and line
spacing of the current paragraph (or of several paragraphs if they are selected). As
shown below, the ruler appears across the top of the screen:
Justification Boxes
term
Ruler
Left :vtargin Indicator
p CT~II~r
S,~,,~,~N~"'~C~"~,"T~C~,,~,,~c~+~"~"'~"'~AH~'N~L1
N~"~"N~.~~~'.~"~C
i.c~Linc Spacing Boxes
This is the first line of a par
aph, so
t lines up with the paragraph margi
indicator. All other lines line up with the
left magin indicator.
Paragraph Margin Indicator
Regular tabs
23.45
23.45
1.2
3422.33
987
Decimal Tab Marker
Decima I tabs
1.2
3422.33
9871
geoWrite screen showing Ruler
Note: There are several indicators displayed on the Ruler. If any two of them
are located at the same spot, they overlap. This can sometimes be confusing. If
you are having trouble finding a particular marker, it may be overlapped by
another.
Set Left and Right Margins
On the left and right sides of the Ruler, you will find two margin markers, which
resemble the letter M. These two markers define the left and right margins for
your text. To change the position of one of these markers, click on it once, drag it
along the Ruler, and click again to drop it.
Set Paragraph Margin
On the left side of the ruler you will find a paragraph margin marker, which
resembles the letter P. This marker sets where the first line of each paragraph
should start. To change the position of this marker, click on it once, drag it along
the ruler, and click again to drop it. For example, setting the paragraph ("P")
marker to the right of the margin ("M") margin marker will indent paragraphs.
geoWrite 2.0
2-12
Set Tab Stops
geoWrite allows you to set up to eight separate tab-stop positions on each page.
For each tab-stop position there is a corresponding tab marker on the Ruler. To set
a tab, point to a spot on the ruler and click once. To change a tab's position, click
on it once, drag it along the Ruler, and click again to drop it. To remove a tab,
drag it up to the top half of the ruler and click.
Set Decimal Tab Stops
In addition to normal tab-stops, geoWrite has a special type of tab-stop that is used
to align the decimal point of a column of numbers. The part of the number before
the decimal point is printed to the left of the decimal tab; the decimal point and the
part of the number after the decimal point arc printed to the right of the decimal
tab. Decimal tab-stops have a solid marker, as opposed to the outline marker used
for regular tabs. To change a regular tab into a decimal tab, click on it once (to
pick it up), press the space bar, (to change it to a decimal tab) and click again (to
set it down).
Set Justification
Justification refers to the layout of each line. geoWrite gives you four justification
options: left, center, right, and full . Left justification causes each line to line up
on the left side. Center justification centers each line between the left margin (or
paragraph margin) and the right margin. Right justification causes each line to
line up on the right side. Full justification causes each line to line up on both the
left and right sides (this paragraph is full justified). To set the justification, click
on one of the justification buttons on the ruler.
Set Line Spacing
geoWrite gives you three options for line spacing: single spacing, one and a half
spacing, and double spacing. To set the line spacing, click on one of the line
spacing buttons on the ruler.
2-13
geoWrite 2.0
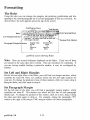
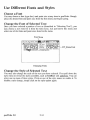
Use Different Fonts and Styles
Choose a Font
You may choose a font (type face) and point size at any time in geoWrite. Simply
select the desired font and point size from the font menu and begin typing.
Change the Font of Selected Text
Once you have selected a portion of text as (described in "Selecting Text"), you
may choose a new font for it from the font menu. Just pull down this menu and
select one of the fonts and point sizes listed in the menu.
Font Menu
i
qeos file
i
edit options: poqe
.
2
Ll'fIT. [[NT£P.C I!IGHTC fLlLlC
Almost
~
hundred diU
\Sill
style
* BSW
n
~ term pllper ~
4
5
S""[ING~ 1. l:(C 20
............ .................
U"LRomo:l ..... ~t in
~he
~nUI~h ':!r t'::O::f~~S':C : :· : ~~ie~t~~:~:· · . . . ~h:lIl~i~in~~t-- L W_Roma Font
oxq~ combinoti
the
~~
· ····C·o·r;:;m·o·dor·@····wo
molecule
other elements~
ems.
Changing Fonts
Change the Style of Selected Text
You may also change the style of the text you have selected. First pull down the
style menu to reveal the styles available, such as boldface and underline. You can
select one or more of these styles. Click on one of the style names to enable it. To
disable a style change, simply click on the style option again.
geoWrite 2.0
2-14
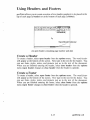
Using Headers and Footers
geoWrite allows you to create a section of text (and/or graphics) to be placed at the
top of each page (a header) or at the bottom of each page (a footer).
q.::!os : file : edit
1options j p(1qe : font : stl"Jle r
2
LEr TO ttt-HU. II! IGKTO fUllD
,
f.-JUSTlflCIITlDN
I~ term p\,pe f_~
,
,
LINE
5~IICIN[i-+
1. 1:(0 20
- PAGE. DATE -
Confidential
I
\.
Open Header I ndicator
___
[D[](i}ID[][!} --
I
I
An open header containing page number and date
Create a Header
To create a header, select open header from the options menu. The word header
will appear at the bottom of the screen. Now type in the text for the header. You
can use fonts, styles, rulers, and pictures just as in the text of the document.
When you are finished entering the header, select close header [Tom the options
menu (open header changes to close header when the header is opened).
Create a Footer
To create a header, select open footer from the options menu. The word footer
will appear at the bottom of the screen. Now type in the text for the footer. You
can use fonts, styles, rulers, and pictures just as in the text of the document.
When you are finished entering the footer, select close footer from the options
menu (open footer changes to close footer when the header is opened).
2-15
geoWrite 2.0
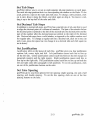
Put the Page Number into the Header or Footer
To put the page number into the header or footer, place the word PAGE (all in
capital letters) into the header or footer. The word PAGE will be replaced with
the current page number when the document is printed.
Put the Date into the Header or Footer
To put the current date into the header or footer, place the word DATE (all in
capital letters) into the header or footer. The word DATE will be replaced with
the current date (as it is set in the preference manager) when the document is
printed.
Put the Time in the Header or Footer
To put the current time into the header or footer, place the word TIME (all in
eapitalletters) into the header or footer. The word TIME will be replaced with
the current time (as set in the preference manager) when the doeument is printed.
A Hint
When the length of the header or footer is changed, the amount of the page
remaining for the main body of the document changes. Because of this, geoWrite
must reformat your entire document when the header or footer changes. Since this
can take a while on a large document, it is best to set up the header and footer (if
you are going to use one) before typing a large document.
Use a Title Page
It is often useful to not have the header and footer appear on the first page of a
document. To do this, choose title page from the page menu.
Set the First Page Nunlber for the Document
The set first page item
number for the document.
as a book, into several
Correct page numbers can
geoWrite 2.0
in the page menu allows you to set the first page
This allows you to break up a very large project, such
smaller files each containing, perhaps, one chapter.
be maintained by using the set first page option.
2-16
Search For and Replace Text
geoWrite allows you to search for words or phrases and to replace these with other
words or phrases. To do this, select search from the options menu.
qeos ~ file ~ edit ~ op~ions : paqe 1 font
r
I
I
i stljle f'I
Seolch /
Search FOI
Replace With
• Whole WOld
.AII Pages
:
Replace
I
.
s
1. ileO 20
--r
-l..
0
Palliol WOld
Page Onl"
o This
IConcel1
1 Next I
--
~ Term P(lper ~
>
2
l[rT. R:NT£I!
-----
Search For Box
R eplace With Box
Search, search/replace dialog box
Search for a Word
The cursor, a blinking 'I', will appear in the Search For box. Type in the word
you want to search for and press Return, or select Next. geoWrite wiII find the
next occurance of the word and select it for you. To replace this word with a new
word, simply type in the new word. To find subsequent occurances of the word,
select find next from the options menu.
Replace One Word With Another Word
To replace one word with another word, type in the word you want to search for in
the Search For box. Move the pointer into the Replace With box and click.
This will move the cursor into this box. Type in the replacement word. When
you do this, an All box will appear between Next and Cancel. Select All to
replace every occurance of the Search For word with the Replace With word. To
decide on each replacement individually, select Next. geoWrite will find the next
occurance of the Search For word and select it.
You may select change, then find from the options menu to replace this
selected word; select find next from the options menu to leave this word
unchanged and find the next occurance of the Search For word. (NOTE: The words
you have replaced wiII not change on the screen until you close or update the
file, or have reached the end of the page.)
2-17
geoWrite 2.0
Whole Word vs. Partial Word Search
Clicking on the Whole Word button causes geoWrite to look only at complete
words while doing a search. For example, searching for the would not match with
there. Clicking on the Partial \Vord button causes geoWrite to find any match,
regardless of word boundries. geoWrite starts in the Whole Word mode.
All Pages vs. This Page Only Search
Clicking on the All Pages button causes geoWrite to search through every page
of your document for a match. Clicking on the This Page Only box causes
geoWrite to search through the current page only. Since geoWrite must load each
page from the disk, the This Page Only mode avoids slow searches when editing
large documents. geoWrite starts in the All Pages mode.
geoWrite 2.0
2-18
Keyboard Shortcuts
Keyboard Short cuts allow you to select frequently used menu and ruler items
directly from the keyboard. Short cuts are selected by holding down the
Commodore key, C= , and pressing the particular key for the short cut desired.
The short cuts for menu items are listed below:
Edit Menu:
cut: C=, and
X
copy: C=, and C
paste(text): C=, and T
paste(picture): C=, and W
Options Menu:
search: C=, and S
find next: C=, and N
change, then find: C=, and Y
open header: C= , and H
open footer: C=, and F
select page: C=, and V
Page Menu:
previous page: C=, and (left ,mow)
next page: C=, and +
goto page: C=, and G
page break: C=, and L
Style menu:
plain text: C=, and P
bold: C=, and B
italic: C=, and I
outline: C=, and 0
underline: C=, and U
superscript: C=, and> or .
subscript: C=, and < or ,
2-19
geoWrite 2.0
In the Ruler:
left justify: C=, and A
center justify: C=, and E
right justify: C=, and R
full justify: C=, and J
single space: C=, and K
one and a half space: C=, and 1\1
double space: C=, and D
For Moving Text Cursor:
left one character: cursor left and the shift keyt
right one character: cursor right
down one line: cursor down
up one line: cursor up and the shift key
Additional Characters
The following additional characters can be created by holding down the Commodore
key and pressing the key indicated:
, { '-- press
, } '-- press
, I '-- press
, _ ' -- press
, \ ' -- press
, ~ , -- press
, " -- press
geoWrite 2.0
C=, and
C=, and
C=, and
C=, and
C=, and
C=, and
C=, and
2-20
r
J
/\
/
*
@
Editing Tips
Let the Word Wrap Work For You
Be sure to allow the word wrap to occur for new lines, and only press Return at
paragraph boundaries. This will make re-formatting much easier since the software
will fill out para!:,'Taphs to match the margin boundaries.
Use a Single Small Font to Enter Your Draft
If you are working on a large document, use a single font in a small point size for
your first draft. This will allow you to view more of the document on one page
and minimize the time that you access the disk for additional font information.
After you have gotten your thoughts down, go back and change the text to the
desired fonts and sizes. This can be done quickly with the select page command
under to options menu.
Use Page Breaks In Large Documents
geoWrite documents can grow up to 62 pages - - assuming enough disk space is
available. In large documents, you should insert page breaks wherever appropriate.
This will maximize the performance of geoWrite. If, however, you have a large
document with no page breaks and you insert a character on the first page, it
might push the last character on the first page down to the second page, and so on,
causing a ripple down effect that may involve every page of the document. By
inserting a page break, the software only has to ripple the changes down to the
next page break.
Update the Document As You Work
After entering a considerable amount of text on a page, you should select update
from the file menu. This will write (save), your current changes to the disk and
protect against losing this data. After selecting update, the cursor will return to
the exact place where you left off in your document.
Recover a Document from the Disk
If you accidently delete a large section of text from a page, or wish to undo all of
your recent editing changes, selecting recover from the file menu. This recover
the last saved version of the current page.
2-21
geoWrite 2.0
Use Graphics From geoPaint
geoWrite allows you to mix geoPaint graphic images with your text. First, read
Chapter 3, "geoPaint" in the GEOS manual, to learn how to copy an image into
the Photo Scrap. Place the Text Cursor where you would like the image to begin,
and select paste from the edit menu. Another sub-menu will appear. Select
photo. This will place the picture onto the page, centered left-to-right.
Show and Hide Pictures
Whenever geoWrite displays a page containing a picture, the pixel-by-pixel image
data for the picture must be loaded from the disk. Since this will slow geoWrite
slightly, you may want to select hide pictures from the options menu. This
will prevent the pictures from appearing in the Writing Window. Space for each
picture will still be reserved in the document, and the pictures will be printed when
print is selected. To show pictures in the Writing Window, select show
pictures from the options menu.
Use the Photo Album
When you select paste and then picture from the edit menu, the current contents
of the Photo Scrap file are used. If you have several pictures or charts you wish to
create in geoPaint and later paste into geoWrite documents, you will probably want
to usc the photo manager desk accessory. Selecting the photo manager gives
you access to any of the graphic images stored in the Photo AJbums on the disk,
you can then cut, or copy any of the images from the Photo Albums into the
geoWrite document. For more details see the "Photo Manager Desk Accessory" in
Chapter 5 of your GEOS manual.
geoWrite 2.0
2-22
Use Text From Other DOCUlnents
In order for text from one geoWrite document to be inserted into another, the text
must first be cut, or copied, into the Text Scrap (see Select Text). After you have
done this, open the second document and position the Text Cursor where you want
the text to be inserted. Select paste and then text from the edit menu. geoWrite
will insert the text into the page.
Use the Text Album
The Text Scrap file used to paste text into a document, only holds one section of
text at a time. If you have several text sections that you wish to copy [rom one
geoWrite application to another, you will probably want to lise the text
manager desk accessory. The text manager will let you collect several text
"clippings" into a Text Album. A text album can be opened, using the text
manager desk accessory, while you are working on a geoWrite document, allowing
you to cut, or copy text from the Text Albums into the geoWrite document. For
more detnils, see "Text Manager Desk Accessory", Chapter 6 of your CJEOS
manual.
2-23
geoWrite 2.0
Print Your Document
In order for your document to be printed, the correct Printer Driver must first be
selected, and its file must be on the disk with geoWrite. If you have not already
done so, return to the deskTop and select the correct printer driver. (See the printer
section of Chapter 2, "GEOS Training Camp" and "Selecting a Printer" in
Chapter 3 of your GEOS manual).
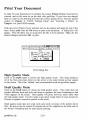
With the correct Printer Driver selected, tum on the printer and align the top of the
form . Select print [Tom the file menu to print your document. A dialog box will
appear. This will allow you to set-up how the file is to be printed. Make all the
desired changes and select OK to print.
qo: o ~ : jil~ ) edit
~~NTtll~
! font j s tl.Jl~
options i p(1qe
1!IlilHC'rLlLLc
"~:5T1rI[RH~N
~ term p(lper ~
,.
LINE 5"RtI N G-+
,
,
1_ 1WC ZD
Print ...
ID
D O.of[ D I1LQ
From Page [D To Paqe [CJ
D Single Sheet &il T,actor Feed
High
c:.::QKJ
'"
iconcell
Print Dialog Box
High Quality Mode
Click on the High button to choose the high quality mode. This mode produces
all of the fonts and styles shown on the screen in the same format as they appear
on the screen. This is the "default" and recommended mode for geoWrite output.
Draft Quality Mode
Click on the Draft button to choose the draft quality mode. This mode does not
produce different fonts and styles and does not produce the same formatting as that
which appears on the screen. Draft quality will print, however, much faster than
the high quality mode. Use this mode to get quick rough drafts of your document.
Pictures or graphics cannot be printed in this mode.
Draft quality mode does not work with some early versions of the printer driver
files. Be sure to use the version 2.0 printer driver files supplied on the back side of
the Writer's Workshop disk for draft quality printing.
geoWrite 2.0
2-24
NLQ Mode
Click on the NLQ button to choose the near letter quality mode. This mode does
not produce different fonts and styles but does produce the same formatting that
appears on the screen. This mode can be used with letter quality printers. To use
this mode, all text must be in the Commodore 10 font. This font is supplied on
the Writer's Workshop disk. Pictures or graphics cannot be printed in this mode.
A few printers have different page lengths for NLQ printing than for graphics
(high quality) printing. Selecting NLQ spacing from the page menu causes
the NLQ page length to be used. Use this option only for printing in the NLQ
mode.
NLQ mode does not work with the early versions of the printer driver files. Be
sure to use the version 2.0 printer driver files supplied on the back side of the
Writer's Workshop disk for NLQ printing.
Select the Page Range to be Printed
Clicking on the From Page and the To Page boxes allows you to specify
which pages of the document to print. For example, to print pages four and five
only, click on the From Page box and typc '4' into the box; click on the To
Page box and type '5' into the box.
Single Sheet vs. Tractor Feed
Clicking on the Single Sheet button causes geoWrite to put up a dialog box
bctween the printing of each pagc. This allows you to inscrt a ncw sheet of
paper for each page. Clicking on the Tractor Feed button causes geoWrite to
print without pausing. geoWrite starts in the Tractor Feed mode.
Note: Printers vary as to the amount of the printed page on which they can
clearly print. For this reason, geoWrite will produce slightly longer pages on
some printers than on others. When geoWrite opens a file that was created on a
printer with a different page length, geoWrite re-formats the file. This reformatting can take a considerable amount of time.
2-25
geoWrite 2.0
Leaving geoWrite
Close the Document
Before leaving geoWrite you must first close the document that you are working
with. Select close from the file menu. The document will be closed, and a dialog
box will appear. Choose one of the three options listed by clicking on it (this
dialog box is explained in the section Entering geoWrite ).
Close and Quit
Selecting quit from the file menu will close the current document, leave geoWrile,
and return you to the deskTop.
geoWrite 2.0
2-26
Chapter 3: geoMerge
-- ---
•
I
This chapter describes geoMerge, a program that will let you produce multiple
copies of a document, such as a form letter. Each copy can have unique names,
addresses, or other data that you can enter in yourself, or which can be read from a
file created by another GEOS program, such as geoDex, geoFi1c, or geoWrite.
3-1
geoMerge
Entering geoMerge
You can enter geoMerge by opening it from the deskTop (as described in the
GEOS manual) . But first you must create a "form" document, described in the
next section.
geoMerge
3-2
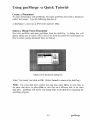
Using geoMerge -a Quick Tutorial
Create a Document
To enter and practice with geoMerge, first open geoWrite and create a document
called "test memo." Type the following data into it:
«ftrstName», meet me at 2PM in the stairwell. Mike.
Select a Merge Form Document
Now exit geoWrite and open geoMerge from the deskTop. A dialog box will
appear asking you to select a ftle to use as the form document (for information on
how to create a merge document form, see below).
Choose form document dialog box
Select "test memo" and click on OK. (Select Cancel to return to the deskTop.)
Note: On a two disk drive system you may also select Drive to view files in
the other disk drive, or select Disk to view files on a different disk in the other
disk drive. geoMerge will not let you change disks in the disk drive containing the
geoMerge program.
3-3
geoMerge
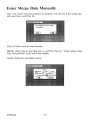
Enter Merge Data Manually
Once "test memo" has been selected, the program will ask you if the merge data
will come from a geoWrite file.
Click on NO to enter the data manually.
NOTE: Select Yes to load data from a geoWrite file (see "Create Merge Data
Files with geoWrite" at the end of this chapter).
Another dialog box will appear asking:
geoMerge
3-4
Print Options
Select either high, draft, or NLQ printing mode depending on the format that
you want to use. Consult the geoWrite 2.0 chapter for more information on these
modes.
The From Page and To Page boxes allow you to print a part of the file.
Normally the entire file is printed. To change the pages printed, click on either of
the boxes and enter a new value.
The Single Sheet and Tractor Feed buttons allow you to print with regular
continuous printer paper, or with single sheets fed in one at a time. geoMerge
will stop after printing each page if Single Sheet is selected.
Once you have made the changes that you want to this dialog box, select OK.
Since you are entering the merge data manually, the program will now start asking
you to supply data each time it encounters a label in the form document. For
example, when geoMerge encounters «firstName» the following dialog box
will appear:
Type in the name you want to replace the label "firstName" with (Paulina, for
instance) and press Retum. Clicking on Cancel here will stop the printing
process. You will then be asked to select another merge form name.
3-5
geoMerge
Print Document
Once geoMerge makes all of the proper replacements, it will print the document
"test memo" with all of the substitutions made in the labels, provided that the
printer is on, and hooked up correctly. While geoMerge prints, you will see a
"cancel" dialog box. Select Cancel if you wish to stop printing for any reason.
The printed document should appear as follows:
Paulina, meet me at 2Pm in the stairwell. Mike.
Do Another Merge...
When geoMerge has printed the document, it will ask if you wish to do another
merge. If you select Yes, the program will again ask you to substitute for "first
name". You can then enter a different name, and geoMerge will print another
document with the new name in place of the «firstName» label. You can do
this for as many stairwell invitations as you wish to make.
Or Quit
Clicking on NO will return you to the initial file dialog box, where you can load
and print a different form, or quit out of the program.
geoMerge
3-6
Making Merge Document Forms
This section will explain how you can make merge document forms.
Labels
Any geoWrite document can be used as a merge document. Wherever you want a
word or group of words to vary [TOm printing to printing, add a label with a
suitable name. The format for a label is as follows:
<<iabelName»
where "labeIName" represents an item to be replaced when you "merge" a
document. The label name cannot contain more than 20 characters, and there
cannot be any formatting, such as font changes, within the label name itself.
However, you can set the whole label in boldface (or any other style) if you wish
the data to appear bold. This lable name can be repeated as often as you wish
throughout the document; geoMerge will ask you once to suppy the data for the
label, and will then use that data each time the label appears.
'If' command
In addition to replacing labels with data, you may wish to have words or groups of
words included, or not, depending on the "value" of a label. For example, if you
are writing cover letters to prospective employers, you may want to include a
specific portion of text if you have previously spoken with them. This can be
done with an IF command. The format for an IF command is as follows:
«IF labelName = "value"»text«ENDIF»
What this means is, "If the data entered for labelName is exactly equal to 'value',
then leave 'text' in when printing the document; otherwise ignore 'text'.
3-7
geoMerge
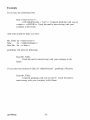
Example
If you have the following form:
Dear «intervieweD>,
«IF talked Already = "true"» I enjoyed speaking with you on
«date». «ENDIF» I look forward to interviewing with your
company in the future.
And when asked for data, you enter:
Mr. Tibbs for «interviewer»
false
for «talkedAlready»
June 9th for« date»
gcoMerge will print the following:
Dear Mr. Tibbs,
I look forward to interviewing with your company in the
future.
If you enter true instead of false for "talkedAlready", geoMerge will print:
Dear Mr. Tibbs,
I enjoyed speaking with you on June 9. I look forward to
interviewing with your company in the future.
gcoMcrge
3-8
'If-Else' command
You may also want to print one portion of text if a label is equal to a certain
value, and another portion of text if it is not. This can be accomplished with the
IF-ELSE command. The IF-ELSE command has the following form:
<<IF labelName = "value"» textl «ELSE»text2«ENDIF»
Example
If your form contains,
Dear «interviewer»,
<<IF talkedAlready = "true"» I enjoyed speaking with you on
«date». «ELSE» I have heard l,,'Teat things about the salaries you
offer.«ENDIF» I look forward to interviewing with your
company in the future.
And when prompted for data, you enter,
Mr. Tibbs for« interviewer»
false
for« talkedAlready»
June 9th for «date»
geoMerge will print the following:
Dear Mr. Tibbs,
I have heard great things about the salaries you offer. I look
forward to interviewing with your company in the future.
1'IOTE: An IF or IF-ELSE command cannot start on one page of a geoWrite
document and end on a following page. Also, IF and IF-ELSE commane!s cannot
be "nested;" that is, an IF or IF-ELSE command could not have appeared in "text"
in the previous examples. However, labels can appear within an IF or IF-ELSE
commane!.
3-9
geoMerge
Using Merge Data Files
Entering the data to be substituted for each label is not the only way to merge
documents. The data can also come from a "merge data file." Merge data files are
simply geoWrite document'>. Other products from Berkeley Softworks, such as
geoDex and geoFile, can create geoWrite documents that are suitable for use as
merge data files. You can also create your own merge data files using geoWrite.
Creating merge data files with geoWrite is described in the next section.
geoMerge
3-10
Create a Merge Data File
A merge data file begins with the label record. This is a list of all of the labels to
be "substituted for" in the merge document form. Each label must appear on a line
by itself. For example, the label record for a form letter might be:
firstName
lastName
address
city
state
zipCode
*
The asterisk at the end of the label list indicates the end of the label record. There
is only one label record in a merge data file, and it is always the first record.
The next line after the asterisk is the first line of the first data record. Each data
entry in the data record is separated by a RETURN. Note that a data entry may be
up to 200 characters long, and include several lines of text, as long as RETURN
is not pressed within the data entry; let the word-wrap create a new line for long
data entries.
Whatever text appears in the first data entry, will be substituted for the first label
in the label record. The second data entry follows immediately after the first, and is
substituted for the second label in the label record, and so on for all of the labels in
the label record. A blank line (i.e., a RETURN on a line by itself) in the data
record tells the merge program not to make a substitution for the corresponding
label in the label record. In others words, each data record must have corresponding
data entries, or blank lines, for every line in the label record.
An asterisk on a line by itself indicates the end of the data record. The next line is
the first line of the next data record. You may type in as many data records as you
like.
The last data record must be followed by an asterisk and a RETURN before the end
of the geoWrite file. Labels must not exceed 20 characters, and a data entry must
not exceed 200 characters in length. When making a long data entry let the wordwrap take you to the next line, since a RETURN indicates the end of a data entry.
3-11
geoMerge
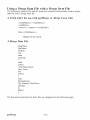
Using a Merge Data File with a Merge form File
The following sample files and the print-out examples demonstrate using a merge
clata file with a merge form file.
A Form letter for use with geoMerge (A Merge Form File)
«firstName» «lastName»
«address»
«city», «state» «zipCode»
Dear «firstName»,
Thanks for the check.
A Merge Data File
firstName
lastName
address
city
state
zipCocle
*
John
Smith
1234 Main Street
Any Town
PA
19152
*
Carl
Greenskeeper
141 Country Club Drive
Chicago
IL
60610
*
The documents generated by these files are displayed on the following page.
geoMerge
3-12
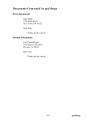
Documents Generated by geoMerge
First Document:
John Smith
1234 Main Street
Any Town, PA 19152
Dear John,
Thanks for the check.
Second Document:
Carl GreensKeeper
141Country Club Drive
Chicago, IL 60610
Dear Carl,
Thanks for the check.
3-13
geoMerge
Chapter 4: Text Grabber
• •
-.-
The GEOS Text Grabber utility application expands the usefulness of geoWrite.
With it, you ean take a file that was created with any of the supported Commodore
word processors and convert it into a geoWrite data file. The formatting directions
from the original word processor will be preserved when converting to geo Write
format (i.e., margins, justification etc.) If you own a word processor that is not
supported, the file can still be converted to a geoWrite document, but the
formatting information will be lost.
This chapter explains how to use the Text Grabber.
4-1
Text Grabber
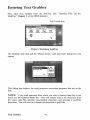
Entering Text Grabber
First, open Text Grabber from the deskTop. (See "Opening Files On the
DeskTop," Chapter 3 of the GEOS manual.)
Text Grabber Icon
~
CEOW&:lITE
rEl
CEOH~"CE
[Ill
(ak<t
Writer's Workshop deskTop
The deskTop will clear and the "Please choose word processor" dialog box will
appear:
This dialog box displays the word processor conversion programs that are on the
disk.
NOTE: If the word processor from which you wish to convert data files is not
listed, use the Generic Form file. This will simply read in all characters from
the source data file, ignoring non-printable characters, and generate a geoWrite
document. You will have to re-format the document in geoWrite.
Text Grabber
4-2
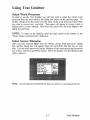
Using Text Grabber
Select Word Processor
In order to use the Text Grabber you will fIrst need to select the correct word
processor from the ones listed in the dialog box shown on the previous page. To
do this, simply move the cursor over the name of the word processor from which
you want to convert text and click. That name will appear in reverse video to
indicate that it is now selected. Now move the cursor over the word Open in the
dialog box and click.
NOTE: To return to the deskTop select the Quit option at the bottom of the
"Please choose word processor" dialog box.
Select Source Filename
After you have selected Open from the "Please choose word processor:" dialog
box, another dialog box will appear listing all non-GEOS fIles that are on your
disk. Use the scroll arrows to find the filename of the word processing document
you wish to convert to geoWrite format. Move the pointer over the filename and
click to select it.
Note: Be sure that the Non-GEOS fIle that you select is a word processor fIle.
4-3
Text Grabber
Using Two Disk Drives
If you have installed two disk drives, and would like to convert a document located
on a disk in the other disk drive to a geoWrite data file, select Drive from the
"Please choose word processor:" dialog box. This will activate the other drive.
Click on the word processor name that you want (it will appear in reverse video)
and select Open.
NOTE: After selecting Drive, an additional button labeled Disk will appear
in the "Choose Source File" dialog box.
If, after switching drives, you discover that the file you want to convert is not on
the disk that is currently in the disk drive, you can click on the Disk button and
insert the correct disk. The program will ask you to insert a new disk and click on
OK to continue with your conversion.
Enter geo Write Filename
After you have selected a valid source file, and click on Open, a dialog box will
appear asking you to supply a name for the geoWrite file to be created, as it will
appear in geoWrite.
Type in the filename, of the file to be created, as you wish it to appear in
geoWrite. (Note: Do not enter a filename that already exists on the disk.) Press
Return. The screen will clear, and the disk drive will activate. After a moment the
geoWrite filename will appear in the title bar, located in the upper righthand corner
of the screen. A box will also appear underneath the title bar containing the name
of the word processor and the source filename for your information.
Text Grabber
4-4
Title Bar
Otherwise, the screen will be empty until the conversion process is completed.
NOTE: If you have entered a filename that already exists on the disk, the
following dialog box will appear:
Click on OK. The screen will clear and return you to the "Please enter write
filename: " dialog box (see above). Re-type the filename and press Return.
To return to the previous dialog box (" ... source filename:"), click on Cancel.
4-5
Text Grabber
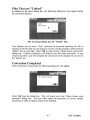
? Unrecognized Character
After pressing Return to begin to convert a file, the following dialog box may
appear:
If you click on Cancel, you will halt the conversion and return to the "Please
choose word processor" dialog box. By clicking on OK you can continue to
convert text, but Text Grabber will insert a ' ? ' into the geoWrite file text in the
position of the unrecognized character, or command. (With each unrecognized
character/Command the above dialog box will appear.) When this dialog box
appears, you should check the information box in the upper righthand comer of the
screen to make sure that Text Grabber is using the proper word processor format
information. If this occurs too frequently you may wish to Select Cancel and use
the Generic Form word processor conversion file.
Text Grabber
4-6
Files That are "Linked"
In addition to the above dialog box, the following dialog box may appear during
the conversion process:
File not found dialog box for "linked" files
Text Grabber has run into a "link" command (a command attaching one file to
another) in the file that you are trying to convert, and the program cannot find the
"linked" file on your disk. Select OK to return to the "Please choose source file"
dialog box. Choose a filename to be linked to the file being converted. If you
select Cancel here, you will complete the conversion of the original file, but not of
the "linked" file.
Conversion Completed
If the conversion is successful, the following dialog box will appear:
Select OK from the dialog box. This will return you to the "Please choose word
processor" dialog box. You can either repeat the procedure to convert another
document, or click on Quit to return to the deskTop.
4-7
Text Grabber
Exiting Text Grabber
To exit Text Grabber at any point, simply select Cancel from the current dialog
box, until you reach the "Please choose word processor" dialog box. Once in this
dialog box, simply click on Quit to return to the Writer's Workshop deskTop.
Text Grabber
4-8
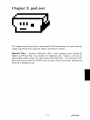
Chapter 5: geoLaser
-
III •
This chapter describes geoLaser, a powerful tool for producing near typeset quality
output of geoWrite files using the Apple LaserWriterT\l printer.
Special Note: Berkeley SofLworks offers a laser printing service (using the
Apple LaserWriter) that is aecessable over Quantum Link. Using it, you can get
professional quality output, by mail, through the Softworks. You can learn more
about this service from the GEOS Forum section of the Commodore Information
Network in Quantum Link.
5-1
geoLaser
Connecting your Computer to the LaserWriter
Talking to the LaserWriter requires a RS-232 interface for your computer
(connected to the user port). Only the Jameco JE-232CM interface card has been
tested. Its switch settings are: I-OFF, 2-0N, 3-0N, 4-0FF. Use a modem cable
to connect the interface card and the LaserWriter.
Entering geoLaser
First, open geoLaser from the deskTop (See "Opening Files On the DeskTop,"
chapter 3 of the GEOS manual.) A dialog box will appear asking you to supply
the LaserWriter baud rate.
Copyright 1986 Berkeley Softworks
Choose RS-232 Serial Transfer Rate dialog Box
On the back of the LaserWriter next to the RS-232 connecter is a metal dial with
four settings. 9600 baud is the normal setting for use with geoLaser, since it is
eight times faster the 1200 baud. Select the proper baud rate on the dial, and click
on the correct baud rate in the dialog box. When everything is correct, click on the
OK box.
geoLaser
5-2
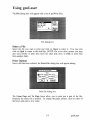
Using geoLaser
The File dialog box will appear with a list of geoWrite files.
File dialog box
Select a File
Select the file you want to print and click on Open to select it. You may also
click on Quit to return to the deskTop. (NOTE: On a two drive system you may
also select Drive to print files from the other disk drive or Disk to print files
from another disk).
Print Options
Once a file has been selected, the Print File dialog box will appear asking:
Print file dialog box
The From Page and To Page boxes allow you to print just a part of the file.
Normally the entire file is printed. To change the pages printed, click on either of
the boxes and enter a new value.
5-3
geoLaser
The Copies box allows you to print multiple copies of the file. Normally a
single copy is printed. To change the number of copies, click on the box and enter
a new value.
The Scale Largest Point Size button controls the printing of non-LaserWriter
fonts. This is explained in the "Non-Resident Fonts" section later in this chapter.
The Overlay button allows you to combine or "overlay" separate pages of the file
onto one page. For example, a three column page could be created by putting each
column in a separate page of the file selected. Each column (or portion of text, or
graphic) must be positioned in the place that it will appear on the printed page.
This can be done by careful usc o[ the Ruler, page indicator, preview page,
and by counting lines on the file's pages. You can produce striking results with
this feature. The geoWrite file "Cake," included on the Writer's Workshop disk, is
an example o[ how the Overlay feature can be used. geoLaser starts with the
overlay option turned off.
Print the File
After making any desired changes to the Print dialog box, click on OK to print
the file. To return to the File dialog box, click on Cancel.
If you have selected 9600 baud, the screen will go blank. When printing large files
the screen will occasionally change colors. This lets you know that geoLaser is
working. After the file is printed, the File dialog box will reappear.
geoLaser
5-4
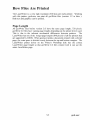
How Files Are Printed
The LaserWriter is a very high resolution (300 dots per inch) printer. Working
with this printer, geoLaser can print all geoWrite files (version 1.2 or later ).
Both text and graphics can be printed.
Page Length
All geoWrite files before version 2.0 have the same page length, 720 pixels.
geoWrite 2.0 files have varying page lengths depending on the printer driver used.
This is due to the inherent mechanical differences between printers. The
LaserWriter has one of the longer page lengths (840 pixels) of all the printers that
are supported by GEOS. When geoLaser prints a document created with a shorter
page, the extra space is divided evenly between the top and bottom margins. The
LaserWriter printer driver on the Writer's Workshop disk has the correct
LaserWriter page length so that geoWrite 2.0 files created with it can use the
entire LaserWriter page.
5-5
geoLaser
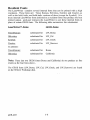
Resident Fonts
The LaserWriter contains several internal fonts that can be printed with a high
resolution. These fonts are: Times Roman, Helvetica, Symbol, and Courier, as
well as the bold, italic, and bold-italic versions of these (except for Symbol). It is
these internal LaserWriter fonts (referred to as resident fonts) that produce the best
printed output. geoLaser instructs the LaserWriter to use these internal fonts in
place of certain GEOS fonts. The following table summarizes this substitution:
LaserWrjter™ Fonts;
GEOS Fonts;
TimesRoman:
substituted for
LW_Roma
Helvetica:
substituted for
LW_Cal
Symbol:
substituted for
LW_Greek
Courier:
substituted for
LW_Barrows
TimesRoman:
substituted for
Roma
Helvetica:
substituted for
California
In addition:
Note: These last two GEOS fonts (Roma and California) do not produce as fine
results as the four fonts above._
The GEOS fonts (LW_Roma, LW_Cal, LW_Greek, and LW_Barrows) are found
on the Writer's Workshop disk.
geoLaser
5-6
Non-resident Fonts
geoLaser prints text in non-resident font') (fonts not supported by the LaserWriter)
by sending the LaserWriter a pixel-by-pixel picture of each character. Since
GEOS's resolution is 80 dots per inch, non-resident fonts appear jagged and broken
compared to resident fonts. Non-resident fonts can also take considerably longer to
print than resident fonts.
geoLaser improves the appearance of non-resident fonts by substituting a larger
version of the font if one is available. For example, geoLaser will send University
24 point in place of University 10 point (or any other smaller size of University)
to the LaserWriter. The LaserWriter then reduces this larger font to the correct
size. This font substitution can only happen if the font file contains a larger point
size than the one being printed. To turn off this automatic substitution, click on
(make the button appear blank), the "Scale Largest Point Size" button in the
Print dialog box.
5-7
geoLaser
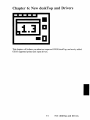
Chapter 6: New deskTop and Drivers
a
.1.3
This chapter will inform you about an improved GEOS deskTop, and newly added
GEOS supported printer and input drivers.
6-1
New deskTop and Drivers
New GEOS deskTop
The new GEOS deskTop file, which is located on the back side of the geoDe x disk,
contains added features that improve the performance of GEOS.
Current Printer Driver Name Displayed
The new deskTop displays the name of the currently selected printer driver in a box
below the printer icon at the bottom of the disk notepad.
Keyboard Shortcuts to: Open/Close Disk, Move Cursor
If you should boot your GEOS disk and do not have the input device that is set as
the default device on that disk, you can use the following keyboard shortcuts to
move the cursor around the screen, and to open and close the disk.
To open the disk:
To close the disk:
To put up the "Select Input
Driver" dialog box:
(Commodore key)
C=, and 0
C=, and C
C=, and I
(This will allow you now to use the
keyboard cursor keys--next to the righthand
Shift key--to move the cursor. [See
"Keyboard Shortcuts," in Chapter 21.
Press the Return key to select an input
driver.)
You should use the latest version of deskTop with your GEOS applications. To
determine which deskTop version is the latest, select the deskTop icon, and click
on info in the file sub-menu (located in the command menu at the top of the
deskTop). The most recent date will be the latest version. Copy the file of the
latest version onto your work disks.
New deskTop and Drivers
6-2
New Printer and Input Drivers
Several new printer and input drivers are now supported by GEOS. A list of them
is located in a Read Me file found on the back side of your disk. Copy this file
onto a work disk that contains any version of geoWrite and open it. Scroll
through the list to find detailed information about your printer and its interface
setup.
The printer driver and input driver files are also located on the back side of the your
disk. You can copy anyone (or several) of these files onto your work disks in
order to print your documents, and to use new input devices.
NOTE: The new printer drivers arc faster than the old drivers, and contain
additional features that will improve your prinling performance. You should,
therefore, replace any old printer driver files that you may be using with copies of
the new ones.
6-3
New deskTop and Drivers
Index
A
additional characters
all page search
2-20
2-18
1-2
5-2
2-17
4-2
4-6
4-6
4-7
4-6
2-2
5-1
2-19
4-7,6-1
6-2
1-2, 1-3
3-3
2-3
4-4
1-3
2-6
2-4
2-12
3-3
2-3
4-4
6-1,6-3
6-1,6-2
6-3
E
4-7
4-2
entering ...
geoLaser
geoMerge
geoWrite
merge data
text
Text Grabber
2-3
3-3
2-2,2-5
D
data entry
data record
date
decimal tabs
deskTop
disk copy
disk icon...
in geoMerge
in geoWrite
in Text Grabber
disks, work
document...
dimensions
rename
double spacing
drive icon ...
in geoMerge
in geoWrite
in Text Grabber
driver...
input
printer
C
change, then find
characters ...
non-printable
un-printable
unrecognized
command...
link
unrecognized
command menu
Commodore Information
Network
Commodore key
conversion ...
completed
program
creating ...
geoWrite files
merge document forms
cursor, text
2-5,2-9
2-11
B
backup Writer's Workshop
baud rate
deleting text
5-2
3-2
2-2
3-4
2-5,2-9
4-2
3-1
3-11
2-16
2-13
7-1
Index
H
F
file ...
convert
linked
non-GEOS
recover
source
update
filename ...
geoWrite
source
write
find next
first page, setting
fonts ...
4-1
4-7
4-3
2-21
4-7
2-21
changing
GEOS
internal
LaserWriter
non-resident
resident
form letter
formatting
footer. ..
date in
open
page number in
time in
4-4
4-3,4-4
4-5
2-17
2-16
2-11
2-14
2-11
2-14
5-6
5-6
5-6
5-7
5-6
3-11
3-12
2-12
2-15
2-16
2-15
2-16
2-16
header...
date in
open
page number in
time in
hide pictures
2-15
2-16
2-15
2-16
2-16
2-22
I
If command
If-else command
indenting
input drivers
install Writer's Workshop
3-7
3-9
2-12
6-1,6-3
1-2
J
Jameco JE-232CM
interface card
justification ...
center
full
left
right
5-2
2-12
2-12
2-12
2-12
2-12
K
keyboard shortcuts
2-5,2-19
L
G
GEOS Forum
generic form
5-1
4-2
label record
labels
LaserWriter™
left margin
line spacing
Index
7-2
3-11
3-5, 3-6
3-7
5-1,5-2
2-12
2-12
M
margins ...
left
paragraph
right
merge data
merge data files
merge document form
merge form file
page length
page numbering
paragraph ...
margin
partial word search
pasting ...
graphics
text
photo album
photo manager
photo scrap
pictures ...
hide
show
pointer
positioning the text cursor
print mode ...
draft quality
high quality
NLQ
printer drivers
2-12
2-12
2-12
2-12
3-4
3-10
3-11
3-12
3-3, 3-7
3-12
N
3-9
nested commands
0
one and a half spacing
open ...
earlier version document
existing document
footer
header
overlay printing
2-12
2-4
2-4
2-15
2-15
5-4
printing ...
from geoLaser
from geoMerge
from geoWrite
merge document
overlay
single sheet
tractor feed
p
page ...
breaks
goto
indicator
next
preview
previous
range
select
2-7,2-21
2-8
2-2,2-8
5-4
2-8
2-7,5-4
2-8
2-25,3-5
2-10
2-21
5-5,2-25
2-16
2-6,2-12
2-12
2-18
2-22
2-11
2-22
2-22
2-23
2-22
2-22
2-2
2-5
2-25,3-5
2-24,3-5
2-25,3-5
6-1,6-2
6-3
5-3
3-5
2-24
3-6
5-4
2-25,3-5
2-25,3-5
Q
Quantum Link
7-3
5-1
Index
R
record ...
data
label
recover file
reformatting
rename document
replacements ...
in geoWrite
merge
right margin
rs-232 interface
ruler
3-11
3-11
2-21
2-9
2-4
2-17
3-6
2-12
5-2
2-2,2-12
5-4
S
scale Largest Point Size
search ...
all page
partial word
this page only
whole word
search and replace
serial transfer rate
set fIrst page
shortcuts, keyboard
show pictures
single spacing
spacing...
double
line
one and a half
single
styles ...
changing
Index
5-4,5-7
2-18
2-18
2-18
2-18
2-17
5-2
2-16
2-5,2-19
2-22
2-12
substitutions...
merge
3-6,3-10
3-11
T
2-6,2-13
2-13
tabs ...
decimal
text...
ablum
inserting
manager
replacing
scrap
selecting
text cursor. ..
positioning
this page only search
time
title bar
title page
2-23
2-5,2-9
2-23
2-11
2-17
2-23
2-10
2-2,2-5
2-5
2-18
2-16
2-2
2-16
U
update file
user port
2-12
2-12
2-12
2-12
2-11
2-14
2-11
2-14
7-4
2-21
5-2
w
whole word search
word processor...
2-18
4-1,4-3
4-4,4-7
select
word-wrap
4-3
2-6,2-21
4-8
3-11
work disks
writing window ...
moving
Writer's Workshop...
backup
install
1-3
2-2
2-8
1-2
1-2
7-5
Index