1
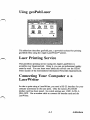
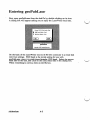
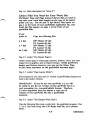
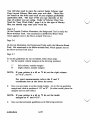
geoPublish User's
Manual Addendum
^^
f
)
including
geoPubLaser instructions
and
geoPublish errata information
Berkeley Softworks
2150 Shattuck Avenue
Berkeley, CA 94704
Special Note
The difference between your current geoPublish disk and this upgrade is that
the geoPubLaser file has been added to the upgrade, and that the geoPublish
application has had some internal improvements added.
geoPublish software design by Jim Deftisco, Doug Fults, Chris Hawley,
Alice Ng, Tony Requist, and Michael Vargas.
geoPublish User's Manual Addendum by Patricia Huey © Copyright
Berkeley Softworks, Inc. 1987
Printed 12/87
Commodore 64 ® is a registered trademark and Commodore 128 is a
trademark of Commodore Electronics, Ltd.
Using geoPubLaser
This addendum describes geoPubLaser, a powerful tool used for printing
geoPublish files using the Apple LaserWriter™ printer.
Laser Printing Service
The LaserDirect printing service (using the Apple LaserWriter) is
accessible over QuantumLink. Using it, you can get professional quality
output by mail. You can learn more about this service from the GEOS
Forum section of the Commodore Information Network in QuantumLink.
Connecting Your Computer to a
LaserWriter
In order to print using a LaserWriter, you need a RS-232 interface for your
computer (connected to the user port). Only the Jameco JE-232CM
interface card has been tested. Its switch settings are: 1-OFF, 2-ON, 3ON, 4-OFF. Use a modem cable to connect the interface card and the
LaserWriter.
A-l
Addendum
Entering geoPubLaser
First, open geoPubLaser from the deskTop by double-clicking on its icon.
A dialog box will appear asking you to supply the LaserWriter baud rate.
Choose RS-232 Serial Transfer Rate
Baud (Blanks Screen)
D 1280 Baud (Blanks Screen)
On the back of the LaserWriter next to the RS-232 connector is a metal dial
with four settings. 9600 baud is the normal setting for use with
geoPubLaser, since it is eight times faster the 1200 baud. Select the proper
baud rate on the dial, and click on the correct baud rate in the dialog box.
When everything is correct, click on the OK box.
Addendum
A-2
Using geoPubLaser
The File dialog box will appear with a list of geoPublish files.
Select a File
Select the file you want to print and click on Open to select it. You
may also click on Quit to return to the deskTop. (Note: On a two-drive
system you may also select Drive to print files from the other disk drive
or Disk to print files from another disk).
Print Options
Once a file has been selected, the Print File dialog box will appear
asking:
The From Page and To Page boxes allow you to print just a part of
the file. Normally the entire file is printed. To change the pages printed,
click on either of the boxes and enter a new value.
A-3
Addendum
The Copies box allows you to print multiple copies of the file. Normally
a single copy is printed. To change the number of copies, click on the box
and enter a new value.
The Smoothing option controls the amount of smoothing to be done on
bitmaps or special text which you designated to be smoothed. Clicking on
this option switches between 75,150, 300, or none. (Selecting "none" will
turn off smoothing.) 75, 150, or 300 smooth to the specified dots per inch.
The option is available because of the large amounts of time required for
smoothing. 300 dpi smoothing takes about four times longer than 150 dpi
smoothing, and about 16 times longer than 75 dpi smoothing.
Select Thumbnails to print a reduced version of every single page of the
document onto one page. The pages are reduced to 22% of their original size
to make all the pages fit onto one page.
Reduce to enables you to reduce or enlarge your documents. A value of
100 is the default for normal printing. Values less than 100 reduce each
page to that percent of the normal. Values of more than 100 enlarge the
document to that percent of the normal. Enlarging causes several sheets of
paper to be printed for each page of the document. For instance, enlarging
one page to 200 percent causes four pages to be printed. Each enlarged page
has tiny crop marks in the corners indicating where the page needs to be
trimmed to allow the pages to be spliced together. Selecting Thumbnails
with a Reduce to value of more than 100 causes just the first enlarged
page (the upper left corner) to be printed.
To print a file:
After making any desired changes to the Print dialog box, click on OK to
print the file. To return to the File dialog box, click on Cancel.
NOTE:
If you are operating in 40-column mode, the screen will go blank
during the printer initialization and printing process. If you wish
to cancel printing, press the input device button (but do not move
the input device). If you are operating in 80-column mode,
however, the screen will display the message "Initializing Printer."
When printing large files, and if you are in 40-column mode, the
screen will occasionally change colors. This lets you know that
geoPubLaser is working. After the file is printed, the File dialog
box will reappear.
Addendum
A-4
How Files Are Printed
The LaserWriter is a very high resolution (300 dots per inch) printer.
Working with this printer, geoPubLaser can print all geoPubish files.
Both text and graphics can be printed.
Resident Fonts
The LaserWriter contains several internal fonts that can be printed with a
high resolution. These fonts apply to both text regions and special text.
These fonts are: Times Roman, Helvetica, Symbol, and Courier, as well
as the bold, italic, and bold-italic versions of these (except for Symbol).
It is these internal LaserWriter fonts (referred to as resident fonts) that
produce the best printed output. geoPubLaser instructs the LaserWriter to
use these internal fonts in place of certain GEOS fonts. The following
table summarizes this substitution:
LaserWriter™Fonts:
GEOS Fonts:
Times Roman:
substituted for
LWJRoma (also Roma)
Helvetica:
substituted for
LW_Cal (also California)
Symbol:
substituted for
LWJ3reek
Courier:
substituted for
LWJBarrows
NOTE: Roma and California (used for Times Roman and Helvetica) do
not produce as fine results as the other fonts above (including
LWJRoma and LW_Cal).
The GEOS fonts (LW_Roma, LW_Cal, LW_Greek, and
LW_Barrows) are found on the geoWrite Workshop disk.
Non-resident Fonts
geoPubLaser prints text in non-resident fonts (fonts not supported by the
LaserWriter) by sending the LaserWriter a pixel-by-pixel picture of each
character. Since GEOS's resolution is 80 dpi, non-resident fonts appear
jagged and broken compared to resident fonts. Non-resident fonts can also
take considerably longer to print than resident fonts.
geoPubLaser. improves the appearance of non-resident fonts by
substituting a larger version of the font (if a larger version is available).
A-5
Addendum
For example, geoPubLaser will send University 24 point in place of
University 10 point (or any other smaller size of University) to the
LaserWriter. The LaserWriter then reduces this larger font to the correct
size. This font substitution can only happen if the font file contains a larger
point size than the one being printed.
Addendum
A-6
Differences Between geoPublish
and geoPubLaser Printed
Documents
If you print a document using geoPublish only, the document will print
exactly as it appears on the screen. If you use geoPubLaser to print the
document, there will be a few differences in the document's appearance.
Transparent/Opaque Option
The LaserWriter does not support the transparent option; it prints all
objects opaque. To minimize the effect of this problem on the printing of
documents, geoPubLaser prints objects in a different order.
geoPublish prints in the following order:
1.
Master page objects (in priority order).
2.
Page Layout regions (in priority order).
3.
Page Graphics objects (in priority order).
geoPubLaser prints in the following order
1.
2.
Master Page transparent objects (in priority order).
Page Graphics transparent objects (in priority order).
3.
Master Page opaque graphics (in priority order).
4.
Page Layout regions (in priority order).
5.
Page Graphics opaque objects (in priority order).
Brush Shape Option
The LaserWriter does not support "brushes" and "brush shapes," but has
"line cap types" instead. This causes the endpoints of objects with large
brushes to appear slightly different.
Pattern Option
The LaserWriter does not support patterns, only levels of gray. Thus
most of the GEOS patterns are not supported and are mapped to 50%
(halfway between white and gray). The GEOS 25%, 50%, 75%, and a few
others are mapped to gray levels on the LaserWriter.
A-7
Addendum
geoPublish Userfs Manual Errata
Information
The geoPublish User's Manual has had a few addtions since the last printing.
i
J
To find the change, go to the indicated page in the manual. In the correction
that follows, text in a regular typeface comes directly from the manual; text
that appears in a bold typeface indicates corrected or added text. Special
comments appear in parentheses.
Page 1-4 (under "A. First install geoPublish")
1:
You can boot in either 64 or 128 mode. To boot in 64 mode, see page
1-4 of your GEOS User's Manual. To boot in 128 mode, see page 1-2
of your 128 GEOS User's Manual.
NOTE:
If you are running GEOS in 128 mode, note that
geoPublish operates in 40-column mode, not 80column mode.
I
J
Pages 1-5-1-6 (under Use the following setup:)
geoPublish program, geoPublish data file, deskTop 1.3, printer driver,
fonts needed, geoWrite data files, Photo Scrap or Photo Manager/Albums as
needed, and Libraries (see "Library Files You Need for Your Work
Disk," below, for details).
Setup 1: RAM disk: geoPublish, geoPublish data file, fonts needed,
geoWrite data files, Photo Scrap or Photo Manager/Albums, deskTop
1.3, printer driver, and Library files. (See "Library Files You
Need for Your Work Disk," below, for details.)
formatted disk:
Floppy,
used to save geoPublish and geoWrite data files.
Setup 2: RAM disk: geoPublish, fonts needed, Photo Scrap or Photo
Manager/Albums, deskTop 1.3, printer driver, and Library files.
(See "Library Files You Need for Your Work Disk," below,
for details.) Floppy, formatted disk: geoPublish and geoWrite
data files.
Addendum
A-8
j
Page 1-6 (after description for "Setup 2")
Library Files You Need for Your Work Disk
The Master Page and Page Layout Library files you need to
copy onto your work disk depend on the type of dot matrix
printer you use. The 60 and 72 dpi library files appear on
page 2 at the back of your geoPublish application disk, and
the 80 dpi files appear on page 1 at the front of your
geoPublish disk.
If your
printer is:
Copy the following files:
a 60 dpi
MP Master 60 dpi
a 72 dpi
PL Layout 60 dpi
MP Master 72 dpi
an 80 dpi
MP Master 80 dpi
PL Layout 72 dpi
PL Layout 80 dpi
Page 2-5 (under "The Master Pages")
Use the master page to create page numbers, headers, footers, any other
original text or graphics, and to import bitmaps. (Unlike geoWrite's
headers and footers, however, you can use the Master Page
to place items anywhere on the geoPublish document page.)
Page 2-7 (under "Page Layout Mode")
This is handy for you, since the 2.1 version of geoWrite has features not
found in the earlier versions.
IMPORTANT:
If you do not own geoWrite 2.1, you will
be unable to use the 2.1 version of your geoWrite files in a
word processing (i.e., non-geoPublish) format.
Therefore,
it is most important that you import a copy, not the
original, of your geoWrite file into a geoPublish
document.
Page 3-2 (under "The Sample Work Disk")
Copy the following files onto a work disk: the geoPublish program, Text
1, Text 2, the Photo Scrap, the LW Roma font file, and a printer
driver.
A-9
Addendum
You will also need to copy the correct Master Library and
Page Layout Library files onto your work disk. These files
are found at the front and back of your original geoPublish
application disk. The type of file you copy depends on the
type of printer you are using. Refer to "Library Files You
Need for Your Work Disk," page 1-6, for the type of library
files you should copy onto your work disk.
Page 3-5
(In the Graphic Toolbox illustration, the Background Tool is really the
Move-to-back Tool. Not mentioned is the Move-to-front Tool,
which appears next to the Move-to-back Tool icon.)
Page 3-6
(In the top illustration, the Foreground Tool is really the Move-to-Front
Tool. Not mentioned is the Move-to-back Tool, which appears next to
the Move-to-front Tool icon.)
Page 3-7
To set the guidelines for our newsletter, follow these steps:
1:
Set the outside vertical margins at the following positions:
1"
(left column, outside margin)
8"
(right column, outside margin)
NOTE:
If your printer is a 60 or 72 dpi, set the right column
at 7-1/2", not 8".
For exact measurements, refer to the X and Y
coordinates box at the lower left corner.
2:
Now you are ready to set the inside margins. Go to the top guideline
margin and click at positions 4 1/2" and 5". (In other words, place the
margins next to each other.)
NOTE:
If your printer is a 60 or 72 dpi, set the inside
margins at 4" and 4-1/2".
3:
Now set the horizontal guidelines at the following positions:
Addendum
A-10
\ J
1"
(header margin)
2-1/2" (header guideline)
10"
(footer margin)
Page 3-7 (under "Create a Header")
2:
Move the cursor into the small area of the page above the topmost
guideline. Pick a position along the top left of the page for die
header and click to choose the starting point for the text.
Page 3-9 (at the top of the page)
...in the lower right (below the bottomost guideline) to place the text. (If
you are using a 60 or 72 dpi printer, select a place within
the 5-1/2" guideline.)
Page 3-9 (under "Create Master Page Graphics")
Running horizontally at the top of each page we want to have some
sort of graphic. We will use a horizontal line for this purpose.
To create a running horizontal line, follow these steps:
1:
Select the Line tool from the toolbox.
2:
Go to the horizontal guideline you placed at the 1"
mark at the top of the page. We want to have the line
extend from the 1" vertical guideline to the 8" (or 71/2") vertical guideline.
Move the cross-hair pointer to
the left point and click to plant the first endpoint. A rubberbanding line will be drawn.
3:
Drag the line across until it touches the 8" (or 7-1/2") vertical
guideline. Ratcheting should make this a simple operation. Plant
the second endpoint by clicking. The line will be entered on the
page.
4:
Now move the horizontal guideline (under the line you
just drew) from 1" to 1-1/2".
A-ll
Addendum
Page 3-11 (under "Use the Snapping Feature")
You will usually want to disable ratcheting when snapping is enabled and
disable snapping when ratcheting is enabled. (You cannot use them
both at once; selecting snap disables ratchet, and vice versa.)
Page 3-11 (under "Reserve Space for the Headline")
2:
With snap enabled, drag the cursor into the upper left comer of the page
where the 1-1/2" horizontal guideline and the 1" vertical
guideline intersect. The cursor should snap to the guidelines. Click
here to plant one corner of the region. A rubber-banding box will
appear.
Page 3-18 (under item # 4)
The region's outline will highlight, and a move button and size button will
appear in the upper left and lower right corners of the region,
respectively.
Page 3-18 (under item # 5)
geoPublish will read and analyze the Photo Scrap on the disk and you will
see the following dialog box:
Page 3-19 (under "E. Create the Page One Headline")
At the head of the first page we want a headline under the name of the
newsletter. This is why we reserved the top portion of the page.
Page 3-20 (at the top of the page)
3:
Click the pointer somewhere near the left side of the box we reserved
for the headline.
Page 3-24 (under "Flow Text into Page 2")
5:
Open a second text region along the right column guidelines. It
should extend from the 4" mark to the 10" mark (vertically). We will
place graphics in the upper portion of this column.
Addendum
A-12
Page 3-26 (under "To draw circles, follow these steps:")
2:
Move the pointer to one of the empty regions and click once to plant
one side of the circle. A rubber-banding circle will appear.
3:
As you move the pointer away from the point you selected, the
circle will become larger. As you move closer, the circle will
become smaller. Select a good-sized circle and single-click to make
it permanent.
Page 3-28 (under "F. Now Print The Jelly Roll")
Once you have completed assembling The Jelly Roll into a presentable
newsletter, you are ready to print it out. Make sure that your
printer is properly hooked up.
Page 4-9 (under Step 2 of "To create a library")
NOTE:
You can have more than one master library per
disk.
However, when you need to use a library
entry, geoPublish will use the first master library
file it finds (i.e., the first one that appears on the
disk).
You can rearrange libraries on the disk, if
necessary, to enable geoPublish to gain access to
certain file.
However, because of limited disk
space, it is easier to have only one library per
disk.
Page 4-13 (under "Importing a geoWrite File")
IMPORTANT: Before you import a geoWrite file, make sure you have
created a backup of that file. Once a geoWrite file has been
converted to a 2.1 version, it cannot be changed back into
its original version. If you do not own geoWrite 2.1, you
will be unable to use the converted file later on in a word
processing (i.e., non-geoPublish) format.
Page 4-21 (under Step 2 of "To create a new library)
NOTE:
You can have more than one layouts library per
disk. However, when you need to use a library
entry, geoPublish will use the first layouts library
file it finds (i.e., the first one that appears on the
A-13
Addendum
disk).
You can rearrange libraries on the disk, if
necessary, to enable geqPublish to gain access to
certain file.
However, because of limited disk
space, it is easier to have only one library per disk.
Page 4-36 (under "To set text attributes")
Point Size Click on the scrolling arrows to increase or decrease the
current size. Point sizes range from 4 to 192.
Page 4-56 (under "Printing Your Document")
Before you select a file to print, make sure that your printer
is properly hooked up and that your work disk contains the
necessary printer driver.
files, refer to "D.
To select and copy the appropriate
Now, Make a Work Copy," page 1-5 of
this manual.
Page 6-4 (under the NOTE in "If you have one disk drive")
If the destination drive is a 1571, make sure it has been configured
as a 1541 disk drive. If necessary, refer to "Appendix L:
Configuring a 1541 Disk Drive."
Page 6-4 (under #4)
If you have two disk drives or one disk drive and a RAM
Expansion Unit:
Page 6-4 (under the NOTE in "If you have two disk drives or one disk
drive and a RAM Expansion Unit:")
If the destination drive is a 1571, make sure it has been configured
as a 1541 disk drive.
If necessary, refer to "Appendix L:
Configuring a 1541 Disk Drive."
Page 6-22 (middle two layout samples)
Master Page: 1C R Punch
Master Page 1C L Punch
Page Layout: 2C Big RM
Page Layout: 2C Big LM
Addendum
A-14
Page 6-23 (lower right sample)
Master Page: 1C Big RM
Page Layout: 2C Big RM
1
Page 6-24 (upper left sample)
Master Page: lCBigLM
Page Layout 2C Big LM
A-15
Addendum