1
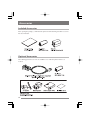
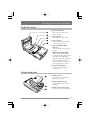
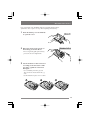
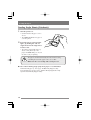
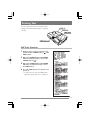
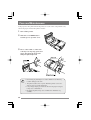
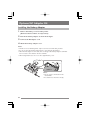
User’s Manual
Handy Printer
PD-22
Latest Information
Printer Drivers, Servicing and Consumables
For the latest information on your PD-22 printer:
• where to obtain service inside or outside of the warranty period
• printer drivers for the latest operating systems
• additional consumables and accessories
please contact Citizen’s office in your region:
United States, Canada, South America:
Citizen Systems America Corporation
www.citizen-systems.com
363 Van Ness Way, Suite 404 Torrance, CA 90501. USA
Tel: (310) 781-1460
Europe, Middle East & Africa:
Citizen Systems Europe GmbH
www.citizen-europe.com
UK: Park House, 643–651 Staines Road, Feltham, Middlesex, TW14 8PA
Tel: +44 (0) 20 8893 1900
Germany: Mettinger Strasse 11, D-73728, Esslingen.
Tel: +49 (0) 711 3906 420
Asia
Citizen Systems Japan Co., Ltd.
www.citizen-systems.co.jp
6-1-12, Tanashi-cho, Nishi-Tokyo-shi, Tokyo 188-8511. JAPAN
Tel: +81 (0) 424 68 4771
CITIZEN is a registered trade mark of CITIZEN WATCH CO., LTD., JAPAN
Company names and product names in this manual are trademarks or
registered trademarks of relevant companies.
Copyright © 2005 CITIZEN SYSTEMS JAPAN CO., LTD.
Contents
FCC Declaration of Conformity ................................................ 4
Declaration of Conformity ....................................................... 5
Compliance Statements ........................................................... 6
Safety Instructions ................................................................... 7
Accessories ............................................................................ 14
Included Accessories ..................................................................................................... 14
Optional Accessories .................................................................................................... 14
External Appearance and Part Descriptions ............................ 15
About the Power Source ......................................................... 18
Loading the Batteries .................................................................................................... 18
Unloading the Batteries ............................................................................................... 20
Turning the Power On and Off .................................................................................... 21
About the Auto Power Off Function ...................................................................... 21
Connecting the Printer .......................................................... 22
Data Reception Methods ............................................................................................ 22
Connecting with the Infrared Port (Optical Interface) .................................... 22
Connecting with the Serial Port (Cable) .............................................................. 23
Loading the Paper.................................................................. 24
Loading Roll Paper ......................................................................................................... 24
If the Paper is Not Loaded Straight ...................................................................... 25
When Printing is Finished ........................................................................................ 25
Feeding Single Sheets (Cut sheets) ......................................................................... 26
Use of the following single (cut) sheet paper is recommended .................... 26
Printing Test .......................................................................... 27
Self-Print Function ........................................................................................................ 27
Hex Dump Function ...................................................................................................... 28
Internal Menu Settings List Print Function ............................................................. 29
Care and Maintenance ........................................................... 30
Troubleshooting .................................................................... 31
Optional AC Adaptor Kit ....................................................... 32
Installing the Battery Adaptor..................................................................................... 32
Specifications ........................................................................ 33
3
FCC Declaration of Conformity
We, the Responsible Party:
declares that the product:
Trade Name:
Product Name:
Model Number:
Citizen Systems America Corporation
363 Van Ness Way, Suite 404
Torrance, CA 90501. USA
Tel: (310) 781-1460
CITIZEN
Printer
PD-22
confirms to the following specifications:
Regulation:
FCC Part 15B, Class B
Test Method:
ANSI C63.4-1992
and therefore is in compliance with the protection requirement of FCC
Rules relating to electromagnetic compatibility.
issued on 1, April, 2005
Authorized Signature:
Toru Morimoto
President
4
DECLARATION OF CONFORMITY
We,
Citizen Systems Europe GmbH
Park House
643-651 Staines Road
Feltham, Middlesex
TW14 8PA. United Kingdom
declare under our sole responsibility that the product:
Product Type:
Thermal Printer
Model Name:
PD-22
manufactured by : Crown Young Industries Ltd
Block 10, Tong Fu Yu Industrial Zone
Long Tian Residents Committee
Keng Zi Subdistrict Office, Long Gang District
Shen zhen 518122, P.R. China
in 2005, to which this declaration relates is in conformity with the following standards:
EMC: EN 55022 / 1998, EN61000-3-3 / 1995, EN 50024 / 1998
Following the provisions of EMC (89/336/EEC) based on the following documents:
1. EMI Test Report issued by OHTAMA CO., LTD.
2. Immunity Test Report issued by OHTAMA CO., LTD.
(European Representative)
London, 1st April 2005
Norimitsu Katoh
Managing Director
Citizen Systems Europe GmbH
5
Compliance Statements
FCC Compliance Statement for American Users
This equipment has been tested and found to comply with the limits for a Class B digital
device, pursuant to Part 15 of the FCC Rules. These limits are designed to provide reasonable protection against harmful interference in a residential installation. This equipment
generates, uses, and can radiate radio frequency energy and, if not installed and used in
accordance with the instructions, may cause harmful interference to radio communications.
However, there is no guarantee that interference will not occur in a particular installation. If
this equipment does cause interference to radio or television reception, which can be
determined by turning the equipment off and on, the user is encouraged to try to correct
the interference by one or more of the following measures:
• Reorient or relocate the receiving antenna.
• Increase the separation between the equipment and receiver.
• Connect the equipment into an outlet on a circuit different from that to which receiver is
connected.
• Consult the dealer or an experienced radio/TV technician for help.
CAUTION: Use shielded cables to connect this device to computers.
Any changes or modifications not expressly approved by the grantee of this
device could void the user’s authority to operate the equipment.
EMI Compliance Statement for Canadian Users
• This Class B digital apparatus complies with Canadian ICES-003.
• Cet appareil numérique de la classe B est conforme à la norme NMB-003 du Canada.
CE Declaration for European Users
CE marking shows conformity to the following criteria and provisions.
• EMC Directive (89/336/EEC)/EN55022, EN55024 & EN61000-3-3
6
Safety Instructions
The Symbols
Instructions that must be followed to prevent any risk to the user and other people and
any damage to property are indicated as shown below. The degree of risk and damage that
will occur if a user operates the machine improperly by failing to obey any of the indicated
instructions are categorized as follows. Read the User’s Manual after you fully understand
this categorization.
Danger
Indicates a situation where there is a high probability
of the death or serious injury of a person.
Warning
Indicates that if a person uses the machine improperly
by failing to obey this instruction, there is a possibility
of death or serious injury.
Precaution
Indicates that if a person uses the machine improperly
by failing to obey this instruction, there is a possibility
of serious injury or of property damage.
Meaning of symbols
This symbol indicates that something must be handled carefully.
This symbol indicates something that must not be done.
This symbol indicates something that must be done.
7
7 Precautions to be followed when handling the printer
Warning
• If the printer is used after it has become hot or produced smoke, a strange smell,
etc., it will start a fire. Immediately cut off the power, remove its battery, and
contact your service representative.
• If any foreign matter (metal scraps, water, or other fluid) gets inside the printer,
first cut off the power and remove the battery, then contact your service representative. If you use it in this condition, it will start a fire.
Precaution
• Do not put in on top of a shaky stand or other unstable place. If may fall or topple
over causing an injury.
• Neither uses it nor stores it in the following locations. If you do, it will malfunction.
– In a car that is exposed to the sun, in any place exposed to direct sunlight, near
a heater etc.
– Place where the temperature and humidity are very high or low or where they
fluctuate widely.
– Extremely dusty place
– Place exposed to water or other fluid
• Do not drop it or vigorously strike or vibrate it. If you do, it will be damaged or
malfunction.
• Keep all foreign material out of the printer. This will cause it to malfunction.
• Do not use a volatile fluid (thinner, benzine, etc.) or wet cloth to clean the printer.
If you do, it will be degraded or discolored. Clean it with a dry soft cloth.
• During printing or when it is in standby status, do not move, shake or strike the
printer. There is a danger that the power will be cut off, losing printing data.
8
Safety Instructions
7 Precautions to be followed when operating the printer
Warning
• Be extremely careful not to touch the print head or paper cutter when replacing
the paper. When the print head has become heated, there is a danger of it burning
your hand. And part of the cutter might cut your hand.
Precaution
• If you use any paper other than the designated kind, the print quality will fall and
the service life of the print head (printing unit) will be reduced.
• Do not perform printing and do not push the paper feed button while there is no
paper in the printer. The heat of the print head will deform the platen (roller) and
friction with the platen will damage the print head.
• Do not tap or rub the print head with a sharp or hard object.
• If moisture has condensed on the print head, be sure to wait until it is completely
dry before performing printing. If you print while the print head is moist, there is a
danger of damage to the print head.
• Do not use any batteries other than AA rechargeable NiMH batteries, AA rechargeable NiCd batteries, and AA alkaline batteries.
• Always use four identical batteries at the same time.
9
7 Precautions when using rechargeable batteries
Danger
• If the fluid of a rechargeable battery gets in your eyes, you will be in danger of
being blinded, so immediately wash them with clean water without rubbing them
and promptly go to a doctor for treatment
• The plus and minus directions of rechargeable batteries are preset. When placing
batteries in the printer, check the plus and minus directions. If you do not, the
batteries may leak, overheat, or crack.
• If you do not obey the following instructions, the rechargeable battery will leak,
overheat, or crack. Be sure to obey the following instructions.
– Do not place them in a fire or heat them.
– Do not remove nor scratch their external tube.
– Do not solder them.
– Do not throw them or strike them vigorously.
– Do not touch their plus and minus terminals with a wire or other metal object.
• Do not take apart or modify a rechargeable battery. If a rechargeable battery is
taken apart or modified, it will leak, overheat, or crack.
Warning
• If fluid from a rechargeable battery touches your skin or clothing, there is a danger
of it harming your skin, so wash it off with clean water immediately.
• Before placing dry cell batteries or rechargeable batteries in the printer, make sure
that the covering of the battery has not been removed and is not scratched.
Be particularly careful when using the same batteries for a long time.
• If the covering on the surface of batteries has been removed or is scratched, do
not use them. If it is, the batteries will short-circuit causing them to leak, overheat,
or crack.
• Do not remove or scratch the covering on the surface of the batteries. If you do,
the batteries will short-circuit causing them to leak, overheat, or crack.
• Do not use old and new batteries, different kinds of batteries, or batteries made by
different makers at the same time.
• When using rechargeable batteries, do not use batteries with different charged
conditions at the same time.
• Do not charge and use alkali batteries or lithium batteries that cannot be charged.
10
Safety Instructions
Precaution
• Do not touch or moisten rechargeable batteries with fresh water or seawater. If a
battery is moistened, it will heat up or rust.
• Do not use or leave rechargeable batteries in hot places. If a rechargeable battery
is used or left in a hot place, it will leak, reducing its performance and service life.
• Store rechargeable batteries where they are out of the reach of infants and small
children. Be extremely careful that an infant or small child does not take out the
rechargeable batteries.
• Use a charger that matches the specifications of each type of battery.
• Be sure to fully charge new rechargeable batteries before using them for the first
time.
• After using a machine that is powered by rechargeable batteries, be sure to turn off
the machine. If the machine is left standing for a long time with its power on, the
batteries will leak.
• When you do not plan to use the printer for a long time, remove its rechargeable
batteries.
• If the batteries overheat, emit smoke or a strange odor or other abnormal
condition appears during use, take the following actions.
1 Quickly turn off the power to the printer and remove the batteries, being
careful not to burn yourself.
2 Return the batteries to the store where you bought them or to a service center.
If you do not, a fire may break out or you may burn yourself.
Please dispose of the used batteries properly and in accordance with local
regulations.
11
7 Precautions when using the specialized RS-232C cable
Warning
• When using one of the connectors on the printer, do not touch the metal part of
the other connector.
Precaution
• There is a danger of static electricity damaging the internal circuits of the product.
• Do not leave the cable wrapped around the product for a long time. If you do,
there is danger of breakage and discoloration of the cable.
7 Precautions when using thermal paper (printing paper)
Precaution
• The darkness (density) of printing varies according to the type of printing paper
used. The printing darkness (density) is adjusted either in the printer driver or
using a software command. For details of this command, please refer to the
Command Reference Manual available from your supplier.
• When using copy type printing paper, set two sheets of copy paper with either in
the printer driver or using a software command. For details of this command,
please refer to the Command Reference Manual available from your supplier.
• When using copy type printing paper, occasionally, the first or second sheet feeds
incorrectly, blurring the printing. When this happens, start the printing over from
the beginning.
12
Safety Instructions
Precaution
• When using thermal printing paper, take the following precautions. Thermal
printing paper becomes discolored or degenerates, resulting in faint printing.
– Do not put printed paper in bright light for a long period.
– Avoid high temperature, humidity, fluids, and sunlight.
– Do not use glue, adhesive, or adhesive tape containing a volatile organic solvent
to retain printed thermal paper by applying it to ground paper.
– When you want to retain the paper for a long time, we recommend that you
either use deterioration-resistant type thermal paper or make a copy on a
copier and retain the copy.
– Do not keep the paper in contact with a PVC film etc. for a long time.
– Avoid ammonia. Keep it away from paper copied on a copier that uses ammonia.
– Do not let perspiration on your hands or oil touch the printed surface of
thermal printing paper (surface to be printed or surface that has been printed).
– When the thermal printing paper will be stored, store it in a dark place where
the average temperature is 25C° or less and the humidity is 65% or less.
• Roll paper curls as it is ejected from the printer, so be careful to prevent it from
entering the single sheet insertion opening.
• It may be impossible to assure the printing quality if the paper thickness is 80µm
or more.
7 Precautions when installing the printing paper
Precaution
• Begin printing only after you have made sure that the printing paper is straight
where it is ejected from the printing (thermal) head. If it is not straight, the paper
will jam.
• To prevent the paper from being bent as it is fed into the printer, make sure that
the front end of the paper is as shown below.
13
Accessories
Included Accessories
After opening the package, confirm that the printer and the following standard accessories
have been included.
Optional Accessories
The following optional accessories are available for use with this printer. Purchase as
needed.
14
External Appearance and Part Descriptions
1 POWER LED (POWER: Green)
The green indicator lights up when the power button ( ) is pressed continuously for
2 to 3 seconds.
Additionally, the indicator blinks according to the printer mode (refer to the Error
Indication Table). The indicator blinks more slowly when the batteries are running low.
Replace the batteries when this occurs.
2 ERROR LED (ERROR: Red)
The red indicator lights or blinks when the printer is unable to print because of the
following conditions.
*1: Indicated only when the printer’s internal “Offline status at reloading paper” setting (p. 29) is
set to “Enable”
Error Indication Table
15
External Appearance and Part Descriptions
3 Optical Receiver
Receives printing data through infrared transmission.
4 Serial Port
Connect the optional RS-232C cable here when using the cable for printing.
5 POWER Button(
)
Turns the printer’s power on and off.
To turn on the power, press this button continuously (2 to 3 seconds) until the power
LED lights up.
6 FEED Button (Paper Feed/Clear Error)
The paper is fed while this button is held down. The feeder does not operate unless
the paper is set in the printer.
7 Cover Open Button
Slide this button to open the cover. Close the cover after loading a roll paper.
8 Paper Check Window
Use to confirm that paper is loaded in the printer.
9 Cut Sheet Insertion Slot
Insert single sheets (cut sheets) of paper here.
0 Paper Exit Slot/Paper Cutter
The printed paper exits from the printer here. The slot includes a cutter (tear bar),
which is used to cut the paper from the roll after printing.
- Roll Paper Cover
Open the cover to load a roll paper. Close the cover after the paper is loaded.
16
External Appearance and Part Descriptions
Inside the Printer
= Paper Feed Roller
This feeds the paper to the
paper exit slot.
~ Paper Holder
The roll paper is placed here.
! Cover Sensor
Detects whether the roll paper
cover is open or closed.
@ Paper End/Black Mark
Detector
Detects whether or not paper is
loaded.
7 About the Black Mark
This is a black marking that is
pre-printed on the paper’s print
side. Once the black mark is
detected, you can then feed the
paper as needed with more
accurate detection of the point
where the paper is to be cut.
# Print Thermal Head
This is the actual printing
component.
Printer Underside
$ Battery Cover
Remove the cover to load the
batteries (see p. 18).
% Battery Release Strip
Pull it upwards to release the
batteries.
^ Battery Protective Sheet
Protects surface of the batteries.
17
About the Power Source
The printer only runs on four AA rechargeable or dry cell batteries.
This section explains how the batteries are loaded and provides additional information
about the batteries.
Loading the Batteries
Use These Batteries
7 You can use the following batteries with this product. Use only four batteries of
identical type.
• AA rechargeable NiMH batteries (Recommended)
• AA rechargeable NiCd batteries
• AA alkaline batteries
7 Do not use any batteries other than those listed above.
Use of batteries other than those specified may result in damage to the unit.
7 The service life of AA alkaline batteries may be reduced according to the environment
or the way they are used. In such cases, use AA rechargeable NiMH batteries or AA
rechargeable NiCd batteries.
Precautions when using batteries
• Before loading dry cell batteries or rechargeable batteries in the printer, make sure
that the covering of the battery has not been removed and is not scratched. And
when removing and replacing rechargeable batteries, handle them very carefully so
that you do not remove or scratch the covers of the batteries.
Be particularly careful when using the same batteries for a long time.
• Remove the batteries from the printer if you are not going to use it for a long time.
If you do not, the batteries may leak.
• The electric power consumption of this printer varies greatly according to the
printing type.
When batteries that have been stored for a long time or AA alkaline batteries that
have been drained of energy are used, the printing may be too light or printer power
may be cut off without any indication of a power reserve error (P. 15).
• The service life of AA alkaline batteries may be shortened depending on the manufacturer and utilization temperature (particularly low temperatures) and the amount of
time that has passed since the batteries were manufactured.
About Battery Chargers
When using NiMH or NiCd batteries, be sure to obtain an appropriate charger that
conforms to the specifications for the respective battery type.
18
About the Power Source
Have on hand the four AA alkaline batteries provided with the printer.
(Follow the same sequence of steps when replacing the batteries.)
1
Slide the battery cover downwards
to open the cover.
2
Raise the release part (green) of
the battery protective sheet.
* Do not vigorously pull up the battery
protective sheet. It might break.
3
Set two batteries in the lower level
according to the directions of the
[+] and [–] symbols as shown in
the figure.
* Set each battery from the [+] side.
They cannot be inserted from the [–]
side.
* Set the batteries in place one at a time.
19
About the Power Source
4
Restore the battery protective sheet and set
two batteries above the battery protective
sheet according to the directions of the [+]
and [-] symbols as shown in the figure.
* Set each battery from the [+] side. They cannot be
inserted from the [-] side.
* Set the batteries in place one at a time.
5
Slide the battery cover up again to close it.
Unloading the batteries
First raise the release part (green) of
the battery protective sheet, remove
the two batteries from the top, then
lift up the battery release lever (red)
and remove the two batteries from the
bottom.
* Do not vigorously pull up the battery
protective sheet. It might break.
If the battery protective sheet has been removed, notify the store where you
bought them or a service center. If you use the printer with the protective sheet
removed, the batteries might short-circuit causing them to leak, overheat, or
crack.
20
About the Power Source
Turning the Power On and Off
Press the power button ( ) continuously for 2 to 3 seconds to turn on the power.
• The green POWER LED lights.
• The red ERROR LED blinks rapidly if no paper is set in the printer.
Press the POWER button ( ) again to turn off the power.
• The POWER LED goes off.
7 About the Auto Power Off Function
If the conditions listed below continue unchanged over a predetermined time period,
the printer automatically shuts off to save battery power (this shutoff time is set at the
factory at three minutes).
• No data received
• No operation with the FEED button (paper feed/clear error)
If the printer happens to be turned off with the Auto Power Off function, press the
POWER button ( ) to turn the printer on again.
21
Connecting the Printer
Data Reception Methods
The printer provides two interfaces for receiving print data and other information: the
serial port and the infrared port (optical interface). The interface selection automatically
switches according to whether or not the RS-232C cable is connected to the serial port.
Data is transferred through the serial port only if the RS-232C cable is connected before
the printer is turned on.
7 Connecting with the Infrared Port (Optical Interface)
1
Direct the printer's infrared port straight at the port of device to be
linked.
• Transmission can be achieved within a 15˚ angle horizontally and vertically from center.
• Confirm that there are no obstacles in the space between the printer and the device
to be connected. Data cannot be transmitted correctly if any obstructions are
present in this space.
• Data may not be received correctly when transmitted in direct sunlight,
under fluorescent lamps, and in other areas with strong light.
• Data may not be received correctly after the printer has been left for an
extended period in temperatures outside the recommended storage
temperature range.
• Transmission distance varies according to the device used and the surrounding conditions, so it may be impossible to establish a connection within the
connection range provided in the specifications. There are devices that
cannot be connected within 10 cm (0.33 feet) of the light receiver.
• A communication error may occur if it is used connected to another
infrared device.
22
Connecting the Printer
7 Connecting with the Serial Port (Cable)
First obtain the optional RS-232C cable (PD79901-0S).
1
2
Turn off the power to the printer and the device to be connected.
Insert the cable connector straight into the printer’s serial port.
• Take care not to connect it upside down. (The connector is connected with the side
marked “PUSH” facing upwards). Forcing the connection may damage the unit.
• To disconnect the connector, pull it out while pressing the part marked “PUSH”.
3
Connect the other end of the cable to the serial port of the device being
connected.
4
Turn on the power to the printer and the connected device.
• Data is transferred through the serial port (through the RS-232C cable) only if the
cable is connected before the printer is turned on.
Precautions When Using the Connector Cable
• Ensure you are using the correct cable. For example,
do not try to force a USB connector cable in this
serial port.
• Do not touch the metal portion of the cable connector once the other end is connected to the printer
port.
• Static electricity poses a risk of damage to the
printer’s internal circuitry.
• Do not leave the cable wrapped around the printer for
extended periods. This may result in short circuiting
and discoloration.
23
Loading the Paper
Loading Roll Paper
1
Turn on the printer.
• The ERROR LED blinks if no paper is
set in the printer.
2
Slide the Cover Open button
towards you to open the cover.
3
Place roll paper in the paper
holder so that the end of the
paper is extending toward you, as
shown in the figure.
4
Move the cover towards you so
that the end of the paper extends
slightly from the paper exit slot.
• Close the cover after removing slack
from the roll paper that you are using.
Slackness may cause a paper jam.
5
Firmly close the cover with both
hands.
The paper is loaded automatically when the internal setting
controlling the automatic
paper feed is set to “ON.”
Make sure the cover is fully
and securely closed.
24
Loading the Paper
7 If the Paper is Not Loaded Straight
Slide the cover OPEN button to open the cover, then adjust the paper by hand.
After confirming that the paper is completely straightened, securely close the cover.
Do not allow the printed paper to enter the single sheet (cutsheet)
insertion slot.
7 When Printing is Finished
When you have finished printing using the roll paper, slowly pull back the printed paper
at an angle along the paper cutter, allowing you to cut it from the roll.
Do not touch the paper
cutter. This may result in
injury to your hand or
whatever part of your
body comes into contact
with the cutter.
25
Loading the Paper
Feeding Single Sheets (Cutsheets)
1
Turn the printer on.
• Confirm that the roll paper cover is
closed.
• The ERROR LED blinks if no paper is
set in the printer.
2
Insert the paper as shown in the
figure, by feeding the end of a
single sheet into the single sheet
insertion slot.
• The printer automatically takes up
about 15 mm (0.6 inch) of the
paper, the ERROR LED goes off, and
the unit is ready for printing.
The paper is loaded automatically when the internal setting
controlling the automatic paper feed is set to “ON.”
Make sure the cover is fully and securely closed.
7 Use of the following single (cut) sheet paper is recommended.
Normal thermal paper (1 sheet type): TF50KS-E2C (Nippon Seishi)
Copy thermal paper (2 sheet type): TLC#25 Black (Naigai Carbon Ink)
Special Labels: HW54S (Nippon Seishi)
26
Printing Test
You can conduct print tests to check the printer
settings and confirm that the printer is operating
correctly.
Self-Print Function
1
With the paper loaded, simultaneously
hold down the POWER button ( ) and
FEED button.
2
When the POWER LED and the ERROR
LED are blinking together, release the
POWER button ( ).
3
When the POWER LED and the ERROR
LED begin to blink alternately, release
the FEED button.
4
Press the FEED button to begin the selfprint test.
• To repeat the test, press the FEED button
again after the previous test is completed.
27
Printing Test
Hex Dump Function
The HEX dump function is used to judge whether or not the transmitted data is correct or
not.
1
With the paper loaded, simultaneously
hold down the POWER button ( ) and
FEED button.
2
When the POWER LED and the ERROR
LED are blinking together, release the
POWER button ( ).
3
The POWER LED and the ERROR LED
start blinking alternately, slowly at first.
When the LED starts blinking faster,
release the FEED button.
4
Press the FEED button to execute the hex
dump.
28
Printing Test
Internal Menu Settings List Print Function
1
With the paper loaded, simultaneously
hold down the POWER button ( ) and
FEED button.
2
When the POWER LED and the ERROR
LED are blinking together, release the
POWER button ( ).
3
The POWER LED and the ERROR LED
alternately blink, slowly at first, then a
little faster, then very fast; when they are
flashing very fast, release the FEED
button.
4
Press the FEED button to begin printing
of the internal menu settings.
• When the internal menu settings are printed
out, the printer automatically turns off.
Note: The Internal Settings of the printer are
usually pre-configured by the supplier for
the particular application. These settings can
be changed by software commands from a
computer or using a special configuration
utility under Windows. For further details of
this, please contact your supplier or visit
Citizen’s web sites shown at the beginning of
this manual.
29
Care and Maintenance
If the paper becomes jammed inside the printer, or if some other such problem occurs,
remove the paper and clean the printer's interior.
1
Turn off the printer.
2
Slide the cover OPEN button
towards you to open the cover.
3
Use a cotton swab or other such
soft object to wipe any grime and
paper dust from the feed roller
and print (thermal) head.
• Never bring any hard object in contact with the head. This may
result in damage to the unit.
• The print head becomes very hot. Allow the printer to rest for a
short to protect yourself from burns.
• If any foreign object gets inside the head or the paper feed gear,
it may cause a malfunction.
• Dropping the printer may cause a malfunction. Handle it very
carefully.
30
Troubleshooting
No malfunction may be indicated in the following situations. Check these points before
considering malfunction as the cause of your problem.
Problem
Printer not operating
Cause
• Printer is not turned on.
• Battery “+” and “–” terminals are
reversed.
• Batteries are running low.
• Rechargeable batteries are not
Solution
• Press the POWER button ( ).
• Install the batteries so that they
are in the proper direction.
• Replace all batteries with fresh
batteries.
• If using rechargeable batteries,
fully charge the batteries.
• Change the batteries again.
sufficiently charged.
Paper cannot feed
• A foreign object is caught on the
gear.
• Remove the foreign object.
Error results when
executing print
command
• Printer is not properly connected
to other device with cable.
• Make sure the printer and the
device issuing print commands are
connected correctly with the RS232C cable, then turn on the
power to the printer.
• Printer is not turned on.
• Paper is jammed in the printer.
• Turn on the power.
• Open the paper roll cover and
remove the jammed paper or
other obstruction.
• Devices are either too close
together or too far apart.
• Adjust the distance between the
two devices so that they are in the
range given in the specifications
(p. 22).
• Align both ports so that they are
directly facing each other.
Cannot print using
infrared transmission
• Infrared ports are not on axis.
Note: The service life of AA alkaline batteries may be reduced according to the environment or the way they are used. In such cases, use AA rechargeable NiMH batteries
or AA rechargeable NiCd batteries.
31
Optional AC Adaptor Kit
Installing the Battery Adaptor
1
Remove the battery cover from the printer.
(Remove batteries if there are any loaded.)
2
Push in the battery adaptor as shown in the figure.
3
Connect the AC adaptor cord.
4
Attach the battery adaptor cover.
Notes:
• This kit is for use with this printer only. You cannot use it with other products.
• Be sure to insert the battery adaptor before connecting the AC adaptor.
• When the AC adaptor is connected, there is voltage at the battery adaptor’s terminals.
Do not create a short between the two terminals.
• When using batteries, be sure to use the original battery cover.
Notes:
• Do not create a short between the
twoterminals.
• Be careful not to insert incorrectly.
32
Specifications
Category
Specification
Printing Method
Direct Thermal
Print Speed
Normal thermal paper (1 sheet type): 300 dotlines/second
(maximum) (64 dots/line or less)
• Print speed with batteries fully charged and printer set to
fast printing
Copy thermal paper (2 sheet type): 100 dotlines/second (64
dots/line or less)
• Print speed with batteries fully charged and printer set to
fast printing
Printhead
Total Dot Count: 384 dots/dotline
Dot Pitch: 8 dots/mm
Print Width: 48 mm (1.89 in.)
Head Life: 50 million pulses (12.5% print ratio, normal temperature, rated energy)
But not if the head has been damaged by a foreign object.
Durability: Recommended designated paper.
30 km (32808 yd.) or greater (w/specified paper).
10 km (10936 yd.) or greater (transfer paper: original
+ one sheet)
Print Direction
Portrait: Normal print mode (printing while receiving data)
Page mode: Printing after reception of data for one page
Landscape: In page mode only
Emulations
Conforms to ESC/P commands, barcode commands (ESC/POS
compatible)
Fonts
Roman, Sans serif, Courier, Prestige, Script
Character codes
ASCII 96 Normal Characters
International Characters: 16 Languages +1 Legal Character set
IBM Characters and Graphics
Code page:
USA, MULTILINGUAL, PORTUGAL,
FRENCH-CANADA, NORWAY, SCANDINAVIA,
YUASCII, LATIN 2, CYRILLIC, RUSSIAN,
HUNGARIAN, KAMENICKY, TURKEY,
ICELANDIC, WELSH, MAZOVIA, UKRAINIAN,
NEW HEBREW, OLD HEBREW, DEC HEBREW,
GREEK 437, GREEK 851, GREEK ABC, GREEK
ELOT 928, CYPRUS, MALTA, ARABIC NLS,
ARABIC EXT, UNISYS, BRAZIL ASCII, BRAZIL
ABICOMP, LATIN 1
Windows Page:
US ANSI, CYRILLIC, ANSI, EAST EUROPEAN
ANSI
33
Category
Specification
Print Columns
21 columns (10 CPI), 25 columns (12 CPI),
32 columns (15 CPI), 36 columns (17 CPI)
Character Font Dot Matrix Sizes
18 H x 24 V (10 CPI), 15 H x 24 V (12 CPI),
12 H x 24 V (15 CPI), 10.5 H x 24 V (17 CPI)
Barcodes
UPC-A, UPC-E, JAN13(EAN), JAN8(EAN), ITF, CODABAR,
CODE39, CODE128
Print Paper
1) Paper Feed Method
2) Media Width
3) Paper Path
4) Media Types
5) Recommended Papers
Friction Feed
0
0
58–1 mm (2.28 –0.04 in.)
Rear (Clamshell)
Single Sheet (Cut Sheet)/
Continuous 1-sheet or copy paper (original + 1 sheet)
(only folded paper supported for continuous transfer paper)
1-sheet Paper: TF50KS-E2C (Nippon Seishi)
Copy Paper: TLC#25 Black (Naigai Carbon Ink)
Special Labels: HW54S (Nippon Seishi)
• Paper Roll Diameter:
Maximum outer diameter φ30 mm (φ1.18 in.)
Minimum diameter for starting roll φ8 mm (φ0.32 in.)
* Do not fold back or apply adhesives to paper rolls ends
Interfaces
Optical Interface <IrDA 1.0>
Serial Port <RS-232C> Special Cable (optional)
IrDA Interface
Transfer Rate: 115200 bps (maximum)
Serial Port
Transfer Rates: 4800, 9600, 19200, 38400, 57600, 115200 bps
Parity: Even, Odd, No
Data Length: 7- or 8-bit
Stop bit: 1- or 2-bit
IR Transfer Range
Figures apply with printer and computer ports on-axis and directly
facing each other, with the computer IR port within a vertical and
horizontal angle ±15° from center
IrDA: Maximum 60 cm (approx. 2 ft.) (may vary according to the
computer and environmental conditions; see p. 22)
Input Buffer Size
64 KB
LED Color
POWER LED: Green
34
ERROR LED: Red
Specifications
Category
Power Source
Specification
4 x AA cells (Rechargeable NiMH/Rechargeable NiCd/Alkaline)
Supply Voltage
Rechargeable NiMH: 4.8 V DC
NiCd: 4.8 V DC
Dry Cell
Alkaline: 6.0 V DC
Power Check Functions
Auto Power Off, Low Power Detect
Printable Lines
Approximately 14000 Lines (with rechargeable NiMH batteries)
Count for the print of slide patterns at 25˚C (77˚F), with unused
AA rechargeable NiMH batteries loaded and print density set to
0; the number of lines that can be printed continuously varies
according to the manufacturer of the batteries, the utilization
temperature, and the amount of time that has passed since the
batteries were manufactured. The above numbers of lines are
criterion that cannot be assured.
Environmental Conditions
Warranted Operating Temperature: 0˚C (32˚F) to +45˚C (113˚F)
(with rechargeable NiMH/rechargeable NiCd batteries)
Warranted Print Temperature: 5˚C (41˚F) to +40˚C (104˚F)
(with rechargeable NiMH/NiCd batteries)
Storage Temperature: –20˚C (–4˚F) to +60˚C (140˚F)
Operational Humidity: 30% to 90% RH (no condensation)
Storage Humidity: 30% to 90% RH (no condensation)
Applicable Standard
FCC Part 15B, Class B/EN55022/EN55024/EN61000-3-3
Power Consumption
7 W (with rechargeable NiMH/NiCd batteries), 8 W (with alkaline
batteries)
Dimensions
77.4 mm (W) x 108.3 mm (D) x 35.4 mm (H)
(3.05 in. (W) x 4.26 in. (D) x 1.39 in. (H))
Weight
Printer (including four AA alkaline batteries) 215 g (0.474 lb.) or less
Included Accessories
User’s Manual, Size AA Alkaline Batteries (4), 30 mm (1.18 in.)
diameter Roll Paper (length approximately 10 m (32.8 ft.))
Optional Accessories
RS-232C cable (9-pin D-sub type connector/Part No. PD799010S), Roll Paper, AC Adaptor Kit (Part No. PD69957-0S)
35
Printed in China
PD74939-50F