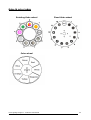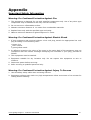
1
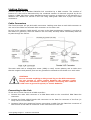
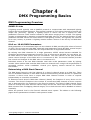
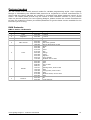
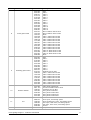
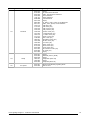
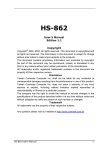
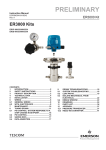
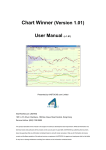
!
!
!
!
!
! AS 330 !
!
Osram Sirius HRI 330W
Spot Moving Head
!
User Manual!
© Conic Lighting Designs, 1 Mar 2014, All Rights Reserved.
Information and specifications in this document are subject to change without notice. CONIC
Lighting Designs assumes no responsibility or liability for any errors or inaccuracies that may
appear in this manual.
Trademarks used in this text: Conic Lighting Designs is a registered trademark.
Other trademarks and trade names may be used in this document to refer to either the entities
claiming the marks and names or their products. Conic Lighting Designs disclaims any
proprietary interest in trademarks and trade names owned by others.
!
!
User Manual Version 1.0
Saturday 1 March 2014
Conic Lighting DesignsTM - Luminaire User Manual! !
!
!
!
!
!
! 1
Contacting Conic Lighting DesignsTM
!
Sales Department
Conic Lighting Designs.
803A, 8/F Far East Consortium Building
121 Des Voeux Rd. Central, Hong Kong
e-mail: [email protected]
!
Customer Service
[email protected]
Conic Lighting Designs
803A, 8/F Far East Consortium Building
121 Des Voeux Rd. Central, Hong Kong
e-mail: [email protected]
Website
!
!
!
http://www.conicld.com
Conic Lighting DesignsTM - Luminaire User Manual! !
!
!
!
!
!
! 2
Important Safety Information
Instructions pertaining to continued protection against fire, electric shock, and injury to
persons are found in Appendix A. Please read all instructions prior to assembling, mounting,
and operating this equipment.
!
Información Importante De Seguridad
En el Apéndice A se encuentran instrucciones sobre protección continua contra incendios,
descarga eléctrica, y lesiones personales. Lea, por favor, todas las instrucciones antes del
ensamblaje, montaje y operación de este equipo.
!
Symbols
The following international caution and warning symbols appear in margins in this manual
CAUTION: This symbol appears next to Caution messages.
Ignoring these messages could result in personal injury
and/or damage to equipment.
!
WARNING: This symbol appears adjacent to high voltage
warning messages. Ignoring these messages could result
in serious personal injury.
!
!
!
This symbol indicates the minimum distance from a
lighted object
Warranty information
Limited Warranty
Unless otherwise stated, your product is covered by a one year parts warranty to be counted
from shipment date. The buyer must provide receipts or invoices for verification of purchase
and date. If purchase date cannot be proved, date of manufacture will be used to determine
warranty period.
!
Freight
All shipping costs will be paid by the purchaser. Under any circumstances freight collect
shipments will be accepted.
Warranty will be absolutely invalid if the product is damaged, modified in any way, or if the
item has been negligently repaired.
!
Conic Lighting DesignsTM - Luminaire User Manual! !
!
!
!
!
!
! 3
Table of Contents
Chapter 1!
Product Overview!
6!
Features ..............................................................................................6
Operation ...................................................................................................6
Construction ...............................................................................................6
Related products and accessories ............................................................6
Specifications .......................................................................................7
Physical specifications ..................................................................................7
Shipping dimensions & weight .............................................................................7
Mounting information ...................................................................................8
Electrical/Optical information.........................................................................8
Operation ...................................................................................................8
Chapter 2!
Setup and Configuration!
9!
Unpacking the fixture ............................................................................9
Installing a power cable cab ...................................................................9
Installing a Neutrik PowerCon .................................................................9
Mounting the fixture ............................................................................10
Mounting the fixture upright ........................................................................10
Mounting the fixture on a truss ....................................................................10
Safety Cable ....................................................................................................10
Clamp.............................................................................................................10
Mounting Procedure ..........................................................................................10
Linking Fixtures ..................................................................................11
Cable Connectors .......................................................................................11
Connecting to the Link ................................................................................11
Powering On the Fixture.......................................................................12
Setting the DMX Start Channel .............................................................12
Shutting Down the Fixture....................................................................12
Chapter 3!
The Menu System!
13!
Menu navigation .................................................................................13
Menu map..........................................................................................13
Chapter 4!
DMX Programming Basics!
Conic Lighting DesignsTM - Luminaire User Manual! !
15!
!
!
!
!
!
! 4
DMX Programming Overview ................................................................15
DMX512 Links ...........................................................................................15
8-bit vs. 16-bit DMX Parameters ..................................................................15
Determining a DMX Start Channel ................................................................15
Protocol modes ...................................................................................16
DMX Protocols ..........................................................................................16
DMX-1 mode: 16 channels ................................................................................16
Gobo & color index ..............................................................................20
Appendix!
21!
Important Safety Information ...............................................................21
Warning: For Continued Protection Against Fire .............................................21
Warning: For Continued Protection Against Electric Shock ...............................21
Warning: For Continued Protection Against Injury To Persons ..........................21
Apéndice : Información Importante De Seguridad ...................................22
Advertencia: Para la protección continua contra incendios ..............................22
Advertencia: Para la protección continua contra shock eléctrico ........................22
Advertencia: Para Protección Continua Contra Lesiones Corporales ..................22
Conic Lighting DesignsTM - Luminaire User Manual! !
!
!
!
!
!
! 5
Chapter 1!
Product Overview
The AS 330 is a very powerful luminaire, able to work as a spot. Offering from very narrow and
bright 4º beam to an impressive 25º spot beam, its scan movement runs smoothly and fast. It
comes with 2 gobo wheels, one fixed and one rotating, color wheel, 2 bi-directional rotative
prisms, smooth dimming from 0-100%; strobe with pulse and random effects, iris, zoom, focus
and frost functions.
!
Features
!
Operation
•
•
•
•
•
•
!
540º pan and 240º tilt movement
Color wheel, static gobo & rotating gobo wheels
Smooth dimmer from 0 to 100%
Auto-switching power supply
100-240 V AC power input
ZOOM, FOCUS, IRIS, FROST and strobe
Construction
• Neutrik PowerCon input.
• 5 or 3 pin XLR DMX connectors
• Thermo plastic housing (black)
!
Related products and accessories
The following table lists related products and accessories available for the EBS 280 fixture. For
more detailed information, contact your Conic Lighting DesignsTM dealer/distributor or Conic
Lighting Designs Sales Team (see contacts section on page 2)
Item Description
Ordering code
Flight case for 2 fixtures
FC-AS330-2
NEUTRIK PowerCon input connector, cable mount (blue)
PWRCON-IN-B
C-Clamp
CLAMP-C
Safety cable
SAFECAB
!
Conic Lighting DesignsTM - Luminaire User Manual! !
!
!
!
!
!
! 6
Specifications
!
Physical specifications
Fixture Dimensions: 375 mm x 461 mm x 662 mm
Fixture Weight:
!
22,5 kg
Shipping dimensions & weight
Single fixture carton
Dimensions: 450 mm x 430 mm x 730 mm
!
Weight:
27,5 kg
Flight case dimensions (2 pcs/case):
Dimensions: 920 mm x 690 mm x 785 mm
!
!
!
Weight:
96 Kg (Case + 2 Fixtures)
Conic Lighting DesignsTM - Luminaire User Manual! !
!
!
!
!
!
! 7
Mounting information
EBS330 can be truss mounted using suitable clamps. Clamps and accessories for truss
mounting installation should be ordered separately. It can also stand upright on a suitable and
stable surface.
Electrical/Optical information
• Power Input: 100-240 VAC; 50-60 Hz; 460 W
• Light Source: Osram Sirius HRI 330 watt
• Beam Angle: 4º to 25º
!
Operation
•
•
•
•
•
•
!
Pan 540º; Tilt 240º
Control: DMX 512
Minimum distance to lighted object: 1 meter
DMX connectors: 3 or 5-pin male and female XLR connectors
Maximum ambient operating temperature: 40º C
Minimum ambient operating temperature: -30º C
Conic Lighting DesignsTM - Luminaire User Manual! !
!
!
!
!
!
! 8
Chapter 2!
Setup and Configuration
!
Use the following steps to set up and configure your fixture:
1.
2.
3.
4.
5.
6.
!
Unpack the fixture.
Install power cord cap for your location.
Mount the fixture upright or suspended from a standard truss.
Connect the fixture to a DMX controller via DMX cabling.
Connect the fixture to power.
Configure the fixture for DMX control.
Unpacking the fixture
The fixture is transported in a shipping box or flight case specifically designed to protect the
product during transportation. When unpacking, inspect the fixture for physical damage of its
components. Conic Lighting Designs assumes no responsibility for products that are damaged
during transport. Always transport a product in its shipping box or flight case.
!
Installing a power cable cab
The fixture is shipped without a power cable although it is ordered by customer. When
installing the power cord, be sure you chose the right input connector as main power input and
chose the correct cord cap for your area. Please note that our standard cores in the mains lead
are colored according to the following criteria:
• green and yellow = earth
• blue = neutral
• brown = live
!
Installing a Neutrik PowerCon
!
!
!
!
!
1. Place bushing and chuck onto the cable.
2. Prepare cable as shown above. The power cable must be a three-conductor 2.5mm2 cable.
3. Insert wires into the terminals and fasten the clamping device by a flat screwdriver.
4. Push insert and chuck into housing (pay attention to the guiding keyway.)
5. Fasten bushing.
Conic Lighting DesignsTM - Luminaire User Manual! !
!
!
!
!
!
! 9
Mounting the fixture
This fixture can be mounted suspended from a support system (as a truss) or freestanding on
its base.
WARNING
This equipment is suitable for dry locations only. Do not
expose this equipment to rain or moisture.
CAUTION:
Always use a secondary safety cable when mounting this
fixture.This fixture must be installed and operated by
trained personnel only.
!
!
!
!
!
!
!
!
!
Mantain a minimum distance of 1 meter from a lighted
object
!
Mounting the fixture upright
To mount the fixture upright, place the fixture on a stable non-flammable surface that will
support more than the weight of the fixture. If the surface is above floor height, use safety
cables to secure the fixture to the surface.
!
Mounting the fixture on a truss
To mount the fixture on a truss, use a reliable and certified truss that will support more than
the weight of the fixture.
Safety Cable
We strongly recommends that you use a safety cable when mounting any fixture. You must
supply your own safety cable and verify that the cable is capable of supporting the weight of
the fixture. You can order safety cables from your Conic Lighting Designs dealer/distributor.
(see Related Products and Accessories on page 5).
Clamp
You must supply your own clamps and verify the clamp is capable of supporting the weight of
the fixture. You can order C-clamps for truss mounting from your Conic Lighting Designs
dealer/distributor (see Related Products and Accessories on page 5).
Mounting Procedure
To mount fixtures on a truss:
1. Disconnect power to the fixture. If the fixture has been operating, allow the fixture to cool
before handling.
2. Always stand on a firm, stable surface when mounting a fixture to its support. The fixture
should be at a height where you can comfortably work on it, and should either be resting
on a stable surface, or held securely.
3. Attach suitable clamp in the clamp attaching holes on the fixture.!
4. Tighten the clamps firmly to the fixture’s base and to the support.
5. Loop one or more suitable safety cables around the support, through the safety wire holes
in the fixture.
!
!
Conic Lighting DesignsTM - Luminaire User Manual! !
!
!
!
!
!
! 10
Linking Fixtures
Fixtures operate on a standard DMX512 link controlled by a DMX console. The number of
fixtures on a link will be determined by the combined number of channels required by all the
fixtures. A EBS 280 fixture using Standard protocol requires a maximum of 25 channels on a
DMX512 link. Attach the fixture to the link using data-grade cable and 3/5-pin XLR cable
connectors.
!
Cable Connectors
The fixture accepts 3/5-pin XLR cable connectors. Cabling must have a male XLR connector on
one end of the cable and a female XLR connector on the other end.
Pin one is the common (cable shield), pin two is the data complement (negative), pin three is
the data true (positive). Pins four and five are not used, but they allow a secondary data link
to pass through the fixture.
Test each cable with a voltage/ohm meter (VOM) to verify correct polarity and to make sure
that the negative and positive pins are not grounded or shorted to the shield or to each other.
!
CAUTION:
Do not connect anything to the ground lug on the XLR connectors.
Do not connect or allow contact between the common (cable
shield) and the fixture’s chassis ground. Grounding the common
could cause a ground loop and/or erratic behavior.
!
!
!
!
!
Connecting to the Link
To link one or more fixtures to a DMX controller:
1. Connect the male XLR connector of a DMX Data cable to the controller’s DMX Data Out
connector.
2. Connect the Data cable’s female XLR connector to the Data In connector of the first (or
next) fixture on the DMX link.
3. Continue linking the remaining fixtures connecting a cable from the Data Out connector of
each fixture to the Data In connector of the next fixture on the link.
Conic Lighting DesignsTM - Luminaire User Manual! !
!
!
!
!
!
! 11
4. Terminate the link by
installing a 120 ohm, 1/4
watt (minimum)
terminator in the fixture’s
Data Out (female) cable
connector in the last
fixture on each DMX link.
A terminator on the last
fixture of the link
prevents data reflection, which can corrupt the data communication on the link.
!
Powering On the Fixture
CAUTION:
Do not power on the fixture until verifying that the line cord
cap is suitable for the power source in your location. For
more information, see Installing a Power Cord Cap on page 8.
!
!
!
To power on the fixture, simply connect it to a 100-230 V AC power source.
Once the fixture is connected to a power source, it automatically begins a homing procedure to
verify the major functions of the fixture.
!
Setting the DMX Start Channel
Each fixture requires a block of consecutive channels on a 512-Channel DMX link. The number
of channels depends on the protocol you are using.
To set the Start Channel on an fixture:
1. Access the fixture’s menu system via the on board display of the fixture. For a detailed
description of the menu system, see Chapter 3: The Menu System.
2. Press and hold the Menu button until AddR appears on the display. Press the Enter button
to select.
3. The display will show the start channel currently assigned to the fixture.
4. Use the Up and Down arrow buttons to select a new DMX start channel. The display will
show a new option ready for selection.
5. Press the Enter button to store the new DMX Start channel. The display will stop flashing
when a new option is entered.
When setting the Start channel on a fixture, remember:
• A fixture’s physical location on the link does not have to coincide with the order of channel
range assignments in the link.
• The fixture’s channel range must not overlap any other device’s channel range on the link.
When two devices on the same DMX link have overlapping channel ranges, one or both
devices will be disabled or behave erratically. The single exception would be if two or more
fixtures need to respond to controller commands in exactly the same way. In that case, those
fixtures must be the same type and must share the entire channel range.
!
Shutting Down the Fixture
To shoot down a fixture you can simply switch off power.
!
!
Conic Lighting DesignsTM - Luminaire User Manual! !
!
!
!
!
!
! 12
Chapter 3!
The Menu System
!
Menu navigation
Access the menu system via the jog wheel on the fixture. The display will
items you can select from the menu map.
show the menu
To access the menu system: press the <Enter>.
To scroll the menu items: use the wheel.
To return to the previous option without changing the value: Select <Exit> on
the menu.
To select/store option/value: press <Enter>.
Menu map
Level 1
Level 2
Setup
DMX Address
Invert
Level 3
Description
Start address
Invert Pan
OFF
Sets reverse pan OFF
ON
Sets reverse pan ON
OFF
Sets reverse tilt OFF
ON
Sets reverse tilt ON
OFF
Set display in normal mode
ON
Set display in reversal mode
Option
Invert Tilt
Display
Reversal
Backlight
Information
Open
Keeps display backlight always open
Auto
Closes after 15s
System version
Shows sw version information
Fixture hours
Shown time info of the fixture
Lamp hours
Show time info of the lamp
Time clear
Manual control
Clear
Fans monitor
Shows fan monitoring information
DMX monitor
Shows DMX information of all the functions
Lamp
Factory default Load password
OFF
Switch the lamp OFF
ON
Switch the lamp ON
1111
Conic Lighting DesignsTM - Luminaire User Manual! !
Restores the factory parameters
!
!
!
!
!
! 13
Level 1
Level 2
Level 3
2222
Description
Color adjust
R.Gobo adjust
S Gobo adjust
Pan Adjust
Tilt adjust
!
!
Conic Lighting DesignsTM - Luminaire User Manual! !
!
!
!
!
!
! 14
Chapter 4!
DMX Programming Basics
!
DMX Programming Overview
!
DMX512 Links
A lighting console typically uses a DMX512 protocol to communicate with automated lighting
fixtures and conventional dimmers. This protocol consists of 512 unique channels of control per
output link (universe). Typically a lighting fixture or device will use a channel for each
parameter’s function. Each channel consists of 256 values ranging from 0 to 255. The lighting
console is programmed to transmit a corresponding DMX value for the desired function of each
parameter. All DMX values are stored within in the lighting console, and typically are referred
to as cues, scenes, or presets. A lighting console locates a device on the link by it’s DMX Start
Channel.
8-bit vs. 16-bit DMX Parameters
Most parameters of an automated light use one channel of DMX providing 256 values of control
(0-255). This is known as 8-bit DMX. Although most parameters use 8-bit DMX, several require
a more accurate range of values than can be provided with a single DMX channel.
By utilising two DMX channels for a single parameter, 65535 values become available for
controlling and adjusting parameter functions. This is known as 16-bit DMX. You can adjust 16bit DMX values in both coarse and fine increments. The first channel of the pair provides
coarse control changes of the DMX value in increments of 256. The second channel provides
fine control and changes of the DMX value in increments of 1.
Individual access of the two DMX channels used with 16-bit parameters varies by lighting
console. Most modern DMX consoles bind these two channels into a single 16-bit parameter to
accurately perform 16-bit crossfades. Consult your lighting console manual for further
information.
Determining a DMX Start Channel
The DMX Start Channel is the first channel of a device’s channel range on a DMX link. There
are 512 available channels on each DMX universe divided among all the devices in a particular
universe. A device must have a unique DMX Start Channel number in order to respond
independently to controller commands.
To determine each device’s DMX Start Channel, identify the footprint of every device on the
universe. The device’s footprint is the number of consecutive DMX channels a device requires
and is determined by the channels in the fixture’s protocol. The fixture’s DMX channel range
must not overlap any other device’s channel range on the link. When two devices on the same
DMX universe have overlapping channel ranges, one or both devices will be disabled or behave
erratically.
Select the protocol level in the fixture’s onboard menu system. The tables on the following
pages list the parameters included in each protocol mode.
!
!
Conic Lighting DesignsTM - Luminaire User Manual! !
!
!
!
!
!
! 15
Protocol modes
You can choose from several protocol modes for variable programming styles. Conic Lighting
Designs is distributing the detailed DMX protocols as requested to console manufacturers to
ensure that the fixture libraries are created in a method that allows optimum control of the
fixture. The charts below provide only an outline of each channel's function. If your console
does not provide a library for Conic Lighting Designs, please contact the console manufacturer
to have one created or contact your dealer/distributor to get the latest version available for the
luminaire you are using.
!
DMX Protocols
DMX-1 mode: 16 channels
Ch. #
Function
1
Cyan
000-255
0-100%
2
Magenta
000-255
0-100%
3
Yellow
000-255
0-100%
4
CMY macros
000-003
004-195
196-255
Empty
CMY Color gradual
Macros speed slow to fast
Color
000-004
005-009
010-014
015-019
020-024
025-029
030-034
035-174
175-255
White
Red
Green
Blue
Orange
Yellow
Magenta
Color gradual
Rainbow slow to fast
6
Strobe
000-003
004-007
008-097
098-101
102-151
152-155
156-205
206-209
210-249
250-255
Close
Open
Slow to fast
Open
Opening Pulse, slow to fast
Open
Closing Pulse, fast to slow
Open
Random strobe, slow to fast
Open
7
Dimmer
000-003
004-255
Off
Linear dimmer
5
DMX Value Description
Conic Lighting DesignsTM - Luminaire User Manual! !
!
!
!
!
!
! 16
Ch. #
Function
DMX Value Description
Fixed gobo wheel
000-003
004-007
008-011
012-115
016-019
020-023
024-027
028-031
032-035
036-039
040-043
044-047
048-051
052-101
102-143
144-151
152-159
160-167
168-176
177-184
185-191
192-199
200-207
208-215
216-223
224-231
232-239
240-247
248-255
Open
Gobo 1
Gobo 2
Gobo 3
Gobo 4
Gobo 5
Gobo 6
Gobo 7
Gobo 8
Gobo 9
Gobo 10
Gobo 11
Gobo 12
Wheel rotation fast to slow
Wheel rotation slow to fast
White
Gobo 1 shake slow to fast
Gobo 2 shake slow to fast
Gobo 3 shake slow to fast
Gobo 4 shake slow to fast
Gobo 5 shake slow to fast
Gobo 6 shake slow to fast
Gobo 7 shake slow to fast
Gobo 8 shake slow to fast
Gobo 9 shake slow to fast
Gobo 10 shake slow to fast
Gobo 11 shake slow to fast
Gobo 12 shake slow to fast
White
Rotating gobo wheel
000-007
008-015
016-023
024-031
032-039
040-047
048-055
056-063
064-071
072-127
128-143
144-159
160-175
176-191
192-207
208-223
224-239
240-255
Open
Gobo 1
Gobo 2
Gobo 3
Gobo 4
Gobo 5
Gobo 6
Gobo 7
Gobo 8
Rotation slow to fast
Gobo 1 shake slow to
Gobo 2 shake slow to
Gobo 3 shake slow to
Gobo 4 shake slow to
Gobo 5 shake slow to
Gobo 6 shake slow to
Gobo 7 shake slow to
Gobo 8 shake slow to
R Gobo rotation
000-063
064- 127
128-191
192-207
208-223
224-239
240-255
Gobo angle adjustment
Counter clockwise fast to slow
Clockwise slow to fast
Swing slow to fast 90º
Swing slow to fast 180º
Swing slow to fast 270º
Swing slow to fast 360º
11
Iris
000-087
088-127
128-167
168-207
208-247
248-255
Min to max
Zoom open, Increasing speed
Zoom closed light -open, Increasing speed
Slow open, fast close, increasing speed
Fast open, slow close, Increasing speed
Min Iris
12
Animation
000-255
Fire panel entry
8
9
10
Conic Lighting DesignsTM - Luminaire User Manual! !
!
!
!
fast
fast
fast
fast
fast
fast
fast
fast
!
!
! 17
Ch. #
Function
DMX Value Description
13
Animation rotation
000-003
004-097
098-191
192-207
208-223
224-239
240-255
14
Prism
000-084
085-169
170-255
Empty
8-facet prism
3-facet prism
15
Prism rotation
000
001-063
064- 126
127-128
129-191
192-207
208-223
224-239
240-255
Empty
0º to 90º angle adjustment
Clockwise, increasing speed
Stop
Counter clockwise, increasing speed
Swing slow to fast 90º
Swing slow to fast 180º
Swing slow to fast 270º
Swing slow to fast 360º
16
Frost
000-255
Linear frost
17
Zoom
000-255
Max to min
18
Focus
000-255
Linear focus
19
Pan
000-255
0-540º
Pan Fine
000-127
128-178
179-204
205-255
0-1,8º
21
Tilt
000-033
034-036
037-152
153-155
156-218
219-221
222-246
247-249
250-255
0 - 240º
22
Tilt Fine
20
Conic Lighting DesignsTM - Luminaire User Manual! !
Empty
Clockwise rotation, decreasing speed
Counter clockwise, Increasing speed
Swing, Increasing speed (1,8º)
Swing, Increasing speed (7,2º)
Swing, Increasing speed (28,8º)
Swing, Increasing speed (57,6º)
0 -1,8º
!
!
!
!
!
! 18
Ch. #
DMX Value Description
Function
000-013
014-024
025-035
036-046
047-’57
058-068
067-079
080-090
091-101
102-112
113-123
124-134
135-145
146-156
157-163
164-170
171-177
178-184
185-191
192-198
199-205
206-212
213-219
220-226
227-233
234-240
241-255
Empty
XY movement blackout
Gobo, Iris shortcut blackout
Color blackout
Prism blackout
Frost blackout
Empty
XY, Gobo, color, prism, frost blackout
Gobo, color, prism, frost blackout
LCD light (5s)
LCD close (5s)
LCD reverse (5s)
LCD positive (5s)
Fixture reset (5s)
R. Gobo Reset (5s)
S- Gobo reset (5s)
Colour reset (5s)
CMY reset (5s)
Animation reset (5s)
Strobe reset (5s)
Iris reset (5s)
Prism reset (5s)
Zoom reset (5s)
Focus reset (5s)
All functions reset (5s)
XY reset (5s)
Empty
24
Lamp
000-031
032-063
064-159
180-191
192-223
224-255
Empty
Reduced power (50W)
Empty
Lamp OFF (after 5s)
Empty
Lamp ON (after 5s)
25
XY speed
000-001
002-255
Speed controlled by lighting desk
Fast to slow
23
!!
!
Function
Conic Lighting DesignsTM - Luminaire User Manual! !
!
!
!
!
!
! 19
Gobo & color index
!!
!
Rotating Gobo wheel
Fixed Gobo wheel
Color wheel
!
!
!
!
!!
!
Conic Lighting DesignsTM - Luminaire User Manual! !
!
!
!
!
!
! 20
Appendix
Important Safety Information
!
Warning: For Continued Protection Against Fire
1. This equipment is designed for use with specified components only. Use of any other type
components may be hazardous and may void the warranty.
2. Do not mount on a flammable surface.
3. Maintain minimum distance of 1.0 meter from combustible materials.
4. Replace fuses only with the specified type and rating.
5. Observe minimum distance to lighted objects of 1 meter.
!
Warning: For Continued Protection Against Electric Shock
1. If this equipment was received without a line cord plug, attach the appropriate line cord
plug according to the following code:
• brown–live
• blue–neutral
• green/yellow–earth
2. In different countries, the colors of the cores in the mains lead of this equipment may not
correspond with the colored markings identifying the terminals in your plug, proceed as
follows:
3. This equipment must be earthed.
4. Equipment suitable for dry locations only. Do not expose this equipment to rain or
moisture.
5. Disconnect power before servicing.
6. Refer servicing to qualified personnel only.
!
Warning: For Continued Protection Against Injury To Persons
1. Use secondary safety cable when mounting fixtures.
2. Equipment surfaces may reach very high temperatures. Allow a minimum of 10 minutes for
cooling before handling.
!
!
Conic Lighting DesignsTM - Luminaire User Manual! !
!
!
!
!
!
! 21
Apéndice : Información Importante De Seguridad
!
Advertencia: Para la protección continua contra incendios
1. Este equipo se ha diseñado para ser usado unicamente con componentes específicos. El
uso de cualquier otro tipo de component puede resultar peligroso, y anula la garantía.
2. No monte el equipo sobre una superficie inflamable.
3. Mantenga una distancia mínima de 1 metro a materiales combustibles.
4. Cambie los fusibles únicamente por otros que sean del tipo y la clasificación especificadas.
5. Guarde una distancia mínima de 1 metro a objetos iluminados.
!
Advertencia: Para la protección continua contra shock eléctrico
1. Si recibió el producto sin un enchufe de alimentación eléctrica, monte el enchufe correcto
siguiendo el código siguiente:
• marrón–línea
• azul–neutro
• verde/amarillo–tierra
2. Desconecte el suministro de energía antes de cambiar lámparas o dar servicio de
reparación.
3. Este equipo debe ser conectado a tierra.
4. Este equipo debe usarse únicamente en ambientes secos. No lo exponga a lluvia ni a la
humedad.
5. El servicio de reparación de este equipo debe ser realizado únicamente por personal
qualificado. El interior no contiene repuestos que puedan ser reparados por el usuario.
!
Advertencia: Para Protección Continua Contra Lesiones Corporales
1. Utilice cables secundarios de seguridad para instalar el equipo.
2. La superficie del equipo puede alcanzar temperaturas muy altas. Deje que se enfríen
durante 10 minutos antes de tocarlas.
Conic Lighting DesignsTM - Luminaire User Manual! !
!
!
!
!
!
! 22