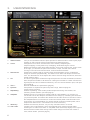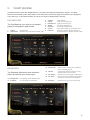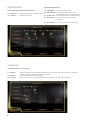
1
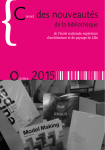
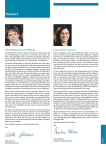
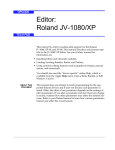
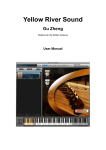
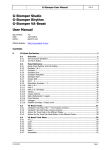
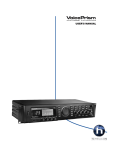
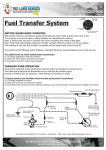
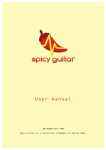
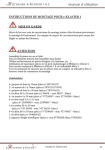
GALAXY PIANOS
Quickstart
Guide
1
Quickstart Manual for Galaxy Pianos
1.
2.
3.
4.
5.
WELCOME...........................................................................................................2
INSTALLATION....................................................................................................3
USER INTERFACE..............................................................................................6
VELOCITY EDITOR.............................................................................................8
WARP ENGINE..................................................................................................... 9
1.
WELCOME
Thank you for buying a virtual piano from the Galaxy Piano line.
This quickstart guide will lead you through the installation process and will show you the basics
of the Galaxy Piano user interface. For more information, use the info field in the Kontakt 4 library
tab or go to www.galaxypianos.com .
1.
Galaxy Piano Models
Currently Galaxy Pianos presents four pianos, the first three being part of the GALAXY II Grand
Piano Collection. All pianos are also available in the reduced Download Edition:
GALAXY STEINWAY A handpicked STEINWAY D concert grand, recorded at Galaxy Studios, both in stereo and 5.1 Surround
VIENNA GRAND A huge and powerful BÖSENDORFER 290
1920 GERMAN BABY GRAND A 75 year old VINTAGE BLÜTHNER with a beautiful, intimate tone
GALAXY VINTAGE D Bauer Studios‘ Vintage Steinway D from 1920, used in dozens of
legendary Jazz Recordings
2.
•
•
•
•
•
•
•
•
•
•
•
•
•
•
•
•
•
•
•
2
Features
Every piano contains more than 2000 samples in 24 Bit
Mapped in up to 13 modeled velocity zones for a wide and smooth dynamic range
Real sustain resonance and release samples with multiple velocity
Real una corda samples (soft pedal)
Adjustable hammer, pedal, damper and string noises
Sympathetic String Resonance with real overtones
Sostenuto and redamper pedal functions
Halfpedalling when used with continuous sustain pedals
Adjustable piano lid
Native Instrument’s Kontakt Player 4 included
Lossless sample compression
Direct access to all parameters
One-button control of tone colour, warmth, punch, brilliance, low keys and dynamics
Adjustable stereo width and position
Flexible and easy to use velocity editor
Specially designed compressor for typical pop piano sounds
Warp section with five FX machines for extreme sound design
High-end convolution reverb with many different rooms, halls and ambiences
Recorded at renowned recording studios
2.
INSTALLATION
To complete the full installation you need to install the library and the Kontakt Player 4 playback
engine. The Kontakt installer can be found on the separate installation DVD in your package.
1.
•
•
•
•
•
2.
System Requirements
Intel Mac and MAC OS 10.5 Leopard or higher
Intel PC with Windows XP / Vista / 7
At least 1GB RAM (2GB recommended)
Approximately 5GB disk space for the Vintage D library / 18GB for Galaxy II
Kontakt 4 runs stand-alone or as plug-in via VST, AU or RTAS for Pro Tools 7 & 8
Installation under OS X
1. Insert the Galaxy Vintage D installer DVD and
open it in your finder. Double-click on the file <Galaxy Vintage D installer Mac>.
2. First the installer will determine, if the Vintage
D and Kontakt Player 4 can be installed on your
computer. If your Mac is, for instance, a Power
PC, the installer won’t start, as Kontakt 4 needs
an Intel mac.
3. The next page will inform you that at the end of
the installation large sample files will be installed.
4. Next is the software license agreement.
5. After agreeing to the license agreement, you
have to choose a destination for the Galaxy
Vintage D Software, not the large library files. In
this dialogue external drives will be unavailable,
however, they can be selected in the next screen.
6. Press continue to install the software to the
default location.
7.After pressing continue you can choose the
destination for the large library files, which are
approximately 5GB. If you want to install them to
an alternative destination, click the folder „shared“
and choose „other“. (The library does not have to
be on the system disk, it can be another internal
or an external hard drive. But it must be a fast
drive, because the samples will be streamed from
the disk.)
3
8. When you get to the next screen, press install
to begin library installation.
9. After about 20 to 30 minutes, the installation is
finished and will show the final window.
3.
Installation under Windows
1) After running the setup, you’ll be greeted by the
welcome screen. Just click next to continue the
installation.
2) Then you’ll see the license agreement. Please
read it carefully. You are only allowed to continue
the installation if you agree to the terms. To do
so, click the checkbox below the textbox and click
next.
3) The next screen just gives you an overview
about what will be installed. There is nothing really
important here so just click next.
4) On the next screen you may choose the installation folder for the Vintage D library. Make sure
that you install the library on a fast drive that has
enough free space.
5)Click the change button to change the installation path and click the next button when you are
satisfied.
4
6) On the next screen just click next to start the
installation.
7) The installation will take some time.
8) After the Vintage D library has been successfully
installed you’ll see this screen:
When the library and the Kontakt Player 4 are installed, you’ll need to authorize the library with
Native Instrument’s Service Center, which has been installed together with Kontakt into you application folder. In Service Center you will need to enter the serial number, which can be found on
the library DVD’s envelope. Service Center also serves for updating the Kontakt 4 software. For
Library updates please go to www.galaxypianos.com or directly to the download page using the
info button of the library browser.
After authorizing, start Kontakt 4 and go to the
library tab, where you now can find your Galaxy
Pianos library. Press on ‘instruments’, load one of
the pianos and enjoy.
5
3.
USER INTERFACE
24
5
2
6
7
8
9
10
3
4
11
12
1
13
14
25
27
28
15
16
29
17
26
18
19
20
21
22
23
30
33
32
31
34
1. Global Presets: 2. Colour: 3. Resonances: 4. Lid:
5. Tone +:
6. Dynamic:
7. Repedalling:
8. Halfpedal:
9. Silent Key:
10. Una Corda:
6
Lets you choose different kind of piano presets for different kinds of music styles (Style Presets) or effect sounds (‘Playing with Pads’ and ‘Warped Pianos’).
Changes the tone colour or timbre from soft to hard by readjusting the
sample mapping. It’s a dynamic way of mapping, while balancing the volume
differences between softer and harder samples. As a result of turning the ‘Colour’ knob to the right, you will hear the piano sound harder, crisper, and with more attack.
Turning it to the left it will sound warmer, softer and with less attack.
Pressing the sustain pedal on a piano raises all the dampers at once, enabling all
strings to resonate sympathetically. This adds a much fuller and deeper sound to the
note. The ‘Resonances‘ knob adjusts the volume of these string resonances, when the sustain pedal is down.
The lid of a grand piano reflects the higher frequencies from the soundboard, while the
lower frequencies radiate in all directions. Closing the lid leads to a duller sound as the high frequencies cannot radiate as effectively. You can choose between open, half open and closed lid.
Reveals additional tone parameters (page 8).
Compresses or expands the piano‘s dynamic range, while keeping the
overall volume constant.
Enables repedalling: if the sustain pedal is depressed during note release, the
remaining sound sustains. (see also page 9)
Enables the use of a continuous sustain pedal for ’half-pedalling’. On a piano you can decide how far the dampers are lifted from the strings by controlling how far down you press the pedal. This affects the release time and the amount of resonance. When the Halfpedal button is unchecked, a continuous sustain pedal is transformed into an on/off switch. (For half-pedalling you need a special continuous sustain pedal, which outputs midi values from 1-127 instead of an on/off command.)
Enables the silent key function: very low key velocities result in no sound.
Loads the una corda samples, which are triggered when pressing the left pedal.
Pressing the so called ’una corda’ or ’soft pedal’ shifts all the keys slightly to the right so that the hammer strikes fewer strings. When fewer strings are struck this creates a more ‚hollow’ timbre. (see also page 9)
11. Listening Position: The samples in Galaxy Pianos are panned with the low notes on the left and the high notes on the right, which corresponds to the listening position of the player. Using the ’Listening Position’ button swaps left and right.
12. Voice Management:Defines the maximum number of playable voices. (This can also be deactivated.)
Voice Management administrates the used voices in a musical, intelligent way in
contrast to the ‚Max Voices‘ adjustment in Kontakt.
13. Tuning:
Allows you to select different tunings. The default tuning is ‚stretched‘, which is the way the piano was tuned for sampling. Stretched tuning accommodates the natural
‘inharmonicity’ of metal strings. This ‘inharmonicity’ stretches harmonics beyond their theoretical frequencies. Solving this dilemma involves some stretching of the higher notes upward and the lower notes downward from their theoretical frequencies. The amount of stretching depends on the length of the string, thus the size of the piano.
14. Release Samples: Loads and enables release samples. When hitting a key, the damper leaves the string. When releasing the key, the damper comes down to the string again. The energy generated by a loudly vibrating piano string, especially by the longer more powerful bass strings, can’t be stopped by the small felt damper right away. So the sound just sort of ‘dies away’, which takes some time especially in the low strings. This is
represented by the release samples.
15. Hammer:
Loads and enables hammer noise samples. When releasing a key, the hammer returns to its resting position. This noise, which happens along with the Release Sample, is called ‘Hammer Noise’.
16. Pedal:
Loads and enables pedal noise samples. Because the pedals in a grand piano are such strong mechanisms, they transfer a lot of energy to the whole piano body and the soundboard, resulting in some low frequency resonance. When using a continuous sustain pedal, the volume of the pedal, damper and string noises depends on the speed in which the pedal is pressed.
17. Damper:
Loads and enables damper noise samples. The damper pedal raises all dampers from the strings at once when pressed and drops them back on the strings when released. Both result in a short ‘damper noise’. This feature is dynamically playable with a
continuous sustain pedal.
18. String:
Loads and enables string noise samples. When the dampers leave the strings after pressing the damper pedal, each damper pulls its corresponding string a little bit,
resulting in vibration of each string with its resonance frequency. (Dynamically playable with a continuous sustain pedal.)
19. Overtones:
Loads and enables overtones. After hitting a key, the corresponding strings may
resonate at their fundamental or overtone frequencies when other strings are triggered. These overtones add ’liveliness’ to the sound. This is also known as ‚Sympathetic String Resonance‘
20. Stereo Width:
Widens or narrows the stereo field. The mid position corresponds to the
stereo width of the original recording, left position to mono, turning it to the right
enhances the stereo width.
21. Transpose:
Transposes the piano in halftones via MIDI transpose up to three octaves.
22. Fine Tune:
Tunes the piano in cents within +/- 50cents.
23. Basic Pitch:
Lets you select the basic pitch, also often called ‚Concert Pitch‘, from 436 - 444 Hz.
24. Velocity:
Opens the Velocity Editor.
25. Space:
On/Off for convolution reverb. Convolution reverb uses the impulse responses of real acoustic spaces to simulate the acoustics of those rooms. These IR’s are a bit like the room’s ‚fingerprint’. Convolution reverb is unbeatable in quality and realism when it comes to simulating real acoustic spaces like concert halls, churches or studio rooms.
26. IR:
Selects the Impulse Response file. When loading the Galaxy Steinway 5.1 in surround, there will be five additional IRs in the presets, which are sampled in 5.0 .
27. Send:
Controls the amount of signal sent to the reverb unit, that is, the amount of reverb.
28. Size:
Increases or decreases the virtual size of the chosen room type.
29. Pre Delay:
Controls the amount of pre-delay before the actual IR reverb starts.
30. Pads:
Activates or deactivates the Pad Machine.
31. Pad Presets:
Allows you to select the pad preset you want to play.
32. Pad Volume:
Controls the volume of the selected pad sound
33. Warp:
Opens the Warp Engine.
34. Info:
Opens an info page about the instrument and its recordings.
7
The ‘+’ button toggles between the two pages of the tone menu.
41
35
36
37
38
39
40
4.
35. Warmth:
Creates a warmer and deeper sound by using an intelligent EQ.
36. Punch:
Increases the instrument‘s punch by using an intelligent EQ.
37. Brilliance:
Boosts the instruments brilliance by using an intelligent EQ.
38. Low Keys: Changes the volume of the keys below middle C. The lower the key the stronger the effect.
39. Compression:Controls the amount of compression, combining several parameters and depending on the chosen compression preset.
A compressor, besides controlling the dynamic range, changes a
sound’s envelope and in this way the sound itself. Galaxy Pianos’ compressor is more of a sound tool than a dynamic tool, which especially serves well in a pop or rock music context.
40. Comp. Type: For choosing your desired compression type with different ratio, attack and release settings.
41. Tone +:
To go back to the main tone page.
VELOCITY EDITOR
Galaxy Pianos feature a special Velocity Editor for customizing the velocity response to your keyboard and your way of playing. You enter it by clicking on the ‘Velocity’ button within the Anatomy
Menu.
The graph shows the current velocity curve. The horizontal axis represents the incoming velocity and
the vertical axis, the corresponding output velocity after modification in the velocity editor:
8
3
6
7
4
5
2
1
1. Preset:
Choose between different velocity curve presets. You can also store and recall user presets.
2. Type:
Choose between ‚Allround Curve‘ and ‚Shift Curve‘. Allround Curve can be bent and minimum and maximum velocities can be changed. Shift Curve offers two more controls: ’Shift In’ and ’Shift Out’ (see below). With these controls you can set a spot on the curve, after which the curve is bent using the Bend knob.
3. Bend:
Bends the chosen velocity curve.
4. Min. Velocity: Defines the minimum velocity output.
5. Max. Velocity: Defines the maximum velocity output.
6. Shift In:
Shifts the bending point horizontally.
7. Shift out:
Shifts the bending point vertically.
8. Main:
To go back to the main page.
By clicking on the graph you can draw your own velocity curve.
8
5.
WARP ENGINE
All Galaxy Pianos include the ‚WARP Machine‘, presenting five specially designed FX engines. The Warp
Machine is accessible via the ‚Warp‘ button in the Pads menu on the main page and includes one edit page for
every effect unit. In the Global Presets you can find a couple of ‚Warped Piano‘ presets.
3. Volume:
4. Cutoff:
5. Resonance:
The Pad Machine is an easy-to-use sample
6. Attack:
player for atmospheric pad sounds.
7. Release:
8. Voices:
1. Preset:
Pad presets
9. Fatness:
2. Select Pad: Selects one of the Pad sample-sets. PAD MACHINE:
2
4
3
5
6
Pad volume
Filter cutoff frequency
Filter resonance freq.
Envelope attack time
Envelope release time
Sets the number of voices per note.
Pans the voices left and right and detunes them in relation to each other.
8
7
9
1
DEGRADER:
The Degrader features all tools needed to
distort and deform your audio signal.
10. Roughness: For adding noise and distortion
11. R.Colour:
For warming the distortion
10
11
12
13
12. Sharpness:
13. Hacker:
14. PS Range:
15. PS Time:
Reduces the sample rate, adding a sharp sounding touch.
A bitcrusher which results in a very distorted and cut off sound.
Defines the pitch range in half tones.
Defines the time it takes the pitching process to reach the next halftone.
16. Detuning:
Detunes every key in a random way.
14
16
15
9
SPIRITUALIZER:
Global Multimode Filter:
Filter, Modulation and Resonance Effects.
17. Madness
18. Presets
19. Filter Menu
20. Filter Morph Creates metallic and flange sounds. Madness Presets.
21. Cutoff Knob 22. Resonance Chooses a filter curve.
Morphs the filter curve from a
horizontal line into the chosen form.
Controls the filter’s cutoff frequency.
Controls the filter’s resonance
frequency.
23. Ghost Mode Plays only the piano resonances.
17
20
18
21
22
23
19
ALTERIZER:
Complete morph-in-one-click tool.
24. Mutator
25. Volume
26. Original
Select a Mutator from the Select Mutator menu and your audio signal will be completely transformed via impulse response technology.
Controls the Alterizer’s output gain
Allows some of the original audio signal pass through the Alterizer unaltered
24
25
10
26
TIME TRAVELLER:
Delay Unit.
27. Time
28. Send
29. Damping
30. Pan 31. Feedback Controls the delay time between 5 ms and 2.5 sec.
Controls how much of the audio signal is sent to the Time Traveller.
Controls the low pass filter on the delay.
Allows you to create ping pong delays: the delays will jump from one side of the stereo
panorama to the other.
Controls the feedback intensity: more feedback means more delay.
27
29
30
31
28
32
33
34
There are 3 basic buttons for all Warp edit pages:
32.Reset Warp
33.Bypass Warp
34.Random Warp
Resets all Warp engines.
Bypasses the Warp Machine without losing any of your adjustments.
Pushing this button gives you a new Warp sound with every click. You just push the Random Warp button and listen to what Galaxy comes up with. Make sure that your speakers are not turned up too loud because the
Random Warp algorithm can generate some loud sounds!
For more information, tutorials, trailers, support and downloads please visit
www.galaxypianos.com .
Produced, recorded and mixed by Uli Baronowsky
Concept by Uli Baronowsky & Klaus Baetz
Scripting by Klaus Baetz
Graphics and GUI design by Ingo Hermes
Editing: Ingo Hermes, Uli Baronowsky
Recorded at Galaxy Studios/Belgium, Hansahaus Studios/Germany, Bauer Studios/Germany
Piano Technician: Andrei Wedel
Pianists: Gert Kapo, Tobias Dehler
Special thanks to:
Mark Joggerst, Klaus Genuit / Hansahaus Studios, Wilfried van Baaren / Galaxystudios, Eva
Bauer / Bauerstudios, Dan Santucci & Frank Elting / Native Instruments, Klaus Kandler &
everbody at Best Service, Andrei Wedel, Monika & Lillianna Dömer, Jennifer Hilgers, Henning
Hilgers, Marianne & Hans Baetz.
11
WWW.GALAXYPIANOS.COM
12