1
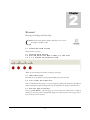
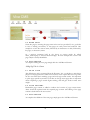
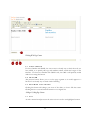
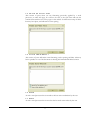
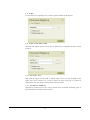
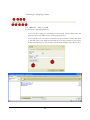
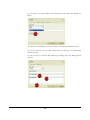
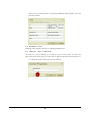
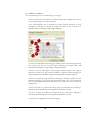
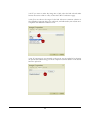
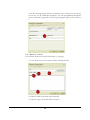
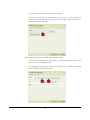
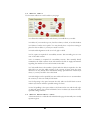
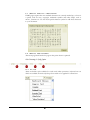
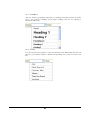
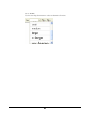
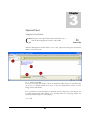
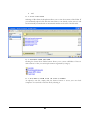
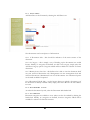
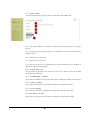
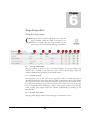
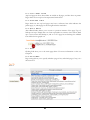
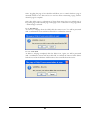
1
Volume
VIVA CMS
By Ilikecake Limited
VivaCMS
Manual
VIVA CMS
User Manual
© Ilikecake Limited
124 Kennelsfort Road • Palmerstown • Dublin 20
Phone 00353 (0)1 675 4000 • Email [email protected]
Table of Contents
OVERVIEW
1
1.1 ENTER USERNAME AND PASSWORD
2.1 MAIN NAVIGATION
2.2 SUB NAVIGATION
2.3 THE MAIN PAGE ELEMENTS
1
1
2
2
‘BROWSE’
3
3.1 CREATING NEW PAGES
4.1 INSTRUCTIONS
4.2 TOP LEVEL NAVIGATION
4.3 SELECT SUB SECTION
4.4 NAME PAGE
5.1 PAGE TITLE
5.2 PAGE CONTENT
5.3 ADD RECORD
6.1 VIEW SOURCE
6.2 PREVIEW
6.3 MAXIMISE THE EDITOR
7.1 CUT
7.2 COPY
7.3 PASTE
7.4 PASTE AS PLAIN TEXT
7.5 PASTE FROM WORD 7
7.6 UNDO
7.7 REDO
7.8 FIND
7.9 FIND AND REPLACE
7.10 SELECT ALL
7.11 REMOVE FORMAT
8.1 TEXT COLOUR
8.2 BACKGROUND COLOUR
8.3 BOLD
8.4 ITALIC
8.5 UNDERLINE
8.6 STRIKETHOUGH
3
3
3
3
4
4
4
4
5
5
5
5
6
6
7
7
7
7
8
8
8
8
9
9
9
9
9
9
8.7 SUBSCRIPT
8.8 SUPERSCRIPT
8.9 ORDERED LIST
8.10 UNORDERED LIST
8.11 OUTDENT
8.12 INDENT
8.13 BLOCKQUOTE
8.14 LEFT JUSTIFY
8.15 CENTRE JUSTIFY
8.15 RIGHT JUSTIFY
8.16 BLOCK JUSTIFIED TEXT
9.1 INSERT / EDIT LINK
9.2 REMOVE LINK
9.3 INSERT / EDIT ANCHOR
9.4 INSERT IMAGE
9.5 INSERT FLASH
9.6 INSERT TABLE
9.6 INSERT HORIZONTAL RULE
9.7 INSERT SPECIAL CHARACTER
9.8 INSERT PAGE BREAK
10.1 STYLE
10.2 FORMAT
10.3 FONT
10.4 SIZE
9
9
10
10
10
10
10
10
10
10
10
11
14
14
16
18
20
20
21
21
21
22
22
23
‘UPLOAD FILES’
24
11.2 FILE LISTINGS
11.3 CREATE NEW FOLDER
11.4 UPLOAD A NEW FILE IN THIS FOLDER
26
26
26
‘EXTRANET’
27
12.2 DOCUMENT TITLE
12.3 CATEGORY
12.4 ACCESS LEVEL
12.5 DOCUMENT LINK
12.6 DATE UPDATED / LINKED
12.7 UPLOADED / LINKED BY
12.8 EDIT
12.9 DELETE
28
28
29
29
29
29
29
29
‘ADMIN’
30
13.2 USER ACTIVE
13.3 USERNAME / EMAIL
13.4 FIRST NAME
13.5 LAST NAME
31
31
31
31
13.6 ACCESS LEVEL
13.7 EDIT
13.8 ACCOUNT LOCKING
13.9 DELETE
31
32
32
32
‘PAGE PROPERTIES’
33
14.1 PAGE ADDRESS
14.2 PAGE TITLE
14.3 PAGE STATUS
14.4 TOP LEVEL PAGE
14.5 SUB NAV LINK
14.6 ROLL BACK
14.7 EDIT
14.8 SETTINGS
14.10 DELETE
33
33
33
34
34
34
34
34
35
V I V A
1
Chapter
C M S
Overview
Overview of Navigation
T
he Viva CMS interface is protected behind a username and password so that
only authorized personnel of National Centre for the Protection fo Older
People have access.
You should receive your username and password from Ilikecake Limited initially, or
your website administrator.
To access Viva CMS, simply go to http://www.ncpop.ie/admin and enter your
username and password.
1 . 1
E N T E R
U S E R N A M E
A N D
P A S S W O R D
Once logged in the main navigation bars and the current website pages are now visible.
2 . 1
M A I N
N A V I G A T I O N
Navigational items always present include the Browse button which takes you to this
page, the Upload Files button which allows you to upload many file types including
images, audio, pdf, powerpoint and video files, and the Admin button which allows
administrators to add and delete users, amongst other things.
Depending on your exact website requirements there may be other top level
navigation buttons. For example, in the image below the client has also added a
1
V I V A
C M S
publicly searchable Courses database, and a password protected Extranet for secure
document sharing.
2 . 2
S U B
N A V I G A T I O N
Sub-navigation elements will change depending on the section you are in. The image
below shows a screen shot of the Browse section.
2 . 3
T H E
M A I N
P A G E
E L E M E N T S
Main page elements will vary throughout the CMS depending on the page you are on.
The image below shows the Browse page. You can see that website pages are listed
along with various controls which allow user modification. Each main page element
will be described in detail throughout this manual.
2
2
Chapter
‘Browse’
Browsing and Editing the Website Pages
C
3 . 1
licking the main browse button will allow you to view
the pages available to edit.
C R E A T I N G
N E W
P A G E S
In this section you may
3 . 1
3 . 2
3 . 3
C R E A T E N E W P A G E S
A S S I G N E X I S T I N G W E B P A G E S T O
& 3 . 4 O R D E R T H E N A V I G A T I O N
T H E
C M S
There are several steps involved in creating a new page.
4 . 1
I N S T R U C T I O N S
Instructions are available on every page detailing the steps necessary
4 . 2
T O P
L E V E L
N A V I G A T I O N
Choose whether the new page is a top level page by ticking the checkbox (NOTE: In
some websites the top level navigation may be locked due to design considerations.)
4 . 3
S E L E C T
S U B
S E C T I O N
If the page IS NOT a top level page, you must select the subsection to which it
belongs, so that the correct navigational supports are put in place on the page, and so
that it is in the correct section.
3
4 . 4
N A M E
P A G E
Name the page by entering the page name in the text box provided. It is a good idea
to have a naming convention, so that pages are easily found and retrieved. One
example is to have the section name, followed by an underscore or dash, followed by
the page, or subsection, name.
So, a mission statement held in the about us section might be called:
about_mission.php or aboutus-missionstat.php. In both examples the section and
page subject is clearly identifiable.
4 . 5
A D D
R E C O R D
To complete adding the new page simply click the ‘Add Record’ button.
Adding Page Titles & Content
5 . 1
P A G E
T I T L E
The default page title is generated from the file name. It is a good idea to write this in
proper text as page titles are visible in the browser in the top left blue area. Page titles
are also seen when book marking a page and in Google search results. It is important
to place page specific keywords in your titles as Google treats page titles as important
when computing a pages search engine ranking, and will give words in titles extra
weight.
5 . 2
P A G E
C O N T E N T
Placeholder page content is added to indicate the location of page content items.
These should be replaced with the required page content. The editing of the page
content is dealt with in the next section
5 . 3
A D D
R E C O R D
To complete the addition of the new page, simply press the ‘Add Record’ button.
4
Working With Page Content
6 . 1
V I E W
S O U R C E
For those familiar with HTML, the view source is a handy way to check the code you
have added, or to quickly edit tags and attributes which would take longer via the
interface. For those not familiar with HTML code, the CMS is still perfectly usable
without ever using this button.
6 . 2
P R E V I E W
The preview button allows you to see the page segment as it would appear in a
browser. It is a handy way to check visual formatting.
6 . 3
M A X I M I S E
T H E
E D I T O R
Clicking this button will enlarge your view of the editor, so that it fills the screen.
Clicking this icon a second time will return it to its original size.
Adding & Editing Page Content
7 . 1
C U T
As with a normal word processor the scissors icon is used to cut highlighted content
5
7 . 2
C O P Y
As with a normal word processor the pages icon is used to copy highlighted content
7 . 3
P A S T E
There are several styles of paste available for use. This version simply pastes the item
that has been cut or copied, with no editing of content.
As with a word processor, simply click in the page where the cut or copied content is
to be placed, and click the paste icon.
6
7 . 4
P A S T E
A S
P L A I N
T E X T
This version of paste clears out any formatting previously applied by a word
processor, or other web page. It is safest to do this, as the style sheet will style the
content in line with the rest of the pages on the website. It will however strip out links
that may be in place, and will remove extra spacing.
7 . 5
P A S T E
F R O M
W O R D
7
This version of paste will retain some formatting such as spacing and links. This may
be the speediest to use if the document is already preformatted with linked content
7 . 6
U N D O
As with a word processor this icon undoes the last action undertaken by the user
7 . 7
R E D O
As with a word processor this icon redoes the last undo action taken by the user
7
7 . 8
F I N D
Use the find tool to quickly locate a word or phrase within the document.
7 . 9
F I N D
A N D
R E P L A C E
The find and replace option can be used to quickly fix a misspelled word in several
locations.
7 . 1 0
S E L E C T
A L L
The select all option can be used to quickly select all the content available in the
editor. The most common use of this is when an entire new page of content is
required and the user needs to delete all the current content.
7 . 1 1
R E M O V E
F O R M A T
The remove format icon can be used to quickly clear unwanted formatting such as
bold and italics from selected text content.
8
Formatting & Styling Page Content
8 . 1
T E X T
C O L O U R
The text colour icon can be used to add colour to a text item. This should be used
sparingly as the overuse of colour can make the page appear amateurish. In addition
the website is already styled with a stylesheet which will style the page in line with
other pages on the site.
8 . 2
B A C K G R O U N D
C O L O U R
The background colour icon can be used to add background colour to a selected text
item. As with the text colour tool, this should be used sparingly as the overuse of
colour can make the page appear amateurish. In addition the website is already styled
with a stylesheet which will style the page in line with other pages on the site.
8 . 3
B O L D
As with any word processor the bold icon is used to make a selected text item appear
in a bold style.
8 . 4
I T A L I C
As with any word processor the italic icon is used to make a selected text item appear
in an italic style.
8 . 5
U N D E R L I N E
As with any word processor the underline icon is used to make a selected text item
appear underlined. Caution should be used when using the underline option on
web page as novice users can mistake this for a broken link.
8 . 6
S T R I K E T H O U G H
The strike-though icon is used to make a selected text item appear to have a line
through it. This can be used to indicate a change in a page, or that a previously
available option is full or no longer available.
8 . 7
S U B S C R I P T
The subscript icon is used to make a selected text item appear smaller and slightly
below the adjacent content. It is normally used in a chemical formula, C6H12O6, or in
mathematics, Chex = 12dec = 14oct..
8 . 8
S U P E R S C R I P T
The superscript icon is used to make a selected text item appear smaller and slightly
above the adjacent content. It is normally used when writing dates - 1st, 2nd, 3rd or for
trademark symbols, ™.
9
8 . 9
O R D E R E D
L I S T
The ordered list icon is used to mark selected text as list items. Use the ordered list
when items have a natural order, such as winners of a race.
Listing items is important for the web, as many users will scan rather than read, and
lists are easier to scan than large amounts of paragraph text.
For accessibility reasons, it is also advisable to put hyperlinked content into lists.
8 . 1 0
U N O R D E R E D
L I S T
The unordered list icon is used to mark selected text as unordered list items. Use the
unordered list icon when the order of items it not important.
Both ordered and unordered lists will inherit styling from the main website style sheet.
8 . 1 1
O U T D E N T
The outdent icon can be used to move indented content to the left – ie to remove the
previously applied indenting. It is displayed grayed out unless the cursor is inside an
indented piece of text content.
8 . 1 2
I N D E N T
The indent icon is used to indent text content from the left. It is purely a visual
change and has no semantic meaning.
8 . 1 3
B L O C K Q U O T E
The blockquote icon is also used to indent text content from the left, however this
should only used for large blocks of quotations.
8 . 1 4
L E F T
J U S T I F Y
The left justify icon is used to align text to the left, however this is the default for
most web pages so may not be needed.
8 . 1 5
C E N T R E
J U S T I F Y
The centre justify icon is used to align text to the centre. Use this only for short
paragraphs such as image captions or headings, as it is more difficult for the user to
read, particularly in long paragraphs of text.
8 . 1 5
R I G H T
J U S T I F Y
The right justify icon is used to align text to the right. As with centre alignment, use
this only for short paragraphs such as image captions or headings, as it is more
difficult for the user to read, particularly in long paragraphs of text.
8 . 1 6
B L O C K
J U S T I F I E D
T E X T
The block justified text icon is used to align text to the left and right. There is some
evidence to suggest that users with reading impairments such as dyslexia find this
particularly problematic to read as the word spacing is inconsistent, so this should be
used with caution.
10
Formatting & Styling Page Content
9 . 1
I N S E R T
/
E D I T
L I N K
Use this icon to link highlighted text.
9.1.1 If the file or page you are linking to is on another website, simply copy and
paste the url into the URL text box in the pop up window.
9.1.2 If the file is on your server use the browse server button to find it and select
it. This will open a new window which will show you the contents of your server.
Simply select the file you want to link to and it will be added to the URL text box.
11
9.1.3 To link to an email address, select Email from the Link Type Dropdown
Menu
9.1.4 Place the email address you want to link to in the E-mail Address text box
9.1.5 If you want you can also add a Subject line by adding text to the Message
Subject text area
9.1.6 If you want you can also add a Message by adding text to the Message Body
text area
12
9.1.7 If the website you are working on is using frames, you can choose the
target for the link. The most common selection is New Window, however this is
not valid code, and will render your website non-compliant with XHTML
validation tools.
9.1.8 You can also name the window the content will appear in by adding a name
to the Target Frame Name text box.
9.1.9 If the file you want to link to is not yet online, you can select the Upload
tab and use the browse button to find the document on your local computer.
9.1.10 When you have located it, simply select the Send it to the Server button.
Depending on the size of your file, this can take a short while, so you may need
to be patient.
13
There is also an advanced tab for specifying additional link properties, but these
are rarely needed.
9 . 2
R E M O V E
L I N K
Selecting a link and press this icon to unlink hyperlinked text.
9 . 3
I N S E R T
/
E D I T
A N C H O R
An anchor is a way of allowing you to link to a part of a document. To insert one,
click at the point in the page you want to link to and then click the insert anchor icon.
9.3.1 Add the anchor name in the pop up window.
14
9.3.2 To link to an anchor, click the make a link icon as in 9.1, and select the Link
to Anchor in the text option from the drop down menu
9.3.3 Select the anchor name from the Select an Anchor by Anchor Name drop
down menu.
15
9 . 4
I N S E R T
I M A G E
Use the insert image icon to add an image to your page.
9.4.1 Use the browse server button to find the image file, or simply paste the url
of an existing image if you know it already
9.4.2 Add alternative text to describe the image. Include keywords in your
description if relevant as Google is thought to check alt text as part of its
algorithm when computing search engine rankings.
9.4.3 You can add width for the image if needed, however if the image is already
the correct size, this can be left blank. Changing the image width will
automatically change the image height to keep proportion.
9.4.4 You can also add height for the image if needed. Again, if the image is
already the correct size, this can be left blank. As with the width, changing the
image height will automatically change the image width to keep proportion.
9.4.5 You can add an image border by entering the number of pixels the line
thickness should be. If you don’t want any border enter a zero. Your image may
have a border applied in the default stylesheet so you may not need to make any
changes here.
9.4.6 Use H Space to position the image along the horizontal axis. Entering a
numerical value will reposition the image by that number of pixels.
9.4.7 Use V Space to position the image along the vertical axis. Entering a
numerical value will reposition the image by that number of pixels.
9.4.8 Choose an alignment to position the image.
16
9.4.9 If you want to make the image into a link, select the link tab and either
browse the server to link to a file, or enter the URL of a website or page.
9.4.10 You can choose the target for the link. The most common selection is
New Window, however this is not valid code, and will render your website noncompliant with XHTML validation tools.
9.4.11 If your image is not currently on the server you can upload it by selecting
the upload tab and browsing your local computer. Click the Send it to the Server
button to upload it.
17
9.4.12 If your image is quite wordy or technical, such as a table, chart or map, the
alt text may not be sufficiently descriptive. You can add additional descriptive
text in an alternative page and use the Long Description URL text box to link to
it
9 . 5
I N S E R T
F L A S H
Use the insert Flash icon to add a Flash object to your page.
9.5.1 Use the browse server option to find an existing flash file.
9.5.2 Set the width of the flash object if needed
9.5.3 Set the height of the flash object if needed
18
9.5.4 Preview the flash object in the preview window.
9.5.5 If your flash object is not currently on the server you can upload it by
selecting the upload tab and browsing your local computer. Click the Send it to
the Server button to upload it.
There are advanced options available in the Advanced Tab.
9.5.6 Auto Play will cause the flash object to play when the page loads, so the
user won’t have to manually start it.
9.5.7 Ticking the loop option will cause the flash movie to restart automatically
when it reaches the end of the movie.
19
9 . 6
I N S E R T
T A B L E
Use the insert table icon to add a table to your page.
9.6.1 Enter the number of rows and colums you would like in your table
9.6.2 Select if you want the top row, the first column, or both, to be table headers
9.6.3 Select a border size in pixels. You may already have a style sheet setting in
place for this on tables so you may not need to set this.
9.6.4 The table alignment can be set to left, right or bold.
9.6.5 A caption is required for accessibility reasons. This normally gives an over
view of the table content.
9.6.6 A summary is required for accessibility reasons. This normally briefly
summarises the table contents. Some web authors also like to supply information
regarding the number of rows and columns in the table.
9.6.7 The width here is the number of pixels wide the table is required to be. The
table will over run the width settings if the content is larger than the space
allowed. You may already have table width settings specifed in the website style
sheet, so you may be able to leave this blank
9.6.8 The height can be specified, but most tables will auto size to accommodate
the contents, so this can usually be left blank.
9.6.9 Cell spacing is the space between the cells. This can be left blank as most
website style sheets will have specified settings for these.
9.6.10 Cell padding is the space within a cell, between the text and the cell edge.
As with cell spacing, this can be left blank as most website style sheets will have
specified settings for these.
9 . 6
I N S E R T
H O R I Z O N T A L
R U L E
A horizontal rule is a visible divider which divides pages horizontally into visually
separate regions.
20
9 . 7
I N S E R T
S P E C I A L
C H A R A C T E R
HTML pages require that non standard characters are correctly marked up, so there is
a special code for euro, copyright, trademark symbols and other shapes such as
arrows , fractions etc. Use the insert special character symbol to add these characters
to your document.
9 . 8
I N S E R T
P A G E
B R E A K
The insert page break breaks the page at that point when it is printed.
Other Formatting & Styling Options
1 0 . 1
S T Y L E
There are default styles available for cited work, inline quotations, keyboard text etc
which are available from the style drop down menu to be applied to selected text.
21
1 0 . 2
F O R M A T
The text format is particularly important, as marking keyworded content as header
text is very good for building search engine rankings and also for ordering a
document structurally.
1 0 . 3
F O N T
Use the font drop down menu to select an alternative font. Remember that the style
sheet for your website will have a default font specified, you so may not need to use
this.
22
1 0 . 4
S I Z E
Use the size drop down menu to select an alternative font size.
23
3
Chapter
‘Upload Files’
Adding Files to Your Wwebsite
C
licking the main upload files button will allow you to
view the file management section of the CMS.
The File Management module allows you to view, upload and categorise documents
within your site structure.
1 1 . 1
F I L E
T Y P E S
Use the size drop down menu to select an alternative folder. There are 4 default ones
set up for you which should cover most of the site requirements. These are File,
Image, Flash, and, Media.
It is a good idea to keep documents organized in these categories, as this allows you
to easily retrieve them when linking to or inserting them in a web page. Below are
recommended files type for each category.
11.1.1 File
24
1. .doc
2. .docx
3. .pdf
4. .xls
5. .zip
6. .rar
11.1.2 Image
1. .jpeg
2. .jpg
3. .gif
4. .png
11.1.3 Flash
1. .swf.
2. .flv
11.1.4 Media
1. .mp3
2. .mp4
3. .avi
4. .wmv
5. .mpeg
6. .mov
7. .wav
25
8. .mid
1 1 . 2
F I L E
L I S T I N G S
Selecting a folder from the dropdown allows you to view the contents of the folder. If
you accidentally upload a file with the same name as one already on the server, it will
be automatically renamed with an incremental number at the end of the file name.
1 1 . 3
C R E A T E
N E W
F O L D E R
Clicking the Create New Folder button allows you to create subfolders of these 4
main sections so that you can keep documents organised by category.
1 1 . 4
U P L O A D
A
N E W
F I L E
I N
T H I S
F O L D E R
To upload a new file, simply click the browse button to access your own local
computer. You can then source the file by selecting it.
26
4
Chapter
‘Extranet’
Adding Password Protected Searchable Files to Your Wwebsite
C
licking the main upload files button will allow you to
view the extranet management section of the CMS.
The File Management module allows you to view, upload and categorise documents
within your site structure.
27
1 2 . 1
A D D
D O C S
Add New Docs to the Extranet by selecting the Add Docs icon.
New documents need several pieces of information:
12.1.1 A Document Title - This should be indicative of the main content of the
document.
12.1.2 A Category – this is simply a way of dividing up the documents into usable
themes. Initially, no categories are defined. To add a new category, simply select the
Add New Category option. Categories added will be available for selection for future
documents.
12.1.3 Restrict Access Level To – this defines who is able to view the document. Staff
can view staff level documents only. Management can view management level and
staff level documents. Administrator can view all documents. An unrestricted option
can be made available if requested.
12.1.4 Document Upload Link – use the browse button to upload a document, or if
the document is already available online, simply enter the URL into the web address
text area.
1 2 . 2
D O C U M E N T
T I T L E
To order the documents by title, select the Document Title header link
1 2 . 3
C A T E G O R Y
Document categories are available to view. These can also be ordered by clicking the
header link. Initially, no categories are defined, however categories added will be
available for selection for future documents.
28
1 2 . 4
A C C E S S
L E V E L
Access levels are available to view. These can also be ordered by clicking the header
link. Staff can view staff level documents only. Management can view management
level and staff level documents. Administrator can view all documents. An
unrestricted option can be made available if requested.
1 2 . 5
D O C U M E N T
L I N K
The location of the document can be seen in link format. These can also be ordered
by clicking the header link.
1 2 . 6
D A T E
U P D A T E D
/
L I N K E D
The date shows the last date of modification of the document details. This is to
enable users to quickly select most recent documents.
1 2 . 7
U P L O A D E D
/
L I N K E D
B Y
The uploaded / linked by field shows the last user to modify the document details.
This is to enable tracking of extranet use by admin.
1 2 . 8
E D I T
Clicking the Edit icon opens the same interface as the New Docs (see 12.1) but the
current document details are available to view and edit.
1 2 . 9
D E L E T E
Clicking the Delete icon triggers a warning clarification message. Only delete if you
are sure that you want to remove the record and the file.
29
5
Chapter
‘Admin’
The Administration Section
C
licking the Admin button will allow you to view the
Admin section of the CMS, if you are an
administrator. Normal CMS editor will not have
access to this section.
The Admin module allows you to view, upload and categorise documents within your
site structure.
30
1 3 . 1
A D D
U S E R
To order the documents by title, select the Document Title header link
13.1.1 The email address is a mandatory field and will be the username in the login
process.
13.1.2 A password must be provided. Use a combination of letters and numbers for
security reasons.
13.1.3 Add the user’s first name
13.1.4 Add the user’s last name
13.1.5 Choose an access level. Administrators can add and delete users in addition to
normal file and page management.
1 3 . 2
U S E R
A C T I V E
You can easily see whether a user account is active or not. These can also be ordered
by clicking the header link.
1 3 . 3
U S E R N A M E
/
E M A I L
View users email addresses easily here, and order by clicking the header link if needed
1 3 . 4
F I R S T
N A M E
View users first name here, and order by clicking the header link if needed
1 3 . 5
L A S T
N A M E
View users last name here, and order by clicking the header link if needed
1 3 . 6
A C C E S S
L E V E L
View users access level here, and order by clicking the header link if needed
31
1 3 . 7
E D I T
Clicking the Edit icon opens the same interface as the New User (see 13.1) but the
current user details are available to view and edit.
1 3 . 8
A C C O U N T
L O C K I N G
To lock an account, for example if someone is on long term leave of absence, such as
Maternity Leave, or a Sabbatical, click the account locking icon.
13.8.1 This transforms to lock into an unlock symbol on that users account. To
reverse the procedure, simply click the lock icon again.
13.8.2 This also changes their user active status to suspended.
1 3 . 9
D E L E T E
To delete a user completely, choose the delete icon. Clicking the Delete icon triggers
a warning clarification message. Only delete if you are sure that you want to remove
the user account.
32
6
Chapter
‘Page Properties’
Working With the Page Properties
C
licking the Browse button will allow you to view the
pages available within the CMS. In Chapter 2 we
looked at working with web page content. We are
now going to look at modifying the page’s properties.
.
1 4 . 1
P A G E
A D D R E S S
The page address is what you see in a browser window. It is unique within each
website, and so is ideal to use when you want to find a specific page. Order the
columns alphabetically by clicking on the linked header.
1 4 . 2
P A G E
T I T L E
The page title is set by the editor in the page edit section. A default page title is
generated from the file name. Page titles are visible in the browser in the top left blue
area. Page titles are also seen when book marking a page and in Google search results.
It is important to place page specific keywords in your titles as Google treats page
titles as important when computing a pages search engine ranking, and will give
words in titles extra weight. Order the columns alphabetically by clicking on the
linked header.
1 4 . 3
P A G E
S T A T U S
The page status simply display whether the page is currently live or not.
33
1 4 . 4
T O P
L E V E L
P A G E
Top level page are those whose links are visible on all pages, and who have no parent.
Pages which are not top level are represented with a dash.
1 4 . 5
S U B
N A V
L I N K
Pages which are not top level pages may have a reference here. This indicates the
parent page, or, which page its sub-navigation link is attached to.
1 4 . 6
R O L L
B A C K
The rollback facility allows you to revert to a previous instance of the page. Up to 5
backups are kept.. Simply click on a back up number to return to that version. Back
up 1 is more recent than backup 2, and so on. If a page has no backups, the rollback
icon will be shown grayed out.
1 4 . 7
E D I T
Clicking Edit takes you to the main page editor. For more information on this see
Chapter 2.
1 4 . 8
S E T T I N G S
Page settings allows you to specify whether a page is live, and which page, if any, it is a
sub-section of.
34
14.8.1 Toggling the page is live checkbox will allow you to control whether a page is
externally visible or not. This can be se to not live when constructing a page, and live
when the page is complete.
14.8.2 The ‘This page is a subsection of’ drop down menu show you which page is
the parent page of the selected page. If the page is not a subsection of any page, None
– Normal Page is selected.
1 4 . 9
R E M O V E
To remove a webpage from the CMS, click the remove icon. You will be presented
with a confirmation screen and must click OK to confirm the removal.
1 4 . 1 0
D E L E T E
To delete a webpage completely click the delete icon. Again you will be presented
with a confirmation screen and must click OK to confirm the removal. This deletes
both the record in the database AND removes the actual file from the server.
35