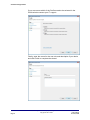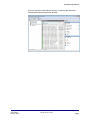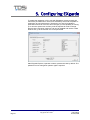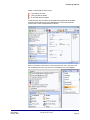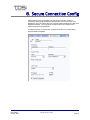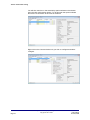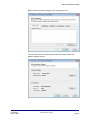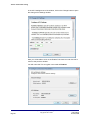
1
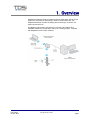
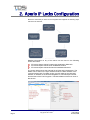
EXgarde ASSA
ABLOY APERIO
INTEGRATION
User Manual
UM0086.GB Issue 1 02/06/2015
www.tdsi.co.uk
TDSi
Unit 10 Concept Park
Innovation Close
Poole
Dorset
BH12 4QT, UK
Tel: +44 (0) 1202 723535
Fax: +44 (0) 1202 724975
Sales Enquiries:
Marketing Support:
Technical Support:
[email protected]
[email protected]
[email protected]
Foreword
Copyright © 2014 TDSi. All rights reserved.
Time and Data Systems International Ltd operate a policy of continuous
improvement and reserves the right to change specifications, colours or prices of
any of its products without prior notice.
Guarantee
For terms of guarantee, please contact your supplier.
Trademarks
Copyright © 2014 Time and Data Systems International Ltd (TDSi). This document
or any software supplied with it may not be used for any purpose other than that for
which it is supplied nor shall any part of it be reproduced without the prior written
consent of TDSi.
Microsoft and Windows are registered trademarks of Microsoft Corporation.
All other brands and product names are trademarks or registered trademarks of
their respective owners.
Cautions and Notes
The following symbols are used in this guide:
CAUTION! This indicates an important operating instruction that should be
followed to avoid any potential damage to hardware or property, loss of data,
or personal injury.
NOTE. This indicates important information to help you make the best use of this
product.
Contents
1. Overview .......................................................................................................................................... 1 2. Aperio IP Locks Configuration ................................................................................................... 2 3. IP Lock Service Manager ............................................................................................................. 3 4. Firewall Configurations ............................................................................................................... 5 5. Configuring EXgarde .................................................................................................................... 10 6. Configuring Doors.......................................................................................................................... 13 7. Adding Keyholders ........................................................................................................................ 15 8. Secure Connection Config .......................................................................................................... 17 Last Change
02 June, 2015
EXgarde Assa Abloy Aperio Integration
Copyright © 2014 TDSi
Page i
1. Overview
EXgarde provides the ability to integrate with the Assa Abloy Aperio IP lock
system by connecting to Assa Abloy’s AH40 communication hub. The
EXgarde interaction includes controlling and monitoring a maximum of 8
Aperio devices per hub.
The diagram below shows a technology overview of all software and
hardware needed for configuration / set up of a working system, complete
with EXgarde Access Control software
Last Change
02 June, 2015
EXgarde Assa Abloy Aperio Integration
Copyright © 2014 TDSi
Page 1
2. Aperio IP Locks Configuration
Before the Assa Abloy IP locks can be integrated with EXgarde the following steps
will need to be followed;
Detailed information on any of the above can be found in the following
online documents:
ST-001321 Aperio Online Programming Application Manual-D
ST-001322 Aperio Online Quick Installation Guide-C
ST-001323 Aperio Online Mechanical Installation Manual-C
The screen below shows the scanned list of Hubs and locks/sensors. The
details can be seen on the right. Details include, the MAC address of the
communications Hub, Firmware version, last four digits of the Hub MAC
address, IP address of the Hub and EXgarde PC, ACU/Hub port number
and the state of the TLS Encryption. The MAC address of the lock / door is
also shown
EXgarde Assa Abloy Aperio Integration
Copyright © 2014 TDSi
Page 2
Last Change
02 June, 2015
3. IP Lock Service Manager
To enable communications between EXgarde and the IP Locks
communication hub, the IP Lock Service must be running. The Service
Manager can be used to configure the IP Locks Service. This can be found
in C:\Program Files\TDSi\Exgarde\IPLocks\IPLockServiceManager.exe.
The Lock Service Manager can be used to control/configure the IP Lock
Service; the start/stop buttons can be used to start or stop the service.
When you first run EXgarde, the IPLocksService will be set to run in manual
mode by default. This can be changed to run in Automatic mode by right
clicking on the shortcut you have just created and selecting Run as
administrator, click yes on the next screen to accept running as
Administrator.
Last Change
02 June, 2015
EXgarde Assa Abloy Aperio Integration
Copyright © 2014 TDSi
Page 3
IP Lock Service Manager
The IP Lock Service Manager will open and 'Start-up type' will default to
Manual. To enable Automatic start-up of the service, click Stop then
Uninstall, then select Automatic from the drop down list and click Install,
next click on Start. From now on every time the PC running EXgarde is
started the IP Service will start.
To check if the service is running and has been changed to automatic start,
go to Services and the IP Locks Service Manager status and Start up Type
should be the same as shown in the screenshot below. Status should be
started and Startup Type should be Automatic
EXgarde Assa Abloy Aperio Integration
Copyright © 2014 TDSi
Page 4
Last Change
02 June, 2015
4. Firewall Configurations
The default IP ports on the PC EXgarde has been installed on will be
blocked by Windows Firewall. The following steps need to be carried out for
both inbound and outbound rules
Search and open Windows Firewall with Advanced Security
Last Change
02 June, 2015
EXgarde Assa Abloy Aperio Integration
Copyright © 2014 TDSi
Page 5
Firewall Configurations
Select Inbound Rules from the left window and then select New Rule
in the Actions window on the right to start the wizard
When the Rule Type window opens, select Port and click next
EXgarde Assa Abloy Aperio Integration
Copyright © 2014 TDSi
Page 6
Last Change
02 June, 2015
Firewall Configurations
From the Protocol and Ports window, select TCP and in Specific local
port enter 9999 for Assa Abloy or specified IP port if changed from
default then select next
Select Allow the connection from the Actions window and click next
Last Change
02 June, 2015
EXgarde Assa Abloy Aperio Integration
Copyright © 2014 TDSi
Page 7
Firewall Configurations
If you are unsure which of the Profiles need to be selected in the
Profile window contact your IT support.
Finally, enter the name for the new rule and description if you desire
and click Finish to complete the wizard.
EXgarde Assa Abloy Aperio Integration
Copyright © 2014 TDSi
Page 8
Last Change
02 June, 2015
Firewall Configurations
You can check the new Inbound rule by re-opening the Windows
Firewall and Advanced Security window.
Last Change
02 June, 2015
EXgarde Assa Abloy Aperio Integration
Copyright © 2014 TDSi
Page 9
5. Configuring EXgarde
To enable the integration of IP Locks with EXgarde a license upgrade will
need to be purchased from TDSi. Each Assa Abloy AH40 hub is capable of
supporting up to 8 locks/sensors. Therefore if you were for example to
purchase a license for 32 locks, this would give you the capability of running
up to 32 locks spread over as many hubs as required for radio coverage.
Doors that are not being used on a hub can be disabled and used to create
another hub, up to the number of IP locks purchased
Start EXgarde Explorer, Operator is Admin, password is tdsi by default. The
password can be changed in operator rights if required.
EXgarde Assa Abloy Aperio Integration
Copyright © 2014 TDSi
Page 10
Last Change
02 June, 2015
Configuring EXgarde
Create a new portal for the IP locks
Type will be IP Locks
Lock type will be Aperio
IP port will default to 9999.
If required other port numbers can be added to EXgarde to allow better
communications speed over large installations running several Hubs.
(Contact the on-site IT department for advice)
Next you will need to create the ACU which represents the Hub, in Summary view
click on ACU then click the drop down list on the New tab and choose Aperio
Last Change
02 June, 2015
EXgarde Assa Abloy Aperio Integration
Copyright © 2014 TDSi
Page 11
Configuring EXgarde
Name the ACU/Hub something familiar such as Assa Abloy Aperio, default
configuration will be DR and the IP address you will enter will be the IP
address of the Hub as shown in the Aperio software. ACU Type will be
greyed out and show as Aperio. Click save when you have finished.
EXgarde Assa Abloy Aperio Integration
Copyright © 2014 TDSi
Page 12
Last Change
02 June, 2015
6. Configuring Doors
In summary view the 8 doors belonging to the Hub will be shown directly
below the Hub you have created.
If you click on any of the doors, the door list will appear in the general
display area in the right hand screen.
Last Change
02 June, 2015
EXgarde Assa Abloy Aperio Integration
Copyright © 2014 TDSi
Page 13
Configuring Doors
Click on the Properties button to access the door details. The relevant door
lock/sensor hexadecimal numbers that were found when scanning with the
Aperio Programming Application will need to be entered into the Door
Number text box. (Refer the Aperio Software for Door Number details.)
Left click on the relevant door in the list and select Properties; here you can
set the Outer & Inner area. The Outer area being the area you are going
from and the Inner Area being the area you are entering into to. Any unused
doors can be disabled by un-ticking the Enabled option in the Properties
window.
EXgarde Assa Abloy Aperio Integration
Copyright © 2014 TDSi
Page 14
Last Change
02 June, 2015
7. Adding Keyholders
To add a keyholder click on all Keyholders in the summary view, and then
click the New button, enter a name for the keyholder and click the Key to
issue drop down box. Click on the key you want the keyholder to have then
select key type. (The key type should always match the reader type)
The reader Type can be set in the reader properties. Key holder access to
the IP Locks follows the same functionality as normal readers in EXgarde,
so if a KeyHolder is allowed access to an area the IP Lock is associated
with the KeyHolder with the correct key technology can gain access.
Last Change
02 June, 2015
EXgarde Assa Abloy Aperio Integration
Copyright © 2014 TDSi
Page 15
Adding Keyholders
Next you can choose which Access Groups you want the keyholder to be a
member of, Keyholder long name and comment can be entered at this point
as well as a Keyholder photograph, click save when you have finished.
EXgarde Assa Abloy Aperio Integration
Copyright © 2014 TDSi
Page 16
Last Change
02 June, 2015
8. Secure Connection Config
When setting up the portal there was the option to enable a secure
connection in the portal properties, selecting the secure connection will
enable the use of TLS Encryption for communications between the Hub and
EXgarde Software. TLS encryption will also need to be enabled in the
Aperio Programming Application.
To begin with click on the Secure connection tick box in the Assa Abloy
portal created in EXgarde.
Last Change
02 June, 2015
EXgarde Assa Abloy Aperio Integration
Copyright © 2014 TDSi
Page 17
Secure Connection Config
You will then need to run the Assa Abloy Aperio software tool and enter
open the Hub configuration options. To do this open the Aperio software
and ensure a connection to the locks is achieved.
Right click on the Communication hub you wish to configure and select
configure.
EXgarde Assa Abloy Aperio Integration
Copyright © 2014 TDSi
Page 18
Last Change
02 June, 2015
Secure Connection Config
Below is the first window to appear in the configuration tool.
You will need to click on the Next button until you reach the EAC and
Network Settings window.
Last Change
02 June, 2015
EXgarde Assa Abloy Aperio Integration
Copyright © 2014 TDSi
Page 19
Secure Connection Config
In the ACU settings area of the window, click on the Change button to open
the Change ACU Settings window.
Here you will be able to click on the Enable TLS check box and click OK to
return to the previous window.
You will notice the TLS encryption now reads as Enabled
EXgarde Assa Abloy Aperio Integration
Copyright © 2014 TDSi
Page 20
Last Change
02 June, 2015
Secure Connection Config
Click the Next button until you reach the Device Update window and click on
the Save Configuration button.
The Save Configuration window will pop up and a Configuration name will
need to be entered before clicking OK to close the window.
Last Change
02 June, 2015
EXgarde Assa Abloy Aperio Integration
Copyright © 2014 TDSi
Page 21
Secure Connection Config
Click the Next button once again to update the device. The window below
will notify you of the status of the update.
Once the update is complete the following window will appear.
Click on the Close button to complete the process and return to the Aperio
home screen.
EXgarde Assa Abloy Aperio Integration
Copyright © 2014 TDSi
Page 22
Last Change
02 June, 2015
Secure Connection Config
You will notice that the home screen now displays TLS Encryption Enabled.
Secure connection will only work on Windows 7 or Windows 2008 R2.
You can check in Internet explorer by going to Internet Options > Advanced,
scroll to the end of the list and look for ‘Use TLS 1.2’.
If it’s not shown then secure connection is not supported.
Please reference the manuals below for help with Aperio Programming
software / Assa Abloy Locks;
ST-001321 Aperio Online Programming Application Manual-D
ST-001322 Aperio Online Quick Installation Guide-C.
Last Change
02 June, 2015
EXgarde Assa Abloy Aperio Integration
Copyright © 2014 TDSi
Page 23
Time and Data Systems International Ltd
Unit 10 Concept Park
Innovation Close
Poole
Dorset
BH12 4QT
UK
+44 (0)1202 723535
+44 (0)1202 724975
http://www.tdsi.co.uk/
[email protected]
[email protected]
[email protected]