1
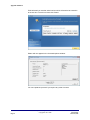
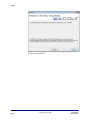
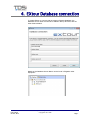
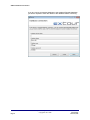
EXtour Security Tour Management Software User Guide UM0084.GB Issue 1 08/06/2015 www.tdsi.co.uk TDSi Unit 10 Concept Park Innovation Close Poole Dorset BH12 4QT, UK Tel: +44 (0) 1202 723535 Fax: +44 (0) 1202 724975 Sales Enquiries: Marketing Support: Technical Support: [email protected] [email protected] [email protected] Foreword Copyright © 2012 TDSi. All rights reserved. Time and Data Systems International Ltd operate a policy of continuous improvement and reserves the right to change specifications, colours or prices of any of its products without prior notice. Guarantee For terms of guarantee, please contact your supplier. Trademarks Copyright © 2012 Time and Data Systems International Ltd (TDSi). This document or any software supplied with it may not be used for any purpose other than that for which it is supplied nor shall any part of it be reproduced without the prior written consent of TDSi. Microsoft and Windows are registered trademarks of Microsoft Corporation. All other brands and product names are trademarks or registered trademarks of their respective owners. Cautions and Notes The following symbols are used in this guide: CAUTION! This indicates an important operating instruction that should be followed to avoid any potential damage to hardware or property, loss of data, or personal injury. NOTE. This indicates important information to help you make the best use of this product. Contents 1. Overview .......................................................................................................................................... 1 2. Upgrade to EXtour ........................................................................................................................ 2 3. Install ................................................................................................................................................. 5 4. EXtour Database connection..................................................................................................... 7 5. Install Location ............................................................................................................................... 9 6. Confirm Install................................................................................................................................. 11 7. Install Complete ............................................................................................................................. 12 8. Configure Guards ........................................................................................................................... 13 9. Configure Tour................................................................................................................................ 15 10. Adding New Tour ........................................................................................................................... 17 11. Start Tour ......................................................................................................................................... 21 12. Stop Tour .......................................................................................................................................... 23 13. Tour Alarms ..................................................................................................................................... 24 14. Reports .............................................................................................................................................. 25 15. Printing Reports ............................................................................................................................. 28 16. Delete old events .......................................................................................................................... 29 Last Change 08 June, 2015 EXtour Security Tour Management Software User Guide Copyright © 2012 TDSi Page i 1. Overview EXtour provides a convenient means of managing security tours using your access readers. The EXtour software module allows you to configure readers and personnel within the EXgarde Pro database to provide management of security tours. Any of the readers within the access control site can be selected for inclusion in the tour and set to a predefined order ensuring a control route can be carried out by defined personnel. The defined tour is timed and requires the administrator to specify times taken to reach each reader. This will provide 3 possible outcomes which will also activate alarms if not done correctly. Early card presentation – Guard is not performing his tour duty correctly Correct time card presentation - Guard is performing his tour duty correctly Late or Failure of card presentation – Guard could be in trouble or has experienced an occurrence The EXtour screen presents a real time status of all tours that are currently active providing a very clear overview. Tour alarms are made visible in the Tour Alarm pane area of the screen. Last Change 08 June, 2015 EXtour Security Tour Management Software User Guide Copyright © 2012 TDSi Page 1 2. Upgrade to EXtour To Upgrade to EXtour from EXgarde Open License Server and click on the Upgrade button Select the Upgrade button in the general Options section EXtour Security Tour Management Software User Guide Copyright © 2012 TDSi Page 2 Last Change 08 June, 2015 Upgrade to EXtour The license window below will appear a Serial Number and a Limit Code. This information and which license you wish to extend (in this case EXtour), will need to be emailed to [email protected]. A quick way to copy the information so it can be pasted into an email is with the Copy to Clipboard button. This will bring up the following conformation window. Last Change 08 June, 2015 EXtour Security Tour Management Software User Guide Copyright © 2012 TDSi Page 3 Upgrade to EXtour TDSi will email you another serial number which will need to be entered in to the text box. Once this is done click Extend. EXtour will now appear in the Licensed Options window. You can repeat the process if you require any other Licenses. EXtour Security Tour Management Software User Guide Copyright © 2012 TDSi Page 4 Last Change 08 June, 2015 3. Install Before you can install EXtour ensure at least two Network User need registered to the License server and that the License server in running. EXtour is installed using an installer setup.exe. This will perform the following steps 1. Install the EXtour application 2. Install the Microsoft .NET framework* 3. Install this help file Last Change 08 June, 2015 EXtour Security Tour Management Software User Guide Copyright © 2012 TDSi Page 5 Install *If Microsoft .NET framework is not installed you will be prompted to install as part of the installation EXtour Security Tour Management Software User Guide Copyright © 2012 TDSi Page 6 Last Change 08 June, 2015 4. EXtour Database connection To enable EXtour to connect with the existing EXgarde Database, the Database server name will need to be added in the top text field, with the other fields left blank. Details of the Database Server Name can be found in EXgarde under Equipment. Last Change 08 June, 2015 EXtour Security Tour Management Software User Guide Copyright © 2012 TDSi Page 7 EXtour Database connection If you are running a separate database to the standard EXgarde database, you will be required to enter the details of the database before continuing EXtour Security Tour Management Software User Guide Copyright © 2012 TDSi Page 8 Last Change 08 June, 2015 5. Install Location The EXtour install will default to the existing TDSi file location. If the install is for private use select the Just me option before continuing. If you require EXtour to be install in an alternative location, click on the Browse Button and the window below will appear. Last Change 08 June, 2015 EXtour Security Tour Management Software User Guide Copyright © 2012 TDSi Page 9 Install Location You can evaluate the available disk volumes by selecting the Disk Cost button. This will open a new window with the details of available drives and also the size and how much space EXtour will require. EXtour Security Tour Management Software User Guide Copyright © 2012 TDSi Page 10 Last Change 08 June, 2015 6. Confirm Install When you are ready to install, click on the next button The window below will appear displaying the progress of the install Last Change 08 June, 2015 EXtour Security Tour Management Software User Guide Copyright © 2012 TDSi Page 11 7. Install Complete Once the install is complete click on the Close button and the EXtour main window will open up. EXtour Security Tour Management Software User Guide Copyright © 2012 TDSi Page 12 Last Change 08 June, 2015 8. Configure Guards To Configure the Guards select the Configure Tab at the top of the main window. Select the Guards option and the new window below will appear. You will notice all the Keyholders registered with EXgarde are available in the box on the left. Last Change 08 June, 2015 EXtour Security Tour Management Software User Guide Copyright © 2012 TDSi Page 13 Configure Guards You can add or remove specific Guards depending on your requirements by using the Add or Remove buttons in the center of the window. Click on close to return to the main window. EXtour Security Tour Management Software User Guide Copyright © 2012 TDSi Page 14 Last Change 08 June, 2015 9. Configure Tour To Configure the Tours select the Configure Tab at the top of the main window. Select the Tours option and the new window below will appear. You will notice all the readers registered with EXgarde are available in the box on the left. Last Change 08 June, 2015 EXtour Security Tour Management Software User Guide Copyright © 2012 TDSi Page 15 Configure Tour Select the Manage Tour button at the top of the window to carry out the following tasks Add new Tour - will allow you to name and create a new tour Edit Tour - will allow you to select and edit a current Tour name Delete Tour - will allow you to delete the current selected Tour in the Tour Name drop down box. EXtour Security Tour Management Software User Guide Copyright © 2012 TDSi Page 16 Last Change 08 June, 2015 10. Adding New Tour When adding a new tour to the system it is advisable you have the following information to hand before starting this process. Name of the readers and their location. The route the tour will take. The time the tour will take to complete. To create a new tour click on the Manage Tour tab at the top of the screen and select Add New Tour. The window below will allow you to enter the name of the new tour. Select Close when complete Last Change 08 June, 2015 EXtour Security Tour Management Software User Guide Copyright © 2012 TDSi Page 17 Adding New Tour The New Tour will appear in the Tour Name drop down box. This will also contain any other tours you may have with different route configurations. You can now begin to build the tour by adding the readers to the Tour Detail. This will need to be done in accordance with the desired route the tour will take. N.B. You cannot remove a reader once it has been added to the Tour, a new tour will need to be created. EXtour Security Tour Management Software User Guide Copyright © 2012 TDSi Page 18 Last Change 08 June, 2015 Adding New Tour Once all the required readers have been added, the Min and Max times to get to each reader will need to be set. These times work on a cumulative bases, meaning the total time taken to complete the tour should be the max time added to the last reader. The table below demonstrates a basic setup. The tour will take a maximum of 4 minutes The guard has a minute to get from one reader to another If the guard takes longer than the times specified on the table, an alarm will be triggered If you have entered an incorrect Min and or Max time value the error message below will pop up when you try to close the main window. To clear this error review your entered time and ensure they meet the details specified in the message box. Last Change 08 June, 2015 EXtour Security Tour Management Software User Guide Copyright © 2012 TDSi Page 19 Adding New Tour Now that the readers and times have been specified you can now close the Window. You will return back to the main window where the name of the tour you have just created will appear in the Available Tours drop down box. EXtour Security Tour Management Software User Guide Copyright © 2012 TDSi Page 20 Last Change 08 June, 2015 Start Tour 11. Start Tour Now that the specified Tour and Guards have been created you can now start a tour. Select the Start Tour button on the left side of the window to begin the tour. The new tour details will appear in the Active Tours area of the main window. Last Change 08 June, 2015 EXtour Security Tour Management Software User Guide Copyright © 2012 TDSi Page 21 When the tour is complete, click on the Stop Tour button to log the tour detail. If there are several tours in process, ensure the black arrow is on the same line as the tour you want to stop. EXtour Security Tour Management Software User Guide Copyright © 2012 TDSi Page 22 Last Change 08 June, 2015 12. Stop Tour When the tour is complete, click on the Stop Tour button to log the tour detail. If there are several tours in process, ensure the black arrow is on the same line as the tour you want to stop. Last Change 08 June, 2015 EXtour Security Tour Management Software User Guide Copyright © 2012 TDSi Page 23 13. Tour Alarms If there is a problem whilst a tour is in process preventing the guard from getting to the readers by the specified times or they get to the reader too early, an alarm will appear in the Tour Alarms dialog box. These will be displayed in the Alarm Message box as followed. Guard has reached EX reader too early Guard not reached EX reader in time Full details of the alarms will be displayed as shown in the example below. As you can see the Guard reached the second reader too early and did not reach any of the other readers specified on their tour by the given times required. When you click on the Stop Tour button, EXtour will log and clear the alarms from the active tour. Full analysis of the tours can be found in Reports. EXtour Security Tour Management Software User Guide Copyright © 2012 TDSi Page 24 Last Change 08 June, 2015 14. Reports EXtour provides the facility to view and analyse any of the tours logged via the Report tap at the top of the screen. Selecting the Reports will open up a new window contain 4 dialog boxes. Last Change 08 June, 2015 EXtour Security Tour Management Software User Guide Copyright © 2012 TDSi Page 25 Reports The Completed Tours window has details of tours carried out. To view a specific tour, highlight the tour and click on the Analyse tab at the top of the window. This will then auto fill the other 3 windows. As you can see from the information below, the Guard completed the tour in the given time, resulting in a Pass being displayed in the bottom right corner of the window. EXtour Security Tour Management Software User Guide Copyright © 2012 TDSi Page 26 Last Change 08 June, 2015 Reports If the Guard did not complete the tour in the given time, details of why will be displayed in the Tour Result window and a Fail will be displayed in the bottom right corner. To close the Reports window click on the red cross in the top right hand corner or Quit via the File tab. Last Change 08 June, 2015 EXtour Security Tour Management Software User Guide Copyright © 2012 TDSi Page 27 15. Printing Reports Once a tour has been analysed it is possible to preview or print the results. All of the information displayed during the analysis is provided on the printed report, however some of the information is laid out differently. To Print or Preview the report, click on the file .tab at the top of the page and select from the options. Below is how the report will be presented when printed out EXtour Security Tour Management Software User Guide Copyright © 2012 TDSi Page 28 Last Change 08 June, 2015 16. Delete old events You can maintain your report database via the Delete old events button at the top of the window. This will allow the user to delete events that are older than a specified number of days, between 1 to 90. It is recommended that the database is cleaned up periodically. When the Delete old events is selected the window below will appear. Default is set at 45 day, however this can be adjusted to suit. Last Change 08 June, 2015 EXtour Security Tour Management Software User Guide Copyright © 2012 TDSi Page 29 Delete old events When you are happy with the desired days, select the Delete Events button and the below confirmation box will appear. Click OK to close window. EXtour Security Tour Management Software User Guide Copyright © 2012 TDSi Page 30 Last Change 08 June, 2015 Time and Data Systems International Ltd Unit 10 Concept Park Innovation Close Poole Dorset BH12 4QT UK +44 (0)1202 723535 +44 (0)1202 724975 http://www.tdsi.co.uk/ [email protected] [email protected] [email protected]