1
High Tech Center for the Disabled Instructional Guide
Volume 1
Second Edition - Nov. 1989
Filch
Freedom 1
TurboLightning
Vista
WordStar
Developed by:
Kathy Gross
Shannon Smithson
Mary Yoder
Dee Konczal
Don Dutton
Edited by:
Carl Brown
Wayne Chenoweth
Judy Graef
Marcia Norris
Jill Rivers
Produced by:
Daisy Baird
Carolyn Hicks
Sponsored by:
California Community College Chancellor's Office
California State Department of Rehabilitation
The Community College Foundation
The High Tech Center for the Disabled
1109 9th Street
Sacramento, CA 95814
(916) 322-4636
•
Copyright © 1989 by The Community College Foundation
These materials may be reproduced for educational purposes only.
•
•
•
Contents
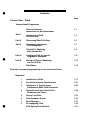
Course One - Filch
Page
Instructional Component
•
Notes to Instructor
Instructions for Brief Assessment
1-1
Unit 1
Introduction to Filch
Low-Tech Aids
1-3
Unit 2
Discovering What Filch Does
1-5
Unit 3
Determining Appropriate
Filch Parameters
1-7
Tutorial For Exploring
Basic Parameters
1-9
Unit 4
Configuring Filch for Specific
Programs or Keyboards
1-11
Unit 5
Review and Test on Knowledge
and Use of Filch
1-13
Final Exam
1-15
Each unit corresponds approximately to one instructional hour,
Handouts
1
2
3
4
•
5
6
7
8
Introduction to Filch
Non-technical Access Considerations
Introduction to Typical Access
Problems and Basic Filch Parameters
Description and List of Basic Filch
Parameters and Values
How to Load Filch
Filch Parameter Screen
Error Messages
Re-configuring Filch
Filch Specification Handout
1-17
1-19
1-23
1-25
1-33
1-35
1-37
1-39
1-41
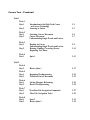
Course Two - Freedoml
Unit 1
Week 1
Day 1
Introduction to the High Tech Center
and Access Technology
Learning to Listen
2-1
Listening, Cursor Movement
Cursor Movement
Understanding Single Words and Letters
2-5
2-7
Reading for Errors
Understanding Single Words and Letters
Hearing, Finding, Correcting Errors
Beginning Text Entry
2-9
Quiz 1
2-13
Week 4
Day 2
Review Quiz 1
2-17
Week 5
Day 1
Day 2
Beginning Wordprocessing
WordStar Cursor Movement
2-19
2-21
Week 6
Day 1
Day 2
Setting Margins, Reforming
Review Wordprocessing
2-23
2-25
Week 7
Day 1
Day 2
WordStar File Navigation Commands
More File Navigation Tasks
2-27
2-29
Week 8
Day 1
Day 2
Quiz 2
Review Quiz 2
2-31
2-35
Day 2
Week 2
Day 1
Day 2
Week 3
Day 1
Day 2
Week 4
Day 1
2-3
2-11
Unit 2
•
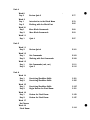
Unit 3
Week 9
Day 1
2-37
Day 2
Cursor Position in a Document and
Cursor Position on the Screen
Review; Stop Speech Command
Week 10
Day 1
Day 2
Quick Paragraph Reform, Find Command
Deleting Letters, Words, Lines
2-41
2-45
Week 11
Day 1
Day 2
Printing
Review Printing and Options
2-47
2-51
Week 12
Day 1
Quiz 3
2-53
Review Quiz 3
2-57
Practicing Wordprocessing and
Screen Reading
Practicing Wordprocessing and
Screen Reading
2-59
Week 14
Day 1
Day 2
Formatting Concepts, Tabs
Review Formatting with Tabs
2-63
2-67
Week 15
Day 1
Day 2
Reading File Directory
Using CorrectStar
2-69
2-73
Week 16
Day 1
Day 2
Block Moves
Review for Final
2-75
2-79
Week 17
Suggestions for Instructor
2-81
Week 18
Final
2-83
2-39
Unit 4
Week 12
Day 2
•
•
Week 13
Day 1
Day 2
2-61
Course Three - Turbo Lightning
Introduction to Turbo Lightning
3-1
Unit 1
Introduction to On-Line Spellchecking
How to Access Turbo Lightning
3-3
Unit 2
Turbo Lightning "Hot" Keys
3-7
Unit 3
Problem Solving
3-11
Unit 4
Adding Words
Performance based Quiz
3-15
Each unit corresponds approximately to one instructional hour.
Course Four - Vista
Assessment Component
Intake Information and Assessment
of Magnification Needs
4-1
Screen Color Evaluation
4-3
Instructional Component
Unit 1
Using the Mouse
Exploring the Full Screen
4-5
Unit 2
Adjusting and Selecting Text Size
4-7
Unit 3
Using Locator Windows
4-9
Unit 4
Cursor Track Function in Vista
4-11
Unit 5
Single Line Display, Scroll Mode
4-13
Quiz
4-15
Vista Reference Guide
4-17
Vista Scrolling Commands
Each unit corresponds approximately to one instructional hour.
•
•
Course Five - WordStar
Unit 1
Week 1
Day 1
Day 2
Introduction to the High Tech Center
Introduction to WordStar
5-1
5-5
Introduction to Turbo Lightning
Inserting/Deleting Text
Full Screen Spell Check
5-9
5-13
Types of Save Commands
Quiz 1
5-19
5-25
Week 4
Day 1
Day 2
Onscreen Menu, Margins, Tabs
Onscreen Menu, Centering Text
5-31
5-37
Week 5
Day 1
Day 2
Paragraph Reform
Quick Menu
5-41
5-47
Week 6
Day 1
Quiz 2
5-53
Week 6
Day 2
Review Quiz 2
5-59
Week 7
Day 1
Day 2
Print Menu, Underscore, Boldface
Practicing Special. Printing Effects
5-61
5-69
Week 8
Day 1
Quiz 3
5-71
Week 2
Day 1
Day 2
Week 3
Day 1
Day 2
Unit 2
Unit 3
•
Unit 4
-
Week 8
Day 2
Review Quiz 3
5-77
Week 9
Day 1
Day 2
Introduction to the Block Menu
Working with the Block Text
5-79
5-85
Week 10
Day 1
Day 2
More Block Commands
More Block Commands
5-89
5-93
Week 11
Day 1
Quiz 4
5-97
Week 11
Day 2
Review Quiz 4
5-101
Week 12
Day 1
Day 2
Dot Commands
Working with Dot Commands
5-103
5-109
Week 13
Day 1
Day 2
Dot Commands (.mb, .mt)
Quiz 5
5-111
5-115
Week 14
Day 1
Day 2
Practicing WordStar Skills
Practicing WordStar Skills
5-121
5-125
Week 15
Day 1
Day 2
Practicing WordStar Skills
Begin Review for Final Exam
5-127
5-131
Week 16
Day 1
Day 2
Review for Final Exam
Review for Final Exam
5-133
5-137
•
Unit 5
Unit 6
Week 17
No Classes
Week 18
Final Exam
5-141
•
Filch
Adaptive Computer Technologies
•
Developed By:
Kathy Gross, Specialist, Santa Monica College
•
•
•
•
•
•
•
•
•
Notes to Instructor
It is assumed that all students participating in the Filch instructional units will
need Filch in order to effectively use the keyboard.
If students are new to using a computer keyboard, they will probably find that their
speed and accuracy increase as they get fmniliar with the keyboard and their
application program(s). The Filch parameters used should periodically be reviewed.
As students gain keyboarding expertise, Filch parameter values may need to be
altered or perhaps removed entirely.
A Plan for Keyboard Evaluation:
A simple evaluation to determine which initial parameters and values to use can be
done by setting up a file in a word processor. Observe how the student moves, how
s/he selects keys, and what text appears on the monitor as the student performs the
following tasks.
1. Have the student type one sentence.
•
2. Have the student press keys located in different areas of the keyboard.
3. Have student capitalize a letter.
4. Have student enter punctuation marks.
5. Have student press the Enter and Escape keys.
6. Have student press combinations of keys (e.g., Ctrl C, Ctrl P).
Noting access difficulties and error patterns will give the instructor a good
indication of the parameters which will be required. Look for repeated letters,
miskeyed letters, and the student's ability to hold down more than one key at a
time.
Try several Filch parameters to see if they help compensate for any difficulties the
student has in using the keyboard. Once the appropriate parameters have been
selected, include them in a batch file.
Note: See Chapters 3 and 4 in Computer Access in Higher Education for Students
with Disabilities, for an in-depth review of computer access evaluation techniques.
Filch
Page 1-1
•
NOTES:
•
•
Page 1-2
Filch
•
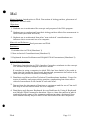
Mal
Major Content: Introduction to Filch. Discussion of sitting position, placement of
equipment, low-tech aids.
Objectives:
1. Students are to understand the concept and purpose of the Filch program.
2. Students are to understand how their sitting position affects fine movements in
their hands (and head and neck).
3. Students are to understand how other "non-technical" considerations can
influence their access and use of a computer.
Material and Software: Word processor and Filch.
Randouts•
1. Introduction to Filch (Handout 1)
•
2. Non-technical Considerations (Handout 2)
3. Keyboard Access Problems and Helpful Filch Parameters (Handout 3)
Instructional Activities:
1. Distribute Introduction to Filch handout. Introduce students to the concept
of a software keyboard adaptor and how it works.
If a student is using a computer in which Filch has been loaded, s/he needs to
know that the instructor has already determined parameters and values to be
used and has provided a means of loading them.
2. Distribute and discuss Non-Technical Considerations handout. Cover the
topics of stability and proper sitting position, emphasizing how these affect
control of movements in the hands or neck and head.
3. Discuss how the placement of furniture or equipment and the use of "low-tech"
aids help to access and facilitate use of a computer.
4. Distribute and discuss Keyboard Access Problems In Using A Keyboard
and Helpful Filch Parameters handout. Have a class discussion in which
students describe some of the common problems in using a keyboard. Have
each student identify ways in which it has been difficult to use a keyboard.
•
Filch
Page 1-3
5. Have students create a file in the word processor which they use. Title it
"access." Students are to analyze the ways in which it has been difficult for
them to use a keyboard and list them in this file.
6. Students are to create another list in this file for "non-technical" solutions to
access difficulties based on the classroom discussion on stability and proper
sitting position, placement of equipment, furniture, and low-tech aids.
7. Students are to save and print a copy of this file for next class.
Homework:
Read handout - Keyboard Access Problems and Helpful Filch Parameters.
Students are to identify parameters which may be useful
to them. If possible, do
not let students know what Filch parameters have been set for them by the
instructor. In this way the homework assignment becomes an exercise in deductive
reasoning.
Expected Outcome:
At the conclusion of these activities which focus on ease of keyboard
use, students will be able to evaluate their own keyboard access
difficulties and list them. Additionally, students will be able to
suaest common-sense non-technical considerations which may
facilitate their keyboard access.
Note: Many students will require preconfigured versions of Filch
loaded into the computer before the word processor can be accessed.
Page 1-4
Filch
•
Unit 2
Major Content: Discovering problems encountered in using a keyboard and
determining appropriate Filch parameters.
Objectives:
1. Through actual hands-on experience, students will develop an understanding of
how Filch can remove barriers to effective computer access. This understanding
is generated by having students use the keyboard with and without Filch
loaded..
2. Students are to learn basic Filch terminology (parameter, parameter list, value)
and how to load Filch parameters.
Materials and Software: Word processor and Filch. Print out of "Access" file
generated at last class.
Handouts:
1. Filch Parameters (Handout 4)
2. How to Load Filch (Handout 5)
3. Filch Specification Summary Table (Handout 6)
Instru t onal Activities:
1. Review and discuss information content of homework assignment: some of the
most common difficulties in using a keyboard; discuss helpful Filch parameters
which eliminate keyboard access difficulties.
2. Have students load their word processor program without loading Filch.
Students are to open up a file and type in a short paragraph (or sentence if
student has slow speed of entry). Students are to notice any difficulties they
have in entering text from the keyboard. Any student needing assistance when
working without Filch is to ask for help when needed.
Note: students with moderate levels of orthopedic disability may experience
extreme difficulty with these exercises. The instructor should be aware of the
physical limitations of his/her students and modify lessons appropriately.
3. Once students have determined their particular difficulties in using the
keyboard, have them refer to the handout assigned as homework. Have each
student determine which parameters are most likely to solve his/her keyboard
access problems.
•
4. Distribute and discuss two handouts: How to Load Filch and Filch
Parameters. Lead students through one Filch parameter load-in process.
Explain the parameter list and Filch Specification Summary Table window
which appears on the screen.
Filch
Page 1-5
5. After Filch is loaded, start the word processor the student is using and open up
the "Access" file. At the end of this file, have students write a few sentences or
a short paragraph comparing keyboard use with and without Filch.
6. Have students make any changes needed to the difficulty lists created at the
last class session.
7. At the bottom of this file, students are to add a Filch parameter list, listing
parameters and values that they have been using (instructor provided). Save
and print out a copy of the file for next class session.
Homework:
Students are to read about the parameters they think will be useful to them in the
Filch Parameters handout. Emphasize the /t , /d and /m parameters.
expected Outcome:
Students will have developed an experiential understanding of how
Filch allows them to access the keyboard more efficiently and will be
able to identify Filch parameters which they must load in order to
achieve efficient keyboard use.
•
Page 1-6
Filch
Major Content: Students explore different parameters and configure Filch for their
own specific needs.
Objectives:
1. Through actual hands-on experimentation with parameter loading activities,
students are to configure Filch to help compensate for whatever difficulties they
have in using a keyboard.
2. Students are to re-configure Filch and know how to respond to error messages
presented by Filch.
3. Students will be instructed in how to de-activate and activate Filch through
keyboard commands.
Material and Software: Word processor and Filch. Print out of "Access" file
generated at last class.
Handouts:
1. Error Messages (Handout 7)
2. Changing Parameters and Values–Reconfiguring Filch (Handout 8)
411
Instructional Activities:
1. Have students open up the "Access" file and move cursor to bottom of file. Lead
students through a discussion of parameters.
2. At the conclusion of this discussion, students should enter the parameters and
values they selected as those which they need.
3. Print the file. Reboot the computer.
4. Lead students through the process of loading Filch and their word processor
using the handout even at the last class (Loading Filch). Have students use
the parameter list from the new print-out of their "Access" file.
5. Have students try using the keyboard. Have students compare their selection of
Filch parameters and values with those selected by the instructor. Change
parameters and values if necessary. (See next step.) This "best" parameter list
should be written or placed in an easily accessible spot for quick reference.
6. Distribute How to Re-configure Filch handout. Show students how to reconfigure Filch so they can load different parameters or values, or negate
parameters previously installed.
•
7. Distribute Error Messages handout. Describe possible errors in a parameter
list and how to correct them.
Filch
Page 1-7
8. Have students experiment with several different configurations of Filch. Focus
on the /t , /d and /m parameters during this session. Students can work
independently or as a class. Have students explore parameters one at a time,
and then try them in different combinations.
•
9. When trying the /m parameter, have students perform a "warm boot" (Ctrl, Alt,
and Delete keys).
10. A tutorial for exploration of parameters and values is attached.
11. Demonstrate how Filch can be de-activated from the keyboard pressing Alt and
then Escape. Also demonstrate that tapping the Alt key three times in
succession will re-activate Filch.
Homework:
Students to are to review the parameters they think will be useful to them in the
"Filch Parameters" handout. Emphasize the /r, /c, id, /pc parameters.
Expected Outcome:
After experimenting with various parameter values, students will
have determined the necessary parameters and best values which
alleviate functional limitations affecting their keyboard use. They
also will be able to respond appropriately to Filch error messages
and be able to reconfigure Filch (including the ability to negate a
parameter), and be able to turn Filch off or on from the keyboard.
•
Page 1-8
Filch
TUTORIAL FOR STUDENTS
Exploration of Parameters and Values
•
UNIT 3
Suggested activities to perform in order to quickly understand the nature of the
parameter being explored:
1. Exploring the /t parameter:
With a It value of 0 (AO), press down keys and observe automatic key repeat
function.
Try /t50 and /t100 and notice how long it takes for keys to repeat on the screen.
Notice that this parameter does not affect typing speed.
2. Exploring the /d parameter:
With a /d value of 0 (/dO), intentionally hit several keys and observe how easily
they register on the screen.
Try /dl and notice how it takes longer for keys to register and it is harder to
"mistakenly" press other keys. Notice that because of a slight delay before a key
registers, it is necessary to get used to a "typing rhythm."
3. Experimenting with the /m parameter:
With a /m value of 1 (/311) try actual combination of keys that are commonly
used with the word processor (keep /r and /c values at what they are usually
set).
After you fully understand /m1, experiment with the other values for /m (2,3,4)
and see how they work differently in modifying, latching, or locking keys.
4. Combining parameters:
Explore using /t and /d in combination. It is best not to use them together
unless absolutely necessary.
Filch
Page 1-9
•
NOTES:
•
•
Page 1-10
Filch
•
UNIT 4
Major Content: Students are to configure Filch for their specific word processor and
machine type.
Objectives: Students are to configure Filch for their own specific word processor
and machine type through actual hands-on experimentation with parameter
loading activities.
Materials and Software: Word processor and Filch. A printout of "Access" file
generated at the last class session.
Instructional Activities:
1. Discuss when and why status windows are used. Explain the use of /r and /c
whenever an /m parameter is used. Explain that /r1 and /el display the status of
locking keys on the keyboard (e.g., NumLock).
2. Discuss the need for application-specific placement of windows: place them on
portions of the physical screen not used for text or menu prompts.
3. Have students load their own parameter list. Use parameters and values
selected last session.
•
4. Have the students load their word processor and open a file (new or old).
Students are to view the screen to determine areas for possible placement of
status windows. Select two possible areas. Try several different combinations
by re-configuring Filch.
5. Students should decide the values for the /r and /c, and /r1 and /d parameters to
use with their word processor. Include these in the parameter list in their
"access" file or where they have written their parameter list for easy reference.
6. Discuss when a machine identification parameter may be helpful: if the student
is using an enhanced keyboard (one which has a middle bank of arrow keys and
special keys between the standard keyboard and numeric keypad), and a /t
parameter, reconfigure Filch to install the /pc machine identification parameter.
Include such a parameter in parameter list if indicated.
7. Discuss how to configure Filch for other application programs.
Filch
Page 1-11
Homework:
Prepare for test scheduled for next session. Test will cover loading Filch
parameters and values and re-configuring Filch. Students are to decide if they can
access a computer adequately for their needs.
•
Expected Outcome:
With the completion of these activities, students will demonstrate
the ability to analyze the environment in which Filch will be
working and will be able to select appropriate application-specific or
keyboard-specific parameters and values.
•
•
Page 1-12
Filch
UNIT 5
Major Content: Final discussion of Filch; parameters test.
Objectives: Students are to demonstrate independent knowledge and use of Filch.
This is to include loading, configuring and re-configuring. They are to select and
use parameters and values most suitable for their own needs.
Material and Software: Word processor and Filch. Students may use notes and/or
handouts for test.
Instructional Activities:
1. Final questions from students.
2. Discuss the fact that Filch settings may need to be adjusted periodically due to
changes in energy level, fatigue, improved manual dexterity and enhanced
familiarity with the keyboard and application program.
3. Inform students that there are other parameters to consider and explore that
were not covered here, but are presented in the Filch manual.
4. Skill Demonstration Test
•
A. Students are to load all programs (Filch and word processor) without
assistance from others.
NOTE: This may not be possible for students with moderate to severe
physical disabilities.
B. Instruct students to re-configure Filch, giving them a set of
parameters and values to be installed. This should be done as a group
activity. The instructor should then check each student's keyboard
operation to determine if the stated parameters and values have been
set.
5. Distribute "Filch Exam." Students are to work independently on the following
activities.
A. Have students reboot and load Filch. Each student is to load those
parameters and values which currently provide him or her with the
most efficient keyboard function
B. Have students load the word processor, open a new file called "Test"
and answer the following questions.
i. What low-tech aids and physical considerations (e.g., placement of
furniture or computer components) facilitate computer use for
you?
•
ii. How is Filch useful to you?
Filch
Page 1-13
•
iii. Which parameter is most helpful to you? Why?
iv. At the A: prompt below, type in the Filch command, parameters
and values which currently work best for you.
A>
6. Have students save the file, print it and turn it in.
Outcome:
At the conclusion of these instructional activities, students will demonstrate
independent proficiency in loading Filch. They will also demonstrate an
understanding of those Filch parameters and values which they must use in order
to achieve effective keyboard access.
instructional Unit Outcome:
At the conclusion of this instructional unit on Filch, a software keyboard adaptor, students will
have a personal understanding of the ways in which Filch provides a means of effective
keyboard access.
Students will understand that effective keyboard access may also be facilitated by simple,
common sense considerations like placement of the monitor, furniture, and the use of simple
assistive devices (e.g., a finger pointing mitten).
Students will understand they can configure Filch with parameters and values which create a
keyboard which operates according to their individual needs.
Students will also understand that Filch is a flexible program which can be tailored to work with
most software application programs and seldom interferes with computer use in any way.
Page 1-14
Filch
•
FILCH EXAM
•
1. Reboot the computer and load Filch. Use those parameters and values which
currently provide you with the most efficient keyboard function.
2. Load your word processor, open a new file called "Test."
3. Type your name and today's date at the top of the document.
4. Answer the following questions.
A. What low-tech aids and physical considerations (e.g., placement of
furniture or computer components) facilitate computer use for you?
B. How is Filch useful to you?
C. Which parameter is most helpful to you? Why?
D. At the A: prompt below, tyw in the Filch command, and the
parameters and values which currently work best for you.
A>
•
5. Save the file, print it and turn it in.
•
Filch
Page 1-15
•
NOTES:
Page 1-16
Filch
•
HANDOUT 1
Filch
What It Is And Who Can Benefit From It
Filch is a software program which changes how the keyboard sends information to
the computer. It makes a standard computer keyboard easy to use. Filch can be
easily customized (configured) for each individual's needs.
The usual way of communicating with a computer is to enter information through
the keyboard. However, not everyone can use a keyboard easily. Some people can
hold down only one key at a time, others may not be able to quickly release a key
once it is pressed. Others may brush several keys unintentionally while trying to
press one particular key.
With Filch it is possible to use the keyboard with only one or a few fingers. Even
single key access via a headwand, mouthstick or hand splint can yield effective
computer use. Filch often eliminates the need for keyguards, special keyboards and
separate scanning displays.
•
Once Filch is loaded into computer memory, application programs such as word
processors, spread sheets, data base management programs and other commercially
available software can be used. Full access to the world of computers and software
is now possible to individuals who previously had difficulty in using a keyboard.
The manufacturer's manual states that Filch is a "user programmable resident
keyboard filter." This means that it is easily tailored to individual needs by the
user (user programmable), stays in computer memory until the computer is turned
off or re-started (resident), and changes how information from the keyboard is
transmitted (or "filtered") to the computer (keyboard filter).
•
Filch Handouts
Page 1-17
NOTES:
Page 1-18
Filch Handouts
•
MEWL=
Non-Technical Considerations
Sitting Position
Placement of Equipment and Furniture
Low-Tech Aids
Several "non-technical" considerations will affect your ability to access and use a
computer, and may decrease or eliminate the need for Filch. These include sitting
position, placement of equipment and furniture, and "low-tech" aids (any simple,
non-technical device which helps you use a computer). Take the time to assess each
of these considerations and try several different combinations. It may take more
than one session to determine the optimal position and set-up for easy access and
use of a computer. If you are unable to position yourself or the furniture and
equipment around you for optimal use of a computer, ask for assistance.
Stability ... the key to control of movement
•
When you are trying to carry out the motion of pressing a particular key on the
keyboard, how easily, correctly, and consistently you can do it will depend on how
much control you have of your hands or other pointing device.
Your hands will be more easily controlled by you if your wrists are stable;
your wrists will be more easily controlled if your lower arm is stable;
your lower arm .... if your upper arm is stable;
your upper arm .... if your shoulders are stable;
your shoulders .... if your upper body is stable;
your upper body ... if your lower body is stable.
Therefore, better control of movements in your hands will start with stability and
support of your lower body and feet. This is true for everyone. These same
principles apply to movements of the neck and head, for those using a mouthstick or
headwand.
Sitting Position
Your sitting position should be comfortable and stable, with your feet well
supported on the ground or in footrests, your hips back in your chair (not slouched
or extended forward), and your upper body straight (not leaning to one side or
forward or backward). Generally, ankle, knee, and hip joints should be at 90 degree
angles. Shoulders and arms should also be stable and relaxed. You may need some
seating modifications or extra support for a good sitting position.
•
Filch Handouts
Page 1-19
Body Support
If the upper body is leaning towards one side, side supports or pillows can help.
Support of the arms on a table or laptray will often increase stability of the upper
back and shoulders, improving control of the upper body, head and hand
movements. An adapted board that slides onto a table with areas for resting elbows
and arms also provides stability and can be beneficial to those who fatigue easily or
have limited control of their arms or hands. Wrists can be supported on an arm or
wrist support bar, or by use of a wrist support splint.
seating Considerations
Chairs with easily adjustable heights can accommodate the needs of several
different individuals. Some will need the stability of a chair with arm supports,
others will be more comfortable without them. Chairs that roll on casters will allow
easier positioning to the equipment, but these will be too unstable for some
individuals who require stationary chairs. If possible, a computer lab should have
several different types of chairs available.
Other Alternatives
If you use a wheelchair or other mobility device and do not feel comfortable or
efficient in your movements, consult with a professional (occupational therapist,
physical therapist, or rehabilitation engineer) who is experienced with positio ning.
You should feel secure yet have some freedom of movement with any type of
mobility device you use.
Placement of Equipment
The monitor should be at eye level. Monitor stands and monitor arms are available
that allow the monitor to tilt, swivel, or move forward.
A long keyboard cable is extremely beneficial in allowing access to the computer.
The keyboard should be positioned to wherever access to the keys is easiest
( midline, either side, up or down). Keyboard holders that can adjust the tilt and
height of the keyboard can make it easier for some individuals to reach the keys,
especially those keys at the top of the keyboard.
Adjustable copy holders will allow optimal placement of work sheets, drafts, or
printed material to be referenced while entering information into the computer.
Page 1-20
Filch Handouts
•
Other Low-Tech Aids
•
Low-tech aids refer to any simple devices or modifications that make it easier to use
a computer. These include positioning and seating aids as well as mouthsticks,
headwands, or chinwands for those who can't use their hands.
Persons who can position their hands) over the keyboard, but do not have the
control, strength, or dexterity to press keys will find hand-help pointing devices
helpful. These can be held or attached to the hand and might include:
common objects such as pencils or wooden dowels with
or without built up handles made of foam or plastic;
universal cuffs or other splints fabricated by
therapists with a pointing device attached;
keyguard mittens which isolate one or more fingers for
pointing.
•
Other low-tech aids are devices to help you insert disks independently (use of a
computer with a hard drive will greatly reduce the need for disk insertion) and
drool guards to protect the keyboard. There are several resources which describe
how to fabricate some of these aids. A number of companies manufacture these and
other assistive aids which make it easier for individuals with disabilities to use a
computer.
Filch Handouts
Page 1-21
•
NOTES:
Page 1-22
Filch Handouts
•
BOUT 3
Keyboard Access Problems
and
Helpful Filch Parameters
Some of the most common difficulties in using a keyboard are listed below, followed
by the Filch parameters that offset these difficulties. Once you have identified a
parameter that may be helpful to you, you can go to the section(s) in the Filch
Parameters handout or Filch manual to obtain more information.
These parameters change how information is transmitted from the keyboard to the
computer. The computer program will interpret the information as though it had
been entered from the keyboard in the "usual" way. A parameter is designated by a
slash ( / ) followed by a letter and then by a value (each parameter has an allowable
range of values). You can choose one or several parameters, based on your needs.
1. Impossible or difficult to hold down more than one key at a time.
/m /r /c parameters
Many programs require you to hold down two or more keys at the same time. If
you can't do this or it is difficult to do, the /m parameter will help you. The /m
parameter will allow you to press a special key combination one at a time, in a
sequence, rather than all at the same time. If you use an /m parameter, you
will need to use the /r and /c parameters as well.
2. Difficulty in letting up on the keys quickly, causing letters to repeat on the
screen.
/t parameter
If it is hard for you to let up on the keys quickly and you frequently see
unwanted repeated letters on the screen, you will benefit from using the /t
parameter. When you press a key on the keyboard, whatever letter, number, or
symbol you are pressing on the keyboard will be displayed on the screen. If you
hold down a key for more than a fraction of a second (1/2 sec.), the letter,
number, or symbol will be repeated on the screen, and it will continue to repeat
across the screen until the key is released.
The /t parameter tells the computer to wait for a period of time before the key is
repeated, allowing you more time to let up on the key without having letters,
numbers, or symbols repeat on the screen and in your document.
•
Filch Handouts
Page 1-23
There are other parameters to consider in combination with the /t parameter.
The /s controls repeiartzeed of keys. The /pc parameter allows some keys to
function in their normal
fashion even when the /t parameter is in place. For
example, the /pc parameter can provide express cursor movement when using
the arrow keys located between the numeric keypad and alpha keyboard..
3. Difficulty in pressing just one key; other keys are pressed inadvertently.
/d parameter
If you hit several keys unintentionally while trying to press one particular key
the /d parameter may be helpful to you. This is not indicated for the person who
presses the wrong keys by mistake because of lack of keyboard familiarity or
typing practice. This parameter is for those who know exactly which key they
want to press and where it is, but accidentally press one or several other keys
while trying to press that particular one. This is frustrating, as errors then
have to be corrected, making entry of information very laborious.
With the /d parameter, only the key held down the longest will register. This
parameter will tend to slow down typing speed (or speed of entry), since a key
must be held down for a period of time (although only for a matter of seconds)
before it registers. Once you get used to how long you must wait for a key to
register you will establish a "typing rhythm," making speed of entry smoother
and faster.
4. Not remembering the status of the Caps Lock or other locking keys.
/rl and /c1 parameters
These parameters will identify a row number Uri) and column number (/c1) for a
small video box to be displayed on the screen that will indicate the status of the
locking keys. These are the Caps Lock, Num Lock, and Scroll Lock. Since the
status of these locking keys can be easily displayed on the screen by the hi and
/d parameters, it is a good idea for most everyone to include them in a
parameter list.
Page 1-24
Filch Handouts
•
•
HANDOUT 4
Filch Parameters
This handout will describe some of the most commonly used parameters.
There are numerous parameters which are not covered here, but are described in
the Filch User's Manual by Kinetic Designs, Inc., which is included with the Filch
program disk.
The parameter, parameter name, range of acceptable values, default value, and
description of the function of the parameter will be presented in the following
format.
GLOSSARY:
Parameter:
A parameter is designated by a "I" followed by a letter.
Parameter Name: This is the name given to a particular parameter by the
manufacturers of Filch (Kinetic Designs, Inc.).
Range of Values:
This will give the allowable values for a parameter. These
will usually be numbers, but may be letters. The value you
specify must be in the allowable range or you will get an error
message.
Default Value:
This is the value that will be used for the parameter if you do
not enter one for it in your parameter list. Some parameters
will not install without a specified value.
Usual Value:
This is a value which is commonly used for a particular
parameter.
Description:
This will describe what the parameter does and how it may
help you use the keyboard.
The parameters described here will be presented in the following order: /d, /t, /m, /r,
/r1, /c, kJ, and /pc.
Filch Handouts
Page 1-25
NOTES:
Page 1-26
Filch Handouts
•
Parameter: Id
Parameter Name: Delay period (Debounce period)
Range of Values: 0 to 127
Default Value: 0
Usual value: 1
Description:
This parameter is helpful to those who hit several keys unintentionally while trying
to press one particular key. With this parameter, (wily the key held down the
longest will register. This parameter does slow down typing speed, since a key
must be held down for a short period of time before the corresponding character
registers on the screen. Once you get used to a "typing rhythm," speed of entry will
improve.
This parameter should be used only by those who frequently brush keys
unintentionally producing unwanted characters on the screen. Its usefulness
should be balanced against how long it takes to make several corrections when this
parameter is not used.
The smallest value necessary should be used. The smallest value, 1 (/dl), is usually
enough to prevent excess keystrokes.
Filch Handouts
Page 1-27
Parameter: /t
Parameter Name: Typematic Delay
Range of Values: 0 to 127
Default Value: 0
Usual Value: 100
Description:
When you press a key on the keyboard, whatever letter, number, or symbol you are
pressing on the keyboard will be displayed on the monitor. If the key is held down
for more than a fraction of a second, the letter, number, or symbol will be repeated
on the screen.
If it is hard for you to release the keys quickly and you frequently have letters
repeating on the screen, you would benefit from using the It parameter. This will
delay the time before the repeating occurs. The higher the value you choose here,
the longer it will take before the letters start repeating on the screen. A common
value to choose is 100 (i.e., /t100).
Use of this parameter will not slow down your typing speed at all.
Page 1-28
Filch Handouts
•
Parameter: /m
Parameter Name: Mode of key modification and latching
Range of Values: 1- 4
Default Value: 0
Usual Value: 1
Description:
Many computer programs require you to hold down two or more keys at the same
time. This parameter will allow you to press keys one at a time, in a sequence,
rather than all at the same time. It does this by "modifying," "latching" or "locking"
the Ctrl, Alt, and Shift keys. How this works will depend on the "mode" that you
choose (1-4). Each of these modes are described below.
/m1
•
This is the most commonly used mode. In this mode all the Ctrl, Alt, and Shift keys
are modified. Once one of these keys is pressed, it will remain engaged unti
key is pressed. For example, if you wanted to capitalize ti e first letter of
your name, you would press the keys sequentially: first the Shift key and then the
letter key, instead of having to hold. down the Shift key as you press the letter key.
When you type the second letter of your name, it will be in lower case (the Shift key
will no longer be latched). All special keys (Control, Alt and Shifts) are affected by
/ml. Once pressed, these special keys release after another non-special key is
pressed.
A common combination of keys used are Ctrl, Alt, and Del (Delete) to restart or
"warm boot" the computer. With the use of the /ml parameter you can press them
one at a time, in sequence, instead of holding them down at the same time.
/m2
In this mode the Left Shift key acts as a "latching" key for the Ctrl, Alt, and Right
Shift keys. Pressing the Left Shift key and then any of the Ctrl, Alt, or Right Shift
keys will cause them to remain in effect until the Left Shift key is pressed again.
For example, if you want to use the Alt key in combination with another key for
several responses or entries in a row, press the Left Shift key and then either Alt
key. The Alt key will remain latched for any number of keystrokes until it is
pressed again or until the Left Shift is pressed again.
When the Left Shift key is not pressed before the Ctrl, Alt, or Right Shift keys, the
parameter /m2 works exactly like the parameter /ml, except that the Left Shift key
will not operate as a Shift key. The Left Shift key serves only as a latching toggle
key for other special keys.
Filch Handouts
Page 1-29
/m3
In this mode, the Right Shift key acts as a "latching" key for the Ctrl, Alt, and Left
Shift keys. Pressing the Right Shift key and then the Left Shift key or either of the
Ctrl or Alt keys will cause them to remain modified until the Right Shift key is
pressed again.
This is the same as the /m2 mode, only the Right Shift key is the "latchi. " key for
the Ctrl, Alt, and Left Shift keys. When the Right Shift key is not pressed. before
the Ctrl, Alt, or Left Shift keys, the parameter /m3 mode works exactly like the
parameter /ml except that the Right Shift key will not serve as a shift key. In this
mode the Right Shift key serves only as a latching toggle key.
/m4
In this mode an of the Shift, Ctrl, and Alt keys are locked when they are pressed
and remain locked until they are pressed again. To change the locked status of the
Shift, Ctrl, or Alt keys, you must press the same Shift, Ctrl, or Alt key again to
unlock it.
Page 1-30
Filch Handouts
•
•
Parameter: /r and hi
Parameter Name: Row
Range of Values: 0 - 24
Default Value: 0 (first row)
Usual Value: Varies
Parameter: /c and kl
Parameter Name: Column
Range of Values: 0 - 77
Default Value: 77 (78th column)
Usual Value: Varies
Description:
These parameters place a small inverse video box on the screen that indicates
which special keys are modified or locked. The /r and /c parameters are used when
an /m parameter has been chosen. The "r" refers to row number and the "c" refers
to column number on the monitor screen where a small box will be displayed to
show you the status of the Shift, Ctrl, and Alt keys.
The /rl and kl parameters are also used together for placement of a small video
window indicating the lock status of special locking keys (e.g., Caps Lock) The "r1"
refers to the row number and the "cl" refers to the column number on the monitor
screen where a small box will be displayed to show you the status of the locking
keys: the Caps Lock, Num Lock, and Scroll Lock keys.
You can place the boxes created by the use of these parameters anywhere on the
screen, from the first to last row (0 - 24), and from the first to last column (0 - 77).
Place them so that they can be easily seen and don't interfere with your application
program or the entry of text. You can experiment with several placements.
•
One strategy is to place the box created by the /r and k parameters directly above
the box created by the /rl and kl parameters (the column #s will be the same).
Some suggested placements for different word processors:
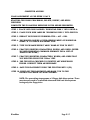
WordStar - - - - - - - - - - - - - - - - - - Irl /c75 /r13 /c175
MindReader - old version - - - - - - - - /r23 /c34 /r123 /c142
MindReader - new version - - - - - - - /r24 /c56 /r124 /c123
WordPerfect - - - - - - - - - - - - - - - - /r2 /c75 /r13 /c175
Filch Handouts
Page 1-31
•
Parameter: /pc /at /xt /ps
Parameter Name: Machine Identification
Range of Values: /pc /at /xt /ps
Default Value: automatic selection
Usual Value: /pc if /t is used and no /d parameter
Description:
This parameter tells Filch to work with a specific machine and keyboard. Filch will
usually automatically adjust to whatever keyboard and machine it is used with (ie.,
PC, PC-XT, PC- AT, PS/2, etc.). If Filch is operating satisfactorily, you need not use
this parameter. You will want to try this parameter if Filch is not operating
satisfactorily and you have investigated and eliminated possible sources of
problems.
IMPORTANT: You will want to try this parameter if you are using a /t or Is
parameter and have a IBM PC-XT/AT (enhanced keyboard). With this parameter
the middle bank of keys are ignored by Filch and rapid cursor movement is restored
to that bank of arrow keys. The middle bank of keys are those positioned between
the typing keys and the numeric pad (they consist of the arrow keys, page up, page
down, insert, delete, etc.). This is an important assist for a single key user wanting
to move quickly through a document with arrow keys.
NOTE: Do not use the /pc option in conjunction with the /d value. The middle bank
of option keys does not function properly.
•
Page 1-32
Filch Handouts
•
How to Load Filch
The file FILCH.COM must be on your floppy or hard disk. Filch must be one of the
first programs loaded into the computer memory before the application program
(word processor, data base, spreadsheet) is loaded.
Steps to Load Filch
1. At the DOS prompt (A>, B>, or C>) type in the word FILCH and press the Enter
key.
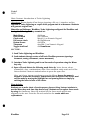
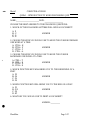
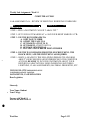
A table titled "FILCH PARAMETER SPECIFICATION SUMMARY" will
appear on the screen. This lists the parameters available (PARM), along with
their functions (FUNCTION), range of values (RANGE), and values (VALUE).
(If you are not interested in seeing this table, and already know which
parameters and values you want, you can skip this step and load them directly
from the command line in one step.)
•
2. Again, type in the word filch followed by a list of the parameters you want and
the values you want the parameters to have.
A parameter is designated by a slash "I" immediately followed by a letter (e.g.,
/m). The value for a parameter is then entered right after it (/ml). You must
list at least one parameter and can include as many as you wish.
A typical parameter list would look like this:
>filch /ml /r2 /c74 /t100 /pc
Write in your parameter list on the line below for easy reference.
>filch
3. Press the Enter key at the end of your parameter list and Filch will finish
loading into computer memory. The keyboard is now modified to user needs.
•
Filch Handouts
Page 1-33
If Filch is already loaded into the computer's memory, a message will come on
the screen, asking you to press the Space bar for the new parameter list you just
entered to be accepted. If this happens, just press the Space bar.
If you get an error message, Filch will not complete its loading until you have
corrected the error. Refer to the Error Messages handout.
4. You can now load up any application programs you wish to work with (word
processor, data base, spreadsheet, etc.).
Page 1-34
Filch Handouts
•
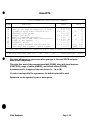
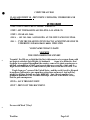
ilainalITA
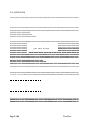
FILCH PARAMETER SPECIFICATION SUMMARY
PARM
/A
/B
/C
/D
/E
/M
/R
/S
IT
/V
/+
FUNCTION
RANGE
AUDIO shift feedback tone duration:
BEEP on all keys and duration of tone:
COLUMN to start video indicator(s):
DEBOUNCE delay value:
ESCape "hot-key":
MODE of keyboard operation:
ROW position of the video indicator(s):
SPEED of key repeat:
TYPEMATIC delay:
VIDEO shift feedback and attributes:
"hot-key" for typematic speed toggle:
L &
S &
*
L &
L &
0
0
0
0
0
0
0
0
0
0
0
to
to
to
to
to
to
to
to
to
to
to
127
127
77
127
127
4
24
127
127
127
127
VALUE
( 3)
( 1)
( 73) ( 77)
( 0)
ON ( 1)
( 0)
( 0) ( 0)
( 0)
( 0)
(116) (116)
FAST ( 78)
1 = takes remaining parametric input from file in form [d:][path] filename.ext
•
* Machine switches are: /PC
/XT
/AT
/PS
Configured as:
AUTO
This table will appear on your screen when you type in the word FILCH and press
Enter at the DOS prompt.
This table lists most of the parameters available (PARM), along with their functions
(FUNCTION), range of values (RANGE), and default values (VALUE).
A parameter can be in upper or lower case letters (i.e., /m or /M).
If a value is not specified for a parameter, the default value will be used.
Parameters can be separated by one or more spaces.
Filch Handouts
Page 1-35
•
NOTES:
•
•
Page 1-36
Filch Handouts
•
HANDOUT 7
Error Messages
If there is an error in your parameter list, an error message will appear, your
parameter list will be displayed, and an arrow will point to the error in your
parameter list.
Correctly enter both the parameter and the value for the parameter where the error
occurred and press the Enter key.
Filch will install the corrected parameter and then continue installing the
remaining parameters in your parameter list.
Typical Errors in a Parameter List
1. Parameter errors:
If the arrow points to the letter you used to specify a parameter, the letter
designation is incorrect. Re-enter the entire parameter specification and value
(ie. /ml).
2. Value errors:
If the arrow points to the first digit of a value, then a number value cannot be
specified for that particular parameter. Re-enter the parameter using no values
(ie. /pc).
If the arrow points to other than the first digit of a value, the value is out of the
allowable range for that parameter. Look up the range of values and re-enter
the parameter along with an allowable value (ie. /t100).
For other error messages, refer to the Error Messages, Help and Trouble Shooting
sections of the Filch documentation manual.
•
Filch Handouts
Page 1-37
•
NOTES:
•
Page 1-38
Filch Handouts
•
HANDOUT 8
Changing Parameters and Values
Re-configuring Filch
Parameters and values can be changed at the DOS prompt. This is called "reconfiguring" Filch. The file FILCH.COM must be on your disk or in an accessible
directory of your hard drive.
1. You may need to exit from your application program to reconfigure Filch.
2. Type in the word FILCH followed by a parameter list containing the parameters
and values you wish to change or add and then press the Enter key. You can
cancel a previously entered parameter by listing the parameter and giving it a
value of zero (e.g., /d0).
3. The message "Filch is already installed" will be displayed. Press the SPACE
BAR to install the new parameters and values you have just listed.
•
Filch will install these new parameters and values, the Filch Parameter
Specification Slimmau table will be displayed with new values, and your cursor
will return to the DOS prompt.
If you press any key other than the space bar, the message "Filch reconfiguration aborted" will be displayed and the Filch program will remain
installed as it was previously.
•
Filch Handouts
Page 1-39
•
NOTES:
Page 1-40
Filch Handouts
FILCH, Ver 2.2
A Programmable Keyboard Filter
From:
Kinetic Designs, Inc.
4113C Bridgeport Way
Tacoma, WA 98466
(206) 565-6727
Need:
MS or PC DOS version 2.0 or later
IBM personal computer or true compatible
List of Machines Known to be Incompatible with FILCH
BONDWELL 8
IBM PC Convertible
IBM PC Junior
KAYPRO 2000
KAYPRO laptops
ZENITH 151
ZENITH 100
TANDY 1000
•
All of these machines employ an <FN> key and thus are not compatible with the
IBM PC, XT, AT or PS/2 models
List of Machines Known to be Compatible with FILCH
AT&T
COMPAQ
COMPUTERLAND
HP VECTRA
IBM (except JR and Convertible)
NEC
NORTHWEST MICROCHIPS
TELEVIDEO
TOSHIBA
KAYPRO (except 2000 and laptops)
ZENITH (except 151 and 100)
VAXMATE
According to the manufacturers, FILCH will work with "almost anything."
Generally, if the machine runs with other IBM software which is keyboard
dependent, FILCH should work. You can always call Kinetic Designs, Inc., at the
number above if you have any questions.
•
The safest approach is to take the FILCH program on a floppy disk to the computer
store and try it out on the computer you are considering purchasing.
Filch Handouts
Page 1-41
•
List of Software Incompatible with FILCH
None reported, although with some graphics programs, the status windows for
latching/locking keys will not show although Filch works properly.
With version 2.2 of Filch, it is necessary to make special changes to some programs
before using them with Filch:
WordPerfect 4.2 and 5.0
It is necessary to set cursor speed to Normal. To do this, access the WordPerfect
Setup menu with Shift Fl, select item 2, Cursor Speed, and then select option 6,
Normal cursor speed. Exit WordPerfect so that it configures itself to operate with
this setting the next time it is loaded. This must be done prior to loading Filch with
WordPerfect.
MicroSoft Word 4.0
It is necessary to change the cursor speed; do this by selecting Options from the
Command menu, go to the cursor speed option and enter zero for cursor speed. Quit
MicroSoft Word so that it permanently installs this cursor set ' as one of its
standard set-up parameters. This must be done prior to loading ch with Word.
Page 1-42
Filch Handouts
•
Freedom 1
Adaptive Computer Technologies
Developed By:
Shannon Smithson, Monterey Peninsula College
•
•
•
COMPUTER ACCESS I
LESSON PLANS FOR FREEDOM1 AND WORDSTAR
The following lesson plans are designed with a two-fold purpose: to provide lesson
plans for a functional one-semester course introducing screen reading and word
processing to blind students, and to provide a detailed guide for instructors who will
be teaching the class.
Teaching blind students to use screen reading technology is not difficult, but few
instructors have expertise in this relatively new area of computer access.
These lesson plans are designed to instruct the instructor as well as to instruct the
student.
•
•
•
•
Week 1
DAY 1
Major Content: Introduce students to the High Tech Center, the concept of
computer use, and screen reading software.
Objectives: Familiarize students with the physical layout of the High Tech Center
room, the location of computer stations, the policies and procedures related to High
Tech Center use. Explain the importance and relative ease of computer use for
blind individuals.
Students should understand that a screen reader enables them to read whatever is
displayed on the computer's monitor, allowing them to be competent computerusing professionals.
Matgrigla: Keyboards should have raised markings (an acrylic drop, a braille label,
or other tactile marker) to identify basic keys. Typically the F key and the J key are
marked along with Control, Alt and Enter. Some keyboards come with tactile
markers on a few keys. During all classroom lectures and at lab time, students
should have with them a tape recorder and enough tape for the lecture and
questions they may have during lab work.
Lecture:
1. Introduce students to the High Tech Center. Stress the fact that all students
must have a basic familiarity with the keyboard and the ability to touch type.
Ask each student what he or she hopes to gain from learning to use a computer
2. Explain attendance policy. It is important to set real-life standards. Students
are learning a real-life skill and need to be responsible in their classroom
attendance and performance.
3. Lead students through a hands-on exploration of the work station. Show where
the monitor, CPU, speech synthesizer, keyboard, and printer are located. Point
out where the switches are to turn the computer, synthesizer, printer and
monitor on. Give students a chance to explore the work station.
4. Discuss concept of word processing and what it is.
5. Discuss concept of screen reading software and what it does.
6. Give an overview of word processing and the use of screen reading software
covering the following points.
a. Using a computer with word processing software and screen reading
software is like using a typewriter which can speak what is on the
page.
Freedoml
Page 2-1
b. Explain that there are different kinds of word processing programs and
screen reading programs and that this course will instruct students in
the use of the word processing program WordStar and the screen
reading program Freedoml.
•
c. Inform the students that with practice they will be able to produce
error-free work in print.
d. Remind students always to bring tape recorders and tape to class.
Expected Outcome:
This introductory session is designed to be non-threatening and nontechnical in order to set the students at ease. The students should
be familiar with their work stations and the overall configuration of
the computer: monitor, speech synthesizer, printer and CPU. At the
conclusion of this class, students will understand the concepts of
word processing and software which reads the screen. Most
importantly, they should be eager to begin working.
•
•
Page 2-2
Freedoml
Week 1
DAY 2
Main Content: Review of physical setup of High Tech Center and computer work
station. Learning to listen.
Objectives: Students are to learn to read single words and single lines; introduce
Alt F, the Plus and Grave Accent key.
Materials: Students are to bring tape recorders and blank tapes. The instructor
should have a welcome file prepared for students to read. Headphones should be
attached to each speech synthesizer.
An example of the "Welcome" file might be simple nursery rhymes (Jack and Jill,
Mary had a Little Lamb) followed by a few sentences which welcome the students to
the High Tech Center and adapted technology. In this way, students are exposed to
both familiar and unknown text as they learn to listen to speech from the speech
synthesizer.
Lecture/Class Activity:
1. With the computer off, review basic keyboard configuration. Make sure
students can locate the Alt key, Plus key, and Grave Accent key.
2. Introduce students to the concept of screen cursor. Students should think of the
screen as rows and columns of small rectangles. The cursor is a small blinking
rectangle which moves through these invisible cells in a horizontal or vertical
direction. The cursor marks the place where a letter will be typed or the effect
of a command will take place.
3. The instructor then loads Freedoms, and WordStar and opens the prepared
welcome file for each student. When all computers are booted and set, instruct
students to put on their headphones.
4. Explain that they are about to hear what is on the screen one word at a time.
Have students locate and hold down the Alt key. Instruct them to tap the F
key. Repeat this process until they have listened to the two nursery rhymes.
5. The instructor is to return the cursor to the top of the document on each
computer. Explain that it is possible to hear a line of text repeatedly. Instruct
students to locate the Plus key on the numeric keypad. Tap the Plus key to
hear the line of text which the cursor is on. Explain that the cursor does not
move and it is possible to hear a line of text over and over again. When all
students are easily able to comprehend hearing all of the line, move on to the
next task.
Freedom1
Page 2-3
6. Again, the instructor is to return the cursor to the top of the document on each
computer. Explain that it is possible to hear what is written on the screen a
line at a time. Have the students locate the Grave Accent key C). Tap this key
to hear a line of text. Each time the Grave Accent key is pressed, the cursor
reads a line and moves down to the next line. It is possible to read (line by line)
a whole text file with this reading command.
•
7. Have students review the file, alternating between using the Grave Accent key,
the Plus key, and Alt F. The instructor returns the cursor to the top of
document as needed. When students are clear about the function of each of
these three commands and easily understand synthesized speech, conclude for
the day.
8. The instructor should pay close attention to two student abilities on this first
day: typing and hearing.
Are students familiar enough with the keyboard? If not, they should be referred
to a typing class before beginning this class.
If a student has difficulty understanding synthesized speech, the student may
have a hearing loss. Try using a higher voice, e.g., Kit (Alt 5) and see if this is
easier to hear. If not, try a lower voice, e.g., Harry (Alt 3). If the difficulty
remains, the student may have a general hearing loss or may have an auditory
processing deficit. Further referral is necessary.
Expected Outcome:
Students are introduced to the sound of synthesized speech. The
purpose of this class session is to "set the climate." This initial class
session serves as a screening mechanism for students with typing
difficulty and students with difficulty understanding synthesized
speech output.
•
•
Page 2-4
Freedoml
so
Week 2
DAY 1
Major Content:
Review of listening tasks; in-depth discussion of concept of cursor
movement; reading text forward and backward a word or letter at a time.
Objectives: Students are to review the use of the Plus key, Grave Accent key and
Alt F in forward reading tasks. Students are to develop an understanding of cursor
movement and the effect of reading commands on cursor movement. Use of Alt A,
Alt S and Alt D will be introduced.
Materials: Students are to have tape recorders and tape. Computers should be set
up and the word processor open at the welcome file used last week.
Lecture/Class Activity
1. Review listening to single words and lines. Ask students to discuss each of the
three commands used for reading. Move from this discussion to a discussion
and illustration of cursor movement.
NOTE: Because the concept of cursor movement may be difficult for some blind
students to understand, a multi-sensory approach to the presentation of cursor
movement concepts is useful. The following methods may be employed: blocks
or tactile representations of lines on a page.
2. Introduce the concept of reading single letters. It is important that students
understand that when using these commands to read, the cursor reads the
letter at the cursor position and then moves to next the letter on the right.
3. Explain that Alt D reads the letter that the cursor is sitting on and then moves
one letter to the right. Suggest students think of their first name and lead them
through visualizing the cursor sitting on the first letter of their name. Have
them visualize entering Alt D, hearing the first letter of their name read and
knowing now that the cursor is on the second letter of their name. Suggest they
imagine repeating Alt D until they have read through their first name.
4. Now have students actually practice Alt D in the text of the welcome file.
Explain that some of the letters may not be perfectly clear, and they can use
context clues to guess the letter spoken. Reinforce the fact that after they have
heard a letter, the cursor has moved on to the next letter.
5. Do the same thing with Alt F. Stress the concept that once they read a word the
cursor has moved on to the beginning of the next word.
Freedom1
Page 2-5
6. Explain that they will not hear the spaces between the words read when they
use Alt F, but they will hear spaces read when they use Alt D as they read
through the text character by character.
•
7. Explain that in using Alt F, when the word "space" is heard, the cursor has
reached the end of a line and is moving down to the beginning of the next.
When reading text with Alt F, students should regard "space" as an end-of-line
marker.
8. Review the Plus key reading command. Discuss the fact that the cursor does
not move when using the Plus key command. The line that the cursor is on is
read in its entirety, but the cursor never moves from its original position.
9. Review the Grave Accent key reading command. Explain that the entire line
the cursor is on is read, just as with the Plus key command, but in this instance,
the cursor moves down to the first character of the next line.
10.Explain that when using the Grave Accent key or the Plus key, hearing the
word "space" indicates an empty line.
11.Conclude the class by asking for any questions. Stress that the next class will
be a review of this lesson.
Expected Outcome:
At the conclusion of this class, students will have developed
important understanding of the spatial concepts of cursor
movement. Thinking of the cursor as a directional pointer
(horizontal or vertical) is fundamental to the ability to edit text
within a file. Students should be familiar with the sound of
synthesized speech and easily able to understand text.
Weekly Lab Assignment:
Students are to work at a computer set up by the instructor and open to a practice
file. The practice file should contain useful information about the High Tech
Center, instructor office hours, attendance policies, etc.
Page 2-6
Freedoms
•
•
Week 2
DAY 2
Major Content: Review of cursor movement and reading commands.
Objectives: Review material covered last class session. Introduce commands for
reading backward.
MateriztjA: Students bring tape recorders and tapes. The instructor should
introduce a new practice file. The instructor still is performing all file opening
tasks.
Lecture/Class Activity:
(The practice file for the day is open and ready for students.)
1. Review concept of cursor motion.
2. Review reading commands covered last class and ask students to describe cursor
action for each command. Stop review with cursor sitting mid-file so students
can practice reading backwards.
•
3. Introduce concept of reading backwards with Alt S. Explain that the same
pattern of cursor action is true for Alt S as for Alt D except that the cursor is
moving left, or backward, through the text.
4. Have students practice with Alt S.
5. Introduce Alt A which reads the word at the cursor and then moves to the first
letter of the word to left of the cursor.
6. Verbally lead students through visualizing the process of reading forward with
Alt D and then reversing to read backward with Alt S. Have them visualize
reading through their name with Alt D.
Point out that after they imagine they hear the last letter of their first name,
the cursor is resting under the space just after their first name.
If they reverse reading direction with Alt S, the first character read will be that
directly over the cursor ("space") and then the cursor will move left to rest under
the last letter of their first name.
If they were to continue reading backward through their name using Alt S, the
cursor would come to rest on the space before their first name after they heard
the first letter of their name read.
7. Lead students through the actual process of reading through the practice file
using Alt D and Alt S.
•
Freedoml
Page 2-7
8. Lead students through the process of reading forward with Alt F and then
reading backward with Alt A. Explain that the same type of cursor action
occurs when reading at the word level as it does at the single character level.
•
9. Let students practice reading independently in the practice file.
10. As the students work, the instructor should circulate through the class. Have
students describe exactly where the cursor is and what they think is occurring
as they work.
Expected Outcome:
Students have now completed two weeks of class and have not yet
begun text production, a task to begin during the third week of
instruction. By becoming thoroughly familiar with the sound of
synthesized speech, reading commands and cursor action, students
are developing skills and knowledge essential to achieving effective
word processing on a computer.
•
•
Page 2-8
Freedom1
•
Week 3
DAY 1
Major Content: Reading for errors; introduction of word and letter clarifier
commands which do not move the cursor.
Objectives: Review basic concepts presented in previous class. Read text and learn
to listen for errors. Introduce use of Alt W and Alt Q for identifying errors.
Materials: Student tape recorders and tapes. Instructor has students work in
practice file of last session, but this version has misspellings which affect the sound
of the words as they are read.
Lecture/Activity:
(The practice file for the day is set up and ready for students to work with.)
1. Review reading commands and cursor action. Introduce concept of
directionality with the Alt A, S, D and F reading commands: D and F read to
the right, S and A read to the left; the inner pair reads letters, the outer pair
reads words. This conceptual framework is especially helpful for some students.
•
2. Have students begin reading practice file; when students begin to notice that
some words do not sound right, explain that the file now contains a number of
typographical errors.
3. Introduce concept of reading commands which allow the user to clarify what a
word or letter is without moving the cursor from the letter or word in question:
Alt W and Alt Q.
4. Discuss Alt W which reads from the cursor position to the end of a word and
leaves the cursor under the first character of the word being read. The cursor
does not move from the word.
This command enables the student to hear a word over and over again and is
useful for understanding and becoming familiar with inconsistencies in
pronunciation.
5. Discuss Alt Q which reads the letter at the cursor in military alphabet (e.g., A is
read as "able", B is read as "baker"). This command is used when a single letter
is not understood phonetically (d and g sound very much alike, for example).
The cursor does not move from the letter.
6. Have students work in a practice file using reading commands, Alt W, and Alt Q
to discover errors in text.
7. Circulate among students and question them as they work.
Freedom1
Page 2-9
Expected Outcome:
By now students should be competent listeners to text produced by
the speech synthesizer. They will have learned to analyze the
output for errors and will have learned commands which enable
them to pinpoint just what the errors are. Students are now ready
to begin text correction.
Weekly Lab Assignment:
Reinforce students ability to perceive errors when they are heard. Have students
listen to the practice file of last the lab session. This version is to have numerous
errors which students are to identify.
Page 2-10
Freedoml
•
Week 3
DAY 2
Major Content: Reading for errors; finding errors; correcting errors; begin text
entry.
Objectives: Review concepts and procedures of last class; introduce use of talking
backspace Delete key to use in error correction; students begin independent text
entry to utilize editing skills.
Materials: Student tape recorders and tapes. Use same practice file as last class
period.
Lecture/Class Activity:
•
(The practice file for the day is open and ready for students.)
1.Tell students they will be working in the same file as last time and will be
correcting the errors.
2. Make sure students can locate the Delete key. Explain that this is a talking
backspace delete key which erases the character to the left of the cursor and
announces the character deleted. No empty space remains where the character
was deleted because all text to right of the cursor moves over one character.
3. Have students find the first error in the practice file. Instruct them to place the
cursor just after the incorrect letter. A simple way to do this is illustrated
below:
To correct "The cay is gray and fluggy and has two kittens."
a. Read through a word at a time with Alt F.
b. Once the word "cay" is heard, enter Alt A once (you hear "is"). The
cursor is now under the "c" in "cay."
c. Use Alt D to read through one letter at a time to the right, stopping
after "y" is heard. (The cursor is now just past the incorrect letter.)
d. Tap the Delete key. The letter deleted will be spoken.
e. Enter "t" to correct the word.
f. Use Alt A to go to the beginning of the word and then Alt F to make
sure the word sounds correct.
Freedoml
Page 2-11
To correct the second error word in the sentence:
a. Continue reading through a word at a time with Alt F.
•
b. Stop after the word "fluggy" is heard and enter Alt A. The cursor now
sits under the "f" in "fluggy."
c. Read through the word a letter at a time with Alt D. Stop after hearing
"g" and delete; use Alt D again and delete second error character.
d. Enter "f' twice.
e. Use Alt W to go to beginning of word.
f. Check word with Alt F
4. Have students continue through the practice file. When the words are
corrected, encourage students to produce text at the bottom of the file.
5. Conclude class with students editing their own text.
6. Let students know that there will be a quiz next class.
Expected Outcome:
At the conclusion of this lesson, students will be competent in the
basic fundamentals of beginning text entry and beginning screen
reading skills. They will be able to read text for errors, correct
errors, understand cursor motion, select most appropriate reading
commands for a task and enter text. At this point, students will be
independent readers and will now be ready to begin developing word
processing skills as they further expand their screen reading skills.
Page 2-12
Freedoml
•
Week 4
DAY 1
Major Content: Quiz 1
Objectives: Students are to use basic reading skills they have developed as they
take this quiz on disk.
Materials: Student tape recorders and tapes.
Lecture/Class Activity:
This first quiz requires very brief answers; in this way students with rusty typing
skills are not penalized for slow text entry.
Students are not yet printing files. When correcting the exam, the instructor will
read the students' exams from disk (and print hard copy, etc.).
Quiz on next page.
When students are through taking the quiz, they may remain and work at whatever
they wish.
Expected Outco $. e:
A student who successfully completes this exam will demonstrate
the ability to apply newly learned screen reading skills.
Lab Assignment:
Students are to write a short letter to a friend. The instructor opens up the file for
the student. This is an easy way for students to refresh typing skills.
•
Freedoml
Page 2-13
•
NOTES:
Page 2-14
Freedoml
•
Quiz 1: Week 4, Day 1.
1. What reading command is used to read the word at the cursor and then move
the cursor one word forward, or to the right?
2. What reading command is used to read the letter at the cursor and then move
the cursor one character to the right?
3. What is the name of the screen reading program you are using?
4. What type of speech synthesizer and computer are you using?
5. What reading command is used to read the letter at the cursor and then move
the cursor one letter to the left, or backward?
6. What key reads the line the cursor is on without moving the cursor?
7. What is the name of the word processing program you are using?
8. What key reads the line the cursor is on and moves the cursor to the beginning
of the next line?
9. What key announces the letter it erases.
•
10. When you press the key mentioned in Question 9, what is the location of the
letter it erases.
Answers:
1. Alt F
2. Alt D
3. Freedom 1
4. Varies between High Tech Centers
5. Alt S
6. Plus key
7. WordStar.
8. Grave Accent key
9. Delete key
10.To the left of the cursor
Freedoml
Page 2-15
•
NOTES:
•
•
Page 2-16
Freedom1
Week 4
DAY 2
Major Content: Review of quiz 1.
Objectives: Review material covered on quiz.
materials: Student tape recorders and tapes.
Lecture/Class Activity:
1. Have students open up quiz file.
2. Discuss answers and have students work in the file to clarify areas of conceptual
difficulty.
3. Structure this review so that students verbalize and discuss answers.
4. Any extra time can be used for free choice text entry.
Freedoml
Page 2-17
•
NOTES:
•
Page 2-18
Freedoms
Week 5,
DAY 1
M.jor Content: Starting up; opening a file; saving a file; WordStar navigation keys;
keyboard entry; printing a file.
Objectives: Introduce basic procedures for starting up: disk insertion; booting the
computer; opening a file; text entry.
Materials: Student tape recorders and tapes.
Lecture/Class Activity:
1. Hand out student data disks (and program disks, if students are to be working
on floppy drive machines). Have disks marked in braille with braille label
sticky tape. Students who do not read braille should have some unique tactile
clue on their data disk so they can identify it as their own.
Briefly explain the function of a program disk and a data disk.
•
2. Lead students through the disk insertion process. Make sure the students
insert the disks in drives and not in the space between the two drives (It
sometimes does happen; if there is a space between the two drives which is
large enough for a disk to slip through, attempt to block this space in some safe
way.)
Many students find it simple to anchor one index finger tip at the corner of a
drive slot and use that position as an anchor for alignment. Have students
practice inserting and removing disks.
3. Turn on the computer. Explain that there is no special way to know when
WordStar has loaded other than to press the Plus key to hear if the bottom line
of the opening menu is read ("N Open a non-document file vertical bar Y Delete
a file vertical bar S run CorrectStar").
4. Lead students through the process of opening a document file. Have them press
D and then use the Plus key to hear "Name of file to edit?".
5. Have students enter the name of an individual to whom they wish to write a
letter. Check with Plus key. (If not correct, instructor should clear entry or
instruct student to use the left arrow key. Press Enter to complete the opening
file process.
6. Students are now free to write a letter.
•
7. The instructor should turn on keyboard echo (Alt K) for students who have rusty
typing skills. The keyboard echo function should be used only during the first
few days of text entry tasks for those students needing this assistance to refresh
their touch typing skills.
Freedoml
Page 2-19
8. Introduce the cursor movement keys: the arrow keys on the numeric keypad
and the additional arrow keys on expanded keyboards.
•
Describe what happens when the up and down arrow keys are pressed. They go
up or down vertically if the cursor is on full lines of text, but will return to the
left side of the screen if the line above or below is blank or shorter than the line
that the cursor is on. Drawing on the student's back might be a good way to
show this if the students are confused.
Arrow keys only move the cursor through areas of the screen which already
have been edited.
Explain that the right and left arrow keys are similar to Alt D and Alt S except
that they do not speak their direction.
9. Have the students move around in the letter file with the arrow keys. To
understand the effects of arrow key movement, ask the students to frequently
use the reading commands in order to find where the cursor is located in the
document. Have students verbalize what they are doing.
10.Have students press the function key which saves their file and closes it.
Explain that there is another key they will use next time which periodically
saves their work and allows them to continue writing. Discuss causes of
information loss: power surge, power outage.
11.Lead students through simple printout of a file. Have student enter P and use
the Plus key to check question, "NAME OF FILE TO PRINT?" Enter file name
and check with Plus key. The instructor removes the letter from the printer.
•
Expected Outcome:
Students will be proficient with simple WordStar tasks. At this
point some students may choose to work on assignments for other
classes during extra lab time.
Lab Assignment:
Students are to begin a WordStar tutorial file called "Wordstar." They are to list all
they know so far about working in WordStar. This file will be an ongoing
assignment throughout the semester and is intended to serve as a reference tool for
the student.
•
Page 2-20
Freedoml
Week 5
DAY 2
Major Content: Introduction of WordStar commands.
Objectives: Introduce WordStar use of Control key for WordStar commands;
Control A, S, D, F.
Materials: Student tape recorders and tapes.
•
Lecture/Clas.: Assignment:
1. Discuss the fact that WordStar uses the Control key in combination with one or
two other keys for the majority of its commands.
2. Explain that basic cursor movement in WordStar matches that which students
have learned in the reading commands: Control A, S, D and F move the cursor
in the same ways the Alt key commands do, but they are silent.
3. Have students practice WordStar cursor movement commands. Have students
check cursor position with reading commands.
4. Students are to complete and edit their letter to a friend.
5. Lead students through the print process and make it possible for students to
tear letter off. Repeat the print process so that students can turn in one copy of
the letter to the instructor.
Expected Outcome:
At the conclusion of this fourth week of instruction, students will be
able to independently start up the computer, open a file, create, and
edit text. Students will be able to discern when it is appropriate to
use reading commands or cursor movement commands for most
efficient word processing. Students will be able to initiate printing a
file although they may still need assistance in setting up the
computer and getting paper ready for tear-off
Freedom1
Page 2-21
•
NOTES:
•
Page 2-22
Freedoml
Week 6
DAY 1
Major Content: Simple format commands.
Objectives: Introduce commands to set the right and left margins (Control OR and
Control OL), Control B, the command to reform text, and Control OC, the command
to center a line of text.
Matitigja: Student tape recorders and tapes.
Lecture/Class Activity:
1. Have students open a new file called "Thoughts" and write about what they
think learning to use a computer means to them.
2. Have students title this writing assignment "Thoughts."
3. Discuss the fact that word processors have commands to center text. Have the
student place the cursor anywhere on the line which contains the word
"Thoughts" and enter Control OC. The title will automatically center itself.
Discuss the concept of centering.
•
4. After students have been writing for approximately 15 minutes and have a body
of text on the screen, discuss how to set new margins.
Discuss the fact that WordStar margins are always set at 1 and 65 unless
changed. Discuss the visual concept of margins.
5. Lead students through the process of setting the left margin at 15 and
reforming text in the following steps:
a. Enter Control OL (non-caps are ok).
b. Check prompt with Plus key. "LEFT MARGIN COLUMN NUMBER
(ESCAPE for cursor column) 9 " is read.
c. Enter the number 15.
d. Check prompt with Plus key. The statement above will be heard with
the addition of the number 15 spoken after "question."
e. Press Enter to complete margin reset.
f. Explain that the text does not automatically fit into this narrower text
shape. It must be re-formed.
g. Have students place cursor under first character of first line of text.
•
h. Hold down the Control key and press B. Describe the way in which all
the text in a paragraph will reshape itself with new margins set.
Freedoms
Page 2-23
6. Reset the right margin to 55 with Control OR and reform the text with Control
B.
7. Students will use Control B to reform any other paragraphs they have created.
8. Have students notice that any left maren setting greater than 1 results in
"space" being read at the beginning of the line if the Plus key or the Grave
Accent key is used.
Expected Outcome:
This activity marks the beginning of mastery of important aspects of
word processing: setting margins, reforming text and centering
text. Students will have more sophisticated screen reading skills.
At this point, blind students will be aware of spatial cursor
movement on the screen. Manipulation of text for centering or
reforming will have created another type of spatial understanding.
Development of these types of spatial understandings will be crucial
to effective use of any type of word processor a student may
eventually use as well as many other types of application software.
Weekly Lab Assignment:
Students are to continue working in their WordStar tutorial file for half of lab time.
The second half should be devoted to a quick letter to a friend.
•
•
Page 2-24
Freedoml
Week 6
DAY 2
MgtjaCdatezt: Review of word processing tasks.
Objectives: Students are working with WordStar information presented in prior
classes. The purpose of today's class is to provide an assignment to foster synthesis
of this information.
Materials: Student tape recorders and tapes.
Lecture/Class Activity:
1. Students will independently boot the computer, open the file "Thoughts" begun
during the last class, and add new information to it.
2. After students have been working for twenty minutes, begin the following
activity:
a. Have students make sure they have at least four paragraphs of text.
(Some students who are extensive braille users may have no
paragraphs or unusually long paragraphs. Explain that, for sighted
readers, paragraphs provide a visual chunk of information. It may be
necessary to help students develop a sense of appropriate paragraph
length.)
b. Lead students through the practice of setting different margins.
Reform paragraphs after each change.
c. The last margin setting should be chosen by students.
3. Tell students they will be using this file again next class.
•
Freedoml
Page 2-25
•
NOTES:
Page 2-26
Freedom'
Week 7
DAY 1
Major Content: Moving Around in a Document with WordStar
Objectives: Students will learn and understand how to use WordStar navigation
commands and special keys to move to different places in a document.
Materials: Student tape recorders and tapes.
Lecture/Class Activity:
1. Have students open up the "Thoughts" file. As new information for the day is
presented, lead students through the process of exploring new commands using
the text in this file.
2. Introduce the concept and efficiency of quickly moving from one place in a file to
another.
3. Explain the function of quick WordStar navigation commands. Discuss the
following:
a. Control QR (or appropriate function key)
Takes the cursor to the beginning of the document and places the
cursor in the top left corner of the document--not the first line of text,
although there may be text on the first line of the document.
b. Control QC (or appropriate function key)
Takes the cursor to the end of the file. It is important to note that this
position may or may not coincide with the end of text. If empty lines or
spaces exist after the end of text, the cursor will be placed at the end of
this extra space.
c. Control QS (or appropriate function key)
Takes the cursor to the left side, or beginning, of the line that the
cursor is on.
d. Control QD (or appropriate function key)
Takes the cursor to the right side, or end, of the line that the cursor is
on. Explain that this command will take the cursor to the last entered
character or space on that line not to the flush right margin.
4. Discuss other special navigation keys:
•
a. Home key
The Home key is located on the 7 key of the numeric keypad and, on
an expanded keyboard, in the middle cluster of special keys. The
Home key takes the cursor to the top left corner of the WordStar
screen. After using the Home key, use the Plus key to determine
location.
Freedoml
Page 2-27
b. End key
The End key is located on the 1 key on the numeric keypad. This key
takes the cursor to the bottom left corner of the physical screen.
Again, students can check where they are in the file with the Plus key.
•
c. PgDn key
The PageDown (PgDn) key is located on the 3 key on the numeric
keypad. This key moves the cursor down twenty-two lines in the
document, that is, toward the end of it.
d. PgUp key
The PageUp (PgUp) key, located on the 9 key of the numeric keypad,
moves the cursor twenty-two lines up in the document, that is, toward
the beginning. This key and the PageDown (PgDn), are quick ways of
moving down or up the document if the student is looking for a
particular line of text.
Expected Outcome:
Students will be able to move to various locations in a document file
with the use of WordStar navigation commands and special keys.
The spatial concepts being developed which are related to text files
are integral to successful, efficient word processing.
Weekly Lab Assignment:
Students are to work in the "Wordstar" tutorial for half of lab time; the last half is
to be devoted to text production of their choice. Begin encouraging students to
bring in work for other classes or necessary personal work. Internalization of new
skills seems to occur more rapidly when students are engaged in production of
information very necessary to their life.
•
Page 2-28
Freedoms
Week 7
DAY 2
Main Content: Review of last class: WordStar navigation commands; navigating
with special keys.
Objectives: Students will review and practice moving through a text file with
WordStar navigation commands or special keys. Students will check their position
in file by pressing the Plus key.
Materials: Student tape recorders and tapes.
Class Activity:
1. Have students open the "Thoughts" file.
2. Lead students through the following activity:
a. Start at the beginning of the file. Have students enter Control QC and
then, after a few seconds, have them press the Plus key to hear the
text of the line they are on in the file.
•
b. Then, have the students enter Control QS and check cursor position
with Alt W.
c. Have students enter Control QR to go to the beginning of the file and
read through their essays using the Grave Accent key to become
familiar with text structure.
d. With students now familiar with text, have them experiment with the
Home, End, pageup and pagedown keys. Make sure students
understand that the Home and End keys move the cursor and that the
pagedown and pageup keys move (scroll) the text.
e. Try out Control QD on lines of differing length.
3. Remind students that a quiz is scheduled for the next class.
Expected Outcome:
At the conclusion of this important lesson review, students will be
expected to understand how to move within the whole of a document
file. Each student will be able to demonstrate moving to the
beginning or end of document, moving the cursor to the Home or
End position on the screen, and moving the text forward with the
PageDown key or backward with the PageUp key. The spatial
concepts developed in these exercises are of great importance to nonsighted computer users.
•
Freedoml
Page 2-29
•
NOTES:
•
Page 2-30
Freedoms
Week 8
DAY 1
M:jor Content: Quiz 2
Objectives: Students independently take this quiz on disk; they are expected to set
up for themselves and be able to open the quiz file.
Materials: None
Class Activity:
1. Students are to take test.
2. Students are to print file when through and hand it in to instructor.
3. Students finishing early may work on an assignment of their choice.
(Test follows on next page)
Freedoml
Page 2-31
•
NOTES:
Page 2-32
Freedoms
•
Quiz for Week 8, day 1.
1. What is the WordStar command to center a line of text?
2. There are three ways to move the cursor through text one character at a time to
the right. What keys or commands do this?
3. What is the command to open a file in WordStar?
4. Pressing what key will let you check to make sure you have entered the right
command in Question 3?
5. Pressing what function key will save your file so you can print it?
6. How are lines and paragraphs reformed in WordStar?
7. How are the left and right margins set in WordStar?
8. What WordStar command will take the cursor to the beginning of the file?
9. Pressing what key will take the cursor to the top left corner of the screen?
•
10.What WordStar command takes the cursor to the beginning of the line the
cursor is on?
11.What WordStar command takes the cursor to the end of the line the cursor is
on?
Answers:
1. Control OC
2. Alt D, Control D, Right Arrow key
3. D
4. Plus key
5. (the function key for AKD)
6. Control B
7. The left margin is set this way:
Control OL, followed by the number of the new margin and the return key. Plus
key can be used any time for checking.
The right margin can be set this way:
Control OR, followed by the number of the new margin and the return key. Plus
key can be used any time for checking.
Freedom1
Page 2-33
8. Control QR
9. Home key
10.Control QS
11.Control QD
Page 2-34
Freedoml
Week 8
DAY 2
Major Content: Review quiz.
Objectives: Return exams and thoroughly cover areas of conceptual difficulty.
Materials: None
Class Activity:
1. Share with the class which parts of the exam seemed to be most difficult.
2. Lead a discussion about why this area proved to be difficult. It is in this verbal
exchange that students will learn strategies from others.
3. Continue through the exam in the same manner.
4. When through with the formal review, have students open a file and lead them
though exercises to clarify the areas of difficulty.
5. If possible, illustrate successful strategies shared by students in class
discussion.
Expected Outcome:
Students will now have basic file navigation skills in addition to
basic reading and text production skills. This foundation is
necessary before more complex word processing skills, to be
introduced in the next unit, can effectively be assimilated.
Freedoml
Page 2-35
•
NOTES:
•
•
Page 2-36
Freedoml
•
Week 9
DAY 1
Major Content:
Differentiating between cursor position in a document and cursor
position on screen: Using Alt T and Alt L.
Objectives: Students are to understand that the command Alt T reads the status
line on the WordStar screen which shows page, line and column number of cursor
position in the document. Additionally, students are to understand that the
command Alt L indicates a different type of cursor position: that of the cursor on the
physical screen.
Materials:
Student tape recorders and tapes.
Lecture:
Discuss the following commands:
1. Alt T reads the WordStar status line at the very top of the screen. The status
line reads: "B:filename, p## l## c## insert on." For the purpose of this exercise,
students will only need to pay attention to the page, line and column numbers.
•
2. Alt L announces the position of the cursor on the physical screen. On the
WordStar screen, the cursor is never below line 22 on the physical screen.
There will never be a line announcement higher than line 22 when using
WordStar. Explain that the WordStar cursor is never allowed in the status line.
Explain that entering Alt L will never produce a character space position higher
than 79. However, WordStar can create a line with several hundred characters,
and will scroll text to the left to allow for visual display of any text beyond the
77 characters allowed on the display screen.
3. Discuss the fact that there is a one number discrepancy between Freedom 1 and
WordStar. Alt L will always announce a row and column number one less than
the Status line of WordStar. If WordStar says that the student is at column 1,
Freedom 1 will say that the student is at column 0. Conversely, if WordStar
says column 25, Freedom 1 will say column 24. Once this is gotten used to, it's
easy to keep straight.
Offer the following example:
It is possible to have the following announcements without moving the cursor:
Alt T: . . .line 3, column 165
Alt L: . . .at line 4, column 1
How is this possible?
Freedoml
Page 2-37
4. Line numbers in Freedom 1 and WordStar will rarely coincide.
5. Emphasize that column numbers are important because checking them is a good
way to know if a margin is in the right place, or if the right number of spaces
have been inserted, or if a tab stop, discussed in a later lesson, is correct.
•
6. Allow time for questions and review.
Expected Outcome:
Students will be able to understand the difference between the
status line in WordStar and the announcement of cursor position in
Freedoml. Students will have developed an understanding of space
and position within the document file and space and position of the
cursor on the physical screen. For a blind student, mastery of the
spatial concepts covered in this lesson provide a critically important
foundation which the student will rely upon when other software
applications are learned.
Weekly Lab Assignment:
Allow students to work on a document of their choice. Periodically question
students about navigation techniques as they work on this self-generated
assignment.
•
•
Page 2-38
Freedoml
S
Week 9
DAY 2
Main Content: Review, introduction of stop speech command.
Objectives: Review WordStar navigation commands, special cursor/text movement
keys and Freedoms cursor announcement commands; introduce Alt M which stops
output from the DEC.
Materials: Student tape recorders and tapes.
Class Activity:
1. Have students open file used in class for Week 7, Day 2.
2. Question students about the difference between using the Home or End keys
and the pagedown or pageup keys. Have them work in the open file and check
cursor position with Plus key, Alt L and Alt T after each special keypress
(Home, End, PgUP, PgDn).
•
3. Question students about the difference between Control QR and Control QC;
compare the effect of these two commands with the effect of using the Home or
End key. Again, have students check cursor position with the Plus key, Alt L
and Alt T.
4. Introduce use of Alt M to stop speech synthesizer output. This is a handy
command to use if the Plus key has been used to check position or correctness of
a prompt. Alt M will discontinue the line read.
5. Urge students to ask questions as they practice navigating in their open file.
Expected Outcome:
It is expected that students will be competent in techniques of file
navigation and will understand spatial aspects of each of the
techniques. Here again students must understand cursor position
within the document file as compared to cursor position on the
physical screen.
Freedoml
Page 2-39
•
NOTES:
•
Page 2-40
Freedoml
Week 10
DAY 1
Major Content: Quick Reform, Find
Objectives: Introduce quick reform of paragraphs or document. Introduce the
WordStar Find function which searches for a single character or a string of
characters.
Materials: Student tape recorders and tapes.
Lecture/Class Activity:
1. Describe and discuss the effect of Control QQ Control B which quickly reforms
more than one paragraph of a document.
2. Have students move the cursor to the beginning of a document and press
Control QQ and then Control B. Because (at this point in the semester)
document structure is now well understood, students can understand the
concept of the cursor moving through the document paragraph by paragraph
and re-formatting the text within existing margins.
•
3. The longer the document, the longer it will take for the Quick Reform command
to finish reforming the document. A student can check progress by pressing the
Plus key. If he hears anything but the last line of the document, Quick Reform
is still at work and this command was halted when the key was pressed. If the
Plus key check indicates the reform process has not yet
been completed, the
student must re-enter the Quick Reform command ( A QQ A B). Pressing the Plus
key is a safe way to check things because this command does not cause the
cursor to move.
4. Describe and discuss how to use the Find command (Control QF) which will find
one or a string of characters:
a. Place the cursor at the beginning of the document.
b. Enter Control QF, then press the Plus key so that the prompt "find
question" (FIND?) will be read.
c. Enter a word known to be in the document. Then press the Return key
twice. The cursor will then move to the space just past the target
word.
If the word is not contained in the document, there will be a prompt
saying that the word has not been found and to press escape to
continue. This is a WordStar prompt which will not be read with the
Plus key. There is a way to do it, but it will not be taught in this class.
If the Plus key is pressed and the word "space" is heard, it can be
assumed that the word is not there. Press escape, then the Plus key
again, and the last line of the document should be heard.
•
5. The Find command has a number of options. Lead students through the
following steps:
Freedom1
Page 2-41
a. Enter Control QF and a word to be found. Check with the Plus key.
Have students press Return once and check with the Plus key again.
At this time they will hear "Find question. Options question.
Question for info."
•
b. After hearing the above, entering a question mark will bring up a list
of options. It is not necessary for students to read these at this time.
Explain that the five main options are:
W Whole words only.
If the character string occurs within a word it will be passed over.
U Ignore case.
If this is used, the search will find a string of characters in either case.
B Search backwards.
This option can be used when at the end of a document.
G Search entire file.
c. Typing one or more of these letters with no spaces between them and
then the return key will find the text using the options that the
student specifies.
6. Discuss use of the Find command as a "begin here" tag when editing:
Explain to students that if they have to close a file before editing is complete,
they can enter a place marker, such as an asterisk, at the place of edit before
they close the file. Then, when they re-open the file, they can use the Find
command and resume editing at that same place. The cursor will be placed just
after the symbol or word used as a place marker.
NOTE: Although it is possible to "drop a marker" in WordStar with Control K#
(where # is any number from 0-9), these markers exist only during a current
edit and are not saved when the file is closed. For that reason, it is much more
efficient to use the Find command to drop a marker symbol than to use the
WordStar marker command. (For example: A QF [find] ***)
Expected Outcome:
At the completion of this activity, students will have demonstrated
the ability to perform efficient document editing tasks which utilize
full document reform and the Find command.
Page 2-42
Freedoml
•
Weekly Lab Assignment:
•
Have students re-open their "WordStar" tutorial file and add the major concepts
which they have mastered since last working in the file: navigation in a document
file and understanding cursor position. Remind them that this document will serve
as a "cheat sheet" and they should be as brief and concise as possible.
•
•
Freedoml
Page 2-43
•
NOTES:
•
•
Page 2-44
Freedoml
Week 10
DAY 2
Major Content: Deleting letters, words and lines, abandoning a file.
Objectives: Introduce WordStar commands for deleting a letter, word and line;
introduce the command for cancelling a file.
materials: Student tape recorders and tapes.
Lecture/Class Activity:
Until now, students have been using the Delete key for all delete tasks.
Introduction of Control Y, Control T and Control G provides students with a more
efficient means of erasing text.
Have students open an existing file. Discuss and describe the following ways to
delete text and then lead the students through exploration of the effects of the
following commands.
1. Pressing Control Y will completely delete the line of text which the cursor is on.
The Plus key should be used before Control Y is entered so that the student
hears what will be erased. The cursor can be anywhere on the line; it does not
matter where.
2. Entering Control QY erases to the right, deleting everything from the current
cursor to the end of the line. Again, Alt W and the Plus key can be used to
check cursor position and text content before and after this delete command.
3. Entering Control QDel erases to the left, deleting
everything from the left of the
cursor to the beginning of the line. Again, Alt W and the Plus key can be used
to check cursor position and text content before and after this delete command.
4. Entering. Control T with the cursor on the first letter of a word will delete that
word. Control T can also be used to delete a part of a word. It will delete from
the letter at the cursor to the end of the word. All text moves from the right to
fill up the space.
5. Entering Control G will delete the character at the cursor. All text moves from
the right to fill up the space.
6. Entering Control KQ will close down a file and not save anything to disk. If any
modifications have been made during the time it was being edited, these will be
lost.
Lead students through the following exercise:
a. Have the students enter Control KQ and then press the Plus key.
•
b. The students will hear thisprompt read: "Abandon Edited version of
File (Drive name, file name) ? (YIN)."
Freedoml
Page 2-45
c. At this point, entering "Y" will allow the cancel process to complete.
The file is closed and the file damaged by the deletion practice is still
intact.
•
d. Explain that entering "N" aborts the cancel command and returns the
cursor to the open file.
Expected Outcome:
With mastery of the delete functions learned in this class session,
students will demonstrate proficiency in all basic editing tasks.
•
•
Page 2-46
Freedoms
Week 11
DAY 1
Main Content: Printing
Objectives: Introduction of WordStar printing options.
Materials: Student tape recorders and tapes.
Lecture:
1. Show students the printer they will be using. Point out the controls and
describe their function (e.g., the form feed button moves the paper forward one
full page).
2. Orient students to the location of the top edge of the paper when top of form
position is correct. Usually the edge of the lead sheet can be recognized in
relationship to some tactile clue. Tape may also be applied to the printer or
paper support to mark appropriate position for top of form.
3. Remind students that printing is done from the Opening menu of WordStar.
Class Activity:
Lead students through the following steps:
a. Enter P, the command to print a file. Have students press the Plus key
to check to make sure the correct command has been entered. If they
hear "Name of File to Print?," they can enter the file name (and
extension if used). Again, check for correct entry with the Plus key. If
all sounds correct, press the Return key which brings up printing
prompts.
4. Until now, students have been printing files by pressing the escape key just
after naming the file to be printed. However, if the return key is pressed after
the document name has been typed in, WordStar displays the first of a number
of options. Each prompt can be read with the Plus key. Entering return bypasses that option.
5. Describe and discuss with students the following printing prompts. They are
listed in the order they appear on the screen. Each prompt should be checked
with the Plus key.
Disk File Output?
Students should press return here.
•
Stop after page # (Return for beginning)?
Pressing Return will begin print job at the beginning of the document; a student
may want to begin printing on page 3, in which case he would enter the number
3 and press Return.
Freedoml
Page 2-47
Stop after page # (Return for end)?
Pressing Return will allow document to print from its designated start page to
the end. If, as above, a student wanted to print only page 3, he would enter 3
and press Return.
Use form feeds (Y/N):
Press Return for default setting which is
Suppress page formatting (Y/N):
Press Return for default setting which is "N".
Pause for paper change between pages (Y/N):
Students will ordinarily press Return to indicate no pause between pages
because they are using continuous feed printer paper, but if they want to use
special paper which is not continuous feed and the document is more than one
page long, they must enter "Y" at this option.
Ready printer, press Return:
Pressing Return at this point begins the print process.
6. At any time the student may exit from these options by pressing Escape.
Printing will begin using answers given to any or all option questions.
7. Lead students through readying the printer. Have them print the multiple page
file "wordstar" and practice collating it.
8. A collating tutorial follows on the next page.
Expected Outcome:
Independent printer use and file collation will require extensive
practice. The introduction to printing is designed to be minimally
technical; it is designed to be at the "survival" level. Students who
successfully complete this activity are developing skills important to
independent computer use.
Weekly Lab Assignment:
Add this new information to the "Wordstar" file, print, collate file and turn it in.
Page 2-48
Freedoms
•
Collating a Multiple Page File
Collating a file is easy with practice and the right technique. Here is one way to
collate that does work.
1. As the paper starts to emerge from the printer, have it run forward over the
printer and towards the student. You may have to hold it forward at first.
In this way, the printed side of the paper is facing the printer and the paper, as
the document continues to print, will head toward the floor.
2. When the document is finished, take the printer offline with the appropriate
button and press the top of form button, advancing the paper one full sheet.
3. Put the printer back online.
4. When this is done, the last page of the document is the closest to the printer,
printed side down. Tear off.
5. Turn the still connected sheets over so that the print is up and turn them
around so that the lead sheet is the one that is being held and the last sheet is
closest to the floor.
6. Tear off lead sheet and discard.
7. Now you are holding the top (or first) sheet with print facingyou. From here,
all that needs to be done is to tear and stack pages accordingly. While holding
the connected sheets, page one can be torn off and set on a chair printed side up.
When page two is torn off, page one is lifted and page two is placed underneath
and so on.
8. If the document is extremely long, it might be easier to tear sheets off as the
document is still printing.
9. There is no "one" way to collate.
Freedoml
Page 2-49
•
NOTES:
•
Page 2-50
Freedoms
•
Week 11
DAY 2
Major Content: Review Printing and Options
Objectives: Solve problems students may be having with printing concepts
presented in previous class. Manipulating the printer and assembly of print copy
may be very difficult tasks for some non-sighted students. Offer positive support to
any students having difficulty.
Materials: Student tape recorders and tapes.
Lecture/Class Activity:
1. Question students in order to discover areas of difficulty in concepts related to
print options, manipulating the printer and collating printed pages.
2. Based on question/discussion with students, lead students through:
a. Printing a multiple page document and collating it (e.g., the "Wordstar"
tutorial file may be used).
b. Print a single page of a multiple page document.
•
In these activities, work to clarify those areas in which students are
having difficulty.
3. Instruct students to bring in a school assignment to complete during the next
class session. Bringing in plans for a personal business letter is also an
acceptable means of fulfilling the assignment.
4. Inform students that a quiz is scheduled for the next class.
Expected Outcome:
At the conclusion of this class session, students will be able to print
all or part of a multiple page document independently. They will be
able to determine if the printer is online, if the paper is at top of
form, and they will be able to use print options provided by
WordStar for printing a partial document or for printing with paper
other than continuous feed.
•
Freedoml
Page 2-51
•
NOTES:
•
•
Page 2-52
Freedoml
•
Week 12
DAY 1
Main Content: Quiz 3
Objectives: Evaluate students' proficiencies in WordStar and screen reading skills
in areas covered since the last exam.
Materials: None.
Lecture/Class Activity:
1. Students take test.
2. Exam is on next page.
Expected Outcome:
Students will be able to function at an independent level within the framework of
word processing with WordStar. The basics will have been learned. All other
information to be presented before the end of the semester will expand students'
word processing skills. As the word processing tasks become more complex, the
•
students will employ screen reading knowledge with additional expertise.
Weekl y Lab Assignment:
Work in WordStar tutorial file.
•
Freedom1
Page 2-53
•
NOTES:
•
•
Page 2-54
Freedoml
Quiz 3 for Week 12, Day 1.
1. Describe, step by step, how to print a document.
2. What WordStar command is used to find a word or character? To what uses
would you put this command?
3. What reading command reads the word at the cursor and does not move the
cursor.
4. List the three WordStar commands which delete a character at the cursor, all
characters from the cursor to the end of a word, all of a line? Where must the
cursor be when you use the command to delete a word?
5. What command reads letters in military alphabet form?
6. What command reads the letter that the cursor is at without moving the cursor?
7. What command reads the status line for WordStar?
8. What command stops output from the synthesizer?
9. What WordStar command cancels a file?
10.What WordStar command reforms an entire document? What key must be
pressed after this command is through working.
Answers:
1. At the opening menu, press P, followed by the name of the document. Press
Escape. The Plus key can be used for checking at any time.
2. Control QF searches for a word or character. Answers to the second part of the
question will vary, depending on individual preference, but the concept of using
this command as a way of dropping a marker should be mentioned.
3. Alt W
4. Control G, Control T, Control Y. The cursor must be directly under the first
letter of a word if the whole word is to be deleted with Control T.
Freedoml
Page 2-55
•
5. Alt Q
6. Alt Q (letters read as military alphabet).
7. Alt T
8. Alt M
9. Control KQ cancels a file.
10. Control QQ Control B. The Space bar must be pressed.
•
•
Page 2-56
Freedoms
Week 12
DAY 2
Major Content: Review quiz.
Objectives: Return exams and thoroughly cover areas of conceptual difficulty.
Materials: None
Class Activity:
1. Share with the class which parts of the exam seemed to be most difficult.
2. Lead a discussion about why this area proved to be difficult. It is in this verbal
exchange that students will learn strategies from others.
3. Continue through the exam in the same manner.
4. When through with the formal review, have students open a file and lead them
though exercises to clarify the areas of difficulty.
5. If possible, illustrate successful strategies shared by students in class
discussion.
6. Students are to bring in an assignment from another class which can be written
in WordStar for the next class.
Expected Outcome:
Students will be able to open files, set margins, tabs, re-form text to
fit new margins, print files. Additionally they will have developed
the ability to read all material produced, understand how to read
file prompts or command prompts, and will have developed an
understanding of spatial structure within a file and on the monitor
screen. They will be able to use these very basic skills
independently.
•
Freedom'
Page 2-57
NOTES:
Page 2-58
Freedoml
•
Week 13
DAY 1
Main Content: Have students experience their ability to produce documents
independently as they work on self-selected assignments in class.
Objectives: Review basic WordStar concepts as needed. Remind students of ways
to read screen prompts and ways to navigate in a document.
Materials: None.
Lecture/Class Activity:
1. At the last class students were instructed to bring to this class another school
assignment or information to be used in a personal business letter.
2. Use this class and the next class period to complete these assignments.
3. Explain to students that a quiz is scheduled for next week, and that they are to
use the work sessions to ask questions when confronted with a difficulty.
4. Question students as they work; hold informal class discussions when
information is relevant for the class as whole.
Expected Outcome:
Students will develop independent mastery of simple text production, basic printing
and basic Freedoml screen reading skills. The intent of this assignment and the
one for the next class is to generate a new level of independent mastery before
introducing any unfamiliar material.
Weekly Lab Assignment:
Continue with class assignment.
Freedoml
Page 2-59
•
NOTES:
Page 2-60
Freedoml
S
Week 13
Day 2
Main Content: Continue fostering independent WordStar/Freedoml skills;
introduce multiple line read commands.
Objectives: Review basic WordStar concepts as needed. Remind students of ways
to read screen prompts and ways to navigate in a document; introduce Alt E and. Alt
X, reading commands which read several lines above the cursor or below the cursor.
Materials: None.
Lecture/Class Activity:
1. Have students continue working on assignment begun in class last session. If
students have completed the assignment, have them write a personal letter to a
friend.
2. Introduce the principle of reading several lines above the cursor to check for
flow of content. Have students enter Alt E and note that when the reading
stops, the cursor has not moved from its original position.
•
3. Have students enter Alt X and note that the five lines below the cursor are read
but the cursor never moves from its position at the time of the command. This,
too, is a useful command to use while writing to check for content flow.
4. Explain to students that a quiz is scheduled for next week. Urge students to ask
questions as preparation for the test.
5. Question students as they work; hold informal class discussions when
information is relevant for the class as whole.
Expected Outcome:
Students will develop independent mastery of simple text
production, basic printing and basic Freedoml screen reading
skills. The intent of these assignments is to stabilize a level of
independent mastery before introduction of any new material.
•
Freedom1
Page 2-61
•
NOTES:
•
•
Page 2-62
Freedoms
•
Week 14
DAY 1
Major Content: Introduce concepts of formatting: tabs.
Objectives: Introduce concept of spatial placement of text. Introduce commands for
deleting and setting tabstops. Explain that tabstops may be used to set up charts in
columns or may be used to indent whole paragraphs.
Materials: Student tape recorders and tapes; tactile aids for teaching structure of
spatially formatted text.
Lecture:
Discuss concepts of formatting; that printed text is organized for visual effect: e.g.,
an empty line is placed between paragraphs, a special place exists for the date in a
modified block business letter, reports containing lists of numbers have the
numbers arranged in columns; lists of items frequently are arranged in columns;
quoted paragraphs are indented to separate them from the text. Tactile displays
(sandpaper pasted on paper) of text structured through placement of tab stops may
be necessary to convey spatial organization of text.
Class Activity:
1. Review left and right margin settings which were taught in week 5. Review
position of Tab key.
2. Discuss the ruler line on the WordStar screen. (The students cannot read it for
themselves as yet; instructions will be given in an advanced class.)
a. The capital "L" at the far left of the ruler line signifies column position
of the left margin and the capital "R" at the right signifies column
position of the right margin. The default margin positions are columns
1 and 65.
b. Exclamation marks represent default tab stops and are positioned
every five spaces on the ruler line at column 6, 11, 16, 21, etc.
c. Hyphens are used to represent all other characters contained within
the margins.
3. Explain that it is necessary to clear all default tab stops before setting new ones.
a. Have students enter Control ON and then use the Plus key to read the
prompt which is now on the screen. The students will hear "CLEAR
TAB AT COL (ESCAPE for cursor col; A for all)?".
•
Freedom1
Page 2-63
b. Students are to enter A and press Enter. Typing accuracy can be
checked by using the Plus key to read the prompt before pressing
Enter. Once Enter is pressed the change is automatic. The hyphen
ruler line reappears and all exclamation marks are gone.
•
4. Lead students through the process of setting a tab stop at column 50, a useful
setting for the address and date in a modified block style personal business
letter.
a. Have students enter Control OI; check the prompt with the Plus key.
The prompt "SET TAB AT COLUMN (ESCAPE for cursor column)?"
will be heard. Students will enter the number "50" and should check
their entry by using the Plus key before pressing Return.
b. Have students press the Tab key. Use Alt T or Alt L to check cursor
position. Remind students of the discrepancy between the cursor
position announced by Alt T and Alt L: Alt L will announce the cursor
position at column 51; Alt T will announce the cursor position at
column 50.
5. Lead students through the process of setting a tab at column 15.
6. Have students move the cursor to the first tab stop and then the second.
Explain that the cursor always stops first on the tabstop closest to the left
margin.
7. Suggest that students work with the Insert function off when editing a
document with tabs. With Insert on, any text encountered by the cursor as it
tabs over will be pushed to the next tab stop. This can create a disorganized file
which must be cancelled and editing resumed in the reopened, intact file.
•
Expected Outcome:
For some blind students, this may be the first time they have
encountered actual formatting tasks of this type. The concept of
arranging text for the visual information its physical structure will
convey may be new. After manipulating tactile samples of
appropriately formatted text, students will have a clearer
understanding of the effects of the formatting commands they learn
during this class period. At the conclusion of the class activity,
students will be able to clear all tabs, set tabs (using Freedom1 to
read all prompts and tabs set), and understand how the Tab key
moves the cursor.
Weekly Lab Assignment:
Have students prepare a three-column chart which lists their thirty-one favorite ice
cream flavors. This assignment has proved helpful in stabilizing tabset concepts
and at the same time, presents a linguistic challenge to student as they search for
words to describe the flavor of each of the ice creams.
Page 2-64
Freedom1
•
•
Instructions:
1. Set a tab at column 30.
2. Set a tab at column 60.
3. Center this title on line 7: 31 Flavors
4. Press Return three times and enter the word "Flavor" as the head for column 1
at character space 1.
5. Tab over to column 30 (check cursor position with Alt L) and enter the word
"Taste" as the header for this column.
6. Tab over to column 60 (again, check cursor position with Alt L) and enter the
word "Rank" as the head for this last column.
7. How to fill in the information:
a. Under "Flavor" students list kinds of ice cream. Some students may
not be able to think of 31 different flavors and can make up some of
their own.
b. Under "Taste" students are to list a brief description of how the flavor
tastes.
•
c. Under "Rank" students are to indicate preferences by entering a
number from 1 through 10, with 10 being the best.
•
Freedoml
Page 2-65
•
NOTES:
Page 2-66
Freedoml
•
Week 14
DAY 2
Main Content: Review formatting with tabs.
Objectives: Review spatial concepts related to formatting. Discuss when setting a
tab stop is useful. Review clearing and setting tabs and how to edit a document
which utilizes tab structure.
Materials: Student tape recorders and tapes.
Lecture/Class Activity:
1. Verbally review with students the basic concepts of the prior class. Question
students regarding their understanding of the spatial structure of documents
containing information placed at set tab stops.
2. Have students continue with lab assignment on ice cream flavors.
3. Pay special attention to helping students having difficulty in working with
tabstops.
•
Expected Outcome:
At the conclusion of this class, students will be able to
independently format text which requires use of tabstops. Students
will also have developed an understanding of how spatial
organization of text can augment the information contained in the
text. The ability to organize text for maximum visual impact may
be a new skill for some students.
•
Freedoms
Page 2-67
•
NOTES:
•
Page 2-68
Freedoms
•
Week 15
DAY 1
Major Content: Reading the File Directory.
Objectives: Students are to learn to use special-area reading commands which
allow them to read the WordStar File Directory on the opening menu. (Introduction
of Alt F2 and review mode reading commands which are different from the ones
these students have been using.)
Materials: Student tape recorders and tapes.
Lecture:
(Describe and discuss these new concepts and then move to class activity)
1. Describe the File Directory on the opening menu to the students. Explain that
it lists all the files on their disk. It is likely that students may be having
difficulty remembering all the name of the files they are working with. Knowing
that they no longer must rely on memory for file names will be a relief.
2. Introduce the concept of Alt Function key commands: all such commands are
directly related to aspects of reading special areas of the screen. ALT
FUNCTION KEY COMMANDS USE A NEW SET OF READING COMMANDS.
3. Discuss and describe the reading and movement commands which must be used
when working on a special-area reading task.
Reading commands:
Enter
Reads from the cursor to the end of line. Cursor moves to the beginning of the
next line.
w
Reads a single word to the right, cursor moves to the first character of next word
right.
Reads letter at cursor, cursor moves right one character.
Movement Commands:
z
Moves cursor to beginning of line.
h
Moves cursor to Home position in reading area.
•
1
Moves cursor one word to the left.
Freedoml
Page 2-69
•
r
Moves cursor one word to the right.
Moves cursor up to beginning of the next line.
d
Moves cursor down to beginning of next line
4. Explain that it is ALWAYS necessary to use the exit command after reading in
special areas: Alt F10.
5. Explain to the students that if they forget and use a reading command other
than those above, the cursor will go back to where it was before the Alt
Function key command was issued. They will hear the announcement "cursor
not in window" when attempting to read using the Plus key or any other
"regular" reading command.
If this is the case, use Alt F10 and the problem will disappear. Enter Alt F2 to
return to reading the File Directory.
Class Activity:
1. Students are to boot the machines and proceed to the point at which they could
open a file on their data disk.
2. Instruct students to enter Alt F2. The cursor moves to the middle of the screen
and rests at the first letter of the line which reads "directory of disk A: (or B: or
C:):"
3. Begin using the new reading commands to hear the content of this area. (It may
be advisable to have students slow-the speech rate for this task.)
Read the directory contents using the w command. Work at the word-by-word
level in the beginning. When students are familiar with directory structure,
they can scan through a line at a time using the Enter key.
4. When students have read the contents of the directory, instruct them to enter
Alt F10 to return to WordStar.
5. Have students practice entering, reading and exiting the directory several
times.
6. Inform the students that the next class session will introduce CorrectStar, a
full-document spell checker. Learning to use the spell checker will also involve
an Alt Function key command and the new reading commands learned today.
Page 2-70
Freedom1
•
Expected Outcome:
With the completion of this activity, students will have begun to use
the screen reading program in its most powerful mode of operation.
The new reading commands which they will have learned this class
session are those of the native review mode in Freedoml.
Freedoml offers far more options than needed by beginning
students who do not generally need to know or use the review mode.
Review mode applications are generally taught in a advanced class.
For those students who will be moving beyond simple text
production on a computer, this early introduction to some commands
in the review mode will serve as a useful bridge when they begin to
learn advanced principles of screen reading.
Weekly Lab Assignment:
Students are to complete the previous lab assignment. Any free time is to be spent
on text production for assignments from other classes.
•
Freedoml
Page 2-71
•
NOTES:
•
Page 2-72
Freedoml
Week 15
DAY 2
Mahr Content: Using CorrectStar, a full-file spell checker with a fixed-format
display.
Objectives: Students are to learn to use CorrectStar and the special-area reading
commands related to its operation.
Materials: Student tape recorders and tapes.
Lecture:
(Describe and discuss these new concepts and then move to class activity)
1. Describe and discuss CorrectStar, the spell checker provided with WordStar.
Impress students with the fact that the use of a spell check program enables
anyone to produce text which is almost 100% error-free. Discuss the fact that
the spell check program will not catch incorrect use of a word with two spellings
(e.g., advise, advice). The spell check program only monitors letter sequence.
2. Discuss some of the major options which CorrectStar offers.
•
a. It suggests a correct word if it finds a close match in its dictionary. If
is it not the right word, it can suggest another (and another, until it
doesn't find a close match).
b. It easily allows the user to add to its dictionary.
c. It is possible to correct the misspelled word from the keyboard.
d. Its fixed-format display makes it friendly to use for blind users.
3. Discuss the special-area reading command Alt F8.
a. As with all Alt function key commands, the special reading and
movement commands introduced last class session must be used to
read the area of the screen which is used by CorrectStar. (Enter, w, s,
etc.)
b. There is one additional command, Shift I (vertical bar), which works
only in CorrectStar; it reads the line in which the word occurs in the
document, but the cursor never leaves the CorrectStar window. This
command provides a context clue about the word.
4. Use Alt F10, the standard exit command, when through working in CorrectStar.
•
Freedoml
Page 2-73
Class Activity:
1. Students are to begin the class activity at the opening menu of WordStar.
•
2. Have students select S to start CorrectStar. Use the Plus key to check prompt.
They will hear "name of file to check question" (NAME OF FILE TO CHECK(?).
Enter file name; check again with the Plus key. If correct, press Enter.
3. When disk drive activity stops, press Escape. Pressing Escape starts the actual
checking of the file by CorrectStar. Wait a few seconds (the longer the file, the
longer it takes to scan all words). Check with the Plus key to see if "What do
you want to do?" is heard. (If not wait a bit and check with the Plus key again.)
When the question is heard, proceed with the following.
4. Enter Alt F8. The cursor moves directly under the first character of "word to
check:" followed by the word being checked.
a. Have the student go through each line word-by-word with the w
reading command. The student may wish to go back up to the word
and read through the word in question on a letter-by-letter basis.
b. If the student is unsure of the word, enter Shift I (vertical bar). This
command reads the line in the document which contains the word in
question. The cursor does not move.
c. Once the student is familiar with the letter commands to invoke certain
CorrectStar options (show next word, correct as suggested, ignore
word, enter from keyboard, etc.) correcting misspelled words in a
document does not take a great length of time.
5. The instructor should now circulate among the students, assisting as necessary,
while they independently explore CorrectStar and its options.
Expected Outcome:
With mastery of a spell checker, students will develop a wide range
of new skills. Not only will they have learned the components of the
spell-check process, but they will also have developed efficient
screen reading methods using the new type of commands required
for special-area reading.
Page 2-74
Freedoml
•
•
Week 16
DAY 1
Major Content:
Manipulating blocks of text, using the Freedom 1 attributes
announcement command.
Objectives: Introduce WordStar commands to mark, move, copy and delete blocks of
text in a document; introduce use of Alt B, the Freedoml attributes announcement
command which will indicate color changes in text.
Materials:
Student tape recorders and tapes.
Lecture:
1. Explain that one of the hallmarks of word processing is the ability to easily edit
text. Some of these editing tasks are easily moving text from one part of the
document to another, easily deleting segments of text and copying portions of
text from one file into another file. Until the advent of the computer, retyping a
document was the only way to change a document.
2. Discuss that marking, or defining, the text to be manipulated is a first step.
Any text in a file (a single character, all pages) can be marked for a block move.
Once a block of text has been marked, there are commands which will move,
copy or delete the text.
3. Discuss the Freedoml attributes announcement command, Alt B.
4. Remind students that it is necessary to reformat a paragraph after adding or
deleting blocks of text.
Class Activity:
Have students open an existing text file (it will later be closed with a cancel
command) in order to practice block commands.
Lead students through the following activities:
1. Marking a block of text with Control KB and Control KK.
a. Have students mark a sentence for moving.
Place the cursor at the first letter of the sentence to be marked and
enter Control KB. The following symbol will appear just in front of the
character over the cursor: <B>. Use the Plus key to check the line
being read to make sure the symbol is there.
b. Move the cursor to just past the last character of the text to be marked;
in this case it will be just after a period. Enter Control KK. The
marked text will change color on a color screen or will go to half
intensity on a monochrome screen.
•
Freedoml
Page 2-75
c. To check to see if the text has changed after the entry of the second
mark command, enter Alt B, the Freedoms attributes announcement
command which announces changes in screen colors. Then press the
Plus key. If the student hears any kind of colors being announced, it
means that there are contrasting colors in the line and that the text is
successfully marked.
•
3. Discuss helpful tips for marking blocks:
a. Place the cursor at the left margin to mark the beginning of an
indented paragraph; the indent will remain with the paragraph.
b. It does not matter which end of the block is marked first; always check
with the Plus key after the first mark command is issued; then check
with the Plus key and Alt B after the second mark command has been
given to make sure the text has changed color.
c. Always toggle off the Alt B command after checking to see if a block is
marked; working with the attributes announcement on results in many
unnecessary announcements of changing screen colors.
d. If using the Plus key and down arrow key to read text to be marked,
when the last word of a block occurs at the end of a line, Control QD
can be pressed as soon as the line has been heard. Then press Control
KK to finish marking the block.
4. The following commands can be used to manipulate a block of text which has
been marked. Lead students through the discovery exercises. The insert
function should be on for these exercises.
•
a. Control KV--move a block of text to position of cursor.
Position cursor at end of file and enter Control KV. The marked block
of text is moved to the cursor position. The cursor remains at the
beginning of the marked block of text. Check with the Plus key to
make sure text is there.
b. Control KC--copy a block of text to cursor position.
Position the cursor at top of the file and enter Control KC. The marked
block of text at the end of the file is copied to the new position at the
top of the file. The text at the top of file is now the marked block of
text. Check with the Plus key.
c. Control KY--delete a marked block of text.
Enter Control KY. The marked block of text at the top of the file is
deleted. Check with the Plus key. Text or space existing below the
deleted block moves up.
•
Page 2-76
Freedoml
Expected Outcome:
At the completion of these activities, students will have gained a
precise understanding of marking and manipulating blocks of text.
These skills represent important components of word processing
mastery. Successful use of the commands presented in this lesson
will indicate that students have an understanding of cursor
movement and positioning; that they will have mastered the spatial
concepts inherent in navigating in the file: to the middle, end or
beginning. Mastery of these skills and the ways Freedoml can be
used to monitor execution of these commands will have moved the
successful blind student to basic independent word processing.
Weekly Lab Assignment:
Have students open a pre-existing file and practice working with block commands.
Question students as they work so they can verbalize what they are doing. Remind
them to cancel the file when they are through working in it.
Freedoml
Page 2-77
NOTES:
Page 2-78
Freedoml
Week 16
DAY 2
Main Content: General review of WordStar and Freedom1 in the context of
student-generated assignments as preparation for the Final Exam.
Objectives: Incorporate review of basic concepts of WordStar and Freedoml screen
reading tasks as students work on self-selected assignments. Students are
completing assignments for other classes, or working on assignments centered
around concepts found to be difficult.
Materials: Student tape recorders and tapes.
Lecture/Class Activity:
1. Question students as they work on independent assignments.
2. Instruction is very individualized at this time as the instructor is to probe for
student weak spots in word processing or screenreading skills.
3. Relevant concept discussions with students should be expanded to include the
whole class.
•
4. Encourage students to evaluate their proficiency in the tasks they are
performing. Suggest that any area of uncertainty ought to be the subject of
questions to the instructor.
5. Discuss the possibility of enrollment in an advanced level course on word
processing and screen reading skills. Students planning on participating in the
mainstream curriculum should be encouraged to expand their Freedoml skills.
6. Announce to the students that the lab will be open all during Dead Week so that
they can come in and work on areas of difficulty in preparation for the final
exam which will be held during the 18th week of the semester.
Expected Outcome:
Students will be able to work independently in all word processing
and screen reading tasks. Students will be expected to identify and
clarify areas of conceptual weakness.
Weekly Lab Assignment:
Students are to continue working on independent assignments and asking
questions of instructor regarding areas of word processing or screen reading
difficulty.
•
NOTES:
Page 2-80
Freedoml
•
Week 17
Traditionally, no classes are held during the week before final exams, hence the
term "Dead Week."
High Tech Centers remain open during this time so that students can complete
papers and exams for other classes.
Students are encouraged to come in during this time to clarify areas of conceptual
weakness. Additionally, it is an excellent time for the instructor to informally
instruct on a highly individualized basis as students ask for assistance in screen
reading tasks or word processing tasks as they work to complete assignments for
other classes.
During Finals Week, some students may take a final exam, at the request of an
instructor, on disk in the High Tech Center.
•
•
Freedoml
Page 2-81
•
NOTES:
tio
Page 2-82
Freedoml
•
Week
Major Content: Final (See "FINAL" on next page)
Objectives: Evaluate student proficiency in basic WordStar word processing skills
and Freedoml screen reading commands.
Materials: The file "Final" should be copied to each student data disk.
Class Activity:
Complete final exam and turn in print copy, properly collated.
Expecte. Outcome:
Successful completion of the final exam will indicate mastery of all
basic word processing and screen reading skills taught in this
introductory class. Mastery of this cluster of skills will result in the
ability to produce, edit, format and modify text files and in the
ability to work independently on these tasks.
Overall Course Outcome:
•
The focus of this course is to develop students who can produce text easily, efficiently, accurately
and quickly. A student who completes this course is a text-productive student able to create and
edit documents appropriate to academic use or entry level business. Not only are these blind
students able to successfully bridge the gap to the printed world, they also are developing basic
technological skills (screen reading techniques) which lie at the center of many academic and
career opportunities for non-sighted individuals.
Blind students wishing to expand their screen reading skills are expected to enroll in a second
semester of screen reading software instruction in which they will learn how to customize a
screen reading program to their software application needs.
•
Freedoml
Page 2-83
•
NOTES:
•
•
Page 2-84
Freedoml
•
Please answer the following questions to the best of your ability and type your name
after these instructions.
Final Exam
Beginning WordStar
And Freedoml
1. What screen reading
command reads the word at the cursor and then moves the
cursor one word to the right, or forward?
Alt F
2. What screen reading command reads the word at the cursor and then moves the
cursor one word to the left, or backward?
Alt A
3. What screen reading command is used to read the word at the cursor and does
not move the cursor; this command is used to repeatedly listen to a word.
Alt W
•
4. What screen reading command is used to read the letter at the cursor and
moves the cursor one letter to the right, or forward?
Alt D
5. What screen reading command is used to hear the letter at the cursor and then
moves the cursor one letter to the left, or backward?
Alt S
6. What screen reading command is reads a letter at the cursor as a military
alphabet word, for example, "tango" for t, "papa" for p?
Alt Q
7. What happens to the cursor when the command described in the question above
is used.
The cursor does not move.
8. What screen reading command reads the line that the cursor is on and does not
move the cursor?
Plus key
•
Freedoml
Page 2-85
9. What screen reading command key reads the line that the cursor is on and then
drops the cursor down to the beginning of the next line?
•
Grave Accent
10.How do you open a document in WordStar? Start with the first thing you would
do once the computer has finished working. Pretend that you are opening a new
file. Give it a name in your description.
Enter D and the name of the document. Check prompt line with the Plus key
and then press Enter.
11.What WordStar command will center a line of text?
Control OC
12. What WordStar command saves a file without closing it?
Control QS (or appropriate function key)
13.What WordStar command saves and closes a file?
Control QD (or appropriate function key)
14.What key do you use when you want to remove the letter to the left of your
cursor?
Delete
15.How do you delete the word at the cursor?
Place the cursor under the first letter of the word and enter Control T.
16.How do you delete a line?
Control Y
17.How do you get to the beginning of your document?
Control QR (or appropriate function key)
18.How do you get to the end of your document?
Control QC (or appropriate function key)
19.Describe how to clear any or all tab stops, then describe how to set a tab stop.
Control ON asks you to enter the number of a tab stop to be cleared. The letter
"a" followed by the return will clear all of the tab stops. Pressing the number 41
and the return will clear the tab stop which is set at column 41 and will leave
the others alone.
Page 2-86
Freedom'
•
•
20. What are the methods of checking that a tab is set at the right column? What
are the differences between these ways?
There are two ways to check if a tab stop is set correctly. Pressing Alt L will
give you the physical screen location of the cursor, (at line 10, column 19) for
example.
Pressing Alt T will read the status line for WordStar. In this particular case,
one wants to pay attention to the column number, (C 20) for example.
Both ways can be used together as long as the difference is kept in mind, that is,
that there is a one count discrepancy between the Alt L and Alt T. If a tab stop
is set at column 20, Alt L will tell you that you are on column 19 because the
screen reader starts counting at column 0 rather than column 1 as Alt T does.
Alt T will tell you that you are on column 20. The screen reader should always
say that you are one column behind the original tab setting.
If the tab is set on column 20, the screen reader will say column 19 and be
correct. If the screen reader says that you are on column 20, there is a problem
because the cursor is either one space beyond the tab stop or the tab stop was
not set correctly.
21. How do you print a document?
•
At the directory level of WordStar, enter P, check prompt line with Plus key,
enter file name to be printed, check prompt line with Plus key again; if all OK
press Escape key to quickly begin print. If special options are necessary, press
Return key and select the print options.
22.How do you move a block of text in WordStar?
With the insert function on, mark the text to be moved. Put the cursor under
the first letter of the text to be moved end enter Control KB. Put the cursor just
after the last character of the text to be moved and enter Control KK. Move the
cursor to the place where the marked text is to be inserted. Enter Control KV.
23.What WordStar command will delete a block of marked text?
Control KY
24.What WordStar command will copy a block of text to another place in a
document?
Control KC
•
Freedoms
Page 2-87
25.How do you initiate a CorrectStar spellcheck in WordStar?
From the directory level in WordStar, press S to start the spell check. Use the
Plus key to check prompt. Enter name of file to be checked. Use the Plus key to
check prompt line. If it sounds correct, press Enter. Wait. Press Escape to
start the actual process.
26.How do you know when to start reading the CorrectStar window?
After pressing Escape wait a short time for the file to be checked. The longer
the file, the longer this wait time will be. Use the Plus key to check to see if file
analysis has been completed. When "What would you like to do?" is heard, it is
time to begin reading the CorrectStar window.
27.What screen reading command places the review mode cursor in the spell check
window?
Alt F8
28.Be honest now. Have you enjoyed this class? How has the class helped you?
Do you have an ideas about what you would like to see changed or what other
things you would like to learn?
Page 2-88
Freedoms
•
TurboLi! htning
Adaptive Computer Technologies
•
Developed By:
Mary Yoder, Specialist, Cuesta College
•
•
•
•
•
COMPUTER ACCESS 1
LESSON PLANS FOR TURBO LIGHTNING
The capacity to continuously monitor and correct spelling errors can be vitally important to
students with some types of disabilities. Students with low vision, learning disabilities, or
acquired brain injuries may find spell-checkers particularly valuable.
This basic introduction to spell-checking and thesaurus software is designed to acquaint students
with the basic concepts associated with their use. Students will become familiar with the
practice of word oriented continuous spell-checking in "real-time" as opposed to document
oriented spell-checking.
The course of instruction will provide students with an introduction to single word and fullscreen error identification and correction procedures. Additionally, students will be introduced
to the use of the "on-line" thesaurus as a method for identifying and selecting synonyms for
words in the existing document.
•
•
•
•
TURBO LIGHTNING--AN ON LINE SPELL CHECKER AND THESAURUS
Introduction: Turbo Lightning is an on-line spell check and thesaurus with the
additional capability of doing a full-screen spell check. The term "on-line" refers to
the fact that Turbo Lightning is active and ready in the background as an individual
is using a word processor. When Turbo Lightning detects a spelling error, a beep
occurs. The writer is cued by this beep to check the spelling of the current word by
using the dictionary function. Additionally, a full-screen spell check can provide final
proofing to correct any errors which may have gone unnoticed. The thesaurus
provides alternate words and helps the student build vocabulary. The basics of
Turbo Lightning can be presented over a two or three week period in conjunction
with beginning word processing. With continued use, students will discover how
spelling difficulties can be lessened and how the writing process is enhanced; the
writer can concentrate on content and organization rather than on spelling.
Objectives: Students are to develop competency in the following aspects of Turbo
Lightning: use of the on-line spell check and thesaurus functions, full-screen spell
check, review screen options, and the addition of words to the dictionary.
•
Materials: Turbo Lightning is taught in conjunction with beginning word
processing use. Teaching students to use an on-line spell check as they begin to use
a computer for word processing greatly enhances the writing process. The following
Turbo Lightning hotkey configurations are to be used:
Check word
Screen check
Review screen
Thesaurus
- (Minus on numeric keypad)
Alt Right Arrow (on numeric keypad)
Alt PgDn (on numeric keypad)
* (Asterisk on numeric keypad)
Assessment:
It is recommended that Turbo Lightning be used with all students who use a word
processing program. All students benefit from using an electronic spell checker, but
for some students with severe language or spelling difficulties, Turbo Lightning
becomes an access tool. Only with spelling and vocabulary assistance will these
students be able to use written language as an effective medium of expression.
Turbo Lightning is unable to provide a visual cue for deaf and hard of hearing
students. However, if Turbo Lightning is used with a word processor which uses a
visual cue to indicate misspellings, the student can access Turbo Lightning when
the visual flag occurs. (MindReader, a smart word processor, has an InstaSpell
function which uses a visual cue to flag a misspelled word, and runs well with
Turbo Lightning.)
Because of its strong visually based frame of reference, Turbo Lightning is not
recommended for blind students.
•
Turbo Lightning
Page 3-1
Overall Instructional Unit Outcome:
Students will successfully use Turbo Lightning for all writing done in conjunction
with word processing in order to produce documents free of spelling errors; use of the
thesaurus function will be incorporated into writing tasks. The following outcomes
are also projected: students will improve their ability to identify and correct
misspelled words; students will learn to improve their vocabulary through access to
the thesaurus; students will gain confidence in their ability to produce professionally
acceptable written work with the aid of Turbo Lightning.
Page 3-2
Turbo Lightning
•
UNIT 1
Turbo Lightning
Major Content: Introduction to Turbo Lightning and concepts of on-line spell
checking and thesaurus use; learning to access Turbo Lightning.
Materials and Software: Students work with Turbo Lightning, a word processor,
and necessary adaptive software. The instructor will copy necessary files to the
student data desk.
Objectives:
1. Define and discuss the following terms: thesaurus, synonym, spell-checker, online.
2. Review parts of speech used by Turbo Lightning: nouns, verbs, adverbs and
adjectives.
3. Learn to access Turbo Lightning within the environment of the word processing
program.
•
Instructional Activities:
1. Students open a new file called "Write" and type as the instructor dictates the
following sentences:
a. Automotive repairs are higher in Pennsylvania than in California.
b. You may become accustomed to having your schedule interrupted.
c. Tomorrow's assignment includes an intelligent selection of essays.
Students are instructed to stop typing when they hear a beep (which will occur
as they press the space bar after typing a word which is misspelled).
2. Access the Turbo Lightning dictionary: Instruct students to press the Minus
key once they hear the beep.
3. Lead students through dual word selection process: use of the selector bar or use
of the letter in front of the desired word.
4. Discuss and illustrate that Turbo Lightning will also check words already typed
if the cursor is placed anywhere within the word and the minus key is pressed.
•
Turbo Lightning
Page 3-3
5. Access thesaurus: Have students type "The nation faced a period of economic
trouble." Have students place the cursor under the first major word and then
press the asterisk key to access the thesaurus. Have students select a
replacement word. Have students do this for each major word in the sentence.
6. At the conclusion of Activity 5, have each student read aloud the now-changed
sentence. Compare the meanings of various sentences and use this step to
illustrate the effect different words have in various contexts.
Expected Outcome:
Students will be able to use the dictionary and thesaurus functions
of Turbo Lightning and will understand the positive effect of
alternate word usage provided by using a thesaurus in the writing
process.
Page 34
Turbo Lightning
WORKSHEET
UNIT 1
SPELLING AND THESAURUS EXERCISE:
1. VISUALIZE THIS SCENE: You are telling a close friend about your favorite
recreation spot, and describing what you like to do to relax in that place.
Picture yourself in the favorite place.
2. Open a new document called 'Vacation." Type a paragraph that describes the
sceneyou have pictured. Use your thesaurus to choose appropriate words to
describe the scene. To access the thesaurus, press the asterisk key on the
numeric key pad.
3. When you hear a beep, the spell checker is telling you that it does not recognize
the spelling of a word. Check the word at the cursor position by pressing the
minus key on the numeric key pad.
4. Close your document, print a copy and turn it in to your instructor.
•
Turbo Lightning
Page 3-5
NOTES:
Page 3-6
Turbo Lightning
•
UNIT 2
Turbo Lightning
Major Content: Explore hot-keys for full screen check and review screen options.
Explore "sound alike" message in spell check use and "close words" message in
thesaurus use.
Materials and Software: Word processor and Turbo Lightning; student data disk;
instructor-copied files "Storm.doc" and "Malcolm.doc" used for worksheet
assignment on student disk.
Objectives:
1. To instruct students in ways to use Turbo Lightning in an edit mode by utilizing
the full screen spell check option (Alt Right Arrow) and review screen option
(Alt Page Down)
2. To have students practice problem solving techniques when responding to
dictionary and thesaurus messages encountered in Turbo Lightning use.
Instructional Activities:
1. Explore Screen check and Review screen options. Have students open file
"Storm.doc" and perform a full screen spell check using the following steps:
•
a. Hold down the Alt key and press the Right Arrow key on the numeric
key pad.
Misspelled words or words not in Turbo Lightning dictionarywill be
highlighted throughout the screen. Typical examples of highlighted
words are proper names, abbreviations, and misspellings.
b. Have students discover that as soon as they move the cursor to correct
a word, all highlighting disappears. Direct students to move cursor
anywhere under or just past ti e target word and press the Minus key
(for spell correction window).
c. Describe Review screen option and then have the students hold down
the Alt key and press the PgDn key on the numeric keypad to
automatically re-highlight any words not yet corrected.
d. Have students correct the first word and then use the Alt PgDn option
for the Review screen option and proceed to correct the remaining
highlighted words.
•
Turbo Lightning
Page 3-7
2. Explore Turbo Lightning messages, "Press F2 for Sound-alike Words" and
"Close Words With Synonyms." In correcting the spelling and using the
thesaurus to replace words in their text, they are guided to press F2 when one
of the above messages appears in the window.
3. Explain that the Turbo Lightning Thesaurus recognizes root words only. Guide
the students through the following steps:
a. Move your cursor to the last sentence at the end of "Storm.doc." Place
the cursor on the word "exploration."
b. Press the asterisk key.
c. At the message, "Not in thesaurus..." press F2.
d. Select the root word of exploration.
e. Press enter. (Note that pressing enter does not insert the word in your
text.)
f. From the window that appears, select a synonym for the root word
"explore."
g. Press enter. (This time the word you select is entered into your text in
place of the word "exploration.")
4. The students practice the steps in class by selecting replacement words from the
thesaurus for any word in "Storm.doc" that is followed by an asterisk.
5. Have students close the file, print it and turn it in to the instructor.
Expected Outcome:
At the completion of this unit, students are expected to be aware of
the many ways in which Turbo Lightning will facilitate the writing
process. Not only will they be able to use Turbo Lightning as an online spell checker or thesaurus when they are creating text, but also
they can use the program as a tool to correct existing text through
use of the Full-screen and Review screen options.
Page 3-8
Turbo Lightning
•
•
WORKSHEET
UNIT 2
1. Open the file "Malcolm.doc" which is on your disk.
2. Do a full-screen check of the document: Use the Alt Right Arrow hot key
command to do a full-screen check.
3. Correct the first word.
4. Press Alt Page Down to bring back the highlighted words. Correct each
misspelled word.
5. Use the thesaurus to find a synonym for each word which is followed by an
asterisk. Choose words which best express your mental picture of the scene.
You may need to rephrase part or parts of the sentence.
6. Save the file, print it and hand it in to the instructor.
•
•
Turbo Lightning
Page 3-9
•
NOTES:
Page 3-10
Turbo Lightning
UNIT 3
Turbo Lightning
Major Content: Problem solving to circumvent shortcomings of the Turbo Lightning
search process.
Materials and software:
Word process and Turbo Lightning, student data disk; instructor-copied files
"Spell.doc" and Freedom.doc."
Objectives:
1. Demonstrate and discuss the face that Turbo Lightning uses only the first two
or three letters of a word in its search process.
2. Identify and use types of problem solving strategies which will circumvent the
limitations of the word search capabilities of Turbo Lightning: e.g., using word
attack skills, finding root word.
Instructional Activities:
•
1. Discuss the following: Turbo Lightning usually looks at the first tow or three
letters of a word to begin its search. It is important to understand that if these
first letters are in error, Turbo Lightning will probably not provide a correct
word choice. Therefore, it is necessary to learn to problem solve and work
around this limitation. Suggest that students can search for identification slues
through phonetic clues and use of parts-of-speech labels. Use of synonyms in
the thesaurus can also help in finding the meaning of a word.
2. Have students open the file "Spell.doc" which is on their disks.
3. Introduce additional clues for choosing the proper word:
a. phonics--is there another way to spell this sound at the beginning of
the word? (c or k)
b. part-of-speech--how is the word used, as a noun or a verb or an
adjective? (advise/advice)
4. Check definitions by use of thesaurus synonyms.
•
Turbo Lightning
Page 3-11
5. Elicit different problem solving techniques from the class as the activity
proceeds. Again, focus on the following problem solving techniques:
a. use of thesaurus to discover possible definitions;
•
b. use of part-of-speech labels in the Turbo Lightning windows (e.g., for
the word "good" in thesaurus);
c. use of word attack skills;
d. use of visual memory.
Expected Outcome:
Students will discover how problem solving skills will help them
work around limitations of the Turbo Lightning search function as it
affects spell checking or thesaurus use.
•
•
Page 3-12
Turbo Lightning
•
Name:
Date:
WORKSHEET
UNIT 3
1. Open the document "Freedom.doc" on your data disk.
2. Do a full screen check of the document, and correct the spelling errors. Press
Alt/Right arrow on the numeric key pad. To review screen, press Alt3Page
down.
3. Use word attack skills and visual clues to find the proper word, when you
receive the message "Press F2 for ... ."
4. Use the thesaurus to replace the words that are followed by an asterisk.
5. Close your document, print a copy and turn it in to your instructor.
•
Turbo Lightning
Page 3-13
•
NOTES:
•
Page 3-14
Turbo Lightning
•
UNIT 4
Turbo Lightning
Major Content: How to add words to the Turbo Lightning dictionary; review
previously learned concepts of Turbo Lightning by student-completion of quiz.
Materials and Software: Word processor and Turbo Lightning; student data disk;
the files "Light.doc" and "Salt.doc" copied to all student disks.
Objectives:
1. To teach student how to customize Turbo Lightning dictionary to meet his/her
own specialized needs.
2. To have students demonstrate personal proficiency in independent use of Turbo
Lightning by completing a quiz.
Instructional Activity:
1. Discuss the following:
a. The need for specialized words in everyday writing: e.g., for a science
course, for a history course.
•
b. The ausidic file in Turbo Lightning which is designed to hold userspecified words.
c. The fact that the user must be certain that words to be added to the
dictionary are spelled correctly.
2. Have students open a file named "Custom.doc" and type in a technical word or a
historical name to add to the dictionary.
3. Instruct the student to press the Minus key (the check word command) and
choose option G: add word to auxiliary dictionary. The word the cursor is on
will automatically be added to the dictionary.
4. Have students add four more words to the dictionary and then close the file.
5. Quiz:
Assess students' understanding and use of the Turbo Lightning dictionary and
thesaurus functions by having students open the file "Salt.doc" and follow the
instructions contained in that files.
6. Have students print and turn in the files "Custom.doc" and "Salt.doc."
•
Turbo Lightning
Page 3-15
Expected Outcome
Students will be able to customize Turbo Lightning to meet their
particular text needs by adding words to its dictionary file auxi.dic.
Successful completion of the activities contained in the "light.doc" by
a student will indicate independent mastery and use of Turbo
Lightning in the context of the word processor used by the student.
•
•
Page 3-16
Turbo Lightning
•
Vista
Adaptive Computer Technologies
Developed By
Dee Konczal, Specialist, Ventura College
•
•
•
•
ASSESSMENT GUIDE AND LESSON PLANS FOR VISTA
This instructional guide is divided into two modules: assessment procedures and
lesson plans. The assessment module provides a basic guide to determining the
correct configuration of Vista for a particular student as well as other factors which
may have impact on the student's visual environment. The lesson plans are
intended to provide a concise series of exercises for familiarizing the low-vision
student with the essential aspects of operating the Vista large print display system.
Using these assessment and lesson guidelines, it should be possible for the majority
of low-vision students to become skilled users of the Vista system in six to eight
hours. The lessons address all of the more commonly used Vista options.
Additional information concerning the less frequently used features of Vista may be
found in the program documentation which accompanies the Vista product.
The instructor may wish to consider producing the student work-sheets in large
print type to facilitate student access.
•
•
•
•
•
ADAPTED COMPUTER TECHNOLOGY LESSON PLANS
For Large Print Screen Display
•
ASSESSMENT COMPONENT
Major Content: The purpose of this session is to obtain information from the
student regarding the nature of the individual's low vision disability. The
instructor will observe the functional limitations imposed by the disability and
determine ways in which these functional limitations can be compensated for when
using Vista.
Objective: Assessment of low vision-related needs for Vista use.
Materials:, A Vista station set up with a MindReader file open.
Assessment: Intake information.
Before a student starts with Vista, the instructor should know the following:
1. The nature of the vision impairment and its functional limitations.
•
(The student may have been evaluated by a low vision eye specialist. If so, a
copy of this report will be useful).
For example, the student's visual loss may be due to diabetes, may fluctuate in
severity, and may be progressive. If a student describes his or her visual
disability as progressive, it may be appropriate for the student to learn to use a
screen reading system as well as low vision technology.
2. The size of magnification used by the student at 18 inches.
Load Vista and MindReader.
In normal computer use, 18 inches represents the usual distance between eyes
and monitor. Show the student varying sizes of text magnification from a
distance of 18 inches. Inability to see print at any level of magnification from
18 inches would indicate that the monitor position may have to be modified or
alternative text reading systems considered.
•
Vista
Page 4-1
3. What colors are best distinguished by the student.
Configure a version of the student's word processor with the favored foreground
color and background color. If the student is not certain of "best" color, it may
be necessary to perform a screen color evaluation (see attached).
•
4. Lighting considerations.
(ELIMINATE ALL POSSIBLE GLARE is a standard principle to apply for all
students working in a High Tech Center.)
As a rule, any glare is poorly tolerated by low vision students. Some students
may benefit from bright lighting (make sure there is no glare), while other
students may not be able to tolerate bright lighting and will benefit from low
level lighting and perhaps even working with contrast reduced on the monitor.
It is important that the High Tech Center computers used by low vision
students be placed in the most glare-free areas of the Center.
5. Is the student wearing bifocals.
If so, experiment with the height of the monitor and angle of vision. The
student may benefit from being fitted for glasses designed especially for
computer use.
Page 4-2
Vista
•
•
ASSESSMENT FOR SCREEN COLOR PREFERENCE
Major Content: Screen Color Evaluation.
Objective: To select most suitable screen foreground and background colors for low
vision users.
Materials: Set up a computer station with MindReader and Vista in use; a file
containing a short paragraph of text is also needed.
Instructional Activity:
A simple way to perform this evaluation is (1) use the Define User Colors option
under the MindReader Setup Menu; (2) select the most favored colors for screen
background, foreground text and menu text; (3) configure the word processing
program the student will be using to these colors. Step-by-step instructions for
screen color evaluation using MindReader follow.
1. Open an existing file in MindReader which contains a short paragraph of text
unfamiliar to the student. In this way the student's ability to understand what
he sees is not affected by knowledge of the content.
The instructor performs the following:
2. Open Setup Menu.
Access the MindReader Setup Menu by pressing Alt S. Choose the Define User
Colors option. From that sub-menu, select the Screen Normal selection. The
color selection window will then appear.
3. Select screen color and contrasting text using student's preferred magnification
setting.
At this juncture, have the students zoom the text to his/her magnification level.
Using the mouse, place the viewing window on the color selection window and
have the student select color combinations which are seen clearly.
It is important to have the text sample on the screen at the magnification level
used
by the student because some color and contrast effects are different at high
g
manification than at low magnification.
Eight screen background colors are available; they are accessed by vertical
arrow movement. Each of these screen backgrounds has sixteen text foreground
color options; these are accessed by horizontal arrow key movement.
Vista
Page 4-3
4. Select a trial set of colors.
When the highlighted square brackets are resting on a favorable color option,
press the Enter key.
At that time, the screen and existing text convert to the colors just selected but
the color selection window does not leave the screen. If the colors are not right,
a new option may be selected instantly.
5. Select an alternate set of colors.
Proceed until the student is satisfied with two options; toggle between them
both until the student decides which of the two is best. Selecting an alternate
foreground text color will suggest a possible color for menu text or special effects
text.
6. Make a note of these selections and configure a version of the student's word
processing program with these color combinations.
Expected Outcome:
At the conclusion of this activity, the instructor will have selected
two sets of colors (foreground and background) which are best
perceived by the student. The instructor is now able to configure a
version of the student's word processing program to fit this color
preference. The secondary set of favored colors may be used as
special effects text highlighters if the wordprocessing program
employs such a system with onscreen text display.
Page 4-4
Vista
•
ADAPTED COMPUTER TECHNOLOGY LESSON PLAN: VISTA
For Large Print Screen Display
•
INSTRUCTIONAL COMPONENT
UNIT 1--Screen Orientation •
Major Content: Familiarizing the student with the Vista mouse and techniques for
exploring full screen display.
•
Objectives: Orient student to the WordStar Opening Menu screen display by
demonstrating and instructing the student in the basic patterns of mouse
movements necessary to explore the entire screen display.
Materials and Software: Load Vista and have ready a screen display of the
WordStar Opening Menu at default magnification (3X). Provide an enlarged copy of
the screen contents (this can be made using nice print and 11" x 14" printer paper
or by using the PrintScreen key to send a facsimile of the screen contents to the
printer and then enlarging this output through xeroxing).
•
Instructional Activity:
Demonstrate moving the mouse horizontally and vertically to view all portions of
the screen. Lead the student through the following activity.
1. Tell the student to think of the screen as being divided into two equal viewing
segments.
The top viewing segment can be seen by moving the mouse horizontally from
left to right.
The bottom viewing segment can be seen by moving the viewing window down
approximately 12 lines and moving the mouse from right to left.
2. At this point, the student should use the paper copy of the screen. With a bold,
contrasting pen, have the student mark lines to indicate the screen segments
created by horizontal mouse passes.
3. Have the student locate signal "landmarks":
a. Function key helps across the bottom
b. Menu name
c. Blinking cursor at far right
4. Explain that as text size magnification is increased, more mouse passes will be
required in order to view all the screen.
Vista
Page 4-5
Expected Outcome:
Through the modeling of instructor actions, the student will
demonstrate the ability to view the entire screen by moving the
mouse in a systematic fashion. This activity will generate in the
student an understanding of how to explore the content of any
screen display.
•
•
•
Page 4-6
Vista
•
Major content: Adjusting and selecting text size.
Objectives: To teach the student how to use the middle mouse button to expand or
contract text size, return Vista to default magnification level, and create the size of
text most clearly seen by the student.
Materials and software: The student will view a WordStar screen with the
following content: WordStar Main Menu (created by using Help Level 3) and a
paragraph of interesting text.
Instructional Activity:
1. Have the student depress and hold down the middle mouse button while moving
the mouse down and to the right at a 45 degree angle until the text has reached
its maximum size. Release the button.
2. Reverse the process: again have the student depress and hold down the middle
mouse button while moving the mouse up and to the left at a 45 degree angle.
The text will return to standard, unmagnified size. Release the button.
3. At this point, have the student click the middle button once to return the text to
Vista default enlargement (3X). Suggest that this setting should be used as a
base for full screen exploration.
4. With the text at default enlargement, have the student depress and hold down
the middle button and move the mouse directly to the right; the student will see
the text become wider. Have the student return text to default enlargement.
5. With the text at default enlargement, have the student depress and hold down
the middle button and move the mouse straight down; the student will see the
text become taller. Have the student return the text to default magnification.
6. Explain to the student that moving the mouse in a 45 degree angle creates truly
proportional text. Mouse movement with a greater vertical axis will produce
text with a "tall" quality; mouse movement with a stronger horizontal axis will
result in text with a "wide" quality.
7. Have the student explore available text size and select the size most easily read.
NOTE: Some students will select a proportional size, but others may best
perceive skinny text or fat text. If selected text is so large that only three or
four letters appear on the screen, suggest that the student consider using a
screen reading system instead of (or in addition to) Vista for more rapid,
efficient computer use.
Vista
Page 4-7
Some low vision students may benefit from a dual approach to computer use: a
visually-based system for text production, and an auditory-based system for text
editing.
The goal is to develop a method of computer use which allows students to work
at a rate no different from the norm.
8. Have students practice returning text to standard size, to the Vista default size,
and then to his/her preferred size.
Expected Outcome:
The student will be able to create the complete range of text sizes
available in Vista and will be able to use the Vista mouse to set the
size of text most appropriate for his/her use. The student will
understand that returning the magnification to default size creates
a screen display easily explored by the Vista mouse.
Page 4-8
Vista
•
•
Major content: Using the Locator Window.
Objective: To teach the student how to use the left mouse button to view the
highlighted window marking the area of the full screen currently magnified by
Vista.
Materials and software: Identical to those used in Unit 2.
Instructional Activity:
The "locator window" is a highlighted area on the full screen display which appears
when the left mouse button is pressed. The window indicates what area of the full
screen currently is magnified by Vista. It is possible to selectively choose an area of
the full screen to view at magnification by moving the mouse (while the left button
is depressed), placing the locator window on that portion of the screen to be
magnified and releasing the left mouse button.
Lead the student through the following exercise.
1. Have the student depress the left mouse button. This reveals the "locator
window."
2. Have the student distinguish the white box by tracing it with his index finger.
3. Experiment with moving the mouse to the right with the button depressed.
Scan from top left to right and then right to left across the bottom of the text.
Note that the window follows the motion of the mouse.
Have the student enlarge the magnification and note that the locator window
changes size. The higher the magnification, the smaller the locator window will
be.
5. The student will not be able to read the small print within the locator window
but will be able to identify its position on the full screen display.
6. Have the student open a file titled "vista" and write the day's
lessons/instructions.
Expected Outcome:
The student will be able to utilize the locator window function to
locate a section of the full screen to be magnified. Conversely, the
student can determine the location of the currently magnified view
by using the left mouse button to see what portion of the full screen
is magnified. The student will learn to use the locator window in a
"go to' mode or a "determine present location" mode.
•
Vista
Page 4-9
•
NOTES:
Page 4-10
Vista
•
UNIT 4
Major content: The cursor track function in Vista.
Objective: The student is to become familiar with the ways in which Vista monitors
the application's cursor position and how to turn off the cursor track function within
Vista.
Materials and software: Identical to those used in Unit 2.
Instructional Activity:
Discuss the fact that Vista ordinarily tracks cursor movement and that the
magnified window is that portion of the screen where the cursor is presently
located. Demonstrate that within this magnified area, the cursor is usually located
exactly in the middle of the viewing area (the middle of the screen) so that the
cursor is always easy to find.
Explain that for almost all software programs, the cursor track function is desired,
but for some it is not. For this reason, the cursor track function in Vista may be
turned on or off. Demonstrate that the cursor track function can be turned off or on
(toggled) by simultaneously pressing the middle and right buttons. The flicker
which occurs on screen indicates that the toggle has changed status.
•
1. Have the student discover that the cursor stays close to the center of the screen
by observing cursor position as s/he:
a. moves the cursor through prepared text;
b. creates text.
2. As the student performs the activities above, s/he should alternate between the
magnified view (the Zoom view) and viewing the locator window to see that the
cursor stays close to the center of the screen as the text moves.
3. Explain that with the cursor track toggle off, the Vista magnification display is
determined by mouse movement. Programs which do not use the normal DOS
cursor, i.e., 11ficrosoft Word and Lotus 123, do not support automatic cursor
tracking. The location of the cursor must be manually tracked by using the
mouse to move the viewing window to the active cursor position.
Expected Outcome:
At the completion of this fourth activity unit, the student is
demonstrating proficiency in performing almost all basic Vista
functions and an understanding of how and when to employ these
functions.
•
Vista
Page 4-11
NOTES:
Page 4-12
Vista
•
UNIT 5
Major Content: Invoking single line display; editing in the scroll mode; resetting
Vista.
Objective: The student is to learn how to invoke single line display, scroll mode,
and the Vista reset command. The student will understand the functional
applications (for low vision students or learning disabled students with visual
perceptual difficulties) of single line display and scroll mode.
Materials and software: The same as in Unit 2.
Instructional Activity:
It is possible for Vista to display only one line of magnified text. This is useful for
editing purposes, or for text production purposes, if it is difficult for a low vision
student or learning disabled student to track a single line of text within other lines
of text. Lead student through the following activity.
1. Place cursor on the first line of the text in file. Have the student simultaneously
depress the left and middle buttons. The screen display changes to show only
one line of text. Have the student use the Right Arrow key to move the cursor
through the text noting that the cursor stays in the middle of the screen while
the text passes by.
2. Have the student move the cursor to the end of the file and begin writing. The
student will see only one line of text; the cursor remains centered on the screen
as the text is produced.
Have the student explore single line scroll mode for editing purposes. Explain that
it is possible to edit a whole document (a line at a time) when using the scroll mode.
1. Return the cursor to the top of the file while in single line display. Have the
student depress and hold down the right mouse button while slowly moving the
mouse to the right. The text on the screen will gradually begin scrolling to the
left.
p
2. Instruct the student not to release the mouse button while ex erimenting with
increasing or decreasing the speed of the horizontal scroll. When an
appropriate rate is set, have the student release the right mouse button and
watch the text continue to scroll.
3. Lead the student through activities which will demonstrate the following:
a. When text is scrolling, clicking the left mouse button moves quickly
back up through the text; clicking the right mouse button moves
quickly down through the text.
b. When text is scrolling, holding down the middle mouse button
temporarily freezes scrolling.
c. Clicking the left and middle buttons simultaneously stops scroll mode.
d. Restart the scroll mode by clicking the right button.
e. Reset the scroll rate by depressing the right button and not releasing it
until proper mouse movement has altered the speed of scrolling.
f. Exit scroll and return to Zoom magnification state by simultaneously
depressing left and middle button once to stop scrolling and again to
exit single line display mode.
Demonstrate that pressing down all three mouse buttons simultaneously and
holding
g them down until a series of beeps are heard will reset Vista to default
manification and start-up values (no scroll rate, cursor track on, etc.)
Expected Outcome:
The student will demonstrate the ability to manipulate the Vista
mouse in order to invoke single line display mode, scrolling mode,
and also demonstrate the ability to exit these modes. Additionally
the student will understand the ways in which these modes will
facilitate text production or text editing tasks.
Overall Instructional Unit Outcome:
A student who has completed these instructional units is now able to use an adaptive technology
which creates large text output for the screen. The student knows how to adjust the text to suit
his or her own visual needs and utilize the options available within Vista to achieve effective
software use.
Page 4-14
Vista
•
VISTA QUIZ
A Performance-Based Evaluation
A performance-based quiz is the most efficient means of evaluating a student's
proficiency with Vista.
Materials: A Vista station open to a WordStar file with text.
Successful completion of the following tasks is expected.
1. Vocabulary quiz.
Define:
Locator window
Default magnification
Mouse
2. Demonstrate how to enlarge and decrease text size.
3. Return text to 80 column display size and then set default magnification.
4. Demonstrate and describe the two basic uses of the Locator Window.
5. Demonstrate the Cursor Track toggle and describe the difference between using
Vista with Cursor Track on and Cursor Track off.
6. Working with a prepared text file, the student is to demonstrate the ability to:
a. set single line display
b. set scroll rate
c. stop scroll rate
d. re-start scroll rate
e. re-set scroll rate
f. return to full-screen display from scroll state
g. quickly move up and down through text while scrolling
h. re-set everything (the big UNDO)
Vista
Page 4-15
Expected Outcome:
A student who successfully completes the above activities
demonstrates the ability to perform all basic adaptive strategies
provided by Vista. The student now has large print access to any
software program compatible with Vista.
Page 4-16
Vista
•
VISTA REFERENCE GUIDE
MAKE TEXT BIGGER
MARE TEXT SMALLER
MOVE VIEWING WINDOW
Nh
OVER-VIEW MODE
SINGLE LINE DISPLAY
CANCEL SINGLE LINE DISPLAY
Vista
VISTA SCROLLING COMMANDS
SET VERTICAL SCROLL RATE
SET HORIZONTAL SCROLL RATE
VISTA RESET
(ENTER
SCROLLING
MODE)
LINE UP
LINE DOWN
EXIT SCROLLING
Vista
I t.
•
Vista
Page 4-17
•
Word Star
Adaptive Computer Technologies
•
Developed By:
Don Dutton, Specialist, Rancho Santiago College
•
•
The High Tech Center for the Disabled
of the
California Community
Colleges
Chancellor's Office
CONTENT-SPECIFIC LESSON PLANS FOR COMPUTER ACCESS I
WordStar Version
Lesson plans for the Computer Access I class are different from a general word
processing class because the major focus of a Computer Access I class is to provide a
functional environment in which students can learn the adapted computer access
application required by their disability. Word processing has been selected as the
environment in which these skills can be taught. Students are accomplishing
several things at one time as they develop computer skills: the instructional
context, word processing, fosters increased use of written language and possible
i mprovement of writing skills; students are indirectly learning to become better
communicators; and the majority of students are learning an industry-standard
word processor which can provide access to the vocational world.
These lesson plans reflect a combination of fixed text entry tasks and open ended
writing tasks.
About Adapted Technologies
Students whose disability(ies) require extensive evaluation and training in
computer access technologies should be enrolled in Computer Access Evaluation
prior to enrollment in this class.
All other students will receive a brief introduction to their specific adapted
computer technology during the first four weeks of Computer Access I. This
introduction will occur within the context of learning word processing.
•
•
•
•
Week 1
DAY 1
Major Content: Introduction and Access Considerations
Objectives: Introduce students to the High Tech Center. Set climate for the
semester. Determine access technology needs (locking special keys, large print
display, speech output, ect.) to have ready for each student by the next class.
Materials: Course schedule to be handed out.
Lecture:
1. Introduction to High Tech Center procedures, sign-up procedures for lab time
and attendance policies.
2. Make absolutely clear that strict attendance policies and assignment deadlines
will be adhered to.
3. Announcement of required textbook and purchase of two blank disks.
4. Ask to meet briefly with each student to discuss probable access technology
needs.
5. Refer students with extensive access technology needs to the Computer Access
Evaluation Class for assessment and introduction to the technologies.
Expected Outcome:
The purpose of this class is to obtain access needs information from
each student who has not previously enrolled in a High Tech Center
class. In this way the instructor will have ready by the next class
period the appropriate batch files and disks for students requiring
keyboard or screen access technologies.
•
WordStar
Page 5-1
•
NOTES:
•
Page 5-2
WordStar
•
Weekly Lab Assignment; Week 1
COMPUTER ACCESS I
LAB ASSIGNMENT #1
All students are to sign up to meet briefly with the instructor prior to the next class
in order to discuss the need for specific access technology assistance.
Students needing an extensive array of access technologies are expected to have
been assessed in the Access Evaluation Class.
Students needing a wide range of access technologies who have not been assessed
are to enroll in the Computer Access Evaluation class rather Computer Access 1.
WordStar
Page 5-3
•
NOTES:
•
Page 5-4
WordStar
•
Week 1
DAY 2
Main Content: Introduction to WordStar
Objectives: Introduce students to word processing in general, and WordStar
specifically. The instructor will evaluate each student to determine that basic
access needs have been met prior to beginning these basic tasks. (Students with
moderate orthopedic disabilities will have undergone prior assessment in Computer
Access Evaluation class.)
Materials and Software: WordStar; a set of hand-out sheets containing a brief
overview of WordStar commands; students exchange new unformatted disk for
formatted disk provided by instructor. Handout #1 containing written instructions
for initial assignment.
Lecture:
1. Present brief overview of word processing.
2. Familiarize students with computer station and keyboard.
•
3. Instruct students in basic start-up procedures, opening files, cursor movement,
simple text production, word-wrap, saving files, and printing files.
Class Activity:
Have students write about what they had to eat for supper last night. Instruct the
students not to worry about any mistakes. The purpose of this assignment is to
familiarize students with using the keyboard.
IMPORTANT:
Many students enrolled in this class will not be regular users of written language:
either it is physically difficult for them to produce written language or, for learning
disabled students, using written language is not a positive experience because
spelling problems or vocabulary problems limit their ability to say what they mean.
Using an open-ended assignment such as the one above is productive because
students can use their own words to write on a topic which is familiar to them.
The intent of this assignment is for students to focus on the process of word
processing (in this case, keyboard entry and arrow key movement). Content is
secondary and within the student's own experience.
•
WordStar
Page 5-5
An environment which fosters independent use of written language is created by
utilizing writing assignments which draw on the content of a student's own
experience. Students who, because of disability, have been denied effective use of
written language appear to benefit greatly from self-generated text production
rather than from fixed text entry tasks.
Although self-generated and fixed text entry tasks are included in this model, keep
in mind the potential for facilitating effective use of written language by using
appropriate assignments requiring student-generated text.
As students work on the computer, the instructor should use this time to observe
and evaluate the effectiveness and appropriateness of the adapted technologies for
students with low vision or orthopedic impairments.
Expected Outcome:
At the conclusion of this assignment the student will demonstrate
the ability to start the word processor, open a document file, use
arrow keys to move the cursor, save a document and print a
document. Successful use of the computer by the student will
demonstrate the appropriateness of the prescriptive access
technology/ies.
At the conclusion of this activity, the instructor will have further
evaluated the appropriateness of selected adapted technologies used
by students.
Weekly Lab Assignment:
Continuation of classroom activity. The instructor will use this time to work with
those students needing further refinement of or instruction in their access
technology.
Page 5-6
WordStar
•
•
COMPUTER ACCESS I
WORDSTAR HANDOUT #1, - INTRODUCTION TO WORD PROCESSING
GENERAL FEATURES OF WORD PROCESSORS
1. A word processor is a program that turns your PC into a SUPER
TYPEWRITER.
2. You can view a document (sometimes called file) on your PC's display before
printing it out. If you don't like what you see, you can change margins, line
spacing, rearrange paragraphs, correct misspelled words, etc., and immediately
see the change on the screen.
GETTING TO KNOW WORDSTAR
The following is a summary of some Wordstar commands. The "A" symbol before a
letter represents the Control key and means that theAControl key is to be pressed and
held down as the next key is pressed. For example, P means that you are to press
the Control key then the letter P while still holding down the Control key. If this
symbol does not appear before the letter then that letter is pressed alone. The
commands are categorized by their usage.
OPENING MENU COMMANDS
110
PRELIMINARY COMMANDS
L .................. Changes logged disk drive
F .................. Turns file directory on/off
Use to set HELP level to display menus
H
COMMANDS TO OPEN A FILE
D
N
Opens a Document file
Opens a Non-Document file
FILE COMMANDS
E
O
P
Renames a file
Copies a file
Prints a file
•
WordStar
Page 5-7
•
MAIN MENU COMMANDS
CURSOR MOVEMENT
As ................ Moves one character left
AD ................ Moves one character right
AA ................ Moves one word left
AF ................ Moves one word right
DELETING
AG ................ Deletes the character at the cursor and one to the right
DEL ............ Deletes one character to the left of the cursor
AT ................ Deletes one word to the right of the cursor
Ay ................. Deletes an entire line
Initial use: Week 1, Day 2
•
Page 5-8
WordStar
•
Wrals.2
DAY 1
Main Content: Introduction to Turbo Lightning
Objectives: Review basics of last lecture (opening a file, etc.); introduce on-line
function of Turbo Lightning as a spell check program and as a thesaurus. Students
will generate original text.
Materials and Software: WordStar, Turbo Lightning configured for WordStar and
having the following HotKey command set.
Main Menu
Last bad word
Check word
Full screen check
Review Screen
Thesaurus
Toggle AutoProof
Alt Home
Alt UpArrow
Minus (-) on Numeric Keypad
Alt RightArrow
Alt PgDn
Asterisk (*) on Numeric Keypad
Alt DownArrow
LECTURE:
1. Load Turbo Lightning and WordStar.
2. Lead students through review of all basic WordStar processes (opening a
document, saving a document, cursor movement).
3. Introduce Turbo Lightning and its on-line mode of operation using the Minus
key only.
4. Open a file and dictate the following words letter by letter: hause, shurt,
autamobile, clere, condaminium, stike. Have students rotely enter each of the
letters dictated. Instruct students when to press the space bar.
After, each beep, instruct students to press the Minus key on the numeric
keypad to access the dictionary. Demonstrate that selection of the correct word
may be made by moving the highlight bar and pressing Enter or simply by
entering the letter in front of the choice.
Class Activity:
Students are to write about a favorite person, place or thing. Instruct students to
use the Minus key each time they hear a beep. Students are to replace three words
by using the thesaurus. Have the student list the three words which were
originally in the text. Print the file and underline the words which are
replacements.
•
WordStar
Page 5-9
•
Lab Assignment: Lab Assignment #2
Expected Outcome:
Students will develop basic competencies in the fundamentals of
word processing and use of an on-line speller and thesaurus.
•
Page 5-10
WordStar
•
Weekly Lab Assignment: Week 2
COMPUTER ACCESS I
LAB ASSIGNMENT #2 - USING THE ON-LINE SPELL CHECKER
COMPLETE THE FOLLOWING EXERCISE IN THE ORDER PRESENTED.
STEP 1- OPEN A FILE CALLED "WORDS."
STEP 2 - TYPE THE FOLLOWING MISSPELLED WORDS, AND LISTEN FOR
THE BEEP AS YOU TYPE. WHEN YOU HEAR THE BEEP, PRESS
THE MINUS KEY TO BRING UP THE TURBO LIGHTNING WORD
SUGGESTION WINDOW. SELECT THE CORRECT WORD BY
PRESSING THE DOWN ARROW KEY TO HIGHLIGHT THE DESIRED
WORD AND PRESS ENTER.
Misspelled words:
diferent
importent
tomarro
messinger
Feberary
Wendsday
dependible
STEP 3 - SAVE THE FILE AND PRINT IT.
STEP 4 - NOW PRINT THE FILE "MALCOLM.DOC" WHICH IS ON YOUR DATA
DISK. SAVE THE COPY FOR USE WITH STEP 6.
STEP 5 - OPEN THE DOCUMENT "MALCOLM.DOC" WHICH IS ON YOUR
DATA DISK. DO THE FOLLOWING FOR EACH WORD WHICH IS
FOLLOWED BY AN ASTERISK (*):
PLACE THE CURSOR UNDER THE WORD AND PRESS THE
ASTERISK KEY TO ACCESS THE THESAURUS. SELECT A
REPLACEMENT WORD.
STEP 6 - SAVE "MALCOLM.DOC" AND PRINT IT. UNDERLINE THE
REPLACEMENT WORDS. USE THE FIRST PRINTOUT OF THE FILE,
IF YOU NEED A REMINDER ABOUT WHICH WORDS YOU
REPLACED.
STEP 7 - TURN IN A COPY OF THE PRINTED FILES TO YOUR INSTRUCTOR.
WordStar
Page 5-11
NOTES:
Page 5-12
WordStar
•
Week 2
DAY 2
Major Content: Inserting, Deleting Text; Full Screen Spell Check
Objectives: Review startup basics, use of Control key, cursor movement, saving and
printing files; introduce deleting and inserting text; introduce full screen spell check
option provided by Turbo Lightning (Alt Right Arrow).
Materials: Students print a copy of file created in last class. This is used in class
activity. Class Assignment #2 for Week 2, Day 2.
Lecture:
1. Discuss word processing and the benefits of easy text insertion and deletion.
This ability to easily modify text is one of the hallmarks of word processing.
2. Discuss the full screen spell check function (Alt Right Arrow) after exercises for
insertion and deletion.
Class Activity:
The following is intended to be an orally presented lecture/group activity. Attached
class Assignment #2 is a printed copy of these sequenced activities.
•
1. Review startup basics by leading students through printing a copy of the file
created in the last class. Put aside for later use.
2. Introduce use of the commands for deleting a letter, word and line. Have
students open up the file which they have just printed. Have students practice
these commands. Print a copy of this file.
3. Introduce use of insert function in word processing. Students are to re-open the
file which they have just printed and, referring to original print of this file,
enter the missing text.
4. Introduce the full screen spell check function of Turbo Lighting. Have the
students check this document for misspellings.
Expected Outcome:
Students will demonstrate the ability to effectively use a word
processor for printing and editing. Additionally, students will be
capable of performing a full screen spell check.
By the end of the 2nd week of instruction, it is expected that all
students will be working with access technologies most appropriate
to their needs. The instructor should check to make sure that this is
BO.
WordStar
Page 5-13
NOTES:
Page 5-14
WordStar
•
COMPUTER ACCESS I
GETTING TO KNOW WORDSTAR
WORDSTAR HANDOUT #2 - ADDITIONAL OPENING MENU COMMANDS
The following is a summary of some Wordstar commands. The "A" symbol before a
letter represents the Control key and means that the Control key is to be pressed and
held down as the next key is pressed. For example, AP means that you are to press
the Control key then the letter P while still holding down the Control key. If this
symbol does not appear before the letter then that letter is pressed alone. The
commands are categorized by their usage.
OPENING MENU COMMANDS
ACCESS OTHER MENUS
AK .....................
Accesses Block Menu
Accesses Quick Menu
Accesses Onscreen Menu
AO .................
Ap...
. . . . Accesses Print Menu
Aj
. . . . Accesses Help Menu
AQ .................
•
•
•
• • •
Initial use: Week 2, Day 2
WordStar
Page 5-15
NOTES:
Page 5-16
WordStar
COMPUTER ACCESS I
CLASS ASSIGNMENT #2 FOR WEEK 1 DAY 2
STARTING THE WORD PROCESSOR; DELETE, INSERT, AND SPELL
CHECKING.
COMPLETE THE FOLLOWING EXERCISE IN THE ORDER PRESENTED.
STEP 1- PLACE YOUR DISK LABELED "WORDSTAR DISK 1" INTO DRIVE A:
STEP 2 - PLACE YOUR DISK LABELED "WORDSTAR DISK 2" INTO DRIVE B:
STEP 3 - REBOOT YOUR DISK BY PRESSING CTRL + ALT + DEL.
STEP 4 - YOU SHOULD NOW BE AT THE OPENING MENU OF WORDSTAR.
PRESS "D" TO OPEN A DOCUMENT FILE.
STEP 5 - TYPE YOUR NAME WHEN IT ASKS "NAME OF FILE TO EDIT?"
STEP 6 - PRACTICE DELETING CHARACTERS, WORDS, AND LINES. (REFER
TO YOUR WORDSTAR COMMAND SUMMARY FOR A LIST OF
THESE FUNCTIONS.)
STEP 7 - PRACTICE INSERTING CHARACTERS, WORDS, AND LINES THAT
YOU DELETED USING THE "INSert" KEY.
STEP 8 - USE THE SPELL CHECKER TO IDENTIFY ANY MISSPELLED
WORDS. CORRECT THEM AS NECESSARY.
STEP 9 - SAVE THIS DOCUMENT USING THE FUNCTION KEY 2 (F2).
STEP 10 -PRINT OUT THE DOCUMENT AND HAND IT IN TO THE
INSTRUCTOR WHEN YOU ARE FINISHED.
NOTE: The preceeding steps assume a 2-floppy disk drive system. These
exercises may need to be modified when used with hard drive systems
having only one floppy drive.
WordStar
Page 5-17
•
NOTES:
•
Page 5-18
WordStar
Week 3
DAY 1
Major Content: Types of Save Commands
Objectives: Introduce the concepts of "save and continue" and "cancel;" review basic
Turbo Lightning concepts.
Materials and Software: WordStar, Turbo Lightning and Class Assignment #3
which contains instructions for class activity.
Lecture:
1. Discuss the concept of saving information to disk.
2. Discuss need for saving work in progress.
3. Discuss need for canceling a file.
4. Discuss quiz to be completed in class next session.
Class Activity:
•
Students will work independently following the written instructions contained in
Class Assignment #3.
Expected Outcome:
Students will understand the effect of canceling
a file; students will
deduce the advantages of canceling a file. Students will have
compared the effects of saving and continuing, saving and exiting a
file and canceling a file and will be expected to employ those three
types of actions appropriately in future assignments.
Lab Assignment: Lab Assignment #3.
Expected Outcome:
After completing this written lab assignment, students will have
correctly used at least two different types of save functions.
•
WordStar
Page 5-19
NOTES:
Page 5-20
WordStar
•
COMPUTER ACCESS I
CLASS ASSIGNMENT #3, FOR WEEK 3, DAY 1
STARTING THE WORD PROCESSOR; SAVE AND CONTINUE, CANCEL FILE.
COMPLETE THE FOLLOWING EXERCISE IN THE ORDER PRESENTED.
STEP 1- PLACE YOUR DISK LABELED "WORDSTAR DISK 1" INTO DRIVE A:
STEP 2 - PLACE YOUR DISK LABELED "WORDSTAR DISK 2" INTO DRIVE B:
STEP 3 - REBOOT YOUR DISK BY PRESSING CTRL + ALT + DEL.
STEP 4 - YOU SHOULD NOW BE AT THE OPENING MENU OF WORDSTAR.
PRESS "D" TO OPEN A DOCUMENT FILE.
STEP 5 - AT THE "NAME OF FILE TO EDIT?" PROMPT, TYPE YOUR FIRST
NAME.
STEP 6 - ADD THE FOLLOWING PARAGRAPH TO THIS FILE:
The Walker party had been observed by the Indians, but this intrusion did not
disturb them too greatly. In fact, all remained pretty much as before until 1848,
when an event occurred several hundred miles to the north that would have an
immediate effect not only on the Indians of the Yosemite area but on the entire
region, nation, and even the world. That gold that had eroded eons before from the
rocks of Yosemite and the central Sierra was discovered in a foothill stream.
STEP 7 - PRESS THE 'SAVECON' KEY (Fl OR ^KS) AND CONTINUE TYPING
THE FOLLOWING PARAGRAPH.
Explorer Kit Carson soon traced the placer gold to its source and, in so doing,
discovered the first lode gold mine in Mariposa, on John Fremont's estate west of
Yosemite. Interest in this area picked up immediately, and prospectors swarmed
into the area all the next year, becoming well-known in history as the "49ers."
STEP 8 - PRESS (Fl OR ^KS) AGAIN TO SAVE THIS DOCUMENT.
STEP 9 - ERASE ALL LINES OF THIS DOCUMENT THEN PRESS (F3 OR ^KQ)
TO CANCEL. ANSWER "Y" TO THE QUESTION ASKED.
STEP 10 -OPEN THE DOCUMENT YOU JUST CANCELED.
STEP 11 -USE THE SPELL CHECKER TO IDENTIFY ANY MISSPELLED
WORDS. CORRECT THEM AS NECESSARY.
STEP 12 -PRESS (F2 OR ^KD) TO SAVE THIS DOCUMENT.
•
STEP 13 -PRINT OUT THE DOCUMENT AND HAND IT INTO THE
INSTRUCTOR WHEN YOU ARE FINISHED.
WordStar
Page 5-21
•
NOTES:
Page 5-22
WordStar
•
Weekly Lab Assignment: Week 3
COMPUTER ACCESS I
LAB ASSIGNMENT #3, - WRITING ASSIGNMENT
STEP 1- WR11E AN INFORMAL PERSONAL LETTER TO A FRIEND OR
FAMILY MEMBER.
STEP 2 - USE THE "SAVE AND CONTINUE" COMMAND KEY EVERY FIVE
MINUTES AS YOU WRITE YOUR LETTER.
STEP 3 - WHEN YOU ARE THROUGH, SAVE YOUR FILE WITH THE
"SAVE/DONE" COMMAND KEY.
STEP 4 - PRINT TWO COPIES OF YOUR FILE: ONE IS FOR YOU TO SEND;
ONE IS TO TURN IN TO YOUR INSTRUCTOR.
•
•
WordStar
Page 5-23
•
NOTES:
•
Page 5-24
WordStar
•
Week 3
Day 2
Major Content: Quiz #1
Objective: Assess effectiveness of access technologies used by students, computer
competencies of students, and students' basic knowledge of WordStar and Turbo
Lightning information presented to date.
Materials: Test file (WSQuiz#1) copied to student disk.
Lecture:
Administer test.
Class Activity:
Test taking. When student has completed the test, s/he will print the test and turn it
in to the instructor.
Expected Outcome:
Students will display beginning computer competency in the use of
adapted computer access technologies and word processing.
Students will demonstrate competency by completing a quiz on basic
aspects of word processing and spell checking which have been
included in class instruction up to this date.
Instructional Unit Outcome:
At the conclusion of this instructional unit, students will demonstrate effective use of access
technologies by successfully completing the following: boot the computer, open a document file,
work in the document file (creating, editing, inserting and deleting text) save and print the file.
Additionally, students will be able to use Turbo Lightning to correct misspelled words, access
the thesaurus and perform a full screen spell check.
•
WordStar
Page 5-25
•
NOTES:
•
•
Page 5-26
WordStar
•
Week 3
COMPUTER ACCESS I
QUIZ#1 - INTRODUCTION TO WORD PROCESSING QUIZ
NAME:
DATE:
CHOOSE THE BEST ANSWER TO THE FOLLOWING QUESTIONS:
1. WHICH OF THE FOLLOWING LETTERS WILL OPEN A DOCUMENT?
A. Z
B. U
C. Q
D. D
ANSWER
2. CHOOSE THE KEYS YOU WOULD USE TO MOVE THE CURSOR FORWARD
ONE WORD AT A TIME.
A. CTRL + R
B. CTRL + F
C. CTRL + Y
D. CTRL + A
ANSWER
3. CHOOSE THE KEYS YOU WOULD USE TO MOVE THE CURSOR
BACKWARD ONE WORD AT A TIME.
•
A. CTRL + T
B. CTRL + B
C. CTRL + A
D. CTRL + E
ANSWER
4. WHICH FUNCTION KEY WILL BRING YOU TO THE BEGINNING OF A
FILE?
A. F2
B. F8
C. F4
D. F9
ANSWER
5. WHICH FUNCTION KEY WILL BRING YOU TO THE END OF A FILE?
A. F3
B. F10
C. F9
D. Fl
ANSWER
6. WHAT KEY YOU WOULD USE TO PRINT A DOCUMENT?
ANSWER:
•
WordStar
Page 5-27
7. WHICH KEYS WILL ERASE CHARACTERS, WORDS, AND LINES FROM
YOUR DOCUMENT?
A.
B.
C.
D.
E.
CTRL + T
CTRL + G
CTRL + Y
DEL
ALL OF THE ABOVE
ANSWER
8. WHICH KEY WOULD YOU USE TO ADD A WORD OR A SENTENCE
WITHOUT DELETING OR RETYPING THE EXISTING TEXT?
A.
B.
C.
D.
HOME
INSERT
PGDN
DEL
ANSWER
9. CHOOSE THE FUNCTION KEY USED TO CANCEL A DOCUMENT.
A.
B.
C.
D.
F9
F4
F3
F2
ANSWER
10. WHICH KEY WILL MOVE THE CURSOR TO THE TOP OF THE SCREEN?
A.
B.
C.
D.
F9
HOME
END
F6
ANSWER
11. WHICH FUNCTION KEY OR KEYS WILL "SAVE" YOUR DOCUMENT TO
DISK?
A.
B.
C.
D.
F4
F2
Fl
F6
ANSWER
12. WHICH KEY WILL MOVE THE CURSOR TO THE BOTTOM OF THE
SCREEN?
A.
B.
C.
D.
F10
PGDN
END
INSERT
Page 5-28
ANSWER
WordStar
•
13A. USING YOUR SPELL CHECKER PROGRAM, PERFORM A FULL SCREEN
CHECK ON THE FOLLOWING PARAGRAPH AND CORRECT ANY
MISSPELLED WORDS.
B. USING YOUR THESAURUS, CHANGE ALL WORDS FOLLOWED BY THE
ASTERISK SYMBOL (*).
Snakes belong to a class* of animals called reptiles. Many snakes are
poiosnous, but most of the snakes in the United States are not.
Farmres find snakes useful beacuse they eat rats, mice, and insects.
Like all reptiles, snakes have scales. These are little plates of rough
skin that protcet the snake as it crawls over the rough ground*. Most
snakes have curued, sharp teeth that hook into their live prey.
Poisonous snakes have special teeth called fangs. People used to
beleive* that snakes could hyponotisze with their eyes. A snake does
staere at you, but only because* it has no 'eyelieds. Instead is has a
transparrent scale - like a windshield - over each* eye.
14. SAVE THIS DOCUMENT AND PRINT IT OUT. TURN IT IN TO THE
INSTRUCTOR.
•
For use with Week 3, Day 2
•
WordStar
Page 5-29
•
NOTES:
Page 5-30
WordStar
•
Week 4
DAY 1
Major Content: Brief review of Quiz #1; Onscreen Menu Commands; Margins, Tabs,
and. Line Spacing.
Objectives: Introduce the concepts of setting margins, tabs and line spacing.
Materials: Wordstar, Turbo Lightning. WordStar handout #3 explaining Onscreen
menu commands and Lab Assignment #4 which contains step-by-step instructionss.
Lecture:
1. Review (briefly) exam given last class.
2. Discussion of how to access the Onscreen menu from the Main menu
emphasizing the flexibility and power of the commands contained within this
menu .
a. Demonstrate setting of the left and right margin; explain that this can
be done
at any time during the typing of a document. Briefly discuss
the A B, paragraph reformat command and indicating it will be
discussed in depth at a later date.
b. Demonstrate how to clear and set tabs at desired points. Show
students "quick" tab setting (e.g. ^0I + Esc key) and "quick" tab clear
(e.g. ^ON + Esc key) at selected points.
c. Demonstrate how to set the line spacing; emphasize the flexibility of
setting line spacing at any time during the document.
Class Activity:
The following activity is to be presented in lecture format followed by
group/individual assignments.
1. Review startup basics by having students create a document. Have students
write for ten minutes on the following topic: the best thing that happened
yesterday.
2. Introduce the commands for setting the left and right margins. Have students
experiment with different margin settings. Demonstrate how margins can be
changed at any time during the word processing session to eliminate
unnecessary key strokes (e.g., no need to use tab key or space bar to realign text
with different margin settings).
3. Introduce the commands for setting line spacing. Have students produce text
using various line spacing settings. Explain that line spacing can be changed at
anytime during the word processing session.
•
WordStar
Page 5-31
4. Introduce the commands for setting and clearing tabs. Lead students through
the "quick" tab setting and clearing procedure. Explain the function of tabs (i.e.,
save keystrokes, use for aligning text, etc.).
Expected Outcome:
The student will be able to demonstrate how to effectively use the
commands for setting margins, line spacing, and tabs. Each student
will be able to recognize the important concepts of "text formatting"
(i.e., overall text organization) before and during the word
processing session.
Outside Reading:
Read Wordstar Handout # 3 explaining WordStar commands listed in the Onscreen
Menu.
Lab Assignment: Lab Assignment #4
Expected Outcome:
After completion of Lab Assignment #4, the student will have
successfully demonstrated how to "set up" and organize text on the
screen. This includes knowledge of commands to set margins, to
clear and set tabs, as well as to set line spacing.
Page 5-32
WordStar
•
•
COMPUTER ACCESS I
GETTING TO KNOW WORDSTAR
HANDOUT #3 - ONSCREEN MENU COMMANDS
The following is a summary of some Wordstar commands. The "A" symbol before a
letter represents the Control key and means that the Control key is to be pressed and
held down as the next key is pressed. For example, AP means that you are to press
the Control key then the letter P while still holding down the Control key. If this
symbol does not appear before the letter then that letter is pressed alone. The
commands are categorized by their usage.
ONSCREEN MENU COMMANDS
MARGINS AND TABS
A
O then...
L ................................. Sets left margin
R ................................. Sets right margin
................................... Sets tabs
N ....................................... Clears tab(s)
LINE FUNCTIONS
A
O then...
C ................................. Centers a line of text
S ................................... Sets line spacing
Initial use: Week 4, Day 1.
•
NOTES:
•
•
Page 5-34
WordStar
•
Weekly Lab Assignment: Week 4
COMPUTER ACCESS I
LAB ASSIGNMENT #4 - ONSCREEN MENU COMMANDS; MARGINS AND
TABS
COMPLETE THE FOLLOWING EXERCISE IN THE ORDER PRESENTED.
STEP 1- OPEN A DOCUMENT NAMED "LAB#4.TXT"
STEP 2 - SET THE MARGINS AS FOLLOWS: L=5 AND R=70
STEP 3 - CLEAR ALL TABS
STEP 4 - SET TWO TABS AS FOLLOWS: THE FIRST AT 20 AND THE SECOND
AT 40
STEP 5 - SET THE LINE SPACING TO DOUBLE SPACED
STEP 6 - TYPE THE FOLLOWING PARAGRAPH EXACTLY AS WRI TTEN:
(YOUR NAME) (TODAY'S DATE)
•
Margie had always hated school, but now she hated it more than ever. The
mechanical teacher in her school was large and ugly, and it had a big screen on
which all the lessons were shown and all the questions were asked. That wasn't so
bad. The part Margie hated most was the slot where she had to put in her
homework and test papers. She wrote them out in a punch code she had learned
when she was six years old. Then the mechanical teacher figured out her marks and
sent them right back. Her test scores were as follows:
MATH
ENGLISH
HISTORY
READING
GEOGRAPHY
75%
25%
99%
59%
34%
Margie concluded that she needed more time to study and less time playing video
games on her computer!
STEP 7 - SAVE THIS DOCUMENT
STEP 8 - PRINT OUT THE DOCUMENT AND TURN IT IN
•
WordStar
Page 5-35
NOTES:
Page 5-36
WordStar
Week 4
DAY 2
Major Content: Onscreen Menu Commands: Centering Text.
Objectives: Introduction to the commands for centering text.
Materials: WordStar, Turbo Lightning. Class Assignment #5 which contains stepby-step instructions.
Lecture:
1. Review procedure to access the Onscreen menu from the Main menu.
2. Review setting of margins, tabs, and line spacing.
3. Demonstrate how to center text anywhere in the text. Emphasize that text must
be typed first in order to center text.
Class Activity:
The following activity is to be presented in lecture format followed by
group/individual assignments.
•
1. Review startup basics by having students create a document entitled
"Class#5.Txt".
2. Review the commands for setting right and left margins as well as clearing and
setting tabs.
3. Introduce the commands for centering text. Explain and demonstrate that the
centering command only works after the text to be centered has been created.
Expected Outcome:
The student will be able to demonstrate how to effectively use the
commands to center text anywhere s/he desires. Each student will
be able to recognize the importance of this type of text formatting.
After completion of this activity, the student will understand how to
center text on the screen and reformat paragraphs according to new
margin settings. This includes commands to set margins, center
text, and reform paragraphs.
Outside Reading:
Read WordStar Handout #3 explaining the comniwnds listed in the Onscreen Menu.
•
WordStar
Page 5-37
NOTES:
Page 5-38
WordStar
•
COMPUTER ACCESS I
CLASS ASSIGNMENT #5 - ONSCREEN MENU COMMANDS; CENTERING
TEXT
COMPLETE THE FOLLOWING ASSIGNMENT EXACTLY AS WRITTEN.
STEP 1- CREATE A DOCUMENT CALLED "CLASS#5.TXT."
STEP 2 - SET THE LEFT MARGIN AT 15 AND THE RIGHT MARGIN AT 60
STEP 3 - CLEAR ALL TABS.
STEP 4 - SET ONE TAB AT COLUMN 20.
STEP 5 - TYPE THE FOLLOWING TEXT AS FOLLOWS:
THE OUT-OF-TOWNERS
by
(First Name Last Name)
(Today's Date)
for
Adapted Computer Instruction
Class Assignment #5
Out-of-towners are always saying that the people in New York City aren't
friendly. These out-of-towners can't believe that you can live in an apartment
building for years and not know the names of all your neighbors. But they don't
understand that New Yorkers are too busy minding their own business to pay
attention to anyone else.
I'm an insurance man, and I know that's true. In fact, I was in on a case where a
man got close to being convicted of murder just because everyone was minding his
own business.
STEP 6 - USE THE SPELL CHECKER TO CORRECT ALL MISSPELLED
WORDS.
STEP 7 - PRESS (F2 OR AKD) TO SAVE THIS DOCUMENT.
Use with Week 4, Day 2
WordStar
Page 5-39
•
NOTES:
Page 5-40
WordStar
•
Week 5
DAY 1
Major Content: Paragraph Reform
Objectives: Introduction to the commands for reforming paragraphs.
Materials: WordStar, Turbo Lightning. WordStar Handout #4 explaining
additional Main Menu commands and Flag Characters. Class Assignment #6 which
contains step-by-step instructions.
Lecture:
1. Review discussion of setting margins. This is important during the reformatting
of paragraphs (i.e., the outcome before, during and after reforming paragraphs).
2. Explain effect of hard carriage return on paragraph format.
3. Introduce concept of Flag Characters and their indications.
Class Activity:
•
The following activity is to be presented in lecture format followed by
group/individual assignments.
1. Review with students startup basics for creating a document entitled
"Lab#5.txt." Topic: Paragraph Reform.
2. Question students on setting left and right margins.
Review setting "quick"
margins (e.g. move to desired column, press A OL or ^Or + Esc key).
3. Introduce the commands for reforming paragraphs.
Expected Outcome:
Students will be able to demonstrate the commands to reform a
paragraph according to the new margin settings.
Outside Reading:
Read WordStar Handout #4 explaining flag characters and the commands for
paragraph reform.
Lab Assignment: Lab Assignment #5
Expected Outcome:
•
In completing this activity, students will demonstrate effective use
of basic commands for setting margins and reforming text to fit
within these new margins.
WordStar
Page 5-41
•
NOTES:
Page 5-42
WordStar
•
COMPUTER ACCESS I
GETTING TO KNOW WORDSTAR
WORDSTAR HANDOUT #4, - ADDITIONAL MAIN MENU COMMANDS AND
FLAG CHARACTERS
The following is a summary of some Wordstar commands. The "A" symbol before a
letter represents the Control key and means that the Control key is to be pressed and
held down as the next key is pressed. For example, AP means that you are to press
the Control key then the letter P while still holding down the Control key. If this
symbol does not appear before the letter then that letter is pressed alone. The
commands are categorized by their usage.
MAIN MENU COMMANDS
MISCELLANEOUS
AB ............................. Reforms a paragraph
A
U ............................. Stops a command
•
Flag characters are located at the extreme right side of the screen. They are placed
there to give the user information about how the text typed on a particular line is
being processed.
Flag characters,
•
Line is before beginning of document
............................... Line is after end of document
•
Line ends in hard carriage return
(no symbol) .................... Line ends in soft carriage return
•
Line extends beyond screen margin
P ............................... New page begins following this line
................................. Line contains dot command that Wordstar
does not recognize
Initial use: Week 5, Day 1
WordStar
Page 5-43
NOTES:
Page 5-44
WordStar
4110
Week y Lab Assignment: Week 5
COMPUTER ACCESS I
LAB ASSIGNMENT #5 - PARAGRAPH REFORM
STEP 1- OPEN THE DOCUMENT NAMED "CLASS#5.TXT."
STEP 2 - CHANGE THE MARGINS ACCORDING TO THE TYPED TEXT IF THE
CURRENT MARGINS ARE DIFFERENT.
STEP 3 - ADD THE FOLLOWING TEXT TO THE END OF THE CURRENT
DOCUMENT.
John Garson was a young man who liked a girl named Isabel Lewis. One evening
around eight o'clock John went to see Isabel. A minute after he went into her
apartment, her neighbors heard them arguing. The battle was loud, and every
word
came through those paper-thin walls. Garson had found out that Isabel was dating
a man named Clarence Hannen, and Garson didn't like it one bit. He spent five
minutes saying all he had to say. Then he left.
STEP 4 - RESET THE LEFT MARGIN TO 20 AND THE RIGHT MARGIN TO 40
STEP 5 - PRESS AB TO REFORM THE PARAGRAPH TO THE NEW MARGIN
SETTINGS.
STEP 6 - PRESS (F2 OR A KM TO SAVE THIS DOCUMENT.
STEP 7 - PRINT OUT "CLASS #5.TXT."
OPTIONAL LAB ASSIGNMENT:
STEP 1- OPEN A DOCUMENT CALLED "CLASSES."
STEP 2 - RESET MARGINS TO 1 AND 65, IF NECESSARY.
STEP 3 - WRITE ONE PARAGRAPH ABOUT THE CLASS YOU LIKE BEST AND
TELL WHY.
STEP 4 - WRITE ANOTHER PARAGRAPH ABOUT THE CLASS YOU LIKE
LEAST AND TELL WHY.
STEP 5 - WHEN YOU HAVE FINISHED WRITING, SET MARGINS TO 15 AND
45. REFORM THE ENTIRE DOCUMENT.
STEP 6 - SAVE THE FTLE, PRINT IT AND TURN IT IN TO THE INSTRUCTOR.
WordStar
Page 5-45
NOTES:
Page 5-46
WordStar
4.
Week 5
DAY 2
Major Content: Review of the Commands for Paragraph Reform; Introduction of
Quick Menu.
Objectives: Introduction to the A QQ AB command for quick paragraph reform of an
entire document.
Materials and Software: WordStar, Turbo Lightning. WordStar Handout #5
explaining Quick Menu commands and Class Assignment #6 which contains stepby-step instructions.
Lecture:
1. Review discussion of paragraph reform.
2. Introduce the Quick Menu command ( A QQ) for repeating commands.
Demonstrate to students that the speed with which this command repeats can
be slowed by entering a number between 1-9.
3. Discuss the hyphen-help command.
•
4. Notify students of quiz covering margins, linespacing, tabs and paragraph
reform on Week 6, DAY 1.
Class Activity:
The following activity is to be presented in lecture and/or demonstration format
followed by group/individual assignments.
1. Have students demonstrate start-up procedure by creating a document entitled
"Lab#6.txt."
2. Review the commands necessary for paragraph reform.
3. Introduce the command for repeating a command. Demonstrate how to access
the Quick Menu and the steps to execute the A QQ AB command for quick
paragraph reform.
Expected Outcome:
The student will be able to demonstrate how to access the Quick
Menu and how to utilize the A QQ or repeat command function. In
addition, each student will demonstrate the effect of quick
paragraph reform when reformatting a document to different
margins.
•
WordStar
Page 5-47
•
NOTES:
Page 5-48
WordStar
•
COMPUTER ACCESS I
GETTING TO KNOW WORDSTAR
WORDSTAR HANDOPT #5 - QUICK MENU COMMANDS
The following is a summary of some Wordstar commands. The "A" symbol before a
letter represents the Control key and means that the Control key is to be pressed and
held down as the next key is pressed. For example, AP means that you are to press
the Control key then the letter P while still holding down the Control key. If this
symbol does not appear before the letter then that letter is pressed alone. The
commands are categorized by their usage.
QUICK MENU COMMANDS
CURSOR MOVEMENT
A
Q then...
Z .................... Scrolls continuously down by line
W .................... Scrolls continuously up by line
S
Moves to the left side of the screen
D .................... Moves to the right side of the screen
E
Moves to the top of the screen
X .................... Moves to the bottom of the screen
R .................... Moves to the beginning of the file
C .................... Moves to the end of the file
P
Moves to the previous cursor location before save
N
Moves to place marker (n = 0-9)
B
Moves to the top of a block
K
Moves to the end of a block
3
Moves to the last block source of find location
* SPEED OF SOME QUICK COMMANDS CAN BE SLOWED BY PRESSING
NUMBER 1 TO 9, WITH 9 BEING THE SLOWEST RATE.
* TO STOP PRESS SPACEBAR
DELETE
A
Q then...
Y .................... Deletes one line to right of cursor
DEL ................ Deletes one line to left of cursor
•
WordStar
Page 5-49
MISCELLANEOUS
A
Q then...
Q ......... Repeats a command
* TO STOP PRESS SPACEBAR, RETURN, OR ANY LETTER OR
NUMBER KEY
Initial use: Week 5, Day 2
Page 5-50
WordStar
•
COMPUTER ACCESS I
CLASS ASSIGNMENT #6 - PARAGRAPH REFORM; QUICK MENU COMMANDS
STEP 1- OPEN THE DOCUMENT NAMED "CLASS#5.TXT."
STEP 2 - RESET THE LEFT MARGIN TO 15 AND THE RIGHT MARGIN TO 35.
STEP 3 - REFORM THE PARAGRAPH
ACCORDING TO THE NEW MARGIN
SETTINGS, USING THE AQQ AB COMMAND.
STEP 4 - RE-CENTER ALL OF THE LINES AT THE TOP OF THE TEXT
ACCORDING TO THE NEW MARGIN SETTINGS. BE SURE TO
CHANGE THE DATE TO TODAY'S DATE.
STEP 5 - SAVE THIS DOCUMENT.
STEP 6 - PRINT OUT "CLASS#5.TX11" AND TURN IT IN.
•
•
For use with Week 5, Day 2
WordStar
Page 5-51
NOTES:
Page 5-52
WordStar
•
Week 6
DAY 1
Major Content: Quiz #2
Objectives: Assess students' knowledge of setting margins, tabs, line spacing and
reforming paragraphs.
Materials: Test file (WSQuiz#2) copied to student disk.
Lactura:
Administer test.
Class Activity:
Test taking. When student has completed the test, s/he will print the test and turn
it in to the instructor.
expected Outcome:
The student will be able to display competency in text set-up and
organization by successfully using a computer to complete a quiz on
setting margins, tabs, line spacing, and paragraph reform.
•
Outside Reading:
None.
Lab Assignment:
Distribute Lab Assignment #6 when students turn in printed exam.
Instructional Unit Outcome:
At the conclusion of this instructional unit, each student will demonstrate how to successfully:
access the Onscreen Menu, set margins, set tabs, set line spacing; reform paragraphs; and
utilize the Quick Menu for repeated commands.
•
WordStar
Page 5-53
•
NOTES:
•
Page 5-54
WordStar
• Week 6, Day 1
COMPUTER ACCESS I
QUIZ #2: MARGINS, TABS, LINE SPACING AND PARAGRAPH REFORM
NAME:
DATE:
CHOOSE THE BEST ANSWER TO THE FOLLOWING QUESTIONS:
1. What is the WS command used to create or open a document?
ANSWER:
2. What are the WS commands used to set the margins?
ANSWER:
3. What is the WS command to clear all tabs?
ANSWER:
4. What is the WS command to set tabs?
•
ANSWER:
5. What is the WS command to reform the paragraph after you have altered the
margins?
ANSWER:
6. What is the WS command use to center text on the screen?
ANSWER:
7. What is the WS command used to set line spacing to double spaced?
ANSWER:
8. Complete the following activity as presented:
STEP 1- CHANGE THE LEFT MARGIN TO 01 AND THE RIGHT MARGIN TO
65.
STEP 2 - BEGINNING ON LINE ONE, COLUMN 01, CE ER THE
FOLLOWING LINES:
A VISIT TO MARSH HARBOR
by
(YOUR NAME)
•
(TODAY'S DATE)
WordStar
Page 5-55
QUIZ #2
Page 2
STEP 3 - CHANGE THE LEFT MARGIN TO 10 AND THE RIGHT MARGIN TO
50.
STEP 4 - REFORM THE FOLLOWING TEXT.
If a visitor first entered Marsh Harbor by boat, and didn't know where he was,
his immediate guess might be New England. There are more hardwood trees here
than palms, and hills unusual for the typically flat Bahamas. Yachts outnumber
fishing boats. The houses seem muted pastels compared to the vivid sherbet colors
found on other islands.
Marsh Harbor is one of the largest Bahamian towns. You'll find good roads,
excellent supermarkets, Godiva chocolate cake flown in from San Francisco, and
other gourmet delights at the popular Wally's Restaurant; excellent hotel and
condominium accommodations t feature telephones in the rooms.
STEP 5 - SAVE THIS DOCUMENT AND PRINT IT OUT. TURN IN YOUR
HARD COPY TO THE INSTRUCTOR.
•
Page 5-56
WordStar
•
Lab Assignment: Week 6
COMPUTER ACCESS I
LAB ASSIGNMENT #6:
STEP 1- BRING IN A HOMEWORK ASSIGNMENT FROM ANOTHER CLASS
AND COMPLETE IT IN WORDSTAR.
STEP 2 - IF YOU DO NOT HAVE HOMEWORK FROM ANOTHER CLASS
WHICH YOU CAN DO IN WORDSTAR, WRITE A LE'ri'ER TO A
FRIEND.
STEP 3 - WHEN YOU HAVE COMPLETED THE ASSIGNMENT, PRINT A COPY
OF THE FTL1 AND TURN IT IN TO THE INSTRUCTOR.
•
DISTRIBUTE AT THE END OF DAY 1 OF WEEK 6
WordStar
Page 5-57
•
NOTES:
Page 5-58
WordStar
•
Week 6
DAY 2
Major Content: Review Exam
Objectives: Review test results. Provide students with additional practice on the
concepts presented in this instructional unit.
Materials: Test file (WSQuiz#2) hard copy.
Lecture:
1. Review each test question and exercise with group.
2. Concentrate on particular problems student(s) may have. Provide additional
explanations and demonstrations as necessary.
Class Activity:
1. Hand back to each student his/her test.
2. Question students as to the correct answer to each test item. Review concepts of
test material as necessary. Emphasize any particular problems with
explanations and/or demonstrations.
•
Expected Outcome:
At the conclusion of this activity, each student should be able to
recognize his or her areas of concept difficulties.
•
WordStar
Page 5-59
NOTES:
Page 5-60
WordStar
Week 7
4. DAY 1
Major Content: Print Menu Commands; Underscore Text; Boldface Text.
Objectives: Introduce the Print Menu commands for underscoring and boldfacing
selected text.
Materials and Software: WordStar, Turbo Lightning. WordStar Handout #6
explaining the Print Menu, and Class Assignment #8, which contains step-by-step
instructions. An atlas for Lab Assignment #7.
Lecture:
1. Discussion of how to access the Print Menu while a document is open.
2. Introduce the commands to underscore and boldface selected text within the
document. Demonstrate that these are "toggle type" commands, i.e., they turn
on/off the command. Emphasize to students that each command must be given
at the beginning and end of the text to be affected.
Class Activity:
•
The following activity is to be presented in a lecture and demonstration format
followed by group/individual assignments.
1. Introduce the command for underscoring text. Have the students experiment
with underlining different sections of text.
2. Introduce the command for boldfacing text. Again, have the students
experiment with boldfacing different pieces of text.
Expected Outcome:
The student will be able to demonstrate the use of "special effects"
when printing documents. Each student will be able to discuss why
these commands are called "toggle commands."
Outside Reading Assignment:
Read WordStar Handout #6 explaining WordStar commands listed in the Print
Menu.
Liab Assignment: Lab Assignment #8
Expected Outcome:
Upon completion of this lab activity, the student will demonstrate
successful use of the underscore and boldface commands.
WordStar
Page 5-61
41)
NOTES:
•
Page 5-62
WordStar
COMPUTER ACCESS I
GETTING TO KNOW WORDSTAR
WORDSTAR HANDOUT #6 - PRINT MENU COMMANDS
The following is a summary of some Wordstar commands. The "A" symbol before a
letter represents the Control key and means that the Control key is to be pressed and
held down as the next key is pressed. For example, AP means that you are to press
the Control key then the letter P while still holding down the Control key. If this
symbol does not appear before the letter then that letter is pressed alone. The
commands are categorized by their usage.
PRINT MENU COMMANDS
SPECIAL EFFECTS
A
P then...
S ......... Underscore text*
B ......... Boldface text*
* Use command to mark the beginning and
end of the procedure.
11111
Initial use: Week 7, Day 1
WordStar
Page 5-63
NOTES:
Page 5-64
WordStar
•
COMPUTER ACCESS I
CLASS ASSIGNMENT #8, - PRINT MENU COMMANDS; UNDERSCORE AND
BOLDFACE
STEP 1- OPEN A DOCUMENT NAMED "LAB#8.TXT."
STEP 2 - SET THE MARGINS AS FOLLOWS: L=10 AND R=70.
STEP 3 - CLEAR ALL TABS.
STEP 4 - SET TWO TABS AS FOLLOWS: AT COLUMN 25 AND COLUMN 40.
STEP 5 - TYPE THE FOLLOWING TEXT EXACTLY AS WRITTEN. BE SURE TO
UNDERLINE AND BOLDFACE WHEN INDICATED.
YOUR NAME TODAY'S DATE
YOSEMITE
THE STORY BEHIND THE SCENERY
•
Yosemite! Its cliffs are so high that the first white men to set eyes upon them could
not begin to calculate their heights; its landmark
Dome is so distinctive that
its shape is recognized throughout the country; some of its giant sequoias are so
old that contemplation of their great ages strains Diaa'fl concept Qf time; and its
High Sierra wilderness is so remote and so ymit that no one has ever seen it all.
People from every corner of the United States, -and the world- travel to this park
in northern California to gaze upon these attractions and marvel. And well they
might, for all these features are truly AWESOME. But there is another, less
prominent dimension to the Yosemite landscape -and that is the infinite variety
that the park encompasses.
STEP 6 - SAVE THIS DOCUMENT.
STEP 7 - PRINT OUT THIS DOCUMENT.
For use with Week 7, Day 1
•
WordStar
Page 5-65
•
NOTES:
Page 5-66
WordStar
Weekly Lab Assignment: Week 7
•
COMPUTER ACCESS I
LABASSIMMENTAZ - UNDERSCORE AND BOLD PRINTING.
STEP 1- OPEN A FILE CALLED "CITIESIXT."
STEP 2 - THINK ABOUT THREE FOREIGN MILS YOU WOULD LIKE TO
VISIT.
STEP 3 - WR1Th ONE PARAGRAPH ABOUT EACH CITY IN WHICH YOU
INCLUDE THE FOLLOWING INFORMATION: ITS NAME, THE
COUNTRY IT IS IN AND THE CONTINENT ON WHICH IT LOCATED.
ALSO EXPLAIN WHY YOU WANT TO GO THERE.
STEP 4 - PRACTICE USING THE SPECIAL EFFECTS COMMANDS: WHEN
YOU HAVE FINISHED WRITING, GO BACK TO THE BEGINNING OF
YOUR DOCUMENT AND DO THE FOLLOWING:
A. UNDERLINE THE NAME OF EACH CITY AND COUNTRY.
B. BOLDFACE THE NAME OF EACH CONTINENT.
•
STEP 5 - SAVE THE DOCUMENT, PRINT AND TURN THE. DOCUMENT 1N.
NOTE: The instructor should have available an atlas or map of the world.
•
WordStar
Page 5-67
•
NOTES:
Page 5-68
WordStar
S
Week 7
DAY 2
Major Content: Use of underline command for titles of books and television series.
Use boldface command for special emphasis.
Objectives: Review the Print Menu commands for underscoring and boldfacing.
Provide additional practice for the student using these commands.
Materials and Software: WordStar, Turbo Lightning. No additional materials.
Lecture:
1. Review the procedure for accessing the Print Menu anywhere in the document.
Question students about underscoring and boldfacing selected text within the
document.
2. Discuss use of underline command for titles of books or television shows;
boldface for emphasis of meaning.
3. Notify students of a quiz covering underscoring and boldfacing on Week 8, DAY
1.
Class Activity:
The following activity is to be presented in individual assignments.
1. Review the procedures for underscoring and boldfacing selected text.
2. Have each student write several paragraphs describing his/her favorite
television programs or books.
3. Instruct the student to use underlining and boldfacing where appropriate.
expected Outcome:
The student will be able to demonstrate underscoring and boldfacing
commands within self-generated text.
Outside Reading/Lab Assignment:
Student-generated text for lab assignment.
•
WordStar
Page 5-69
NOTES:
Page 5-70
WordStar
•
Week 8
DAY 1
Major Content: Quiz #3
Objectives: Assess students' knowledge of the commands used for special effects
printing: underscoring and boldfacing.
Materials: Test file (WSQuiz#3) copied to student disk.
Lecture:
Administer test.
Class Activity:
Test taking When student has completed test, s/he will print the test and turn it in
to the instructor.
Expected Outcome:
The student will display competency in the use of the commands
which create special effects printing by successfully using a
computer to complete a quiz which covers commands from the Print
Menu: APS, APB.
Outside Reading:
None.
Lab Assignment:
Hand out Lab Assignment #8 after students have turned in tests.
Expected Outcome:
After completion of lab assignment #8, students will understand the
positive effect of computer use in the preparation of documents for
school or personal needs.
Instructional Unit Outcome;
At the end of this instructional unit the student will be able to recognize and
demonstrate the use of the commands for underscoring and underlining within text
for special effects printing.
WordStar
Page 5-71
NOTES:
Page 5-72
WordStar
Week 8, Day 1
COMPUTER ACCESS I
QUIZ #3: SPECIAL EFFECTS PRINTING
NAME:
DATE:
CHOOSE THE BEST ANSWER TO THE FOLLOWING QUESTIONS:
1. What menu would you find the commands for special effects printing?
a. The Onscreen Menu
b. The Print Menu ANSWER:
c.The Quick Menu
d. The Help Menu
2. What is the WS command used to underscore book titles?
a. Ctrl +P +S
b. Ctrl +K +D
ANSWER:
c. Ctrl +S +P
d. Ctrl +Q +N
•
3. What is the WS command used to boldface selected text?
a. Ctrl +J +H
b. Ctrl +K +P
ANSWER:
c. Ctrl +P +B
d. Ctrl +P +X
4. IN THE TEXT BELOW, find the following word or words and:
a. Underline these:
first animals
insects
lodgepole-pine needleminer
odd-numbered year
b. Boldface these:
ANIMALS OF THE HIGH COUNTRY
dragonflies
host
food and shelter
•
WordStar
Page 5-73
c. Underline and Boldface these:
after the glaciers
insect
moth
swarms, reproduce, deposit more eggs, and die
ANIMALS OF THE HIGH COUNTRY
The first animals that returned to the region after the glaciers melted were
probably insects, traveling on the wind. Even today dragonflies are found on the
glaciers, blown there from elevations far below. Others arrived along with their host
plants. One such insect was the lodgepole-pine needleminer, a little moth whose
larvae utilize the needles of that particular tree only. The needleminer drills into
the foliage for food and shelter, then emerges every odd-numbered year to fly in
swarms, reproduce, deposit more eggs, and die.
Page 5-74
WordStar
•
Weekly Lab Assignment: Week 8
COMPUTER ACCESS I
LAB ASSIGNMENT #8,
STEP 1- BRING IN A HOMEWORK ASSIGNMENT FROM ANOTHER CLASS
AND DO IT IN WORDSTAR.
STEP 2 - IF YOU DO NOT HAVE HOMEWORK FROM ANOTHER CLASS
WHICH YOU CAN DO IN WORDSTAR, WRITE A LE1-1ER TO A
FRIEND.
STEP 3 - WHEN YOU HAVE COMPLETED THE ASSIGNMENT, PRINT A COPY
OF THE FILE AND TURN IT IN TO THE INSTRUCTOR.
•
•
Distribute at the end of Day 1 of Week 8.
WordStar
Page 5-75
•
NOTES:
Page 5-76
WordStar
Week 8
DAY 2
Major Content: Review Exam
Objectives: Review test results. Have students do additional practice on the
concepts presented in this instructional unit.
Materials: Test file (WSQuiz#3) hard copy.
Lecture:
1. Review each test question and exercise with group.
2. Concentrate on particular problems any student(s) may have. Provide additional
explanations and demonstrations as necessary.
Class Activity:
1. Hand back to each student his/her test hard copy.
2. Question students as to the correct answer to each test item. Review concepts of
test material as necessary. Emphasize any particular problems with
explanations and/or demonstrations.
Expected Outcome:
At the conclusion of this activity, each student should be able to
effectively use the commands for special effects printing as well as
to recognize his or her areas of concept difficulties.
•
NOTES:
Page 5-78
WordStar
Week 9
DAY 1
Major Content: Block Menu Commands: Beginning Block; End Block; Move Block;
Copy Block; Delete Block.
Objectives: Introduce the concepts of "Cut and Paste" using the Block Menu
commands.
Materials and Software: WordStar, Turbo Lighting. WordStar Handout #7 and Lab
Assignment #9 which contains step-by-step instructions.
Lecture:
1. Discussion of how to access the Block Menu from the Main Menu.
a. Explain to students the reasons and benefits behind "cutting and
pasting."
b. Demonstrate to the students how to insert beginning and end block
commands for "marking" text.
2. Guide students through "marking" pieces of text of varying lengths.
3. Demonstrate moving and copying "marked" text.
ample
a. Have students spend an ample
amount of time experimenting with all
of these new commands for
and pasting."
Class Activity:
The following activity is to be presented in a lecture/demonstration format followed
by group/mdtvidual assignments.
1. Have each student open an already existing lab assignment and explain that in
this session the current structure of this document will be altered.
2. Introduce the commands for "marking" the beginning and end of selected text.
Guide the students into "marking" increasing larger pieces of text.
3. Introduce the commands for moving a block of text from one place to another
within the document.
a. Demonstrate the value of using the Insert key when relocating text
within the document. Make sure the students understand that the
insert function must be "on."
•
WordStar
Page 5-79
4. Introduce the commands for copying or duplicating a block of text from one
place to another within the document.
a. Explain possible uses for this function.
5. Have students exit this file activity with a Cancel ( AKQ or F3) command.
Expected Outcome:
The student will be able to demonstrate how to effectively use the
commands
for "marking" a block of text, moving a block of text,
y
coping a block of text, and deleting a block of text. Additionally,
each
student will be able to define the terms "cut" and "paste" as
applied to a word processing session.
Outside Reading:
Read WordStar Handout #7 explaining the commands listed in the Block Menu.
Lab Assignment:
Lab Assignment #9 - Block Menu Commands.
Expected Outcome:
At the conclusion of this activity, the student should have
conceptual knowledge and demonstrated skills in "marking" selected
pieces of text as well as moving and copying a block of text within
the document.
Page 5-80
WordStar
•
COMPUTER ACCESS I
GETTING TO KNOW WORDSTAR,
WORDSTAR HANDOUT #7 -
BLOCK MENU COMMANDS
The following is a summary of some Wordstar commands. The "A" symbol before a
letter represents the Control key and means that theA Control key is to be pressed and
held down as the next key is pressed. For example, P means that you are to press
the Control key then the letter P while still holding down the Control key. If this
symbol does not appear before the letter then that letter is pressed alone. The
commands are categorized by their usage.
BLOCK MENU COMMANDS
SAVING FILES
A
K then...
S
Saves file and resumes typing
Saves file and returns to OPENING MENU
X ................................ Saves file and exits Wordstar to DOS
Q ................................. Abandons file
D .................................
PLACE MARKERS,
•
AK then n .......................... Sets/hides place markers (n = 0-9)
BLOCK OPERATIONS
A
K then...
B
Marks the beginning of a block
K
Marks the end of a block
Hides/displays a block
H
3
Moves a block
C ................................ Copies a block
W .............................. Writes a block to another file
Y ................................ Deletes a block
Turns column block feature ON/OFF
N
FILE OPERATIONS
A
K then...
E
Renames a file
0 .............................. Copies a file
J
Deletes a file
R ................................... Reads text from another file into an open file
Prints a file
P
•
WordStar
Page 5-81
•
DISK OPERATIONS
A
K then...
L .............................. Changes logged disk drive
F .............................. Turns a file directory ON/OFF
Initial use: Week 9, Day 1
Page 5-82
WordStar
Weekly Lab Assignment: Week 9
COMPUTER ACCESS I
LAB ASSIGNMENT #9 - BLOCK MENU COMMANDS
uir
V
TI
• Mk
;
11.9
4,
STEP 1- PRINT OUT THE LAST LAB ASSIGNMENT DOCUMENT THAT YOU
COMPLETED.
STEP 2 - OPEN THIS LAB ASSIGNMENT DOCUMENT.
STEP 3- USING BLOCK COMMANDS, MARK OFF THE ENTIRE FIRST
PARAGRAPH OF THIS DOCUMENT.
STEP 4- MOVE THIS BLOCK OF TEXT TO THE END OF THE FILE; TO THE
MIDDLE OF THE FUN; AND BACK TO THE BEGINNING OF THE
FILE
STEP 5- USING BLOCK COMMANDS, MARK OFF THE ENTIRE SECOND
PARAGRAPH OF THIS DOCUMENT.
•
STEP 6- COPY THIS BLOCK OF TEXT TO THE END OF THE FILE; TO THE
BEGINNING OF THE FTLE; AND AFTER THE FIRST SENTENCE OF
THE FIRST PARAGRAPH.
STEP 7- SAVE THIS PTA AND PRINT IT OUT. TURN IT IN TO THE
INSTRUCTOR
•
WordStar
Page 5-83
NOTES:
Page 5-84
WordStar
411
Week 9
DAY 2
Major Content: Working with marked blocks of text.
Objectives: Review of Block Menu commands for manipulating text on the screen.
Introduction of the Block Delete command.
Materials: WordStar, Turbo Lightning. WordStar Handout #7 explaining the Block
Menu commands. Class Assignment #9 which contains step-by-step instructions.
Lecture:
1. Review the procedure for accessing the Block Menu commands for "marking"
text, moving text, and copying text.
2. Introduce the commands for deleting a block of text from within the document.
a. Have students duplicate or copy a block of text to the end of the
document then delete it.
b. Explain the possible dangers of this command if one is not observant.
Class Activity:
•
The following activity is to be presented in lecture and demonstration format
followed by group/individual assignments.
1. Have the students open the lab assignment from last word processing session.
2. Review the commands for "marking", moving, and copying blocks of text within
a document.
3. Introduce the command for deleting blocks of text.
a. Guide students through deletion of the blocks of text that were copied
during the last block menu session.
b. Have students "mark" and delete words and sentences within the file.
Expected Outcome:
After completion of Class Assignment #9, the student should be able
to demonstrate his/her use of the Block Menu commands for
deleting blocks of text. Additionally, the student should have
conceptual knowledge of when to perform this command.
WordStar
Page 5-85
NOTES:
Page 5-86
WordStar
COMPUTER ACCESS I
CLASS ASSIGNMENT #9 - ADDITIONAL BLOCK MENU COMMANDS
DELOW:
STEP 1- OPEN THE LAST LAB ASSIGNMENT DOCUMENT WHICH YOU
COMPLETED.
STEP 2 - USING BLOCK MENU COMMANDS, DELETE THE PARAGRAPHS
THAT YOU COPIED DURING THE LAST WORD-PROCESSING
SESSION.
STEP 3 - USING BLOCK MENU COMMANDS, MARK OFF WORDS AND
DELETE THEM FROM THE TEXT.
STEP 4 - USING BLOCK MENU COMMANDS, MARK OFF SENTENCES AND
DELETE THEM FROM THE TEXT.
STEP 5 - SAVE THIS DOCUMENT, PRINT IT OUT AND TURN IT IN TO THE
INSTRUCTOR.
•
•
For use with Week 9, Day 2
WordStar
Page 5-87
S
NOTES:
•
Page 5-88
WordStar
Week 10
DAY 1
Major Content: Block Menu commands; writing a block or reading a block of text to
and from a file.
Objectives: Introduce the commands for writing a block to another file name and
reading a block into existing and/or new text from disk.
Materials: WordStar, Turbo Lightning. WordStar Handout #7 explaining Block
Menu Commands and Lab Assignment #10 which contains step-by-step
instructions.
Lecture:
1. Review the Block Menu commands for "marking" blocks of text.
2. Discussion of the Block Menu commands for writing a block of text to another
file name.
a. Explain the concept of "writing" a block of text to disk.
•
b. Include discussion of the concept of a "temporary file name" when
writing a block of text to disk.
3. Discussion of the Block Menu commands for reading a file from disk into
existing and/or new text.
a. Explain the concept of "reading" a file into another file.
4. Discussion of how the "writing" and "reading" functions work together during
the "cut and paste" session phase of wordprocessing.
Class Activity:
The following activity is to be presented in lecture and in demonstration format
followed by groupimdividual assignments.
1. Have each student open up an already existing lab assignment and review the
commands for "marking" blocks of text.
2. Introduce use of the Block Menu commands for "writing" a block of text to
another file name.
3. Introduce use of the Block Menu commands for "reading" this newly created file
(using the write command) into existing and/or new files.
•
4. Demonstrate the value of the "temporary" or "holding" file during the editing
phase of the word processing session.
WordStar
Page 5-89
Expected Outcome:
The student will be able to demonstrate the use of the Block Menu
commands to "write" and "read" files to and from disk. Each student
will be able to create several "temporary" or "holding" files and
"read" them into existing and/or new text.
Outside Reading:
WordStar Handout #7 explaining Block Menu commands.
Lab Assignment:
Lab Assignment #10 which contains step-by-step instructions for using Block Menu
commands.
Expected Outcome:
At the conclusion of Lab Assignment #10, the student will be able to
"write" blocks of text to files and "read" the block of text into another
existing and/or new file.
Page 5-90
WordStar
•
•
Weekly Lab Assignment: Week 10
COMPUTER ACCESS I
LAB ASSIG I NT #10, - ADDITIONAL BLOCK MENU COMMANDS
•
VA_ F.
I ilk
1
11.1 •
t_11
•;
kitV_
STEP 1- OPEN THE FILE NAMED "LAB#4.TX11."
STEP 2- USING BLOCK MENU COMMANDS, MARK OFF THE FIRST
PARAGRAPH.
STEP 3- USING BLOCK MENU COMMANDS, WRITE THIS PARAGRAPH TO A
FILE CALLED "HOLD1.TXT."
STEP 4- ABANDON THE FILE "LAB#4.TXT."
STEP 5- OPEN THE FILE NAMED "LAB#5.TXT."
STEP 6- USING BLOCK MENU COMMANDS, MARK OFF THE LAST
PARAGRAPH.
•
STEP 7- USING BLOCK MENU COMMANDS, WRITE THIS PARAGRAPH TO A
FTTN, NAMED "HOLD2.TXT."
STEP 8- ABANDON THE FILE "LAB#5.M."
STEP 9- OPEN THE FILE NAMED "LAB#6.TXT."
STEP 10 -MOVE THE CURSOR TO THE END OF THE FILE.
STEP 11-USING BLOCK MENU COMMANDS, READ INTO THE FILE NAMED
"HOLDLTXT."
STEP 12 -SAVE THE FTLE "LAB#6.TXT."
STEP 13 -PRINT OUT "LAB#6.TXT" AND TURN IT IN TO THE INSTRUCTOR.
STEP 14 -OPEN THE FILE "LAB#7.TXT."
STEP 15-MOVE THE CURSOR TO THE BEGINNING OF THE FILE.
STEP 16 -USING BLOCK MENU COMMANDS, READ INTO THE FILE NAMED
"HOLD2.TXT."
STEP 17 -SAVE THE FILE "LAB#7.TXT."
•
STEP 18 -PRINT OUT THE FILE "LAB#7.TXT," AND TURN IT IN TO THE
INSTRUCTOR.
WordStar
Page 5-91
•
NOTES:
Page 5-92
WordStar
Week 10
DAY 2
Major Content: More work with "marked" blocks of text
Objectives: Review of Block Menu commands; Beginning/End of block; Moving,
Copying, and Deleting blocks of text; "Writing" and "Reading" of files.
Materials: WordStar, Turbo Lightning. WordStar Handout #7 explaining Block
Menu commands.
Lecture:
1. General review of Block Menu commands for "marking" text and manipulating
text onscreen.
2. General review of Block Menu commands for "writing" blocks of text to a file
and "reading" files into existing and/or new text.
3. Notify students of a quiz covering "marking" blocks of text; moving, copying and
deleting blocks of text; and "writing" and "reading" blocks of text to/from disk.
Class Activity:
The following activity is to be complete in group/individual assignments.
1. Assist students with the completion of the previous lab assignment as
necessary.
2. Demonstrate Block Menu commands for "writing" blocks of text to file names
and "reading" blocks of text into existing text as necessary.
Expected Outcome:
At the conclusion of this activity, the student should have
conceptual knowledge of "writing"
and "reading" Block Menu
commands as well as demonstrable skills using these commands.
•
WordStar
Page 5-93
•
NOTES:
•
Page 5-94
WordStar
Week 11
DAY 1
Major Content: Quiz #4
Objectives: Assess students' knowledge of "marking" blocks of text; moving, copying,
and deleting blocks of text; "writing" and "reading" blocks of text to/from disk.
Materials: Test file (WSQuiz#4) copied to student disk.
Lecture:
Administer test.
Class Activity:
Test taking. When student has completed test, s/he will print the test and turn it in
to the instructor.
Expected Outcome:
•
The student will be able to demonstrate competency with the Block
Menu commands by completing a quiz on "marking" blocks of text;
moving, copying, and deleting blocks of text; "writing" and "reading"
blocks of text to/from disk.
Outside Reading/Lab Assignment:
None
Weekly Lab Assignment:
Optional (Lab Assignment #11). If used, copy file "Mess" to student disks.
Expected Outcome:
Completion of this optional assignment will require the student to
utilize block commands in order to reassemble a design. Prior
assignments have required reassembling text to restore semantic
sense; this assignment requires use of the same block commands but
requires different problem solving strategies because students are
required to restore spatial relationships.
instructional Unit Outcome:
•
At the conclusion of this instructional unit, each student will demonstrate competency accessing
and using the Block Menu commands. This includes "marking" blocks of text; moving, copying,
and deleting blocks of text; "writing" and "reading" blocks of text tolfrom disk.
WordStar
Page 5-95
•
NOTES:
•
•
Page 5-96
WordStar
Week 11, Day 1
QUIZ #4: BLOCK MENU COMMANDS
NAME:
DATE:
CHOOSE THE BEST ANSWER TO THE FOLLOWING QUESTIONS:
1. What is the WS command for "marking" the beginning of a block?
a. ^KW.
b. ARK
ANSWER:
c. ^KB
d. AKR
2. What is the WS command for "marking" the end of a block?
a. AKK
b. ^ICD
ANSWER:
c. ^KQ
d. ^KP
3. What is the WS command for moving the marked block of text from one place to
another?
a. "KC
b. ^KV
ANSWER:
c. ^KY
d. ^KB
4. What is the WS command for copying a marked block of text from one place to
another?
a. AIM
b. ^KR
ANSWER:
c. ^KW
d. ^KC
5. What is the WS command for deleting a marked block of text?
a. ^KQ
b. ^KY
ANSWER:
c. ^KP
d. ^ICD
6. What is the WS command for "writing" a marked block of text to a file on disk?
a. ^KR
b. ^KW
ANSWER:
c. ^KQ
d. AKK
•
WordStar
Page 5-97
7. What is the WS command for "reading" a file from disk into another file?
a. "Kt)
b. ^KP
ANSWER:
c. ^KO
d. ^KR
•
8. UNSCRAMBLE the following sentences using Block Menu commands:
a. The sun melted the snow.
There was a raging snowstorm.
The ground was covered with snow.
b. The armed robber went into the bank.
A bank employee phoned the police department.
He stole $50,000 in large bills.
c.Last night the firemen were called to extinguish a fire.
A raging fire broke out at the First Interstate Bank Building.
A security guard phoned the fire department.
d. The Space Shuttle was successfully launched.
It traveled through the passing weather front.
The crew of the Discovery were anxious to complete their mission.
It landed on the planet Mars.
The Discovery crew returned successfully to Earth without any major
difficulties.
9. Using Block Menu commands, block off question #8 and "WRITE" it to the file
named SCRAMBLE.TXT
10. Using Block Menu commands, "READ" the file NEWBLOCK.TXT from your
disk and place it in the space below this question.
11. Save your answers, print them out, and turn in your quiz to the instructor.
•
Page 5-98
WordStar
•
Weekly Lab Assignment: Optional Lab Assignment #11.
COMPUTER ACCESS I
Make your file MESSWORK look like this:
xxxxxxxxxxxxxxxxxxxxxxxxxxxxxxxxxxxxxxxxxxxxxxxxxxxxxxxxxxxxxxxxx
xxxxxxxxxxxxxxxxxxxxxxxxxxxxxxxxxxxxxxxxxxxxxxxxxxxxxxxxxxxxxxxxx
XXXXXXXXXXXXXXXXXXXXXXXXXXXXXXXXXXXXXXXXXXXXXXXXXXXXXXXXXXXXXXXXX
xxxxxxxxxxxxxxxxxxxxxxxxxxxxxxxxxxxxxxxxxxxxxxxxxxxxxxxxxxxxxxxxx
YYYYYYYYYYYYYYYYYYYYYYYYYYYYYYYYYYYYYYYYYYYYYYYYYYYYYYYYYYYYYYYYY
YYYYYYYY MYYYYYyYYYYYMYYYYYYYYYYYYYYYYYYYYYYYMYYMYYYYYYYYY
zzzzzzzzzzzzzzzzzzzzzzzzzzzzzzzzzzzzzzzzzzzzzzzzzzzzzzzzzzzzzzzzz
zzzzzzzzzzzzzzzzzzzzzzzzzzzzzzzzzzzzzzzzzzzzzzzzzzzzzzzzzzzzzzzzz
xxxxxxxxxxxxxxxxxxxxxxxxxxxxxxxxxxxxxxxxxxxxxxxxxxxxxxxxxxxxxxxxx
•
XXXXXXXXXXXXXXXX
XXXXXXXXXXXXXXXX
XXXXXXXXXXXXXXXX
XXXXXXXXXXXXXXXX
XXXXXXXXXXXXXXXX
XXXXXXXXXXXXXXXX
XXXXXXXXXXXXXXXXXXXX
XXXXXXXXXXXXXXXXXXXX
XXXXXXXXXXXXXXXXXXXX
XXXXXXXXXXXXXXXXXXXX
XXXXXXXXXXXXXXXXXXXX
XXXXXXXXXXXXXXXXXXXX
xxxxxxxxxxxxxxxxxxxxxxxxxxxxxxxxxxxxxxxxxxxxxxxxxxxxxxxxxxxxxxxxx
zzzzzzzzzzzzzzzzzzzzzzzzzzzzzzzzzzzzzzzzzzzzzzzzzzzzzzzzzzzzzzzzz
zzzzzzzzzzzzzzzzzzzzzzzzzzzzzzzzzzzzzzzzzzzzzzzzzzzzzzzzzzzzzzzzz
YYYYYYYYYYYYYYYYYYYYYYYYYYYYYYYYYYYYYYYYYYYYYYYYYYYYYYYYYYYYYYYYY
YYYYYYYYYYYYYYYYYYYYYYYYYYYYYYYYYYYYYYYYYYYYYYYYYYYYYYYYYYYYYYYYY
XXXXXXXXXXXXXXXXXXXXXXXXXXXXXXXXXXXXXXXXXXXXXXXXXXXXXXXXXXXXXXXXX
xxxxxxxxxxxxxxxxxxxxxxxxxxxxxxxxxxxxxxxxxxxxxxxxxxxxxxxxxxxxxxxxx
put this in box
WordStar
Page 5-99
File: MESSWORK
XXXXXXXXXXXXXXXXXXXXXXXXXXXXXXXXXXXXXXXXXXXXXXXXXXXXXXXXXXXXXXXXX
XXXXXXXXXXXXXXXXXXXXXXXXXXXXXXXXXXXXXXXXXXXXXXXXXXXXXXXXXXXXXXXXX
xxxxxxxxxxxxxxxxxxxxxxxxxxxxxxxxxxxxxxxxxxxxxxxxxxxxxxxxxxxxxxxxx
YYYYYYYYYYYYYYYYYYY
YYYYYYYYYYYYYYYYYYYYY
YYYYYYYYYYYYYYYYYYYYYYYYY
xxxxxxxxxxxxxxxxxxxxxxxxxxxxxxxxxxxxxxxxxxxxxxxxxxxxxxxxxxxxxxxxx
xxxxxxxxxxxxxxxx
xxxxxxxxxxxxxxxxxxxx
xxxxxxxxxxxxxxxx
xxxxxxxxxxxxxxxxxxxx
xxxxxxxxxxxxxxxx
xxxxxxxxxxxxxxxxxxxx
xxxxxxxxxxxxxxxx
put this in box
xxxxxxxxxxxxxxxxxxxx
xxxxxxxxxxxxxxxx
xxxxxxxxxxxxxxxxxxxx
xxxxxxxxxxxxxxxx xxxxxxxxxxxxxxxxxxxx
xxxxxxxxxxxxxxxxxxxxxxxxxxxxxxxxxxxxxxxxxxxxxxxxxxxxxxxxxxxxxxxxx
zzzzzzzzzzzzzzzzzzzzzzzzzzzzzzzzzzzzzzzzzzzzzzzzzzzzzzzzzzzzzzzzz
zzzzzzzzzzzzzzzzzzzzzzzzzzzzzzzzzzzzzzzzzzzzzzzzzzzzzzzzzzzzzzzzz
YYYYYYYYYYYYYYYYYYYYYYYYYYYYYYY
YYYYYYYYYYYYYYYYYYYYYYYYYYYYYYYYYY
YYYYYYYYYYYYYYYYYYYYYYYYYYYYYYYYYYYYYYYYYYYYYYYYYYYYYYYYYYYYYYYYY
XXXXXXXXXXXXXXXXXXXXXXXXXXXXXXXXXXXXXXXXXXXXXXXXXXXXXXXXXXXXXXXXX
ZZZZZZZZZZZZZZZZZZZZZZZZZZZZZZZZZZZZZZZZZZZZZZZZZZZZZZZZZZZZZZZZZ
zz,Zzzz =zzzzz22ZZZ2ZZ2222ZZZZZ2Z2ZZZZZZZZZZZZZZZZZ22ZZZ2ZZZZZZZZ
YYYYYYYYYYYYYYYYYYYYYYYYYYYYYYYYYYYYYYYYYYYYYYYYYYYYYYYYYYYYYYYYY
XXXXXXXXXXXXXXXXXXXXXXXXXXXXXXXXXXXXXXXXXXXXXXXXXXXXXXXXXXXXXXXXX
XXXXXXXXXXXXXXXXXXXXXXXXXXXXXXXXXXXXXXXXXXXXXXXXXXXXXXXXXXXXXXXXX
Page 5-100
WordStar
•
Week 11,
DAY 2
Major Content: Review Quiz #4
Objectives: Review test results. Additional practice on the concepts presented in
this instructional unit.
materials: Test file (WSQuiz#4) hard copy.
Lecture:
1. Review each test question and exercise with group.
2. Concentrate on particular problems any student(s) may have. Provide additional
explanations and demonstrations as necessary.
Class Activity:
1. Hand each student back his/her test results.
2. Question students as to the correct answer to each test item. Review concepts of
test material as necessary. Emphasize any particular problems with
explanations and/or demonstrations.
Bxpected Outcome:
At the conclusion of this activity, each student should be able to
recognize his/her areas of concept difficulties and demonstrate
competency in using the Block Menu commands.
WordStar
Page 5-101
•
NOTES:
•
•
Page 5-102
WordStar
Week 12
DAY 1
Major Content: Dot commands; Omit Pagination; Page Offset; Page Break.
Objectives: Introduce the dot commands and their effect on the printed document.
1VIaterials and Software: WordStar, Turbo Lightning. WordStar Handout #8
explaining dot commands and Lab Assignment #12 which contains step-by-step
instructions.
Lecture:
1. Discussion of dot commands and their effect onscreen versus their effect on the
printed document.
a. Discuss the concept of page offset and default page offset settings.
Demonstrate with different page offset numbers.
b. Discuss the concept of pagination including omission and placement of
page numbers.
c. Discuss the concept of hard page break dot command. Demonstrate
when and where to use this dot command.
Class Activity:
The following activity is to be presented in lecture and/or demonstration format
followed by group/individual assignments.
1. Have each student open a previous lab assignment.
2. Introduce the dot commands for page offset. Experiment with different page
offset numbers and print out the results.
3. Introduce the dot command for omitting pagination.
4. Introduce the dot command for setting a page break. Discuss placement and use
of this command.
Expected Outco • e:
The student will be able to demonstrate competency using the dot
commands. This includes proper placement for omitting pagination,
page offset, and setting a page break.
Outside Reading:
•
WordStar Handout #8 explaining dot commands.
WordStar
Page 5-103
Lab Assignment:
Lab Assignment #12 which contains step-by-step instructions.
Expected Outcome:
At the conclusion of Lab Assignment #12, each student will
demonstrate competency in using the dot commands discussed. This
includes dot commands to omit pagination, page offset, and set page
break.
•
Page 5-104
WordStar
•
COMPUTER ACCESS I
GETTING TO KNOW WORDSTAR
WORDSTAR HANDOUT #8 - DOT COMMANDS
The following is a summary of some WordStar commands. The "A" symbol before a
letter represents the Control key and means that the Control key is to be pressed and
held down as the next key is pressed. For example, AP means that you are to press
the Control key then the letter P while still holding down the Control key. If this
symbol does not appear before the letter then that letter is pressed alone. The
commands are categorized by their usage.
DOT COMMANDS
All Dot commands MUST begin in column 1
Dot commands that affect page or document appearance when PRINTED
•
.PLn ...................... Changes paper length .PLn (n = # of lines)
(default = 66 lines, 6 lines per inch)
.MTn ...................... Changes top margin (n = # of lines)
(default = 3 lines)
.MBn ...................... Changes bottom margin (n = # of lines)
(default = 8 lines)
.POn
Changes left margin offset (n = # of columns)
(default = 8 columns)
Dot commands that affect pagination
.PA ....................... Sets required page break
Dot commands that affect page numbering
.OP ........................ Omits page numbering
.PN ........................ Resumes page numbering
.PNn ...................... Specifies different page # (n = page number)
.PCn ...................... Sets column at which page number prints
when no footing (.FO) is given (n = column
number, default = center column)
•
Initial use: Week 12, Day 1
WordStar
Page 5-105
•
NOTES:
•
Page 5-106
WordStar
•
Weekly Lab Assignment: Week 12
COMPUTER ACCESS I
LAB ASSIGNMENT #12 - DOT COMMANDS
V 11.11
_
_
_ ail_ V
WA&
•
OPEN A FILE CALLED "WEATHER.TXT" AND PERFORM THE ACTIONS
DESCRIBED IN THE FOLLOWING STEPS.
STEP 1- USE DOT COMMANDS TO OMIT PAGE NUMBERING AND CREATE
A PAGE OFFSET OF 4.
STEP 2 - WRITE THREE PARAGRAPHS ABOUT YOUR FAVORITE KINDS OF
WEATHER.
STEP 3 - SHOW UNDERSTANDING OF THE EFFECT OF THE PAGEBREAK
DOT COMMAND BY PLACING A PAGE BREAK IN THE MIDDLE OF
PARAGRAPH 1.
STEP 4 - SAVE THE FILE
STEP 5 - PRINT THE FILE AND TURN IT IN TO THE INSTRUCTOR.
WordStar
Page 5-107
•
NOTES:
Page 5-108
WordStar
•
Week 12
DAY 2
Major Content: Working with dot commands.
Objectives: Provide additional practice in placement and use of the dot commands
for omitting pagination, page offset and setting page breaks.
Materials and Software:, WordStar, Turbo Lightning. WordStar Handout #8
explaining dot commands.
Lecture:
1. Question students on the placement and use of dot commands for omitting
pagination, page offset and setting page breaks.
2. Discuss and demonstrate problems student(s) may have using these dot
commands.
Class Activity:
The following activity should be in the form of group/individual assignments.
1. Have each student open up any previous lab assignment.
2. Review placement and use of dot commands for omitting pagination, page offset
and setting page breaks.
Expected Outcome:
At the completion of this activity, each student should have a firm
grasp of the concepts of dot commands including placement and use.
WordStar
Page 5-109
NOTES:
Page 5-110
WordStar
Week 13
DAY 1
Major Content: Dot commands; setting margins at top and bottom of file; setting
page length.
Objectives: Introduce additional dot commands and their effect on the printed
document.
IVIaterials and Software: WordStar, Turbo Lightning. Handout #8 explaining dot
commands and Lab Assignment #13 which contains step-by-step instructions for
this class/lab activity.
Lecture:
1. Discussion of additional dot commands and their effect onscreen versus the
printed document.
a. Discuss the concept of setting top and bottom margins using dot
commands. Emphasize that these dot commands must be placed at the
top of the file in order to be effective. Demonstrate the effect on the
document by using different number settings with these commands.
b. Discuss the concept of setting page length using a dot command.
Demonstrate the relationship between the .MT, .M:13 and the .PL dot
commands i.e. changing margins at top and bottom alters the page
length.
2. Notify students of a quiz covering dot commands on Week 13, DAY 2.
Class Activity:
The following activity is to be presented in lecture and demonstration format
followed by group/individual assignments.
1. Have each student open up any previous lab assignment.
2. Introduce the dot commands for setting the margins at the top and bottom of the
file. Experiment with different number settings to see their effect of the printed
document.
3. Introduce the dot commands for setting page length.
Expected Outcome:
Students will be able to demonstrate competency using the
additional dot commands for setting margins at the top and bottom
of the page as well as for setting the page length.
Outside Reading:
•
WordStar Handout #8 explaining dot commands.
WordStar
Page 5-111
Lab Assignment:
Begin Lab Assignment #13 in class and complete during lab time.
•
Expected Outcome:
At the conclusion of this activity, the student will be able to
demonstrate how to use dot commands which change the
appearance of a printed document through proper placement of each
dot command. Additionally, the student will be able to discuss the
difference between the effect of dot commands on the printed page
versus what is shown onscreen (e.g. some dot commands, e.g., .op
and .pa, do not affect the onscreen version of the document).
•
•
Page 5-112
WordStar
•
Weekly Lab Assignment: Week 13
COMPUTER ACCESS I
CLASS/LAB ASSIGNMENT #13 - ADDITIONAL DOT COMMANDS
• ur
Mtn
0_0__E a
I.
•
1_11
II
STEP 1- OPEN ANY PREVIOUS LAB ASSIGNMENT LONGER THAN ONE
PAGE.
STEP 2 - USE THE DOT COMMAND TO
NUMBER.
SEIMMIQBALARalli.
CHOOSE ANY
STEP 3 - USE THE DOT COMMAND TO SET THE BOTTOM MARGIN. CHOOSE
ANY NUMBER.
STEP 4 -
SAVE THIS MR AND PRINT IT.
STEP 5 - OPEN THE PRINTED FILE AGAIN.
STEP 6 - USE THE DOT COMMAND TO SET THE PAGE LENGTH.
ANY NUMBER.
STEP 7 - SAVE THIS FT] Y, AND
•
CHOOSE
PRINT IT.
STEP 8 - REPEAT STEPS 2 THROUGH 7 FOUR TIMES, USING DU
NUMBER SETTINGS EACH TIME.
ERENT
STEP 9 - TURN IN FIVE DIFFERENT PRINT OUTS TO THE INSTRUCTOR.
•
WordStar
Page 5-113
NOTES:
Page 5-114
WordStar
Week 13
DAY 2
Major Content: Quiz #5
Objectives: Assess students' knowledge of dot commands.
Ma - rials: Test file (WSQuiz#5) copied to student disk.
Lecture:
Administer test.
Class Activity:
Test taking. When student has completed the test, s/he will print the test and turn
it in to the instructor.
Expected Outcome:
•
The student will be able to display competency in the use and
placement of dot commands by successfully completing a quiz on the
dot commands for omitting page numbers, setting page offset,
setting top and bottom page margins, and setting required page
breaks.
fnstructional Unit Outcome:
At the conclusion of this instructional unit, each student will demonstrate how to place and use
dot commands within a file. This includes dot commands for omitting page numbers, setting page
offset, setting top and bottom page margins, and setting required page breaks.
•
WordStar
Page 5-115
NOTES:
Page 5-116
WordStar
Week 13, Day 2
COMPUTER ACCESS I
QUIZ #5: DOT COMMANDS
NAME:
DATE:
CHOOSE THE BEST ANSWER TO THE FOLLOWING QUESTIONS:
1. What is the WS dot command to omit page numbers?
a..PO
b. .MT
ANSWER:
c..OP
d. .MB
2. What is the WS dot command to set the top margin of the document?
a. .TM
b. .PA
ANSWER:
c. .LM
d ..MT
3. What is the WS dot command to set a required page break?
a. .PA
b. .RP
ANSWER:
c. .MB
d. .PL
4. What is the WS dot command to set the bottom margin of the document?
a. .MB
b. .BM
ANSWER:
c..OP
d. .MT
5. What is the WS dot command to set the page length of the document?
a. .LP
b. .PA
ANSWER:
c. .PL
d. .0P
6. Which WS dot command is used to change the page offset?
a..PO
b. .0P
ANSWER:
c. .PA
d. .MB
WordStar
Page 5-117
7. The WS dot commands require a dot (period) plus two letters immediately
following. What other information follows these two letters?
a. Your Name
b. A Number
ANSWER:
c. The Date
d. A Question Mark
8. Place the following dot commands in their correct place in the text on the next
page.
a. .0P
b. .P0 4
c. .MT 3
d. .MB 3
e. .PA
f. .PL 55
•
Page 5-118
WordStar
•
Quiz 5, p.2
PLANTS IN A CHANGING LAND
by
William R. Jones
During the Ice Age, when the climate of much of the world was cooler, many
alpine plants were forced to keep moving to ever-lower elevations, as temperatures
dropped and snowfall increased. Once beyond the influence of the cold, they spread
laterally, colonizing the greater area available to them - such as the shores of lakes
that formed in the desert of the Great Basin. there they intermingled with other
plants that had moved down the slopes of nearby mountains. Meanwhile, arctic
plants moved southward, in front of the advancing continental glaciers, mixed with
the alpine plants.
•
•
WordStar
Page 5-119
•
NOTES:
Page 5-120
WordStar
Week 14
DAY 1
Major Content: No new WS material to be presented; class assignment is to
synthesize student WordStar skills.
Objectives: Each student will use current WS knowledge to write a letter.
Materials and Software: WordStar, Turbo Lightning. All class handouts containing
WS commands. Lab assignment #14 which contains step-by-step instructions.
Lecture:
1. Instruct students to write a letter, following the format given in Lab
Assignment #14, which expresses their feelings and experiences in the Adapted
Computer Technology Program; include statements about their individual
adaptations and use of Wordstar and Turbo Lightning this semester.
Class Activity:
The following activity is to be presented in individual assignments; students will
begin the assignment in class. Lab time will be used to complete the assignment.
•
1. Have each student open a document and write a letter to their legislative
representative. Encourage each student to express his/her feelings and
experiences in the Adapted Computer Technology Program to date. Urge each
student to include statements about their individual access adaptations and use
of Wordstar and Turbo Lightning this semester.
Expected Outcome:
The student will be able to use all current WS knowledge learned to
date for composing a letter. This includes utilizing the Spell
Checker, the Onscreen Menu, the Print Menu, the Block Menu, and
dot commands as required.
Outside Reading:
All class handouts relating to WS commands.
WordStar
Page 5-121
•
Lab Assignment:
Lab Assignment #14 which contains step-by-step instructions.
Expected Outcome:
At the end of this activity each student will have completed a letter
in which he/she has made optimal use of dot commands as well as
WordStar commands from the Onscreen, Print and Block Menus.
•
•
Page 5-122
WordStar
Weekly Lab Assignment: Week 14
COMPUTER ACCESS I
LAB ASSIGNMENT #14 - REVIEW OF ESSENTIAL WORDSTAR COMMANDS
ur
111_
• d
i
,
•
•
zo
xfol V k
PRESENTED.
STEP 1- OPEN A DOCUMENT CALLED "LAB#14.TXT."
STEP 2 - SET YOUR LEFT MARGIN AT 10 AND YOUR RIGHT MARGIN AT 70.
STEP 3 - USE THE DOT COMMANDS TO:
A. OMIT PAGE NUMBER
B. OFFSET THE PAGE TO 4
C. SET MARGIN AT TOP TO 10
D. SET MARGIN AT BOTTOM TO 6
E. SET PAGE LENGTH TO 60
F. INCLUDE A PAGE BREAK WHEN FINISHED
STEP 4 - USE THE WS COMMANDS FROM THE ONSCREEN MENU, THE
BLOCK MENU, AND THE PRINT MENU AS REQUIRED.
•
STEP 5 - WRITE A LE'ri'ER TO THE FOLLOWING PERSON TELLING HIM
ABOUT YOUR FEELINGS AND EXPERIENCES IN THE COMPUTER
ACCESS I. BE SURE TO INCLUDE STATEMENTS ABOUT YOUR
INDIVIDUAL ADAPTATIONS, USING WORDSTAR AND TURBO
LIGHTNING, CLASS ASSIGNMENTS, MATERIAL PRESENTED, ETC.
YOUR LEGISLATIVE REPRESENTATIVE
CALIFORNIA STATE CAPITOL
SACRAMENTO, CALIFORNIA 95814
Dear Legislator,
Sincerely,
Your Name, Student
• Your College
For use with Week 14
Also for use with Week 15
•
WordStar
Page 5-123
NOTES:
Page 5-124
WordStar
Week 14
DAY 2
Major Content: No new WordStar skills; continue to synthesize student WordStar
skills.
Objectives: To continue the letter writing assignment.
Materials and Software: WordStar, Turbo Lightning. All class handouts containing
WS commands. Lab assignment #14 which contains step-by-step instructions.
Lecture:
1. Individual appointment with each student to discuss the contents of his/her
letter (did s/he include statements regarding special adaptations, use dot
commands correctly, etc.).
2. Guide students with revisions if necessary.
Class Activity:
The following activity is to be presented in individual assignments.
•
1. Provide individual guidance on letter format (e.g. use of dot commands,
Onscreen menu commands, etc.) Have students discuss all adaptive access
technologies which they use.
xnected 0 tcome:
In the creation of this document, the student will have appropriately
used commands from the Onscreen menu Menu, the Print Menu,
the Block Menu as well as dot commands.
Additionally, each student will have stated, and demonstrated an
understanding of, the ways in which adaptive technologies have
enabled him/her to use a computer more effectively.
•
WordStar
Page 5-125
•
NOTES:
Page 5-126
WordStar
4110
Week 15
DAY 1
Major Content: No new WS material presented; continue synthesis of student
WordStar skills.
Objectives: Review text organization and set-up. This includes setting left and
right margins; setting tab stops; setting line spacing; use of dot commands;
centering text; and paragraph reform.
Materials and Software: WordStar, Turbo Lightning. All class handouts explaining
WS commands and Lab Assignment #15 which contains step-by-step instructions.
Lecture:
1. Review all previously discussed Onscreen Menu commands.
a. These include setting left and right margins, setting tab stops, setting
line spacing, and centering text.
2. Review command for paragraph reform ( A QQ AB and AB).
3. Review dot commands which affect the printed document.
•
Class Activity:
The following activity is to be presented in lecture and demonstration format
followed by individual assignments.
1. Have each student open a document entitled "Lab#15.txt."
2. Lead the student through proper text set-up procedures emphasizing margins,
tabs, etc.
a. Guide the student through analysis of the document in Lab
Assignment #15, making sure they know how to reproduce this
document accurately.
Expected Outcome:
The student will be able to access and use the appropriate Onscreen
Menu commands for text set-up and organization. This includes
competency in setting margins, tabs, line spacing, and centering
text as well as paragraph reform.
•
WordStar
Page 5-127
Outside Reading:
None
Lab Assignment:
Lab Assignment #15 which contains step-by-step instructions.
expected Outcome:
At the conclusion of Lab Assignment #15, the student should be able
to perform basic set-up commands i.e. setting margins, tabs and line
spacing as well as text organization commands i.e. centering of text
as well as paragraph reform.
40
Page 5-128
WordStar
•
Weekly Lab Assignment: Week 15
COMPUTER ACCESS I
LAB ASSIGNMENT #15 -
REVIEW OF ESSENTIAL WORDSTAR COMMANDS
STEP 1- OPEN A DOCUMENT CALLED "LAB#15.TXT."
STEP 2 - USE THE DOT COMMANDS AS FOLLOWS:
A.MARGIN AT TOP = 6
B. MARGIN AT BOTTOM = 6
C.PAGE OFFSET = 0
D. OMIT PAGE NUMBER
STEP 3 - SET THE LEFT MARGIN TO 20 AND THE RIGHT MARGIN TO 45.
STEP 4 - CLEAR ALL TABS. SET ONE TAB AT 25; SET ANOTHER TAB AT 35.
STEP 5 - CENTER THE TITLE "FIRE: FOE OR FRIEND?"
STEP 6 - TYPE THE FOLLOWING TEXT AS
•
WRI'rrEN.
NAME DATE
FIRE: FOE OR FRIEND?
Summer and autumn fires are also a part of the natural
environment in which the giant sequoia lives. In fact, the
mature sugar pine and ponderosa pine that live together
with the giant sequoia in the mixed-conifer forests of the
Sierra Nevada all rely on these occasional fires for their
existence. Without fire to clear out the limb canopy
overhead, the sunlight would not penetrate to the
offspring of these sun-loving trees, which would languish
in the shadows below. The forests would fill instead with
the shade-tolerant white fir and incense cedar.
Forest managers have long known that fire is requisite to
certain kinds of plant life;however, it is only in recent
years that this natural laws begun to be understood by
the public. Virtually all of the specimens trees in the
groves show fire scars on their trunks, proving that they
have survived many fires of the past. Dry sequoia
heartwood burns well, but the highly insulative
characteristics of the mature tree's bark - which may be
as much as eighteen inches thick- serves as a very
effective defense against fire.
•
WordStar
Page 5-129
STEP 7 - SAVE THIS DOCUMENT AND PRINT IT OUT. TURN IT INTO THE
INSTRUCTOR.
STEP 8 - OPEN THIS DOCUMENT AGAIN.
•
STEP 9 - RESET THE LEFT MARGIN TO 10 AND THE RIGHT MARGIN TO 50.
STEP 10 -RESET THE LINE SPACING TO DOUBLE SPACING.
STEP 11-REFORM THE TEXT ACCORDINGLY.
STEP 12 -SAVE THIS DOCUMENT AND PRINT IT OUT. TURN IT IN TO THE
INSTRUCTOR.
•
Page 5-130
WordStar
Week 15
DAY 2
Major Content: Review WordStar commands in preparation for Final Exam.
Objectives: Continuation of Lab Assignment #15.
Materials and Software: WordStar, Turbo Lightning. All class handouts explaining
WS commands and Lab Assignment #15 which contains step-by-step instructions.
Lecture:
1. Assist the student in completing Lab Assignment #15. Review WS commands as
required. Focus on any particular problems s/he may have relating to the
completion of this assignment.
Class Activity:
Continue with lab assignment #15.
Expected Outcome:
•
At the conclusion of Lab Assignment #15, the student will
demonstrate consistent proficiency in performing basic set-up
commands (i.e., setting margins, tabs and line spacing), in addition
to text organization commands (i.e. centering of text as well as
paragraph reform).
•
WordStar
Page 5-131
•
NOTES:
•
Page 5-132
WordStar
•
Week 16
DAY 1
Major Content: No new WS material presented; review for Final Exam.
Objectives: Review Block Menu commands: "marking" beginning and ending of
block; moving blocks of texts; "reading" a file into another file.
Materials and Software: WordStar, Turbo Lightning. WordStar Handout #7
containing Block Menu commands. Lab Assignment #16 which contains step-by-step
instructions.
Lecture:
1. Review all Block Menu commands.
2. Demonstrate these commands as required.
Class Activity:
The following class activity is to be completed in individual assignments.
1. Have the student open a document labeled "Lab#16.txt."
•
2. Lead them through the procedure for "reading" from one file to another. In this
case, from "Lab#15.txt" into "Lab#16.txt."
3. Guide the student through the procedure for rearranging the second paragraph
of "Lab #16.txt."
Expected Outcome:
When the student is finished with this lab assignment, s/he will be
able to effectively use the Block Menu commands for editing
purposes. This includes commands for "marking" beginning and
ending of block; moving blocks of texts; "reading" and "writing" files.
Outside Reading:
WordStar Handout #7 on Block Menu commands.
Lab Assi
e t:
Lab assignment #16 which contains step-by-step instructions.
•
WordStar
Page 5-133
Expected Outcome:
On completion of this lab assignment, the student will demonstrate
use of the Block Menu commands for "cut and paste" activities, and
demonstrate competency in"marking" the beginning and ending of a
block of text, moving blocks of texts, "reading" and "writing" files.
•
•
Page 5-134
WordStar
Weekly Lab Assignment: Week 16
COMPUTER ACCESS I
LAB ASSIGNMENT #16, - REVIEW OF ESSENTIAL BLOCK MENU COMMANDS
•
_ L TA • _
_
_Oa
b
6_1_ •
La
'
011
STEP 1- OPEN THE DOCUMENT CALLED "LAB#16.TXT."
STEP 2 - USING BLOCK MENU COMMANDS, "READ" INTO THE FILE
CALLED "FIRE.TXT."
STEP 3 - SET THE LEFT MARGIN TO 10 AND THE RIGHT MARGIN AT 55.
STEP 4 - REARRANGE THE FOLLOWING PARAGRAPH IN THE CORRECT
ORDER. (YOU MAY NEED TO USE "LAB#15.TXT" AS GUIDE)
;however, it is only in
recent laws that this
natural years begun to be
understood by the Forest.
public managers have long
known that fire is
requisite to certain kinds
of plant life Virtually
all of the specimens trees
in the groves show fire
scars on their trunks,
proving that they have .
Dry sequoia heartwood
burns well, survived many
fires of the past but the
highly insulative
characteristics of the
mature tree's bark - serves as a very effective
defense against fire.
which may be as much as
eighteen inches thick
41)
STEP 5 - USING BLOCK MENU COMMANDS, MARK OFF THE ENTIRE FILE
AND "WRITE" IT TO A FILE NAMED "FOREST.TXT."
STEP 6 - CANCEL THE CURRENT DOCUMENT.
STEP 7 - PRINT OUT "FOREST.TXT" AND TURN IT IN TO THE INSTRUCTOR.
•
WordStar
Page 5-135
•
NOTES:
•
Page 5-136
WordStar
•
Week 16
DAY 2
IVIajor Content: No new WS material; review for Final Exam.
Objectives: Continuation of Lab Assignment #16.
Materials and Software: WordStar, Turbo Lightning. WordStar Handout #7
containing Block Menu commands Lab Assignment #16 which contains step-by-step
instructions.
Lecture:
1. Assist the student in completing Lab Assignment #16. Review Block Menu
commands as needed. Focus on any particular problems students may have
pertaining to this assignment.
Class Activity:
Continue with Lab Assignment #16.
Expected Outcome:
At the end of this activity, the student should be able to
demonstrate competency
in using the Block Menu commands for
"cut and paste" tasks. Specific Block Menu commands involve
"marking" the beginning and ending of a block; moving blocks of
text; and. "reading" and "writing" files.
WordStar
Page 5-137
•
NOTES:
•
Page 5-138
WordStar
•
Week 17--DEAD WEEK–NO CLASSES
WordStar
Page 5-139
NOTES:
Page 5-140
WordStar
Week 18
DAY 1
IVIajor Content: Final Exam
Objectives: Assess students' knowledge of all WordStar commands covered during
the entire semester. This assessment will include commands from the Opening
Menu, Onscreen Menu, Block Menu, Print Menu, and miscellaneous commands.
Materials: Test hard copy given to each student. The instructor will have prepared
a disk which contains the files used for the final exam.
Lecture:
Administer test.
Class Activity:
Test taking. When the student has completed the test, s/he will print the test and
turn it in to the instructor.
Expected Outcome:
The student will be able to analyze the necessary steps to complete
the final exam and demonstrate competency in apply ' g all
Wordstar commands acquired during the semester. These include
commands from the Opening Menu, Onscreen Menu, Block Menu,
Print Menu, and miscellaneous commands.
Instructional Unit Outcome:
At the conclusion of this unit each student will demonstrate effective use of an on-line spell check
program and basic word processing skills at a competency level which allows for basic
independent file creation, file editing and document production.
Overall Course Outcome;
At the conclusion of this course, each student will demonstrate effective
use of an adapted technology in the context of a word processor. For
students taking this class, successful mastery of a word processor for
standard document production is also indicative of successful use of an
adapted technology.
WordStar
Page 5-141
NOTES:
Page 5-142
WordStar
•
COMPUTER ACCESS I
*******************************
* WORDSTAR FINAL EXAMINATION *
*******************************
1. OPEN A FILE NAMED "FINAL.TST."
2. SET THE MARGINS TO: LEFT =10 AND RIGHT =. 70.
3. CLEAR ALL TABS AND SET TWO TABS: ONE AT 15 AND ANOTHER AT 30.
4. PLACE DOT COMMANDS TO:
A. OMIT THE PAGE NUMBER
B. SET THE TOP AND BOTTOM MARGINS TO 6
C. SET THE PAGE OFFSET TO 4
D. PLACE A PAGE BREAK AT THE END OF THE FILE
5. USE THE TAB STOPS TO WRITE YOUR NAME AND TODAY'S DATE.
6. USE BLOCK MENU COMMANDS TO "READ" THE FILE CALLED
"PARALTXT" AND PLACE IT AT THE BEGINNING OF THE OPEN FILE.
7. USE BLOCK MENU COMMANDS TO "READ" THE FRY, CALLED
"PARA2.TXT" AND PLACE IT AT THE END OF THE FILE "PARALTXT."
8. USE BLOCK MENU COMMANDS TO "READ" THE FILE CALLED
"PARA3.TXT" AND PLACE IT AT THE END OF THE FILE "PARA2.TXT."
9. USE BLOCK MENU COMMANDS TO SWITCH THE SECOND AND THIRD
PARAGRAPHS.
10. REFORM ALL THE PARAGRAPHS ACCORDING TO THE CURRENT
MARGIN SETTINGS.
11. USING PRINT MENU COMMANDS, UNDERLINE AND BOLDFACE THE
TITLE OF THE STORY.
12. CENTER THE TITLE OF THE STORY.
13. SET THE LINE SPACING TO DOUBLE SPACED.
14. REFORM ALL THE PARAGRAPHS ACCORDING TO THE NEW LINE
SPACING.
15. PERFORM A FULL SCREEN SPELL CHECK AND CORRECT ANY
MISSPELLED WORDS.
16. USING BLOCK COMMANDS, MARK OFF THE ENTIRE DOCUMENT AND
"WRITE" THIS TO A FILE CALLED "FINAL.LAB."
17. SAVE THIS DOCUMENT AND PRINT IT OUT. TURN IN YOUR HARD
COPY TO THE INSTRUCTOR.
WordStar
Page 5-143
NOTES:
Page 5-144
WordStar