1
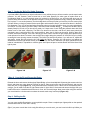
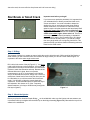
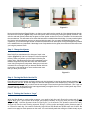
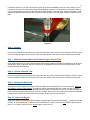
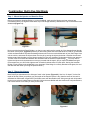
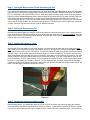
__________________________________________
Windshield Repair Technical Manual
American Windshield Repair Systems
20936 State Route 410 East
Bonney Lake, WA 98390
Phone: 888.860.1518
Fax: 253.891.7284
Email: [email protected]
Website: www.rockchipkits.com
2
Starting a Windshield Repair Business Manual by:
American Windshield Repair Systems & Apex Auto Glass, Inc.
20936 State Route 410 East
Bonney Lake, WA 98390
Phone: 888.860.1518
Fax: 253.891.7284
Email: [email protected]
Website: www.rockchipkits.com
© 1999 by American Rock Chip Kits
All Rights Reserved. No part of this document may be reproduced in any form without the permission of American
Windshield Repair Systems & Apex Auto Glass Inc.
3
Table of Contents
Introduction to Windshield Repair…………………………………………………………………………
Product Care & Precautions…………………………………………………………………………………
Type of Chips…………………………………………………………………………………………………..
Bulls Eye Repair……………………………………………………………………………………………….
Star Repair……………………………………………………………………………………………………...
Combination Repair…………………………………………………………………………………………..
Crack Repair…………………………………………………………………………………………….……..
Technical FAQ’s…………………………………………………………………………………....………….
5
6
6
7
10
14
16
17
Figure List
Figure 1.1- Star Break Chip……………………….…………………………………………………………
Figure 1.2- Bull’s Eye Chip…………………..………………………………………………………………
Figure 1.3- Small Crack……………...…………...…………………………………………………………..
Figure 2.1- Bulls Eye Repair…….……..…………………………………………………………………….
Figure 2.2- American Repair Bridge …….………………………………………………………………...
Figure 2.3- Correct Position Over Chip …………………………………………………………………..
Figure 2.4- Charging the Injector…………………………………………………………………….……..
Figure 2.5- Correct Bridge Use.………………………………………………………………....………….
Figure 2.6- Bull’s Eye Curing Under Pressure ………………………….……………………………..…
Figure 2.7- Correct Positioning of UV Light During Curing Process………………….………..…...
Figure 2.8- Clearing off Excess Resin w/ Razor Blade……..…………………………………………..
Figure 3.1- Drilling the Pit: ……………………….………………………………………………………….
Figure 3.4- Probing the Cracks of a Star Break…..………………………………………………………
6
6
6
7
7
7
8
8
9
9
9
10
12
4
5
Welcome to the windshield and rock chip repair industry. This introduction manual is designed to give
you basic information to begin a windshield repair business and technical training by answering basic
questions about windshield repair and running a windshield repair business. Feel free to visit us online at
www.rockchipkits.com for further information and product support.
An Introduction to Windshield Repair
In the early 1970’s windshield repair was introduced with the advent of equipment and resins to repair damages to
laminated windshields. As the newly emerging industry grew, newer equipment and resins began making their way
into the scene, making it economical, even profitable to repair auto glass. Windshield repair, when done properly
offers the following:
!
!
!
!
Restoration of the windshield strength and integrity.
Further damage of cracking or splitting.
Improved optical clarity in damages area.
Retained original seal and saves the windshield.
The auto glass repair industry has grown considerable since the 1970’s and has become an accepted and serious
division of the auto glass industry. As car manufactures continue to increase the use of laminated and tempered
glass to function as important safety features in every car’s design, the importance of repairing windshield damage
verses replacing it will continue to grow!
What is Windshield Repair?
Windshield repair is the simple process of injecting a liquid resin into the damaged area of the windshield and
allowing it to cure, thereby restoring the integrity of the glass and preventing further damage from occurring. Most
people are unaware that a windshield is made of two separate pieces of glass with a layer of lamination in the
middle. This lamination is a thin layer of clear soft PVP. Lamination is a required safety feature in the manufacturing
process, designed to prevent the glass from shattering in the even of a crack or break, as well as preventing road
debris from reaching the driver. When a windshield is “chipped or dinged” in general only the outer layer of glass is
damaged and this is the layer of glass the repair technician will be working with.
Windshield Repair Systems
The following are the key basic components you will need in order to do quality repairs for your customers.
•
•
•
•
•
•
•
•
•
Windshield Repair Bridge - This device is used to inject the liquid resin under pressure into the area of
damage.
Repair Resin - Repair resins are sold in several levels of viscosities (thicknesses), each for a different part
of the repair process.
Curing Film – Curing films prevent air and debris from entering the repair while the resins are curing
(drying). They also help to accelerate the curing of the finished repair.
Ultra Violet Light - All windshield repair resins are UV sensitive. When exposed to UV rays whether from
sunlight or a UV light, repair resins are will harden and bond the damaged glass together.
Nitrile Gloves - Used to protect hands from repair resin chemicals. Most resins contain acids that are
harmful to the skin.
Glass Probe - Used to probe cracks and clean debris from the impact area.
Heating Element - Device to warm the repair during the repair process.
Razor Element - Used to scrape off the excess resin from the repair site.
Glass Cleaner & Towel - To clean the windshield once all repairs are completed.
6
Note: It is important to obtain training before you start repairing any windshield with any windshield
repair systems. Read all proper safety precautions! Each system may work differently and you will need
to be familiar with the specifics of that repair system and the repair process so you do not cause further
damage to the glass or injury to yourself or others.
Product Care and Precaution Information
American Repair Bridge™: Please note, before first use wipe all parts with soft cloth and soak injector in
acetone overnight to remove any lubricant with may remain after manufacturing. For nightly storage wipe all
parts with a clean soft cloth. Once a week, during times of heavy use, you should soak the injector and insert in a
small amount of acetone overnight. Remove all seals before soaking. End seals and inner O-rings should be
replaced as needed.
American Repair and Pit Fill Resins: Our repair resins are UV (sunlight) sensitive. Always replace the cap
after use. Be sure to tighten the cap, and store in the carrying case when not in use. Keep resin bottles out of direct
sunlight!
When using any type or brand of repair resin it is recommended that you wear nitrile gloves to protect your skin from
harmful chemicals and safety glasses to protect the eyes from possible resin splashes. If resin enters the eyes
flush immediately with water and seek medical attention! Keep out of reach of children!
Razor Blades: Razor blades should always be stored in a blade keeper. If the blade keeper is not available, it is
recommend that you place a small magnet inside a small storage box (in your carrying case) to keep loose blades
from falling out and becoming a possible safety hazard.
2 Point Probe: The probe should be handled and stored with care. The pointed ends could become damaged if
handled carelessly, and can cause injury to yourself or your customers vehicle.
Different Types of Chips & Damage
Below are the most common types of damage you will find on a windshield.
Figure 1.1
Figure 1.2
Figure 1.3
Star Break
Bull’s Eye
Small Crack
7
Bull’s Eye Repair
Figure 2.1
Important note before you begin!
A Bull’s Eye is actually a small cone shaped break inside the first layer
of glass. (Figure 2.1) As you can see in Figure 2.1, the top of the cone
is where the pit (impact point) is located. The bottom of the cone lays on
the lamination of the windshield. When you repair a Bull’s Eye, you are
forcing resin from the top to the bottom or border area of the cone.
Because the bottom of the cone lays on the lamination, this circular area
is a place where damage can occur to the lamination. When you apply
heat to a windshield or if already hot from the sun, this lamination can
become soft. When repairing a Bull’s Eye or Combination Bull’s Eye
Start Break you will need to keep a close eye on this border area while it
is under pressure to prevent damage to the lamination. If the resin goes
beyond the border, reverse the insert immediately to avoid damage to
the lamination.
Step 1: Mount the Injector and Heat the Glass
Before you place the American Repair Bridge TM on the windshield, make sure the injector and rear setscrew are
unscrewed until they are higher then the brass cup on the bridge assembly (Figure 2.3), otherwise the cup will not
adhere to the windshield properly.
Figure 2.2
Figure 2.3
Next mount the American Repair Bridge TM so that you can easily see the central pit (impact point) of the damaged
area through the center of the injector. (Figure 2.3) Before you begin to screw the injector against the windshield
(minus the insert) go inside the vehicle and heat the Bull’s Eye with the heating element until it is hot to touch with
the back of your index finger. Take care to not over heat the glass as you could melt the lamination. Now you are
ready to screw the injector down over the pit by turning the injector clockwise until the end seal makes contact with
the glass, turn the injector another 3/4 to 1 full turn clockwise until the seals is snug against the glass. Do the same
with the rear setscrew. This will create a tight seal between the windshield and the American Repair Bridge TM. You
may need to tighten or adjust the injector and rear set screw a bit more as you proceed with the repair. (As you
repair windshields and gain more experience, you will find the right amount of tension that works the best for each
repair. Having the injector properly mounted to the windshield is very important! If the bridge is not firmly attached to
the glass, the end seal located at the end of the injector will leak resin when you begin the repair process.)
8
Step 2: Charge the Injector
Most Bull’s Eyes take between 6 to 8 drops of American Repair Resin in the injector (Figure 2.4). Use 8 to 12 drops
if it is the first repair of the day. When you perform your first repair of the day the injector is dry, therefore some of
the resin is absorbed into the threads. Larger Bull’s Eye will take more resin then smaller ones. Using enough
American Repair Resin is important. Having too much resin is better than not enough! Until you become familiar
with how much resin a chip should absorb, use a few drops more than you think you will need.
Figure 2.4
Figure 2.5
Step 3: Forcing the Resin into the Pit and Vacuuming Air Out:
First, make sure you have secured the top outermost portion of the injector with your thumb and index finger as
above in Figure 2.5. With your other hand, place the insert in the injector and begin to slowly screw the insert into
the injector clockwise. This will slowly force resin down into the Bull’s Eye. It is important to use small fractions of a
turn. Small turns allow you better control over the injection process, helping to prevent windshield damage. As the
resin begins to flow into the Bull’s Eye watch it closely. Once the resin reaches the border of the Bull’s Eye, reverse
the direction of the insert with a couple of 3/4 turns, this action will produce suction, creating a vacuum cycle. You
should be able to see air leaving the Bull’s Eye and flowing into the injector. (This air looks like small black lines or
bubbles moving in the direction of the injector. Areas within the rock chip that contain air are generally dark or
black.) Leave the injector in the vacuum cycle for about ten seconds.
Step 4: Bring the Pressure Down and Vacuuming a Second Time:
Once again slowly turn the insert in slow clockwise turns. As soon as the resin reaches the border of the Bull’s Eye
again reverse the insert with again with a couple of 3/4 turns in a counter-clockwise. Leave the injector in the
vacuum cycle for another ten seconds.
Step 5: Bring the Pressure Down the Last Time:
rd
Repeat step number 4 for a 3 time but this time leaving leave the pressure on the Bull’s Eye for about thirty
seconds. Watch the border of the chip closely. If you see resin going beyond the border reverse the direction of the
insert immediately.
Step 6: Viewing the Repair:
At this point reverse the insert slowly to relieve the pressure. Now, slightly reverse the injector and rear set screw by
turning them counter-clockwise. Now that the injector is loosely touching the glass, pivot the bridge away from the
Bull’s Eye and view the repair. If there is no air in the Bull’s Eye it should be nearly invisible and you may skip the
next step and go on to *Step 8 - Curing the Pit. If you still see air in the Bull’s Eye you will need to follow Step 7.
9
Step 7: Curing the Bull’s Eye Under Pressure:
If you heat a Bull’s Eye before you inject it with resin it is very unlikely that you will ever need to cure the repair under
pressure. You will, however, need to know how to cure under pressure for other types of repairs such as a
Combination Break. If you still see dark areas (air pockets) in the Bull’s Eye, you will notice that when you put
pressure down with the insert, the air appears to be gone. Curing under pressure is simply ‘freezing’ resin the Bull’s
Eye in place. To cure under pressure, pivot the bridge back over the pit so that you have the pit in the center of the
end seal. When you begin to pressurize the repair again as discussed in Step 3, you should see the air in the Bull’s
Eye disappear. If not, or if the end seal leaks excessively when you bring the pressure down, you may not be directly
over the pit. You may wish to go back to Step 1 and remount the American Bridge TM. At this point, the Bull’s Eye is
already nearly full of resin, so you should only need 4 or 5 drops more of resin. Bring the pressure down with small
fraction turns of the insert, clockwise. The Bull’s Eye should now be clear, and the air (dark areas) should be
completely gone. Leaving the Bull’s Eye under pressure, place the UV light over the repair. Wait for about 5-10
minutes, and remove the light. If the sun is shining you won’t need to use the UV light. Simply leave the Bull’s Eye
under pressure for about 5 minutes in the sunlight. Next, begin taking the pressure off of the Bull’s Eye by slowly
reversing the insert (turning counter-clockwise). The Bull’s Eye should look perfect. If you still see air, repeat this
step again, except this time place the UV light inside the vehicle. Press the UV light suction cup against the
windshield so that the light shines directly on the Bull’s Eye. Be careful! Whenever you apply pressure from the
inside of a windshield, it is possible to crack the glass. Use a piece of tape to hold the bottom end of the Ultra Violet
light in place.
Figure 2.6
Figure 2.7
Figure 2.8
*Step 8: Cure the Pit and Scrape the Resin:
Release the lever and remove the American Repair Bridge TM from the windshield. Wipe away the excess resin from
the pit, and place one or two drops of Pit Resin on the pit. Place a curing film over the resin filled pit, and cure the
resin with your UV light (Figure 2.7). It only takes about three minutes to cure. If there is even a minimal amount of
sunlight, you will need to use the UV light. Remove the UV light. Wait 5-10 minutes and remove the light. With your
hand feel the resin. It should be hard to the touch. If not, let it cure a bit longer. Next, remove the curing film and with
your razor blade in a circular motion to shave the excess resin away from the pit (Figure 2.8).
Step 9: Buffing the Pit:
You can use a small buffing wheel or a rag to polish the repair. Place a couple drops of glass polish on the repaired
area and either buff or rub it until it is shiny.
(Tip: If you press a small dent in the curing film before you cure the resin, you won’t need to buff the pit. When you
10
shave the resin, the razor will miss the pit area and it will come out shiny.)
Star Break or Small Crack
Important note before you begin!
If you have never repaired a windshield, it is important that
you understand how to identify a small crack with resin,
versus one without. You need to be able to determine
whether the chip or crack has previously been filled by
another technician. It is common for a technician to be
asked to repair a chip that someone else has already filled!
Follow this simple rule: If the crack is visible from any
angle, it does not have resin in it. If a crack is only
visible from certain angles, it has resin in it. This rule is
extremely important for those just starting in windshield
repair. You don’t want to find yourself trying to fill a break
someone else has already filled! Try to view any cracks
from every angle while you are injecting it with resin. This
practice will help you become familiar with seeing resin as it
flows into the small cracks.
Step: 1 Drilling:
The purpose of drilling is to create an avenue inside the crack to inject the resin. While repairing Star Breaks or
Small Cracks, you will notice that some are formed at an angle. When you drill into a crack that is angled, it is
important to drill at the same angle as the crack.
Drill a hole in the center of the pit (Figure 3.1). You do not
need to drill all the way to the lamination. Your goal is to
get at least 3/4 the way to the lamination. Drill until the bit
is about to reach the lamination and stop. Because of the
different thickness in glass, there is no precise
measurement to go by. If you do happen to drill all the
way to the laminate, do not panic, simply use a cloth or a
small piece of steel wool to remove any lam from your drill
bit. Lamination on your bit can make it dull for the next
repair. You will learn to judge the correct depth with
experience. Some technicians prefer to drill all the way to
the lamination. We choose not to. (See “Frequently
Asked Questions: Is it okay to drill all the way through the
first layer of glass?”)
Figure 3.1
Step 2: Mount the Injector:
Before you place the American Repair Bridge TM on the windshield, make sure the injector and rear setscrew are
unscrewed until they are higher then the brass cup on the bridge assembly (Figure 3.2). Otherwise the cup will not
adhere to the windshield.
11
Figure 3.2
Figure 3.3
Next mount the American Repair Bridge TM so that you can easily see the central pit of the damaged area through
the center of the injector. (Figure 3.3). Screw the injector down over the pit by turning the injector clockwise. Just
after the end seal makes contact with the glass, turn the injector another 3/4 of a turn clockwise. Do the same with
the rear setscrew. This will create a firm close seal between the windshield and the bridge. You may need to tighten
the injector and rear setscrew more as you proceed with the repair. (As you repair windshields and gain more
experience, you will find the right amount of tension that best works for each repair. Having the bridge firmly sealed
to the windshield is very important! If the bridge is not firmly attached to the glass, the end seal will leak resin when
you bring the pressure down.
Step 3: Charge the Injector
Most Bull’s Eyes take between 6 to 8 drops of resin in the
injector (Figure 3.3). Use 8 to 12 drops if it is the first repair of
the day. When you perform your first repair of the day the
injector is dry, therefore some of the resin is absorbed into the
threads. Larger Bull’s Eye will take more resin then smaller
ones. Using enough resin is important. Having too much resin
is better than not enough! Until you become familiar with how
much resin a chip should have, use a small amount more
than you think you will need.
Figure 3.3
Step 4: Forcing the Resin into the Pit:
Place the insert into the injector and begin driving resin into the break, by turning the insert slowly clockwise. Use
small fractions of a turn. As the resin begins to enter the damaged area of the windshield you will start to feel
resistance. Watch closely and you should see the resin begin to flow into the legs of the Star Break. (The “Legs” are
the small cracks) At this time turn the insert approximately one eighth of a turn more. Let the injector stay in that
position, and begin to probe the legs.
Step 5: Probing the Cracks or “Legs”
With the Star Break or crack under pressure, you need to help the resin flow to the outer end of each
crack. With your 2 point probe at an angle, put pressure directly on the leg that you are trying to fill
(Figure 3.4). Hold the pressure down on the leg for 3 or 4 seconds. This pressure opens the crack,
and you will see the resin flowing outward, filling it. Lift the probe and apply gentle pressure again 2
or 3 times for each leg. You need to find every leg within a Star Break and probe each one of them. Be
careful not to apply too much pressure on the crack. You could actually make the crack grow. Watch closely as you
12
perform this process. If you see a crack start to grow, lift the probe immediately. Don’t be overly cautious. It’s not
a common occurrence to cause a crack to grow while probing. However, it is a possibility you should be aware of.
It’s very important that you watch closely and find the angle needed to view the repair clearing. Remember, small
cracks look different when they have resin in them and you will learn to find the angle at which to view the flow of
resin.
Figure 3.4
Step 6: Vacuum
Reverse the pressure from the injector by turning the insert with 3 fast 3/4 turns counter-clockwise. This will create
suction, placing the injector in the vacuum cycle. Leave the injector in the vacuum cycle for about thirty seconds.
Step 7: Bring the Pressure Down and Probe the Legs a Second Time:
Using small fractions of a turn the insert clockwise and bring the pressure back down and probe each of the legs a
second time. Again, probe each leg two or three times. By probing the legs each time you will help resin to flow
further and further into the crack.
Step 8: Vacuum a Second Time:
Reverse the pressure from the injector by turning the insert with 3 fast 3/4 turns counter-clockwise. This will create
suction, placing the injector in the vacuum cycle. Leave the injector in the vacuum cycle for about thirty seconds.
Step 9: Heating the Windshield:
Increase the pressure again by turning the insert clockwise with small fractions of a turn, one last time. While the
Star Break or crack is under pressure, go inside the vehicle and heat the chip with a match or lighter. Heat the
windshield slowly by moving the flame towards and away from the Star Break or crack. As you gently heating the
break, test the temperature with the back of you of your finger. When it becomes almost too hot to touch discontinue
heating. Exit the vehicle and slowly remove the pressure by the insert counter-clockwise.
Step 10: Inspect the Repair:
Inspect the repair by loosening the injector slightly, and pivoting the American Repair Bridge TM away from the chip
or crack. All of the legs should be filled with resin. Remember, if a crack is seen from any angle, it does not have
resin in it. If a crack is seen only from certain angles, it has resin in it!
13
Step 11: If you Have Air Bubbles in the Pit:
If you get an air bubble in the pit, take your thick repair resin and squeeze it into the hole. You may need to use your
probe to pick the air bubble out of the hole. Be careful. It is possible to fracture the glass when you insert the probe
into the hole. It can be somewhat of a problem to get an air bubble out but you must remove it before curing the
repair or a hole will remain where the air bubble was.
Step 12: Cure the Pit:
Pivot the injector back over the pit. Have a curing pad in hand. Quickly remove the American Bridge Assembly TM
and catch the resin with the curing film by sliding it over the hole and press a slight dent into the middle of the hole
with your thumb. If the sun is out you will not need your UV Lamp. If you are working indoors or if it is a cloudy day,
you will need to use your UV lamp to cure the resin. The resin will cure in about 5-10 minutes. After the resin
becomes hard, remove the curing film and scrape the excess resin off the pit. We suggest you do this in a “circular
motion” to avoid pulling the resin out of the hole. Because you pressed a small dent in the resin, it should look shiny
when finished.
Step 13: Buffing the Pit:
If the repair is not shiny, you can use a small buffing wheel or a rag to polish the repair. Place a couple drops of glass
polish on the repaired area and either buff or rub it until it is shiny.
(Tip: If you press a small dent in the curing film before you cure the resin, you won’t need to buff the pit. When you
shave the resin, the razor will miss the pit area and it will come out shiny.)
14
Combination Bull’s Eye-Star Break
Step 1: Mount the Injector and Heat the Glass
Before you place the American Bridge TM on the windshield, make sure the injector and rear setscrew are
unscrewed until they are higher then the brass cup on the bridge assembly. Otherwise the cup will not adhere to the
windshield (Figure 4.1).
Figure 4.1
Figure 4.2
Next mount the American Repair Bridge TM so that you can easily see the central pit of the damaged area through
the center of the injector. (Figure 4.2) Before you screw the injector minus the insert down over the pit, go inside the
vehicle and heat the Bull’s Eye with the heating element until it is hot to touch with the back of your index finger. Now
exit the vehicle, and screw the injector down over the pit by turning the injector clockwise. Just after the end seal
makes contact with the glass, turn the injector another 3/4 of a turn clockwise. Do the same with the rear setscrew.
This will create a firm close seal between the windshield and the American Repair Bridge TM. You may need to
tighten the injector and rear setscrew more as you proceed with the repair. (As you repair windshields and gain
more experience, you will find the right amount of tension that best works for each repair. Having the American
Bridge TM firmly sealed to the windshield is very important! If the bridge is not firmly attached to the glass, the end
seal will leak resin when you bring the pressure down.)
Step 2: Charge the Injector
Most Bull’s Eyes take between 6 to 8 drops of resin in the injector (Figure 4.3). Use 8 to 12 drops if it is the first
repair of the day. When you perform your first repair of the day the injector is dry, therefore some of the resin is
absorbed into the threads. Larger Bull’s Eye will take more resin then smaller ones. Using enough resin is important.
Having too much resin is better than not enough! Until you become familiar with how much resin a chip should have,
use a small amount more than you think you will need.
Figure 4.3
Figure 4.4
15
Step 3: Driving the Resin into the Pit and Vacuuming Air Out:
First, grab the top outer portion of the injector with your thumb and index finger (Figure 4.4). With your other hand,
place the insert in the injector and begin slowly screwing the insert clockwise, driving the resin down into the Bull’s
Eye. It is important to use small fractions of a turn. Small turns allow you better control over the injection process,
helping to prevent windshield damage. As the resin will begin to flow into the Bull’s Eye watch it closely. When the
resin reaches the border of the Bull’s Eye, quickly reverse the direction of the insert with 3 fast 3/4 turns in a
counter-clockwise direction. This action will create suction, placing the injector in the vacuum cycle. You should be
able to see air leaving the Bull’s Eye and flowing into the injector. (The dark areas within the Bull’s Eye are the air
pockets.) Leave the injector in the vacuum cycle for about ten seconds.
Step 4: Driving the Resin into the Pit:
Increase the pressure again by turning the insert slowly clockwise. Use small fractions of a turn. Let the resin flow
out to the small cracks. Quickly reverse the direction of the insert with 3 fast 3/4 turns counter-clockwise. Leave the
injector in the vacuum cycle for about fifteen seconds. Drive the resin down a third time, and this time leave it under
pressure while you probe the cracks.
Step 5: Probing the Cracks or “Legs”
With the Bull’s Eye Star Break or crack under pressure, you need to help the resin flow to the outer end of each
crack. With your 2 point probe at an angle, put pressure directly on the leg that you are trying to fill (Figure 4.5). Hold
the pressure down on the leg for 3 or 4 seconds. This pressure opens the crack, and you will see the resin flowing
outward, filling it. Lift the probe, apply gentle pressure again 2 or 3 times for each leg. You need to find every leg
within a Star Break and probe each one of them. Be careful not to apply too much pressure on the crack. You could
actually make the crack grow. Watch closely as you perform this process. If you see a crack start to grow, lift the
probe immediately. Don’t be overly cautious. It’s not a common occurrence to cause a crack to grow while probing.
However, it is a possibility you should be aware of. It’s very important that you watch closely and find the angle
needed to view the repair clearing. Remember, small cracks look different when they have resin in them and you will
learn to find the angle at which to view the flow of resin.
Figure 4.5
Step 6: Heating the Cracks only when needed!
Before starting Step 6, you should have done all you can do to fill the cracks with resin by bringing the pressure
down and probing, and flick turning the insert in reverse for vacuum. You should have done this at least 3 or 4 times.
It is also very important that you have looked at every crack from every possible angle, while probing,
16
so that you haven’t missed any cracks. It’s extremely important that you read the heating
procedure that follows closely. While the Combination Bull’s Eye Star Break is under pressure and you
are inside the vehicle and heat the cracks it is important to try do keep the heat away from the center
of the break. This is where the Bull’s Eye part of the Combination break is. You will not heat the cracks
as thoroughly as you would a normal Star Break or Small Crack. Simply warm the cracks a bit to assist
the resin in flowing to the ends. After you apply heat; as quickly as possible remove the pressure. Do
this by turning the insert counter-clockwise. Loosen the injector slightly and view the repair as you
normally would. If you have air in the Bull’s Eye portion of the Combination, cure it under pressure. (*see next
step) The cracks should be completely filled at this point. Finish the repair by curing the pit as you normally would a
Bull’s Eye repair. Heating cracks under pressure is quite effective in getting the resin to flow out to the end of the
cracks. However, it should always be used as the last step.
Step 7: Curing the Bull under Pressure:
If you heat a Bull’s Eye before you inject it with resin it is very unlikely that you will ever need to cure the repair under
pressure. You will, however, need to know how to cure under pressure for other types of repairs such as a
Combination Break. If you still see dark areas (air pockets) in the Bull’s Eye, you will notice that when you put
pressure down with the insert, the air appears to be gone. Curing under pressure is simply ‘freezing’ resin the Bull’s
Eye in place. To cure under pressure, pivot the bridge back over the pit so that you have the pit in the center of the
end seal. When you begin to put pressure down on the repair again as discussed in Step 3, you should see the air
in the Bull’s Eye disappear. If not, or if the end seal leaks excessively when you bring the pressure down, you may
not be directly over the pit. You may wish to go back to Step 1 and remount the Diamond Repair Bridge TM. At this
point, the Bull’s Eye is already nearly full of resin, so you should only need 4 or 5 drops more of resin. Bring the
pressure down with small fraction turns of the insert, clockwise. The Bull’s Eye should now be clear, and the air
(dark areas) should be completely gone. Leaving the Bull’s Eye under pressure, place the UV light over the repair.
Wait for about 5-10 minutes, and remove the light. If the sun is shining you won’t need to use the UV light. Simply
leave the Bull’s Eye under pressure for about 5 minutes in the sunlight. Next, begin taking the pressure off of the
Bull’s Eye by slowly reversing the insert (turning counter-clockwise). The Bull’s Eye should look perfect. If you still
see air, repeat this step again, except this time place the UV light inside the vehicle. Press the UV light suction cup
against the windshield so that the light shines directly on the Bull’s Eye. Be careful! Whenever you apply pressure
from the inside of a windshield, it is possible to crack the glass. Use a piece of tape to hold the bottom end of the
Ultra Violet light in place.
Crack Stop Repair
Occasionally, you may have a customer who has a 2-6 inch crack that they would prefer to
have repaired instead of replacing the whole windshield. In these cases the customer
usually will have a high deductible, liability coverage only, or no insurance and prefer to
try to repair a crack before having a replacement done.
You will begin by drilling a small hole at one the end of the crack. It’s a bit tricky so you need to center the hole to be
drilled directly over the end of the crack. (You might try etching a small mark where you think the end and center of
the crack is.) Once you etch the small mark right where it should be, you can begin drilling. Drill all the way to the
lamination. On your way through, make the hole bigger than the circumference of your bit. Do this by gently pushing
outward in a circular motion as you drill through the glass. If you don’t make the hole bigger, it’s quite possible the
crack will bypass the hole and go wherever it pleases. You will inject the crack and treat it as you would a Star Break
repair. Remember to probe the resin out as far as you can and cure the pit when done! It is also a good idea to inject
the damaged area where the crack begins. If you are billing an insurance company, make sure you charge them for
2 repairs, since you are doing 2 injections.
17
Frequently Asked Questions
These pages contain important information that will be useful for you when you are in the field. We suggest
you read the Frequently Asked Questions before you begin performing rock chip repairs.
1. What is “the pit”?
The pit is the center of the damage on the windshield, where the rock hit. This is the area where resin is injected
into the chip.
2. Will I encounter different types of chips besides those discussed in this training manual?
Yes. However, nearly every chip you will ever find will have some characteristics of the chips found in your
manual.
3. What is the “lamination” in a windshield?
Lamination is the thin layer of clear soft plastic between the two layers of glass. Lamination is a required safety
feature that keeps the glass in a windshield from shattering. It is what keeps a rock from flying through the
windshield when you are driving down the road. Most people do not know that a windshield is really made up of
two pieces of glass. When a windshield is chipped, it is usually only the outside layer of glass that damaged, and
the inside layer is unscathed.
4. Is it okay to drill all the way through the first layer of glass?
Yes. However, we do not recommend it. Some technicians find it easier to fill small cracks and Star Breaks by
drilling through the first layer of glass. If you choose to drill all the way through the first layer, remember to
remove the laminate from the bit with a small piece of steel wool or your fingernails. Sometimes, although rare,
when drilling to the bottom of the first layer of glass, the bit can cause a small halo to appear. While we do not find
this to be unacceptable, to get the best appearance from a repair we choose to avoid going all the way through
the first layer. You may decide to do it differently. It really is a matter of personal preference.
5. Is it possible to damage the lamination during a windshield repair?
Yes, the laminate can be damaged by both heat and pressure. Certain methods of repairing chips require heat.
When you put pressure on the lamination with your injector, you have to be careful. Heat softens the lamination
in a windshield. If you are doing a Bull’s Eye or Combination Break, it’s important to pay close attention to the
borders when you are pressurizing the resin into the break.
6. What is a “Daisy?”
A daisy is damage to the lamination usually caused by a combination of too much heat and pressure on the chip.
It looks a lot like a real daisy, but is transparent. The size of a daisy will usually depend on the length of time the
chip is left under pressure. A daisy cannot be repaired or reversed. It is unlikely you will cause a daisy in chips
other then a Bull or Combination Bull-Star Break. This is because of the large opening to the lamination in these
types of chips.
7. How do you avoid causing a “Daisy?”
Use tiny fractions of a turn while driving the resin down, and pay close attention to the border of the Bull or
Combo. If you see the resin going beyond the border, quickly reverse the insert to relieve the pressure.
8. Why does my drill sometimes stop cutting?
When you are drilling a hole in a Star Break or small crack, you may need to stop and let the bit cool. If that
doesn’t work, the bit may be too dull and you may need to change it. Keep in mind that you should be seeing a
18
‘powder’ accumulating around the pit while you are drilling. If not, you probably are not cutting through the
glass. A drill bit should last you for several repairs.
9. When do you drill a hole at an angle?
Many small cracks or partial Bulls are formed at an angle. When you drill into the center or pit of a small crack,
you need to follow the angle of the crack. This opens an avenue that is congruent, or in line, with the crack you
are trying to fill.
10. I keep breaking drill bits. Why is that?
Most likely you are drilling a hole, backing off and drilling again at a different angle. Drilling at a different angle the
second time can not only break the bit, but also it can fracture the glass. It’s very important to keep the drill at the
same angle when you reinsert the bit.
11. Why won’t my bridge cup adhere to the windshield?
First, make sure the windshield isn’t dirty where you are trying to mount the cup. Use a small amount of cleaner
to ready the area. (Never spray glass cleaner into the pit!) Next, hold up the bridge assembly and make sure the
cup is positioned lower than the injector and rear set screw. If not, adjust the bridge accordingly. Finally, before
you press the lever down to secure the cup to the glass make sure you are also applying a downward pressure
on the whole bridge assembly. This will make sure the cup is pressed flat before you press the lever down.
12. Why not heat a combination Bull Star Break before injecting?
Heating cracks can actually cause them to temporarily disappear or close. We do not recommend heating a
Combo first because of the cracks. We do recommend heating cracks under pressure, but only after the cracks
have been probed.
13. If it’s a hot sunny day should I take any extra precautions in repairing windshields?
Yes! If the windshield is extra hot, we recommend cooling it before you begin. If you reside in a hot environment
it is a good idea to either have an awning that you can set up to shade the windshield or keep a golf umbrella in
your vehicle. The other option is to let the customer know ahead of time to have the vehicle parked under a tree
or somewhere in the shade. This is only a recommendation, not a requirement. Anytime you are working on a
warm windshield it is very important to pay special close attention to the effect the pressure will have on the
lamination. A warm windshield is also a good thing! You will find it easy to fill Bulls, Combinations, and small
cracks when the windshield is warm, so don’t be discouraged if it is a hot day, just remember to be aware of
possibility of lamination damage and all should go smoothly!
14. Is it possible to drive air into the lamination?
Yes, it most often occurs on older windshields or extra hot windshields. The lamination in an older car can
actually become liquefied on a hot day! This cannot be reversed or repaired. If it’s really hot outside or you are
working on an older car, be extra careful shade the glass before you begin working! Older cars are generally
considered those that are 15-20 years old. Cars kept in extreme weather conditions – such as very hot areas,
may have windshield laminates that liquefy more easily then the average vehicle.
15. How can I stop my end seal from leaking resin?
It isn’t anything to worry about if your end seal leaks a small amount of resin. If the end seal is new, the problem
will subside after a few repairs. If the problem persists, simply remove the end seal and turn it around. If you still
have a problem you may not be tightening the injector and rear set screw hard enough. Remember the basic rule
is when the injector and the rear set screw make contact with the glass, turn these knobs another 3/4 turn. Don’t
be afraid to tighten these knobs more during the repair process. These guidelines are a starting point. You will
learn what works best for your injector as you gain experience using it.
16. How do you decide if a windshield is too old to repair?
19
If the vehicle is older you may still be able to repair the windshield. You do need to take extra care if the
windshield looks to be aged. Older cars are generally considered those that are 15-20 years old. Cars kept in
extreme weather conditions – such as very hot areas, may have windshield laminates that liquefy more easily
then the average vehicle. Often, an older car will have had the windshield replaced sometime recently. You can
usually tell by looking at the condition of the windshield or asking the customer. The problem with an older
windshield is that the lamination can be so soft that you can’t even inject it, without pumping it full of air. Never
heat an old windshield! Always take extra care when injecting and watch closely. If you see air going into the
laminate reverse the insert and halt the repair. Let the customer know ahead of time that an old windshield has
soft laminate and may not be repairable.
17. What is the high stress area of the windshield and how do you do repairs in this area?
About 3 inches from the edge of the windshield is considered a high stress location. This area is close where the
windshield is glued to the vehicle. Be extra care when repairing chips in this area. It’s a good idea to let the
customer know of the risk before you do a repair in this area of the windshield. This is a policy you will need to set
for yourself. Never use heat when repairing a chip near the edge of the glass! The customer will understand why
the repair may not look as good as it could when you explain to him/her the extra caution you are taking.
(Before I would do any repairs in this area, I would let my customer know that if the windshield cracks while I am
doing the repair, I will not be held liable for a replacement. I also let him/her know that I will be extra careful while
injecting the resin into the chip. Of course if the chip is not repaired, the chances of it spreading are even greater.
After explaining this to the customer I let him/her decide. He/she usually allows me to do the repair. This policy
has worked well for me for many years. You, however, may choose a different policy.)
18. How will I know when to change the o-ring or end seal on my injector?
The end seal will begin to expand and/or leak excessively. As for the O-ring, it will become loose on the insert.
Remember to wipe off any resin from your O-ring and end seal after every appointment. This will greatly extend
the life of these parts. Always be sure to follow the care instructions in the front of your repair manual.
19. How can you do a motor home or a bus windshield when the glass is nearly vertical?
The difficulty here is getting resin into the injector. Using an eye dropper you can inject the resin into the injector
and do the repairs as you normally would.
20. What do you mean by a ½ Bull and is there a ¼ Bull?
A ½ Bull is when the cone of the Bull is only half formed. The same goes for a ¼ bull. It’s only ¼ formed or maybe
⅓ formed. Treat these types of partial Bulls as you would a full Bull eyes. You can make these types of damage
nearly disappear, especially if you heat them first. We highly recommend the heat method for any Bull! Unless of
course it’s a hot day and the windshield is already hot to the touch. In fact we prefer to get a partial Bull a bit
hotter than a full Bull before injecting.
21. I have a Bull’s Eye that won’t take resin. What should I do?
This is rare, but sometimes a Bull won’t accept resin. You can usually get the Bull to absorb the resin by doing
the following. Take your probe and put direct pressure on the center of the Bull. This is the top of the cone of the
Bull. As you put pressure down on the cone you will see the Bull flexing. After doing this a few times, use your
drill to clean around the top of the cone and inject it one more time? It should take resin now. What happens is
sometimes after a period of time a Bull can become contaminated. The cone can adhere to the glass disallowing
you to inject resin. Flexing the Bull will usually loosen the cone and solve this problem.
22. A small area of the Bull will not take resin. What can I do to complete the repair?
This is also rare, but sometimes a small area of the Bull is stubborn and won’t allow you to pressurize it with
resin. A good remedy is as follows. While the Bull is under pressure, drill a hole into the part of the Bull that you
are seeing the air. This will almost always solve the problem.
20
23. I did a Bull repair and when I was finished, I could see small cracks in the cone. Why?
Sometimes the cone of a Bull will contain fractures inside it. These small cracks in the cone pose no threat and
there is nothing you can do to make them disappear. Be sure to let the customer know this.
24. I am doing a star break and one or more of the legs won’t fill with resin. What now?
First, be sure that you have probed the cracks by putting direct pressure on the legs, while the star break is under
pressure with resin. If necessary repeat this for at least 3 or 4 cycles. If there are still one or more cracks that are
not taking any resin, simply go inside the vehicle and heat the cracks while under pressure with resin. You will
most likely watch them all fill perfectly!
25. How much pressure can I put on a crack when probing?
There is no exact way to determine how much pressure to put on a crack with your probe. It is possible to enlarge
a crack when probing. If you see the crack enlarge remove the pressure immediately. This does not happen very
often and when it does the crack will usually not go far. The resin will usually fill out to the end of the now longer
crack, making it nearly invisible. You will learn by experience how to determine how much pressure is needed for
probing cracks.
26. My injector does not seem to be vacuuming out any air. Why is that?
If you are not seeing air being removed from a chip it is most likely because you are using too much resin. Too
much resin in the injector will fill the injector and not allow for the vacuum cycle. Try using a few less drops of
resin when doing a repair. If that does not work, it may be time to change the insert’s O-ring.
27. Heating cracks under pressure makes the resin flow so why not do that from the start?
You could do that. The problem is you wouldn’t be getting any air out of the cracks. This is a very important part
of the process. Air in a chip is always visible. Where there is air, there is no resin! With Star Breaks and small
cracks, it’s always best for heat to be the very last part of the process.
28. Should I repair a windshield in the rain?
We do not recommend repairing windshields in the rain. If a windshield is wet, it needs to be dry before repairing.
Just as a chip will absorb resin, it will also absorb water. Water does not mix with repair resin! You must dry the
chip out before repairing it! A good way to do this is to have the customer run his or her vehicle with defrost on full
hot for about 15 minutes before doing the repair. Check to make sure the chip is dry. A Bull is dry when is has a
dark “marble-like” look to it. With your probe, put pressure on the bull and flex the cone inside. If the appearance
changes as you do this, it has water in it. With a small crack or Star Break, remember the rule? If a crack is visible
from any angle, it does not have resin in it. If a crack is only visible from certain angles, it has resin in it. The same
holds true with water. Water in a small crack will make the crack visible from certain angles only. If a small crack
is completely dry, it will be visible from any angle. Just be sure to give small cracks and Star Breaks plenty time
to dry before repairing. This shouldn’t be a huge problem for your business. We have been repairing thousands
of windshields in “The Emerald City,” (Seattle) for over 10 years and have always found a way to get them done!
Please note: We do not recommend leaving a vehicle running unattended while drying out a chip in a windshield.
29. What happens if I crack the customer’s windshield?
This is a policy that you will need to set for yourself when you start your business. There is always a small
possibility this may happen whenever you do a windshield repair. If you do a lot of windshield repairs, and that is
obviously your goal, it is likely that at some point in time you will accidentally crack a windshield and it may not
even be your fault. You might be following the instructions of your manual exactly and still crack out a windshield.
It is important to know that it is a rare occasion and most customers are very understanding about it when it
happens. They realize that the windshield was damaged before you began the repair anyway. Some technicians
and business owners will pay for a replacement or refer customers to someone they know to replace the
21
windshield for them at a special rate. While others technicians will let the customer know ahead of time that
there is a slight possibility of the windshield cracking during the repair and because of the fact that the windshield
is already damaged; they will not be held responsible. But do remember if you follow the directions of your
manual closely, cracking a windshield will be extremely rare.
30. How do I know if a windshield has a rock chip that has already been repaired?
Anyone who enters the windshield repair business will soon learn how to spot a chip that’s already been
repaired. The problem is customers will sometimes insist a chip needs to be fixed and has never been repaired.
One way of determining if a repair has been done is looking at the pit. If there is some yellowing in the center, you
know its aged resin. You can also take your probe to the pit and it feels soft, it’s probably has resin in it. You
cannot repair a chip a second time!
31. My customer has a surface chip. Is that something that would need to be repaired?
It’s not absolutely necessary to fix a surface chip however you can make the appearance look better. This is a
policy you will set for yourself and your customers. It is very unlikely that a surface chip would ever spread to a
crack. What we do is let the customer know that and ask them if they would like it repaired anyway. To do the
repair: Use your drill to grind the pit down about 1/32 of an inch deep. Drop resin into the pit and place a small
piece of curing tape over the pit. Press a small dent into tape where the pit is and cure it. It should come out
looking shiny and much better than before.
32. I have followed all the steps and I am not satisfied with the appearance. What now?
Leave it alone! Remember what you told the customer before you began? The chip won’t disappear. It will look
better but the main reason for the repair is to keep the chip from spreading to a long crack. We do not
recommend going over a chip repair a second time after the resin has been cured! No matter how tempted you
may be to drill out a crack in a Star Break that didn’t fill, you are much better off just to leave it as it is. The
chances are you will only make it look worse! The customer will understand that a chip in a windshield is
permanent damage and most all customers are only interested in prevention. Reassure your customer of your
guarantee and move on.
33. What kind of guarantee should I give to my customers?
Again this will be up to you. A good guarantee is this; “Mrs. Johnson, if the repair ever fails, the money is
refunded back to your insurance company.” Of course if Mrs. Johnson paid for the chip she would get her money
back. This is the guarantee that we have given for more than 10 years and have seldom ever refunded any
money back. The reason for this is because windshield repair is very effective!
34. If I get resin on the paint of a vehicle, will it remove the paint?
If you do spill resin on a painted area you must clean it right away. You don’t want the resin to cure on the paint,
so it is best to spray the area with glass cleaner and wipe it as soon as possible
35. I am new at windshield repair and wearing gloves makes it difficult to do repairs?
Our resin does not contain high levels of Acrylic Acid. That means it is very unlikely that your skin will be irritated
from our resin. We still recommend you wear gloves if you have sensitive skin or any type of allergies. Resin that
contains high levels of Acrylic Acid are very toxic, and gloves are absolutely required!
36. My potential customer has a huge chip. Can I help this person?
Yes, you can inject at least some resin into almost any damage on a windshield. Just let the customer know that
it certainly will not disappear but that it should keep the windshield from becoming worse. Heating a big chip
before injecting will actually cause the chip to absorb resin without any pressure. In the case of a huge chip, you
might heat it first, even if it is a Combination. You don’t have much to lose. Most likely your customer will be
amazed at your work!
22
Product & Business Disclaimer
American Windshield repair Systems™ and American Rock Chip Kits™ its employees
are in no way responsible for injuries to any person (s) or damage (s) to any vehicle (s) in
which a person performing repairs with any product (s) that he/she purchased from
Diamond Windshield Repair Systems™. Instructions in our kits are meant as training and
guide tools only and in no way guarantee against damage to person (s), glass, or vehicle
(s) or any object what so ever during windshield repair. Thus, any damage/negligence
resulting from action(s) and/or decisions of the purchaser of any American Windshield
Repair System™ / American Rock Chip Kits™ products are the responsibility of the
purchaser. Therefore, American Windshield Repair Systems™ /American Rock Chip
Kits™ are in no way accountable.
www.rockchipkits.com or call us at 1-888-860-1518
23