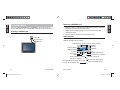
1
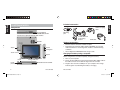
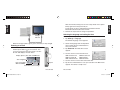
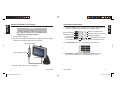
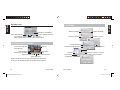
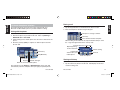
English
Quick Reference Guide
N.I.C.E. 430
Portable Navigation System
N.I.C.E. 430
NICE430QuickReference.indd 1
1
2/2/2007 1:03:32 PM
Components
Vehicle charging
cable
Secure Digital/
MultiMediaCard slot
Connector for optional external GPS antenna
Mounting
pad
Cradle attached
to mounting
bracket
Speaker
Stylus
English
English
Included accessories
1. GETTING STARTED
USB cable
Optional accessories
Power
Navigation
Touch screen
Stylus
•
External antenna for better satellite reception
•
Traffic Message Channel (TMC) module (NAVRDS) for receiving
radio transmissions concerning traffic, weather, and other driving
conditions
•
Secure Digital and MultiMediaCard storage cards
Charging the battery using a computer
Before using the N.I.C.E. 430, completely charge the battery.
Bluetooth indicator
Microphone
Charge indicator
Reset
Headphones
2
NICE430QuickReference.indd 2-3
1. Turn on your computer.
Mini-USB Connector/TMC
2. Plug in the mini-USB end of the Universal Serial Bus (USB) cable to
the USB connector on the bottom edge of the N.I.C.E. 430.
3. Plug the other end into a USB port on your computer. The charge
indicator glows red, indicating the battery is charging.
N.I.C.E. 430
N.I.C.E. 430
3
2/2/2007 1:03:37 PM
English
English
After the first time, briefly press to enter “sleep mode.” Press power
briefly again to turn the power fully on.
To fully power off, press and hold the power button until the
Bluetooth indicator flashes blue one time.
2. Remove the stylus from its storage compartment.
Selecting the language and setting the time
Charge
indicator
These steps are required the first time you use the N.I.C.E. 430.
1. Tap Settings > Language.
The Switch Language screen appears.
When the charge indicator glows green, the battery is fully charged.
Powering on and off
1. The first time you use the N.I.C.E. 430, press and
hold the power button ( ) for six seconds. This
is necessary because the unit’s power is off. The
N.I.C.E. 430 displays the main menu.
3. Tap Date/Time. The Date/Time screen
appears.
4. Use the arrows to select the time zone.
GMT-5 Eastern US
GMT-8 Pacific US
GMT-6 Central US
GMT-9 Alaska
GMT-7 Mountain US GMT-10 Hawaii
Display photos (JPG, GIF and BMP files
Start navigation
Play music (MP3,
WAV and WMA)
Customize system settings
4
NICE430QuickReference.indd 4-5
2. Select the language from the drop-down
menu and tap the check mark button to
save your selection.
5. Use the arrows to set the date and current time.
Stylus
N.I.C.E. 430
6. Tap the check mark button to save your selections. The Main menu
appears. The device is ready to use.
N.I.C.E. 430
5
2/2/2007 1:03:38 PM
You may use the N.I.C.E. 430 to navigate while you drive by mounting it
in a vehicle or as a pedestrian by holding it in your hand.
Attaching the mounting bracket to the vehicle
2. If mounting on the dashboard, remove the backing on the mounting
pad and attach the pad to the dashboard. If mounting on the
windshield, you don’t need the mounting pad.
3. Place the mounting bracket in position with the suction cup touching
the mounting pad or the windshield.
English
English
2. NAVIGATING
4. Press the compression lever.
CAUTION
5. Use the adjustment knobs as needed.
Position the mounting bracket where the N.I.C.E.
430 will not block the driver’s field of vision.
1. Based on where you plan to mount the bracket, attach the cradle to
the mounting bracket.
Mounting bracket Mounting pad
Release tab
Position for
mounting
on the
dashboard
6
NICE430QuickReference.indd 6-7
Cradle
Adjustment knobs
Position for
mounting
on the
windshield
Removing the mounting bracket
1. If the power cord is connected, disconnect it from the USB port on
the N.I.C.E. 430.
2. Hold the mounting bracket and cradle, then lift the lever.
3. If the mounting bracket and cradle do not drop away from the
mounting pad or windshield, gently pull on the suction tab.
Removing the N.I.C.E. 430 from the cradle
To remove the N.I.C.E. 430 from the cradle, press on the release tab.
Suction tab Compression lever
N.I.C.E. 430
N.I.C.E. 430
7
2/2/2007 1:03:39 PM
Navigating to a destination
1. Tap the navigation icon on the Main menu. It takes approximately 10
seconds to load the map and display the navigation menu.
CAUTION
To protect the N.I.C.E. 430 from receiving a sudden surge of current, start the ignition before
plugging into the cigarette lighter.
1. Start the vehicle’s ignition.
2. Plug in the mini-USB end of the Vehicle charging cable into the USB
connector on the bottom edge of the N.I.C.E. 430.
Define destination
Open map screen
View progress
Current position
Current date and time
Return to the Main menu
Display software information
Configure navigation
English
English
Charging the battery in the vehicle
View Global Positioning
Battery charge System (GPS) status
2. Tap Destination. The N.I.C.E. 430 displays the Find menu.
To cigarette lighter
Vehicle charging cable
3. Tap Address or POI (point of interest) and define the location.
When you’re finished, the N.I.C.E. 430 displays the map.
To USB port
3. Plug the other end into the cigarette lighter.
8
NICE430QuickReference.indd 8-9
N.I.C.E. 430
N.I.C.E. 430
9
2/2/2007 1:03:39 PM
Zoom in
GPS position
and quality
Zoom out
Volume
Map scale
(drag to zoom)
Tilt up
Tilt down
Cockpit
Main menu
Turn preview &
Route menu
Next street
Destination
Compass (tap
for overview)
Battery status
Track log to
record or
playback route
Distance to
next turn
Route data
Next turn
approach
Main menu
Tilt up
Tilt down
Cursor: Red bulls eye that serves as the starting point, via point,
destination or POI.
Zoom out Cursor
Cursor menu
Current street Location Active route
Lock-to-position
Terms in italic are defined as follows:
Active route: Current route. An journey may consist of multiple legs.
Only one can be active.
10
NICE430QuickReference.indd 10-11
N.I.C.E. 430
Lock-to-position: State in which the blue (or yellow) arrow always
represents your current global position. If you move the cursor away,
the button changes from “Follow” to “Lock.” Tap Lock to readjust the
map so that the arrow again identifies your current global position.
English
English
Compass: Arrow pointer indicating the direction of north.
Map screens
POI: Point of Interest
Tilt: Gradually changing the map from 2D to 3D and vice versa.
Track log: Record of a journey, which you can replay later.
Navigation options
1. On the main navigation menu, tap Settings.
2. Select the grouping of options to change.
Set colors and safety
Set beeps and voice
Set language, units, date
Set map appearance
Set route calculation
Configure more options
3. After making changes, tap the back button to return to the main
screen. The software saves your change(s).
To restore the default values for the advanced settings, tap Settings >
Advanced > Reset Advanced Settings.
N.I.C.E. 430
11
2/2/2007 1:03:40 PM
The Secure Digital/MultiMediaCard (SD/MMC) slot on the top of the
N.I.C.E. 430 supports up to a 2 GB SD card (for music and or pictures).
1. Make sure that no audio file is being played or no photos are being
displayed by returning to the Main menu.
Inserting a SD/MMC card
2. Slightly push in on the top edge of the card. The N.I.C.E. 430
releases the card.
Insert card with the connector toward the slot and the label side up.
English
English
Removing a SD/MMC card
3. PLAYING MUSIC
3. Pull the card out and store it in its protective case.
Label side
Audio features
Card connector
SD/MMC port
To play music, tap the Audio icon on the Main menu. The N.I.C.E. 430
displays the Audio Player controls.
Play back time Volume Current volume setting
Minimize
Play list
Battery charge
Equalizer
Repeat setting
Previous
Exit
Normal: play back all
Play/pause
Next
current files in sequence
Stop
Repeat
current file
Repeat all files in current
play list in sequence
Intro/Sampling: play back 10 seconds
of each file in random order
12
NICE430QuickReference.indd 12-13
N.I.C.E. 430
N.I.C.E. 430
Shuffle: play back current
play list in random order
13
2/2/2007 1:03:40 PM
Select default profile
5. SETTINGS
Exit without confirmation
Confirm selection and exit
Cycle through options: Normal, Hall, 3D, Soft,
Disco, Heavy, Dance, Classic, Jazz, Pop and Rock
Darken backlight
Lighten backlight
Decrease volume
Increase volume
English
English
Equalizer panel
4. VIEWING PHOTOGRAPHS
Green frame indicates
selected photo
Page up
Charge remaining
Automatic power off options
Start alignment
Set time zone
Selected photo
Page down
Exit
Total number of photos
Open selected photo
Delete selected photo
Start slide show
Set date
Exit without
confirmation
Set hours, minutes, seconds
Confirm settings and exit
Tap the thumbnail twice to view selected photo in full screen.
To return to the thumbnail view, tap anywhere, then tap Exit.
14
NICE430QuickReference.indd 14-15
N.I.C.E. 430
N.I.C.E. 430
15
2/2/2007 1:03:41 PM
The built-in Bluetooth phone interface works together with your
Bluetooth-enabled mobile phone to provide hands-free calling.
English
English
Placing a call
6. Hands-free phone interface
1. Tap the keypad button on the Bluetooth HF Phone screen.
2. Enter the telephone number using the keypad.
Pairing with the phone
1. Turn on both the N.I.C.E. 430 and your mobile phone.
Backspace to change a number
2. Wait for the phone to pair with the N.I.C.E. 430 or tap Settings >
Bluetooth icon > Pair mode.
Call history
3. Initiate pairing on the mobile phone. See the owner’s manual for the
phone.
4. Enter the passkey (0000), if required, on both the phone and the
N.I.C.E. 430.
Call history
Exit (Minimize)
Pair mode Reconnect
Keypad Bluetooth manager
Name of connected mobile phone
NICE430QuickReference.indd 16-17
When making an international call, tap and hold the 0 key to enter
the + sign that appears before the country code.
Increase/decrease volume Exit
Open keypad e.g.
to enter extension
Call duration
Switch call to your
mobile phone
Volume setting
End call
Mute microphone
Viewing call history
Tap Call history. The N.I.C.E. 430 displays the call history screen.
The next time you tap Settings > Bluetooth icon, the N.I.C.E. 430
automatically searches and pairs with up to eight pre-paired phones.
16
Place call when number complete
N.I.C.E. 430
1. Tap the Call history button. The N.I.C.E. 430 displays the 20 most
recent incoming calls.
N.I.C.E. 430
17
2/2/2007 1:03:42 PM
Incoming history
Delete current selection
Clear all in current list
English
English
Outgoing history
Missed calls
Page up
Page down
Go back
Dial the selected number
2. Tap one of the buttons at the top of the screen to display incoming
or outgoing calls and missed calls.
Receiving a call
After pairing, when a call comes in, the N.I.C.E. 430 rings and displays
the Incoming Call screen.
Increase/decrease volume Exit
Signal strength
Accept call
Reject call
Mute ring tone before accepting or rejecting
18
NICE430QuickReference.indd 18-19
N.I.C.E. 430
N.I.C.E. 430
19
2/2/2007 1:03:42 PM
English
Clarion Corporation of America
All Rights Reserved. Copyright © 2007: Clarion Corp. of America
Printed in China
20
NICE430QuickReference.indd 20
N.I.C.E. 430
2/2/2007 1:03:43 PM