1
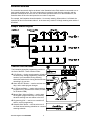
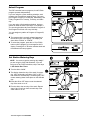
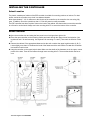
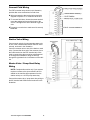
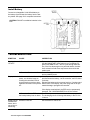
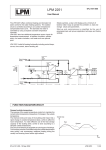
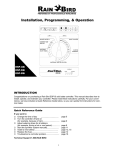
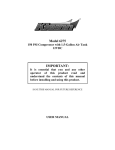
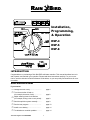
RAIN BIRD ® PREFERRED BY PROFESSIONALS WORLDWIDE Installation, Programming, & Operation ESP-4 ESP-6 ESP-8 INTRODUCTION Congratulations on purchasing a Rain Bird ESP solid state controller. This manual describes how to install, operate, and maintain your controller. Please read these instructions carefully. For your convenience, we have included a Quick Reference Guide below, so you can quickly find instructions for common tasks. Quick Reference Guide If you want to: ¨ Change the time of day............................ page 4 ¨ Turn the controller off and on (for example, because of rain).................. page 8 ¨ Adjust watering times for all stations (for example, during a hot or cool period)... page 9 ¨ Start the sprinkler system manually.......... page 9 ¨ Run the test program............................... page 10 ¨ Install a new battery................................ page 14 ¨ Troubleshoot a controller problem............. page 14 Technical Support: 1-800-RAIN BIRD 1 Controller Stations The controller has several stations as shown in the illustration below. Each station is connected to a remote control sprinkler valve. The valve opens when it receives a signal from the controller, and the sprinklers connected to the valve turn on. When these sprinklers have run for their allotted time, the controller shuts off the valve and opens the next valve in sequence. For example, the illustration shows that station 1 is currently watering. When station 1 is finished, the controller will shut it off and start station 2. In the same way, station 3 will begin watering when station 2 is finished. Sample Station Layout Controls and Switches The illustration shows the programming controls on the face of the ESP. These controls include: Œ LCD Display — during normal operation, displays the time of day; during programming, shows the results of your commands; during watering, shows the station that is running and the minutes remaining in its run time. • Arrow ON-OFF Buttons — used to set times and days, and to make program changes. Ž A / B Program Button — used to select watering program A or B. (On some ESP models, this button is labeled PGM.) • Manual Start / Advance Button — used to start the irrigation program manually or to manually advance watering from one station to the next. • Programming Dial — used to turn controller off and on, and for programming. ‘ Schedule Slide Switch — used to select one of the fixed-interval watering schedules or a custom watering schedule. Technical Support: 1-800-RAIN BIRD 2 PROGRAMMING THE CONTROLLER Your ESP controller is an electronic clock that controls when your sprinkler system turns on, and how long the sprinklers run. Programming is the process of telling the controller exactly when and how long you want to water. The controller opens and closes the remote control valves according to the program you set. Each program contains: n Watering days — the specific days of the week on which watering takes place (for example, Monday, Wednesday, Friday), or the watering interval (for example, every third day). n Start time — the time of day that the program begins; this is the time that the first station in the program begins watering; all other stations then follow in sequence. n Run time — the number of minutes that each station runs. Programming Checklist To program the ESP- controller for the first time, we recommend that you complete the following steps in order: Fill out Program Schedule Sheet................................... page 3 Select watering schedule............................................... page 4 Set the current time....................................................... page 4 Set the current day........................................................ page 5 Select the program (A or B)........................................... page 6 Set station watering days. (custom schedule only).................................................. page 6 Set station run times...................................................... page 7 Set watering start times.................................................. page 7 Set controller to automatic operation............................. page 8 Fill Out Program Schedule Sheet Before you begin programming, fill out the ESP Controller Program Sheet and attach it to the label on the inside of the controller door. A sample Program Sheet is shown in this illustration. Œ Enter a brief description of each station on the controller. • In the Program A column, mark the watering schedule. Either circle one of the fixed intervals, or fill in the watering days in the “Custom” row. Ž Enter the starting time(s) for Program A. You may have up to three separate start times for each program. • Enter the run time for each station assigned to Program A. Enter “0” for stations that are not used in Program A. • Repeat steps 2 - 4 for Program B. If you are using a fixed schedule, Program B will have the same watering days as Program A. Technical Support: 1-800-RAIN BIRD 3 Select Watering Schedule The ESP has two types of watering schedules, either fixed or custom. The fixed schedule sets watering to occur every second, third, or fifth day. The custom schedule lets you select specific days of the week on which watering is to occur. The type of schedule you select applies to both programs, A and B. For example, you cannot set Program A to a fixed schedule and Program B to a custom schedule. Œ To use a fixed schedule, move the Schedule Slide Switch to one of the FIXED positions: 2 = every other day 3 = every third day 5 = every fifth day • To use the custom schedule, move the Schedule Slide Switch to the “C” position. Set Current Time Œ Turn the dial to “HR.” •The display shows the hour that is currently set, either AM or PM. Ž Press ñ or ò to set the current hour. • Turn the dial to “MIN.” • The display shows the minute currently set. ‘ Press ñ or ò to set the current minute. Technical Support: 1-800-RAIN BIRD 4 Set Current Day 3 Setting the current day varies somewhat depending on whether you are using a custom schedule or a fixed schedule. 4 DAY PGM A Custom Schedule ON OFF OFF Œ Make sure the Schedule Slide switch is set to “C.” • Turn the dial to “DAY.” TUE WED MIN THU HR FRI DAY • Press ñ or ò to change the display to the current day of the week. ADV. DAYS TO WATER MON CURRENT TIME AND DAY WATERING START TIMES MAN START B AUTO ADJUST WATER % 2 Ž The display shows the day of the week that is currently set (for example, “MO” for Monday). A CUSTOM SCHEDULE SAT 3 SUN 2 1 1 2 6 5 4 3 WATERING TIME PER STATION SCHEDULE FIXED ESP-6Si 1 Fixed Schedule Œ Make sure the Schedule Slide switch is set to a fixedday schedule: 2, 3, or 5. • Turn the dial to “DAY.” Ž The display shows “1” for the first day of the watering cycle. Day 1 is always the watering day. • Press ñ or ò to change the current day from 1. If you want tomorrow to be the watering day, change the current day to the last day in your fixed schedule. For example, if you’re using a two-day schedule and you want to start watering tomorrow, set the current day to “2.” If you’re using a three-day schedule and you want to start tomorrow, set the current day to “3.” Technical Support: 1-800-RAIN BIRD 5 2 3 5 C CUSTOM Select Program The ESP controller has two programs, A and B. Each program operates independently. If you are using the custom watering schedule, each program can have different watering days. For example, Program A might run on Monday, Wednesday, and Friday; Program B on Tuesday, Thursday, and Saturday. If you are using a fixed watering schedule, both programs will have the same “ON” days. For example, if you are using the three-day fixed schedule, Program A and Program B will both run every third day. You can assign any station to Program A, Program B, or both. Œ The program that is currently selected appears in the far left corner of the display. The display will show either “PGM A” or “PGM B.” • To select the program, press the A / B (or PGM) button until the program you want appears in the display. Pressing the A / B button switches back and forth between the two programs. Set Station Watering Days NOTE: You must set station watering days only if you are using the CUSTOM Schedule. If you are using one of the FIXED schedules, skip to the steps in Set Station Run Times Œ Turn the dial to “MON.” • The display shows the day of the week (for example, “MO” for Monday) and either “ON” or “OFF.” ON means the selected day is a watering day. OFF means watering doesn’t take place on the selected day. Ž Press the ON or OFF button to set the selected day of the week on or off. • Turn the dial to the next day of the week. Repeat steps 2 and 3 until you have set each day of the week either on or off. Technical Support: 1-800-RAIN BIRD 6 Set Station Run Times 2 3 Œ Turn the dial to Station 1. PGM • The display shows the selected station and its run time. If you are programming the controller for the first time, or after a long power outage, the built-in run time of 10 minutes will appear. A STATION ON WATER TIME OFF OFF TUE WED MIN THU HR FRI DAY WATERING START TIMES ADV. DAYS TO WATER MON CURRENT TIME AND DAY • Turn the dial to the next station in sequence. Repeat steps 2 through 4 until you have set the run time for each station. START B AUTO ADJUST WATER % Ž Press ñ or ò to change the display to the run time you want (up to 99 minutes). Set any unused stations to 0 minutes. MAN A CUSTOM SCHEDULE SAT 3 1 SUN 2 4 1 1 2 6 5 3 4 WATERING TIME PER STATION SCHEDULE FIXED ESP-6Si Set Watering Start Times 1 Each program on the ESP can have up to three watering start times, which tell the controller when to begin the watering program. The start time applies to all watering days for that program. CUSTOM 2 3 5 C 3 4 AM PGM A ON OFF If you want to water more than once a day, you can set the second and third watering start times. For example, if you are growing new lawn seed, you might want to water several times a day. To do so, you could set a program to run at 6:00 A.M., 11:00 A.M., and 4:00 P.M. OFF MON CURRENT TIME AND DAY Œ Make sure the program you want appears in the display. Either “PGM A” or “PGM B” will appear. To switch to the other program, press the A / B (or PGM) button. DAYS TO WATER WED MIN THU FRI DAY SUN 1 1 2 6 • Turn the dial to 1 in the “Watering Start Times” section. 5 4 3 WATERING TIME PER STATION Ž The display shows the start time currently set for this program. SCHEDULE FIXED ESP-6 Technical Support: 1-800-RAIN BIRD CUSTOM SCHEDULE SAT 3 2 2 ADV. TUE HR WATERING START TIMES START B AUTO ADJUST WATER % 5 MAN A 7 2 3 5 C CUSTOM Set Watering Start Times (Continued) 1 • Press ñ or ò to change the start time. The time setting moves forward or backward in 15 minute increments. To eliminate a start time, press ñ or ò until the blank setting between 11:45 PM and 12:15 AM appears. AM A ON OFF OFF MON CURRENT TIME AND DAY ADV. DAYS TO WATER WED MIN THU FRI DAY WATERING START TIMES START B TUE HR 5 MAN A AUTO ADJUST WATER % If you are following the programming checklist on page 6, you have now completed all programming steps for Program A. At this point, you may: n 4 PGM • If you want to set additional start times for this program, move the dial to 2 or 3 in the “Watering Start Times” section. Then repeat steps 3 and 4. n 3 CUSTOM SCHEDULE SAT 3 SUN 2 1 2 1 2 6 Enter Program B by following the steps that begin on page 3, or 5 4 3 WATERING TIME PER STATION Set the controller to automatic operation, as described on page 8. SCHEDULE FIXED ESP-6 OPERATING THE CONTROLLER Turn Controller On and Off 1 DAY PGM A Œ To set the controller to automatic operation, turn the dial to AUTO. The display will show the current day and time until the next scheduled automatic start. When a program is running, the display will show the station currently turned on and the minutes remaining on its run time. When the entire program is complete, the display will change back to the current day and time. AM ON OFF OFF ADV. DAYS TO WATER MON TUE CURRENT TIME WED MIN AND DAY THU HR FRI DAY START TIMES MAN START B AUTO ADJUST WATER % WATERING A CUSTOM SAT 3 SCHEDULE SUN 2 1 1 2 3 6 4 5 WATERING TIME PER STATION If you forget to turn the dial to AUTO, the controller will eventually set itself to automatic operation. The only setting that prevents automatic operation is OFF (see step 2). SCHEDULE FIXED ESP-6 CUSTOM 2 3 5 C DAY PGM A • To turn the controller off and prevent all watering, set the dial to OFF. The display will show the current day and time. In addition, the righthand minute digit will blink to show that the controller has been turned off. AM ON OFF A MAN START B ADV. 2 OFF AUTO ADJUST WATER % DAYS TO WATER MON CURRENT TIME AND DAY TUE WED MIN THU HR FRI DAY WATERING START TIMES The OFF setting can be used during rainy weather, seasonal shutdown, or system maintenance. CUSTOM SAT 3 SCHEDULE SUN 2 1 1 2 3 6 5 4 WATERING TIME PER STATION SCHEDULE FIXED ESP-6 Technical Support: 1-800-RAIN BIRD 8 2 3 5 C CUSTOM 2 3 5 C CUSTOM Adjust Water Budget Percent The Water Budget feature on the ESP lets you increase or decrease the run times of all stations by a selected percentage. You may adjust the run times as low as 10 percent and as high as 200 percent. Adjustments must be made in increments of 10 percentage points. The percentages are calculated on the normal programmed run times for each station. For example, if a station is programmed to run for 10 minutes, and you set the water budget percent to 80%, the station will run for 8 minutes (80% of 10 minutes). If you set the water budget to 120%, that same station will run for 12 minutes (120% of 10 minutes). The water budget feature can be useful for cutting back watering during cool winter months, or for increasing watering during periods of unusual heat. Keep in mind that the percentage you set applies to all stations on both programs. Œ Turn the dial to ADJUST WATER %. • The display shows the current water budget setting (between 10% and 200%). A setting of 100% means that all stations will run according to their normal programmed run times. Ž Press ñ or ò to increase or decrease the percentage in 10-point increments. When water budgeting is set above or below 100 percent, the words WATER BUDGET PERCENT will appear in the top of the display. To turn off water budgeting, repeat steps 1 to 3, and set the percentage to 100%. Use Manual Start / Advance Œ Select the program you want to start. Press the A / B (or PGM) button to switch back and forth between the two programs. • Press the MAN START / ADV. button to begin the program with the first assigned station. To advance through the stations in the program, press MAN START / ADV. repeatedly until the station you want is displayed. Technical Support: 1-800-RAIN BIRD 9 Run Test Program The ESP controller has a built-in test program that will run each station in sequence for two minutes. You can use this program to check out the operation of all the sprinklers in the system. Œ Turn the dial to AUTO. • Press both arrow buttons at the same time and hold them down. Ž The display shows the first station number and two minutes of watering time remaining. The controller will run each station for two minutes and then return to AUTO mode to await the next scheduled start time. Any station that has been set to a 0 run time will be skipped during the test program. REPLACING THE BATTERY The ESP controller features a rechargeable battery backup, which will preserve the controller's program in the event of a power failure. A fully charged battery will maintain the controller's program and keep current time for up to three days. However, the battery cannot operate the system. To replace the battery: Œ Open the controller door and swing the face panel out on its hinges from right to left. • Remove the old battery from the battery holder and disconnect it from the battery clip. Connect a new 9-Volt rechargeable, NiCad battery to the battery clip. Then insert the battery into the battery holder. CAUTION: DO NOT use 9-Volt alkaline batteries. They may burst or leak when subjected to the continuous charging circuit of the ESP. Use NiCad batteries only. Technical Support: 1-800-RAIN BIRD 10 INSTALLING THE CONTROLLER Select Location The plastic, weatherproof cabinet of the ESP controller is suitable for mounting outdoors or indoors. For best results, mount the controller at eye level in a sheltered location. Allow approximately 7 1/2" of clearance to the left side of the controller so the controller door can swing fully open. In addition, mount the controller so that 117-Volt AC power is readily accessible. The ESP controller has three "keyhole" slots on the back of the cabinet. Use these slots to mount the controller to a flat wall or vertical stud. Always use lower mounting hold "D" to secure the bottom of the controller. Mount Controller Œ Open the controller door and swing the face panel out on its hinges from right to left. • Place the open controller on the mounting surface and mark through the upper slots of the keyholes. (Use keyholes A and C for wall mounting. Use keyhole B for mounting on a stud.) Then mark the location of hole D. Ž Remove the cabinet. Drive appropriate fasteners into the wall or stud at the upper keyhole marks (A, B, C). Leave slightly more than 1/4" between the head of the fastener and the wall surface. Do not drive a fastener into location D at this time. • Hang the controller on the upper keyhole slots. Make sure the shafts of the fasteners are in the upper, narrow portion of the slots. Then drive a fastener through lower mounting hole D. The controller should now be secure. Technical Support: 1-800-RAIN BIRD 11 Connect Field Wiring The ESP's terminal strip, shown in this illustration, provides fast screw connections for field wires. Œ Wires connected to the terminal strip should be stripped to expose 1/2" of conductor at the end. • To connect field wires, loosen the screw terminal. Insert the stripped wire around the base of the screw. Then tighten the screw terminal to grip the wire. ŽTug gently on each wire to make sure it's securely connected. Station Valve Wiring Connect each valve by its own separate power wire to one of the numbered terminals on the ESP terminal strip, as shown in the illustration. Connect a common wire to one of the leads on each valve. Connect the other end of the common wire to the COM terminal on the ESP terminal strip. Wire used to connect the valves must be code-approved for underground installation. Bring all wires up through the right-hand hole in the bottom of the cabinet. Master Valve / Pump Start Relay Wiring NOTE: Complete this section only if your system requires a master valve (an automatic valve installed on the mainline pipe upstream from the station valves) or a 24-Volt pump start relay. Connect the master valve / pump start relay wiring to the MV terminal and COM terminal as shown in the illustration. Technical Support: 1-800-RAIN BIRD 12 Jumper Settings for Unused Stations CAUTION: To prevent pump damage when using a pump start relay, use a jumper to connect unused stations to a station that is being used. If program information is lost during a prolonged power outage, the ESP will automatically run a "default" program when power is restored. This program runs all stations for 10 minutes. If unused stations are not jumpered, the pump will operate with no flow (dead-head) during this 10-minute period. Dead-heading may cause the pump to overheat or burn out. Connect Transformer The ESP controller has a nipple-mounted transformer that provides a 1/2" nipple below the cabinet. Use this nipple to connect the ESP to an electrical function box or other code-approved enclosure for wire connections. Œ Make sure the 117-Volt AC power is off. • Connect the white wire from the controller nipple to the white wire coming out of the electrical conduit from the power source. Make sure all connections are made with code-approved insulated connectors. Ž In the same way, make the black-to-black and green-to-green wire connections. • Close up the weatherproof junction box after all connections are complete. 1 Technical Support: 1-800-RAIN BIRD 13 Install Battery Connect a rechargeable 9-Volt NiCad battery to the battery clip and insert the battery into the battery holder. See page 10 for complete instructions. CAUTION: DO NOT use alkaline batteries in the ESP. TROUBLESHOOTING SYMPTOM CAUSE CORRECTION Display shows "PR OFF " 1. Fuse has blown Replace the fuse with one of the same amperage rating. Use the MAN START / ADV button to run a watering program Press MAN START / ADV to cycle through each station; if the fuse blows again on a particular station, that station's solenoid or field wires may have a short circuit that needs repair. Determine why power to the controller has been interrupted, and re-establish power. Display is blank 3. If the controller is still receiving Shut off power to the controller, open the lower face panel, and disconnect the battery. Let the controller "rest" for about power, an electrical surge ex5 minutes. ceeding the controller's built-in surge protection may have dam- Reinstall the battery and turn power back on. If numbers and aged the controller's microproces- letters return to the display, the power surge did not do persor. manent damage: reprogram the controller. 2. Power is off to the controller If the display remains blank, the ESP may be permanently damaged. Call 1-800-RAIN-BIRD for a service referral. 4. Power is off to the ESP and Re-establish power to the controller, and then reprogram it. the backup battery has run down. The recharging circuit will charge the battery in about 12 to 14 hours. Display shows numbers and letters, but Is not moving or advancing Same as Cause #3 Technical Support: 1-800-RAIN BIRD See correction for Cause #3 14 This controller generates radio frequency energy and may cause interference to radio and television reception. It has been type tested and found to comply with the limits for a Class B computing device in accordance with the specifications in Subpart J of Part 15 of FCC Rules, which are designed to provide reasonable protection against such interference in a residential installation. However, there is no guarantee that interference will not occur in a particular installation. If this equipment does cause interference to radio or television reception, which can be determined by turning the equipment off and on, the user is encouraged to try to correct the interference by one or more of the following measures: 1. Reorient the receiving antenna. 2. Move the controller away from the receiver. 3. Plug the controller into a different outlet so that the controller and receiver are on different branch circuits. If necessary, the user should consult the dealer or experienced radio / television technician for additional suggestions. The user may find the following booklet prepared by the Federal Communications Commission helpful: “How to Identify and Resolve Radio-TV Interference Problems.” This booklet is available from the U.S. Government Printing Office, Washington, D.C. 20402, Stock No. 004-000-00345-4. RAIN BIRD PREFERRED BY PROFESSIONALS WORLDWIDE Rain Bird Sales, Inc. Customer Support Center 6640 S. Bonney Ave. Tucson, AZ 85706 1-800-RAIN BIRD (520) 434-6289 FAX © 1995 Rain Bird Sprinkler Mfg. Corp. ® Registered trademark of Rain Bird Sprinkler Mfg. Corp. Technical Support: 1-800-RAIN BIRD 15