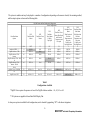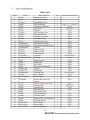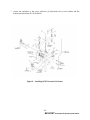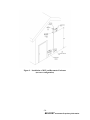
1
BELFORTINSTRUMENT Co. 8009372353 www.DIGIWX.com DigiWx ® Automated Weather Observing System AWOS Installation and Checkout Manual Proprietary Prepared in Response to FAA, Automated Weather Observing System (AWOS) Requirements June 2006 TABLE OF CONTENTS Section 1.0 1.1 1.2 2.0 2.1 2.2 3.0 4.0 4.1 4.2 4.3 4.4 4.5 5.0 6.0 6.1 6.2 6.2.1 6.2.2 6.2.3 6.3 6.4 7.0 7.1 7.2 7.3 7.4 7.5 7.6 7.7 7.8 7.9 7.10 7.11 7.12 7.13 7.14 7.15 8.0 8.1 8.2 9.0 9.1 9.2 Description Page Introduction ............................................................................................... 1 Purpose...................................................................................................... 1 Scope......................................................................................................... 1 Applicable Documents & List of Acronyms ................................................ 1 Applicable Documents................................................................................ 1 List of Acronyms........................................................................................ 1 System Overview and Description .............................................................. 3 Commissioning Process Overview .............................................................. 7 Coordinating the installation With the FAA ................................................ 7 Establishing Site–specific Operational Procedures....................................... 7 Performance Test and Installation Checkout ............................................... 8 Facility Commissioning and Inspection ....................................................... 8 Facility Reference Data File (FRDF) Documentation .................................. 9 Qualifications for Installation & Maintenance Personnel.............................. 9 Selection of Site Location .......................................................................... 9 Safety Precautions...................................................................................... 10 Site Preparation & Installation Options....................................................... 10 Tools Required for Site preparations .......................................................... 10 Installation on Unpaved Ground ................................................................. 10 Installation on Flat Metal, Paved or Wood Surface ..................................... 12 Installation of True North Monument ......................................................... 12 Lightning Protection and Grounding Requirements..................................... 12 Hardware Installations................................................................................ 14 Parts & Hardware....................................................................................... 15 Tools Required for Tower Installations ...................................................... 17 TiltOver Tower Assembly and Installation................................................. 18 Installing Tower Channel Section, Balance Weights and Lightning Rod ...... 22 Installing Cross Arm Assembly................................................................... 24 Installing DCP and Barometer Enclosure .................................................... 26 Installing DCP and Barometer Enclosure (no Tower Configuration) ........... 28 Installing Wind Speed Sensor ..................................................................... 30 Installing Wind Direction Sensor ................................................................ 32 Installing Temperature/Dew Point Sensor ................................................... 34 Installing Belfort Model 6000 Visibility Sensor ........................................... 36 Installing Solar Power Kit........................................................................... 41 Installing Battery Box Mounting Bracket.................................................... 43 Connecting Solar Power with Battery Backup........................................... 45 Installing A/C Power with Battery backup................................................. 47 Data Acquisition and Terminal Unit (DATU) Installation............................ 51 Installing DigiWx Phone............................................................................. 53 Installing DigiWx Voice ............................................................................. 55 System Checkout and Verifications............................................................. 58 Tools & Test Equipment Required for System Checkout ............................ 58 Display Acquisition Terminal Unit (DATU) Checkout ................................ 59 i 9.3 9.4 9.5 9.6 9.7 10.0 11.0 Table 1 Table 2 Table 3 DCP – Barometric Pressure Installation Verification & Calibration ............. Temperature, Humidity and Dew Point Installation Verification.................. 6000 Visibility Sensor Verification and Calibration ..................................... Wind Direction Sensor Installation Verification ......................................... Wind Speed Sensor Installation Verification ............................................... System Alignment and Checkout ................................................................ Customer Support and Assistance............................................................... 61 66 67 71 74 75 75 Tables Configurations Available................................................................................. Hardware & Parts List .................................................................................... DigiWx Alert Messages .................................................................................. 5 15 61 Figures & Illustrations Figure 1 Interior & Exterior DigiWx Components....................................................... 4 Figure 2 Typical Alignment of Tower Mounting Post .................................................. 11 Figure 3 Installation of Earth Grounding System ......................................................... 13 Figure 4 Photo of DATU at Operational Site............................................................... 14 Figure 5 Tiltover Tower Assembly (Lower Portion)................................................... 19 Figure 5a Tiltover Tower Assembly (Upper Portion) ................................................... 20 Figure 6 Installing Tower Channel Section and Balance Weights ................................. 23 Figure 7 Installing CrossArm Assembly...................................................................... 25 Figure 8 Installing DCP Electronics Enclosure ............................................................ 27 Figure 9 Installation of DCP Barometer Enclosure (No Tower)................................... 29 Figure 10 Installing Wind Speed Sensor ........................................................................ 31 Figure 11 Installing Wind Direction Sensor ................................................................... 33 Figure 12 Temperature Dew Point Sensor..................................................................... 35 Figure 13 Visibility Sensor with Scatter Plate Installed .................................................. 37 Figure 13a Visibility Sensor and ALS……………………………………………………. 38 Figure 14 Installing Solar Power Kit ............................................................................. 42 Figure 15 Installing Battery Box Mounting Bracket....................................................... 44 Figure 16 Connecting Solar Power................................................................................ 46 Figure 17a Basic AC Wiring Power Wiring Schematic .................................................... 48 Figure 17b Installing Commercial AC Power With Battery Backup................................ 49 Figure 18 Typical DATU Setup .................................................................................... 52 Figure 19 Installing DigiWx Voice Modules.................................................................. 57 Figure 20 Typical DigiWx Advisor Main Screen............................................................ 59 Figure 21 System Status Page ....................................................................................... 60 Figure 22 Typical DigiWx Tower Equipment Mounting Locations ................................ 62 Figure 23 Securing the Tower for Maintenance ............................................................. 63 Figure 24 Scatter Plate Attachment Detail..................................................................... 68 Figure 25 Tower with Visibility Scatter Plate Attached ................................................. 68 Figure 26 Installation of Opaque Filters on Transmitter and Receiver Hoods ................. 69 Figure 27 Wind Direction Vane Alignment .................................................................... 72 Appendices Appendix A: FAA Construction Notification Requirements & Forms ii 1.0 INTRODUCTION 1.1 PURPOSE – This manual has been prepared to thoroughly describe the planning, FAA coordination requirements, hardware/software installation and checkout procedures to be followed by system owners and qualified technicians to assure successful installation and facility commissioning of a DigiWx™ AWOS system. 1.2 SCOPE – This manual has been developed in accordance with the guidance and requirements described in FAA Advisory Circular, AC No: 150/522016C and other referenced documents. This manual is intended to support installation and operational checkout procedures applicable to all FAA approved DigiWx™ AWOS configurations. Consequently, only those hardware and software installation procedures applicable to the specific DigiWx™ AWOS configuration of options purchased need be completed. Owners and installation technicians are encouraged to contact the Belfort product support group at 18009372353 regarding questions concerning the applicability of any specific installation procedure. 2.0 APPLICABLE DOCUMENTS & LIST OF ACRONYMS 2.1 APPLICABLE DOCUMENTS: FAA AC No: 150/522016C Automated Weather Observing Systems (AWOS) For Non Federal Applications FAA Order 6700.20A NonFederal Navigational Aids and Air Traffic Control Facilities FAA Order 6560.13B Maintenance of Aviation Meteorological Systems and Miscellaneous Aids FAA Form 60301 Facility Maintenance Log 2.2 FAA Order 6560.20B Siting Criteria for Automated Weather Observing System (AWOS) FAA Form 74601 Notice of Proposed Construction or Alteration FAA Form 74602 Notice of Actual Construction or Alteration LIST OF ACRONYMS AC AVG ALS AWOS BIT CTAF DATU DC DCP DDR Alternating Current Average Ambient Light Sensor Automated Weather Observing System BuiltInTest Common Traffic Advisory Frequency Data Acquisition Terminal Unit Direct Current Data Collection Processor Digital Data Receiver 1 BELFORT INSTRUMENT Proprietary Information DMM DSL DTMF ELDF EEPROM FAA FBO FCC FRDF FRU FSDO Hg HHDU ICAO ID INOP KT LED LRU MCIF MHz MOU MSL NAVAID NIST NOTAM OMM RAF REL HUM RIF RPM T1 UHF UNICOM VAC Digital Multimeter Digital Subscriber Line DualTone MultiFrequency Endless Loop Dedicated Frequency Electrically Erasable Programmable ReadOnly Memory Federal Aviation Administration Facility Base Operator Federal Communication Commission Facility Reference Data File Field Replaceable Unit Flight Standards District Office Mercury Hand Held Display Unit International Civil Aviation Organization Identification Inoperative Knots Light Emitting Diode Lowest Replaceable Unit Microphone Click Interface MegaHertz (million Hertz) Memorandum of Understanding Mean Sea Level Navigational Aid National Institute of Standards and Technology Notice To Airmen Operations and Maintenance Manual Regional Airway Facilities Relative Humidity Radio Interface Revolutions Per Minute Tcarrier 1 (digital transmission line, 1.544 Mbps, 24 voice channels) Ultra High Frequency Universal Integrated Communications (System) Volts Alternating Current VDC VDD VDU VHF VS Volts Direct Current Version Description Document (DigiWx® Configuration Baseline Document) Video Display Unit Very High Frequency Visibility Sensor 2 BELFORT INSTRUMENT Proprietary Information 3.0 SYSTEM OVERVIEW AND DESCRIPTION – The DigiWx™ AWOS is a fully automated aviation weather observing and reporting system designed to support airborne and ground users. The DigiWx system is modular and may be installed in a number of configurations. A full DigiWx™ AWOS system consists of wind speed, wind direction, temperature, humidity, barometric pressure and visibility sensors mounted on a rugged, aluminum tiltover tower. Sensor readings are monitored and processed by a digital processor located in the DCP enclosure. The processor uses sensor data to calculate the prevailing and gust wind components for pre programmed runway headings. The DigiWx™ AWOS also calculates the altimeter setting, density altitude, condensation altitude, and dew point. All of this information plus the speed and direction of both prevailing wind and wind gusts, current surface temperature and visibility are broadcast on UHF 464 MHz by a FCC licensed transceiver located in the DCP enclosure. The system reports weather conditions to pilots in the air through the DigiWx™ AWOS HandHeld Display Unit (HHDU). The pilot receives this information at ranges up to 10 miles from the airport. In order to get the weather information, the pilot only has to power up the hand held display and select the runway heading that he/she will use. In addition to alphanumeric readouts of the various weather parameters, the hand held unit provides a graphical representation of the selected runway with the head, tail and/or cross wind components displayed thereon. Through DigiWx Advisor and a Digital Data Receiver (DDR), the weather information and any NOTAMs can be communicated to users by Pilot Activated Unicom or an Endless Loop Dedicated Frequency (ELDF) on a dedicated VHF frequency. An internet option and dial up voice modem allow remote users to access the information. DigiWx™ AWOS system software design also incorporates plug and play simplicity for ease of installation and maintenance, and an intuitive interface for ease of operation. Figure 1 illustrates a typical DigiWx installation with all sensor options installed and the solar power option added. 3 BELFORT INSTRUMENT Proprietary Information Interior DigiWx Data Acquisition Terminal Unit Exterior DigiWx Tower Figure 1 4 BELFORT INSTRUMENT Proprietary Information The system is modular and may be deployed in a number of configurations depending on the sensors selected, the mounting method, and the output options as shown in the following table. DigiWx Sensor and Data Distribution Configurations Sensor Configurations DCP Dual Baro Wall Mount DCP Dual Baro Tower Mount DCP Dual Baro Tower Mount Visibility Day/Night Code BNT B BV W DCP Dual Baro Tower Mount Wind Speed and Direction Temperature and Dew point Visibility with Day/Night Sensor V H A1 A2 BNTH BNTA1 BNTA2 BH BA1 BA2 BVH BVA1 BVA2 BWH BWA1 BWA2 BWVH BWVA1 BWVA2 BWSH BWSA1 BWSA2 A3 BNTA3 BA3 BVA3 BWA3 BWVA3 BWSA3 A4 BNTA4 BA4 BVA4 BWA4 BWVA4 BWSA4 V1 BNTA*V1 BA*V1 BVA*V1 BWA*V1 BWVA*V1 BWSA*V1 V2 BNTA*V2 BA*V2 BVA*V2 BWA*V2 BWVA*V2 BWSA*V2 Data Distribution Options Handheld (HHDU) ** DigiWx Advisor – FBO DigiWx Advisor FBO – Internet DigiWx Advisor FBO – Dial In DigiWx Advisor FBO – Internet Dial In With DigiWx Voice – UNICOM Or DigiWx Voice VHF DCP Dual Baro Tower Mount Wind Speed and Direction Temperature and Dew point DCP Dual Baro Wind Sock Mount Wind Speed and Direction Temperature and Dew point Visibility with Day/Night Sensor S Table 1 Configurations Available * DigiWx Voice requires the presence of one of the DigiWx Advisor modules – A1, A2, A3 or A4. ** All systems are supplied with one Hand Held Display Unit. A solar power option is available for all configurations, and is denoted by appending “SP” to the above designators. 5 BELFORT INSTRUMENT Proprietary Information Details of the configurations in the shaded boxes in table 1 are listed as examples. BNTH BA1 BVA3 BWA*V1 BWVA*V2 Dual Barometer DCP, wall mount, Handheld Receiver (HHDU) Dual Barometer DCP, Tower Mount, HHDU, DigiWx AdvisorFBO Dual Barometer DCP, Visibility, Tower Mount, HHDU, DigiWx Advisor FBODial In Dual Barometer DCP, Tower Mount, Wind Speed and Direction, Temperature and Dew point, HHDU, DigiWx Advisor A1, A2, A3 or A4, DigiWx Voice on UNICOM Dual Barometer DCP, Tower Mount, Wind Speed and Direction, Temperature and Dew point, HHDU, Visibility, DigiWx Advisor A1, A2, A3 or A4, DigiWx Voice on Dedicated VHF 6 BELFORT INSTRUMENT Proprietary Information 4.0 COMMISSIONING PROCESS OVERVIEW – In order for the system to become an FAA approved AWOS site installation a commissioning process must be completed. There are three phases to the commissioning process. They consists of: (1) Establishing a Memorandum of Understanding (MOU) and a sitespecific Operations and Maintenance Manual (OMM) (2) Physical installation of the DigiWx™ AWOS hardware and software at the owner’s site, and (3) Successful completion of a FAA conducted Commissioning ground inspection. 4.1 COORDINATING THE INSTALLATION WITH THE FAA – At least 120 days prior to the anticipated commissioning date, the owner should notify the FAA Regional Flight Standards District Office (FSDO) so that timely routine revisions may be made to the instrument approach procedures. Owners also need to contact and coordinate their installation plans be with the FAA regional nonFederal facilities program manager and follow the procedures provided (this person may be called the nonFederal coordinator in some regions). This FAA person is the official FAA point of contact and is responsible for the overall project coordination between the sponsor (owner) and other elements within the FAA. Coordination will include preparation and submittal of FAA forms 7460, “Notice of Proposed Construction or Alteration.” Refer to Appendix A for forms, requirements and instructions for completing and submitting these forms. FAA (Order 6700.20) requires that a Memorandum of Understanding (MOU) and a sitespecific Operations and Maintenance Manual (OMM) be established and agreed to between the sponsor (owner) and the FAA prior to commissioning the AWOS installation for public use. The purpose of the MOU/OMM is to ensure that there is a mutual understanding of what is required to operate and maintain a commissioned AWOS system. After the AWOS site installation is complete and the MOU/OMM is signed, the FAA will conduct a commissioning ground inspection to verify that the system is installed and operating correctly and that the owner has the resources and procedures in place to properly maintain the system. In addition, a flight inspection is required for NAVAIDS used for AWOS dissemination. As installation approaches operational readiness, the owner should request a commissioning ground inspection by Regional Airway Facilities (AAF) personnel. This inspection includes participation by the owner or the owner’s maintenance representative. This commissioning inspection includes tests and checks of the operational readiness of the AWOS system installation and also includes recording of initial facility performance data which should be retained in the facility reference data file (FRDF). 4.2 ESTABLISHING SITESPECIFIC OPERATIONAL PROCEDURES – FAA Order 6700.20 requires that a Sitespecific Operational Maintenance Manual (OMM) be established and the content agreed to by the FAA prior to commissioning of an AWOS system for public use. The purpose of this manual is to ensure there is a mutual understanding of what is required to operate and maintain a commissioned AWOS system. The required content of this manual is specified in FAA circular AC 150/522016C Section 12.d. The following items should be covered: Physical security of the facility Personnel to contact if a weather parameter is found to be out of tolerance or system maintenance is needed Posting of licenses and signs Notice to the FAA 7 BELFORT INSTRUMENT Proprietary Information How to keep station logs and other technical reports and documentation Procedures to be followed for periodic scheduled maintenance or shutdown. Procedures to be followed to freeze AWOS data in the archive file after an aircraft accident or incident. Locations of AWOS components on the airport Copy of the signed MOU between the owner and the FAA The system owner should work closely with the “FAA regional nonfederal facilities program manager” to assure the content of this manual is agreed to prior to the commissioning inspection. 4.3 PERFORMANCE TESTS AND INSTALLATION CHECKOUT – Prior to the FAA commissioning inspection, approved maintenance personnel should verify the functionality of the installation. All applicable operating requirement parameters identified in Chapter 4 of AC 150/522016C should be measured and documented to assure the system is performing within the tolerances specified. Refer to the DigiWx Maintenance Manual, Appendix A, and document these preliminary performance verifications on a “Comprehensive Facility Performance and Adjustment Record” form. 4.4 FACILITY COMMISSIONING AND INSPECTION – The facility commissioning inspection is a formal FAA ground inspection of the AWOS site installation. The completion of this event assures and demonstrates to the FAA that the system has been installed correctly and is operating in accordance with specified performance requirements. It consists of demonstration that the system is operational and performing within the operating tolerances specified in Chapter 4 of FAA circular AC 150/522016C and includes participation of the system owner’s FAA approved maintenance representative. The owner’s maintenance personnel should operate the system and measure all applicable system performance parameters as identified in Chapter 4 of AC 150/5220 16C. The results of this initial commissioning performance parameter measurements shall be recorded and documented on the “Comprehensive Facility Performance and Adjustment Data” form (similar to FAA Form 603017) and must be retained at the facility in the Facility Reference Data File (FRDF). If the installed system uses the voice outlet of the local NAVAID to broadcast weather information, the commissioning inspection will also include a flight inspection to ensure that the performance of the NAVAID has not been degraded as a result of the AWOS installation. To facilitate successful completion of the commissioning, owners should have the following documents and items readily available during the inspection: The FAA agreed to Memorandum of Understanding, MOU A copy of the FAA Type Approval letter, sent to Belfort Instrument, granting approval of DigiWx AWOS system design. A copy of the documentation from the FCC assigning the approved operating frequencies (if applicable) The sitespecific operations and maintenance manual (OMM), which have been agreed to by the FAA. All test equipment required for maintenance and needed to measure all applicable system performance parameters. All test equipment must be calibrated and show evidence of current calibration traceable to national standards. 8 BELFORT INSTRUMENT Proprietary Information 4.5 FACILITY REFERENCE DATA FILE (FRDF) DOCUMENTATION – The FRDF file should contain all of the documentation identified in Section 12 of FAA circular AC 150/522016C: Copy of FAA Type approval letter for the DigiWx system being installed. Frequency Allocation Approval from the FCC Copy of this Installation and Checkout Manual, Copy of the Belfort DigiWx Maintenance Manual and System description manual. Copy of the site specific Operational Maintenance Manual, OMM Initial commissioning documentation of facility performance and adjustment data to include measured performance data and respective standard or reference values. This file must be kept current and be available for FAA review at any time. 5.0 QUALIFICATION REQUIREMENTS FOR INSTALLATION AND MAINTENANCE PERSONNEL – Installation and maintenance of the DigiWx™ AWOS system must be performed by qualified personnel. FAA Order 6700.20A contains the qualification requirements for maintenance personnel who maintain NonFederal facilities. A Belfort Instrument trained technician or a technician verified by the FAA may install and maintain the system. The AWOS maintenance program is the responsibility of the system owner. Installation and maintenance personnel should have the special knowledge and skills needed to maintain a DigiWx™ AWOS facility. These skills can be obtained by completing the Belfort Instrument “DigiWx™ Installation and Maintenance Training Program” course and successfully passing the performance examination. Owners or maintenance technicians interested in scheduling this training should contact the Belfort Instrument DigiWx program manager at 18009372353 to schedule this training. In addition, the FAA will may give a practical exam to any DigiWx technician to assure the technician is qualified to perform system maintenance. 6.0 SELECTION OF SITE LOCATION – The site for installing the DigiWx™ AWOS should be carefully selected, in accordance with FAA Order 6560.20B. There are several factors that will impact the cost of installation and maintenance and could impact system performance. 1. The DigiWx™ AWOS tower is 15 feet tall, an illustration of the DigiWx tower is shown in Figure 2. Therefore, the unit should be located far enough away from runways and taxiways to provide adequate clearance for aircraft landings, takeoffs or while aircraft are taxiing in the vicinity of the DigiWx™ AWOS tower. 2. If the tower is to be supplied with commercial electric power, it should be located as close to the power source as possible and the power service should be installed by the site contractor to be within three (3) feet of the base of the DigiWx tower. Junction box will be provided by Belfort. Trenching for power service should comply with NEMA codes and all local electrical codes or ordnances that may apply. 3. In order to obtain accurate wind speed and direction measurements, the DigiWx™ AWOS should not be located close to buildings, trees or other obstructions. Best operational performance will be obtained if there are no obstructions within 500 feet of the DigiWx™. 9 BELFORT INSTRUMENT Proprietary Information 6.1 SAFETY PRECAUTIONS 1. Do not perform any DigiWx™ AWOS site preparation operations during inclement weather particularly during electrical storms. 2. Always contact the local agency capable of identifying the location of underground utilities prior of commencing any excavation operations. 3. Have all A/C power installations and connections performed by a fully qualified electrician. 6.2 SITE PREPARATION AND INSTALLATION OPTIONS: The following installation instructions apply to tower mounted systems. 6.2.1 TOOLS REQUIRED FOR SITE PREPARATIONS: Power drill and ½" drill bit. Socket wrench set including: 13/16", ¾", 5/16" and 3/8" sockets Carpenter's level #2 Phillips head screwdriver Allen Wrench (3 mm supplied with Hardware Kit) Allen Wrench, 3/16” ¼ Straight/slothead screwdriver Hand Bearing Compass, Lensatic 8' Step Ladder 1 1/16" – 1 1/8" hole saw with pilot drill Laptop computer with communication/RS232 interface 6.2.2 INSTALLATION ON UNPAVED GROUND – The DigiWx™ AWOS can be easily installed on unpaved ground. Site preparation consists of burying an 8 foot aluminum mounting channel (P/N 80021) to a depth of 4 feet below ground level. 1. Dig or auger a hole at least 4 feet in depth and 12 inches in diameter. NOTE: If the local frost depth is 4 feet or greater, the depth of the hole should be at least 6 inches below the frost depth and the aluminum channel appropriately longer to assure 4 feet extension above ground level. 2. Place the 8 foot aluminum channel in the hole and align a 6" side to face true north as described below: 3. With the aluminum channel (P/N 80021) standing in the hole, place the magnetic compass on the end, aligned with the north facing edge of the aluminum channel (P/N 80021), and rotate the aluminum channel (P/N 80021) until the compass indicates true north, taking into account local variation or declination. 10 BELFORT INSTRUMENT Proprietary Information Figure 2 Typical Alignment of Tower Mounting Post 11 BELFORT INSTRUMENT Proprietary Information 4. Use a carpenter’s level to align the aluminum channel (P/N 80021) vertical to the ground. 5. Secure the aluminum channel (P/N 80021) in this alignment. 6. After securing the aluminum channel (P/N 80021), check both the true north and vertical alignments and adjust if necessary. 7. While holding the aluminum channel (P/N 80021) in alignment, fill the hole with concrete to ground level. Immediately after pouring the concrete, recheck both the true north and vertical alignments and adjust if necessary. 8. Leave the alignment holding arrangement in place until the concrete is set. 9. When the concrete is set, remove the alignment holding arrangement and verify that one 6" side of the aluminum channel (P/N 80021) still faces to true North. 10. Mark the north facing side of the aluminum channel (P/N 80021) with the letter “N” using paint or a permanent marker. 11. As a condition of the DigiWx sale, the airport/owner will coordinate the physical site location of the DigiWx tower on the airfield with the local Flight Standards District Office (FSDO). 6.2.3 INSTALLATION ON FLAT METAL, PAVED OR WOOD SURFACE – The DigiWx™ AWOS can be installed on any flat metal or wood surface by securing the appropriate mounting bracket to the selected surface. The Belfort Instrument Company must be consulted to review the particular installation and provide a recommended mounting method. 6.3 INSTALLATION OF TRUE NORTH MONUMENT As a further condition of the DigiWx sale, the airport/owner is charged with providing a certificate of site survey for field elevation and installation of a permanent true North marker positioned 100 150 feet North of the physical site where the tower will be located. A concrete monument, 5 inches square at the top, 30 inches long, buried in the ground so that 1 inch extends above ground level is available from: Precast Concrete Sales Company 123 Route 303 P.O. Box 516 Valley Cottage, NY 10989 Phone: 8452684949 Fax: 8452684376 Marker Part Number: 212 or equivalent 6.4 LIGHTNING PROTECTION AND GROUNDING REQUIREMENTS Installation of the DigiWx tower must also include a lightning and grounding system: This system consists of a 5/8 inch diameter x 6 foot aluminum lightning rod mounted to the tower affording a 45 degree cone of protection, coupled through a bimetallic coupling to a 4/0 stranded bare copper down conductor to the site earth ground system. The site earth ground system shall consist of 3 each 10 foot long, ¾ inch diameter copper clad steel rods driven to a depth such that the tops of the rods are at least 18 inches below local grade. The rods shall be positioned in an equilateral triangle with 20 foot sides and connected with 1/0 bare stranded copper wire. All connections shall be CadWeld or commercial equivalent. 12 BELFORT INSTRUMENT Proprietary Information The site earth ground system must also be connected to any adjacent grounding system within 30 feet of the DigiWx installation with 1/0 bare copper conductor. Figure 3 Installation of Earth Grounding System 13 BELFORT INSTRUMENT Proprietary Information 7.0 Hardware Installations – All DigiWx™ AWOS systems except the Dual Barometer pressure reference only versions (BNT*) are mounted on a 15 foot fold over tower. This photo illustrates the installation of the DigiWx DATU at an operational site Figure 4 14 BELFORT INSTRUMENT Proprietary Information 7. 1 PARTS AND HARDWARE PARTS LIST ITEM 1 2 3 4 5 6 7 8 9 10 11 12 13 14 15 16 17 18 19 20 21 22 23 24 25 26 27 28 29 30 PART # 80010 80035 679501 80089 80018 22167 22168 679401 80014 80015 80016 80017 ZXSRS8HC R13HYCLIPS3 ZXMUF4502 872001 872101 872801 ZX1324U2 ZX1242DPCHR 80003 800031 800032 80057 ZXRPG125 ZX3827T34 ZX4491K42 ZXS56 SCP30S15DN ZXA8R84 31 32 33 34 35 36 37 80152 80009 80090 80097 80091 80087 90000 DESCRIPTION Instruction Manual HHDU User Manual Hand Held Receiver Pole and Harness Computer and Monitor Cross Arm Channel DCP Enclosure Assy Wind Speed Bottle Wind Direction Bottle Wind Speed Cups Wind Direction Vane Solar Radiation Shield Temperature/Humidity Sensor Antenna Harness, Tower Harness, Power Cable, Antenna Cap, End Eye Strap Battery Bracket Battery Box Solar Panel Solar Panel Mounting Kit Weights Nylon Rope Cap Plug, Red Solar Controller Power Supply Junction Box and circuit breaker Battery backup power cable Ground Cable Lightning Rod Mounting Plate Data Comm Cable DCP Mounting Kit Visibility Sensor 38 39 40 41 42 80098 92000 SFL612100 SFL612100 LPC 102627 Hardware Kit, Visibility meter Day Night Sensor Power Supply Power Supply Surge Suppressor QTY 1 1 1 1 1 1 1 1 1 1 1 1 1 1 1 1 1 1 2 1 1 1 1 1 3 1 6 1 1 INSTALLATION REF Figs 5, 6, 7, 15, & 16 Fig 18 Figs 5a & 7 Fig 6 Fig 8 Fig 10 Fig 11 Fig 10 Fig 11 Fig 12 Fig 12 Fig 5a Fig 5 Fig 5a Fig 5a Fig 10 & Fig 11 Fig 5a Fig 15 Fig 16 Fig 14 Fig Fig 5 Fig 6 Fig 10 & Fig 11 Fig 16 Fig 17 Fig 17 1 2 1 1 1 2 1 Fig 17 Figs 6 & 17 Fig 5a Fig 13 Fig 9 Fig 13 1 1 1 1 1 Fig 13 Fig 13 Fig 17 Fig 17 17 15 BELFORT INSTRUMENT Proprietary Information ITEM 43 44 45 46 47 48 49 50 51 PART # 80040 80041 80039 90001 80109 80110 80111 80113 80156 DESCRIPTION DDR & Power Supply DDR Comm Cable RIF Calibration Kit Obstruction Light and wiring harness kit Base Transceiver Pressure Vent Kit ELDF Base Transceiver MCIF HARDWARE PACKAGE KIT ITEM H1 H2 H3 H4 H5 H6 H7 H8 H9 PART NBR 80022 80023 80025 80026 80027 80028 80030 80031 80032 QTY 1 1 1 1 1 INSTALLATION REF Fig 19 Fig 19 Fig 19 Fig 5a 1 2 2 1 Fig 5a Fig 5a Fig 5a Fig 19 PART NUMBER 80033 WASHERS QTY FLAT LOCK NUT FASTENER Socket Head Screw, M4 x 8 Hex Head Bolt, ¼20 x ¾ Flat Head Screw, #832 x ½ Pan Head Screw, #832 x ½ Hex Head Bolt, 3/816 x 1 Hex Head Bolt, 3/816 x 6 Hex Head Bolt, ½13 x 7 Lag Bolt, ¼ x 1¼ Lag Bolt, 5/16 x 4½ * 6 11 2 4 6 1 2 1 4 6 11 4 6 3 4 1 * 6 11 4 6 2 * 2 4 * * Extra Hardware for Solar Panel and Mounting Table 2 16 BELFORT INSTRUMENT Proprietary Information 7.2 TOOLS REQUIRED FOR HARDWARE INSTALLATIONS 1. Common hand tools (i.e., wrenches, screwdrivers, nut drivers) 2. Digital multimeter (DMM) Fluke 77 or equivalent 3. Notebook computer with DB9 serial interface 4. PROCOMM software PROCOMM Plus, Datastorm Tech or equivalent 5. Portable pressure standard Model 76016B, (Paroscientific, Inc) 6. Visibility sensor calibration kit 32041, (Belfort Instrument Company) 7. Magnetic compass S&Y 183, Stocker and Yale or equivalent 8. Kestrel Model 3000 Wind Instrument with calibration kit 9. Scanner w/AC Adapter Radio Shack PRO 36/2731455 or equivalent 10. Wire brush (Commercial) 11. Scraper, w/razor blade (Commercial) 12. Gloves, rubber (Commercial) 13. TechniTool TECH DUSTER inert dusting gas or equivalent 14. Battery Terminal cleaning brush (Sears P/N 00947697000 or equivalent) 15. Wooden tongue depressors (to be used to remove debris from DCP pressure ports) 17 BELFORT INSTRUMENT Proprietary Information 7.3 TILTOVER TOWER ASSEMBLY & INSTALLATION SAFETY PRECAUTIONS 1. Before starting any power installation tasks, ensure that the A/C power circuit breaker is in the open position. 2. Do not perform DigiWx™ AWOS installation tasks during a thunderstorm. 3. Use extreme caution when lowering the tiltover tower whenever ice or snow has accumulated on the tower cross arm or the sensors. The extra weight may cause the tower to fall over rapidly. PARTS AND TOOLS REQUIRED 1. 2. 3. 4. Power drill and ½" drill bit Two (2) bolts, Four (4) flat washers, four (4) nuts, (Item H7, P/N 80030) Socket wrench and 13/16" socket Carpenter's level INSTALLATION INSTRUCTIONS 1. Determine the face of the buried aluminum channel (P/N 80021) post that faces north. 2. Attach the hinged section of the tiltover tower to the north face of the aluminum channel (P/N 80021) post using the bolts and washers provided (Item H7, P/N 80030). As shown in Figure 4, install a nut and washer on one of the bolts and run the nut down the bolt until 4½" of thread remains above the washer. This will ensure that you will be able to access the bolt head with a 13/16" socket in order to tighten the nut on the south face of the aluminum channel (P/N 80021) post. Insert this bolt through the upper mounting bolt access hole in the lower half of the tiltover tower as shown in Figure 4. Now attach the tower to the north face of the aluminum channel (P/N 80021) post by inserting the bolt through the ½" hole and tighten snugly. 3. Using a carpenter’s level, ensure that the lower section of the tiltover tower is vertical. Holding the tower section vertical, mark the position of the bottom mounting bolt hole. Rotate the tower out of the way and drill the second ½" hole through the aluminum channel (P/N 80021) post at that point. 4. Rotate the lower section of the tiltover tower back to vertical being careful not to pinch the wiring at the hinge point. Insert the bottom mounting bolt, install a nut and washer on one of the bolts and run the nut down the bolt until 4½" of thread remains above the washer (H7, P/N 80030), as shown in Figure 4. 5. NOTE: DO NOT INSTALL NUT AND WASHER ON THE SOUTH SIDE OF THE aluminum channel (P/N 80021) POST AT THIS TIME! 6. Figure 5 illustrates the lower portion of the tiltover tower. 18 BELFORT INSTRUMENT Proprietary Information Figure 5 – TiltOver Tower Assembly & Installation (Lower Portion) 19 BELFORT INSTRUMENT Proprietary Information 20 BELFORT INSTRUMENT Proprietary Information Figure 5a – TiltOver Tower Assembly & Installation (Upper Portion) 21 BELFORT INSTRUMENT Proprietary Information This page intentionally left blank. 22 BELFORT INSTRUMENT Proprietary Information 7.4 INSTALLING TOWER CHANNEL SECTION, BALANCE WEIGHTS AND LIGHTNING ROD SAFETY PRECAUTIONS 1. Before starting any power installation tasks, ensure that the A/C power circuit breaker is in the open position. 2. Do not perform DigiWx™ AWOS installation tasks during a thunderstorm. 3. Use extreme caution when lowering the tiltover tower whenever ice or snow has accumulated on the tower cross arm or the sensors. The extra weight may cause the tower to fall over rapidly. PARTS AND TOOLS REQUIRED 1. 2. 3. 4. 5. 6. 7. 8. Tower channel section (Item 7) Six 3/816 x ¾ hex head bolts and washers (Item H5, P/N 80027) Two 832 x ½ flat head screws (Item H3, P/N 80025) Nylon rope (Item 26) Eye Strap (Item 20) Balance weight mounting bolt, nut and washers (Item H6, P/N 80028) Five 12.5 lb. Weights (Item 25) Lightning Rod Kit (Item 33, P/N 80090) INSTALLATION INSTRUCTIONS 1. Locate the channel (Item 7) and attach it to the upper half of the hinged section of the tiltover tower with three (3) hex head bolts and washers (Item H5, P/N 80027) as shown in Figure 2. 2. Locate the eye strap and attach it to the upper half of the hinged section using the two (2) tapped holes and two (2) flat head screws provided (Item H3, P/N 80025). 3. Feed the 3/8" nylon rope through the rope bail and tie a stopper knot at the end as shown in Figure 6. 4. Insert balance weight mounting bolt (Item H6, P/N 80028) through the hole near the bottom end of the channel section. Install washers & nut and tighten as shown in Figure 6. 5. Locate the lightning rod, two (2) 3/816 x 4½ eye bolts, nuts and washers, twentyfive (25) feet 32/17 braided copper wire, the Bimetallic Connector and the eight (8) ground wire securing clips which are all part of Item 33, P/N 80090. Secure the lightning rod to the tower using the two (2) eyebolts, nuts and washers with the upper portion of the rod bending away from the tower as shown on Figure 6. Attach one end of the down conductor to the bottom of the lightning rod using the Bimetallic Connector. Route the grounding wire down the tower, securing every two (2) feet with the clips and fasteners supplied. Route the grounding wire to the earth ground system and secure with a wire clamp, making sure any wire bends have a radius of at least 8 inches. Trim any excess grounding wire. 6. Erect the tiltover tower and hold it in place by installing the lower one of the three (3) tower securing bolts (Item H5, P/N 80027) and tighten fingertight. NOTE: Do not overtighten the towersecuring bolts since excessive torque may damage the threaded inserts. Use care when erecting the tower and ensure that the wiring routed inside the hinged tower section is not being pinched at the hinge point. 23 BELFORT INSTRUMENT Proprietary Information 7. Place the five (5) 12.5 lb. weights provided over the balanceweight mounting bolt and secure with hardware (Item H6, P/N 80028) as shown in Figure 6. Figure 6 – Installing Tower Channel Section and Balance Weights 24 BELFORT INSTRUMENT Proprietary Information 7.5 INSTALLING CROSS ARM ASSEMBLY AND OBSTRUCTION LIGHT SAFETY PRECAUTIONS 1. Before starting any power installation tasks, ensure that the A/C power circuit breaker is in the open position. 2. Do not perform DigiWx™ AWOS installation tasks during a thunderstorm. 3. Use extreme caution when lowering the tiltover tower whenever ice or snow has accumulated on the tower cross arm or the sensors. The extra weight may cause the tower to fall over rapidly. PARTS AND TOOLS REQUIRED 1. Cross arm assembly (Item 6) 2. Four (4) cross arm mounting bracket bolts and lock washers (Item H2, P/N 80023) 3. Socket wrench and ¾" socket INSTALLATION INSTRUCTIONS 1. Remove towersecuring bolts and pull the tower down to the point where the top of the tower is at a comfortable working height and secure it in that position by tying the nylon rope around the aluminum channel (P/N 80021) post. 2. Untangle the wind sensor cables from the wiring harness in the upper section of the tiltover tower and locate the markers on the cable ends that identify them for the “wind direction” and “wind speed” sensors, respectively. 3. Locate the cross arm assembly. Route the radio antenna cable out through the cross arm and the cross arm adapter bracket. 4. Route the antenna cable through the upper section of the hinged section and out through the cutout for the electronics enclosure. 5. Route the obstruction light power cable out through the tower hole and install the protective rubber grommet. 6. Route the two sensor cables through the cross arm adapter bracket and out the ends of the cross arm. The wind direction cable must be routed out the right side of the cross arm and the wind speed sensor cable is routed to the left as viewed from the sensor side (top) of the cross arm. 7. Using two (2) of the bolts and washers provided (Item H2, P/N 80023), mount the cross arm to the upper half of the hinged tower section as shown in Figure 3. 8. Using the other two (2) bolts and washers, secure the obstruction light mounting bracket with obstruction light to the tower. This will also complete the attachment of the crossarm. 9. Figure 7 illustrates the details of the crossarm assembly. Figure 8 illustrates the details of the obstruction light. 25 BELFORT INSTRUMENT Proprietary Information Figure 7 – Installing CrossArm Assembly 26 BELFORT INSTRUMENT Proprietary Information 7.6 INSTALLING DCP AND BAROMETER ENCLOSURE SAFETY PRECAUTIONS 1. Before starting any power installation tasks, ensure that the A/C power circuit breaker is in the open position. 2. Do not perform DigiWx™ AWOS installation tasks during a thunderstorm. 3. Use extreme caution when lowering the tiltover tower whenever ice or snow has accumulated on the tower cross arm or the sensors. The extra weight may cause the tower to fall over rapidly. PARTS AND TOOLS REQUIRED 1. 2. 3. 4. 5. 6. 7. 8. 9. DCP enclosure (Item 8) Fold Over Tower with all cabling preinstalled Data Communication Cable (Item 35) Four 832 x ½" Pan head screws (Item H4, P/N 80026) Phillips head screwdriver Two each static pressure vents (Item 49, P/N 80111) Phillips head screwdriver Four ¼20 x ¾ bolts with washers (Item H2, P/N 80023) Socket wrench and ¾" socket INSTALLATION INSTRUCTIONS Note: Installation of the DCP requires prior installation of the static pressure port vents onto the tower. 1. Locate the static pressure ports with brackets and hoses. 2. Align bolt holes in the mounting brackets with the drilled and tapped holes on the sides of the tiltover tower as shown in Figure 5. 3. Secure the vents to the tiltover tower using four (4) bolts and washers (Item H2, P/N 80023) provided. 4. Slip one end of each ¼” diameter hose over the barbed fitting on the bottom of the vent (See Figure 5) 5. Insert the other end of each hose through the grommet holes into the interior of the tower and feed them up and out through the DCP cutout. Form a drip loop in each hose to retard moisture entry into the tower. 6. Locate the DCP enclosure and connect the following to the receptacles on the back of the enclosure as shown in Figure 8: the antenna cable, power cable, 9pin communication cable and sensor harness from the cutout in the upper half of the hinged tower section. Connect both of the ¼” hoses from the static pressure vents to the bulkhead barbed fittings located on the back of the DCP below the antenna connector. It does not matter which hose attaches to which fitting. If there are no additional sensors, fold and store the sensor harness in the tower above the DCP access cutout. NOTE: All of the connectors and their respective receptacles are keyed. 27 BELFORT INSTRUMENT Proprietary Information 7. Secure the enclosure to the tower with four (4) Pan head screws, lock washers and flat washers provided (Item H4, P/N 80026). Figure 8 – Installing DCP Electronics Enclosure 28 BELFORT INSTRUMENT Proprietary Information 7.7 INSTALLING DCP AND BAROMETER ENCLOSURE (NO TOWER CONFIGURATION) SAFETY PRECAUTIONS 1. Before starting any power installation tasks, ensure that the A/C power circuit breaker is in the open position. 2. Do not perform DigiWx™ AWOS installation tasks during a thunderstorm. 3. Use extreme caution when lowering the tiltover tower whenever ice or snow has accumulated on the tower cross arm or the sensors. The extra weight may cause the tower to fall over rapidly. PARTS AND TOOLS REQUIRED 1. 2. 3. 4. 5. 6. Electronics enclosure (Item 8) Two DCP mounting brackets and power harness (Item 36, P/N 80097) Four 832 x ½" Pan head screws (Item H4, P/N 80026) Phillips head screwdriver Wire clips procured locally to suit use. Data Comm Cable (Item 35, P/N 80091) INSTALLATION INSTRUCTIONS 1. Mount the two DCP mounting brackets to the DCP using the four pan head screws. 2. Mount the antenna to the upper bracket in the cutout provided. 3. Connect the antenna cable and power cable to the receptacles on the back of the enclosure as shown in Figure 8. NOTE: All of the connectors and their respective receptacles are keyed. 4. The DCP enclosure should be installed in a convenient location on the building exterior wall approximately 12 feet above ground level facing East or at a level to assure clearance above any possible accumulation of snow as shown in Figure 9. 5. Route the Data Comm Cable and Power Harness down the wall and secure every two (2) feet with the wire clips. 6. See Section 7.15 and Figure 19 for detailed installation of AC power and battery backup that are illustrated in Figure 9. 29 BELFORT INSTRUMENT Proprietary Information Figure 9 – Installation of DCP and Barometer Enclosure (no tower configuration) 30 BELFORT INSTRUMENT Proprietary Information 7.8 INSTALLING WIND SPEED SENSOR SAFETY PRECAUTIONS 1. Before starting any power installation tasks, ensure that the A/C power circuit breaker is in the open position. 2. Do not perform DigiWx™ AWOS installation tasks during a thunderstorm. 3. Use extreme caution when lowering the tiltover tower whenever ice or snow has accumulated on the tower cross arm or the sensors. The extra weight may cause the tower to fall over rapidly. PARTS AND TOOLS REQUIRED 1. 2. 3. 4. 5. Wind speed sensor (Item 9) Three (3) M4 x 8, Socket head screws (Item H1, P/N 80022) 3 mm Allen wrench End Cap (Item 19, P/N ZX1324U2) Three (3) hole plugs (Item 27, PN ZX4491K42) INSTALLATION INSTRUCTIONS 1. Reference Figure 10. 2. Locate the wind speed sensor and remove the three (3) screws installed in the bottom of the sensor and discard. 3. Remove the knurled protective collar from the sensor connector flange and discard. 4. Route the wind speed sensor cable through the cutout in the top of the left side of the cross arm. 5. Carefully insert the keyed cable connector into the sensor and hand tighten completely. 6. Insert sensor with the cable attached through the cutout in the top of the cross arm and secure with three (3) Socket head screws (Item H1, P/N 80022) using the Allen wrench provided. 7. Insert the End Cap (Item 27) into the end of the cross arm and tap into place. Insert the three (3) hole plugs in the bottom of the cross arm to cover the screw access holes. 31 BELFORT INSTRUMENT Proprietary Information Figure 10 – Installing Wind Speed Sensor 32 BELFORT INSTRUMENT Proprietary Information 7.9 INSTALLING WIND DIRECTION SENSOR SAFETY PRECAUTIONS 1. Before starting any power installation tasks, ensure that the A/C power circuit breaker is in the open position. 2. Do not perform DigiWx™ AWOS installation tasks during a thunderstorm. 3. Use extreme caution when lowering the tiltover tower whenever ice or snow has accumulated on the tower cross arm or the sensors. The extra weight may cause the tower to fall over rapidly. PARTS AND TOOLS REQUIRED 1. 2. 3. 4. 5. Wind direction sensor (Item 10) Three (3) M4 x 8, Socket head screws (Item H1, P/N 80022) 3 mm Allen wrench End Cap (Item 19, P/N ZX1324U2) Three (3) hole plugs (Item 27, PN ZX4491K42) INSTALLATION INSTRUCTIONS 1. Locate the wind direction sensor (Item10) that has the wind vane already attached to the shaft. NOTE: The wind direction vane has been aligned at the factory such that it will indicate a direction of 360 when it is aligned with the red pointer mounted on the sensor body. DO NOT REMOVE THE WIND DIRECTION VANE FROM THE SHAFT OR THE POINTER FROM THE BODY! 2. Remove the three (3) screws installed in the bottom of the sensor and discard. 3. Remove the knurled protective collar from the sensor connector flange and discard. 4. Route the wind direction sensor cable through the cutout in the top of the cross arm. 5. Carefully insert the keyed cable connector into the sensor and hand tighten. 6. Insert sensor with the cable attached through the cutout in the top of the cross arm and position it so that the red pointer is parallel to the cross arm as shown in Figure 11. Secure the sensor with three (3) Socket head screws and washers (Item H1, P/N 80022), using the Allen wrench provided. 7. Insert the End Cap (Item 27) into the end of the cross arm and tap into place. Insert the three (3) hole plugs in the bottom of the cross arm to cover the screw access holes. 8. To verify wind direction sensor alignment, follow the procedures in section 7.16. 33 BELFORT INSTRUMENT Proprietary Information NOTE: THE WIND DIRECTION VANE HAS BEEN ALIGNED AT THE FACTORY 0 SUCH THAT IT WILL INDICATE A DIRECTION OF 360 WHEN IT IS ALIGNED WITH THE RED POINTER MOUNTED ON THE SENSOR BODY Figure 11 – Installing Wind Direction Sensor 34 BELFORT INSTRUMENT Proprietary Information 7.10 INSTALLING TEMPERATURE/DEW POINT SENSOR SAFETY PRECAUTIONS 1. Before starting any installation work, ensure that the power circuit breaker is open. 2. Do not perform DigiWx™ AWOS installation tasks during a thunderstorm. 3. Use extreme caution when lowering the tiltover tower whenever ice or snow has accumulated on the tower cross arm or the sensors. The extra weight may cause the tower to fall over rapidly. PARTS AND TOOLS REQUIRED 1. 2. 3. 4. 5. Temperature/dew point radiation shield (Item 13) Temperature/dew point sensor (Item 14) Phillips head screwdriver Two ¼20 x ¾ bolts with washers (Item H2, P/N 80023) Socket wrench and ¾" socket INSTALLATION INSTRUCTIONS 1. Locate the temperature/dew point radiation shield. 2. Align bolt holes in the sensormounting bracket with the drilled and tapped holes in the right hand side of the tiltover tower as shown in Figure 12. 3. Secure the radiation shield to the tiltover tower using two (2) bolts and washers (Item H2, P/N 80023) provided. 4. Being very careful to observe the keyed connector pin orientation, insert the sensor into the connector located on the end of the temperature/dew point cable. (See Figure 12) 5. Loosen the three (3) Phillips head screws on the bottom of the sensor's radiation shield and remove the plastic sensor adapter. 6. Loosen the jam nut on top of the plastic sensor adapter a few turns. 7. Insert the sensor and sensor connector assembly through the bottom of the adapter until the connection between the sensor and the connector is under the rubber seal in the top of the plastic adapter. Handtighten the jam nut to secure the sensor in the adapter. 8. Slowly insert the plastic adapter, with the sensor and connector installed, through the bottom of the radiation shield until the end of the sensor touches the top of the radiation shield. Retract the adapter approximately ½" and secure it in place by tightening the three (3) Phillips head set screws in the base of the radiation shield. NOTE: The adapter is retracted approximately ½" to insure the sensor is not contacting the top plate of the solar radiation shield. 35 BELFORT INSTRUMENT Proprietary Information 1 2 TOP PLATE OF THE RADIATION SHIELD RADIATION SHIELD 13 PHILLIPS HEAD SCREW 3 PLACES TOWER BOLT LOCK WASHER FLAT WASHER 2 PLACES PROBE SENSOR 1 3 8 GROMMET JAM NUT CONNECTOR ASSEMBLY KEY PROBE SENSOR PLASTIC SENSOR ADAPTER KEY CONNECTOR ASSEMBLY Figure 12 Temperature Dew Point Sensor 36 BELFORT INSTRUMENT Proprietary Information 7.11 INSTALLING BELFORT MODEL 6000 VISIBILITY SENSOR SAFETY PRECAUTIONS 1. Before starting any installation work, ensure that the power circuit breaker is open. 2. Do not perform DigiWx™ AWOS installation tasks during a thunderstorm. 3. Use extreme caution when lowering the tiltover tower whenever ice or snow has accumulated on the tower cross arm or the sensors. The extra weight may cause the tower to fall over rapidly. PARTS AND TOOLS REQUIRED See Figure 13 1. Visibility Sensor Assembly, PN 900003 (Item 37). (12VDC Version) 2. One 110/240 VAC to 12 VDC 6 amp power supply, P/N SFL612100 (Item 41) 3. Visibility Sensor mounting plate, rubber pads and 4 each 3/816 X 5 bolts, nuts, locks and flats, P/N 80097. 4. 8 foot step ladder. 5. Socket wrench with 9/16" socket 6. Cordless drill and 1/8” drill bit 7. 3 each ½” conduit clamps 8. 6 each 1/8 x 5/8 self tapping screws and washers 9. 1 each DB9 Null Modem adapter 37 BELFORT INSTRUMENT Proprietary Information Figure 13 Visibility Sensor with Scatter Plate Installed 38 BELFORT INSTRUMENT Proprietary Information Figure 13a Visibility Sensor and ALS 39 BELFORT INSTRUMENT Proprietary Information INSTALLATION INSTRUCTIONS Note: The following instructions assume the visibility sensor will be installed on an existing DigiWx tower 1. Unpack the Visibility Sensor and mounting hardware. Check contents against the parts list to assure there are no missing components. 2. Carefully attach the visibility sensor (Item 37) to the upper DigiWx tower section approximately 14 inches above the hinge point just above the channel, using the mounting plate and mounting hardware. Mount the ALS on the top Northern most bolt of the mounting plate on the back side from the VS, pointing in a Northerly direction. Center the bubble on the ALS bubble level to set the proper elevation angle. Wire tie the ALS cable and the VS power and communications cables to the cross arm, forming drip loops at the enclosure entrance points. See Figure 13a 3. Load the three 12 lb. weights on the new channel and secure. Carefully return the tower to the upright position and secure with all three 3/816 x 1 bolts and washers. 4. Facing the Visibility Sensor, route the sensor wire bundle down the hinge side of the tower, securing every 24 inches with conduit clamps and self tapping screws using the predrilled holes. 5. At the base of the tower, connect the red and black visibility power harness to the positive and negative outputs of the visibility sensor 12VDC power supply (See Figure 17a). 6. Before the DigiWx AWOS Data Collection Processor (DCP) can sense the 6000, it needs to be configured. Using a laptop running ASOSDCP102 and connected to the DCP through the RS232 communication cable located in the tower, enter the password protected configuration mode of the DigiWx AWOS DCP by applying power to the DCP and typing an “m” to force the DCP to the monitor mode. Enter current date of this configuration change. In configuration mode, set the visibility sensor to “6000” and the baud rate to “9600”. Hit Esc to store the configuration data in the EEPROM. The DCP will ask for the password, enter the password and type “CR”, the new configuration data will be stored. Exit ASOSDCP102 by typing “x” followed by “enter”. Turn power to the DigiWx Tower off. 7. Connect the DB9 connector on the Visibility Sensor Data Cable to the RS232 cable coming down inside the tower using a null modem adapter. Apply Dow Corning DC7 liberally to the connectors to protect against moisture. Place the cable connection in the junction box with the power supply to protect it against weather. 8. Power up the DigiWx tower and visibility sensor. Allow 10 minutes for the averaging algorithm to be satisfied and visibility information will appear in the output string. 40 BELFORT INSTRUMENT Proprietary Information This page intentionally left blank. 41 BELFORT INSTRUMENT Proprietary Information 7.12 INSTALLING SOLAR POWER KIT Note: Each solar power kit and configuration will be sized for the specific location and historical weather conditions. The following is a generic installation guideline. SAFETY PRECAUTIONS 1. REMOVE THE INLINE FUSE FROM THE RED LEAD OF THE SOLAR PANEL WIRES. 2. Do not perform DigiWx™ AWOS installation tasks during a thunderstorm. 3. Use extreme caution when lowering the tiltover tower whenever ice or snow has accumulated on the tower cross arm or the sensors. The extra weight may cause the tower to fall over rapidly. PARTS AND TOOLS REQUIRED 1. 2. 3. 4. 5. 6. 7. 8. 9. Solar panel support brackets (Part of Item 24) Four ¼" bolts (Part of Item 24) Solar power panel (Item 23) Solar panel mounting channel (Part of Item 24) Four 5/164½ lag bolts (Item H9, P/N 80032) Four 3/816 x 1 bolts, washers and nuts (Part of Item 22) Socket wrench with 3/8" and 5/16" sockets Flat head or Phillips Screwdriver Extra hardware is supplied if needed (Item H9, P/N 80032) INSTALLATION INSTRUCTIONS 1. Unpack solar panel. 2. Install solar panel support brackets to the back side of the solar panel as shown in Figure 14 using the four ¼" bolts provided. Be sure that the mounting support brackets are aligned as shown in the instructions located in the Solar Power kit box. 3. Loosely attach the panel support end brackets to the solar panel support brackets as shown in the instructions located in the Solar Power Kit box. 4. Locate the solar panel mounting channel and secure it near the top of the south side of the aluminum channel (P/N 80021) using the four lag bolts (Item H9, P/N 80032) provided. 5. NOTE: IT IS RECOMMENDED THAT TWO PEOPLE PERFORM THIS STEP. Attach the assembled solar panel to the solar panel support end brackets using four 3/816 x 1 bolts, nuts and washers provided. Start the two top bolts first and fingertighten them. The two bottom bolts can then be inserted and the solar panel set to 45° from the vertical plane. Tighten all bolts at this time. 6. The red and black power leads will be attached to the solar charge controller as described in section 7.14, Figure 18. 42 BELFORT INSTRUMENT Proprietary Information Figure 14 – Installing Solar Power Kit 43 BELFORT INSTRUMENT Proprietary Information 7.13 INSTALLING BATTERY BOX MOUNTING BRACKET SAFETY PRECAUTIONS 1. Before starting any installation work, ensure that the power circuit breaker is open. 2. Do not perform DigiWx™ AWOS installation tasks during a thunderstorm. 3. Use extreme caution when lowering the tiltover tower whenever ice or snow has accumulated on the tower cross arm or the sensors. The extra weight may cause the tower to fall over rapidly. PARTS AND TOOLS REQUIRED 1. 2. 3. 4. 5. 6. Battery box mounting bracket (Item 21) One ¼ x 1¼ lag bolt and washer (Item H8, P/N 80031) Two (2) battery box strap brackets (Part of Item 22) Four (4) wood screws (Part of Item 22) Phillips Screwdriver Socket wrench and 13/16" socket INSTALLATION INSTRUCTIONS 1. Locate the battery box mounting bracket and place it over the end of the bottom tower mounting bolt as shown in Figure 15. Install washer & nut and tighten snugly. 2. Drill pilot hole and install the lag bolt (Item H8, P/N 80031) through the remaining hole in the batterybox mounting bracket. 3. Locate the two (2) battery box strap brackets (Part of Item 22) and install them on the aluminum channel (P/N 80021) post as shown in Figure 15 at 1" and 12" above the top of the battery box mounting bracket. 44 BELFORT INSTRUMENT Proprietary Information Figure 15 – Installing Battery Box Mounting Bracket 45 BELFORT INSTRUMENT Proprietary Information 46 BELFORT INSTRUMENT Proprietary Information 7.14 CONNECTING SOLAR POWER WITH BATTERY BACKUP Note: Each solar power kit and configuration will be sized for the specific location and historical weather conditions. The following is a generic installation guideline. SAFETY PRECAUTIONS 1. Remove the in line fuse from the red lead in the tower power harness (See Figure 18). 2. Do not perform DigiWx™ AWOS installation tasks during a thunderstorm. 3. Use extreme caution when lowering the tiltover tower whenever ice or snow has accumulated on the tower cross arm or the sensors. The extra weight may cause the tower to fall over rapidly. PARTS AND TOOLS REQUIRED 1. 2. 3. 4. 5. Slothead and Phillips screwdriver Deep Discharge 100 amp hour flooded cell group 27 battery procured locally Battery Box (Item 22) Solar Charge Controller (Item 28) Battery Power Cable (Item 31) INSTALLATION INSTRUCTIONS 1. Unpack the battery and position it near the base of the tiltover tower. 2. The solar power controller is shipped with a jumper installed. This sets the controller for charging SEALED batteries (any battery that cannot have distilled water added). If a FLOODED battery (any battery that is capable of having distilled water added) is being used, simply remove the jumper to optimize the battery charging circuit for a FLOODED battery. 3. Attach the solar power panel cable to the “Solar” terminals on the solar controller, red to positive and black to negative as shown in Figure 16. 4. Place the solar controller on the battery and connect the 6inch red lead to the positive (+) terminal and place the 6inch black lead to the negative () terminal. NOTE: Some solar panel charge controllers may include terminal labeled “LOAD”. DO NOT USE THESE TERMINALS. 5. Feed the end of the Battery Power Cable without lugs through one of the available water tight penetrations on the AC junction box. The red or positive lead goes to the bottom or input side of the DC circuit breaker. Make sure the breaker is open before attaching any wires. The red wire from the DCP power cable attaches to the top or output side of the DC breaker. The black or negative Battery Power Cable lead is made up with the green wire attached to the grounding stud, and the black lead from the DCP power cable. See Figures 17a and 17b 6. Attach the lugged ends of the Battery Power Cable to the battery terminals, red to positive and black to negative. Reset the DC breaker to enable battery backup. 7. Route the batteryretaining strap through both of the battery retaining strap brackets which are mounted on the aluminum channel (P/N 80021) post and then place the battery in the battery box sitting on the bracket and secure with retaining strap. 47 BELFORT INSTRUMENT Proprietary Information 28 Figure 16 – Connecting Solar Power 48 BELFORT INSTRUMENT Proprietary Information 7.15 INSTALLING A/C POWER WITH BATTERY BACKUP SAFETY PRECAUTIONS 1. Before starting any power installation tasks, ensure that the A/C power circuit breaker is in the open position. 2. Do not perform DigiWx™ AWOS installation tasks during a thunderstorm. 3. Use extreme caution when lowering the tiltover tower whenever ice or snow has accumulated on the tower cross arm or the sensors. The extra weight may cause the tower to fall over rapidly. PARTS AND TOOLS REQUIRED 1. 2. 3. 4. 5. 6. 7. 1. 2. 3. 4. 5. 6. 7. 8. 9. Phillips head screwdriver Slot head screwdriver Green ground wire 36" (Item 32) Battery box (Item 22) Backup battery Battery mounting straps (Item 21) Battery Power Cable (Item 31) INSTALLATION INSTRUCTIONS Locate the AC junction box and ensure that the power circuit breaker to this box is in the OPEN position. Locate the AC power input line. The Black or hot lead goes to the bottom or input side of the AC circuit breaker. The Green or ground wire gets a ¼ inch lug attached and goes to the ground marshalling post. The white or neutral lead makes up with the white lead from the surge suppressor, and the white leads from the Sola AC to DC power supplies. Connect the white wire from the DCP power cable to the negative () terminal of the 15VDC power supply output and the green wire to the positive (+) terminal. Feed the end of the Battery Power Cable without lugs through one of the available water tight penetrations on the AC junction box. The red or positive lead goes to the bottom or input side of the DC circuit breaker. Make sure the breaker is open before attaching any wires. The red wire from the DCP power cable attaches to the top or output side of the DC breaker. The black or negative Battery Power Cable lead is made up with the green wire attached to the grounding stud, and the black lead from the DCP power cable. See Figures 17a and 17b Attach the lugged ends of the Battery Power Cable to the battery terminals, red to positive and black to negative. Reset the DC breaker to enable battery backup. Thread the batterybox retaining strap through both of the battery box retaining brackets mounted on the aluminum channel (P/N 80021) post. Place the battery in the battery box, set the battery box on the batterybox mounting bracket, and secure it with the batterybox retaining strap. Attach the tiltover tower ground wire and the Power Junction Box ground wires to the tower using the tapped hole in the lower section of the tower and the screw provided. Attach the tower ground wire to the earth ground system previously installed using a properly sized copper clamp. 49 BELFORT INSTRUMENT Proprietary Information 10. Dress the wiring harness high up on the installation by securing the exposed wiring to the tower with wire ties. NOTE: Be sure to secure the wires high enough to prevent them from being damaged by lawn mowers or weed eaters. Keep all bend radii greater than 8 inches. 11. Inspect all connections and insure that they are installed correctly and securely. AC wiring should be inspected to the following wiring schematic diagram: Figure 17a Basic AC Wiring Schematic 50 BELFORT INSTRUMENT Proprietary Information Figure 17b Installing Commercial AC Power With Battery Backup 12. After wiring inspections are complete, replace the cover on the junction box and close the power breaker to this box. 51 BELFORT INSTRUMENT Proprietary Information This page intentionally left blank. 52 BELFORT INSTRUMENT Proprietary Information 8.0 DATA ACQUISITION AND TERMINAL UNIT INSTALLATION SAFETY PRECAUTIONS 1. Before starting any installation work, ensure that the power circuit breaker is open. 2. Do not perform DigiWx™ AWOS installation tasks during a thunderstorm. 3. Insure that the desktop computer is installed in a wellventilated area. PARTS AND TOOLS REQUIRED 1. 2. 3. 4. 5. 6. Desktop computer and Monitor(Factory configured with software installed)(Item 5) Digital Data Receiver (DDR) and power supply (Item 43) 9 pin male/female 6’ serial cable (Item 44) DigiWx Handheld Receiver (HHDU) (Item 2) Customersupplied T1/DSL/local telephone line (for internet uploads option) Phillips head screwdriver, small flat head screwdriver INSTALLATION INSTRUCTIONS NOTE: PC will be factory configured for each specific airport 1. 2. 3. 4. 5. 6. Unpack and setup the factory configured DigiWx Advisor desktop computer and monitor. Unpack and setup DDR with 3" rubber antenna installed. Connect DDR to desktop computer COM1 port using 6' serial cable. Place DDR at least three (3) feet from the PC to maximize DDR sensitivity. Powerup both the PC and DDR. Powerup HHDU and insure that current weather data is being received from the DigiWx tower. 7. Open HyperTerminal session (Start>All Programs>Accessories>Communications>Hyper Terminal>RS232) to insure weather data is streaming from DDR. 8. Close HyperTerminal session and then doubleclick the desktop DigiWx FBO icon…current weather data should be displayed locally on PC. 9. If the local weather data will be uploaded to the internet: a) plugin T1/DSL line to NIC card, or b) plugin dedicated local phone line to modem telephone jack labeled Line. Once the PC is connected to the internet, realtime weather data will be automatically uploaded to a Belfort maintained URL if this option was also purchased. Otherwise, the enduser will need to set up and maintain their own URL. 53 BELFORT INSTRUMENT Proprietary Information Figure 18 Typical DATU Setup 54 BELFORT INSTRUMENT Proprietary Information 8.1 INSTALLING DIGIWX PHONE SAFETY PRECAUTIONS 1. Before starting any installation work, ensure that the power circuit breaker is open. 2. Do not perform DigiWx™ AWOS installation tasks during a thunderstorm. 3. Insure that the desktop computer is installed in a wellventilated area. PARTS AND TOOLS REQUIRED 1. Parts already specified for DATA ACQUISITION AND TERMINAL UNIT INSTALLATION 2. Customersupplied local telephone line 3. Phillips head screwdriver, small flat head screwdriver INSTALLATION INSTRUCTIONS NOTE: PC will be factory configured for each specific airport 1. Insure that DigiWx Advisor is already up and running on factory configured PC. 2. Plugin dedicated local phone line to modem telephone jack labeled Line. 3. Using the telephone number supplied by the customer, test the functionality of DigiWx Phone by calling the dialin weather number. 55 BELFORT INSTRUMENT Proprietary Information This page intentionally left blank. 56 BELFORT INSTRUMENT Proprietary Information 8.2 INSTALLING DIGIWX VOICE SAFETY PRECAUTIONS 1. Before starting any installation work, ensure that the power circuit breaker is open. 2. Do not perform DigiWx™ AWOS installation tasks during a thunderstorm. 3. Insure that the RIF and VHF base station are installed in a wellventilated area. PARTS AND TOOLS REQUIRED 1. Parts already specified for DATA ACQUISITION AND TERMINAL UNIT INSTALLATION. 2. Radio Interface module (RIF) and power supply (Item 45) 3. Microphone Click Interface module (MCIF) (Item 51) 4. Two 9 pin male – female 6’ serial cables. 5. Two 6' shielded audio cables (¼" stereo plug to 1/8" stereo miniplug) 6. Belfortrecommended VHF base station (in excellent working condition) 7. Phillips head screwdriver, small flat head screwdriver INSTALLATION INSTRUCTIONS NOTE: DigiWx Voice requires the prepurchase of DigiWx Advisor 1. 2. Insure that DigiWx Advisor is already up and running on factory configured PC. Unpack and setup Radio Interface (RIF) module, Microphone Click Interface module (MCIF), and VHF base station. 3. Locate 6' shielded audio cable (¼" stereo plug to 1/8" stereo miniplug) and connect the ¼" stereo plug to Line In on the back of the RIF (PC side). Connect the remaining 1/8" stereo miniplug to Line In (colored blue) on the back of the PC. 4. Locate 6' shielded audio cable (¼" stereo plug to 1/8" stereo miniplug) and connect the ¼" stereo plug to Line Out on the back of the RIF (PC side). Connect the remaining 1/8" stereo miniplug to Line Out (colored green) on the back of the PC. 5. Locate 9 pin male female 6' serial cable and connect the 9 pin male to the 9 pin female located on the side of the VHF base station. Connect 9 pin female end of cable to 9 pin male located on the end of the MCIF. 6. Locate 9 pin male female 6’ serial cable and connect the 9 pin male to the 9 pin female located on the end of the MCIF. Connect the 9 pin female other end to the 9 pin male on the end of the USB to Serial Adapter. 7. Plug USB Serial Adapter into USB port on PC. 8. Power up RIF and VHF base station. 9. Ensure DDR is poweredup, then doubleclick the desktop DigiWx Voice icon. 10. Data is Current should now be displayed locally on PC. 11. Click Show Data box to view current DDR data stream. 12. Insure the accuracy of the sound card adjustments by opening Start>Control Panel>Sound & Audio Devices>Sound Scheme>No Sounds 57 BELFORT INSTRUMENT Proprietary Information 13. Open Start>Control Panel>Sound and Audio Devices>Audio>Sound Playback>Volume and insure that: a. Volume Control & Wave: must NOT be muted b. Volume Control: set to ~50% full scale c. Wave: set to ~50% full scale d. SW Synth: mute box checked e. Line In: mute box checked f. CD Audio: mute box checked g. PC Beep: mute box checked 14. Local pilot(s) activate DigiWx Voice weather broadcast by clicking the microphone the preset number of times using the local airport UNICOM frequency. 15. After being recognized by the PC’s software, a weather message including wind direction/speed/gusts and local barometric pressure setting is broadcast over an existing UNICOM frequency. If beginning of DigiWx Automated Advisory is being cutoff…. increase volume control setting noted in number 13b above! 58 BELFORT INSTRUMENT Proprietary Information Figure 19 – Installing DigiWx Voice Modules 59 BELFORT INSTRUMENT Proprietary Information 9.0 SYSTEM CHECKOUT AND VERIFICATIONS – After hardware installations have been completed, the following installation checkout verifications must be completed to verify the system is working properly and reporting data accurately. 9.1 TOOLS AND TEST EQUIPMENT REQUIRED FOR SYSTEM CHECKOUT: 1. Common hand tools (i.e., wrenches, screwdrivers, nut drivers) 2. Digital multimeter (DMM) Fluke 77 or equivalent (calibrated and traceable to NIST) 3. Notebook computer with DB9 serial interface 4. PROCOMM software PROCOMM Plus, Datastorm Tech or equivalent 5. Portable pressure standard Model 76016B, (Paroscientific, Inc) (calibrated and traceable to NIST) 6. Visibility sensor calibration kit 32041, (Belfort Instrument Company) 7. Magnetic compass S&Y 183, Stocker and Yale or equivalent 8. Kestrel Model 3000 Wind Instrument with calibration kit 9. Scanner w/AC Adapter Radio Shack PRO 36/2731455 or equivalent 10. Wire brush (Commercial) 11. Scraper, w/razor blade (Commercial) 12. Gloves, rubber (Commercial) 13. TechniTool TECH DUSTER inert dusting gas or equivalent 14. Battery Terminal cleaning brush (Sears P/N 00947697000 or equivalent) 15. Wooden tongue depressors (to be used to remove debris from DCP pressure ports) 60 BELFORT INSTRUMENT Proprietary Information 9.2 DISPLAY ACQUISITION TERMINAL UNIT (DATU) CHECKOUT 1. To check that System DATU is functioning properly the following actions must first have been completed: a. Tower must be operational b. DATU must have all software installed and be operational 2. Start the DigiWx Advisor software by double clicking on the DigiWxFBO icon on the desktop. Verify that the screen display appears as similar to figure 20. Figure 20 Typical DigiWx Advisor Main Screen 3. Verify that the correct airport name, ICAO, latitude and longitude, site elevation and CATF frequency are displayed. If any of this information is incorrect, contact Belfort Instrument Co. for assistance in correcting these factory installed settings. 4. Verify that all automated weather data outputs are displayed in the “Current Data” section along the left side of the screen display. 5. On the top line menu, select and double click “System Status.” Verify that the System status page (figure 21) is displayed. 61 BELFORT INSTRUMENT Proprietary Information Figure 21 System Status Page 6. Click on the “Return” button to return to the main DigiWx Advisor display screen. 7. At the tower main AC power junction box, simulate a power failure by turning off the circuit breaker. 8. Verify that the System Status Alert Indicator is flashing on the main DigiWx Advisor screen. This verifies that the DigiWx Advisor has recognized the status change. 9. Select the “System Status” page again from the top line menu. An AC Power error flag should be indicated. If no error flag has been set, contact Belfort Instrument Co. for assistance in troubleshooting this problem. 10. Return to the Main Advisor display screen. 11. Select “NOTAM” from the top line menu bar and enter a short duration NOTAM advising users that maintenance activities are being performed following the instructions for entering NOTAMs described in section 4.2.2.6 of the “DigiWx Operator Manual.” Verify that the test NOTAM expires at the date and time it was scheduled to expire. 12. Select “History” from the display screen top line Menu. 13. Verify that History data charts can be obtained in accordance with the instructions provided in the “DigiWx Operator Manual.” section 4.2.2.1. 62 BELFORT INSTRUMENT Proprietary Information 9.3 DCP –BAROMETRIC PRESSURE INSTALLATION VERIFICATION & CALIBRATION SAFETY PRECAUTIONS 1. Do not perform DigiWx® AWOS maintenance tasks during a thunderstorm. 2. Use extreme caution when lowering the tiltover tower whenever ice or snow has accumulated on the tower cross arm or the sensors. The extra weight may cause the tower to fall over rapidly. PARTS AND TOOLS REQUIRED 1. Paroscientific model 76016 portable pressure standard with current NIST traceable certification. 2. Notebook computer running ASOSDCP102 and RS232 cable 3. DigiWx® AWOS hand held display 4. Socket wrench and 13/16" socket 5. Eight (8) foot step ladder INSTRUCTIONS 1. 2. At the DATU display terminal, issue a NOTAM advisory, to alert users that the DigiWx system is being serviced, prior to beginning this maintenance tasks. The NOTAM to be issued is "DigiWx system being serviced, do not use current weather data outputs." Verify that this NOTAM advisory is displayed on the operator screen prior to beginning this maintenance tasks. Instructions for issuing and deleting NOTAMs are provided in the "DigiWx Operator Manual" sections 4.2.2.5 and 4.2.2.6. At the tower, toggle the “ALERT MESSAGE” toggle switch located on the lower half of the hinged tower section (refer to figure 2.a) six (6) times (See Table 3). DigiWx® Alert Messages 1. Contact FBO for an important message. 2. Wind speed sensor INOP. 3. Wind direction sensor INOP. 4. Temperature and/or humidity sensor INOP. 5. Barometric pressure sensor INOP. 6. DigiWx® AWOS being serviced. Do not use readings. 7. DigiWx® AWOS not maintained. Do not use readings. 8. Private DigiWx® AWOS weather station. Do not use. 9. Landing area warning 0. No Alerts Table 3 63 BELFORT INSTRUMENT Proprietary Information 3. Remove towersecuring bolts and lower the tower until the DCP is at a comfortable working height so that the portable pressure standard on an upper step of the ladder is at the same height as the DCP. Secure the tower in that position by tying the rope to the base of the DigiWx® tower. Figure 20 illustrates the height locations where the various DigiWx sensors and other system components are located on the tower. Figure 22 illustrates the tower as typically secured for maintenance. Figure 22 Typical DigiWx Tower Equipment Mounting Locations 64 BELFORT INSTRUMENT Proprietary Information Figure 23 Securing the Tower for Maintenance 65 BELFORT INSTRUMENT Proprietary Information 4. 5. 6. 7. 8. 9. 10. 11. 12. 13. 14. 15. 16. Power on the DigiWx® AWOS hand held display. The word “ALERT” must be displayed across the HHDU runway display. Push the “PAGE” button and the message “DigiWx® AWOS being serviced” must appear. The Alert messages are programmed in the same order as they appear in Table 3. If an alert message other than message 6. is displayed, consult the list of alert messages in Table 3. You will need to toggle the tower switch an appropriate number of times until the “DigiWx® AWOS being serviced” alert message is displayed. For example, if the alert message number 2 is displayed, toggle the switch 4 times. Verify accuracy of pressure sensor data Place the portable pressure standard on the ladder at the same height (± 6 inches) as the DCP. Turn the standard on and allow it to stabilize for five (5) minutes. Check for low battery indication (a decimal point will appear between each digit of the displayed pressure when the battery is low). If the system has a visibility sensor, there will be a serial RS232 cable from the visibility sensor connected to another RS232 cable which is connected to the back of the DCP. Disconnect these two RS232 cables. Connect the cable connected to the DCP to the test notebook computer RS232 serial communication port. If there is no visibility sensor installed, connect the portable notebook computer (with ASOSDCP102 installed) to the DCP through the serial communication cable that extends to the bottom of the tower. If the system has a battery backup, disconnect the battery power by turning circuit breaker off in the power distribution box. Start the ASOSDCP102 program. After 10 seconds, turn the circuit breaker in the DigiWx® power box off and then on again to force a reset. Immediately type “m” <enter> to put the DCP in monitor mode. Type “T10” <enter> to display the measured pressure from the 2 sensors. If the measured pressure of either of the sensors differs from the standard by more than 0.10 in Hg, it indicates that the sensor is not suitable for calibration. Replace the DCP before continuing further with this procedure. DO NOT ATTEMPT TO CALIBRATE A PRESSURE SENSOR THAT DIFFERS FROM THE STANDARD BY MORE THAN 0.10 in Hg. If either sensor differs from the standard by more than .02 in Hg, or the sensors differ from each other by more than .02 in Hg, start the pressure sensor calibration process by typing “U” and press <enter>. The DCP will prompt you for a password. Enter the site password (the password is case sensitive). Next, hold the CTRL key down and type “V” then enter the 5 digit target pressure from the portable pressure standard (Example 30.235) and press <enter>. The automatic calibration routine will make any required adjustments to the pressure sensor parameters. At the end of the routine, press the “esc” key to return to the main configuration menu. Verify that the pressure sensors are calibrated by repeating step 10. If the sensors still differ from each other or the standard by more than .02 in Hg. repeat step 11. Type “c” and enter the new date of calibration, then type “cr”. Press the “Esc” key. This will cause the data to be saved in the EEPROM. Exit ASOSDCP102 by typing “x” then press <enter>. Disconnect the RS232 cable from the notebook computer and reconnect the RS232 data communication cable to the visibility sensor (if present). Apply Dow Corning #4 liberally to the connection to protect against moisture. . Remove and reapply power to the DCP to restore normal operation. 66 BELFORT INSTRUMENT Proprietary Information 17. If additional installation verification tasks are to be performed, skip to next sensor verification task. If verification tasks are complete, toggle the “ALERT MESSAGE” switch 4 times to return the unit to service. 18. Observe system output and verify that the system is reporting data as expected. 19. Reconnect the positive lead to the backup battery if present. 20. Untie the rope and SLOWLY erect the tower to the vertical position and secure it by installing and tightening (DO NOT OVER TIGHTEN) the three (3) towersecuring bolts. NOTE: Be careful to avoid pinching the wires on the inside of the hinged Tower Section when raising the tower. 21. If all maintenance tasks are complete, issue another NOTAM advising users that “maintenance activities were completed, system has been returned to normal operation.” The expiration date and time of this NOTAM should coincide with the same expiration date and time of the previous advisory NOTAM that was issued to put the system in the maintenance mode. Verify that this NOTAM advisory is correctly displayed on the operator screen. Refer to the "DigiWx Operator Manual" sections 4.2.2.5 and 4.2.2.6 for instructions on how to enter and delete NOTAMs. 67 BELFORT INSTRUMENT Proprietary Information 9.4 TEMPERATURE, HUMIDITY AND DEW POINT INSTALLATION VERIFICATION PROCEDURES SAFETY PRECAUTIONS 1. Do not perform DigiWx® AWOS maintenance tasks during a thunderstorm. 2. Use extreme caution when lowering the tiltover tower whenever ice or snow has accumulated on the tower crossarm or the sensors. The extra weight may cause the tower to fall over rapidly. PARTS AND TOOLS REQUIRED 1. Kestrel Model 3000 Wind Instrument 2. DigiWx® AWOS hand held display The Temperature and Dew point Verification Test is a confidence test, which verifies that the DigiWx® AWOS air temperature and humidity readings compare reasonably with readings taken by a calibrated Kestrel Model 3000 Wind Instrument. VERIFICATION INSTRUCTIONS 1. Turn on the HHDU. Stand near the base of the DigiWx® tower, facing into the wind. Observe the DigiWx® wind indicator vane to ascertain wind direction. Turn on the Kestrel Model 3000, select average mode, and hold the Kestrel Model 3000 at eye level, square to the wind and record the temperature and relative humidity. If the wind speed is below 2 mph, wave the Kestrel Model 3000 back and forth several times to assure air temperature is being measured and not case temperature. Press refresh on the HHDU to get the most recent DigiWx® data. The temperature and humidity readings should agree within 20%. 2. If either temperature or relative humidity does not agree within 20%, the sensor should be replaced. 68 BELFORT INSTRUMENT Proprietary Information 9.5 6000 VISIBILITY SENSOR – INSTALLATION VERIFICATION & CALIBRATION INSTRUCTIONS SAFETY PRECAUTIONS 1. Do not perform DigiWx® AWOS maintenance tasks during a thunderstorm. 2. Use extreme caution when lowering the tiltover tower whenever ice or snow has accumulated on the tower cross arm or the sensors. The extra weight may cause the tower to fall over rapidly. PARTS AND TOOLS REQUIRED 1. 2. 3. 4. Belfort Instrument Company 6000 Calibration Kit, Item 46, P/N 90001 Notebook computer running Hyperterminal and male/female serial DB9 cable Window cleaner and soft cloth Tape Measure PROCEDURE 1. At the DATU display terminal issue a NOTAM advisory to alert users that the DigiWx system is being serviced prior to beginning this maintenance tasks. The NOTAM to be issued is "DigiWx system being serviced, do not use current weather data outputs." Verify that this NOTAM advisory is displayed on the operator screen prior to beginning this maintenance tasks. Refer to the "DigiWx Operator Manual" sections 4.2.2.5 and 4.2.2.6 for instructions on how to enter and delete NOTAMs. 2. Before beginning calibration, clean the visibility sensor glass windows, the ALS window, and the scatter plate with a nonabrasive commercial window cleaner and a soft cloth. 3. Toggle the “ALERT MESSAGE” toggle switch located on the lower half of the hinged tower section six (6) times. 4. The Alert messages are programmed in the same order as they appear in Table 3. If an alert message other than message 6. is displayed, consult the list of alert messages in Table 3. You will need to toggle the tower switch an appropriate number of times until the “DigiWx® AWOS being serviced” alert message is displayed. For example, if the alert message number 2 is displayed, toggle the switch 4 times. 5. Mount the scatter plate to the sensor support bracket as shown in Figures 24 and 25. Make sure the scatter plate is spaced an equal distance from the center of each hood, within ±¼ inch (see figure 25). 69 BELFORT INSTRUMENT Proprietary Information Figure 24 Scatter Plate Attachment Detail Figure 25 Tower with Visibility Scatter Plate Attached 6. If the battery backup option is installed, disconnect the red positive lead from the battery. 7. At the bottom of the tower, the RS232 communication cable from the visibility sensor is connected to the RS232 cable from the DCP through a null modem adapter. Disconnect the RS232 visibility sensor cable from the null modem adapter and connect it to a notebook computer running Hyper terminal or Procomm, 9600 baud, N,8,1. It may be convenient to add a RS232 extension cable. 70 BELFORT INSTRUMENT Proprietary Information 8. Remove power to the DCP by turning off the circuit breaker in the power box. After waiting 10 seconds, turn it back on again to force a reset. The display should show the start message with model and version number. If not, disconnect and reconnect the RS232 cable and remove and reapply power to the DCP once again. If this does not result in the display showing the start message with model and version number, contact Belfort Instrument Co. customer support at 18009372353. 9. Hold down the “ctrl” key and type the letter “V” then type the word “foggy” in lower case letters when prompted for the password. 10. Type “FT” then press <enter> to run diagnostics, if the first 2 characters are FP, sensor is OK, FF indicates a failure and further diagnostics are necessary (see troubleshooting section of this manual). Type “FJ” to start streaming data. 11. Check the state of calibration first. Allow the measured visibility to settle for 5 minutes. If the ExtCo (the number in the last numerical column on the right) is within 5% of the value marked on the scatter plate, no recalibration is required. If recalibration is needed, proceed to the next step. 12. The zerostate calibration must be done first. Place the opaque filters (the triangle shaped pieces of rubber) on the receiver and transmitter hoods as close to the glass windows as possible. The filters are 5/8 thick rubber, triangular in shape, with ears that hook over the transmitter and receiver hoods to secure them in place. They may be attached easily near the mid point of the hood and slid back to the window as shown in Figure 26. Figure 26 Installation of Opaque Filters on Transmitter and Receiver Hoods 13. Type “FZ” then press <enter> on the terminal. Answer “Y” when prompted “are you sure” question and wait approximately five (5) minutes for the routine to finish and prompt for acceptance. This acceptance prompt allows you to recover from an accidental invocation of the routine. Acceptable values for the zero offset are between –0.01 and +0.01. If the zero offset value displayed is acceptable, type “Y” and then press <enter>. The new value will be written to EEPROM, it will be discarded if you answer “N”. Answer yes and press <enter> when prompted with the “OK to save TxPwrCal?” Question. 14. Remove the opaque filters from the hoods. 71 BELFORT INSTRUMENT Proprietary Information 15. The spanstate calibration requires the use of the scatter plate installed as shown in figure 24 16. Install the scatter plate and record the Cal_ExtCo marked on the scatter plate. 17. Type “FC” and press enter. Make sure the number in the configuration information for Cal_ExtCo is the same extinction coefficient as on the calibration scatter plate. If not, enter the correct number in the configuration data. Press (ESC) key to get back to the terminal screen. 18. Type “FS” and type “Y” at the “are you sure” query. When the routine has finished, the terminal will display the new span calibration value and prompt for acceptance. Acceptable values range between 0.5 and 4.0. 19. Record the acceptable value displayed on the Quarterly maintenance data record form. 20. Type “Y” and the new span value will be written to EEPROM . Remove the scatter plate and store it for protection. 21. Type “FR” to reset the sensor and exit the diagnostic mode. 22. Disconnect the notebook computer and reconnect the sensor RS232 cable to the communication cable running up to the DCP at the bottom of the tower. Apply Dow Corning #4 liberally to the connection to protect against moisture. 23. If the battery backup option is installed, reconnect the red battery cable lead to the positive terminal of the battery. 24. If additional installation checkout verification tasks are to be performed, skip to the next verification task. If verification tasks are complete, toggle the “ALERT MESSAGE” switch 4 times to return the unit to service. 25. Verify the system begins outputting visibility information after a ten (10) minute algorithm delay. 26. If all maintenance tasks are complete, issue another NOTAM advising users that “DigiWx maintenance activities were completed, system has been returned to normal operation.” The expiration date and time of this NOTAM should coincide with the same expiration date and time of the previous advisory NOTAM that was issued to put the system in the maintenance mode. Verify that this NOTAM advisory is correctly displayed on the operator screen. Refer to the "DigiWx Operator Manual" sections 4.2.2.5 and 4.2.2.6 for instructions on how to enter and delete NOTAMs. 27. If you need additional assistance or have questions concerning these maintenance or calibration tasks, contact Belfort Instrument Co. customer support at 18009372353. 72 BELFORT INSTRUMENT Proprietary Information 9.6 WIND DIRECTION SENSOR INSTALLATION VERIFICATION This maintenance includes checking the sensor for free rotation and balance and verification of sensor directional alignment and accuracy. SAFETY PRECAUTIONS 1. Before starting any power installation/Maintenance tasks, ensure that the A/C power circuit breaker is in the open position. 2. Do not perform DigiWx® AWOS maintenance tasks during a thunderstorm. 3. Use extreme caution when lowering the tiltover tower whenever ice or snow has accumulated on the tower cross arm or the sensors. The extra weight may cause the tower to fall over rapidly. PARTS AND TOOLS REQUIRED 1. 2. 3. 4. DigiWx® AWOS hand held display unit (HHDU) 3 mm Allen wrench Socket wrench and 13/16" socket Large rubber band VERIFICATION INSTRUCTIONS 1. At the DATU display terminal, issue a NOTAM advisory to alert users that the DigiWx system is being serviced prior to beginning this maintenance tasks. The NOTAM to be issued is "DigiWx system being serviced, do not use current weather data outputs." Verify that this NOTAM advisory is displayed on the operator screen prior to beginning this maintenance tasks. Refer to the "DigiWx Operator Manual" sections 4.2.2.5 and 4.2.2.6 for instructions on how to enter and delete NOTAMs. 2. Put the DigiWx® AWOS in “service mode” by toggling the “ALERT MESSAGE” toggle switch located on the lower half of the hinged tower section six (6) times (See Table 3). This will assure that pushing “REFRESH” on the HHDU will display instantaneous rather than averaged wind direction, and true rather than magnetic information.. 3. Remove towersecuring bolts and tilt the tower until the cross arm is at a comfortable working height to access the wind direction sensor. Secure it in that position by tying the rope around the base of the DigiWx® tower (refer to figure 23). 4. Power on the DigiWx® AWOS HHDU. The word “ALERT” must now be displayed across the rectangular HHDU runway display. Push the “PAGE” button and the message “DigiWx® AWOS being serviced” must appear. 5. The Alert messages are programmed in the same order as they appear in Table 3. If an alert message other than message 6. is displayed, consult the list of alert messages in Table 3. Toggle the tower switch an appropriate number of times until the “DigiWx® AWOS being serviced” alert message is displayed. For example, if the alert message number 2 is displayed, toggle the switch 4 times. 6. Position the wind vane so that it is vertical and parallel to the red pointer installed on the sensor body. Secure the vane in that position by placing a rubber band around the tail of the direction vane and the transmitter antenna as shown in figure 27. 73 BELFORT INSTRUMENT Proprietary Information Figure 27 Wind Direction Vane Alignment 7. 8. 9. 10. 11. 12. 13. 14. 15. 16. Press the “REFRESH” button on the DigiWx® AWOS HHDU and verify that the wind direction is 360°. If the direction does not read 360°, verify that the vane is aligned parallel with the red pointer and parallel to the long axis of the cross arm. If adjustments need to be made, proceed with Steps 7 thru 14 below. Remove the three (3) red plastic plugs and loosen the three (3) socket head screws holding the direction sensor to the cross arm. Rotate the sensor bottle in the direction required to obtain a reading of 360°. Wait for five (5) seconds, press the “REFRESH” button on the HHDU, and read the wind direction. Repeat this process until a reading of 360° is obtained. Tighten the three (3) socket head screws securely using the supplied Allen wrench. Press the “REFRESH” button again to verify that the wind direction still reads 360°. Remove the rubber band from the vane and antenna. Reinstall the three (3) red plastic plugs into the three (3) sensor mounting accessholes in the cross arm. Locate the True North Monument. Using a stepladder, sight along the folded tower section to assure it points to the True North Monument. Rotate the direction vane 360 o and verify it is free to turn with no rough spots in rotation. Noise or sudden rotational resistance indicates worn bearings and the unit must be replaced. This is a digital sensor, if the true north direction is reported accurately; all other directions will also be reported accurately. If a segment of the sensor is out, the error log will report recurring problems. 74 BELFORT INSTRUMENT Proprietary Information 17. Untie the rope and SLOWLY erect the tower to the vertical position and secure it by installing and tightening (DO NOT OVER TIGHTEN) the three (3) towersecuring bolts. NOTE: Be careful to avoid pinching the wires on the inside of the hinged tower section when raising the tower. 18. Toggle the “ALERT MESSAGE” switch 4 times to return the unit to service. Push the “refresh” button on the HHDU to make sure the “ALERT MESSAGE” is gone and that the system begins reporting weather data as expected. 19. If all maintenance tasks are complete, issue another NOTAM advising users that “DigiWx maintenance activities were completed, system has been returned to normal operation.” The expiration date and time of this NOTAM should coincide with the same expiration date and time of the previous advisory NOTAM that was issued to put the system in the maintenance mode. Verify that this NOTAM advisory is correctly displayed on the operator screen. Refer to the "DigiWx Operator Manual" sections 4.2.2.5 and 4.2.2.6 for instructions on how to enter and delete NOTAMs. 75 BELFORT INSTRUMENT Proprietary Information 9.7 WIND SPEED SENSOR – VERIFICATION PROCEDURE The wind speed sensor verification procedure is a confidence test, which verifies that the DigiWx® AWOS wind speed readings compare reasonably with measurements taken from a reference Kestrel Model 3000 Wind Instrument. SAFETY PRECAUTIONS 1. Before starting any power installation tasks, ensure that the A/C power circuit breaker is in the open position. 2. Do not perform DigiWx® AWOS installation tasks during a thunderstorm. 3. Use extreme caution when lowering the tiltover tower whenever ice or snow has accumulated on the tower cross arm or the sensors. The extra weight may cause the tower to fall over rapidly. PARTS AND TOOLS REQUIRED 1. DigiWx® AWOS hand held display unit (HHDU) 2. Kestrel Model 3000 Wind Instrument VERIFICATION INSTRUCTIONS 1. Turn on the HHDU. Stand near the base of the DigiWx® tower, facing into the wind. Observe the DigiWx® wind indicator vane to ascertain wind direction. Turn on the Kestrel Model 3000, select average mode, and hold the Kestrel Model 3000 as high as possible, square to the wind for approximately one minute. Observe the average on the Kestrel and compare it to the wind speed measured by the DigiWx® and displayed on the HHDU. Press refresh to get the most recent HHDU data. The wind speed readings should agree within 20% for speeds above 5 knots. 2. If the readings do not agree within 20%, the wind speed sensor should be replaced. 76 BELFORT INSTRUMENT Proprietary Information 10.0 SYSTEM ALIGNMENT AND CHECKOUT – The DigiWx AWOS system has been completely aligned and tested at the factory. Final checkout consists of performing and documenting the verification procedures Sections 9.2 through 9.6. These final checkouts should be completed and documented prior to the FAA commissioning inspection to prepare for the inspection and to assure a successful commissioning of the system. 11.0 CUSTOMER SUPPORT AND ASSISTANCE – Belfort Instrument maintains a website, http://www.belfortinstrument.com containing an AWOS product support link. This website provides an efficient method of providing owners and maintenance personnel the most uptodate product information and support available to AWOS users. For additional customer support, owners and approved maintenance personnel can call Belfort Instrument at 18009372353. 77 BELFORT INSTRUMENT Proprietary Information Appendix A FAA Construction Notification Requirements & Forms This page intentionally left blank.