1
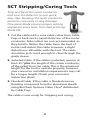
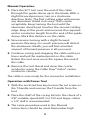
Cable Prep Tools
for Hard Line
Applications
User Guide
Standard Product Warranty
Ben Hughes Communication Products Co., (BHCP) warrants
that the company’s tools are free from defects in
workmanship and material.
BHCP will repair or replace its tools, which fail to give satisfactory service, due to defective workmanship or material.
Repairs or replacement should be at the election and expense
of BHCP and is your exclusive remedy in place of all other
rights and remedies.
Plastic tool components are warranted for as long as you
own your tools.
Metal components are a consumable product. A consumable
product is warranted at the time of sale, only against defects
in workmanship and materials that prevent its use.
Consumable products are goods reasonably expected to be
used up or damaged during use including, but not limited to
core bits, strip core bits, jacket strip blades, CPT series blades,
gator teeth and crimp and compression tools, links and pins.
BHCP shall not be liable for any incidental, special or
consequential cost or damages incurred by the purchaser
or others (including without limitation, lost profits, revenues,
anticipated sales, business opportunities, goodwill or interruption of business and any other injury or damage).
We reserve the right to make changes in design or construction at any time, without incurring any obligation in
incorporating such changes in tools previously sold.
We also reserve the right to discontinue the manufacture or
offering for sale through our exclusive distributors of any
tools at such time as we consider necessary.
We cannot accept responsibility for tools which have been
abused, worn, altered, repaired by others or used incorrectly.
To make a claim, call Cable Prep toll-free at 800-394-4046.
Upon authorization, US Customers may ship product prepaid
to Ben Hughes Communication Co., 207 Middlesex Ave.,
P.O. Box 373, Chester, CT 06412. Customers outside continental
US must ship product to point of purchase. Damage
occurring during transit is not covered by this warranty.
Cable Prep Tools for
Hard Line Applications
User Guide
Contents:
SCT Stripping/Coring Tools . . . . . . . . . . . . . . . . . . . . . 2
AIO All-In-One Cable Preparation Tools . . . . . . . . . 3
JCS Jacket Stripping Tools . . . . . . . . . . . . . . . . . . . . . . 7
MRT Messenger Removal Tools . . . . . . . . . . . . . . . . 10
ART Armor Removal Tools . . . . . . . . . . . . . . . . . . . . . 13
Gator® Center Conductor Beveller and Cleaner . 15
Cable Cutters . . . . . . . . . . . . . . . . . . . . . . . . . . . . . . . . . 16
RTH Ratchet T-handles . . . . . . . . . . . . . . . . . . . . . . . . 17
Read instructions carefully. Tool performance is
subject to the care and judgement exercised by the
user, so a thorough review of the instructions
presented in this guide is essential.
To view instructional videos, visit our website:
www.cableprep.com.
To order parts, additional products, blades and
cartridges, contact your distributor or visit our
website: www.cableprep.com.
CAUTION: THE BLADES USED IN CABLE PREP TOOLS
ARE EXTREMELY SHARP. BE SURE TO KEEP YOUR FINGERS
CLEAR OF THEM.
CAUTION: ALWAYS WEAR EYE PROTECTION WHEN
USING ANY HAND TOOLS.
1
SCT Stripping/Coring Tools
Strip and bevel the outer conductor
and core the dielectric in one quick,
easy step. Beveling the outer conductor
prevents connector O-ring damage.
One-piece blade ensures proper cutting
alignment every time. Tool steel prolongs
blade life.
1. Cut the cable with a coax cable cutter from Cable
Prep or hack saw to avoid distortion of the center
conductor. Side cutters are not recommended, as
they tend to flatten the cable. Even the best of
cutters will distort the cable, however, a slight
distortion is allowable with this tool. The cable
should be just round enough to clear through the
guide sleeve.
2. Jacketed Cable. If the cable is jacketed, remove at
least 2½” plus the length of the center conductor
of the jacket from the cable. This is the minimum
length for the tool to operate properly, however,
your connector installation requirements may call
for a longer length. Check your connector
instruction sheet.
3. Flooded Cable. If the cable is flooded remove
flooding compound from the aluminum sheath
using BioChem Systems Cable Clear® distributed
by Cable Prep.
The cable is now ready for stripping and coring.
2
Manual Operation
1. Place the SCT tool over the end of the cable
through the guide sleeve up to the blade. With a
slight forward pressure, turn in a clockwise
direction. Note: The first cutting edge will remove
any aluminum shield in its way. This is quite
acceptable. Keep turning the tool until the
aluminum sheath just touches the second cutting
edge. Stop at this point and measure the required
center conductor length from the end of the guide
sleeve. Mark this distance on the cable.
2. Now resume turning with a slight forward
pressure. Warning: too much pressure will distort
the aluminum sheath; you will find a limited
amount of forward pressure is all you need.
3. Continue coring and stripping the cable until you
have reached the marked point on the cable.
Rotate the tool once more the square the end of
the cable.
4. Remove the tool. Bevel and clean the center
conductor using the Cable Prep® Gator® center
conductor cleaner.
The cable is now ready for the connector installation.
Operation with Power Tool
1. With the enclosed hex key loosen the set screw on
the T-handle and remove the T-handle from the
tool.
2. Place the shaft of the coring bit into the chuck of a
3/8" variable speed drill. For 750 and larger cables
a 1/2" drill is recommended.
3. The same procedure used in the Manual
Instructions should be used. Remember high
3
speeds should not be used. High speed in this case
does not increase the production time.
To Operate Ratchet Handle
1. Use the supplied hex key to tighten the 3 set
screws against the flats of the blade shaft. The tool
is now ready for use.
2. Proceed as in manual operation instructions.
3. The ratchet handle establishes a positive torque in
the core direction (clockwise) and is available in
4-½" length (RTH-4500) and 8" length (RTH-8000).
4. The ratchet handle is maintenance free.
TOOL CARE: The Stripping/Coring tool blade
should be lubricated every six to twelve cuts. The tool
steel when cutting aluminum will cause a build-up of
aluminum on the edge of the blade giving the
appearance of a dull blade. The oil as a lubricant will
wash away the excess and bring back the blade to
normal for a quick and efficient cut.
4
AIO All-In-One Cable
Preparation Tools
Strip the jacket, strip and bevel the outer
conductor, core the dielectric, and
measure and bevel the center conductor
in one operation. AIO tools work on PIII
and T10 cables.
To Use the Tool in One Step Operation
For use on jacketed non-flooded cable, the cable
must be flush cut and straightened. The straighter
and rounder the cable, the better the tool will
perform. There are three choices of operation: Use
the T-handle or ratchet handle or adapt to a drill.
All three require insertion of the tool onto the cable
and light forward pressure in a clockwise direction.
Function 1: The tool will begin removing the jacket
Function 2: will then remove dielectric
Function 3: stripping edge of core bit will begin to
cut back outer conductor
Function 4: bevels the outer conductor
Function 5: simultaneously bevels the center
conductor leaving a perfect preparation at pre-set
dimensions.
NOTE: The tool is factory pre-set so that
the length of the center conductor protrusion is
1" (± 1/16")
5
To Prepare the Tool for Use on Flooded Cable
1. Due to the gummy and sticky properties of
flooded cable, it’s advised to remove the bushing
that protects the outer conductor in non-flooded
cable. Taking the guide sleeve out eliminates a
floodant buildup. The purpose of the center guide
sleeve is to ensure proper alignment of the blade
and the cable. However, when there is a flooding
compound on the wall, it creates a protective
barrier eliminating the need for the guide sleeve
on this tool.
2. Separate the A and B bodies of the tool by
unthreading the B body from the A body.
3. Remove tool from the drill, ratchet or T-handle.
4. Using the enclosed allen wrench, loosen setscrew
holding color-coded guide sleeve from coring tool
(A body) and remove from tool. Secure it in storage
area of the A body in rear of tool with provided
setscrew.
5. Re-connect B body to A body of the tool and install
handle again, T-handle, ratchet or attach to drill.
Now you’re ready to core and strip the cable. Proceed
with insertion of tool on the cable and with slight
forward pressure in a clockwise direction finish the
cable preparation.
6
JCS Jacket Stripping Tools
A dual-edged blade that lifts the jacket
for a clean cut. Knurled tool bodies
provide a firm grip, and color-coded
guide sleeves facilitate picking the
right tool.
NOTE: The jackets on QR cables should be
stripped only after the cable has been cored and the
center conductor cleaned. Use the jacket stripper
provided with the appropriate Cable Prep SCT-QR
tool. See the "Strip/Core Tools for QR" page on our
website for instructions on how to strip QR cables.
To Strip the Outer Jacket of all Non-QR Cables
1. Ensure that the JCS tool is clean and free of debris.
Use Cable Clear® cleaning solution, available from
Cable Prep, to clean the tool if necessary.
2. Mark the cable jacket at the point where the
stripping operation is to stop – at approximately
4 inches.
3. Slip the smooth end of the tool (the end opposite
the color-coded guide sleeve) over the end of
cable.
4. With the end of the cable facing you, rotate the
tool clockwise, using slight pressure to push the
tool onto the cable until the blade engages and
begins to cut the jacket. Continue to apply
pressure and to rotate the tool in the same
direction.
7
5. When you have reached the desired stop point,
disengage the tool by rotating it in the same
direction without applying pressure. The jacket will
be cut off cleanly at this point.
6. Pull the tool back, and remove it from the cable.
7. If the cable jacket is flooded, clean off the floodant
with the Cable Clear cleaning solution.
Now strip back the outer conductor and core the
dielectric using a tool from the Cable Prep SCT series.
TIP: An out-of-round cable may cause scoring of
the outer conductor as you begin to strip the jacket.
When this happens, use the hex wrench provided to
loosen and remove the screw that holds the JCS
blade to the tool body, and then remove the blade.
Remove the spring washer from the top of the blade,
and place it under the blade. Replace the blade,
tighten the screw, and return to stripping the jacket.
Be sure to place the spring washer back in its normal
position when finished.
TIP: As the tool approaches the point where the
stripping is to stop, grab the cable with your free
hand, which will act as a stop point for the stripper.
TOOL CARE: Keep your JCS tools free of debris
and clean them regularly with the Cable Clear
cleaning solution, available from Cable Prep.
Although Cable Prep blades are made of hardened
tool steel for long life and easy cutting, they may
need replacing after extended use. Order the Cable
Prep JCS maintenance kit that includes a replacement
blade, as well as a new screw, spring washer, and hex
wrench for your convenience.
8
To Replace the Blade
1. Loosen the hex screw that secures the blade to the
body. Remove the blade and discard it – along
with the screw and spring washer – in a proper
receptacle.
2. Insert the new screw through the new spring
washer and through the hole in the new blade,
such that the washer is on top of the blade and the
"V" of the blade is facing out.
3. Place the blade into the tool body, and use the hex
wrench provided to tighten the screw. No further
adjustment is necessary.
9
MRT Messenger
Removal Tools
Separate the messenger from the jacket
on hardline cables. MRT tools strip the
messenger from the end of the cable,
and the companion WST web slitting tool
removes the messenger in the middle
of a cable run.
To Remove the Messenger
1. Feed the cable through the hole of the MRT tool
starting opposite the knurled end.
2. Insert cable to desired length of messenger you
want removed.
NOTE: If you need to make an adjustment with
the length of messenger to be removed, push the
spring loaded blade to the open position and
adjust the removal length accordingly.)
3. Once the length has been determined, grasp
knurled end of tool in one hand and cable in the
other. Pull the tool towards the end of cable to be
spliced.
4. The messenger is now separated from the main
cable leaving the cable ready for further
preparation as required by manufacturer’s specifications.
5. As with any cable installation tools, proper
maintenance and use will extend the life of the
tool.
10
To Replace the Blade
1. Remove the socket bolt and old blade from the
MRT body using 1/8” hex key provided. Note: To
avoid injury, use caution when handling blades.
Maneuver blades to and from slot position using
the curved end of blade as a lever.
2. A spring plunger protrudes into the blade slot and
rests against the side wall of the blade. This
provides pivot action allowing the blade cutting
edge to travel back and forth across the lateral tool
opening. Do not remove the spring plunger.
Simply push the ball end down into the housing as
you slip the replacement blade into the blade slot.
3. Align blade screw hole with tapped hole in blade
slot of MRT body and install socket bolt. Tighten
bolt down against the replacement blade using
1/8” hex key.
To Use Integrated messenger web slitter
This tool (Part Number: WST-UNV) was designed to
separate jacketed steel on Integrated Messenger
products. Integrated messenger (IM) cables have a
web separating the cable and strand. The web must
be cut to separate the cable/strand for hardware
attachment at each pole, and allow for splicing.
NOTE: Consult your company methods or
procedures for bonding and grounding prior to
locking the jacketed strand to the clamp.
TIP: A lubricant such as WD-40 may be used on
the cable to reduce friction.
11
1. Mark the specified separation distance on the IM
cable on either side of the thru bolt after the cable
has been sagged in.
NOTE: CommScope, Inc. recommends twelve
(12”) inches on both sides of the thru bolt.
2. Move the blade to the open position so that the
strand groove is completely unobstructed by the
blade.
3. Place the tool over the strand side of the IM cable
at the point of separation. Move the blade to
contact the web and pull toward you to begin
cutting.
NOTE: The tool will only cut in one direction.
NOTE: Once the blade has been engaged it
will not release until force is applied in the
opposite direction.
4. Place your index finger and middle finger over the
end of the tool; pull the tool to the separation
point on the opposite side.
5. With separation complete, push the tool in the
opposite direction to release the blade.
12
ART Armor Removal Tools
The safe alternative to using a knife.
Multiple angles on the steel blades lift
the jacket to enable a clean cut.
Bi-directional operation, activated
with a push or pull. Now available
for MC2 cables.
To Strip Armor from a CommScope Cable
1. Ensure that the tool is free of debris, floodant, and
other foreign material. To clean the tool, use
BioChem Systems Cable Clear® cleaning solution,
available from Cable Prep.
2. Place the knurled end of the tool onto the end of
the cable, and grip the knurled end of the tool.
3. Applying slight pressure, pull the tool towards the
cable and rotate the tool clockwise, such that the
cutter engages and bites into the armor.
4. Continue to rotate the tool body until the desired
amount of armor has been stripped from the
cable. Note that the blades, which are made of
hardened tool steel for long life, have perpendicular cutting edges. This unique design lifts the
armor as it is being removed, ensuring a smooth
clean cut, without scoring the underlying
conductor.
5. To stop the strip-back action and cut the armor
from the cable, place your free hand around the
cable at the stop point and continue rotating the
tool without applying pressure.
6. Remove the tool by sliding it back off the end of
the cable.
13
7. Remove excess floodant from the cable using the
Cable Clear solution.
At this point, you can continue preparing the cable
with the appropriate SCT stripping/coring tool,
together with the “Gator” tool, all from Cable Prep.
See the corresponding Tech Guides on this website
for proper use of these tools.
TOOL CARE: Keep your Armor Removal Tool free
of debris, and clean it regularly with the Cable Clear
cleaning solution, available from Cable Prep.
Although Cable Prep blades are made of hardened
tool steel for long use, the ART blade may need
replacing after extended use. Order the Cable Prep
ART maintenance kit that includes not only a
replacement blade, but also a new screw, spring
washer, and hex wrench for your convenience.
To Replace the Blade
1. Loosen the hex screw that secures the blade to the
body. Remove the blade, and discard it – along
with the screw and spring washer – in a proper
receptacle.
2. Insert the new screw through the new spring
washer and through the hole in the new blade,
such that the washer is on top of the blade and the
"V" of the blade is facing out.
3. Place the blade into the tool body, and use the hex
wrench provided to tighten the screw. No further
adjustment is necessary.
CAUTION: THE ARMOR REMOVED DURING OPERATION
OF THE TOOL IS EXTREMELY SHARP, AND THE USE OF
PROTECTIVE GLOVES IS ADVISED.
14
Gator® Center Conductor
Beveller and Cleaner
Removes bonded dielectric and
burrs that can damage a
connector’s seizing mechanism.
This ergonomic tool eliminates need
for making pyramid cuts. Long-lasting
reversible teeth.
1. Insert the center conductor into the
beveller part of the tool and with light pressure
rotate the tool back and forth three to five times.
Rotate tool 180° and repeat back and forth motion
three to five times. You are not trying to sharpen
the center conductor, you are simply removing
any outer burrs, which if left on the center
conductor may cause damage to the seizing
mechanism of the connector.
2. Remove the bonded dielectric with the Gator
“Teeth”. Grasp the center conductor with the teeth
of the Gator tool. Rotate tool side to side to cut
through foam dielectric. Using short strokes and
rotating the tool side to side, continue until
dielectric builds up behind the teeth. Keep rotating
the tool side to side while pulling the tool in a
downward motion until all dielectric is removed.
Your cable is now prepped and ready for the
connector.
NOTE: When Gator teeth appear worn, use a
Phillips head screwdriver to remove the teeth and flip
the teeth so that the other side may be used. For
replacement teeth for the Gator tool, simply ask your
Cable Prep distributor for part number “Teeth”.
15
Cable Cutters
Perfectly-aligned hex blades
that do not distort or crimp
the cable. High-carbon forged-steel
maintains blade sharpness over an extended
lifetime. Cut cables up to 1" in diameter.
To operate, open handles and place open jaws over
the cable to be cut. While applying close pressure,
swing the tool back and forth to cut the entire
circumference of the cable. This technique produces
the least amount of cable distortion and ensures that
your jacket stripper and coring tool will work
correctly on the cable.
CAUTION: DO NOT USE TO CUT STEEL CABLE.
16
RTH Ratchet
T-handles
4.5" and 8" lengths
for use with any SCT
or AIO tool to establish
greater torque in the
coring direction.
The longer (8") tool can be mounted in the center
position to operate as a T or in the end position to be
used as a conventional ratchet.
CAUTION: WE DO NOT ADVISE USE OF THE RTH-8000
IN THE END POSITION WHEN USING THE RSCT-1000MC.
17
207 Middlesex Avenue
Post Office Box 373
Chester, CT 06412-0373 USA
Toll-free: 1-800-394-4046
Phone: 1-860-526-4337
Fax: 1-860-526-2291
www.CablePrep.com
© 2015 Ben Hughes Communication Products Company. All rights reserved.
Cable Prep, the Cable Prep logo, Tools You Trust, the Cable Prep Tools You
Trust logo, the CPT logo, FOCUS, the FOCUS logo, Gator, the Gator logo,
Super CPT, and Wing Ding are registered and common law trademarks of
Ben Hughes Communication Products Company. All other trademarks are
the property of their respective owners.
Cable Prep brand products and tools are covered under one or more of the
following patents: U.S. Pat. Nos.: 5,561,903; 5,647,119; 5,749,270; 7,849,589;
7,232,235; 7,322,713 and other patents pending.
4/1/2015