1
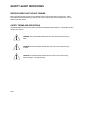
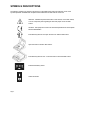
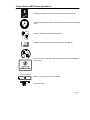
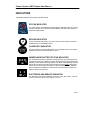
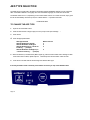
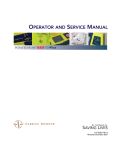
CARDIAC SCIENCE AED TRAINER USER MANUAL Cardiac Science AEDs Trainer User’s Manual CARDIAC SCIENCE AED TRAINER USER MANUAL IMPORTANT The AED Trainer is for training and demonstration purposes only and not intended for use on humans. The AED Trainer will not generate or deliver defibrillation shock therapy. CAUTION Cardiac Science AEDs are intended for use by or on the order of a Physician or persons licensed by State law. IMPORTANT Read this User Manual carefully. It contains information about your safety and the safety of others. Become familiar with the controls and their proper use before operating the product. The AED Trainer Model 180-4021 is manufactured by Cardiac Science, Inc. Corporate Headquarters: 1900 Main Street, Suite 700 Irvine, CA 92614 USA Internet: www.cardiacscience.com Email: [email protected] Manufacturing: Cardiac Science, Inc. 5474 Feltl Road Minnetonka, MN 55343 USA Authorized European Representative: Cardiac Science International Kirke Vaerloesevej 14 3500 Vaerloese Denmark 112-2019-201 Rev. B Page i TRADEMARK INFORMATION Powerheart , MDLink, SmartGauge, STAR, IntelliSense, RescueReady, RescueLink and Survivalink are trademarks and registered trademarks of Cardiac Science, Inc. Microsoft and Windows are registered trademarks of Microsoft Corporation. All other trademarks are the property of their respective owners. Other U.S. and foreign patents pending. LIMITED WARRANTY The AED Trainer User Manual and any and all information contained herein does not constitute any warranty as to the AED Trainer or any related products in any manner whatsoever. The “Limited Warranty” is shipped with the products and serves as the sole and exclusive warranty provided by Cardiac Science regarding the AED Trainer. ORDER ENTRY For questions on your order call: Worldwide Toll Free: 800-991-5465 Phone: 949-797-3806 Fax: 949-851-4418 [email protected] CUSTOMER SERVICE/TECHNICAL SUPPORT For 24-hour service, call U.S. and Canada Toll Free: 888-466-8686 Phone: 949-797-3807 Fax: 949-851-4425 [email protected] Outside the U.S. and Canada Phone: +44 161 926 0000 Fax: 44 161 926 0002 [email protected] There is no charge to the customer for a Customer Service call. Please have the model number available when contacting Customer Service. NOTICE OF RIGHTS All rights reserved. No part of this documentation may be reproduced or transmitted in any form by any means without the express written permission of Cardiac Science, Inc. Information in this documentation is subject to change without notice. Names and data used in the examples are fictitious unless otherwise noted. Page ii CARDIAC SCIENCE AED TRAINER USER MANUAL TABLE OF CONTENTS SECTION 1 – SAFETY…………………………………………………………. ......1 Safety Alert Definitions ...........................................................................2 Safety Alert Descriptions ........................................................................3 Product References ...............................................................................3 Symbol Descriptions ..............................................................................4 SECTION 2 – INTRODUCTION………………………………………………….....7 AED Trainer…………………………………………………. ........................7 Operation…………………………………………………………… ...............8 Instructor’s Responsibilities………………………………………. ...............8 SECTION 3 – SETUP………………………………………………………… .........9 Unpacking and Inspecting………………………………………. .................9 AED Trainer………………………………….……………..........................10 AED Trainer Accessories…………………...…………….........................11 Battery Installation……………………………………………….. ...............12 Using the Remote Control………………………………………. ...............13 Remote Control Functions………………………………………................13 Electrodes………………………………………………………… ...............16 Indicators………………………………………………………….................17 AED Type Selection .............................................................................18 Language Selection………………………………………………...............19 SECTION 4 – SIMULATED RESCUE………………………………………........20 Performing a Simulated Rescue………………………………..................21 Rescue Scenarios………………………………………………..................22 SECTION 5 – MAINTENANCE………………………………………………... ....25 Maintenance……………………………………………………… ...............26 SECTION 6 – TECHNICAL DATA……………………………………………......27 Parameters……………………………………………………….. ...............28 Safety and Performance Standards……………………………................29 Page iii Page iv CARDIAC SCIENCE AED TRAINER USER MANUAL SECTION 1 SAFETY OVERVIEW This section presents safety information to guard against injury to persons, and damage to the AED G3 Trainer. The discussions are Dangers, Cautions, Warnings, and Symbols. Topic Safety Alert Definitions Page 2 Safety Alert Descriptions 3 Product References 3 Symbol Descriptions 4 Page 1 SAFETY ALERT DEFINITIONS BEFORE OPERATING THE AED TRAINER Before operating the AED Trainer, become familiar with the various safety alerts in this section. Safety alerts identify potential hazards using symbols and words to explain what could potentially harm you, the patient or the AED Trainer. SAFETY TERMS AND DEFINITIONS The triangle attention symbol shown below, identifies the potential hazard categories. The definition of each category is as follows: DANGER: This alert identifies hazards that will cause serious personal injury or death. WARNING: This alert identifies hazards that may cause serious personal injury or death. CAUTION: This alert identifies hazards that may cause minor personal injury, product damage, or property damage. Page 2 CARDIAC SCIENCE AED TRAINER USER MANUAL SAFETY ALERT DESCRIPTIONS The following is a list of AED Trainer safety alerts that appear in this section and throughout this manual. You must read, understand, and heed these safety alerts before attempting to operate the AED Trainer. WARNING: Possible Improper Usage The AED Trainer is to be used for training purposes only and will not deliver a defibrillation shock during a rescue. Do not store the AED Trainer in the same area used to store an actual AED. WARNING: Possible Improper Usage The Cardiac Science Training Electrodes are for training purposes only and will not deliver defibrillation pulse energy to a patient during a rescue. Do not store the Cardiac Science Training Electrodes in the same area used to store actual Defibrillation Electrodes. PRODUCT REFERENCES For purposes of retaining simple, clear instructions in this manual, note the product references used. Features, specifications operating instructions and maintenance common to Cardiac Science AEDs or Cardiac Science AED Trainers will be referred to as “AED” and “AED Trainer” respectively. When necessary to distinguish product differences, the product will be referenced by product and/or part number. Features and specifications vary, so please read this manual carefully. For questions regarding the differing features among Cardiac Science AEDs or AED Training, please contact Customer Service. Page 3 SYMBOLS DESCRIPTIONS The following symbols may appear in this manual, on the AED Trainer and its accessories. Some of the symbols represent standards and compliances associated with the AED Trainer and its use. Attention!: Identifies important information in this manual, on the AED Trainer, or on its component parts regarding the safe and proper use of the AED Trainer. CE Mark: This equipment conforms to essential requirements of the European Directive 89/336/EEC. International symbol for ON. Open the lid to turn ON the AED Trainer. Open the lid to turn ON the AED Trainer. International symbol for OFF. Close the lid to turn OFF the AED Trainer. Indicates the battery status. Check electrodes Page 4 CARDIAC SCIENCE AED TRAINER USER MANUAL Indicates that maintenance is required by authorized service personnel. For the Powerheart AED Trainer, when lit, push this button to deliver simulated shock. Place the electrodes on the chest of the patient. Additional information is provided in the AED Trainer User Manual. Not for human use. The AED Trainer will not generate or deliver defibrillation shock energy. 2 "D" cell batteries Battery energy source is two “D”-cell batteries. Tear here to open. Page 5 Symbols for remote graphics are detailed below. Page 6 CARDIAC SCIENCE AED TRAINER USER MANUAL SECTION 2 INTRODUCTION OVERVIEW This section presents information about the AED Trainer, its operation, and the instructor’s responsibilities. Topic Page AED Trainer 7 Operation 8 Instructor’s Responsibilities 8 AED TRAINER AED TRAINER DESCRIPTION The AED Trainer is a training device for training personnel on the basic rescue skills and correct defibrillation procedures using the Cardiac Science AEDs. The AED Trainer allows interactive simulated rescues in order to train class members as first responders during a sudden cardiac arrest (SCA). The AED Trainer allows the instructor to: • • • • Advance through different rescue stages Change the rescue scenarios based on the class needs Vary simulated rhythms from shockable to non-shockable Monitor the skills of the trainee while responding to a simulated rescue attempt Page 7 OPERATION WARNING: Possible Improper Usage The AED Trainer is to be used for training purposes only and will not deliver a defibrillation shock during a rescue. Do not store the AED Trainer in the same area used to store the actual AED. The AED Trainer has the same easy-to-use features as the AED to facilitate rapid rescue skill development. The AED Trainer has an infrared, wireless remote control that allows the instructor to advance through preprogrammed simulated rescues, pause the AED Trainer operation and interrupt pre-programmed scenarios. The AED Trainer allows the instructor to advance through 8 simulated rescue scenarios following American Heart Association (AHA) guidelines enabling the trainee to hear the voice prompts that would typically occur during an actual rescue attempt. The AED Trainer operates with two alkaline D-cell batteries. The remote control is powered by two AAA alkaline batteries. Most importantly, the AED Trainer will not deliver defibrillation pulse energy. The delivery of the defibrillation pulse is simulated for training purposes. INSTRUCTOR’S RESPONSIBILITIES The Instructor is responsible for the safe and effective use of the AED Trainer and its accessories, and should have the following minimum training and experience: • CPR certification and first responder defibrillation training equal to that recommended by AHA • Adequate training in the use of the actual AED and its accessories • A thorough understanding of the procedures in this manual When conducting training sessions, the instructor is responsible for: • Instructing trainees about the differences which may be encountered in the field between the AED Trainer and the AED • Testing and certification of trainees and their understanding of AED operation, as required by federal and state regulations Page 8 CARDIAC SCIENCE AED TRAINER USER MANUAL SECTION 3 SETUP OVERVIEW This section presents information on unpacking and setting up the AED Trainer. Topic Page Unpacking and Inspecting 9 AED Trainer 9 AED Trainer Accessories 10 Battery Installation 12 Using the Remote Control 13 Remote Control Functions 13 Electrodes 16 Indicators 17 AED Type Selection 18 Language Selection 19 UNPACKING AND INSPECTING Every attempt is made to ensure your order is accurate and complete. However, to be sure that your order is correct, verify the contents of the box against your packing slip. If you have any questions about your order, contact Cardiac Science Order Entry or your local Cardiac Science distributor. Page 9 AED TRAINER The following drawings show the AED Trainer parts and their locations. Pad Holders Speaker Pad connector port Shock Button Rescue Ready Status Indicator Text Display Battery Compartment and IR window Expiration Window Lid Latch Page 10 CARDIAC SCIENCE AED TRAINER USER MANUAL AED TRAINER ACCESSORIES Training Electrodes Remote Control Page 11 BATTERY INSTALLATION TO INSTALL BATTERIES IN THE AED TRAINER Battery Compartment and IR window 1. 2. 3. 4. 5. The AED Trainer uses two alkaline D-cell batteries. Rechargeable batteries may also be used. Remove the door from the battery compartment. Install each D-cell battery into the unit, aligning the (+) and (-) ends correctly. Replace the door on the battery compartment. Install into trainer with the label facing outward, push firmly to snap into place. Note: When using rechargeable batteries, it is recommended that the batteries be recharged after each training session. TO INSTALL BATTERIES IN THE REMOTE CONTROL Page 12 1. Hold the remote control in the palm of the hand with thumb on the grooved area of the battery door. Apply downward pressure on the grooved area with the thumb and slide the door in the direction of the arrow. 2. Insert two AAA alkaline batteries taking care to align (+) and (-) ends correctly as follows: Install the first battery at the (+) end of the battery compartment noting battery polarity. Install the second battery. Hold down the second battery while laying the battery door over the batteries. Hold the battery door down and slide it all the way shut until it snaps into place. 3. Note: It is not recommended to use rechargeable batteries in the remote control unit. The remote control unit’s energy consumption is extremely low and rechargeable batteries will selfdischarge well before single use batteries need to be replaced. CARDIAC SCIENCE AED TRAINER USER MANUAL USING THE REMOTE CONTROL During a training session, the instructor may use the remote control to select, interrupt, or pause training rescue scenarios. The remote control allows the instructor to: • Pause operation of the AED Trainer • Interrupt pre-programmed scenarios with other AED audio prompts • Select any of the eight pre-programmed rescue scenarios The remote control communicates with the AED Trainer through wireless infrared signal. In order for the remote control to function properly, the remote must be directed at the rear of the AED Trainer. REMOTE CONTROL FUNCTIONS TABLE 1. Button Shock Cancelled 1 Function a) Simulates “Rhythm changed. Shock cancelled.” voice prompt. Description a) During a rescue scenario, press button 1 when a shock is advised. The “Rhythm changed. Shock cancelled.” voice prompt will then be heard. Scenario 1 b) Initiates Rescue Scenario #1 b) Press “S” then button 1 within three seconds to initiate rescue scenario #1. Close AED Trainer lid and re-open. The text screen will display the proper scenario number selected. Shock Advised 2 a) Simulates “Shock advised. Charging” voice prompt a) During a rescue scenario, press button 2, the “Shock advised. Charging“ voice prompt will be initiated. b) If pressed during CPR, the voice prompt. “Do not touch patient, analyzing rhythm” will be issued. Page 13 Scenario 2 c) Initiates Rescue Scenario #2 c) Press “S” then button 2 within three seconds to initiate rescue scenario #2. Close AED Trainer lid and re-open. The text screen will display the proper scenario number selected. Check Electrodes 3 a) Simulates “Check electrodes” voice prompt a) When pressed, “Check electrodes” voice prompt is heard. Press button 4 to resume normal operation. Scenario 3 b) Initiates Rescue Scenario #3 b) Press “S” then button 3 within three seconds to initiate rescue scenario #3. Close AED Trainer lid and re-open. The text screen will display the proper scenario number selected Place Electrodes 4 a) Simulates “Place electrodes on patient’s bare chest.” voice prompt a) The unit will automatically start the “Tear open electrodes and remove electrodes” voice prompt. Press button 4 to activate the following additional prompts. i. “Peel one electrode from plastic liner” ii. “Place one electrode on bare upper chest” iii. “Peel second electrode and place on bare lower chest” iv. Press button 4 to indicate that the electrodes have been placed. Scenario 4 b) Initiates Rescue Scenario #4 b) Press “S” then button 4 within three seconds to initiate rescue scenario #4. Close AED Trainer lid and re-open. The text screen will display the proper scenario number selected. a) Simulates “Analysis interrupted. Stop patient motion.” voice prompt a) During a rescue scenario, press button 5 during simulated analysis period. The “Analysis interrupted. Stop patient motion.” voice prompt is heard. Press button again to resume normal operation. b) Initiates Rescue Scenario #5 b) Press “S” then button 5 within three seconds to initiate rescue scenario #5. Close AED Trainer lid and re-open. The text screen will display the proper scenario number selected. Analysis Interrupted 5 Scenario 5 Page 14 CARDIAC SCIENCE AED TRAINER USER MANUAL Battery Low 6 a) Simulates “Battery low.” voice prompt a) When lid is open, press button 6. The “Battery low” voice prompt is heard. Press button again to resume normal operation. Scenario 6 b) Initiates Rescue Scenario #6 b) Press “S” then button 6 within three seconds to initiate rescue scenario #6. Close AED Trainer lid and re-open. The text screen will display the proper scenario number selected. Service Required 7 a) Simulates “Service required.” voice prompt a) With lid open, press button 7. The “Service Required” voice prompt is heard. Press button again to resume normal operation. Scenario 7 b) Initiates Rescue Scenario #7 b) Press “S” then button 7 within three seconds to initiate rescue scenario #7. Close AED Trainer lid and re-open. The text screen will display the proper scenario number selected. a) Allows trainer to Pause/ Resume Operation a) Press button “P” at any time to pause AED Trainer operation. Press button again to resume normal operation. Scenario 8 b) Initiates Rescue Scenario #8 b) Press “S” then button 8 within three seconds to initiate rescue scenario #8. Close AED Trainer lid and re-open. The text screen will display the proper scenario number selected. Scenario Shift Key 9 Scenario - Allows trainer to select or configure shock protocol Press button “S” and button 1 through 8 within three seconds to change the shock protocol. Pause 8 Close AED Trainer lid and re-open. The text screen will display the proper scenario number selected. Page 15 ELECTRODES The electrodes included with the AED Trainer are for use with the AED Trainer only. They simulate the function of actual AED electrodes. The electrodes have a reusable adhesive backing for multiple uses. The electrode placement on the chest by the student is illustrated on the electrode label to aid the trainee in the most effective electrode placement. WARNING: Possible Improper Usage The Cardiac Science AED Training Electrodes are for training purposes only and will not deliver defibrillation pulse energy to a patient during a rescue. Do not store the Training Electrodes in the same area used to store actual Defibrillation Electrodes. TO INSTALL THE ELECTRODES 1. Open the lid of the AED Trainer. 2. Match the color code of the connectors (red to red), and then slide the electrode connector along the recess in the AED Trainer case, until the electrode connector fully mates to the connector of the AED Trainer. 3. Slide the electrode package fully into the AED Trainer electrode compartment, inserting the cable end first, as shown in the drawing. Make sure that the mock expiration label on the electrode label is displayed through the transparent lid. 4. Loop the excess cable length as shown in the drawing. 5. With the electrode package completely under the AED Trainer lid, close the lid. Page 16 CARDIAC SCIENCE AED TRAINER USER MANUAL INDICATORS The following indicators are located on the AED Trainer. STATUS INDICATOR The status indicator is simulated and always displays RED with a black “X” so that it cannot be mistaken for an AED that is RescueReady. This feature only applies to Powerheart AED Trainers. RESCUE INDICATOR On the Powerheart AED Trainer, the “Shock” button is used to allow the trainee to simulate delivery of a defibrillation pulse. CLEAR DATA INDICATOR For the Powerheart Automatic AED Trainer, the “Clear Data” button can be used to simulate the removal of stored data after a rescue. SMARTGAUGE BATTERY STATUS INDICATOR The SmartGauge has been modified for training purposes. Upon opening the lid of the AED Trainer with good batteries installed, the SmartGauge remains illuminated; simulating a 50% battery remaining capacity in the AED. The SmartGauge does not indicate the true status of the AED Trainer battery life and will always display 50% unless remote control button 6 is selected or until the batteries become depleted. Once the batteries are depleted, or when remote control button 6 is selected, the battery indicator is turned to 0%. ELECTRODE AND SERVICE INDICATOR The “Electrode” and “Service” indicators do function on the AED Trainer. They are turned on and off by remote control buttons 3, 4 and 7. Page 17 AED TYPE SELECTION The AED can be programmed to simulate an automated external defibrillator (default) or a fully automatic AED. If the AED is desired in a language other than the default language, the TYPE must be set first. The default modes are 3 or 4, depending on the model number ordered. To confirm the mode, simply open the lid and immediately check the top line; the number after the “-“ represents the mode. CODE002-4 LANG TO CHANGE THE AED TYPE: 1. Open the lid of the AED Trainer. 2. Allow the AED Trainer to begin to play the voice prompt “Tear Open Package . . .” 3. Press Pause 4. Press the appropriate button AED Type Desired AED G3 US English (default) AED G3 Automatic US English AED G3 UK English (no “Check for breathing . . .” prompts) AED G3 Automatic UK English (no “check for breathing . . . ” prompts) Button to Press 3 4 5 6 4. When the SHOCK (or CLEAR DATA) Button lights up, press the button ONCE and it will begin to flash. If the button does not flash, repeat steps 2-4. These steps must be done within a few seconds. 5. Close the lid. The AED Trainer will then begin the selected AED Type. If the fully automatic mode is desired, please adhere the overlay on top of the SHOCK button. Page 18 CARDIAC SCIENCE AED TRAINER USER MANUAL LANGUAGE SELECTION Some of the AED Trainers come equipped with multiple languages pre-programmed within the Unit. TO CHANGE THE LANGUAGE: 1. Open the lid of the AED Trainer. 2. While all of the LED lights are on, press and hold the SHOCK (or CLEAR DATA) Button. 3. The text display will scroll through the available languages. 4. When the language that is desired appears, release the SHOCK (or CLEAR DATA) Button. The AED Trainer will then begin the selected scenario in the new language. Page 19 SECTION 4 SIMULATED RESCUE OVERVIEW This section presents information about how to use the AED Trainer to perform a simulated rescue. Topic Page Performing a Simulated Rescue 21 Rescue Scenarios 22 Page 20 CARDIAC SCIENCE AED TRAINER USER MANUAL PERFORMING A SIMULATED RESCUE PERFORMING A SIMULATED RESCUE - EXAMPLE 1. Open the lid of the AED Trainer. When the lid is opened, the “Tear open electrode package and remove pads” voice prompt is heard. Have the student place the electrodes. 2. After the student has completed step 1, press button 4 on the remote. Then, the “Peel one pad from plastic liner” voice prompt will play. 3. After the student has completed step 2, press button 4 on the remote. The prompt “Place one pad on bare upper chest” will play. 4. After the student has completed step 3, press button 4 on the remote. The prompt “Peel second pad and place on bare lower chest as shown” will play. 5. When the student has achieved correct electrode placement, press button 4 on the remote. After button 4 is pressed, the AED Trainer advances to the analysis stage of the rescue sequence. The “Do not touch patient. Analyzing rhythm” voice prompt will be heard. 6. If the scenario defines a shockable rhythm, the next voice prompts heard are, “Shock Advised. Charging,” and then: a. For the Powerheart/FirstSave AED Trainer i. The prompt “Stand clear. Push flashing button to deliver shock.” will be heard. ii. At this point the student should press the “Shock” button on the AED Trainer to deliver the first simulated defibrillation pulse. iii. Upon simulating a charge, if the “Shock” button is not pressed after 30 seconds, the AED Trainer will return to the analysis mode. The “Do not touch patient, Analyzing rhythm” voice prompt will be heard. b. For the Powerheart Automatic AED Trainer i. The prompt ”Stand clear. Shock will be delivered in 5 seconds. 4…3…2…1. Shock delivered.” At this point the shock has been simulated and the trainer will advance again to the analysis stage. 7. If the scenario defines a non-shockable rhythm, the next voice prompts heard are, “Check for breathing, if not breathing give two breaths” or, in modes 5 or 6, “Check for signs of circulation. If no circulation, Start CPR.” Note: Unlike the actual AED, the AED Trainer does not save the rescue data in its internal memory. Page 21 RESCUE SCENARIOS The following are eight examples of rescue scenarios that are consistent with the American Heart TM Association HeartSaver AED training course. Scenario One 3 shocks – CPR – Fourth shock – Pulse & breathing return Training Steps 1. 2. 3. 4. 5. 6. 7. Two 2 shocks – “No shock indicated” – Pulse absent – CPR 1. 2. 3. 4. 5. 6. Three 2 shocks – Pulse present – Breathing absent – Ventilate 1. 2. 3. 4. 5. 6. Four Obstructed airway – Airway cleared – “No shock indicated” – CPR – Pulse returns, but no breathing 1. 2. 3. 4. 5. 6. 7. 8. Page 22 Student opens lid of AED Trainer. Student places training electrodes on manikin. Once electrodes properly placed, instructor advances through the pad placement steps by pressing button 4 as needed on the remote. Student defibrillates 3 times. Student performs CPR for one minute. Student defibrillates 1 time. Student checks for pulse, signs of circulation and breathing. Student opens lid of AED Trainer. Student places training electrodes on manikin. Once electrodes properly placed, instructor advances through the pad placement steps by pressing button 4 as needed on the remote. Student defibrillates 2 times. Student checks for pulse and signs of circuation and finds none. Student performs CPR. Student opens lid of AED Trainer. Student places training electrodes on manikin. Once electrodes properly placed, instructor advances through the pad placement steps by pressing button 4 as needed on the remote. Student defibrillates 2 times. Student checks for pulse, signs of circulation and breathing and finds pulse and signs of circulation, but no breathing. Student continues to ventilate patient. Student clears obstructed airway. Student opens lid of AED Trainer. Student places training electrodes on manikin. Once electrodes properly placed, instructor advances through the pad placement steps by pressing button 4 as needed on the remote. Student checks for pulse, signs of circulation and breathing. Student performs CPR. Student finds pulse and signs of circulation, but no breathing. Student ventilates patient. CARDIAC SCIENCE AED TRAINER USER MANUAL Five Victim has nitroglycerin patch. 3 shocks – CPR – Fourth shock – Pulse present, breathing returns 1. 2. 3. 4. Six Drowning victim is lying in a puddle of water. “No shock indicated” – Pulse absent – CPR – Pulse & breathing return 1. 2. 3. 4. Seven 2 shocks – Pulse & breathing return – Pulse & breathing lost – 3 shocks – Pulse & breathing restored 5. 6. 7. 8. Student removes nitroglycerin patch properly. Student opens lid of AED Trainer. Student places training electrodes on manikin. Once electrodes properly placed, instructor advances through the pad placement steps by pressing button 4 as needed on the remote. Student defibrillates 3 times. Student performs CPR for one minute. Student defibrillates 1 time. Student checks for pulse, signs of circulation and breathing. Student moves victim. Student opens lid of AED Trainer. Student places training electrodes on manikin. Once electrodes properly placed, instructor advances through the pad placement steps by pressing button 4 as needed on the remote. 5. Student checks for pulse, signs of circulation and breathing and performs CPR. 6. Student checks for pulse, signs of circulation and breathing, but finds no pulse or signs of circulation. 7. Student checks for pulse, signs of circulation and breathing and finds all. 1. 2. 3. Student opens lid of AED Trainer. Student places training electrodes on manikin. Once electrodes properly placed, instructor advances through the pad placement steps by pressing button 4 as needed on the remote. 4. Student defibrillates 2 times. 5. Student checks for pulse, signs of circulation and breathing and finds both. 6. Student checks for pulse, signs of circulation and breathing and finds none. 7. Student defibrillates 3 times. 8. Student checks for pulse, signs of circulation and breathing and finds all. Eight Loose electrodes – Corrects – 2 shocks – “No shock indicated” – Pulse returns, but no breathing 1. 2. 3. 4. 5. 6. 7. Student opens lid of AED Trainer. Student places training electrodes on manikin. Instructor presses remote button 3. Student reevaluates electrode placement. Once electrodes properly placed, instructor advances through the pad placement steps by pressing button 4 as needed on the remote. Student defibrillates 2 times. Student checks for pulse, signs of circulation and breathing and finds pulse, but no breathing. Student ventilates patient. . Page 23 Page 24 CARDIAC SCIENCE AED TRAINER USER MANUAL SECTION 5 MAINTENANCE OVERVIEW This section presents maintenance information about the AED Trainer. Topic Page Maintenance 26 Page 25 MAINTENANCE The AED Trainer is durable and requires little maintenance. Generally, the only maintenance required is the replacement of depleted batteries. The symptoms of depleted or low batteries in the AED Trainer may be: • • • • SmartGauge indicator changes from 50% to 0% with red low battery indicator illuminated SmartGuage indicators are dim, flicker during voice prompts, or are no longer lit Quality of the voice prompts begin to degrade No voice prompts To replace the batteries, remove the depleted batteries from the back of the AED Trainer. Install new or fully charged batteries noting polarity symbol in battery compartment. The symptoms of depleted or low batteries in the remote control unit may be: • Remote control operating range is poor. Remote control has to be close to AED Trainer in order to function. To replace the batteries in the remote control unit, hold the remote control in the palm of the hand with the thumb on the grooved area on the battery door. Apply downward pressure with the thumb and slide the door in the direction of the arrow. Remove the old batteries. Install one battery at the (+) end of the battery compartment noting polarity. Install the second battery. While holding the second battery in place, lay the battery door on the remote control unit and slide the door shut until it snaps. Note: It is not recommended to use rechargeable batteries in the remote control unit. The remote control unit energy consumption is extremely low and rechargeable batteries will self-discharge well before single use batteries need to be replaced. AUTHORIZED REPAIR SERVICE The AED Trainer has no user-serviceable internal components. If you are unable to resolve the problem, contact our Customer Services department for repair information at one of the following telephone numbers: In the U.S. and Canada (888) 466-8686 [email protected] Outside the U.S. and Canada +45 4438 0539 or 44 161 926 0000 [email protected] Page 26 CARDIAC SCIENCE AED TRAINER USER MANUAL SECTION 6 TECHNICAL DATA OVERVIEW This section presents technical data about the AED Trainer. Topic Page Parameters 28 Safety and Performance Standards 29 Page 27 PARAMETERS DIMENSIONS Measurement Height Width Depth Dimension 8 cm (3.3 in) 27 cm (10.6 in) 31 cm (12.4 in) OPERATION AND STANDBY CONDITIONS Atmosphere Temperature Humidity Condition 0°C to +50°C (32°F to +122°F) 5% to 95% (non-condensing) SHIPMENT AND TRANSPORT CONDITIONS (FOR UP TO 1 WEEK) Atmosphere Temperature Humidity Condition -40°C to +65°C (-40°F to +149°F) 5% to 95% (non-condensing) BATTERY AED Trainer - 2 Standard D-cell batteries Remote control - 2 Standard AAA-cell battteries Page 28 CARDIAC SCIENCE AED TRAINER USER MANUAL SAFETY AND PERFORMANCE STANDARDS This equipment has been designed and manufactured to conform to the highest standards of safety and performance including electromagnetic compatibility (EMC). This system, the AED Trainer, Remote Control, and training electrodes, conform to the applicable requriements of the following standards. ELECTROMAGNETIC COMPATIBILITY (EMC) EMISSIONS Field Radiated E-M Standard or Compliance EN 55011, Group 1, Category B IMMUNITY Field Radiated E-M Radiated M ESD Standard or Compliance EN 61000-4-3 EN 61000-4-8 EN 61000-4-2