1
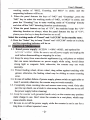
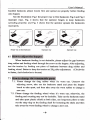
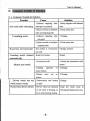
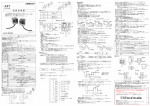
BiⅡ
Thanks for Use
Counter
l∶
User’ s
Manua1
Precauuon!!!
For your personaI safety, pIease use only the socket w⒒
△
grouⅡ dimg connection.
Be sure‘ he power suppIy comDⅡ es with the speciⅡ c Ⅱmit。
l)
A.CounΙ ng specd: )1000pos/min
B.Hopper&stacker Capacity: >130pcs
C。 Banknotc size:
Mgx。 90x 175nⅡn,Min.50x 100nun
p.c。 unting Doplay Rangc: ⒈999pcs/⒈ 9999pcs
E~Preset Display Range: 1-999pcs/1ˉ 9999pcs
E POwer supply: 220V(1圭 10%),60Hz
110V(1± 10%),60Hz
Ch Max.Working Current: 0,5A
H.Ambiem Tempcrature:0~+40℃
I Re1碰 ive Humidity: 40%~90%
J,Noise: (60dB
K.POwcr Consumpton: 6llW
L・
We廴 垂⒒:
8kg
2)曦鬟
曦 曦 曦
Plug the cord into the Ⅱght power supply sooket.If your counter has the
outer display,please plug to connect weⅡ
.
After sW扯ching on(bo钆 erin perfonmance to keep it set up rt】 ming for one
mhutΘ ,your counter wm start∞ l孓 dagno“ s,and then enter“ MG1丿 UV”
working mode when no troub1e is detectcd,No、 v on1y fccd banknote to keep it
working. M△en somc codc appears in display, pIease refer to the chapter of
“
Conlmon Trouble‘ 1solution” to so1Ve the problcⅡ 1before nor1nal、 Vorking.
selectthe worⅡ ng mode ofⅡ 淫G1,I压 G2,CouⅡ ting and UV:
1 Vˇ hen thc panc1fcaturcs the key of“ Function” ,press thc kcy to seleCt the
_
User’
“MG2,
working modes of
s ManuaI
Counung, and MG1” in circlc; and the
responding indicator wⅡ I be on.
2. When the panel features the keys of“ MG’ ’and “CounΙ ng” , press tbe
’
MCI’ key to select the working mode of‘ ‘
MG1,or
“
MG2”
in circle;and
press犰 e“ Coun“ ng” k叩 to enter wo水 ing” ode of ⅡCoun血 呜 ” direcuy
and shut offthe‘ ‘
MG” detecting functi。 n synchronousIy.
3. When the paneI features no key of△
J、 ″
1曲 e machine kceps the△
detecting function on a1、 vays;whcn the panel features the key of‘
please press the key to keep the function on°
’
J、 ″
qJv9’
,
roⅡ
seIect the wor△山ng mode of“ Preset” and“ ACCu△ 江”im the stamdby state:
‘
4.press the‘ ‘
seIecr’ key to keep‘ Preset’ ’and‘ %`CCuM” lnode on in circIe;
and the
in旦
indicator wⅡ l
be on。
3)
power supply∶ AC22oV〈 圭10%〉 60Hz;and optonal for
AClI0、 ′(± 10o/o) 5oHz Be sureto cuto仃 powcr supply and unp1ug the
cρ rd before diβ assembⅡ
ng or stopping】 or
a ti】
ne.
3.2.Kecp免 r away from some electHc applhmces(e.g.oelI phone or weldeo
that can cause interference on power supply、
vhⅡ e usihg。
Avoid direct
strong Ⅱght or magnetic fleId; other、 vise, the counter may not work
desirably.
3.3.Protect fecding wheel,drivon whecl,drag rubber against touching
Ⅵ汀th
grease;othα wise,伍 e feeding wheel may be sⅡ ding to cause GOun位 ng
eⅡ o⒈
3.4.In case ofsudden n拉 lure。 fpower supply,please sⅥ 汀tch on again aftor at
least5seConds;c吨 herwisc,the counterrnay not work noma11y.
3.5.Completely clean counting仞 be and sensors once every week。 Only take
part曲c top shicld,use a bmsh to clear away the dust.(Be sure to cut o狂
the power supply before clea而 nD
36Keep the cou时 er wClI grounded OaHh wire),as the cou叮 ner may produce
static charge in use。
DOn’ t store曲 e counter in a wet place,which may
cause electric shook.
3.7。
Bes刂 e to cut or伍e power supply whⅡ e1he
long time or Ⅵ汀thout operator’ s care.
-2-
counter is not in use for a
User、 Manual
ntenance Worker for
3.8.P1ease cut of the power supply and contact1n拉
rep缸 r services Ⅱ1case that the be1oW case happens:
A.Hcavily broken due to faⅡ
ng
B.Not wOrk eVen by follow吨 the operation hs饪uCtions
C.Function abnomal
D,Liquid splashed onto the counter
4)窭
曩
燠
龌
蠛
曩
蠛
蠛
曩
A.MG⒈ For comting and detec血 呜 伍 e banknote that’ s1ow in m徙 羿⒍om
B △ΙG2:For counting and detecting banknote that’ ss△ong in magnctism
like Us do11ars.
C.Coun血 g:FOr counting and spectrum-detec住 ng banknote that’ s咖 thout
magnetom
D.CounⅡ ng:FOr“ U、″ detec“ ng generally ke。 p the func“ on。n while
0ounting。
E.Preset:Press the preset button to activate the function;Now press‘
“-‘ ‘button to preset the coVr⒒ ing batch as rcqu屺
automaticalIy while compIeting the setup p始
忱kng
F+’ ’
or
d.The comter wⅡ 1stop
ces;and s咖
aga1n after
away the baMote from stackc⒈ Press伍e“ se1∝ 卩 kcy to canCel
the func伍 。n.
Note:For3ˉ digit counting dispIay,伍 e preset range is fron11t。 999;and
for4-dig⒒ counting display,range frOIn1to9999.
R ADE):⒒ e
oomter Ⅱlay add up the coun“ ng result eadh thne atthis mode.
only Whcn ta⒗ ng away the b汕 ote fTOm stacker and pressing the
“rese`’ key to cIear up the result,the counter can start oomting flom zero
and accutnulaJ山g agaln.
NOte:For3-digh comung disp1ay,the accumu1a伍 ng range io Ⅵo山 in999;
and for4--ig⒒ Counting disp1够 range W⒒ hin9999.
s)
Clear up the badmote and sort as
pcr par 嘎
嵌 ue, clear away staIns on
badmote and spread properly, and feed onto hopper for counung. F。 r the
-3ˉ
User’ s
Manual
bundIed banknote,please Ioosen frst and spread out properIy before fceding
onto hoppe⒈
see the i11ustation:Fig∶ 1the proper Way to feed bahknote;Fig.2and Fig.3
2 shows that the operator forgets to keep b岫 otcs
spreading proper1y;and∏ g.3shows that the operator spreads the banknotes
impⅡ oper ways. Fig。
×
睽
impropcr1I/∶
y
F豳
萤
卜∷
。
卜1
嘤
¨
J
Ⅱ・
氵肀 ∷
・滢言产
ˉ圹
′
≡擎∷
×
墅△麂
窨
Fig2
Fig 1
pr。 per
w叩 to feed banknote
Improper Way
Fig3
△nproper way
6)
When banknote feeding o not desirab1e,please a(,just the gap bc“
″een
dmg mbber and feedng whβ d through the screw oh the hoppe⒈ After a苟 usthg,
test the tension by feeding one piece of banknote be小
Ⅳeen drag mbbcr and
feed鸭 whee⒈ Better to keep the tenson at2Kg after侧 usment.(Clockw柚
to fasten,Anti-clockwise to1ooser|)
7)
7.1.Please change the drag mbber When⒈ 、 wom out.UnscreW the
a苟 usting‘ σo吒 take out曲 eb湘
ote stand and press the hopper
board to take apad,and曲en take away犰 e wom mbberto chamge a
neW one。
7.2. PⅡ
ease change the feeding wheel when h’ s wom out; othemise, the
feedi1n"E当
and comtmg may not be deskable。 Take outthe banknote stand
and take apart p1astic she1d at bou1sides,use1ongˉ
nose pⅡ ers to take
out thc snap ong on】 hc fecding shan f。 r1。 。sening the shaft,and then
take away the、 vonn feeding、 vheeIto changc a new one。
-4ˉ
tJser’ s
Manual
8.1.CoⅡ Ⅱnon Troub1ed廴 so1ution
Tmuble
Not work after swhching
Cα mdng eⅡ or
soIuJon
Cause
1In丘 arcd targ西 ng 如be
1.Keep aligmed w汕 h± arcd
Ⅱnproper h position
tube
2Dust covcrcd on Infrarcd
2CIcar away dust
"bc and targcting tubc
1h△ ared targeting mbc
1Changc
not good
2Dust covercd on infrarcd
2Clcar away dust
targcting tube
Reset Key not functi。 nal
Key broken2 Connec反 on
Changc;conncct
not Wc11
Cou"吨
resu⒒
cleaned
Rcp缸 r
Reset Kcy brokcn
automatically
1.Che0k the connection W△
1,C△ ouit not weⅡ
MOtor not Work
h
motor
2,创 忉r吐 ng
capaoitor∶
of
2Change
motor broken
3Motor
bun1
out
or
3Change
brokcn
Driven whee1 not rIIn
Transmissi0n bc1t broken
Chmge
while motor Works
or aged
Noise fIom dHven、vheeI
E)1riveⅡ
Whee1 not fastcncd
Kccp the ψheel olose to
or】 lot
cIosc to be-g,so
bcaHng and fasten the screw
as to makc bcaHng sⅡ ding
-5ˉ
tJser’ s
8.2。
Manual
Code displayed aftρ r se1f-diagnosis d廴 solu七 ion
IroubIe Code
πˇoubⅡ e Pos扯 oⅡ
C△
Feeding sensor
soI讧 tion
C1ear away dust and other
i11V证 ties
C-2
stacⅡ ng sensor
C-3
COunting sensor1
C-4
Counting senso扌 2
C1ear away du哎 and other
i唧 耐 ues
C-5
UV sensor
Cheok the conncction
Cˉ 6
speed sensor
Clear aWay dust and o伍 er
imp1rities
Code
Code
Cause
Eˉ 1
Bam。 te
E9
UV Problcm
Half-sheeted
E-3
Magnetism Problem
E-9
Ba曲
9)鬟 蠛
曩
ote sandwiched
蠛
Please check the below attached oarts
whi
parts while
No.
l
2
QTY
Items
User’ s
Manu1
Waranty Card
Brush
4
Cord
6
Consu1nables
Extemal Disp1ay(optiona1)
〃b
reser/e
sets
仂 er△ gh彦 矽@make
〃Ι仂 @Er矽
矽eε 乃刀rCa丿 刀o汐 ∵/∵ ε刁古J,J,
prr@r刀 ε扌rε e.
ˉ6ˉ