1
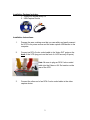
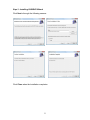
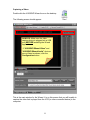
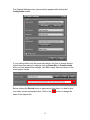
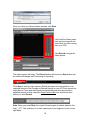
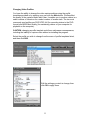
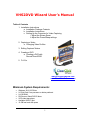
VHS2DVD Wizard User's Manual Table of Contents 1. Installation Instructions a. Installation Package Contents b. Installation Instructions c. Setting Up the Computer for Video Capturing i. Adjust the Screen Saver ii. Adjust the Power/Sleep settings 2. Capturing a Video a. Changing Video Profiles 3. Editing Captured Videos 4. Creating a DVD a. Creating a DVD with Record Direct2DVD 5. F.A.Q.s www.VHS2DVDWizard.com www.ClearClickSoftware.com Minimum System Requirements: Windows 10/8.1/8/7/Vista 2.0 GHz Dual Core processor or better preferred 2-4 GB RAM DVD burner, Blank DVD-R discs VCR video tape player Available USB 2.0 port 15 GB free hard disk space 1 Installation Package Includes: 1. VHS2DVD Wizard (blue) CD 2. USB Capture Device Installation Instructions: 1. Prepare the area, making sure that you can safely and easily connect the VCR to its power source and the video capture USB device to the computer. 2. Connect an RCA-3 color coded-cable to the Video OUT ports on the back of the VCR (any ports on the front of a VCR are only IN ports). Note: Be sure to plug an RCA-3 color-coded cable into the Video or A/V Out section on the rear of the VCR. 3. Connect the other end of an RCA-3 color-coded cable to the video capture device. 2 4. Insert the blue VHS2DVD Wizard CD into your computer. a. If prompted, click the RunMe program so that the Wizard’s installation menu will appear (shown on next page). Windows 10 Users: If you receive a message about Windows Smartscreen, click “More Info” and select “Run Anyway.” Click each Installation button, in order, to set up VHS2DVD Wizard. 3 Step 1 - Install Video Card Driver Click Next to begin the installation, then click Finish when prompted. YOU WILL NEED TO REBOOT YOUR COMPUTER. Note: when connecting the video capture device to the computer, DO NOT plug it into a USB Hub (port splitter) as this will not provide the speed necessary for video capturing. Remove the plastic cap (above the printed name) and plug the video capture device into any available USB port on the computer, after the reboot. 4 Step 2 - Installing VHS2DVD Wizard Click Next > through the following screens: Click Close when the Installation completes. 5 Setting up your computer for Video Capturing: Adjusting the Screen Saver: 1. Right click on the desktop, choose Properties… (or Personalize in Windows Vista/7). (For Windows 8, use Windows Key + X to bring up the start menu and choose Power Options.) 2. Click on the Screen Saver tab (or link in Windows Vista). 3. Adjust the Screen Saver time to be 180 minutes. (This leaves your screen saver enabled, but sets a time of 3 hours before it engages.) 4. Click the Power button (or Change Power Settings link) then follow the steps below. Windows XP Change the settings to match the following image: Click the Save As… button and give the new power scheme a name of “Video Capture”. (Note: if you run into difficulties while capturing, change the Turn off monitor option to Never also.) Click the Apply button. Click the Hibernate tab and uncheck “Enable Hibernation.” Click Apply then OK. (Rebooting the computer is recommended.) 6 Windows Vista/Windows 7/8/10 Change the Power Options Control Panel settings to match the following screens. (Windows 10 Users: to access Power Options, type in “Power Options” in the Windows search bar and choose “Power Options.”) Click the Save Changes button and close any remaining windows. These changes will ensure that you computer is providing its full attention and resources to the Video Capturing process and VHS2DVD Wizard. 7 Capturing a Video: Double click the VHS2DVD Wizard icon on the desktop The following screen should appear: ALWAYS: Make sure the video capture device is plugged into a USB port BEFORE launching the Wizard application. If “VHS2DVD Wizard Video” and “VHS2DVD Wizard Audio” devices are not listed as shown, click the Configuration button. This is the main window for the Wizard. It is on this screen that you will be able to capture the video that is played from the VCR (or other connected device) to the computer. 8 The Capture Settings screen (shown below) appears after clicking the Configuration button. If your settings differ from the screen shot above, feel free to change them to match the screen above for settings such as Frame Size or Preview Audio. After you have adjusted the settings, click OK to apply them and return to the main capture screen. Before clicking the Record button to capture your first video, it is best to give your video a more meaningful name. Click on the name of the capture file. 9 button to change the Once you have your Movie’s Name entered, click Save. Verify that the Green meter bars are bouncing with the sound that you hear coming from your VCR. Click Record to begin the video capture. The video capture will begin. The Record button will become a Stop button and the status will change from Previewing to Capturing. Click Stop to end the video capture. Queue the tape to the next position to be captured using the Fast Forward or Rewind buttons on your VCR then repeat the steps above. If you wish the Wizard to automatically stop the capture after a specified amount of time, check the Stop Capture After box and set the time, before you click Record. Note: When you press Stop, the output file names gets a number added to the end (“_01”). This enables you to start capturing the next segment of your movie right away. 10 Changing Video Profiles: You have the ability to change the video capture settings using the profile templates provided or by creating your own with the New button. Profiles affect the quality of the captured Audio and Video. It enables you to produce videos in a select number of formats or for a select number of screen sizes. The two most commonly used profiles are DVD NTSC 4x3 (for recording videos to the DVD format) and WMV Best Quality (for maintaining videos on your computer for playback on the computer). CAUTION: changing a profile template could have unforeseen consequences, including the inability to capture video without re-installing the program. Select the profile you wish to change from the menu of profile templates listed, and then click Edit. Edit the settings you wish to change, then click OK to apply them. 11 Editing Captured Videos: Open the VHS2DVD Wizard and click on the Video Editing tab at the top. Click the button to select the video you wish to edit. The Zoom slider allows you to make the time line “appear” longer so you can more precisely place the range markers. Use the scroll bar (under the timeline) to move across the timeline when zooming. With the movie loaded: 1. Move the two Range Markers across the timeline to surround the part of the video you wish to cut (remove). 2. Click Cut. 3. Press the Range Play a. Use the Undo 4. Click the button to play the newly edited clip. button, to restore the clip to its previous length. button to change the name of the clip to be saved. 5. Press the Export button to save the newly clipped video. 6. Repeat the above steps by using Undo clip of video to export/save. 12 after exporting, to edit the next Creating a DVD: Insert a blank DVD-R into your computer and close the Windows Auto Run windows for blank discs. Open the VHS2DVD Wizard and click on the Create DVD tab at the top. Click Add Video to locate the video clips for the DVD. (Note: you may add more than one video clip to the DVD project, providing the Disk Size of the movie clips added does not exceed the capacity of the disc. Standard DVD-Rs hold 4.7Gb or 120 minutes of video, Dual Layer DVD-Rs hold 8.5Gb. or 240 minutes (4 hours) of video.) Chapters are the special markers that allow a DVD to Fast Forward or Rewind. Set the increment of time that the movie will “jump” Forwards or Backwards. DVD Menu creates a simple Menu for navigating multiple videos on a single disc. Click on a Title name (video name) then click the Rename Title button to change the videos’ DVD Menu display name. Click OK when finished. (Note: you can also choose a background image for the DVD menu.) Click Create DVD to burn the disc. The new disc will be ejected by the computer when the process completes. Click Create DVD again to make another copy. 13 Creating a DVD with Direct2DVD: Insert a blank DVD-R into your computer and close the Windows Auto Run windows for blank discs. Open the VHS2DVD Wizard and click on the Record Direct2DVD tab at the top. Use the preview window to queue the movie from the attached VCR, DVR, or Camcorder. Setting the Stop and Finalize DVD feature will automate the recording and finalization processes after the set duration has elapsed. Start your movie playing then press Record, to begin recording the movie. Press Stop Recording to stop the recording. (Note: you may press Record again to begin recording more content to the same disc. This can be repeated until the capacity of the disc has been reached.) Click Finalize DVD when you are done, to make the disc playable. WARNING: Closing the program without Finalizing the DVD will make the disc unreadable, and the recording must be recreated. 14 Frequently Asked Questions: Q. What kind of DVDs should I use, DVD-R vs. DVD+Rs - name brand vs. generic? a. We recommend name brand DVD-R discs (that’s DVD “dash” R discs) for maximum compatibility with most computer and set-top players. Q. My DVD player that’s connected to my TV (set-top) is three (3) to five (5) years old, will it play burned DVDs? a. We recommend that you always check the user’s manual to confirm this. The ability for set-top players to correctly read “burned” or “homemade” DVDs has only been in the main stream for about the last three years. If your set-top box is that old or older, you will have to consult the user’s manual for that model of player to confirm that it can play burned DVDs. Q. When I open the program, I get a window that pops up with an error that says “Value does not fall within expected Range”? a. This is common when other Imaging Devices are connected to the computer such as Web Cameras, All-In-One Printer/Scanner/Fax machines, or digital camera and camcorders. This error can be resolved by clicking OK to the error and then using the Configuration button in the VHS2DVD wizard main screen to select the VHS2DVD Wizard video and audio devices. See pages 8 and 9 for adjusting the Capture Settings. Q. I am trying to capture a movie and I get an error that “Cannot Save Disc is Full,” why? a. This can occur when you are trying to save your movie directly to the DVD drive through the Video Capture tab. The movie must be saved to your computer’s hard drive first, and then rendered to the DVD with the Create DVD tab. You cannot save a movie directly to the DVD drive unless you are using the Record Direct2DVD tab. Q. My software CD arrived cracked or broken. a. Please visit us at http://support.vhs2dvdwizard.com/ support ticket and let us know. Q. to open a My VCR only has one audio output jack. Is this a problem? a. You need this splitter for the audio output jack that can be purchased from the location or a local store that sells TV/VCR connection cables: http://www.cablestogo.com/product.asp?cat_id=118&sku=40650 15 Q. “The video in the output file is not in sync / There’s a delay in the audio / OR The edit function does not work, why?” a. 1) This is normal, burn a DVD from the captured file to see if the issue is a display anomaly or actually part of the file. 2) Restart your computer and close out of any unnecessary running programs. 3) Update your graphics card driver from your computer's manufacturer's website. 4) The computer may not meet the minimum system requirements or the movie may be larger than the available resources of the computer. Q. I am told the audio device is missing or the Audio Device drop down box on the configuration screen is grayed out. a. Please visit us at http://support.vhs2dvdwizard.com to open a support ticket and let our technicians know you are experiencing this issue. Please be sure to include what operating system you have Windows XP/Vista/7/8/10 and if it is 32-bit or 64-bit. Need Some Help? Open a support ticket in the support center at: http://support.vhs2dvdwizard.com/ Thank You For Your Business! Please help spread the word! Tell your friends and family about our software. www.ClearClickSoftware.com 16