1
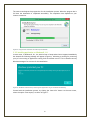
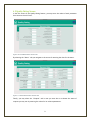
Cultivation Management Software User Manual Contents 1. Project Description ........................................................................... 3 2. System Requirements ........................................................................ 4 2.1 Supported Operation Systems ............................................................. 4 2.2 Screen Resolution ........................................................................... 4 3. Installation..................................................................................... 4 3.1 Web Installer ................................................................................ 4 3.2 Installation Wizard ......................................................................... 5 3.2.1 Installing application on Windows 7 ................................................ 5 3.2.2 Installing application on Windows 8, 8.1 ........................................... 6 3.2.3 Completion of application’s installation ........................................... 7 4. Launching application ........................................................................ 7 4.1 Initial Screen ................................................................................ 7 4.2 Quality Rating Screen ...................................................................... 9 4.3 Evaluation Report Screen .................................................................11 2 1. Project Description The project LIFE11 ENV/GR/951 “Sustainable strategies for the improvement of seriously degraded agricultural areas: The example of Pistachia vera L” with acronym AgroStrat, is an ambitious project which foresees the development of an integrated scenario for the sustainable management of intensively cultivated Mediterranean areas using as example the cultivation of Pistachia vera L. trees, which are intensively cultivated in Aegina Island, Greece for the last 150 years. One of the innovative project actions is the development of a soil monitoring software, which is expected to contribute to the sustainable management of intensively cultivated Mediterranean areas. The software consists of two parts: Cultivation Management Software Central Management Monitoring Tool (for Local and Regional Authorities and agricultural associations) The first part, the Cultivation Management Software, is a software which provides to farmers specific consultancy on cultivated field management, as regards the quality of soil, irrigation water and waste or composts to be reused on soil. By entering data of soil analysis, of irrigation water and of waste or compost to use, the farmers obtain specific consultancy on fertilization, irrigation and reuse of waste or composts as well as on monitoring cultivated soil quality. After the first data entry, the users may continue updating the system on most recent analyses and thereby to update it and receive new advices. To assist users on monitoring soil quality, specific portable field equipment has been constructed, with which farmers can measure soil pH, electrical conductivity and moisture by themselves. These values can be also inserted into the software (information given on the project website http://www.agrostrat.gr, the Project-Field instruments) so as to ensure continuous monitoring of the cultivated areas. It should be particularly noted that this advisory software does not intend to replace the role of agronomists to the provision of farming advices. Instead, the software is anticipated to assist the agronomists and simplify the way in which producers are informed regarding their cultivation and on the risk of soil degradation. 3 2. System Requirements 2.1 Supported Operation Systems The 32-bit and 64-bit versions of the following operating systems are supported by the Cultivation Management Software: Windows 7 Windows 8 Windows 8.1 2.2 Screen Resolution Minimum screen resolution that is supported by the Cultivation Management Software is 1024x768. For optimal user experience screen resolution of 1920x1080 is recommended. 3. Installation 3.1 Web Installer Cultivation Management Software can be installed through a web installer found on the software section of the project’s official web page: http://www.agrostrat.gr/?q=en/CultivationManagementSoftware Figure 1. Download link of installation web installer By clicking on the installation link, an installation executable file (setup.exe) is downloaded and stored to a predefined location (The stored location is depending on the settings of your web browser). Specific web browsers may block the installation file from being stored, indicating the file may be harmful for your computer. In order to bypass this action, you must explicitly inform the web browser that the installation file is safe. As an example Figure 2 shows how to inform Google Chrome browser that the setup.exe file is not harmful for your computer by pressing the “Keep” when the relative warning message appears. 4 Figure 2. Google Chrome warning message after software download from the web 3.2 Installation Wizard Running the installation file (double-click setup.exe) from the predefined stored location will initiate the installation wizard. Initial screen of installation wizard may defer depending on the user’s operating system. In order to proceed with the installation you must remain connected to the internet. The setup process for different types of operating systems supported by the Cultivation Management Software, is stated below. 3.2.1 Installing application on Windows 7 The first screen of installation wizard is shown in Figure 3. Figure 3. Installation wizard’s first screen At the second screen, as shown in Figure 4, you must press the “Install” button in order to proceed. Figure 4. Press Install button to proceed with software installation 5 The next screen depicts the progress bar for the installation process. When the progress bar is full then the installation is completed successfully. The completion time depends on your internet connection. Figure 5. Progress bar indicates the status of installation 3.2.2 Installing application on Windows 8, 8.1 In most cases, in Windows 8, 8.1, the initial screen of setup wizard won’t appear immediately but instead the following message will appear (Figure 6), indicating a warning for protecting your pc from running an application coming from an unknown source. This is common security Windows message of no concern for this installation. Figure 6. Windows SmartScreen preventing the application to get installed immediately Proceed with the installation process, by clicking the “More Info” button. At the next screen, select the option “Run anyway” as shown in Figure 7. 6 Figure 7. Press "Run anyway” button in order to proceed with the installation The rest of the installation process remains the same as described above for Windows 7. Please refer to the Windows 7 installation section in order to proceed. 3.2.3 Completion of application’s installation Once the application is successfully installed, Cultivation Management Software will launch automatically. For Windows 8, 8.1 users, a warning screen may appear upon the first launch of the application (Figure 6). In order to bypass the warning screen, you must click on the “More info” link and press the “Run anyway” button (Figure 7). 4. Launching application Installation wizard will create a launch application icon in the startup menu but also on your desktop. Desktop’s launch icon will appear on the desktop of your operation system with the name “Cultivation Monitoring Tool”. 4.1 Initial Screen The first screen (Figure 8) displays the main four buttons of the application related to the key features for managing the status of your cultivation. These are the following: 1. Quality rating This allows the user to get an evaluation report of the soil, water and compost status for its cultivation in accordance with the International and EU standards. The evaluation is based on the parameter values that the user has entered for each factor, using the data entry interface. 2. Advisory* This feature provides you with a set of recommended cultivation practices based on the evaluation of your cultivation status. 3. Sensor data* This feature is based on the use of field equipment for measuring the pH, moisture and electric conductivity of your field and getting a quick assessment for the soil status. 4. Publish data* Allows the user to publish the data analysis for its cultivation to the server of the regional authorities. 7 *In the current demo version 1.0.0.1 the functionality of this module is not integrated. Figure 8: Initial screen view In order to change the application language, you must select the status bar. button from the The info button leads you to the project information (Figure 9) where you can view the project description and the details for the contributors. Figure 9: Info view 8 4.2 Quality Rating Screen In the first screen of the Quality Rating feature, you may enter the values of each parameter that concerns the soil factor. Figure 10: Soil Measurement Values view By selecting the “Water” tab you navigate to the screen for entering the data for the water. Figure 11: Water Measurement Values view Finally, you may select the “Compost” tab in case you want also to evaluate the status of compost you may own by entering the values for its relative parameters. 9 Figure 12: Compost Measurement Values view After finalizing the data entry session, you may view your evaluation report by selecting the “Report” button below. If you enter a value that it’s not valid (ea. a percentage value greater than 100%) a red border around the entry value will appear (Figure 13). Figure 13. Validation red border around data entry In that case you will also notice that the “Report” button is turned into grey and it is not clickable anymore. The button will return to its original state the moment you will correct all the entry values that are currently not valid. In cases where the invalid state is more complicated, an error message description will appear in order to provide guidance and clarify the reason that the specific invalid state appears (Figure 14). Figure 14. Error message display 10 Based on your screen resolution a horizontal or vertical bar may appear on the application screen. Use the scrollbars in order to navigate to the whole entry value area. Use the back button anytime you want to return to the Initial screen. Be careful as any data entries on your Quality Rating screen will be lost. 4.3 Evaluation Report Screen In the Evaluation Report View, you are presented with a description text and the relative color scale indication for the values you entered for soil, or water/compost according to the tab you select. The red color indicates a strong concern, orange is of medium concern, yellow is of light concern and green is an optimum value indicator. Figure 15: Evaluation Report View Use the tab buttons found on the left side of the evaluation screen in order to navigate through soil/water/compost evaluation report. You may again use the back button in order to return to the “Quality Rating” screen and modify your previously entered values. In that case, your data have been saved. In order to start a new evaluation session, you must navigate to the initial screen using the back buttons and select again the button “Quality Rating”. 11