1
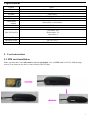
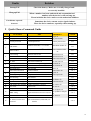
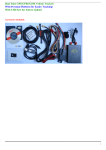
USER MANUAL -JB 200 Preface Thank you for purchasing the GPS tracker. This manual shows how to operate the device smoothly and correctly. Make sure to read this manual carefully before using this product. Please note that specification and information are subject to change without prior notice. Any changes will be integrated in later releases. The manufacturer assumes no responsibility for any errors or omissions in this document. 1 Content 1 Summary ------ ---------------------------------------------------------------------------------- 3 2 Applications ------------------------------------------------------------------------------------------ 3 3 Hardware description 3.1 Front face ------------------------------------------------------------------------------------------ 3 3.2 Rear face ------------------------------------------------------------------------------------------ 3 3.3 Side face ------------------------------------------------------------------------------------------- 3 3.4 Bottom face ------------------------------------------------------------------------------------------- 3 3.5 Interior ------------------------------------------------------------------------------------------- 4 -------------------------------------------------------------------------------------------- 4 4 Specifications 5 Usage 5.1 SIM card installation --------------------------------------------------------------------------- 4 5.2 Device setting --------------------------------------------------------------------------- 5 5.3 Startup --------------------------------------------------------------------------------- 5 5.4 Initialization ---------------------------------------------------------------------- ---- 5 5.6 Change or resume the password -------------------------------------------------------------- 6 5.6 Authorization -------------------------------------------------------------------------- 6 5.7 Real-time polling ---------------------------------------------------------------------------- 6 5.8 Auto track ---------------------------------------------------------------------------------- 5.9 Time zone setting ---------------------------------------------------------------------- 6 6 5.10 Geo-fence ----------------------------------------------------------------------- 7 5.11 Movement Alert ----------------------------------------------------------------------- 7 5.12 ---------------------------------------------------------------------- 7 ---------------------------------------------------------------------- 7 Overspeed Alert 5.13 IMEI Check 5.14 Setting a website ----------------------------------------------------------------------- 7 5.15 Adding the number to an online positioning platform -------------------------------- 7 5.16 Switch modes between"telephone "and"web 8 5.17 GPRS setting 6 Other settings 7 Caution --------------------------------------------- 8 -------------------------------------------------------------------- 9 --------------------------------------------------------------------------- ----------------------------------------------------------------------------------- 8 Faults & Solutions ------------------------------------------------------------------------------ 9 Quick glance command guide --------------------------------------------------------------------- 9 10 10 2 1. Summary This device works based on existing GSM/GPRS networks and GPS satellites. It can locate any remote target by SMS or GPRS. 2. Applications Vehicle rental / Fleet management / outer equipment management etc. Protection / tracking of: children / the elderly / pets etc. Personnel management etc. 3. Hardware Description 3.1 Front face 3.2 Rear face 3.3 Side face 3.4 Bottom face 3 4.Specifications Content Dim. Weight Network Band GPS chip GSM/GPRS module GPS sensitivity GPS accuracy Specs. 83mm x 50mm x 11mm 80g GSM/GPRS 850/1800/1900Mhz or 900/1800/1900Mhz or 850/900/1800/1900 SIRF3 chip Time To First Fix Storage Temp. Operation Temp. Humidity Simcom300 or Simcom340 -159dBm 5m Cold status 45s Warm status 35s Hot status 1s -40°C to +85°C -20°C to +55°C 5%--95% non-condensing 5. User instructions 5.1 SIM card installation Make sure that there is no call transfer and that call display is on, and PIN code is off. The SMS message must in Text format as the device cannot identify PDU formats. 4 5.2 Device setting GPS/GSM/GPRS tracker should be installed by technical professional of local service centre. Without permission, the user can’t repair and move the tracker randomly. If users do, any unfortunate damage should be compensated by himself. 5.2.1 Connect the power connection box: Insert the power line in the connection box. 5.2.2 Connect the power connection box: The red line connect the 12 v dc car battery anode, black line connect car battery cathode Note: the equipment is based on built-in GSM antennas and GPS antennas, please ensure receiving facing above (toward the sky), and no metal shield block. When install 5.3 Startup 5.3.1 Connecting the device to the car ,then put the simcard in the device until the green indicator bright .please put the device to the place which have the signal for the first using 5.3.2 Indicator light will flash with a short burst every 2 seconds (Blue light is not brighting means that the GPS module is working, but not getting the position, Blue lights is brighting means that GPS module is in working and getting the position. Green lights is flashing quickly means the terminal device is communicating ) 5.3.3 After the device receive the GPS signal normally, you can set any command in the user manual 5.4 Initialization Please use the cell phone number which is to be the main respondent to the device to set up these instructions. SMS “begin+password” to the device. The device will respond “begin ok” and all settings will be reset to default (default password: 123456). 5.5 Change or resume the password Send SMS "password+old password+#+new password "to the device to change the password. Remark: 5.5.1 Please remember the new password as the software will have to be reloaded to restore the original settings. 5.5.2 The new password must be 6 digits otherwise the device will not recognize the password. 5.5.3 "resume#password" can be sent to the device to restore the device to the default password (123456).it will respond with a " resume password ok " SMS . 5 5.6 Authorization The device can handle 5 authorized numbers. 5.6.1 SMS the device with “admin+password+#+cell phone number” to set up an authorized number. The rest of the numbers must be set up by the first authorized number. If the number is authorized successfully the device will respond with a “add admin number ok” SMS. 5.6.2 By calling the device 10 times it will automatically make that number an authorized number if no numbers has been authorized by SMS. 5.6.3 SMS “noadmin+password+#+authorized number” to delete an authorized number. 5.6.4 For roaming purposes the country code must be added before the cell phone number. E.g. admin123456#0027711112222 5.7 Real-Time Polling 5.7.1 If no numbers has been authorized and a number calls the device it will hang up and report the Geo-info to that number. If numbers has been authorized then when an un-authorized number calls the device it will not respond. 5.7.2 When an authorized number calls the device, it will hang up and report the Geo-info as follows: 5.8 Auto Track To report the Geo-info 15 times at 30 second intervals. 5.8.1 Set up: SMS “at030s015n+#+password” (at030s015n 123456) to the device. The reporting setting must be 3 digits and have a maximum of 999 in value. You can determine the timeslot yourself. 5.8.2 SMS “at030s***n+password” (at030***n 123456) to the device for unlimited tracking. 5.8.3 To cancel: SMS “noat+password” (noat 123546) to the device to cancel auto tracking. Remark: the interval must not be less than 20 seconds. 5.9 Time Zone Setting 5.9.1 In order to make the time the same as the user’s country please SMS “time zone+password+#+timezone” to the device. E.g. if the user country is GMT +2 then send “time zone123456#+02” to the device. The device will respond “set time zone ok”. 5.9.2 To cancel : SMS “notime zone+password” (notime zone123456) to cancel the time zone. Remark: There is a space between time and zone and the time zone setting must be 3 digits long. 6 5.10 Geo-fence Set up a Geo-fence to restrict the device to a certain area. The device will send an alert to the authorized numbers if the Geo-fence area has been breached. 5.10.1 Set up: When the device is immobile for 3 – 10 minutes the user can SMS “stockade+password+#+ latitude&longitude;latitude&longitude ( stockade123456#33.813322S,018.473574E;33.813111S,0.18.473688E)” to the device to set the restricted area. In case of a breach the device will respond with a SMS “stockade!+geo-info” to the authorized numbers. Remark: The first latitude & longitude the coordinates at the top left corner of the Geo-fence, while the second latitude & longitudeis the bottom right coordinates. 5.10.2 To cancel: SMS “nostockade+password” to the device to deactivate this function. It will not respond if the device moves out of the area. 5.11 Movement Alert 5.11.1 Set up: when the device is immobile for 3 – 10 minutes the user can SMS “move+password” to the device, to which it will respond “move ok”. In case of any movement the device will respond with a “device move” SMS along with the Geo-info to all the authorized numbers. 5.11.2 To cancel: SMS “nomove+password” to the device to deactivate the movement alert. 5.12 Overspeed Alert: 5.12.1 Set up: SMS “speed+password+#+080” to the device (supposing the limit is 80km/h) and the device will respond “speed ok”. When the device exceeds the 80km/h limit the device will send a SMS “speed+080! + Geo-info” to the authorized numbers. 5.12.2 To cancel: SMS “nospeed+password” to deactivate the speeding alert. Remark: It is recommended that the speeding alert is set at no less than 50km/h as below this rate clouds or other factors many influence the GPS signal. 5.13 IMEI Checking: SMS “imei+password” to the device to check the IMEI number. 5.14 Setting a Website 5.14.1 SMS: “home+password+#+website” Reply: “set home # website ok” 5.14.2 SMS: “nohome+password” to cancel In order to see your website in each replying SMS, E.g. if your website is www.webs***.com, then send "home123456 www.webs***.com" to the device to which it will respond “set home ok”. To cancel, SMS “nohome123456” to which the device will respond “cancel home ok”. 5.15 Adding the Number to an Online Positioning Platform 7 To add the number to an online positioning platform SMS “number+password+#+device number” to the device to which it will reply “set number ok”. E.g. “number123456#711112222”. A special platform is required for this function. 5.16 Switching Modes between “telephone” and “web” 5.16.1 For sending GPS data to an IP address: SMS “web+password” to the device. If successful the device will respond “set web ok”. Afterwards the device can be called, it will hang up and report the GPS data to the IP address. 5.16.2 For sending GPS data to a cell phone SMS “telephone+password” to the device. If successful the device will respond “set telephone ok”. Afterwards the device can be dialed, it will hang up and report the GPS data to the cell phone. 5.17 GPRS Setting In order to use the GPRS function, the user needs to set the IP, Port and APN (access point name) on the device. This is done as follows: Set up an IP address and port: SMS “ipport+password+#+ipaddress,port number”. If successful the device will respond “set ip address and port ok”. Eg: ipport123456#116.255.131.50,2332 5.17.2 To cancel: SMS “noipport+password” 5.17.3 Set up APN: SMS “apn+password+#+apn#”(local country APN name). If successful the device will respond “set apn ok”. Eg: apn123456#internet# Remark: The old APN will be invalid when you set a new APN. 5.17.4 Set up: SMS “apn+password+#+apn +","+apn name+","+apn password#" to set the APN user name and password. Eg: apn123456#internet,LIGONE,34789235# ( internet is APN , LIGONE is APN name ,34789235 is APN password ,"#" is ending symbol ) Remark: when set apn if there is no apn user name and password only set the command” apn+password+#+apn#” if there is apn user name and password only set the command “apn+password+#+apn +","+apn name+","+apn password#" 5.17.1 As soon as the IP, Port and APN are set up, the user can call or SMS the device after which the device will respond with the coordinates to the IP address. The message sent to the IP address by the device is as follows: Serial number + authorized number + GPRMC + GPS signal indicator + command + IMEI number + CRC16 checksum. E.g. The device will send the GPS coordinates as illustrated below. 8 6 Other settings SMS “others+password+#+ABCD” Reply: “set others/ABCD ok” Remark: A=0, close device sending reboot SMS (default) A=1, open device sending reboot SMS; B=0, close device "low battery and auto power off" B=1, open device "low battery and auto power off" (default) C=0, close device enter into blind area (there's no GPS signal) alarm (default) C=1, open device enter into blind area (there's no GPS signal) alarm D=0, prohibit system run normally before close all indicators (default) D=1, make the system run normally before close all indicators 7 Caution Please comply with the instructions to ensure the smooth running and extended device life: 1. 2. 3. 4. 5. 6. 7. 8. 9. Keep the device dry. Any liquid may short-circuit it. Keep away from dusty areas. Do not overheat or freeze the device. Handle carefully. Do not clean with chemicals or detergents. Clean with a dry cloth Do not paint the device. Do not take the device apart. Please use the battery and charger provided by the manufacturer. The use of other batteries and chargers can cause failure of the device. Do not remove the antenna or use other antennas. This will interfere with transmissions. 8 Faults & Solutions 9 Faults Solution Startup Fail Check the battery. Make sure it is fully charged and / or correctly installed. Hang up Fail When a number has been authorized and an unauthorized number calls the device it will not hang up. Please initialize the device and re-set the authorized numbers. Coordinates reported in zeroes. Sometimes the device cannot receive signals indoors. Place the device outdoors, especially when starting up. 9 Quick Glance Command Guide No 1 2 FUNCTION SMS Initialize Change password begin123456 password123456#666888 Resume password resume#password SMS REPLY CHAP begin ok 5.4 set password ok 5.5 resume password ok 5.5.3 admin123456#0027711112222 add admin number ok noadmin123456#0027711112222 cancel admin number ok 5.6.3 Auto tracking at030s015n#123456 auto track set ok 5.8.1 Continuous Auto tracking at030s***n#123456 auto track set ok 5.8.2 Cancel Auto track noat123456 cancel auto track ok 5.8.3 Set Time time zone123456#+02 set time zone ok Geo-fence stockade123456#geo-info;geo-info stockade ok 5.10.1 Cancel geo-fence nostockade123456 no stockade ok 5.10.2 Movement alert move123456 move ok 5.11.1 Cancel movement alert nomove123456 cancel move ok 5.11.2 Speeding alert speed123456#080 speed ok 5.12.1 Cancel Speeding alert nospeed123456 cancel speed ok 5.12.2 9 Imei checking imei123456 10 Setting a website www.webs***.com set home ok 5.14.1 11 Cancel website setting Nohome123456 Cancel home ok 5.14.2 12 Add number into platform number123456#711112222 set number ok 13 Web mode web123456 set web ok 5.16.1 Telephone mode telephone123456 5.16.2 GPRS setting ipport123456#116.255.131.50,2332 set telephone ok set ip address and port 15 Set APN apn123456 #internet# 16 Set APN user name and password apn123456#internet,LOGONE,347 89235# 3 Add number Delete number 4 5 6 7 8 14 5.6.1 5.9 5.13 ok set APN ok 5.15 5.17.1 5.17.3 5.17.4 10