1
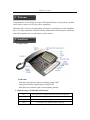
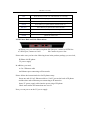
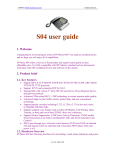
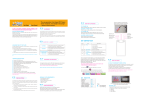
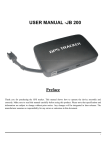
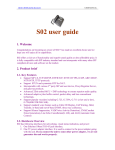
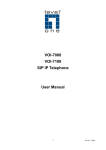
SIP-6002 User Guide
SIP-6002
User Guide
1
SIP-6002 User Guide
Directory
1. Welcome---------------------------------------------------------------------------------3
2. Installation-------------------------------------------------------------------------------3
3. Setup Guide----------------------------------------------------------------------------- 4
4. Additional functions--------------------------------------------------------------------9
5. Product Use Environment------------------------------------------------------------10
2
SIP-6002 User Guide
1. Welcome
Congratulations on becoming an owner of SIP-6002 IP Phone! You made an excellent
choice and we hope you will enjoy all its capabilities.
SIP-6002 offers a rich set of functionality and superb sound quality at ultra affordable
price. It is fully compatible with SIP industry standard and can interoperate with many
other SIP compliant devices and software on the market.
2. Installtion
2.1 Appearance:
LED status
Red and green indicator light are birghting ,using VOIP.
Only green indicator light brighting ,using PSTN.
Red and Green indicator light are not birghting ,handup.
2.2 Function Keys of SIP-6002 introduction:
SET
Press this key to configure date, time and LCD’s brightness.
STORE
Press this key to store phone NO. to M1-M9.
VOIP
Press this key to change PSTN or VOIP line.
DEL
Press this key to delete the input wrong NO.
3
SIP-6002 User Guide
OUT
Press this key to look over outbound NO. in 6 recently.
CHECK
Press this key to gain the NO. from M1-M9.
UP/DOWN
Press this key to turn over the inbound NO. in 4 recently.
BACK
Press this key to quick dail the outbound NO. in 1.
RECALL
Press this key to gain the NO. from M1-M9.
HOLD
Press this key to hold a calling.
PAUSE
Press this key to pause a calling.
FlASH
Quick cut off the call.
2.3 IP Phone Back and Side Illustrations:
A: Phone port, you can connect an phone. B: Line port, connect to PSTN line.
C: RJ-45 port, connect to LAN.
D: Connect to power line.
Please make sure you have the following items in the product package you received,
IP-Phone 100 IP phone
5V power supply
In addition, you need,
A Cat-5 Ethernet cable
An Ethernet port connecting to IP networks
Please follow the instruction below for IP phone setup:
Insert one end of Cat-5 Ethernet cable to “LAN” port on the back of IP phone
and the other end to Ethernet port connecting to IP networks.
Insert 5V power supply cable into the power plug of IP phone.
Check and confirm all connections are correct.
Now you can power on the 5V power supply.
4
SIP-6002 User Guide
3. Setup Guide
It is possible that this product has been pre-setup by either a service provider or
network manager. Then user’s own configurable settings can be very limited. However,
if end user is allowed to make changes to the system and service settings, the following
are the instructions for your device setup.
End user needs to get the following information from his/her service provider or
network manager,
IP address: if it is static, subnet and network gateway IP address, or user DHCP.
SIP proxy server IP address and any registration information.
User information such as user ID and password.
3.1 Setup with Keypad
Pressing “**00” to enter SIP-6002 setup menu. You can use keypad referencing
following menu to do basic network setup. Please use web browser to do more
advance setup.
Option
Code
User Input
Notes
============================================================
Enter configuration menu
**00
None
After “Setup menu”,
enter option and end
by “#”
----------------------------------------------------------------------------------------------------Check DHCP
10
None
Announce DHCP
Status on or off
----------------------------------------------------------------------------------------------------Set DHCP
11
1 to enable
Press “#” to confirm
0 to disable the input
----------------------------------------------------------------------------------------------------Check IP Address
20
None
----------------------------------------------------------------------------------------------------Set static IP Address
21
Enter value using End input
numbers on the
by ‘#’
telephone pad.
Use‘*’when enter
a decimal point.
----------------------------------------------------------------------------------------------------Check Subnet Mask
30
None
-----------------------------------------------------------------------------------------------------
5
SIP-6002 User Guide
Set Subnet Mask
31
Enter value using
End input
numbers on the
by ‘#’
phone pad. Use ‘*’
for decimal point.
----------------------------------------------------------------------------------------------------Check Gateway
40
None
----------------------------------------------------------------------------------------------------Set Gateway
41
Enter value using
End input
number on the
by ‘#’.
phone pad. Using
‘*’ for decimal
point
----------------------------------------------------------------------------------------------------Check primary DNS
50
None
Server setting
----------------------------------------------------------------------------------------------------Set Primary DNS Server
51
Enter value using
End input
number on the
by ‘#’.
phone pad. Using
‘*’ for decimal
point
----------------------------------------------------------------------------------------------------Manual Reboot
9999
None
Automatically
Reboot after
“hang up”
----------------------------------------------------------------------------------------------------Manufacture Reboot
79898
Enter “1” to
will reboot and all
Confirm
the datas will return
Enter “*” to
to the original form
cancel
=============================================================
3.2 Setup with Web Browser
1. After you have got your IP phone’s IP address, you can use web browser for
system setup within the same subnet.
2. Enter http://<Phone IP address>/, where <Phone IP Address> is the said IP
address of your IP phone.
3. Web browser will show the webpage interface of the system setup menu.
Choose “Admin Login” to enter administrator setup.
If your IP Phone is in a LAN and your LAN connects to Internet through a
firewall (with NAT), your IP phone’s IP address will be private. Your system
settings should include the follows,
6
SIP-6002 User Guide
3.2.1 Choose outbound proxy server for NAT traversal
Under User Account Setup
Set “User ID” to the number provided by your service provider. If you use
FWD, here you can put your FWD number e.g.180000. As for how to get free
FWD number, please check details of http://www.fwd.pulver.com.
Set “Password” to the password provided by your service provider.
Under Proxy Server Setup
Set “Proxy” to the SIP proxy server IP address or domain name. In FWD case,
it is “fwd.pulver.com”.
Set “Use Outbound Proxy” to “yes”.
Set “Outbound Proxy” to be the outbound proxy server IP address or domain
name. In FWD case, it is http://fwdnat.pulver.com:5082.
At bottom of the pager:
Click “Save Changes” to apply the changes.
3.2.2 Choose STUN server for NAT traversal
Under User Account Setup:
Set“User ID”to the number provided by your service provider. If you use
FWD, here you can put your FWD number e.g. 180000.
Set “Password” to the password provided by your service provider.
Under Proxy Server Setup:
Set “Proxy” to the SIP proxy server IP address or domain name. In FWD case,
it is “fwd.pulver.com”.
Set “Use Outbound Proxy” to “no”.
Under NAT Support:
Set“NAT Mapping Enable”to “yes”.
Set“NAT Keep Alive Enable”to “yes”.
Set “Substitute VIA addr” to “yes”.
Set “Stun Enable” to “yes”.
Set “STUN server” to be one of the public STUN server IP address or domain
name. For an example, http://stun01.sipphone.com.
7
SIP-6002 User Guide
At bottom of the pager:
Click “Save Changes” button to apply all the changes.
3.2.3 If your IP Phone is connected to the Internet directly, your IP phone’s IP
address will most likely be public IP address. Your setting should be,
Under User Account Setup:
Set“User ID”to the number provided by your service provider. If you use
FWD, here you can put your FWD number e.g. 180000.
Set “Password” to the password provided by your service provider.
Under Proxy Server Setup:
Set “Proxy” to the SIP proxy server IP address or domain name. In FWD case,
it is “fwd.pulver.com”.
At bottom of the pager:
Click “Save Changes” button to apply all the changes.
3.3 Call features
Name
Code
Description
-------------------------------------------------------------------------------------------------Call forward
*31
forward all calls to the target specified after
the activation code.
Example:
A with number 1000, B with number 2000,
pick up A, key in *312000, then hang up.
when number 1000 is called, B rings instead
of A. This will stay until someone picks up
A, then key in *32.
---------------------------------------------------------------------------------------------------Cancel call forward
*32
cancel call forward code
---------------------------------------------------------------------------------------------------Call transfer
None
example: A call B, B transfer A’s call to C.
1)A dial B’s number.
2)B answer, then click hang up hook. After
head a dial tone, key in C’s number.
3)After C answers the phone, B hang up,
A’s call will transfer to C.
---------------------------------------------------------------------------------------------------Three way conference
None
example: A call B and C for conference.
1)A dial B’s number.
8
SIP-6002 User Guide
2)After B answered, A(or B)click hang up
hook.
3)After A(or B)heard a dial tone, A(or B)
dial C’s number.
4)After C answered, A(or B)click hang up
hook again, Three way conference is on.
------------------------------------------------------------------------------------------------------
4. Additional Functions
4.1 Function
35 inbound call log
6 outbound call log (number and time).
Auto redial
One key redial
3 sets clock alarm
9 key to store the NO.
4.2 Function setting
4.2.1 Setting mode:
When the unit is under hang up status, push “SET” key to enter setting mode.
The functions will show on LCD. Using “UP” and “Down” key to select the
function you want to set.
Pushing “SET” key again to enter the function. When you finish one setting,
pushing “SET” to enter next one. Using “UP” and “DOWN” key to select the
data. Using “DEL” key to exit setting mode.
4.2.2 Function operating
9
SIP-6002 User Guide
Inbound Call log search: After pick up the phone, you can use “UP” and
“DOWN” key to search inbound call number and use “OUT” and “UP” key to
search outbound call number. Pushing “REDIAL” key. The number shows on
LCD will dial out.
Outbound Call log search: Pushing “OUT ” key to enter outbound call search.
Using “UP” key to search recent outbound call number. LCD shows the
number one by one. Pushing “REDIAL” key. The number shows on LCD will
dial out.
Auto redial: When head a busy tone after you dial out, pushing “BACK” key,
the unit is going into auto redialing status.
Musical hold: After phone has been picked up, push “hold” key to enter
musical hold, hold musical start, then put down the handset. If
Pick up handset again, musical stop, it will be back handset using status.
Push “speak “ button, musical stop, it will be speak using status.
Push “Hold” button again, it will be speak using status.
Call time: As soon as phone is picked up, the call time starts to count.
Clock alarm: When alarm is on, the alarm ring will last a minute start from the
alarm time. Push any key to cancel alarm.
Store and fetch number
Store number: When phone is hang up status, press the stroe,key in the
number, push “store” key, then push store location key (such as M1- M9).
Fetch number: Push CHECK or RECALL,the press M1- M9, the number
stored in the location will dial out.
5. Product Use Environment
SIP-6002 is recommended to work as in-door equipment.
10