1
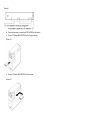
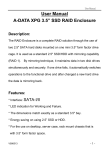
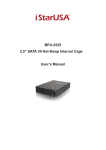
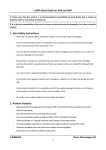
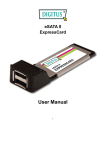
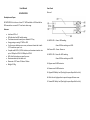
User Manual BP-SATA2221B Front Panel Picture A Description and Specs: BP-SATA2221B is for the use of two 2.5” SATA hard disk or SSD hard disk or SSD mounted on one mini 3.5” form factor drive cage. Features: Interface: SATA x 2. LED indication for HDD and Accessing. The dimension match exactly as a standard 3.5” bay. Energy saving on using 2.5”HDD or SSD. For the use on desktop, server case, rack mount chassis that is with 3.5” form factor space… etc. Complies with SATA-I, SATA-II interface, and maximum transfer rate up to 1.5Gbps for SATA-I & 3.0Gbps for SATA-II. HDD Auto Eject when you open the cover. Aluminum material, best heat sink. Dimension: 101.7mm x 25.8mm x 146mm Weight: 0.23kg A1: HDD 0 LED -- Green: HDD working. Green Off: Not working or no HDD. A1a: Power LED – Green: Power on. A2: HDD 1 LED – Green On: HDD working. Green Off: Not working or no HDD. A3: Upper cover & HDD extractor. A4: Lower cover & HDD extractor. A5: Upper HDD Safety Lock (Push right to open & push left to lock). A6: Push the rise high position to open the upper & lower cover. A7: Lower HDD Safety Lock (Push right to open & push left to lock). Picture B Picture D B1: SATA 15pin power connector. B2: SATA 7pin data connector for HDD 0. B3 SATA 7pin data connector for HDD 1. Hardware Installation Procedures Safety Lock Upper HDD Safety Lock & Lower HDD Safety Lock. (Push right to open & left to lock.) See Picture C. Picture C HDD Installing Open the upper & lower cover and put the HDD inside the cage. You can install one HDD or two HDDs. (See Picture D) Please follow the following procedures to complete the hardware installation: 1) Open the package and take out the product and make sure the product is brand new and all the necessary parts are included. If damage or shortage occurred, please contact your distributor or where you bought. 2) Unlock the upper and lower cover (See Picture C), push the lock rightward and open the two covers and then, put the two 2.5” SATA HDD inside the box (See Picture D). 3) After both HDDs installed, push both covers back like Picture C and then, push the lock button leftward to lock both covers to secure the HDD inside properly. 4) Then, mount the BP-SATA2221B on the 3.5” space using the included screws to mount it on the device (desktop, case…, etc.) and make all the cable connected properly and it is ready for use. 5) See the drawing the two ways to mount BP-SATA2221B on the device. (See Picture E) Picture E 6) There are two ways to mount the BP-SATA2221B on the device: Picture F-1: Mount BP-SATA2221B on the floppy drive bay. Picture F-1 Picture F-2: Mount BP-SATA2221B inside the case. Picture F-2