1
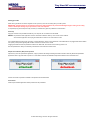
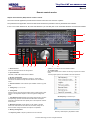
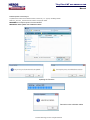
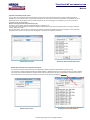
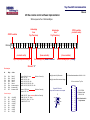
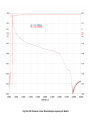
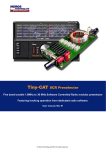
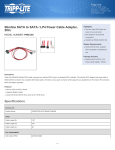
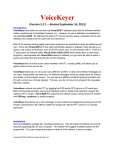
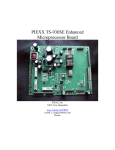
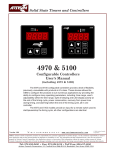
Tiny Plus-CAT
SCR Preselector
Five band Tunable 1.8MHz to 30 MHz Software Controlled Radio Preselector
Featuring tracking operation from dedicated radio software.
User manual. Rev 01
© Heros Technology Ltd 2012. All rights reserved.
Tiny Plus-CAT SCR PRESELECTOR
Manual
Features:
Tiny Plus-CAT SCR preselector is connected in line between the antenna and your
receiver or transceiver providing filtering of R.F.spectrum to reduce broadband signal
energy into the receiver.
Note: If the preselector is connected to a transceiver take precautions to prevent
transmitting through it. An Input/Output by-pass dual power relay accessory is
available to by-pass the preselector in transmission. FlexRadio user do not need
external by-pass relay; see Owners_Manual, Primary antenna ports configuration.
Suitable to work with SDR or analogue radios.
Tiny Plus-CAT preselector is remotely operated from a personal computer via USB or from a radio or digital system supporting I2C bus data communication. The software application runs on PC under Windows 2K, XP, Vista and Windows 7 (32 & 64 bits) OS.
Four remote control modes:
- CAT serial protocol over Virtual Com Port (VCP), Kenwood TS-2000 protocol.
- Over the Internet or Local Network. (TCP/IP protocol).
- Graphic User Interface (GUI) on PC.
- I2C bus from an external radio or digital system.
CAT remote control. Tracking feature.
CAT (Computer Aided Transceiver), serial data communication protocol over
Virtual Com Port (VCP) enables Tiny Plus-CAT preselector to provide the user
with a way to interface with several radios. The microcontroller on board translate
valid CAT commands into specific instructions. The user can operate the
preselector from remote control software such as Power SDR, DDUtil, HamRadio
de Luxe, SDR Console, HDSDR, SDRMAX, etc., radio Logging programs, N1MM
and others, CAT utilities like CSP Manager, OmniRig and SDRMAX-CAT Connection among others.
Technical features:
■ Tuneable Band Pass Filter bank for HF Bands covering 1.8 to 30 MHz.
■ Five selectable bands more preselector By-Pass.
■ Passive Band Pass Filters.
■ Removes strong signals radiated back to the antenna from SDR quadrature mixers.
■ No active switching or amplifier devices in the signal path, therefore it does not contribute to IMD (Intermodulation Distortion).
■ High linearity (IP3). Suitable for Software Define Radios and analogue receivers.
■ Two antenna inputs.
■ 0dB, 6dB, 12dB, 18dB input attenuator.
■ Embedded 110dB stop band Broadcast Band Rejection Filter. (AKA, BCB filter, Brick Wall filter, MW band killer filter).
■ Embedded 7th order, 30MHz, Elliptic Low Pas Filter for FM
broadcast band rejection.
■ Five Band Pass Filters: Tapped mono coil wound on large
toroidal T-200 iron core avoiding saturation in front of large
signals.
■ Digital tuning. Eight bits variable digital capacitor.
■ PTT feature enables by-passing the preselector in transmission allowing connecting in-line with a 100 Watts transceiver.
(with Input/Output by-pass dual power relay accessory).
■ 12V DC/1Amp DC max. output cinch connector for a 150
Watts RF rating Input/Output by-pass dual power relay.
(PTT or Keying line activated)
■ Mini Din connector for I2C control lines from an external radio
or digital system.
■ USB type B connector.
■ Power supply: 12Volts DC/ 0.5Amp max. 2.5mm plug power
connec-tor.
■ Dimension: 1650mmx165mmx52mm(6.496x6.496x2.047in).
■ Weight: 1Kg.
USB
■ Full speed USB v2.0 compliant.
■ Plug and Play feature.
■ Optocoupled USB sense signal.
I2C bus.
■ I2C bus lines Galvanically isolated(ADuM1251).
■ 16 bits standard I2C Bus serial bus interface. PCF8575 I2C controller.
■ Supports 100Kbits/s and 400kbits/s FAST I2C Bus protocol.
■ Compatible with most microcontrollers.
© Heros Technology Ltd 2012. All rights reserved.
12V/1Amp output for dual RF power relay.
(By-passing preselector in line with a transceiver)
In Circuit Serial Programming
Service Connector
PTT
Keying line
Antenna 1
Input
Filtered
Microcontroller
Antenna selection
USB remote from PC:
GUI
CAT- VCP
TCP/IP
EMC / ESD
Protection
PIC 18F2455
Gas Discharge Tube
USB mode
(from PC)
Antenna 2
Input
External I2C remote mode
2
1
Control Bus
Gas Discharge Tube
3
4
I2C bus remote
Galvanic Isolator
I2C controller
Relay drivers
Preselector By-Pass
Preselector By-Pass
Broadcast band rejection filter
(BCB filter)
Band A
Band B
Band C
Band D
Band E
Z Match
La
Lb
Lc
Ld
Le
Z Match
1.8MHz to 30MHz.
Five Band Pass Filters Bank.
(tapped monocoil on T200 toroidal iron core.)
Input attenuator
- 0dB
- 6dB
- 12dB
- 18dB
8 bits/256pf variable capacitor
1pf resolution
30MHz 7 poles Elliptic LPF module
(FM band rejection)
Tiny Plus-CAT SCR Preselector. Diagram
Preselector
Output
Tiny Plus-CAT SCR PRESELECTOR
Manual
2
3
1
1 - Switch Power-ON.
2 - LED Power-ON
3 - Remote control mode.
USB remote control mode
I2C remote control mode
9
1
2
4
3
8
5
6
7
1 - BNC connector, RF output 50Ω.
2 - Chinch connector. Output to external Antenna By-Pass relay , 12V DC/1Amp max..
3 - Jack 3.5mm. PTT/Keying line switch Input. 13mA close to ground.
External I2C Bus
Line Input
4 - USB connector. Type B.
J7
5 - Mini-Din 4 ways connector. I2C bus lines input.
Gnd
+12V DC
6 - Power Jack 2.5mm. Input DC12V/500mA max.
+
SCL
SDA
7 - BNC connector, antenna 2 input 50Ω.
(Front view)
8 - BNC connector, antenna 1 input 50Ω.
9 - Earth post.
2
1
© Heros Technology Ltd 2012. All rights reserved.
3
4
CAT remote control from dedicated radio software,
Power SDR, Ham Radio de Luxe, HDSDR, ....
Logging software, N1MM....
VCP management software, vspMgr, DDUtil, Omni-Rig, ....
Optional USB Galvanic isolator
Virtual COM port
Virtual COM port
Optional USB Galvanic isolator
USB cable
Receiver antenna
Antenna 1
Input
RF Output
Earth
Antenna 2
Input
Generic radio
12VDC/500mA max.
+
Earth
Tiny Plus-CAT. Tracking feature over VCP. CAT protocol.
© Heros Technology Ltd 2012. All rights reserved.
Tiny Plus-CAT SCR PRESELECTOR
Manual
USB Plug and Play.
Remote control from PC
Optional USB Galvanic isolator
USB cable
Antenna 1
Input
RF Output
Antenna 2
Input
-+
Receiver
Antenna
12VDC/500mA max.
Generic radio
Earth
Tiny Plus-CAT Interconnection. In line with a receiver.
© Heros Technology Ltd 2012. All rights reserved.
Tiny Plus-CAT SCR PRESELECTOR
Manual
Optional USB Galvanic isolator
USB cable
150 Watts RF rating Input/Output by-pass dual power relay.
RF Output
(model: Default By-Pass)
Antenna 1
By-pass relay control
Antenna
Input
Earth
PTT/Keying line
13mA close to ground
Generic radio
Transceiver
Antenna
Tiny Plus SCR Preselector interconnection. In line with a 100W Transceiver.
© Heros Technology Ltd 2012. All rights reserved.
Tiny Plus-CAT SCR PRESELECTOR
Manual
Starting procedure
Select among the above connection diagrams to set-up the Tiny Plus-CAT according with your radio system.
IMPORTANT: If the preselector is connected to a transceiver take precautions to prevent transmitting through it. Failing to do so may
result in catastrophic damage of your preselector, radio, and computer..
An Input/Output by-pass dual power relay accessory is available to by-pass the preselector in transmission.
Power Up.
Copy the contents of the provided CD-ROM on your computer, do not execute from CD-ROM.
NOTE: The preselector GUI application must be closed before interface with any CAT remote control software.
Close the GUI application and unplug the USB cable to switch to I2C mode remote control.
Use a reliable external power supply providing 12 Volts/ 500mA DC. Switch-on the preselector; if the USB cable is not plugged both LED located in
front panel (2 and3) will lit signaling ON condition and I2C bus remote control mode.
Plugging the USB connector the preselector switches to USB mode, LED remote control mode (3) will turn off.
Now the preselector is ready to be remotely controlled from GUI mode and TCP/IP mode.
Graphic User Interface (GUI) mode operation.
Open the tiny Plus-CAT preselector application; a pop-up window will emerge indicating the USB connection status. By default the preselector
application starts in by-pass state on power-on. In this state all controls are disabled except antenna selection and contextual menu.
Control and modes of operation available to the operator are itemised below.
Power Down.
Close all open related applications before power down the preselector.
© Heros Technology Ltd 2012. All rights reserved.
Tiny Plus-CAT SCR PRESELECTOR
Manual
Remote control modes:
Graphic User Interface (GUI). Remote control console.
The control console application provides manual remote control from PC and a set of options.
The preselector GUI application must be closed before interface the preselector with any dedicated radio software.
It runs on PC under Windows 2K, XP, Vista and Windows 7 (32 & 64 bits) OS. It is an executable file does not need to be installed.
11
10
80m
Beacon
1
9
2
3
4
5
6
1- Band selection.
Click over band push-button to change band.
7
8
updated in accordance with the calibration tables.
11- Context menu.
Right mouse button click on dial or function key F2 opens the context
menu.
A set of program options are available to the user as follows:
2- Input attenuator.
0dB, 6dB, 12dB, 18dB of attenuation available.
3- By-Pass push-button.
By-passes the preselector. Default on power-on. In this state
all controls are disabled except antenna selection and contextual
menu.
4- Antenna selection. Two antenna input available. Active in by-pass
state.
5- Tuning step. x1, x2, x5, x10
6- Tuning knob.
Performs tuning rolling the mouse wheel. Also by pressing left or right
arrows on the keyboard. Adjust to maximum signal or background
noise.
Set Frequency. Function key F3
7- Tune Reference Dial. Displays the actual tuned frequency and the
corresponding capacitor value. Notice the attenuation of the pass
band filters increases with less capacity due to the response of series
tuned circuits.
8- Mnemonic text box. A brief caption can be written in the text
boxes. Five memories for each band can be stored, twenty-five in
total. On band change memories and captions are updated.
9- Memory management.
Enter any valid frequency expressed in MHz.
10- Frequency scale. Frequency references on the scale are
© Heros Technology Ltd 2012. All rights reserved.
Tiny Plus-CAT SCR PRESELECTOR
Manual
Calibration table
Write calibration tables. modes. Function key F5
IMPORTANT: Keep safe a back-up of the calibration tables.
Calibration tables are needed by the microcontroller on board to translate frequency CAT commands
into tune capacity values.
Tiny Plus-CAT Preselector comes calibrated from factory. Whenever the user can do recalibration
with the aid of the calibration tables for each band.
The Tiny Plus-CAT Preselector program folder contains five documents so-called
table_BAND_A.txt
table_BAND_B.txt
table_BAND_C.txt
table_BAND_D.txt
table_BAND_E.txt
The tables link the operating frequency with the tuning capacity value, comprised between 0 and
255. That value can be read on Tune Reference Dial (7)
The column on the left is the capacity value, on the right the frequency related in MHz.
With the aid of a reference frequency or receiver, values in the calibration tables can be modified.
Up to 64 reference points can be added to the list. Intermediate values in the table are computed
by the microcontroller on board.
To calibrate, tune the preselector at maximum reference frequency or background noise on your
receiver; enter in the table the capacity value shown in the Tune Reference Dial (7) and the
reference frequency from your RF generator or receiver dial. Frequency must be expressed in MHz.
Next, calibration tables must be uploaded into the microcontroller; function key “F5” opens the
message box.
Uploading calibration tables.
After upload close the program and open again. The microcontroller on board
resets, starts again and reads the new calibration tables.
If writing tables a sintaxis error occurs a warning message is show when the program is open
again.
Logfile. Function key F6
A Logfile is generated each time that the Tiny Plus-CAT application
is opened . It is helpfull to diagnosis purposes.
Function key “F6” opens the Logfile.
Also the file can be found in the program folder.
© Heros Technology Ltd 2012. All rights reserved.
Tiny Plus-CAT SCR PRESELECTOR
Manual
Firmware update. Function key F7
To update the on board microcontroller firmware, Function key “F7” pops-up the dialog window.
Select Tiny_Plus-CAT_ firmware.hex file, located in the program folder.
WARNING! Do not stop the process, wait until finished.
IMPORTANT: After update write calibration tables.
Updating the Firmware
Remember write calibration tables
© Heros Technology Ltd 2012. All rights reserved.
Tiny Plus-CAT SCR PRESELECTOR
Manual
Internet/Local network remote control
The Tiny Plus-CAT preselector supports connections via the Internet and Local network.To make use of this feature execute the
application on your computer and on a remote one.The protocol only uses TCP/IP; UDP which by definition is unreliable is not used.
Remember that you are accepting incoming TCP/IP connections so you must configure your firewall on your PC and on external
hardware firewall. See details below.
Remote server (preselector side) Function key F9
To start the communication open first the Remote Server, Function key “F9”.
The connection console is displayed showing the address in dotted format of the computer where the server is running and the port
number, default port 51000.
Click on Start button. If the connection is successful you will start to receive commands from the client computer, current commands
are traced on the console. The Tiny Plus-CAT will respond in accordace with valid CAT commands.
Remote Server console
Receiving data from the Remote Client
Remote Client (remote control side) Function key F8
To connect to the server make sure the server is started and is listening. Open the Remote Client, Function key “F8”.
The connection console is displayed showing the default address in dotted format of the host computer and the port number, default
port 51000. Enter the Host IP address in the text window and start operating the Tiny Plus-CAT application. Executed commands on
the GUI are traced on the console. Also valid CAT commands can be send from the text box.
Remote Client console
Sending data to the Remote Server
© Heros Technology Ltd 2012. All rights reserved.
Tiny Plus-CAT SCR PRESELECTOR
Manual
Send CAT command. Function key F10
Let send valid CAT commands for testing purposes.
BU;
© Heros Technology Ltd 2012. All rights reserved.
Tiny Plus-CAT SCR PRESELECTOR
Manual
Network Configuration
Public IP Address.
To make your Tiny Plus-CAT Remote server visible to the outside world you must have a public IP address; this is an address that is reachable on
the global Internet. Some ISP's assign public addresses which may change from time-to-time; this is known as a dynamic IP address.
Firewall configuration
You must allow incoming TCP/IP connections on the port number selected in the Remote server's Console, by default this port number is 51000.
You may have more than one firewall activated on your router and Windows Firewall. If the Windows firewall is enabled then when you start the
Remote server for the first time you will see a popup window as below (from Windows Vista)
Unblock
Windows Firewall
© Heros Technology Ltd 2012. All rights reserved.
Tiny Plus-CAT SCR PRESELECTOR
Manual
Anti-virus.
Make sure you do not have anti-virus software inspecting and/or blocking TCP/IP traffic on the server port.
Port Forwarding
As well as allowing incoming TCP/IP connections on port 51000 you must route connections on this port to
the computer where the server is running, this is known as Port Forwarding.
Depending on your router configuration software this may be referred to as Firewall> Virtual Servers, Port
Forwarding, Forwarding - Virtual Servers,etc.
The screenshot below is from a Belkin router.
© Heros Technology Ltd 2012. All rights reserved.
Tiny Plus-CAT SCR PRESELECTOR
Manual
USB driver software installation. 32-64 bits OS.
When plugging for the first time to the USB port the system will ask for install
the driver software.
- Ignore the “Found New Hardware” window and go to “Device Manager”
path: Control Panel/System/Device Manager`.
- Rigth mouse button on “Heros Tech Tiny Plus-CAT 2012” and click on
“ Update Driver Software”
- Click on “Browse my computer for driver software”
© Heros Technology Ltd 2012. All rights reserved.
Tiny Plus-CAT SCR PRESELECTOR
Manual
Locate “Tiny Plus-CAT SCR Preselector.inf” file in the Tiny Plus-CAT folder and click “Next” button.
Click on “Install this driver software anyway.
© Heros Technology Ltd 2012. All rights reserved.
Tiny Plus-CAT SCR PRESELECTOR
Manual
Installing driver software
Driver succesfully installed
A Virtual Com Port has been created over the USB port
© Heros Technology Ltd 2012. All rights reserved.
Tiny Plus-CAT SCR PRESELECTOR
Manual
CAT remote control. Kenwood TS-2000 compatible.
CAT (Computer Aided Transceiver), serial data communication protocol over Virtual Com Port (VCP) enables Tiny Plus-CAT preselector
to provide the user with a way to interface with several radios. The user can operate from remote control software such as Power SDR,
DDUtil, HamRadio de Luxe, SDR Console, HDSDR, SDRMAX, etc., radio Logging
programs, N1MM and others, CAT utilities like CSP Manager, OmniRig and SDRMAXCAT Connection among others.
Refer to your specific software application manual about CAT operation.
The microcontroller on board translate valid CAT commands and responds in accordace.
Starting in CAT remote control mode.
NOTE: The preselector GUI application must be closed before interface with any remote
control software.
Power-On the preselector and plug the USB cable, a new virtual COM port is open; start
and configure your application to control remotely the preselector.
An example of working with HamRadio Deluxe.
When the application is open, a connection console will emerge, select parameters in
accordance with your
hardware.
In order to test CAT commands go to TOOLS/CAT command tester.
Conexion console on HamRadio Deluxe
CAT command tester on HamRadio Deluxe
© Heros Technology Ltd 2012. All rights reserved.
Tiny Plus-CAT SCR PRESELECTOR
Manual
CAT control commands list (Kenwood 2000 compatible)
CAT CONTROL COMMANDS. General information.
A CAT control command is composed of an alphabetical command, parameter, and the terminator that signals the end of the control command.
EXAMPLE: Command to set tune frequency to 14.250 MHz
Alphabetic command (prefix)
Parameter(11 digits)
Terminator (semicolon)
FA00014250000;
There are three command categories: Set (write) command that change preselector status, Get (read) command that request status
information from the preselector and Answer (response) command that return information requested in a Get command.
A correctly executed Set command does not return an Answer command.
The terminator for all CAT commands is the semicolon (;). CAT commands are not case sensitive. Get and Set commands must contain the
correct number of parameter characters as shown below. Get commands are simply the prefix followed by a termination.
Tiny Plus-CAT preselector. Available CAT commands.
Band commands: prefix BNx (x band number, 1 digit ; ). SET commands
BN0;
By-Pass
BN1;
Band A
BN2;
Band B
BN3;
Band C
BN4;
Band D
BN5;
Band E
BU;
Band-up
ZZBU
(PowerSDR)
BD;
Band-down
ZZBD;
(PowerSDR)
BN;
(answer: BNx; where x is the band number) request information about Band status. GET command.
Frequency commands: prefix FA (band number, 11 digit ; ). frequency in Hz. SET commands.
FA000xxxxxxxx;
(e.g. 3.8MHz FA00003800000, e.g. 21.315MHz FA00021315000
ZZFA;
(PowerSDR)
FA;
(answer FA000xxxxxxxx;) request information about frequency status. GET command.
Antenna commands: prefix ANx (x antenna number, 1 digit ; ). SET commands.
AN1;
antenna 1.
AN2;
antenna 2
AN;
(answer ANx; where x is the antenna number) request information about antenna status. GET command.
Attenuator commands: prefix RAxx (xx attenuator number, 2 digit ; ). SET commands.
RA00;
attenuator 0dB
RA06; or RA01;
attenuator 6dB
RA12; or RA02;
attenuator 12dB
RA18; or RA03;
attenuator 18dB
RA;
(answer RAxx; where xx is the attenuator value) request information about attenuator status. GET command.
Tune capacity commands: ( non standard Kenwood) prefix CPxxx (xxx capacity value (pF.), 3 digit ; ). SET commands.
CPxxx;
(e.g. CP210; sey capacity to 210pF, e.g. CP009; set capacity to 9pF).
CP;
(answer CPxxx; where xxx is the capacity value in pF.) request information about tune capacity status. GET command.
© Heros Technology Ltd 2012. All rights reserved.
Tiny Plus-CAT SCR PRESELECTOR
Manual
I2C bus remote control mode.
Tiny Plus-CAT preselector features remote control mode from an external radio or digital system supporting I2C bus data communication
system. It operates totally independent of other remote control modes.
The on board I2C slave controller is based on the widespread PCF8575, a 16 bits I/O expander, follow by a pair of ULN 2803 Darlington
transistor array drivers interfacing with the system relays.
I2C lines are Galvanically isolated by means of ADuM1251 a hot swappable digital isolator specialised device from Analog Devices Inc.
External master controller must implement the control software detailed in the table below.
I2C address from factory is 0100000. Address can be changed accessing to the main board.
Starting I2C bus remote control mode.
Unplug the USB cable and Power-On the preselector, the preselector starts in I2C bus mode and will remain in that state until the USB cable is
plugged again. I2C signal lines SDA, SCL, +12V and Ground from the I2C controller are connected to a 4 ways miniDin socket on rear panel.
Pinout cabling is shown below.
External I2C Bus lines
4 ways mini-Din connector pin-out
+12V
2
1
SCL
Gnd (isolated)
3
4
SDA
(Front view)
© Heros Technology Ltd 2012. All rights reserved.
Tiny Plus-CAT SCR PRESELECTOR
Manual
I2C Bus remote control software implementation
Write sequence.Two 8 bits data Bytes.
Acknoledge
from
Tiny Plus(slave)
START condition
SDA line
S
0
1
0
0
A2 A1 A0
0
Acknoledge
from
Tiny Plus(slave)
STOP condition
(controller ends)
0 P07 P06 P05 P04 P03 P02 P01 P00 0 P17 P16 P15 P14 P13 P12 P11 P10
(controller calls)
(from controller)
(from controller)
Tiny Plus(slave) Address Byte
First Data Byte(Port0) Bands & Functions*
Second Data Byte(Port1) Tuning*
P
Write bit= “0”
First data byte
bit
Relay
Action
P00
P01
P02
P03
P04
P05
P06
P07
RL11
RL10
RL12
RL13
RL9
RL14
RL16
RL17
Band C
Band B
Band D
Band E
Band A
Antenna selection
Attenuator 6dB
Attenuator 12dB
By-Pass- P00 to P4 - Unset
(Default on Power Up)
Band A- P04 - Set
Band B- P04, P01 - Set
Band C- P04, P01, P00 - Set
Band D- P04, P01, P00, P02 - Set
Band E- P04, P01, P00, P02, P03 - Set
Antenna 1- P05-Unset
Antenna 2- P05 - Set
(Default on Power Up)
Att 0dB- P06, P07 - Unset
Att 6dB- P06, Set _P07 - Unset
Att 12dB- P06, _Unset _ P07 - Set
Att 18dB- P06, P07 - Set
(Default on Power Up)
Tuning Byte clear in By-Pass mode.
Tuning Byte value128 on new band change.
I2C bus controller on Tiny Plus
External I2C Bus lines
4 ways mini-Din connector on rear panel
Second data byte
P10
P11
P12
P13
P14
P15
P16
P17
RL8
RL7
RL6
RL5
RL4
RL3
RL2
RL1
Cap 128pF
Cap 64pF
Cap 32pF
Cap 16pF
Cap 8 pF
Cap 4pF
Cap 2pF
Cap 1pF
I2C default hardware address A0-A1-A2 = 0-0-0
2
1
SCL
3
SDA
A2
SCL
P00
A0
P01
P17
P02
Gnd
P16
P03
P15
SDA
P04
P14
P05
P13
P06
P12
J7
+12V
Vdd
INT
A1
4
(Front view)
P07
P11
Vss
P10
PCF 8575DW
I2C Address format
0100 A2 A1 A0
A0,A1,A2 address bits
set by hardware
Tiny Plus-CAT SCR PRESELECTOR
Manual
Accessories
USB Galvanic Digital Isolator for SDR radios
The USB Galvanic Digital Isolator for SDR radios is designed to break the galvanic connection between USB
host PC and the attached SDR radio peripheral avoiding that whatever power and ground noise from the PC
side do not influence the sensible radio on the other side.
The resultant galvanic isolation improves common-mode voltage, prevents ground loops, a common cause of
interference and data distortion issues, improves reception, as the noise floor in the receiver is lowered, and
removes spikes and birdies on the PC panoramic screen. In addition provides isolation of 1000V AC between
the host PC and the radio peripheral that guard against surges that may come from the antenna connected to
the receiver.
The USB Galvanic Digital Isolator for SDR radios is based on ADuM 4160 Full/Low Speed 5 kV USB Digital
Isolator and ADuM 5000 Isolated DC-to-DC Converter both from Analog Devices combining high speed CMOS
and chip-scale air transformer iCoupler technology.
The USB Galvanic Digital Isolator complies with specifications USB 1.1, Low speed (1.5Mbit/s) and USB 2.0 Full
Speed (12Mbit/s). The speed mode is set manually via two jumpers inside (default full speed). Most of the time it
is not necessary change between modes but if automatic speed detection is desired, an external hub can be
connected to the peripheral side configured for full speed.
The USB Galvanic Digital Isolator is self powered from the host PC through the USB cable. An embedded DC/DC converter provides a galvanic isolated voltage of 5VDC/100mA to the
peripheral side. It includes additionally ESD, EMC protection of the data lines and power transient short-circuit guard.
It is highly advisable not to power any part of the connected radio from the USB bus, instead an external dedicated power supply must be used.
The USB Galvanic Digital Isolator behaves like an USB cable, no USB drivers are needed. It works on all operating systems, Mac, Windows, Linux, etc.
Features:
Isolation 1.000 Volts AC
Protection: EMC, ESD, Overvoltage Surge, Short-circuits.
Power supply:
- PC side: From USB cable, 5VDC. Attached signalling LED.
- Drawn power from peripheral radio max: Through USB cable, 5V DC/100mA.
USB modes: Full speed (12 MBit/S) Low speed (1.5 MBit/S). Switchable.
Standard socket connectors: PC side: USB type B, peripheral side: USB type A.
Dimensions 67 mm x 66 mm x 28 mm. (2.638x2.598x 1.102inch)
USB2 pair of cables included
Input/Output ports by-pass dual power relay
Let by-pass the Input and Output RF ports of devices such as Preselectors, Amplifiers, Filters,etc.
Typical applications are:
- Inserting in line between the antenna and transceiver a preselector, preamplifier or filter device to be by- passed on transmission.
- Switching antennas or RF signals.
A control line permits switch ON or OFF the dual relay. If the control line is connected to a transceiver, on transmission switchover, via PTT or
Keying line, the Input and Output RF ports of any device in line are by-passed avoiding being overloaded.
Features:
- Specialised high performance, low insertion loss set of RF relays is used in order to keep impedances and isolation between ports.
- Frequency range: HF: 60MHz
- Insertion loss: HF: 0.2 dB
- Isolation: >100 dB
- Power rating: 150 W PP max.
- Impedance: 50 Ohm
- Diode protection.
- Power supply: 12 Volts DC/60 mA (Active state)
- Switching time:
- Set: 5mS
- Reset: 4mS
- Life expectancy (Mechanical): 20,000,000 operations (at 18,000 operations/hr)
- External Dimensions: 40x111 40x37mm.(1.57x4.37x1.45in)
- Connectors: SO-239 or N type for Antenna Input/Output; BNC for Device Input/Output.
(N or combined connectors configurations also available. Please ask.)
- Coaxial tails and complete shielded control cable with snap-on RFI-EMI suppressor ferrite cores are included.
WARNING! TO AVOID DAMAGE THE UNIT
In order to give enough time to the relays to switch before the RF power signal outputs the transceiver when the PTT is pressed, assure that your transceiver provides a delayed "SEND"
control line signal. Alternatively a TX/RX Sequencer can be used.
© HEROS technology Limited 2012. All rights reserved
Tiny Plus SCR Preselector. Vetor Network Analyzer response plot. By-Pass
Tiny Plus SCR Preselector. Vector Network Analyzer response plot. Band A
Tiny Plus SCR Preselector. Vector Network Analyzer response plot. Band B
Tiny Plus SCR Preselector. Vetor Network Analyzer response plot. Band C
Tiny Plus SCR Preselector. Vetor Network Analyzer response plot. Band D
Tiny Plus SCR Preselector. Vetor Network Analyzer response plot. Band E
Tiny Plus-CAT SCR PRESELECTOR
Manual
NOTES:
Heros technology Limited disclaims all liability arising from this information and its use.
It is your responsibility to ensure that your application meets with your specifications.
Information contained in this publication regarding device applications and the like is provided only for your convenience
and may be superseded by updates.
Heros technology Limited makes no representations or warranties of any kind whether express or implied, written or oral,
statutory or otherwise, related to the information, including but not limited to its condition, quality, performance,
merchantability or fitness for purpose.
© HEROS technology Limited 2012. All rights reserved