1
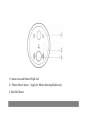
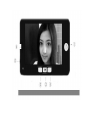
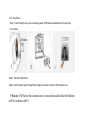
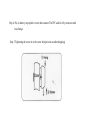
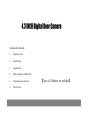
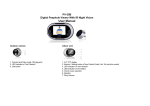
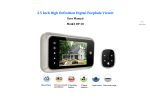
1: Camera Lens and Infrared Night Led
2: * Motion Detect Sensor
3: Door Bell button
(Apply for Motion detecting Model only)
1.
Monitoring(viewing the outdoor environment)
2.
UP button ( for increased regulation in the menu and zoom in the viewing)
3.
MENU button(for Language/Date/Screen off/Mode/Preview functions)
4.
DOWN button(for reduced regulation in the menu and zoom out the viewing)
5.
TF card slot
6.
Speakers(Door Bell speaker)
Intrudction of Using DPV
1. When visitors press the door bell button, the DPV will ring "DING-DONG".
2. The DPV will automatically take a picture once visitors press the door bell
button .And save it to TF cards , user can preview the photos directly by
using "preview" Function on the DPV or just viewing TF cards` contents
from computer
3. When user press the "Monitoring" button , you can see the outdoor view
directly from the screen so you can distinguish visitors and decide wether
open the door or not.
Intrudction of Using DPV
4. After user pressed the "Monitoring" button,the screen will on and showing
Outdoor environment,at this time you can press the Monitoring button
again to snap a picture
5. User can choose "video" mode from the menu,then you can
record
videothe
of outdoor by press the Monitoring button during screen
on.
6. When the screen is on, you can press “up” or “down” key to ZOOM in / out
*7. When you enable the Motion detect function, if someone stayed inside 0.5~1M in front of
the door for 5~10s, the DDV will auto turn on and snap one picture
* This function only applied with DDV with motion detect function.*
Adjustment of Menu Mode
1.Language
Press menu button ,and then press "up" or "down" button to select the "language"
Option, and then Press menu button to enter "language" option.Select the
language and then press menu button to confirm the selection.
2.Date&Time
Press menu button ,and then press "up" or "down" button to select the
"Date&Time" option,Press menu button to enter "Date&Time" option.
Adjust the date and time and then press menu button to confirm the adjustment.
Adjustment of Menu Mode
3.Screen off time
Press menu button ,and then press "up" or "down" button to select the "Screen off"
option,Press menu button to enter "Screen off" option.Select the screen off time
(10s/20s/30s) to indicate the duration of screen on, press menu button to confirm
the selection
4.Mode switch
Press menu button,and then press "up" or "down" button to select "Mode switch"
option, Press menu button to enter "Mode switch" option.Select the "Picture snapping"
or "Video recording" mode and press menu button to confirm the selection.
5.Preview
Press menu button ,and then press "up" or "down" button to select "Preview"
option,
Press menu button to enter "Preview" option.Press up/down button to view
all the
Pictures and videos that saved on TF cards. Press menu button to
quit.
Adjustment of Menu Mode
6.Dont Distrub
Press menu button ,and then press "up" or "down" button to select "Don't Distrub" option,
Press "up" or "down" button to enable or disable Don't Distrub function.When you
enable the Don't Distrub Function,the door bell will not ring any more.
7.Ring set
Press menu button ,and then press "up" or "down" button to select "Ring Set” option,
Press “up” or “down” key to select the volume and the type of the door bell and press Menu
button to confirm
8.Motion Detect
Press menu button ,and then press "up" or "down" button to select "Motion Detect” option,
Select “ON”/“OFF” to enable/disable Motion Detect function
9.Exit
Press menu button ,and then press "up" or "down" button to select "Exit option,
Press menu button to quit menu operation.
DIY installation:
Step 1. Insert Peephole lens ( pls tear backing paper of 3M double-sided adhesive) through door
from outside.
Step 2. Pull off the 3M sticker
Step 3 Insert Peephole barrel through Base flange And rotate to fix them with Peephole lens .
(*Remark: Pls Notice the camera lens is on top side and the door bell button
will be on down side!!)
Step 4: Put Li-battery in peephole viewer,then connect The FPC and fix it by extrusion with
base flange.
Step 5 Tightening the screw in to the screw hole(prevent accident dropping)
Function Description:
1.
4.3 inch TFT LCD Screen
2.
Peephole barrel (diameter) :14-22mm
3.
Fits any door : 35-72 or 60-90mm ( thickness ),pls confirm the door thickness with dealer
before purchase .
4.
Sensor : 1.3M
pixels camera with zoom in and zoom out function
5.
Screen will automatically be in sleep model after 10seconds Once press monitor button.
6.
Monitor outside anytime when press monitor button
7.
Used TF card as external memory ,easily save pictures and videos to family computer.
8.
When visitor press Door bell button, machine automatically turn on and take photo .
9.
Press UP/DOWN key to view photos any time .Or Select preview mode in menu
10.
Menu setting
11.
Rechargeable
battery ,support to view outside for more than 400 times.
Components included:
1.
Peephole viewer
2.
Based Flange
3.
Peephole lens
4.
Battery charger and USB cable
5.
English manual instruction
6.
Fixate Screw
【2pcs of Li-Battery are included】
【Notes】
(1)
Our Company is committed to reform and innovation, and reserves the right to make
changes and improvements without further notice. Illustrations in this manual are for reference
only.
(2)
All warranty and liability is void should you or your dealer open the unit without authorization
or remove/deface the product labeling
(3)
Warranty: For one year from purchasing this product, we promise to provide you with free
maintenance and technical support. This excludes damage during installation, unauthorized
tampering and willful damage.
(4)
Warranty periods different from this cannot be support by the manufacturer.