1
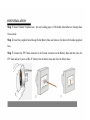
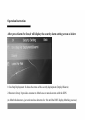
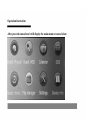
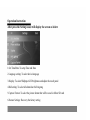
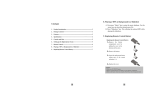
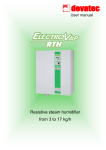
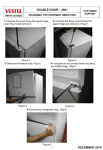
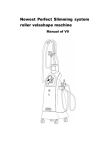
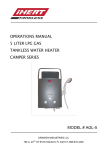
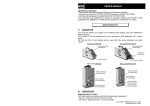
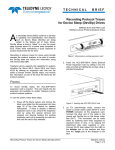
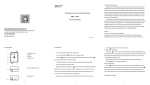
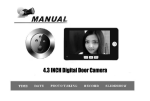
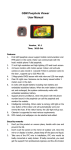
Outdoor Unit Specification
1: Camera Lens
2: Night vision Led
3: Movement detector
4: Door bell button
5: Mic
6: Speaker
INDOOR UNIT SPECIFICATION
INDOOR UNIT SPECIFICATION
INDOOR UNIT SPECIFICATION
1.Extral Battery Base
9.Speaker
2.Main Monitoring Unit
10.Indoor unit connecting JACK
3.Micro USB Slot
11: FPC female connector
4.Power Key
12: BL-5C battery hole
5.SIM Card Slot
13:Battery base door
6.Return Key
14: FPC door
7.Monitoring Key
8.Micro SD Card Slot
Function Description
1.5” GSM digital door viewer is smart security inspection device that could be installed to
all kinds of door,just replace the traditional peephole and install the DDV very easily.
2.This device will auto-snap visitor`s picture when visitor press the door bell or visitor has
been detected by device`s PIR movement detecting function..The picture will save to
Memory cards for previewing. And you can also view out door environment anytime just
simply by pressing the monitoring key on the device.
3.When insert the SIM card to the device,it can send automatically MMS alert to specified
mobile phone once the picture snapping has been triggered..So you can know who is
visiting your house just via your mobile phone.
Function Description
4.If you set “AWAY HOME” mode, the device will tell visitors to leave a 10s` video
message,if visitor is urgently finding you, the device can directly phone your specified
number..And you can talk with visitor immediately.
Function Description
5. With security alarm system function enabled, this device allow you to connect up to 8
pieces of security detectors, after matching with those detectors , the device will send a
MMS alert to your mobile phone once any of the detector has been triggered , likes if some
one break your door or window..Or the gas detector detected gas.
6. GSM digital door viewer will provide your family a SMART, SAFE,Secured
environment.
7. DIY
INSTALLATION:
1. Outdoor Unit
2. DOOR
3. Extral Battery Base
4. Indoor Monitoring Unit
DIY INSTALLATION
Step 1: Insert Outdoor Peephole lens ( pls tear backing paper of 3M double-sided adhesive) through door
from outside.
Step 2: Insert the peephole barrel though Extral Battery Base and rotate to fix them with Outdoor peephole
lens..
Step 3: Connect the FPC Male connector to the Female connector on the Battery Base and then close the
FPC door and put 2 pieces of BL-5C battery into the battery base and close the battery door..
DIY INSTALLATION
Step 4: Insert the battery into the indoor monitoring unit and insert the SIM card/Micro SD card(if any) into
the indoor unit.
Step 5: Slide and put the indoor monitoring unit onto the battery base
Operation Instruction
Press the POWER KEY
to switch on the product,It will display the main screen as below:
Mode select: To select Home mode or AWAY mode(Please refer to page 11)
Photos :To Preview the guest picture that taken by DDV
Videos: To Preview the guest`s video message who leaves to you
Security Alarm Set: To Enter security alarm setting screen (please refer to page 12)
Menu: To Enter main menu screen(please refer to page 13)
Operation Instruction
Home Mode: When Home Mode is active, anyone press the door bell or be detected by movement PIR
detector ,the device will snap one visitor picture and save to Micro SD card. You can preview the visitor
picture by press the “photos” icon
AWAY Mode: When AWAY Mode is active,anyone press the door bell or be detected by movement PIR
detector ,the device will snap one visitor picture and save to Micro SD card and immediately send you one
MMS alert with visitor`s picture. And the device will allow visitor to leave a 10s` video message and save
into the Micro SD card.
If Visitor is urgently finding you, after press 3 times of door bell, the device will call your mobile
phone, so you can talk with visitor directly.
Operation Instruction
After press Alarm Set Icon,it will display the security alarm setting screen as below:
1.One Step Deployment: It shows the status of the security deployment (Deploy/Disarm)
2.Detectors Setup: It provides customer to Match one or more detectors with the DDV
(to Match the detectors, just activated one detectors for 10s until the DDV display Matching success)
Operation Instruction
After press the menu Icon it will display the main menu screen as below:
Operation Instruction
Photos :To Preview the guest picture that taken by DDV
Videos: To Preview the guest`s video message who leaves to you
Calendar: To display the full calendar
SOS: To enter/edit the device bonded SOS number
Smart Inspection: To enter monitoring setting screen(please refer to page12)
File Manager:To view/edit the files contained inside the device or memory card
Setting:To enter Device setting screen(please refer to page13)
Device info: To display the device information
Operation Instruction
After press the Smart Inspection icon,it will display the screen as below:
1.Movement Detecting Time: To select how long if device detected the visitor movement will trigger pciture
snapping
2.Voice alarm time(visitor stay too long): To select how long the alarm will ring if visitor staying in front of
your house
3.Movement Detecting Sensitivity:To select movement detecting sensitivity
4.MMS sending setting:To enable/disable the MMS sending after snapped the visitor`s picture
Operation Instruction
After press the Setting icon,it will display the screen as below:
1.Set Time/Date: To setup Time and Date
2.Language setting: To select device language
3.Display: To select Wallpaper/LCD brightness and adjust the touch panel
4.Bell setting: To select all alarm/door bell ringtong
5.Capture Format: To select the picture format that will be saved in Micro SD card
6.Restore Settings: Recovery the factory setting
Package Contain:
1. Outdoor peephole les Unit * 1
2. Indoor monitoring unit*1
3. Extral Battery base unit*1
4. Peephole barrel *1
5. Peephole adapter *1
6. Tighting tool
7. BL-5C battery *2 (for battery base)
8. BL-6N battery*1(for
9. USB charger *1
10. User Manual * 1
indoor unit)
【Notes】
(1)Our Company is committed to reform and innovation, and reserves the right to make
changes and improvements without further notice. Illustrations in this manual are for reference
only.
(2)All warranty and liability is void should you or your dealer open the unit without authorization
or remove/deface the product labeling
(3)Warranty: For one year from purchasing this product, we promise to provide you with free
maintenance and technical support. This excludes damage during installation, unauthorized
tampering and willful damage.
(4)Warranty periods different from this cannot be support by the manufacturer.