1
Getting Started
STM32Java (Evaluation)
Reference:
TLT-0571-MAN-RCP-GETTING-STARTED-STM32
Product Version:
1.2.0
Revision:
B
Confidentiality & Intellectual Property
All right reserved. Information, technical data and tutorials contained in this document are
confidential, secret and IS2T S.A. Proprietary under Copyright Law. Without any written
permission from IS2T S.A., copying or sending parts of the document or the entire document by
any means to third parties is not permitted including but not limited to electronic communication,
photocopies, mechanical reproduction systems. Granted authorizations for using parts of the
document or the entire document do not mean they give public full access rights.
IceTea®, IS2T®, MicroJvm®, MicroEJ®, SNI™, SOAR®, Drag Emb'Drop™, IceOS®, Shielded
Plug™ and all associated logos are trademarks or registered trademarks of IS2T S.A. in France,
Europe, United States or other Countries.
Java™ is Sun Microsystems' trademark for a technology for developing application software and
deploying it in cross-platform, networked environments. When it is used in this documentation
without adding the ™ symbol, it includes implementations of the technology by companies other
than Sun.
Java™,all Java-based marks and all related logos are trademarks or registered trademarks of Sun
Microsystems Inc, in the United States and other Countries.
Other trademarks are proprietary of their authors.
Table of Contents
1 Introduction............................................................................................................... 2
1.1 Intended Audience..............................................................................................2
1.2 Scope.................................................................................................................. 2
1.3 Prerequisites.......................................................................................................2
2 Product Registration................................................................................................3
3 Overview.................................................................................................................... 5
3.1 Platforms............................................................................................................. 5
3.2 Package.............................................................................................................. 6
4 Run First Example ...................................................................................................7
4.1 Create Example..................................................................................................7
4.2 Run Example on SimJPF....................................................................................8
4.3 Run Example on EmbJPF...................................................................................8
5 Create and Use Your First Platform......................................................................12
5.1 Create Platform.................................................................................................12
5.2 Compile Java Application..................................................................................14
5.3 Link and Deploy Java Application.....................................................................15
6 Appendix..................................................................................................................18
6.1 Board Setup......................................................................................................18
6.2 Keil µVision Configuration.................................................................................19
6.3 Examples Installation........................................................................................20
7 Document History...................................................................................................22
I
Index of Tables
Table 1-1: Document history.............................................................................................22
II
Illustration Index
Illustration 1-1: STM32Java (Evaluation) Welcome Page..................................................3
Illustration 1-2: Generated UID...........................................................................................3
Illustration 1-3: Available Platforms....................................................................................5
Illustration 1-4: New MicroEJ Example Project (page 1)....................................................7
Illustration 1-5: New MicroEJ Example Project (page 2)....................................................8
Illustration 1-6: EmbJPF MicroEJ Launcher Execution Tab................................................9
Illustration 1-7: EmbJPF MicroEJ Launcher JPF Configuration Tab.................................10
Illustration 1-8: ST-LINK/V2 Configuration Page..............................................................10
Illustration 1-9: New MicroEJ Example Project Wizard (page 1)......................................12
Illustration 1-10: New MicroEJ Example Project Wizard (page 2)....................................13
Illustration 1-11: [example] Projects.................................................................................13
Illustration 1-12: MyJPF MicroEJ Launcher Execution Tab..............................................14
Illustration 1-13: Copy Configuration Page......................................................................15
Illustration 1-14: Keil µVision Project File.........................................................................16
Illustration 1-15: Keil µVision............................................................................................16
Illustration 1-16: Serial Cable...........................................................................................18
Illustration 1-17: Board configuration...............................................................................19
Illustration 1-18: ULINK Probe Configuration...................................................................20
III
STM32JAVA (EVALUATION) GETTING STARTED
1
STM32JAVA (EVALUATION) GETTING STARTED
1 Introduction
1.1 Intended Audience
The intended audience for this document are developers who wish to develop their first Java
application with MicroEJ.
Notes:
• This document is for STM3220G-EVAL and STM3240G-EVAL boards.
• This document is not a user guide for Keil µVision. Please visit the Keil website for more
information about Keil products.
• Please visit the website stm32java.com for more information about STM32Java products
(platforms, videos, examples, application notes etc.).
1.2 Scope
This document describes, step by step, how to start your development with MicroEJ:
• Register your product.
• Understand the package.
• Create a Java application from a built-in example and run it on the simulation platform
(SimJPF) and on the embedded platform (EmbJPF).
• Create your own platform (work-in-progress JPF) and run the same Java application on that.
In this document we will use a STM3220G-EVAL board, however you can use the same steps with
your STM3240G-EVAL board.
1.3 Prerequisites
• PC with Windows XP, Windows Vista or Windows 7.
• The MicroEJ environment for STM32: STM32Java (Evaluation).
• A STM3220G-EVAL board or a STM3240G-EVAL board.
• The ST-LINK utility.
• Keil µVision 4.60 or higher, with at least 256Kb code size link.
Notes:
– Keil µVision evaluation version is 32Kb code size limited. To get a Keil µVision
evaluation license for STM32Java (Evaluation), please visit the website
stm32.microej.com.
– Keil µVision 4.5x is sufficient except for deploying your application on the board using a
ST-LINK/V2. Refer to the appendix “Keil µVision Configuration” to use a ULINK probe
instead of using the integrated ST-LINK/V2.
2
STM32JAVA (EVALUATION) GETTING STARTED
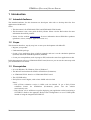
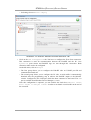
2 Product Registration
The evaluation version of MicroEJ uses software activation keys.
• Open STM32Java (Evaluation).
• Open welcome page: Help > Welcome.
Illustration 1-1: STM32Java (Evaluation) Welcome Page
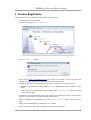
• Press Generate UID button.
Illustration 1-2: Generated UID
• Sign into the https://stm32.microej.com site (create your account if you do not have one
already). Accept certification exception if asked to by your browser.
• Submit product and user information (page Register a Product from your account):
– Product P/N: Product P/N (Part Number) is a 12 alphanumeric code available on your
DVD.
– UID: UID is the 16 alphanumeric code available when Generated UID button is pressed
on the welcome page.
• Download your Activation Key from your account once notified by email (License Status
page of your account) or from the email (the attached file).
• Back to STM32Java (Evaluation), press the Manage Licenses button on the welcome
page.
• Enter your Activation Key by clicking the Add… button.
• Check your license status and the expiration date in the license table.
3
STM32JAVA (EVALUATION) GETTING STARTED
Note: the MicroEJ preferences page is also accessible from the menu Window > Preferences >
MicroEJ.
4
STM32JAVA (EVALUATION) GETTING STARTED
3 Overview
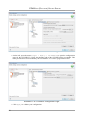
3.1 Platforms
Several Java platforms (JPF) are pre-installed in MicroEJ.
• Open STM32Java (Evaluation).
• Open the welcome page: Help > Welcome.
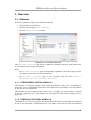
• Press the Manage Platforms button.
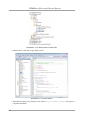
Illustration 1-3: Available Platforms
This Available Platforms page shows all platforms installed in MicroEJ. Each platform has
its own characteristics and specific behavior.
Notes:
• The Available Platforms page is automatically populated by the work-in-progress JPFs
(see chapter Create and Use Your First Platform).
• The Available Platforms page is also accessible from the menu Window >
Preferences > MicroEJ > Available Platforms.
3.1.1 STM3220GEVAL-001EVAL-GNUv4.5.1
This platform is a standalone platform. That means this platform is ready to use. This platform is
designed to run on a STM3220G-EVAL board. The chapter Run First Example uses this platform
to run your first Java application.
This platform has been compiled with the GNU v4.5.1 C compiler. No extra compiler is required
to run a Java application on it. This platform uses the STM32 ST LINK Utility to deploy the Java
application.
3.1.2 STM32JavaF2-GT1EVAL-ARMCCv4
This platform is an extensible platform. That means this platform has been designed to be extended
to run on any board with a STM32JavaF2 CPU. The chapter Create and Use Your First Platform
5
STM32JAVA (EVALUATION) GETTING STARTED
uses this platform to run your first Java application on your first extended platform: a STM3220GEVAL.
This platform requires the Keil µVision C compiler to create the final binary file for a Java
application.
3.1.3 STM32JavaF4-GT1EVAL-ARMCCv4
The aim of this platform is the same as the previous platform: it has been designed to be extended
to run on any board with a STM32JavaF4 CPU.
Note: The chapter Create and Use Your First Platform can use this platform instead of using the
previous one in order to create your first extended platform: a STM3240G-EVAL.
3.2 Package
Some additional information about the MicroEJ package is available in the documentation
“STM32Java (Evaluation) Overview”:
• Open STM32Java (Evaluation).
• Help > MicroEJ > STM32Java (Evaluation) Overview.
6
STM32JAVA (EVALUATION) GETTING STARTED
4 Run First Example
The aim of this chapter is to create a simple Java application from a built-in example. This
example will initially be run on the simulator (SimJPF) of the STM3220GEVAL-001EVALGNUv4.5.1 platform. Then this application will be compiled and deployed on the STM3220GEVAL board using the EmbJPF.
4.1 Create Example
• Open STM32Java (Evaluation).
• Open the welcome page: Help > Welcome.
• Press the Try out Java Examples button to open the New Java Example Project
wizard.
• Select the Java platform STM3220GEVAL-001EVAL-GNUv4.5.1 from the combo box.
• Select the example Examples > MicroUI > Hello World.
Illustration 1-4: New MicroEJ Example Project (page 1)
• Click on Next. The next page suggests a name for the new project.
7
STM32JAVA (EVALUATION) GETTING STARTED
Illustration 1-5: New MicroEJ Example Project (page
2)
• Click on Finish. The selected example is imported into a project with the given name. The
main class (the Java class which contains the main() method, here: HelloWorld.java) is
automatically opened.
Note: The New Java Example Project wizard is also accessible from the menu File > New >
Java Example.
4.2 Run Example on SimJPF
• Right-click on the Main class of the created project.
• Select Run as > MicroEJ Application.
The application starts. It is executed on the simulator (SimJPF) of the selected JPF
(STM3220GEVAL-001EVAL-GNUv4.5.1). A picture of the board appears. The result of the
execution is printed on the display of the board.
Notes:
• The menu item Run as > MicroEJ Application creates an Eclipse launcher called
MicroEJ launcher.
• This MicroEJ launcher can be retrieved from the menu Run > Run Configurations...
> MicroEJ Application > MyHelloWorldSample SimJPF. Click on Run to relaunch
the execution.
4.3 Run Example on EmbJPF
• Open the run dialog (Run > Run configurations...) and select the MicroEJ launcher
MyHelloWorldSample SimJPF.
• Right-click on this launcher and select Duplicate. This creates a new MicroEJ launcher
called MyHelloWorldSample SimJPF (1).
• Rename it MyHelloWorldSample EmbJPF (it is just a name; it makes it easy to
differentiate the two launchers).
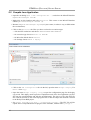
• Click on the Execution tab. Here you have to select the execution target:
– click the JPF combo box and choose STM3220GEVAL-001EVAL-GNUv4.5.1.
– for execution type choose Execute on EmbJPF.
– for MicroJvm Mode choose Default.
8
STM32JAVA (EVALUATION) GETTING STARTED
– for Settings choose Build & Deploy.
Illustration 1-6: EmbJPF MicroEJ Launcher Execution Tab
• Click on the JPF Configuration tab. You have to configure the Trace Port connection.
This connection is used for communication between the EmbJPF and the PC. Java
System.out print stream and EmbJPF logs are sent through this connection. Both
connection sides need to be configured.
On the left menu, click on Target:
– The first group allows you to configure the EmbJPF side: an USART port ID and
communication baud rate.
– The second group allows you to configure the PC side. A serial sniffer is automatically
launched after the programming step to redirect the EmbJPF output to the MicroEJ
console. Configure the PC COM port which has been connected to the board. The COM
port is available from Windows Device Manager (COMnn).
Note: this configuration is optional: you can uncheck the check box Redirect “Trace
Port” output to Eclipse console in order to not launch a serial sniffer at the end of
the execution.
9
STM32JAVA (EVALUATION) GETTING STARTED
Illustration 1-7: EmbJPF MicroEJ Launcher JPF Configuration Tab
• On the left, open the menu Target > Deploy > ST-LINK/V2 to open the configuration
page for the ST-LINK/V2. Verify the absolute path of the ST-LINK utility executable. This
utility should have been installed by the self installer. It is used to program the board.
Illustration 1-8: ST-LINK/V2 Configuration Page
• Click Apply to validate your configuration.
10
STM32JAVA (EVALUATION) GETTING STARTED
• Click Run: the application is compiled, linked and programmed to the STM3220G-EVAL
board. Then the STM3220G-EVAL board is automatically reset.
The application starts. The result of the execution is printed on the display of the board.
Congratulations, you have run a Java application on the STM3220G-EVAL board!
11
STM32JAVA (EVALUATION) GETTING STARTED
5 Create and Use Your First Platform
The aim of this chapter is:
• to create a platform (the work-in-progress JPF) from an extensible platform.
• to run the previous Java example on this platform.
• to deploy the application on the STM3220G-EVAL board using Keil µVision.
5.1 Create Platform
• Open STM32Java (Evaluation).
• Open the Java Platform Example wizard: File > New > Java Platform Example.
• Select the Java extensible platform STM32JavaF2 from the combo box.
• Select the example Platform > STM3220GEVAL > HMI.
Illustration 1-9: New MicroEJ Example Project Wizard (page 1)
• Click on Next. The next page suggests a name for the new project.
12
STM32JAVA (EVALUATION) GETTING STARTED
Illustration 1-10: New MicroEJ Example Project Wizard (page 2)
• Click on Finish. The selected example is imported as several projects prefixed by the
given name:
– [example]-bsp contains a ready-to-use package for Keil µVision on STM3220G-EVAL
board.
– [example]-intern contains scripts to build the work-in-progress JPF automatically.
– [example]-jpf contains the work-in-progress JPF.
– [example]-microuiGeneratorExtension contains some files to extend the MicroUI
Image Generator tool.
A README file is automatically opened. This file explains the aim of the projects and how to
launch an example. Please ignore this file and follow the next steps in this document.
The work-in-progress JPF needs to be finalized with several additional items (Java and natives
libraries, scripts etc.). You have to run a script which finalizes the work-in-progress JPF:
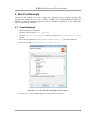
• Expand the project [example]-intern. A build script called build.xml is available.
Illustration 1-11: [example] Projects
• Right-click on this script.
• Select Run As > Ant Build.
The build starts. This step can take several minutes. You can see the progress of the build steps in
the Eclipse console. Please wait for the final message BUILD SUCCESSFUL.
At the end of the execution the work-in-progress JPF is fully built for the STM3220G-EVAL board
and is ready to be linked into the Keil µVision project. The name of this JPF is STM3220GEVALHMI-ARMCCv4.
13
STM32JAVA (EVALUATION) GETTING STARTED
5.2 Compile Java Application
• Open the run dialog (Run > Run configurations...) and select the MicroEJ launcher
MyHelloWorldSample SimJPF.
• Right-click on this launcher and select Duplicate. This creates a new MicroEJ launcher
called MyHelloWorldSample SimJPF (1).
• Rename it MyHelloWorldSample MyJPF (it is just a name; it makes it easy to differentiate
the two launchers).
• Click on the Execution tab. Here you have to select the execution target:
– click the JPF combo box and choose STM3220GEVAL-HMI-ARMCCv4.
– for execution type choose Execute on EmbJPF.
– for MicroJvm Mode choose Default.
– for Settings choose Build & Deploy.
Illustration 1-12: MyJPF MicroEJ Launcher Execution Tab
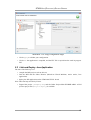
• Click on the JPF Configuration tab. On the left, open the menu Target > Deploy. For
Means select Copy.
• Open the menu Target > Deploy > Copy to open the configuration page for the deploy
copy mode. This deploy mode copies the compilation result of the Java application (an ELF
file) into the specified folder and with the specified name. The aim is to copy this ELF file
into a known location in the work-in-progress JPF so that the output file location is known
to the Keil µVision BSP project.
• Set Output File as ${jpf.dir}/../source/lib/javaapp.o. The ELF file will be
copied in the corresponded work-in-progress JPF's lib folder, with the name javaapp.o.
14
STM32JAVA (EVALUATION) GETTING STARTED
Illustration 1-13: Copy Configuration Page
• Click Apply to validate your configuration.
• Click Run: the application is compiled, and the ELF file is copied into the work-in-progress
JPF.
5.3 Link and Deploy Java Application
The aim of the final step is to:
• compile the BSP project (such as drivers).
• link the BSP and the others libraries (MicroJvm Virtual Machine, native stacks, Java
application).
• deploy the full application on the STM3220G-EVAL board.
Note: This final step uses Keil µVision.
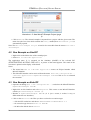
• Expand the project [example]-bsp and the folder Project/MicroEJ/MDK-ARM. A Keil
µVision project file (Project.uvproj) is available.
15
STM32JAVA (EVALUATION) GETTING STARTED
Illustration 1-14: Keil µVision Project File
• Double-click on this file to open Keil µVision.
Illustration 1-15: Keil µVision
• Build the Keil project by clicking on the menu Project > Build target. The project is
compiled and linked.
16
STM32JAVA (EVALUATION) GETTING STARTED
• Deploy the link result on the STM3220G-EVAL board by clicking on the menu Flash >
Download.
The application starts. The result of the execution is printed on the display of the board.
Congratulations, you have built the Java application on your own platform!
17
STM32JAVA (EVALUATION) GETTING STARTED
6 Appendix
6.1 Board Setup
This chapter explains how to configure and connect a STM3220G-EVAL board (it is the same
configuration for a STM3240G-EVAL board).
6.1.1 Jumpers and Switches
Set all jumpers and switches to their default settings: please refer to the STM3220G-EVAL
documentation (STMicroelectronics documentation: UM1057 User manual STM3220G-EVAL
evaluation board).
6.1.2 Power Supply
Select your power supply mode: please refer to the STM3220G-EVAL documentation
(STMicroelectronics documentation: UM1057 User manual STM3220G-EVAL evaluation board).
6.1.3 PC-Board Connection
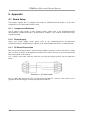
Plug a serial cable between the PC and the board USART 3 connector (CN16). Note the PC's COM
port, it will be used later in the application launcher. This allows all traces to be received from the
board and printed on the console.
Use a simple serial cable with only data lines (crossed) and signal ground. See the illustration
below :
Illustration 1-16: Serial Cable
Plug a USB cable between the PC and the board ST-LINK/V2 connector. This allows you to
program the board using the on-board integrated ST-LINK/V2.
18
STM32JAVA (EVALUATION) GETTING STARTED
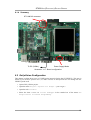
6.1.4 Summary
ST-LINK/V2 connector
CN16
To PC (COMx)
Power Supply Mode
Illustration 1-17: Board configuration
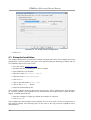
6.2 Keil µVision Configuration
This chapter explains how to use a ULINK probe instead of using the ST-LINK/V2. This step is
useful if you use Keil µVision 4.5.x, as older versions of Keil µVision do not manage the STLINK/V2 probe well.
• Open a Keil µVision project.
• Open the menu Project > Options for Target '(your target)'.
• Open the tab Utilities.
• Select the item ULINK2/ME Cortex Debugger in the combo box of the menu Use
Target Driver for Flash Programming.
19
STM32JAVA (EVALUATION) GETTING STARTED
Illustration 1-18: ULINK Probe Configuration
• Click on OK.
6.3 Examples Installation
This chapter explains how to install extra examples and application notes. The examples have been
packaged for a specific platform. They have to be imported using the following procedure and not
as a standard Eclipse project archive file:
• Go to the website stm32java.com.
• Download zip files containing one or more examples.
• Open STM32Java (Evaluation).
• Open the wizard Import: File > Import .
• Select the item MicroEJ > Examples.
• Click on Next.
• Click on the radio button Select file.
• Click on the Browse... button.
• Select the downloaded zip file.
The available examples in the zip file appear in the list box. These examples have been packaged
for a specific platform. If that platform is not installed, then the examples import cannot be done.
Import / install the platform first.
• Select the examples to import (by default all examples are selected).
• Click on Finish.
The examples have been installed in the platform. You can now create a new Java project from a
new built-in example. The following steps are the same as the one previously explained in this
documentation.
20
STM32JAVA (EVALUATION) GETTING STARTED
• Open the wizard New MicroEJ Example Project: File > New > Java Example.
• Select the platform.
• Select a new installed example.
• Click on Finish.
21
STM32JAVA (EVALUATION) GETTING STARTED
7 Document History
Date
th
May 14 , 2012
Revision
A
Description
First public release (v1.1).
Getting started with the very first JPF for STM3220GEVAL boards.
October 24h, 2012
B
Update for release 1.2.0.
Redesign document for creating and using a platform.
Addition of Keil µVision configuration.
Table 1-1: Document history
22