1
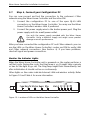
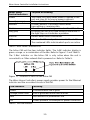
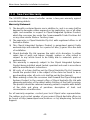
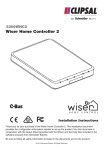
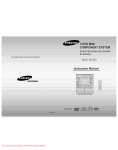
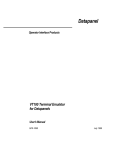
Wiser Home Control
5200PG
Installation Instructions
Wiser Home Controller Installation Instructions
© Copyright Clipsal Australia Pty Ltd, 2009. All rights reserved. This material is
copyright under Australian and international laws. Except as permitted under the
relevant law, no part of this work may be reproduced by any process without prior
written permission of and acknowledgement to Clipsal Australia Pty Ltd.
Clipsal and C-Bus are registered trademarks of Clipsal Australia Pty Ltd.
The information in this manual is provided in good faith. Clipsal Australia Pty Ltd
(CAPL) has endeavoured to ensure the relevance and accuracy of the information,
but it assumes no responsibility for any loss incurred as a result of its use. CAPL
does not warrant that the information is fit for any particular purpose, nor does it
endorse its use in applications that are critical to the health or life of any human
being. CAPL reserves the right to update the information at any time without notice.
Release date: March 2009.
2
Wiser Home Controller Installation Instructions
Contents
1.0
2.0
Product Description
5
1.1 Hardware Components
5
1.2 Software
7
1.3 Product Information
8
Network Topology
9
2.1 Mapping Your Existing Network
3.0
9
2.2 Adding the Wiser Home Controller and CNI
10
2.3 Setting up a Wireless LAN
13
Installation
14
3.1 Installation Location
14
3.2 Important Notes
14
3.3 Overview of Hardware Installation Steps
15
3.4 Step 1, Connect the CNI to the
C-Bus Network Cable
16
3.5 Step 2, Assemble the Router, CNI and Busbar 17
4.0
3.6 Step 3, Install the Hardware
18
3.7 Step 4, Connect Your Configuration PC
19
Software Configuration
22
4.1 Step 1, Configure the Wiser Home Controller
Router
22
4.2 Step 2, Use C-Bus Toolkit to Collect
Project Information
26
4.3 Step 3, Use PICED to Create and Transfer
a Project
27
5.0
Introduction to the User's Interface (UI)
32
6.0
Additional Information
34
6.1 Using Static TCP/IP Settings on
the PC (if necessary)
3
34
Wiser Home Controller Installation Instructions
6.2 Useful MS-DOS Command Prompt Programs 36
6.3 Frequently Asked Questions (FAQs)
37
6.4 Release Notes
41
7.0
Terms
43
8.0
Product Specifications
44
9.0
Standards Complied
45
10.0
GNU General Public Licence
47
11.0
Two-Year Warranty
49
4
Wiser Home Controller Installation Instructions
1.0
Product Description
The 5200PG Wiser Home Controller provides an easy-to-use graphical
user interface (GUI) to access the home C-Bus network and other home
applications. The Wiser Home Controller lets you monitor and control your
home environment locally, or remotely over the Internet.
Using the Wiser Home Controller, you can locally or remotely
•
Configure and commission certain aspects of lighting, security and
environmental equipment using C-Bus Toolkit and PICED software
products.
•
Recognise and utilise C-Bus TAG descriptions, Locations and
Function Groups.
•
Back up and restore projects to and from a PC.
•
Control and monitor C-Bus lighting scenes on C-Bus networks.
•
Create, trigger and control scenes.
•
Control and monitor HVAC equipment.
•
Interface with security panels and cameras.
1.1
Hardware Components
Component
Description or Characteristics
Wiser Home
Controller router
The Wiser Home Controller router provides
C-Bus Network
Interface (CNI)
•
A wired connection to the customer’s Internet.
•
•
A wired connection to the CNI for C-Bus network access.
A wireless 802.11 LAN set up for WPA encryption.
•
Four wired LAN ports (one is reserved for the CNI).
The inline CNI connects to
•
A Wiser Home Controller router LAN port.
•
The C-Bus network using a Cat.5e cable, twisted pairs
1 GB USB drive
Includes readme.htm, Installation Instructions and User's
Guide
Power supply
The supply provides d.c. power for the router and CNI
Busbar
The busbar provides a simplified power and signal
connection for the Wiser Home Controller router and CNI.
5
Wiser Home Controller Installation Instructions
Cat.5e network
cable
The blue or black network cable connects the customer's
broadband device to the Wiser Home Controller's router. Do
not use this cable for C-Bus connections.
Link
The link comes attached to the CNI and locks the Wiser
Home Controller and CNI together to form a single unit.
Support stand
The optional stand is useful when placing the Wiser Home
Controller on a table or desk. (Not shown in Figure 1.)
Setup Sheet
The Setup Sheet provides quick instructions for installation
and configuration.
Table 1. Hardware components
Figure 1. Wiser Home Controller hardware components
To avoid equipment damage, you must install the three supplied
antennas before connecting the power supply to the Wiser Home
Controller router.
6
Wiser Home Controller Installation Instructions
1.2
Software
Normally, the installer loads PICED and C-Bus Toolkit on a PC and brings it
to the customer site.
Software Applications
When installing the Wiser Home Controller, you must use the downloaded
versions of the following Clipsal software applications:
•
PICED setup software, version 4.5, or later. Access the PICED
software using the link in the readme.htm file located on the
provided Wiser USB drive.
•
C-Bus Toolkit setup software, version 1.10.2, or later. The latest
C-Bus Toolkit version is available at the Clipsal Integrated Systems
technical downloads site:
http://www2.clipsal.com/cis/technical/ select Downloads.
You must use the latest PICED software to obtain the latest firmware and
the automatic firmware update feature. If you are unsure about the
correct software versions to use, contact Technical Support.
The PICED setup software contains the latest Wiser Home Controller
firmware .IMG file. The latest firmware is loaded automatically as part of
transferring your PICED project to the Wiser Home Controller. The setup
packages also include the latest CNI configuration software, C-Gate and
transfer utilities. Refer to Section 4.3.
Graphical User Interface (GUI)
After configuring the Wiser Home Controller, your entry point to the Wiser
Home Controller is the Wiser Graphical User Interface (GUI). Refer to
Section 5.0 for more information about using the GUI. The factory installs
the GUI and a sample project in the Wiser Home Controller router. The
sample project is not intended to be used as is; you must create a new
project with PICED.
To access the GUI, connect to the LAN and open a browser session. Clipsal
recommends using Internet Explorer or Mozilla Firefox. Type the following
IP address and press Enter:
http://192.168.2.1
The username is admin and the password is admin
7
Wiser Home Controller Installation Instructions
1.3
Product Information
The following documents and online files are available from the downloads
site noted previously:
C-Bus Wiser Home Controller 5200PG Setup Sheet
The Setup Sheet provides quick installation information for installers who
are familiar with home LANs. The Setup Sheet is shipped with the product.
C-Bus Wiser Home Controller 5200PG Installation Instructions
A copy of this document is shipped with the product on a USB drive. You
can download the latest version of the document from the CIS technical
download site as a PDF file.
C-Bus Wiser Home Controller User's Manual
This document is provided on a USB drive with your equipment. The User's
Manual is a handy reference when configuring the Wiser Home Controller
and developing programs that control C-Bus equipment in the home. The
latest version of the document can be downloaded from the Clipsal CIS
downloads site as a PDF file.
readme.htm file for the Wiser Home Controller
The readme.htm file provides a link to the download site for the latest
PICED software setup package. The readme.htm file is provided on the
Wiser 1GB USB drive that is provided with the unit.
C-Bus Toolkit Help
C-Bus Toolkit Help is part of the software setup. The latest version has
current GUI and device content. Help is available whenever C-Bus Toolkit is
running.
PICED Help
When using PICED, you should access Help as needed to create your
projects. Help provides information about the toolbars and menus.
Other Help files
Clipsal software products such as C-Gate and the CNI Configuration Utility
have help files that can be very useful during installation and
troubleshooting.
8
Wiser Home Controller Installation Instructions
2.0
Network Topology
You should carefully consider the existing network layout at the customer
site before installing the Wiser Home Controller. Try to minimise the
amount of reconfiguration required. There are a couple of important points
to remember during the Wiser Home Controller installation.
•
The Wiser Home Controller is not a modem. You must connect the
router to an Internet connection, NOT a telephone line. A
broadband modem is not provided as part of Wiser Home
Controller.
•
The Wiser Home Controller has wired and wireless LAN capabilities.
The CNI uses one wired router LAN port. The three remaining wired
ports are for IP connections to the local LAN.
2.1
Mapping Your Existing Network
There are many variations found in home networks. By mapping the
existing network, you make it much easier to see what cabling and
configuration tasks must be performed when installing the Wiser Home
Controller.
Example:
The figure below shows a basic network configuration that is common in
many homes. The network might use automatic IP addressing (DHCP), static
IP addressing or a mix of the two.
Figure 2. A basic home network example BEFORE installing a Wiser Home Controller
In the example above, the customer can easily access the static IP address
of the modem/router to set wireless security parameters.
9
Wiser Home Controller Installation Instructions
2.2
Adding the Wiser Home Controller and CNI
The installer has several choices when adding the Wiser Home Controller to
the customer's network. The basic options are:
•
Option A. Connect the Wiser Home Controller's WAN port to the output
of the customer's modem/router as shown in Figure 3. In this
configuration, all network traffic passes through the Wiser Home
Controller's wired and wireless LANs.
•
Option B. Place the Wiser Home Controller on the existing customer
LAN as shown in Figure 4. This configuration allows you to make
minimal changes to the customer's equipment setup.
•
Option C. Connect the Wiser Home Controller to an ADSL modem in
bridge mode. In this configuration, the Wiser Home Controller is the
direct gateway to the customer's ISP.
Option A
Figure 3. Option A, Wiser Home Controller as the connection point for the
customer's LAN
When using Option A, you must re-establish the IP addresses of the
customer's IP connected devices to subnet 2. You might have to configure
static IP addresses. If you are using wireless devices, you must also
configure the wireless LAN on the Wiser Home Controller.
If the Wiser Home Controller does not provide enough physical connections
for IP connected devices, a hub must be added. Clipsal does not provide the
hub.
10
Wiser Home Controller Installation Instructions
Option B
Figure 4. Option B, Wiser Home Controller placed on the customer's LAN
Option B requires a minimum of changes to the existing customer
configuration. After adding the Wiser Home Controller, move the
customer's wireless equipment to the Wiser wireless LAN. Be sure to set up
security on the new wireless LAN, if used.
Option C
Figure 5. Option C, Wiser Home Controller connected to a bridging modem.
11
Wiser Home Controller Installation Instructions
Choosing a Network Setup Option
The following table can be helpful in deciding which of the three basic
options is best suited to the customer's needs.
Feature
Option A
Option B
Option C
WAN access for programming and
configuration
Yes
Yes note 1
Yes
All traffic is routed through the Wiser
unit. See note 3
Yes
No
Yes
Minimal disruption to customer's
network
No
Yes
No
Can use all switch ports on the
customer's router
No
Yes
No
Requires changing customer devices IP
addresses
Yes note 2
No
Yes note 2
Migrate the customer's wireless devices
to the Wiser's LAN
Yes
Yes
Yes
Requires changing the Wiser unit's IP
address.
No
Yes
No
Requires port forwarding for remote
access.
Yes
Yes
No
Need to disable one DHCP server
No
Yes
No
Single router in system
No
No
Yes
Dyn DNS
No
No
Yes
Requires the ability to put
modem/router in bridge mode
No
No
Yes
Single IP network (subnet)
No
Yes
Yes
Table 2. Choosing a configuration based on option features
Notes
1. Requires port forwarding.
2. Unless Wiser is changed to use 192.168.1.x
3. This might create problems if the customer is using VOIP or other
settings, such as port mapping that are not supported by Wiser.
12
Wiser Home Controller Installation Instructions
2.3
Setting up a Wireless LAN
Many homes use wireless devices connected to the wireless LAN on the
customer's ADSL modem/router. The Wiser Home Controller provides a
wireless LAN that should be used for wireless-connected devices. Install the
unit as close as possible to the wireless devices on the LAN.
The IP address of the Wiser Home Controller wireless LAN is the same as
the wired LAN, 192.168.2.1.
Wiser Home Controller is delivered with the wireless LAN enabled and WPA
security is in place.
SSID: WiserHomeController
Security: WPA-PSK
Figure 6. Wiser Home Controller using the wireless LAN used with Option A
Notes:
•
You can use the Wiser Home Controller's wireless LAN as the
connection to the PC being used to setup the installation.
•
The Wiser Home Controller's wireless LAN does not communicate
directly with the customer's wireless C-Bus devices. The data path to
these devices uses the inline CNI and a C-Bus Wireless Gateway
unit.
13
Wiser Home Controller Installation Instructions
3.0
Installation
Use the C-Bus Wiser Home Controller 5200PG Setup Sheet, provided with
the equipment to do the hardware installation. Consult other Wiser Home
Controller product information for details.
3.1
Installation Location
It is important to select the best location to install the Wiser Home
Controller. Some considerations are listed below:
•
The Wiser Home Controller is designed for indoor use only.
•
The Wiser Home Controller can be mounted on a wall using the
keyholes on the rear of the router. Refer to the Setup Sheet for
details.
•
Locate the equipment near associated wireless devices for best
reception.
•
Choose a location free of water, humidity, direct sunlight and heavy
dust. Make sure the equipment will have adequate ventilation.
•
Route network cables where they will not be disturbed by people
walking about.
•
Provide a building power point for the power supply.
3.2
•
Important Notes
Keep the PC network (Ethernet) and C-Bus network isolated from each
other. Do not connect the pink C-Bus network cable to an Ethernet LAN
or telephone lines.
The C-Bus network uses polarised 15 - 36 V d.c. that can
damage PC equipment. Connecting Ethernet network cables to
a C-Bus network will cause the networks to fail. Use pink C-Bus
network cable to avoid confusion.
•
Using software not provided by Clipsal Integrated Systems (CIS) for
C-Bus operation may cause unpredictable results.
•
If you install the CNI unit in a different location from Home Controller,
you must provide a 6-12 V d.c. power supply for the LAN side of the
CNI. You will also use a network cable in place of the extender (busbar).
Polarity for the power socket of the CNI is as follows:
14
Wiser Home Controller Installation Instructions
3.3
Overview of Hardware Installation Steps
The steps listed in Table 3 are detailed in this document and in the Wiser
Home Controller 5200PG Setup Sheet.
Prerequisite
Install Clipsal C-Bus Toolkit and PICED software on a PC using the
downloaded versions (refer to Section 1.2). Bring the PC to the customer
site.
Main Installation Steps
Step
Tasks to Perform
Refer to
Section
1
Connect the CNI to the customer's C-Bus network
cable. The connection uses twisted pairs.
3.4
2
Assemble the router, CNI and busbar.
3.5
3
Install the hardware. Mount the Wiser Home
Controller on the wall or place it on a flat surface,
such as a desktop.
3.6
4
Connect the your configuration PC to one of the
three available LAN ports on the Wiser Home
Controller router. Connect the power supply to the
router, and connect to the power outlet. Check
indicator LEDs.
3.7
Go to Section 4.0, Software Configuration.
Table 3. Overview of the main hardware installation steps
Helpful Hint: The installer can develop the PICED project for the
customer's Wiser Home Controller before arriving at the customer's
home. Update the customer's C-Bus project using a backup of the .cbz
file and the latest C-Bus Toolkit. Any projects developed or updated with
the latest C-Bus Toolkit version are not compatible with older versions of
the program.
15
Wiser Home Controller Installation Instructions
3.4 Step 1, Connect the CNI to the C-Bus Network Cable
The C-Bus network and the Ethernet LAN are electrically isolated inside the
CNI unit. The C-Bus network provides power for the C-Bus side of the CNI
circuit board.
Do not connect the C-Bus side of the CNI to an Ethernet LAN. Damage to
the equipment will occur.
1. Open the cable access door on the CNI unit.
2. Crimp the wire pairs using bootlace connectors. Connect the
twisted pairs for C-Bus positive (+) and C-Bus negative (-) to the
screw terminals on the PCB connector. The C-Bus network cable
wire colour assignments are defined in Figure 7.
Note: You can install a second set of twisted pairs to daisy chain to
another C-Bus device. For best results, use bootlace crimp connectors.
3. Install the plastic strain relief piece. The strain relief is in the shape
of the letter 'H.'
4. Close the access door. The CNI is now ready for attachment to the
router and busbar.
C-Bus Connection
Colour
C-Bus Positive (+)
blue
C-Bus Negative (–)
blue & white
C-Bus Positive (+)
orange
C-Bus Negative (–)
orange & white
Figure 7. C-Bus cable details for the C-Bus network
Note:
Wireless C-Bus devices require a C-Bus Wireless Gateway unit. They do not
communicate directly with the Wiser Home Controller's wireless LAN.
16
Wiser Home Controller Installation Instructions
3.5 Step 2, Assemble the Router, CNI and Busbar
Assemble the Wiser Home Controller's router, CNI and busbar to form a
single unit. Use the instructions below:
1. Install the three antennas on the Wiser Home Controller's router
box. The antennas must be installed to prevent internal damage to
the wireless transceivers.
2. Using the link that is attached to the CNI, connect the CNI and the
router together. If you have not already connected the pink C-Bus
cable to the CNI terminals, do this now. See Section 3.4.
3. Carefully attach the busbar (power and network cable connector) to
the sides of the Home Control's router and the CNI. Be sure that the
RJ-45 plugs make good connections.
4. The assembled unit is ready for wall or desktop placement.
Figure 8. Busbar Power and Signal Connections
17
Wiser Home Controller Installation Instructions
3.6 Step 3, Install the Hardware
1. Choose a suitable location for the Wiser Home Controller.
2. Adjust the antennas. Normally, the higher you mount the
equipment, the better the performance.
3. Mount the equipment on a wall using the two keyhole screws on
the back of the router, or place the unit on a desk or table.
If you are using the Wiser Home Controller's wireless LAN, do not place
the router within 20 cm of the operator. This is a personal safety
requirement.
Figure 9. Mounting Screw locations
18
Wiser Home Controller Installation Instructions
3.7
Step 4, Connect your Configuration PC
You can now connect and test the connection to the customer's C-Bus
network using the Wiser Home Controller and the inline CNI.
1. Connect the configuration PC to one of the open RJ-45 LAN
connectors on the Wiser Home Controller. You may use the Wiser
Home Controller's wireless LAN, if preferred.
2. Connect the power supply wire to the busbar power port. Plug the
power supply unit into a wall power outlet.
Use only the power supply provided with the Wiser Home
Controller. Using a different supply unit might cause product
damage or erratic performance.
After you have connected the configuration PC and C-Bus network, you can
use the LEDs on the Wiser Home Controller's router and CNI to verify LAN
and C-Bus network connections (See Section 4). If you have problems,
check all signal and power connections.
Monitor the Indicator Lights
When the Wiser Home Controller unit is powered on, the router performs a
self-test cycle. During the cycle, the Diag lamp is on. It might take a minute
or two for the light to go out. The Diag lamp might flash intermittently, but
after initialisation it should not be on continuously.
Other lights on the router indicate Internet, LAN and wireless activity. Refer
to Figure 10 and Table 4 for more information.
Figure 10. Location of LEDs on the Wiser Home Controller
19
Wiser Home Controller Installation Instructions
Wiser Home
Control indicators
Power
Security (orange)
Wireless
Router
Diag (red)
Internet
LAN
Purpose or Meaning
The Power LED lights when power is applied to the
unit and stays lit, as long as power is present.
Not used for Wiser Home Control functions.
Lit when wireless is available. Blinks when
transmitting or receiving data.
When the unit is working as a ‘router’ the LED is lit.
Lit during self-test and a few moments thereafter. If
the light stays on it indicates a problem.
Flashes when data is transferred.
Lit when the Ethernet port is connected to a LAN.
The numbered LEDs indicate which ports are active.
Table 4. Wiser Home Controller LEDs
The Inline CNI unit has two indicator lights. The 'LAN' indicator display is
green, orange, or a combination of the two. Refer to Figure 11 and Table 5.
The 'C-Bus' indicator on the Inline CNI is only active when the unit is
connected to a C-Bus network that is powered on. Refer to Table 5.
Figure 11. Location of LEDs on the Inline CNI
The Wiser Home Controller's power supply provides power for the Ethernet
indicator and the associated circuits in the CNI.
LAN indicator
Meaning
Green
Communication link is good
Orange/Green flash
Link is good with active data transfer
Red
Non-existent or problematic link
Off
Power problem, for example no power connection
Table 5. The LAN indicator
20
Wiser Home Controller Installation Instructions
The C-Bus network powers the C-Bus indicator and C-Bus circuits in the CNI.
The C-Bus LED lights only when the network is powered on. For C-Bus LED
meanings refer to Table 6.
C-Bus Indicator
Meaning
Orange
C-Bus clock signal is present, voltage is good
Orange/Red flash
C-Bus good, active communication between
C-Bus and Ethernet
Off
No C-Bus connection
Table 6. The C-Bus indicator
21
Wiser Home Controller Installation Instructions
4.0
Software Configuration
You are now ready to configure the Wiser Home Controller and create a
custom project for the customer. The installer can develop the PICED
project for the customer's Wiser Home Controller before arriving at the
customer's home.
Prerequisites
Perform the hardware installation and basic checks found in Section 3.
If you have not already done so, install Clipsal C-Bus Toolkit and PICED
software on a PC using the downloaded versions (refer to Section 1.2).
Bring the PC to the customer site.
Note: During configuration tasks, the router must reboot several times. Allow at
least 90 seconds after a reboot, and then access the router.
Software Configuration Steps
Step
Tasks to Perform
Refer to
Section
1
Using a browser, configure the Wiser Home
Controller's router. Access the GUI at 192.168.2.1,
username is admin and password is admin.
4.1
2
Use C-Bus Toolkit to verify the connection from the PC
to the customer' C-Bus network and to update the
project. The router is the path to the CNI. The IP
address of the router unit is 192.168.2.1 and the
inline CNI is at port 10001, (as a point of information,
the CNI has the IP address 192.168.2.2.
4.2
3
Use PICED to create and transfer a custom Wiser
Home Controller project for the customer's home.
4.3
Table 7. Software configuration steps
22
Wiser Home Controller Installation Instructions
4.1
Step 1, Configure the Wiser Home Controller's Router
Follow these steps to make changes to the router configuration:
1. To access the user interface (GUI) and router configuration pages
use an Internet browser such as Microsoft Internet Explorer or
Firefox on the configuration PC and enter the following address:
http://192.168.2.1
The username is admin and the password is admin
The user GUI is displayed. For details about the GUI refer to
Section 5.
2. Click the toolbox icon (screwdriver and spanner/wrench).
3. Select Configure Router. The Wiser Home Controller's main Setup
window is displayed.
23
Wiser Home Controller Installation Instructions
If you have previously configured a broadband router, the Wiser Home
Controller configuration procedure is very similar. During the configuration
session, you will set up the following:
• Change password on Administration page (recommended)
• Host Name and Domain Name on Setup page (optional)
• Wireless Settings on Wireless page and Wireless Security page
• Remote access on Administration page or User UI
Changing the password is recommended for security reasons. You can
change the password, but you cannot change the username. Passwords are
limited to 30 characters. Do NOT use spaces or any of the following in your
router password: ' " \ < > &
Setup Page Window
Follow the steps below during your configuration session.
1. The first display you see is the Setup page window. Add a Host
Name and Domain Name if needed and then move to other pages.
After you make changes on a page and select Save Settings the
router reboots and the new information is captured for future
sessions. Allow about 90 seconds for a reboot.
The following message appears to notify the system is rebooting (a
reboot could take about 90 seconds):
Your changes have been saved.
System Rebooting…Please wait…
2. Go to the Administration tab and change the password. This is
highly recommended for security reasons. Save settings.
3. Select the Wireless tab and set up the wireless parameters.
Wireless Page Window
In the Setup window, click Wireless to view the options for the Wiser Home
Controller's wireless LAN. Clipsal highly recommends setting up security at
this time to stop intruders. Refer to Section 2.3 Setting up a Wireless LAN.
24
Wiser Home Controller Installation Instructions
1. On the main Wireless section, enable or disable wireless. Select a
network mode. If you enabled wireless, go to Step 2.
Network Mode:
B/G Mixed
Wireless-B Only
Wireless-G Only
Wireless-BGN
Wireless-N Only
2. Provide a Network Name. The default SSID is WiserHomeControl.
3. Select radio band (standard: 20 MHz or wide: 40 MHz).
4. Select a channel. Select a channel that does not conflict with other
local wireless devices.
1 - 2.412 GHz
2 - 2.417 GHz
3 - 2.422 GHz
4 - 2.427 GHz
5 - 2.432 GHz
6 - 2.437 GHz
7 - 2.442 GHz
Channel
8 - 2.447 GHz
9 - 2.452 GHz
10 - 2.457 GHz
11 - 2.462 GHz
12 - 2.467 GHz
13 - 2.472 GHz
Note: Check for compliance with local and country
regulations.
5. Click the Wireless Security tab to view the wireless security page.
Clipsal recommends using WPA-PSK.
25
Wiser Home Controller Installation Instructions
4.2
Step 2, Use C-Bus Toolkit to Collect Project Information
You can access the C-Bus network with C-Bus Toolkit software using the
Wiser Home Controller and the CNI. C-Bus Toolkit lets you update the
Customer's project and gather information for the PICED project.
Do not run C-Bus Toolkit software and PICED at the same time on
your computer. Both applications use the C-Gate program but in
slightly different modes of operation.
To use C-Bus Toolkit with the Wiser Home Controller and CNI, do the
following:
1. Open the C-Bus Toolkit application. Verity that the current interface
CNI/192/168/002/001:10001
settings are:
If the IP address shown is the same as the Wiser Home Controller
(not the CNI), then press the Scan Network button on the toolbar.
2. If the information on the Welcome screen is not correct, go to the
File menu and select Set Default Interface. Follow the steps to
define the interface.
3. Use the tools provided to scan the network, search for networks, or
refresh the list of projects, as needed.
4. If you have difficulty accessing the C-Bus network using C-Bus
Toolkit, check all signal and power connections for the C-Bus
network and CNI. Look for indicator lamp indications of a problem.
5. After you have updated the Tag database using C-Bus Toolkit, shut
the program down before opening PICED. Refer to the help files for
more information.
26
Wiser Home Controller Installation Instructions
4.3 Step 3, Use PICED to Create and Transfer a Project
Note: PICED software Help files contain new information specific to the Wiser
Home Controller. Be sure to access PICED Help during installation, as
needed.
Setting up a New Project in PICED
1.
2.
Start PICED.
Select Create a New Blank Project. Click Next.
3.
Select Wiser Home Controller. Click Next.
27
Wiser Home Controller Installation Instructions
4. Enter details as for other C-Bus products.
5. When you get to the Options 2 tab, select a Skin (use the drop
down to see the choices).
6.
7.
8.
To verify that the Wiser Home Controller and CNI are connected
correctly, or to configure them, click the respective Open buttons.
Click Next. Enter details as for other C-Bus products. When
complete, click Finish.
The Widget Manager will be displayed. Add some Locations. Click
the Help button to open the PICED help file for details. Click Next
when complete.
28
Wiser Home Controller Installation Instructions
9.
Add some Function Groups. Refer to the PICED help file for details.
Most projects will include Lighting, Security and Climate Control. Click
Next when complete.
10.
Add some Widgets. Refer to the PICED help file for details
Tip: at the top of the page are drop-down lists to change some of the
properties of selected Widgets. This is much quicker to use than
opening each Widget separately.
29
Wiser Home Controller Installation Instructions
11.
If needed, add:
• Scenes
• Schedules
• Logic
• User System IO Variables
• E-Mail Accounts
Refer to PICED help files for details.
Transferring the Project to the Wiser Home Controller
1.
When the project is complete, click on the Transfer button (box with a
red arrow). The Transfer Project to Wiser Home Control form will be
shown.
30
Wiser Home Controller Installation Instructions
2.
Click OK. The Wiser Connection Wizard will be displayed.
3.
Select Fixed IP and enter the IP Address of the Wiser Home Control
(192.168.2.1 by default).
Click OK.
If the Wiser unit has out of date firmware, the Firmware tab will be
displayed. Enter a password (admin by default) and click on Transfer
Firmware. Wait for the Wiser unit to re-start, then repeat steps 1 to 4.
If the Wiser firmware is up to date, the Transfer tab will be selected.
Click on Start. Wait for the Wiser unit to re-start.
Open a web browser and enter the IP Address of the Wiser unit
(192.168.2.1 by default). You should be able to see your project and
control it.
Use simulation mode in PICED (the button with a picture of a hand on
it) to test further changes to your project without the need to transfer
the project each time. Some aspects of Simulation mode can only be
used once a project transfer has been done.
4.
5.
6.
7.
8.
Refer to the PICED and Transfer Utility help files for additional information.
31
Wiser Home Controller Installation Instructions
5.0
Introduction to the User's Interface (UI)
Access the Wiser Home Controller's user interface with a web browser such
as Internet Explorer or Mozilla Firefox. Type the following URL and press
Enter on your keyboard.
http://192.168.2.1/
username is admin password is admin, or your changed password
Note: if your Wiser Home Controller's IP Address is not 192.168.2.1, use
the correct IP Address in the URL above.
You should now be able to see the Wiser Home Controller's graphical user
interface (GUI). If you click one of the Location names, you will see the
Widgets for that location. If you click a Function Group icon, you will see the
Widgets for that Function Group. Click the Widgets to control them.
You can also control the Wiser Home Controller using a 'projector'
application running on a device such as a mobile phone or PDA.
The Wiser Home Controller's web interface appearance depends on many
factors, including the 'skin' used and the selected 'widgets.' A typical screen
is shown below.
32
Wiser Home Controller Installation Instructions
A Widget is a graphical component displayed on the Wiser Home
Controller that is used to control and/or display the state of something.
Typical functions for widgets include:
•
Controlling lighting
•
Controlling a home audio system
•
Controlling and monitoring a security system
•
Displaying a web camera
The Wiser Home Controller displays the widgets using the selected skin. The
skin defines the appearance of the background and the Widgets, as well as
the way the user interface operates.
The Wiser Home Controller automatically arranges the Widgets onto pages
according to their ‘Location’ and/or ‘Function Group.’
Locations are defined by the user and are used to arrange Widgets
according to their physical location in a site. Typical Locations in a home
might include:
•
Lounge
•
Dining
•
Bedrooms
•
Outside
Function Groups are defined by the user and are used to arrange Widgets
according to their usage. Typical Function Groups in a Home might include:
•
Lighting
•
Security
•
Climate Control
•
Media (Audio/Video)
33
Wiser Home Controller Installation Instructions
6.0
Additional Information
6.1
Using Static TCP/IP Settings on the PC (if necessary)
When possible, use the automatic IP setting feature (DHCP enabled). Use
static IP addressing when a fixed IP address is needed. The following steps
might be necessary for your installation.
Windows 2000 or Windows XP
1. Connect the PC cable to an unused LAN port on the Wiser Home
Controller. Apply power to the router and allow it to initialise.
2. Click Start; click Settings and then click Control Panel.
3. Double-click the Network Connection icon.
4. Right-click the Local Area Connection icon and then click
Properties. The Local Area Connection Properties window appears.
5. Under the General configuration tab, locate and select TCP/IP with
the corresponding network card, and then click Properties. The
Internet Protocol (TCP/IP) Properties window appears.
6. Click Use the following IP Address and enter:
IP Address:
192.168.2.10
Subnet Mask:
255.255.255.0
Default Gateway: 192.168.2.1
(see Note )
Note: Provide a unique address that does not conflict with any other
device on the LAN.
34
Wiser Home Controller Installation Instructions
7. Now your PC is ready to access and configure the Wiser Home
Controller's router.
Windows VISTA
1. Connect the PC cable to an unused LAN port on the Wiser Home
Controller. Apply power to the router and allow it to initialise.
2. Click Start, Control Panel, and then Network and Internet: Manage
network connections.
3. Right-click the Local Area Connection icon and then click
Properties. The Local Area Connection Properties window appears.
4. Under the Networking configuration tab, locate and select Internet
Protocol Version 4 (TCP/IPv4) with the corresponding network card
and then click Properties. The Internet Protocol (TCP/IP) Properties
window appears.
5. Click Use the following IP Address and enter:
IP Address:
192.168.2.10
Subnet Mask:
255.255.255.0
Default Gateway: 192.168.2.1
Note 1: Provide a unique address that does not conflict with any other
device on the LAN.
6. Now your PC is ready to access and configure the Wiser Home
Controller.
35
Wiser Home Controller Installation Instructions
6.2
Useful DOS Command Prompt Programs
The two DOS programs illustrated here use command lines. These
programs can be useful to diagnose some connectivity problems and
gather information about IP addresses. Go to Start/Run and then type:
cmd.exe then click OK then type: ipconfig /all and press Enter
ping <ip address> and then press Enter
In the example below, the PC is using an automatically assigned address of
192.168.2.101. The default gateway is the customer’s modem/router. Note
that the wireless LAN is not shown in this example.
The example below shows a successful ping to the Wiser Home Controller
unit. You could also ping the customer’s modem/router or other units on
the network.
36
Wiser Home Controller Installation Instructions
6.3
Frequently Asked Questions (FAQs)
Q1:
What do I do if I have forgotten my password?
A1:
The default username is admin. The default password is admin. You
cannot change the username on the router. You can only change the
password. If you have changed the default password and have forgotten the
new one, you must reset the router back to factory defaults.
Q2:
How do I reset the router back to factory defaults?
A2:
There are two ways to do this. The first is the physical method of
inserting a thin paper clip end into the reset button (recessed in a hole) at
the back of the unit. (1) Unplug the power connector, (2) insert the clip
apply power and hold the button in for 10 seconds, and then (3) remove the
clip and wait 30 seconds. The second method is to open the router Setup
page (you must know the current user name and password) go to the
Administration page and select Factory Defaults. Confirm the selection.
Using either method, the router automatically reboots.
Q3:
How do I apply the latest firmware release?
A3:
Clipsal recommends using the Transfer Utility because it is less
prone to disruption during the data transfer than other methods. Whenever
you transfer a project in PICED using the transfer function, the software
checks the firmware version with the version on your PC. The latest
firmware is automatically updated in the Wiser Home Controller's router.
Q4:
A4:
How can I report any problems?
There are several methods:
Phone Technical Support: See the last page of this instruction
E-mail Technical Support: See the last page of this instruction
Use the C-Bus forum:
http://www.cbusforums.com/forums/
Q5:
What details does Clipsal require to identify, isolate and solve a bug
that I have found?
A5:
A detailed bug report is always greatly appreciated and may
possibly earn you eternal gratitude from the developers. We encourage
users to use the "backup configurations" tool in the router's web user
interface (under Administration->Management tab) to generate a config.bin
file that will allow us to have exactly the same setup/configuration that you
have used on your router. Further, you can also attach the PICED project
archive that you used. These two items are valuable to us in diagnosing and
working on solving a particular problem. Additional information pertinent
to the issue or failure mode you have observed or identified is also
essential. For example, if filing a bug about an unexpected mode of
behaviour with the GUI affecting C-Bus, it is valuable to record the sequence
of steps that you performed.
37
Wiser Home Controller Installation Instructions
Q6: What are the meanings of the icons at the top right of the graphical
user interface?
A6:
See the following paragraphs.
This icon reflects the state and stability of the graphical user
interface's connection to the router. For example, if you see it going
red, this means that it is no longer connected to the router. This can
happen for many reasons. Typically, this happens when using the web UI
over Wi-Fi and the Wi-Fi is going out of range. It will automatically restore
itself to green when it has successfully re-established the connection.
Clicking on the icon will provide more detailed information such as
"attempted reconnects, watchdog counter, keep-alive signals, and
successful reconnections". These will be helpful to report if you
encountered any unexpected behaviour.
The envelope icon reflects the status of a POP3 mailbox if one
has been configured in the project. It will report how many emails
are in the mailbox and the From/Subject lines of up to the first 5
messages.
The C-Bus logo with a red slash across it means that the web UI
does not have C-Bus connectivity.
The wrench logo means that the web UI is currently in CNI mode
meaning that the device is being used as a CNI and thus the web UI
will not function until the CNI mode is disconnected. Once CNI
mode is disconnected, the icon will disappear and the GUI can be used like
normal.
The toolbox icon (screwdriver and wrench) shows a page with
Toolkit Remote Enable, Projector Control Enable and Project
Update Enable (see below).
Q7:
What do Toolkit Remote Enable, Projector Control Enable and
Project Update Enable mean?
Toolkit Remote Enable allows the device to be used as a CNI over
A7:
the Internet. This means that anyone on the Internet, if they knew the
Internet address of your device, can connect on port 10001 and perform
C-Bus tasks. Disabling closes this port. The port is closed by default. This
feature is intended to allow installers to use C-Bus Toolkit to manage a
C-Bus network remotely when they need to. IT IS IMPORTANT TO MAKE
SURE TO CLOSE THE PORT AFTER USE. LEAVING IT OPEN ALLOWS
ANYONE TO MANIPULATE YOUR C-BUS NETWORK.
38
Wiser Home Controller Installation Instructions
Projector Control Enable allows the web user interface to function even
when run remotely over the Internet. This feature is intended to allow an
end-user or installer to interact with their C-Bus network even when outside
of their home or premise.
Project Update Enable allows a PICED project to be uploaded to the device
over the Internet. This means that anyone on the Internet, if they knew the
Internet address of your device, can connect to the device and transfer a
project to the unit and/or retrieve a project from the unit. It is important to
make sure to close the port after usage as leaving it open will allow anyone
to manipulate your C-Bus network.
Q8:
Can I transfer a PICED project from the router to my PC using the
project that I previously loaded on to a router?
A8:
Yes, you can transfer a project from the PC to the Wiser Home
Controller and transfer a loaded program back to the PC.
Q9:
How do I set up Port Forwarding on my Wiser Home Controller?
A9:
The screen below is a representation of how your modem /router
(Not the Wiser unit) should be configured to support access to the Wiser
Home Controller from the Internet.
Note: This setup is only applicable if you are connecting the Wiser Home Controller
behind your Modem/Router. It does not apply if you are using you’re a bridged
Modem or have configured your modem/router to work as a bridged modem.
Q10: How do I use the port definitions built into the Wiser Home
Controller?
A10: To use the Port Definitions refer to the table and the notes that
follow: See Note 1 Wiser Home Controller Wan IP
39
Wiser Home Controller Installation Instructions
Application
ID
ECHO1
Protocol
Ext
Port
8080
Int
Port
8080
TCP
ECHO2
TCP
8888 &
8889
8888
&
8889
CBUS
TCP
14000
14000
CTCT
TCP
8336 &
8337
8336
&
8337
ECHOROUTE
TCP
80
8080
Port Function
Port 8080 is the default port used for
connecting to the web server of the
Wiser Home Controller, When enabled
the Wiser Home Controller UI can then
be reached at http://<your URL or
External IP>:8080/ You will be required
to authenticate with a username and
password to gain access.
Ports 8888 to 8889 are used for the
command interface between your web
application or projector application and
Wiser Home Controller. If these ports
are not open or are being blocked by
your internet service provider then
control from the User interface will not
be possible.
Port 10001 is the default port for the
CNI currently being used in the field
trials. This port is only required if you
wish to obtain programming access
from toolkit to C-Bus, Refer to Note 2
for more details
Ports 8336 and 8337 are used in the
project transfer process to transfer a
Project from PICED to the Wiser Home
Controller remotely
Optional Feature. If your
Modem/Router support port mapping
and you are not using Port 80 for any
other external services you may use this
mapping so you are not required to
enter the port address in your URL to
remotely connect, at http://<your URL
or External IP>
Note 1. To maintain and ongoing connection to your Wiser Home Controller you
should use either a Fixed IP address for the WAN interface of the Wiser Home
Controller or Alternately setup your Modem/Router to always provide the same IP
Address to the Wiser Home Controller Unit (refer to your modem/router manual for
further details on how to do this)
Note 2. The CNI Port is configurable; the default port address is 10001 (to match
toolkit defaults). If the Port address is change from the default it must also be
changed in your Wiser Home Controller Project and downloaded to the Wiser Home
Controller, the new port number will also need to be used in your port forwarding
rules of your modem/router. (Refer to Figure 3 for details on enabling the remote
access to your CNI from within the Wiser Home Controller.
40
Wiser Home Controller Installation Instructions
6.4
Release Notes
Functional product issues listed here are sorted into two main categories.
The first category is "Router Issues" and the second is "C-Bus/GUI Issues".
Router issues refer to anything to do with the routing/network related
functionality of the device. C-Bus/GUI issues refer to anything to do with the
C-Bus related functionality of the device.
Router Issues
1. During setup, the web user interface requires save-and-reboot
steps that make setting up somewhat time consuming.
2. The firmware upgrade screen sometimes does not return to the
web user interface and appears to be stuck. However, returning to
the main page shows that the router has upgraded itself.
3. Setting the date and time requires an Internet connection or an
external device that provides the time and date.
4. If the unit is not connected to the Internet and has no time source,
the router unit starts up with a date of 01-01-1970.
5. If the router hangs or locks-up during normal operation. You are no
longer able to ping the router or access the GUI or access the
router's web user interface. To fix this problem, remove and
reconnect the power connector.
6. The router's port forwarding management page does not let you
specify a destination port. The router only allows port forwarding
but not port mapping. So an internal device such as a camera that
you want to forward must be configured to have an identical
destination port.
C-Bus and Graphical User Interface Issues
1. In simulation mode, if there is no connection to the Wiser unit, an
error message will be displayed.
2. To transfer a project to a router remotely from Internet, use the
'search by IP' function of the transfer client and enter the external
IP address of the router.
If you are using a dynamic naming service such as dyndns.org, you
can use 'nslookup name' or 'ping name' to get the IP address that
can be entered in the 'search by IP' dialog box. Please note that
connections over the Internet can be less stable and if disconnected
41
Wiser Home Controller Installation Instructions
during a transfer, you will need to retry the process. Also the
modem must be in bridge mode to use dyn DNS.
3. Search for Wiser Home Controller using the transfer client fails
when running on Windows Vista. The workaround is to use the
search by IP functionality.
4. Slow boot up depending on utilized functionality. If the router is
configured to use DHCP to retrieve its IP address, boot up can
sometimes take longer than expected.
5. Secured POP3 Mail POP3 mail servers that require Encryption such
as TLS/SSL are not supported.
42
Wiser Home Controller Installation Instructions
7.0
Terms
Busbar A passive connector for Ethernet and power connections to the
Wiser Home Controller and CNI.
CNI C-Bus Network Interface. The CNI handles Ethernet to C-Bus
communication and provides electrical isolation between the networks.
Customer’s modem The hardware component connecting the Wiser
Home Controller to the Internet.
Default gateway A network node, for example a router, that serves as an
access point to another network.
DHCP Dynamic Host Configuration Protocol. A protocol that assigns IP
addresses to client stations on a network at startup.
DNS A network server that resolves Internet Protocol (IP) numeric
addresses from domain names and puts them in a readable form.
Wiser Home Controller The router and CNI unit that provides the
connection from the customer’s equipment to C-Bus and IP devices.
ipconfig.exe A program used to identify the IP connections on a
computer. The program is normally run from a DOS command prompt.
LAN Local Area Network is restricted to a small area such as a home.
Ping A ping command sends packets of data to a defined IP address and
then monitors and reports the returned data. This is useful for testing
two-way communication between points on a network.
RSS feed A web link that follows the RSS (Really Simple Syndication)
specification to access a location that provides frequently updated
information, such as news.
TCP/IP Transaction Control Protocol/Internet Protocol. This protocol uses
unique IP addresses to identify devices on the LAN.
WAN Wide Area Network. The data communications network that links
the customer to the Internet.
WPA WiFi Protected Access, a modern form of encryption for wireless
data. It lacks the vulnerabilities that WEP had,
MAC Media Access Control is a unique address built into Ethernet
hardware devices.
WEP Wired Equivalent Privacy is a form of wireless data encryption using
a 64-bit or 128-bit shared key algorithm.
43
Wiser Home Controller Installation Instructions
8.0
Product Specifications
Parameter
Description or value
Power Source
Wiser Home Controller's router: AC power pack
Inline C-Bus Network Interface: AC power pack
through busbar for Ethernet; C-Bus side is
powered by the C-Bus network
Mounting location
Wall mounted with two keyhole openings
Must be installed indoors
Minimum distance to operator
20 cm from nearest antenna
Mounting screw spacing
95.5 mm between centres
Operating ambient temperature
0—45 degrees C (32—113 degrees F)
Operating relative humidity
10% to 90%, non-condensing
Types of electrical connection
Disconnectable d.c. power supply jack on the
busbar
1 x 3 mm centre positive
Disconnectable WAN connector on busbar
1 x RJ-45 plug
Disconnectable LAN connectors on router
3 x RJ-45 plug
Fixed aux (C-Bus) terminal for
2 x 2.5 mm; for twisted pairs;
with strain relief post
(Suitable for copper or
aluminium conductors)
Ethernet WAN protocol
TCP/IP
Recommended Internet
browsers
Internet Explorer or Mozilla Firefox
44
Wiser Home Controller Installation Instructions
9.0
Standards Complied
Declarations of Conformity
Changes or modifications not expressly approved by Clipsal could void the user's authority to
operate the equipment.
Australian/New Zealand EMC & Electrical Safety Frameworks and Standards
The Wiser Home Controller complies with the following:
Regulation
Standard
Title
Radio
Communications
AS/NZS 4268
Radio Equipment and Systems
-- Short Range Devices
EMC
AS/NZS CISPR22
Information Technology Equipment
-- RF emissions
European Council Directives and Standards
The Wiser Home Controller complies with the following:
Directive
Standard
Title
EMC Directive
2004/108/EC
CISPR 22,
EN 55022
CISPR 24,
EN 55024
ETSI
EN 300 328
Information Technology Equipment
-- RF emissions
Information Technology Equipment
-- Immunity
Electromagnetic compatibility and Radio
Spectrum Matters--DTE 2.4 GHz band, wideband
modulation
Electromagnetic compatibility--electronic
subassemblies
Electromagnetic compatibility and Radio
Spectrum Matters--wideband and HIPERLAN
equipment
Radio base stations and fixed terminal stations
for wireless telecommunications-- Human
exposure to RF electromagnetic fields
Product safety--IT and TTE equipment
R&TTE Directive
1995/5/EC
ETSI
EN 301 489-1
ETSI
EN 301 489-17
EN 50385
Low Voltage
Directive
73/23/EEC
RoHS Directive
2002/95/EC
EN 60950-1
EN 60950-1/A11
Restriction of Hazardous Substances
45
Wiser Home Controller Installation Instructions
US FCC Regulations
The Wiser Home Controller complies with the following:
Regulation
Title
FCC Part 15, Subpart B
Radio Frequency Devices
This device complies with Part 15 of the FCC Rules. Operation is subject to the following two
conditions: (1) this device may not cause harmful interference, and (2) this device must accept
any interference received, including interference that may cause undesired operation.
This equipment has been tested and found to comply with the limits for a Class B digital device,
pursuant to Part 15 of the FCC Rules. These limits are designed to provide reasonable
protection against harmful interference in a residential installation. This equipment generates,
uses and can radiate radio frequency energy and, if not installed and used in accordance with
the instructions, may cause harmful interference to radio communications. However, there is
no guarantee that interference will not occur in a particular installation.
If this equipment does cause harmful interference to radio or television reception, which can
be determined by turning the equipment off and on, the user is encouraged to try to correct
the interference by one or more of the following measures:
-- Reorient or relocate the receiving antenna.
-- Increase the separation between the equipment and receiver.
-- Connect the equipment into an outlet on a circuit different from that to which the receiver is
connected.
-- Consult the dealer or an experienced radio/TV technician for help.
Changes or modifications to this device that are not expressly approved by Clipsal Australia Pty
Ltd, a member of Schneider Electric, could void the user's authority to operate the equipment.
***********
If you are using the Wiser Home Controller's wireless LAN, do not place the router
within 20 cm of the operator. This is a personal health and safety requirement.
46
Wiser Home Controller Installation Instructions
10.0 GNU General Public Licence
Some software components included in the Wiser Home Controller are
provided under a general public license.
GNU GENERAL PUBLIC LICENSE Version 2, June 1991
Copyright (C) 1989, 1991 Free Software Foundation, Inc. 51 Franklin Street, Fifth Floor, Boston, MA 021101301, USA
Everyone is permitted to copy and distribute verbatim copies of this license document, but changing it is not allowed.
Preamble
The licenses for most software are designed to take away your freedom to share and change it. By contrast, the GNU General
Public License is intended to guarantee your freedom to share and change free software to make sure the software is free for
all its users. This General Public License applies to most of the Free Software Foundation's software and to any other program
whose authors commit to using it. (Some other Free Software Foundation software is covered by the GNU Lesser General
Public License instead.) You can apply it to your programs, too. When we speak of free software, we are referring to freedom,
not price. Our General Public Licenses are designed to make sure that you have the freedom to distribute copies of free
software (and charge for this service if you wish), that you receive source code or can get it if you want it, that you can change
the software or use pieces of it in new free programs; and that you know you can do these things. To protect your rights, we
need to make restrictions that forbid anyone to deny you these rights or to ask you to surrender the rights. These restrictions
translate to certain responsibilities for you if you distribute copies of the software, or if you modify it. For example, if you
distribute copies of such a program, whether gratis or for a fee, you must give the recipients all the rights that you have. You
must make sure that they, too, receive or can get the source code. And you must show them these terms so they know their
rights. We protect your rights with two steps: (1) copyright the software, and (2) offer you this license which gives you legal
permission to copy, distribute and/or modify the software. Also, for each author's protection and ours, we want to make
certain that everyone understands that there is no warranty for this free software. If the software is modified by someone else
and passed on, we want its recipients to know that what they have is not the original, so that any problems introduced by
others will not reflect on the original authors' reputations. Finally, any free program is threatened constantly by software
patents. We wish to avoid the danger that redistributors of a free GNU GENERAL PUBLIC LICENSE.txt program will individually
obtain patent licenses, in effect making the program proprietary. To prevent this, we have made it clear that any patent must
be licensed for everyone's free use or not licensed at all. The precise terms and conditions for copying, distribution and
modification follow.
TERMS AND CONDITIONS FOR COPYING, DISTRIBUTION AND MODIFICATION
0. This License applies to any program or other work which contains a notice placed by the copyright holder saying it may be
distributed under the terms of this General Public License. The "Program", below, refers to any such program or work, and a
"work based on the Program" means either the Program or any derivative work under copyright law: that is to say, a work
containing the Program or a portion of it, either verbatim or with modifications and/or translated into another language.
(Hereinafter, translation is included without limitation in the term "modification".) Each licensee is addressed as "you". Activities
other than copying, distribution and modification are not covered by this License; they are outside its scope. The act of
running the Program is not restricted, and the output from the Program is covered only if its contents constitute a work based
on the Program (independent of having been made by running the Program). Whether that is true depends on what the
Program does.
1. You may copy and distribute verbatim copies of the Program's source code as you receive it, in any medium, provided that
you conspicuously and appropriately publish on each copy an appropriate copyright notice and disclaimer of warranty; keep
intact all the notices that refer to this License and to the absence of any warranty; and give any other recipients of the
Program a copy of this License along with the Program. You may charge a fee for the physical act of transferring a copy, and
you may at your option offer warranty protection in exchange for a fee.
2. You may modify your copy or copies of the Program or any portion of it, thus forming a work based on the Program, and
copy and distribute such modifications or work under the terms of Section 1 above, provided that you also meet all of these
conditions:
a) You must cause the modified files to carry prominent notices stating that you changed the files and the date of any change.
b) You must cause any work that you distribute or publish, that in whole or in part contains or is derived from the Program or
any part thereof, to be licensed as a whole at no charge to all third parties under the terms of this License.
c) If the modified program normally reads commands interactively when run, you must cause it, when started running for such
interactive use in the most ordinary way, to print or display an announcement including an appropriate copyright notice and a
notice that there is no warranty (or else, saying that you provide a warranty) and that users may redistribute the program
under these conditions, and telling the user how to view a copy of this License. (Exception: if the Program itself is interactive
but does not normally print such an announcement, your work based on the Program is not required to print an
announcement.)
These requirements apply to the modified work as a whole. If identifiable sections of that work are not derived from the
Program, and can be reasonably considered independent and separate works in themselves, then this License, and its terms,
do not apply to those sections when you distribute them as separate works. But when you distribute the same sections as part
of a whole which is a work based on the Program, the distribution of the whole must be on the terms of this License, whose
permissions for other licensees extend to the entire whole, and thus to each and every part regardless of who wrote it. Thus, it
is not the intent of this section to claim rights or contest your rights to work written entirely by you; rather, the intent is to
exercise the right to control the distribution of derivative or collective works based on the Program. In addition, mere
aggregation of another work not based on the Program with the Program (or with a work based on the Program) on a volume
of a storage or distribution medium does not bring the other work under the scope of this License.
3. You may copy and distribute the Program (or a work based on it, under Section 2) in object code or executable form under
the terms of Sections 1 and 2 above provided that you also do one of the following:
47
Wiser Home Controller Installation Instructions
a) Accompany it with the complete corresponding machinereadable source code, which must be distributed under the terms
of Sections 1 and 2 above on a medium customarily used for software interchange; or,
b) Accompany it with a written offer, valid for at least three years, to give any third party, for a charge no more than your cost
of physically performing source distribution, a complete machinereadable copy of the corresponding source code, to be
distributed under the terms of Sections 1 and 2 above on a medium customarily used for software interchange; or,
c) Accompany it with the information you received as to the offer to distribute corresponding source code. (This alternative is
allowed only for noncommercial distribution and only if you received the program in object code or executable form with such
an offer, in accord with Subsection b above.)
The source code for a work means the preferred form of the work for making modifications to it. For an executable work,
complete source code means all the source code for all modules it contains, plus any associated interface definition files, plus
the scripts used to control compilation and installation of the executable. However, as a special exception, the source code
distributed need not include anything that is normally distributed (in either source or binary form) with the major components
(compiler, kernel, and so on) of the operating system on which the executable runs, unless that component itself accompanies
the executable. If distribution of executable or object code is made by offering access to copy from a designated place, then
offering equivalent access to copy the source code from the same place counts as distribution of the source code, even
though third parties are not compelled to copy the source along with the object code.
4. You may not copy, modify, sublicense, or distribute the Program except as expressly provided under this License. Any
attempt otherwise to copy, modify, sublicense or distribute the Program is void, and will automatically terminate your rights
under this License. However, parties who have received copies, or rights, from you under this License will not have their
licenses terminated so long as such parties remain in full compliance.
5. You are not required to accept this License, since you have not signed it. However, nothing else grants you permission to
modify or distribute the Program or its derivative works. These actions are prohibited by law if you do not accept this License.
Therefore, by modifying or distributing the Program (or any work based on the Program), you indicate your acceptance of this
License to do so, and all its terms and conditions for copying, distributing or modifying the Program or works based on it.
6. Each time you redistribute the Program (or any work based on the Program), the recipient automatically receives a license
from the original licensor to copy, distribute or modify the Program subject to these terms and conditions. You may not
impose any further restrictions on the recipients' exercise of the rights granted herein. You are not responsible for enforcing
compliance by third parties to this License.
7. If, as a consequence of a court judgment or allegation of patent infringement or for any other reason (not limited to patent
issues), conditions are imposed on you (whether by court order, agreement or otherwise) that contradict the conditions of this
License, they do not excuse you from the conditions of this License. If you cannot distribute so as to satisfy simultaneously
your obligations under this License and any other pertinent obligations, then as a consequence you may not distribute the
Program at all. For example, if a patent license would not permit royalty-free redistribution of the Program by all those who
receive copies directly or indirectly through you, then the only way you could satisfy both it and this License would be to
refrain entirely from distribution of the Program.
If any portion of this section is held invalid or unenforceable under any particular circumstance, the balance of the section is
intended to apply and the section as a whole is intended to apply in other circumstances. It is not the purpose of this section to
induce you to infringe any patents or other property right claims or to contest validity of any such claims; this section has the
sole purpose of protecting the integrity of the free software distribution system, which is implemented by public license
practices. Many people have made generous contributions to the wide range of software distributed through that system in
reliance on consistent application of that system; it is up to the author/donor to decide if he or she is willing to distribute
software through any other system and a licensee cannot impose that choice. This section is intended to make thoroughly
clear what is believed to be a consequence of the rest of this License.
8. If the distribution and/or use of the Program is restricted in certain countries either by patents or by copyrighted interfaces,
the original copyright holder who places the Program under this License may add an explicit geographical distribution
limitation excluding those countries, so that distribution is permitted only in or among countries not thus excluded. In such
case, this License incorporates the limitation as if written in the body of this License.
9. The Free Software Foundation may publish revised and/or new versions of the General Public License from time to time.
Such new versions will be similar in spirit to the present version, but may differ in detail to address new problems or concerns.
Each version is given a distinguishing version number. If the Program specifies a version number of this License which applies
to it and "any later version", you have the option of following the terms and conditions either of that version or of any later
version published by the Free Software Foundation. If the Program does not specify a version number of this License, you may
choose any version ever published by the Free Software Foundation.
10. If you wish to incorporate parts of the Program into other free programs whose distribution conditions are different, write
to the author to ask for permission. For software which is copyrighted by the Free Software Foundation, write to the Free
Software Foundation; we sometimes make exceptions for this. Our decision will be guided by the two goals of preserving the
free status of all derivatives of our free software and of promoting the sharing and reuse of software generally.
NO WARRANTY
11. BECAUSE THE PROGRAM IS LICENSED FREE OF CHARGE, THERE IS NO WARRANTY FOR THE PROGRAM, TO THE EXTENT
PERMITTED BY APPLICABLE LAW. EXCEPT WHEN OTHERWISE STATED IN WRITING THE COPYRIGHT HOLDERS AND/OR
OTHER PARTIES PROVIDE THE PROGRAM "AS IS" WITHOUT WARRANTY OF ANY KIND, EITHER EXPRESSED OR IMPLIED,
INCLUDING, BUT NOT LIMITED TO, THE IMPLIED WARRANTIES OF MERCHANTABILITY AND FITNESS FOR A PARTICULAR
PURPOSE. THE ENTIRE RISK AS TO THE QUALITY AND PERFORMANCE OF THE PROGRAM IS WITH YOU. SHOULD THE
PROGRAM PROVE DEFECTIVE, YOU ASSUME THE COST OF ALL NECESSARY SERVICING, REPAIR OR CORRECTION.
12. IN NO EVENT UNLESS REQUIRED BY APPLICABLE LAW OR AGREED TO IN WRITING WILL ANY COPYRIGHT HOLDER, OR
ANY OTHER PARTY WHO MAY MODIFY AND/OR REDISTRIBUTE THE PROGRAM AS PERMITTED ABOVE, BE LIABLE TO YOU
FOR DAMAGES, INCLUDING ANY GENERAL, SPECIAL, INCIDENTAL OR CONSEQUENTIAL DAMAGES ARISING OUT OF THE
USE OR INABILITY TO USE THE PROGRAM (INCLUDING BUT NOT LIMITED TO LOSS OF DATA OR DATA BEING RENDERED
INACCURATE OR LOSSES SUSTAINED BY YOU OR THIRD PARTIES OR A FAILURE OF THE PROGRAM TO OPERATE WITH ANY
OTHER PROGRAMS), EVEN IF SUCH HOLDER OR OTHER PARTY HAS BEEN ADVISED OF THE POSSIBILITY OF SUCH
DAMAGES. END OF TERMS AND CONDITIONS
48
Wiser Home Controller Installation Instructions
11.0 Two-Year Warranty
The 5200PG Wiser Home Controller carries a two-year warranty against
manufacturing defects.
Warranty Statement
1) The benefits conferred herein are in addition to, and in no way shall be
deemed to derogate; either expressly or by implication, any or all other
rights and remedies in respect to Clipsal Integrated Systems Product,
which the consumer has under the Commonwealth Trade Practices Act
or any other similar State or Territory Laws.
2) The warrantor is Clipsal Australia Pty Ltd., with registered offices in all
Australian States.
3) This Clipsal Integrated Systems Product is guaranteed against faulty
workmanship and materials for a period of two (2) years from the date
of installation.
4) Clipsal Australia Pty Ltd reserves the right, at its discretion, to either
repair free of parts and labour charges, replace or offer refund in
respect to any article found to be faulty due to materials, parts or
workmanship.
5) This warranty is expressly subject to the Clipsal Integrated Systems
Product being installed, wired, tested, operated and used in accordance
with the manufacturer's instructions.
6) All costs of a claim shall be met by Clipsal Australia Pty Ltd, however
should the product that is the subject of the claim be found to be in
good working order, all such costs shall be met by the claimant.
7) When making a claim, the consumer shall forward the Clipsal Integrated
Systems Product to the nearest office of Clipsal Australia Pty Ltd with
adequate particulars of the defect within 28 days of the fault occurring.
The product should be returned securely packed, complete with details
of the date and place of purchase, description of load, and
circumstances of malfunction.
For all warranty enquiries, contact your local Clipsal sales representative.
The address and contact number of your nearest Clipsal Australia office can
be found at http://www.clipsal.com/locations or by telephoning Technical
Support.
49
Product of Clipsal Australia Pty Ltd
A member of Schneider Electric
CIS Technical Support Hotline:
1300 722 247 (Australia)
Technical Support email:
[email protected]
Contact us: clipsal.com/feedback
National Customer Service Enquiries
Tel 1 300 202 525
Fax 1 300 202 556
clipsal.com
Clipsal Australia Pty Ltd reserves the right to change
specifications, modify designs and discontinue items
without incurring obligation and whilst every effort is made
to ensure that descriptions, specifications and other
information in this document are correct, no warranty is
given in respect thereof and the company shall not be
liable for any error therein.
© Clipsal Australia Pty Ltd.
F2150
March 2009
1036670