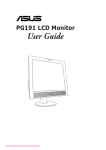
1
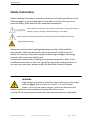
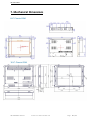
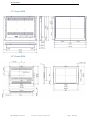
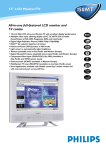
Configuration
Manual
FlatMan
®
Industrial Monitor
Optional with
touchscreen and/ or
bezel
8.4”
10.4”
12”
15”
17”
19”
/ 21,34cm
/ 26,41cm
/ 30,48cm
/ 38,10cm
/ 43,18cm
/ 48,26cm
Language: English
FB084SIxxDDxx
FB104SIxxDDxx
FB121SIxxDDxx
FS150SIxxDDxx
FS170SBxxDDxx
FS190SBxxDDxx
FS190WBxxDDxx
F2150SIxxDDxx
F2170SBxxDDxx
F2190SBxxDDxx
www.snt-embedded.de
s&t embedded
Thank you for purchasing a s&t embedded GmbH product!
© 2014 s&t embedded GmbH
All rights reserved.
The information in this user’s guide is provided for reference only.
s&t embedded does not assume any liability arising out of the application or use of the information or
products described herein. This user’s guide may contain or reference information and products
protected by copyrights or patents and does not convey any license under the patent rights of s&t
embedded, nor the rights of others.
s&t embedded is a registered trademark of s&t embedded GmbH. All trademarks, registered
trademarks, and trade names used in this user’s guide are the property of their respective owners. All
rights reserved. This user’s guide contains information proprietary to s&t embedded.
Customers may reprint and use this user’s guide in other publications. Customers may alter this user’s
guide and publish it only after they remove the s&t embedded name, cover, and logo.
s&t embedded reserves the right to make changes without notice in product or component design as
warranted by evolution in user needs or progress in engineering or manufacturing technology. Changes
which affect the operation of the unit will be documented in the next revision of this user’s guide.
Picture source: http://www.stockvault.net/photo/118566/smoke by 2happy
s&t embedded G m b H
I n d u s t r i a l M o n i tor Rev. 1.6
Page
1 / 32
s&t embedded
1 INTRODUCTION
4 Product description
4 Package contents
5 Product features
5 Cleaning techniques
5 Additional
- Power
- Plugs
- Power and extension cords
- Environment
CONTENTS
2 CONTROL FUNCTIONS
8 Control Buttons
9 OSD Control Panel
- OSD control: displays of
adjustments
- OSD User’s definition of color
temeperature
7 MECHANICAL DIMENSIONS
20 Dimensions
- 8,4” OEM
- 10,4” OEM
- 12” OEM
- 15” OEM
- 15” with bezel
- 15” full metal casing
- 17” OEM
- 17” with bezel
- 17” full metal casing
- 19” OE
- 19 WB
- 19” with bezel
- 19” full metal casing
8 SERVICE INFORMATION
27 Information
3 INPUT DIAGRAMS
13 Input description
9 WINDOWS SETUP
28 Setup information
4 SETUP
14 Signal connection
5 TROUBLESHOOTING
14 Troubleshooting guide
6 PRODUCT SPECIFICATIONS
15 Specifications
- 8,4”
- 10,4”
- 12”
- 15”
- 17”
- 19” (4:3)
19” (16:10)
s&t-embedded
GmbH
19 Display Modes
I n d u s t r i a l M o n i tor Rev. 1.6
Page
2 / 32
s&t embedded
Safety Instructions
Before handling the product, read the instructions and safety guidelines on the
following pages to prevent damage to the product and to ensure your own
personal safety. Refer below for the notational conventions:
Please pay extra attention to this warning, otherwise, it may result in device
damage, property damage, personal damage or even death.
Note. Please read and pay attention to the advices marked with this warning.
High voltage warning.
Always use caution when handling/operating a monitor. Only qualified,
experienced, authorized electronics service personnel should access the
interior of a monitor. The power supplies produce high voltages and energy
hazards, which can cause bodily harm.
Use extreme caution when installing or removing components. Refer to the
installation instructions in this user’s guide for precautions and procedures. If
you have any questions, please contact s&t Post-Sales Technical Support.
WARNING
High voltages are present inside the chassis when the unit’s power
cord is plugged into an electrical outlet. Turn off system
power, turn off the power supply, and then disconnect the
power cord from its source before removing the chassis cover.
Turning off the system power switch does not remove power to components
s&t embedded G m b H
I n d u s t r i a l M o n i tor Rev. 1.6
Page
3 / 32
s&t embedded
1. Introduction
Product Description
Congratulations on your purchase of a LCD monitor. It incorporates high quality
display into a small light weighted module. It has power-saving capabilities and
emits no radiation. You will certainly benefit from this monitor in lots of ways;
to name some of them: comfort safety, and environmental protection.
This LCD monitor incorporates a color active matrix thin-film-transistor (TFT)
liquid crystal display to provide superior display performance. Its maximum
resolution is ideal for displaying complex graphics and high definition images.
Its other outstanding capabilities include audio system and OSD (On Screen
Display) controls.
8.4”
10.4”
12"
15"
17"
19"(4:3)
19"(16:10)
resolution SVGA
resolution SVGA
resolution SVGA
resolution XGA
resolution SXGA
resolution SXGA
resolution WXGA+
800×600
800×600
800×600
1024×768
1280×1024
1280×1024
1440×900
Package Contents
TFT LCD monitor
D-sub signal cable (VGA)
DVI cable
Included with your LCD
monitor are following
items. If there are any
missing accessories,
please contact us
immediately.
Optional for touch screen
models:
- USB or RS232 cable
- Driver CD
AC power cord
s&t embedded G m b H
Power ad a p t o r
I n d u s t r i a l M o n i tor Rev. 1.6
Manual
Page
4 / 32
s&t embedded
Product Features
•
•
•
•
•
•
•
•
High contrast color TFT LCD display
Compatible VESA standards.
Imbedded audio system provides sound performance.
Power management system conforms to VESA DPMS standard.
Support DDC 1/2B for Plug & Play compatibility.
Advanced OSD control for picture quality adjustment.
Detachable stand for wall-mounting application.
Support HDMI V1.0 (Option only DVI model).
Screen cleaning techniques
- Gently clean the screen with a clean camel hair lens brush, or a soft, clean,
lint-free cloth, to remove dust and other particles that can scratch the screen.
- Do not apply pressure to the screen surface when wiping it clean.
- Do not pour or spray any liquid directly onto the screen or casing. Chemical
cleaners have been reported to damage the screen or case of the LCD monitor.
Additional
Read all of these instructions and save them for later use.
Follow all warnings and instructions on the product.
Product
• Do not cover block the vent holes in the case.
• Do not insert sharp objects or spill liquid into the LCD monitor through
cabinet slots. They may cause accident fire, electric shock or failure.
• Disconnect the power plug from the AC outlet if you will not use it for an
extended period of time.
• Do not attempt to service this product yourself, as opening or removing
covers may expose you to dangerous voltage points or other risks.
• Do not touch the screen directly with your fingers. You may damage the
screen, and oil from your skin is difficult to remove.
• Do not apply pressure to screen. The LCD is very delicate.
s&t embedded G m b H
I n d u s t r i a l M o n i tor Rev. 1.6
Page
5 / 32
s&t embedded
Power
• Use the type of power indicated on label.
Plugs
• Do not remove any of the prongs of the monitor’s three-pronged power
plug.
• Disconnect the power plug from the AC outlet under following
conditions:
- If you will not use it for an extended period time.
- When the power cord or plug is damaged or frayed.
- If the product does not operate normally when the operating instructions are
followed. Adjust only those controls that are covered by the operating
instructions. Improper adjustment of other controls may result in damage and
will often require extensive work by a qualified technician.
- If the product exhibits a distinct change in performance, service may be
required.
•
•
•
Connect the signal input cable and tighten it
by turning the screws clockwise.
Do not press the screen with your finger for
a long time. This may result in damage.
Avoid displaying a fixed image on the screen
for a long period of time as it might end with
image burn. Use a screensaver if possible.
Power and extension cords
• Do not allow anything to rest on the power cord.
• Do not locate this product where persons will walk on the cord.
• Use the proper power cord with correct attachment plug type. If the power
source is 120V AC, use a power cord that has UL and C-UL approvals, If the
power source is a 240V AC supply, use the tandem (T blade) type
attachment plug with ground conductor power cord that meets the
respective European country’s safety regulations, such as VDE for
Germany.
• Do not over load wall outlets or power cords. Ensure that the total of all
units plugged into the wall outlet does not exceed 10 amperes.
s&t embedded G m b H
I n d u s t r i a l M o n i tor Rev. 1.6
Page
6 / 32
s&t embedded
• Ensure that the total ampere ratings on all units plugged into the extension
cord is not above the cord’s rating.
• If the power supply cord, which came with your monitor, is to be
connected to the PC instead of the wall outlet, Use an UL/TUV approved
computers with receptacle rated 100~240V AC, 50/60Hz, 1.0A (minimum)
only.
Environment
• Place the monitor on a flat and levelled surface.
• Place the monitor in a will-Ventilated place.
• Keep the monitor away from:
- overly hot places
- cold places
- humid places
- places directly under sunlight
- dusty surroundings
- equipment that generate strong magnetic fields
• Please adjust the frequency to 75 Hz after setting up the LCD monitor.
• Then push the OSD menu button and use the Auto Adjust function to find
the best mode of your computer.
s&t embedded G m b H
I n d u s t r i a l M o n i tor Rev. 1.6
Page
7 / 32
s&t embedded
2. Control Functions
Control Button Front View
1. Power Switch
2. LAMP LED
3. OSD menu / select è
4. Adjust (increase +)
5. Adjust (decrease -)
6. Auto adjust / select ç
s&t embedded G m b H
Power switch
Power LED
Pressing this button pops up the OSD menu on
the screen. Add used to select the OSD control
options on the screen
This button is used to adjust the increasing
value of selected
This button is used to adjust the decreasing
value of selected
Select this function to obtain the best display
efficiency.
OSD Windows display is function selection
I n d u s t r i a l M o n i tor Rev. 1.6
Page
8 / 32
s&t embedded
OSD Control Panel
This OSD Window status will appear when pressing the AUTO button.
The screen will be automatically adjusting.
If there is no VGA or DVI signal input, “No Cable” will display for 3 seconds.
OSD Control: displays of adjustments
OSD Buttons
Pressing the MENU button will display OSD Windows
Pressing AUTO button: left face selection function
Pressing MENU button: right face selection function
Pressing + button:
increase the selection function value
Pressing - button:
decrease selection function value
s&t embedded G m b H
I n d u s t r i a l M o n i tor Rev. 1.6
Page
9 / 32
s&t embedded
Brightness:
Adjust the Brightness using + and - buttons.
Contrast:
Adjust the Contrast using + and - buttons.
Horizontal Position:
Adjust the Horizontal Position using + and - buttons. (VGA mode only)
Vertical Position:
Adjust the Vertical Position using + and - buttons. (VGA mode only)
Sharpness:
Adjust the Sharpness using + and - buttons. (VGA mode only)
OSD Transparency:
Adjust the OSD Transparency using + and - buttons.
Phase:
Adjust the Phase using + and - buttons. (only VGA mode)
Clock:
Adjust the Clock using + and - buttons. (only VGA mode)
Color Temperature:
Select the Color Temperature using + and - buttons.
6500ºK - 7500ºK - 9300ºK - USER
(USER adjust see sub OSD window)
Horizontal OSD Position:
Adjust the Horizontal OSD Position using + and - buttons.
Vertical OSD Position:
Adjust the Vertical OSD Position using + and - buttons.
Graphic Text:
Graphic : VGA 640×400
Text
: VGA 720×400
Only for VGA 600×400 & VGA720×400 Selection
s&t embedded G m b H
I n d u s t r i a l M o n i tor Rev. 1.6
Page
10 / 32
s&t embedded
Recall:
Select the Recall using + and - buttons.
Recall factory model
Language:
Select the Language using + and - buttons.
Supports English – Français – Deutsch – Español Italiano – Russian – Chinese simplified - Chinese- traditional - Japanese.
Auto Adjustment:
Select the Auto Adjustment using + and - buttons.
Image shall be occupied full screen, then this function is effective.
(VGA mode only)
Exit:
Select the Exit using + and - buttons.
Input Select:
Select the VGA or DVI input using + and - buttons.
OSD User’s definition of color temperature
Pressing AUTO button:
Pressing MENU button:
Pressing + button:
Pressing - button:
s&t embedded G m b H
upward selection function
downward selection function
increase the selection function value
decrease selection function value
I n d u s t r i a l M o n i tor Rev. 1.6
Page
11 / 32
s&t embedded
3. Input Diagrams
3.6
3.1
3.2
3.3
3.4
3.5
3.1 DVI - D Video
For the digital video signal DVI-D.
3.2 RGB Video - VGA
Video signal connector for analogue RGB Video signal 15-pin D-Sub.
3.3 RS-232 connector DE-9
Touch connector
3.4 USB Touch connector (TYP A)
12
3.5 POWER
Input green threaded coupling connector
The power connector for the industrial monitor is
+12V
Masse
a green Phoenix (Type MC 1,5/2-STF-3,5). Please
use the external power supply SPU63-105 only.
There are two types: 2-pin 12V and 3-pin 24V. Optionally you receive the
24VDC connector.
3.6 ADDITIONAL POWER CONNECTOR for DC adapter cable.
This is for connection of the DC cable adapter. Inside is +12VDC; outside is
Ground.
Both Power connectors are for alternative power input!
NOT FOR THE OUTPUT!
s&t embedded G m b H
I n d u s t r i a l M o n i tor Rev. 1.6
Page
12 / 32
s&t embedded
4. Setup
Electrical Connection
Please follow the instructions below to properly connect the LCD
monitor to external electrical source.
1. Connect the female-end of the power cable to the transformer. Connect
the male-end of the power cable to the wall outlet or extension cable.
2. Connect the cable from the other end of the transformer to the LCD
monitor DC IN located at the back of the LCD monitor.
Signal Connection
1. Power off both the LCD monitor and PC system before connecting
them.
2. Take out the signal cable from the box; connect it to the signal
connector at the back of the LCD monitor.
3. Connect the other end to the signal connector on the back of the PC
system.
4. Please make sure the connections to both the PC system unit and the
LCD monitor are strong and secure.
Please don’t forget to tighten the screws on each connector end.
5. Now turn on both the PC system unit and the LCD monitor.
6. After you finish setting up the LCD monitor, please set the refresh rate
to 75Hz.
7. After setting up the LCD monitor, please perform Auto Adjust in OSD so
that the LCD monitor will be automatically set to optimal color display
each time.
Please note: When you disconnect any power cable or signal cable, please do
not pull the cable by grabbing the cable body.
Please grab the cable connector itself whenever you try to pull the cable
during disconnection.
s&t embedded G m b H
I n d u s t r i a l M o n i tor Rev. 1.6
Page
13 / 32
s&t embedded
5. Troubleshooting
Check the following before calling for service and support
No image is showing
Is the power cord connected to the
• Check and make sure that the
monitor?
power cord is connected to both the
monitor and the power outlet
Is the power LED light next to the
• Press the power button to switch on
power switch on?
the monitor. The LED should be
green.
Is the power LED orange?
• Press Auto Adjust
• Check the signal cable (VGA or DVI)
• Is the graphic card working normally?
Is the power on but you still don’t
• Adjust brightness and contrast
have a picture?
Do you see a “No Signal” message?
• If the monitor is on “No Signal” in a
short period the device goes into the
sleeping mode/ shuts down.
Do you see a “No Cable” message?
• Connect the VGA or the DVI signal
cable
Display image is incorrect
Display position is incorrect.
Vertical bars and stripes appear on
the screen?
The color of the screen is abnormal
There is noise on the screen or the
pixels don’t match
s&t embedded G m b H
• Press the 6. button: AUTO adjust to
automatically adjust your display to
the ideal setting.
• Press the 6. button: AUTO adjust to
automatically adjust your display to
the ideal setting.
• Check if the signal cable is properly
attached
• Set the color settings in the OSD
Control Panel: Contrast or Color
Temperature
• Press the 6. button: AUTO adjust to
automatically adjust your display to
the ideal setting
• Set manually in the OSD Control
Panel: See OSD Contol Panel (p. 9)
I n d u s t r i a l M o n i tor Rev. 1.6
Page
14 / 32
s&t embedded
6. Product Specification
8.4“ Specification
Type
Spec
LCD Display
10.4” Specification
PC
8.4" Active matrix TFT LCD
panel
Pixel Pitch
0.213(H) x 0.213(V) mm
Max. Resolution 800(H) x 600(V) SVGA
480(W) x 330(H) x 460(D)
Set Size
mm
Pack Size
422(H) x 426(V) x 214(D)
mm ( in 10 set)
Contrast Ratio
500 : 1(depending on panel
spec)
Brightness
230 cd/m2 (depending on
panel spec)
Response Time
Tr : 10ms Tf : 25ms
(depending on panel spec)
Display Color
265K
View Angle L+/R- ±60° (depending on panel
spec)
U+/D+60°-40° (depending on
panel spec)
PC Interface
RGB analog 0.7V peak to
peak
PC Video Sync.
TTL positive or negative
Display Mode
VGA, SVGA
Audio in
DVI Connector
Video Connector RCA Jack/ BNC Jack/
Audio Amplifier 2W ×2
Power
ON < 25W (maximum)
consumption
Frequency
(Horizontal) 31.5-48KHz
(Vertical) 56-75Hz
Signal Connector D-sub 15 pin
Front Control
Auto adjust, Power SW with
LED, OSD Menu,
+/- Adjustment
OSD Menu
Brightness, Contrast, Auto
Adjust, Clock, Phase,
H-Position, V-Position,
Language
Power Adapter
AC Input : 100-240V~1.8A,
50-60Hz
DC Output : 12V/ 4.16A
Operating
Temperature : 0°C~40°C
Conditions
Humidity
: 20% ~ 85%
Storage
Temperature : -20°C~60°C
Conditions
Humidity
: 10%~95%
Certification
BSMI,FCC (DOC), CE-B,
TUV/GS, UL,CUL
Weight
Net
1.4Kgs
Gross 12.5Kgs ( in 5 set )
s&t embedded G m b H
Type
Spec
LCD Display
Pixel Pitch
Max. Resolution
Set Size
Pack Size
Contrast Ratio
Brightness
Response Time
Display Color
View Angle L+/RU+/DPC Interface
PC Video Sync.
Display Mode
Audio in
Video Connector
Audio Amplifier
Power
consumption
Frequency
Signal Connector
Front Control
OSD Menu
Power Adapter
Operating
Conditions
Storage
Conditions
Certification
Weight
I n d u s t r i a l M o n i tor Rev. 1.6
DVI
10.4" Active matrix TFT LCD
panel
0.264 (H) x 0.264(V) mm
800(H) x 600(V) SVGA
265(W) x 208(V) x 48(D) mm
395(W) x 320(H) x 275(D) mm (
in 5 set)
500 : 1(depending on panel
spec)
230 cd/m2 (depending on panel
spec)
Tr : 10ms Tf : 25ms
(depending on panel spec)
265K
±60° (depending on panel spec)
+60°-40° (depending on panel
spec)
RGB analog 0.7V peak to peak
TTL positive or negative
VGA, SVGA
DVI Connector
RCA Jack/ BNC Jack/
2W ×2
ON < 25W (maximum)
(Horizontal) 31.5-48KHz
(Vertical) 56-75Hz
D-sub 15 pin
Auto adjust, Power SW with
LED, OSD Menu,
+/- Adjustment
Brightness, Contrast, Auto
Adjust, Clock, Phase, H-Position,
V-Position,
Language
AC Input : 100-240V~1.8A,
50-60Hz
DC Output : 12V/ 4.16A
Temperature : 0°C~40°C
Humidity
: 20% ~ 85%
Temperature : -20°C~60°C
Humidity
: 10%~95%
BSMI,FCC (DOC), CE-B, TUV/GS,
UL,CUL
Net
1.4Kgs
Gross 12.5Kgs ( in 5 set )
Page
15 / 32
s&t embedded
12” Specification
Type
Spec
LCD Display
Pixel Pitch
Max.
Resolution
Set Size
Pack Size
DVI
12" Active matrix TFT LCD panel
0.3075(H) x 0.3075(V) mm
800(H) x 600(V) SVGA
Storage
Conditions
Certification
Temperature : -20°C~60°C
Humidity
: 10%~95%
BSMI,FCC (DOC), CE-B, TUV/GS,
UL,CUL
Net
2.0Kgs
Gross 16.5Kgs ( in 5 set )
310(W) x 239(H) x 46(D) mm
472(W) x 393(H) x 341(D) mm ( in 5
set)
on panel spec)
Contrast Ratio 500 : 1(depending
400 cd/m2 (depending on panel
Brightness
spec)
Response Time Tr : 10ms Tf : 20ms
(depending on panel spec)
Display Color 262K
View
Angle ±60° (depending on panel spec)
L+/RU+/D+60°-40° (depending on panel spec)
PC Interface
RGB analog 0.7V peak to peak
PC Video Sync. TTL positive or negative
Display Mode VGA, SVGA
Video
DVI connector
Connector
Audio
2W ×2
Amplifier
Power
ON < 25W (maximum)
consumption
Frequency
(Horizontal) 31.5-48KHz
(Vertical) 56-75Hz
Signal
D-sub 15 pin
Connector
Front Control Auto adjust, Power SW with LED,
OSD Menu,
+/- Adjustment
OSD Menu
Brightness, Contrast, Auto Adjust,
Clock, Phase, H-Position, V-Position,
Language
Power Adapter AC Input : 100-240V~1.8A,
50-60Hz
DC Output : 12V/ 4.16A
Operating
Temperature : 0°C~40°C
Conditions
Humidity
: 20% ~ 85%
Weight
s&t embedded G m b H
I n d u s t r i a l M o n i tor Rev. 1.6
Page
16 / 32
s&t embedded
15“ Specification
Type
17“ Specification
DVI
15" Active matrix TFT LCD panel
0.297(H) x 0.297(V) mm
1024(H) x 768(V) XGA
392(W) x 300(H) x 50(D) mm
565(H) x 410(V) x 515(D) mm (in
5 set)
500 : 1 (depending on panel
Contrast Ratio
spec)
300 cd/m2 (depending on panel
Brightness
spec)
: 12ms Tf : 4ms
Response Time Tr
(depending on panel spec)
Display Color
16.777M
View Angle L+/R- ±80° (depending on panel spec)
+65°-80° (depending on panel
U+/Dspec)
RGB analog or digital 0.7V peak
PC Interface
to peak
PC Video Sync. TTL positive or negative
Display Mode
VGA, SVGA, XGA
Video Connector DVI Connector
Power
ON < 40W (maximum)
consumption
(Horizontal) 31.5-60KHz
Frequency
(Vertical) 56-75Hz
Signal Connector D-sub 15 pin
Auto adjust, Power SW with
Front Control
LED, OSD Menu, +/- Adjustment
AC Input : 100-240V~1.8A,
Power Adapter 50-60Hz
DC Output : 12V/ 4A or 4.14\6A
Operating
Temperature : 0°C~40°C
Conditions
Humidity
: 20% ~ 85%
Storage
Temperature : -20°C~60°C
Conditions
Humidity
: 10%~95%
Certification
FCC (DOC), CE-B,
Weight
Net 3.24Kgs
Net 7.1Kgs
Gross
21.9Kgs
(
in
5
set )
Weight
Spec
LCD Display
Pixel Pitch
Max. Resolution
Set Size
Pack Size
Type
DVI
17" Active matrix TFT LCD panel
0.264(H) x 0.264(V) mm
1280(H) x 1024(V) SXGA
442(W) x 361(H) x 52(D) mm
552(W) x 490(H) x 535(D) mm
(in 5 set)
: 1 (depending on panel
Contrast Ratio 400
spec)
250 cd/m2 (depending on panel
Brightness
spec)
: 15ms Tf : 10ms
Response Time Tr
(depending on panel spec)
Display Color
16.777M
View Angle L+/R- L+/R- ±85° U+/D- ±85°
+65°-80° (depending on panel
U+/Dspec)
RGB analog or digital 0.7V peak
PC Interface
to peak
PC Video Sync. TTL positive or negative
Display Mode
VGA, SVGA, XGA, SXGA
Video Connector DVI Connector
Power
ON < 45W (maximum)
consumption
(Horizontal) 31.5-80KHz
Frequency
(Vertical) 56-75Hz
Signal Connector D-sub 15 pin
Auto adjust, Power SW with
Front Control
LED, OSD Menu, +/- Adjustment
AC Input
: 100-240V~1.8A,
Power Adapter 50-60Hz
DC Output : 12V/ 5.0A
Operating
Temperature : 0°C~40°C
Conditions
Humidity
: 20% ~ 85%
Storage
Temperature : -20°C~60°C
Conditions
Humidity
: 10%~95%
Certification
BSMI,FCC (DOC), CE-B,
Weight
Net 4.4Kgs
Net 9.8Kgs
Weight
Gross 31.4Kgs ( in 5 set )
Spec
LCD Display
Pixel Pitch
Max. Resolution
Set Size
Pack Size
F2150 monitor’s weight is different due to the full metal casing.
F2170 monitor’s weight is different due to the full metal casing.
s&t embedded G m b H
I n d u s t r i a l M o n i tor Rev. 1.6
Page
17 / 32
s&t embedded
19" (4:3) Specification
Type
Spec
LCD Display
Pixel Pitch
Max.
Resolution
Set Size
Pack Size
Contrast
Ratio
Brightness
19” (16:10) Specification
DVI
19" Active matrix TFT LCD panel
0.294(H) x 0.294(V) mm
1280(H) x 1024(V) SXGA
442(W) x 361(H) x 52(D) mm
552(W) x 490(H) x 535(D) mm (
in 5 set)
700 : 1(depending on panel spec)
250 cd/m2 (depending on panel
spec)
Tr : 16ms Tf : 9ms
Response
(depending on panel spec)
Time
Display Color 16.777M
View Angle ±85° (depending on panel spec)
L+/RU+/D±85°(depending on panel spec)
PC Interface RGB analog 0.7V peak to peak
PC Video
TTL positive or negative
Sync.
Display Mode VGA, SVGA, XGA, SXGA
Video
DVI Connector
Connector
Power
ON < 46W (maximum)
consumption
(Horizontal)
31.5-80KHz
Frequency
(Vertical) 56-75Hz
Signal
D-sub 15 pin
Connector
Auto adjust, Power SW with LED,
Front Control OSD Menu,
+/- Adjustment
Brightness,
Contrast,
Auto
OSD Menu
Adjust, Clock, Phase, H-Position,
V-Position, Language
AC Input : 100-240V~1.8A,
Power
50-60Hz
Adapter
DC Output : 12V/ 5.0A
Operating
Temperature : 0°C~50°C
Conditions
Humidity
: 20% ~ 85%
Storage
Temperature : -20°C~60°C
Conditions
Humidity
: 10%~95%
Certification FCC (DOC), C E
Weight
Net 5.2Kgs N
Net 10,8Kgs
Gross
36.4Kgs
(
in
5
set
)
Weight
Type
Spec
LCD Display
Pixel Pitch
Max.
Resolution
Set Size
Pack Size
Contrast
Ratio
Brightness
DVI
19" Active matrix TFT LCD panel
0.285(H) x 0.285(V) mm
1440(H) x 900(V) WXGA+
456(W) x 331(H) x 54(D) mm
566(W) x 413(H) x 535(D) mm (
in 5 set)
500 : 1(depending on panel spec)
300 cd/m2 (depending on panel
spec)
Tr : 7ms Tf : 11ms
Response
(depending on panel spec)
Time
Display Color 16.777M
View Angle ±85° (depending on panel spec)
L+/RU+/D±85°(depending on panel spec)
PC Interface RGB analog 0.7V peak to peak
PC Video
TTL positive or negative
Sync.
Display Mode VGA, SVGA, XGA, SXGA
Video
DVI Connector
Connector
Power
ON < 46W (maximum)
consumption
(Horizontal) 31.5-80KHz
Frequency
(Vertical) 56-75Hz
Signal
D-sub 15 pin
Connector
Auto adjust, Power SW with LED,
Front Control OSD Menu,
+/- Adjustment
Brightness, Contrast, Auto
OSD Menu Adjust, Clock, Phase, H-Position,
V-Position, Language
AC Input : 100-240V~1.8A,
Power
50-60Hz
Adapter
DC Output : 12V/ 5.0A
Operating
Temperature : 0°C~50°C
Conditions Humidity
: 20% ~ 85%
Storage
Temperature : -20°C~60°C
Conditions Humidity
: 10%~95%
Certification FCC (DOC), C E
Weight
Net 5.2Kgs
Net 10,8Kgs
Weight
Gross 36.4Kgs ( in 5 set )
F2190 monitor’s weight is different due to the full metal casing.
s&t embedded G m b H
I n d u s t r i a l M o n i tor Rev. 1.6
Page
18 / 32
s&t embedded
PC Display Modes
Mode
1
2
3
4
5
6
7
8
9
10
Model
15" 17" 19"
15" 17" 19"
15" 17" 19"
15" 17" 19"
15" 17" 19"
15" 17" 19"
15" 17" 19"
15" 17" 19"
17" 19"
17" 19"
Resolution
640 × 350
640 × 400
640 × 480
640 × 480
800 × 600
800 × 600
1024 × 768
1024 × 768
1280 × 1024
1280 × 1024
H Freq (KHz)
31.469
31.469
31.469
37.500
37.879
46.875
48.363
60.023
63.981
79.976
V Freq (Hz)
70.087
59.940
59.940
75.000
60.317
75.000
60.004
75.029
60.020
75.025
PC Display Modes FS190WB
Mode
1
2
3
4
5
6
7
8
9
10
Resolution
640 × 350
640 × 400
640 × 480
640 × 480
800 × 600
800 × 600
1024 × 768
1024 × 768
1360 × 768
1440 × 900
H Freq (KHz)
31.469
31.469
31.469
37.500
37.879
46.875
48.363
60.023
47.712
55.935
V Freq (Hz)
70.087
59.940
59.940
75.000
60.317
75.000
60.004
75.029
60.015
59.887
PC (VGA&HDMI) Display Modes 8.4”
Mode
1
2
3
4
Resolution
640 × 480
640 × 480
800 × 600
800 × 600
H Freq (KHz)
31.469
37.500
37.879
46.875
V Freq (Hz)
59.940
75.000
60.317
75.000
PC (VGA&HDMI) Display Modes 12“
Mode
1
2
3
4
5
6
s&t embedded G m b H
Resolution
640 × 350
640 × 400
640 × 480
640 × 480
800 × 600
800 × 600
H Freq (KHz)
31.469
31.469
31.469
37.500
37.879
46.875
I n d u s t r i a l M o n i tor Rev. 1.6
V Freq (Hz)
70.087
59.940
59.940
75.000
60.317
75.000
Page
19 / 32
s&t embedded
7. Mechanical Dimensions
8.4“ Chassis OEM
10.4” Chassis OEM
s&t embedded G m b H
I n d u s t r i a l M o n i tor Rev. 1.6
Page
20 / 32
s&t embedded
12“ Chassis OEM
15“ Chassis OEM
s&t embedded G m b H
I n d u s t r i a l M o n i tor Rev. 1.6
Page
21 / 32
s&t embedded
Optionally a monitor with a bezel can be bought. Thus the dimensions
are different. Here is an example for a 15” bezel:
Optionally a monitor with full-metal casing can be bought. Thus the
dimensions are different. Here is an example for a 15” full metal
monitor F2:
s&t embedded G m b H
I n d u s t r i a l M o n i tor Rev. 1.6
Page
22 / 32
s&t embedded
17“ Chassis OEM
17“ Chassis OK monitor (smaller as OE)
s&t embedded G m b H
I n d u s t r i a l M o n i tor Rev. 1.6
Page
23 / 32
s&t embedded
Optionally a monitor with a bezel can be bought. Thus the dimensions
are different. Here is an example for a 17” monitor with a plastic bezel:
Optionally a monitor with full-metal casing can be bought. Thus the
dimensions are different. Here is an example for a 17” full metal
monitor F2:
s&t embedded G m b H
I n d u s t r i a l M o n i tor Rev. 1.6
Page
24 / 32
s&t embedded
19“ Chassis OE monitor
19“ Chassis WB monitor
s&t embedded G m b H
I n d u s t r i a l M o n i tor Rev. 1.6
Page
25 / 32
s&t embedded
Optionally a monitor with a bezel can be bought. Thus the dimensions
are different. Here is an example for a 19” monitor (FS190xxDDxx):
Optionally a monitor with full-metal casing can be bought. Thus the
dimensions are different. Here is an example for a 19” full metal
monitor F2:
s&t embedded G m b H
I n d u s t r i a l M o n i tor Rev. 1.6
Page
26 / 32
s&t embedded
8. Service Information
Your monitor has been tested by a qualified test person. The test procedure is
recorded at a test protocol. This form contains the serial number, date, type of
product and the test passed.
When you buy this excellent LCD Monitor, you receive 1 year warranty from us.
Please contact us if you need any information about our product or help.
Thank you for buying our product again.
s&t embedded G m b H
I n d u s t r i a l M o n i tor Rev. 1.6
Page
27 / 32
s&t embedded
9. Windows setup
For the best view, please set up with the monitor type in Windows.
Please select as following:
Control Panel > Monitor > Setting > Advance > Monitor > Change > Show all List
> Stand >
15" For 1024 ×768, please set to XGA 1024 × 768@75Hz
(AV setup@60Hz)
17" /19" For 1280 ×1024, please set to SXGA 1280 ×1024@75Hz
(AV setup@60Hz)
19" For 1440 ×900, please set to WXGA+ 1440 ×900@75Hz
(AV setup@60Hz)
= Company has the right to change the specifications without notice=
s&t embedded G m b H
I n d u s t r i a l M o n i tor Rev. 1.6
Page
28 / 32
s&t embedded
s&t embedded G m b H
I n d u s t r i a l M o n i tor Rev. 1.6
Page
29 / 32
s&t embedded
s&t embedded G m b H
I n d u s t r i a l M o n i tor Rev. 1.6
Page
30 / 32
For support please contact us: [email protected]
Keep this manual in an accessible place for possible
future references.
Note the customer number/ order number and model
of your device for service references on the space
below.
The the model specification can be found on the back of
your monitor and the order number can be seen on the
delivery notice.
MODEL___________ ___________________________
ORDER NUMBER______________________________
s&t embedded GmbH
Phone: +49 (0)89 37 00 58 - 0
Fax:
+49 (0)89 37 00 06 – 89
Web: http://www.snt-embedded.de