1
The copyright, all possible intellectual and industrial property rights, and similar rights regarding the Software and the
associated documentation belong exclusively to Metatude.
Metatude BV
Sarphatistraat 706
1018 AV Amsterdam
P.O. Box 94828
1090 GV Amsterdam
The Netherlands
Metatude
Project Manager
User Manual
Tel. +31 (0)20 5289 688
Fax +31 (0)20 6384 039
www.metatude.com
© Metatude
Version 2.2
1
Project Manager User Manual
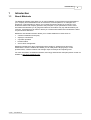
Table of Contents
Chapter 1 Introduction
2
1 About Metatude
2
2 About this manual
3
3 The Metatude Suite
4
Chapter 2 Installation and modification (for
administrators)
5
1 Operating system
5
2 Installation
6
3 Users and administrators
7
4 Connecting datasources
10
5 Custom attributes
12
6 Adding an LDAP-directory
14
7 Adding a database
15
8 List with attributes
18
9 Value Translation
20
10 Editing and deleting directories
21
Chapter 3 Starting
22
1 The basics
22
2 Connecting to the Metatude Dialogue Server
23
3 Login after connection was broken
25
4 Main window
26
Chapter 4 Target groups
27
1 Creating and editing a target group
27
2 Overview of target groups
28
3 Creating a new target group
29
4 Rules, multiple rules and rule sets
31
5 Editing and deleting target groups
33
Chapter 5 Projects
34
1 Overview of projects
34
2 Creating and managing projects
35
General information
Setting a dialogue
Target groups
Invitation
Reminder messages
Results
3 Editing an existing project
36
38
39
40
43
45
47
© 2001 - 2004 Metatude
Introduction
1
Introduction
1.1
About Metatude
2
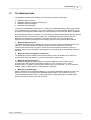
The Metatude software suite allows you to collect feedback on the performance and activities of
your company from stakeholders such as customers, business partners, co-managers and
employees. This information is vital to your company because it allows you to fine-tune your
business activities and company policies to the perception of your performance. And it is this
information that will allow you to gauge and influence what others may say and think about your
company, something that can make or break you. Essential information that constitutes the basis
for your business decisions.
Metatude's web-based interaction allows you to collect feedback on issues such as:
· customer satisfaction and loyalty
· employee commitment
· corporate reputation
· business ethics
· service level management.
Metatude is designed for large organizations with complex IT infrastructures and many
stakeholders. Once the software is installed you can easily define target groups, create
questionnaires, conduct research and manage output for analysis and reporting tools.
For more information on Metatude software, technology and business examples please consult our
website at: http://www.metatude.com/
© 2001 - 2004 Metatude
3
1.2
Project Manager User Manual
About this manual
This manual will show you how to manage stakeholder feedback with the Metatude Project
Manager. After you have read this manual you will be able to manage projects designed to collect
stakeholder feedback.
We distinguish two types of users of the Metatude software: the administrator and the end-user.
Installation and maintenance of the Metatude software is the responsibility of the Administrator.
The managers who use Metatude to collect feedback are the Users. The license agreement for
your organization indicates the number of administrators and users.
All information for administrators on installation and maintenance of the software can be found in
the next chapter. More extensive information about the use of Metatude software for both
administrators and users can be found in following chapters.
This manual is dated August 16th, 2004; Metatude will update this documentation if needed.
Please check http://www.metatude.com/support/ for recent versions.
© 2001 - 2004 Metatude
Introduction
1.3
4
The Metatude Suite
The Metatude software suite consists of four interacting software components:
1.
2.
3.
4.
Metatude Dialogue Server
Metatude Channel Integration Components
Metatude Dialogue Designer
Metatude Project Manager.
The basis of the Metatude architecture is a central server (Metatude Dialogue Server) that needs
to be installed in your organization. This server maintains the connections with databases, stores
and serves the dialogues to stakeholders and collects and stores the collected data in a database.
Once the Dialogue Server is installed, you can manage any stakeholder feedback with two desktop
applications that are relevant for the regular user: the Metatude Dialogue Designer and the
Metatude Project Manager. Consultants, managers and researchers can use these two
applications to prepare questionnaires and manage projects involving stakeholder feedback.
1. Metatude Dialogue Server
The Metatude Dialogue Server (MDS) is the central component within the Metatude architecture.
This server connects to databases and directories with stored stakeholder information,
communicates with electronic channels, stores and serves dialogues and writes results to a
database. All the project information and intelligence to manage projects automatically resides on
this server.
2. Metatude Channel Integration Components
The Metatude Channel Integration Components (MCIC) need to be installed on an electronic
channel. This allows the channel to communicate with the central server.
3. Metatude Dialogue Designer
The Metatude Dialogue Designer (MDD) is a Windows application that is used to create
questionnaires. With a simple and intuitive interface any user can learn how to create
questionnaires in a matter of minutes. Many question types are supported, e.g. open questions,
multiple choice, multiple response, scale and matrix questions.
4. Metatude Project Manager
With the Metatude Project Manager (MPM) you can manage stakeholder feedback projects. The
MPM can connect via a network to the Metatude Dialogue Server. Once logged on you can
connect databases and directories, create target groups, assign dialogues to (multiple) target
groups and retrieve results in the desired format.
© 2001 - 2004 Metatude
5
Project Manager User Manual
2
Installation and modification (for administrators)
2.1
Operating system
In this section you can find information on the system requirements and how to install the Metatude
Project Manager.
Operating system and system requirements
The Metatude Project Manager is a Windows application. It will run on Windows 98, Windows NT,
Windows 2000 and Windows XP. In order to work with Metatude Project Manager, you will need
hardware that meets the following minimum specifications:
· 400 MHz Intel or AMD Processor
· 32 MB RAM
· 30 MB of available space on the hard disk
· CD-ROM station.
The CD-ROM station is needed for installation of the software. The project manager can download
results as Microsoft Excel files. For this you need to have installed Microsoft Excel 97 or higher.
© 2001 - 2004 Metatude
Installation and modification (for administrators)
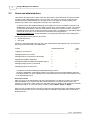
2.2
6
Installation
Installing from CD-ROM:
· Place the Desktop software CD-ROM in the CD-ROM drive.
· Browse to the Project Manager directory on the CD-ROM and double click the file setup.exe.
· Press OK to start the installation procedure.
· Follow the instructions on the screen.
· A message will appear when the installation is completed.
© 2001 - 2004 Metatude
7
2.3
Project Manager User Manual
Users and administrators
This section describes how to create, edit, and delete users. These functions are only accessible
for persons with administrator rights. If you only have user rights, you can not access the user
management area. Administrators can arrange who has user rights by creating, editing, and
deleting users. Each user is assigned a username and a password.
To gain access to the Metatude Dialogue Server (MDS) a license is needed for each user and
administrator. The license key for the MDS is issued for a certain number of users. The number
of users and administrators cannot exceed this limit. When the maximum number of users is
reached the server will not accept the creation of new users. A possibility is to upgrade the MDS
license with more users. You can find more information about upgrading at
http://www.metatude.com. Another alternative is to temporarily inactivate some existing users.
Within Metatude there are rights on two levels:
· administrator level
· user level
Usually an organization will have only one or two administrators and multiple users. The functions
they may perform are listed in the table below:
Activity
Administrator level
User
level
x
Logging on to the server
x
Managing users on the server
x
Managing server connections to directories
x
Managing destination databases
x
Managing Database Feedback Templates (DFT's)
x
Managing target groups on the server
x
x
Managing projects on the server
x
x
First time access after installing the Metatude Dialogue Server:
During the installation of the Dialogue Server one is asked to enter an administrator password.
The administrator can use this password in combination with the username 'Administrator' to log
in to the Dialogue Server
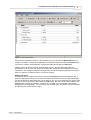
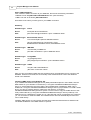
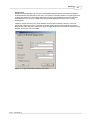
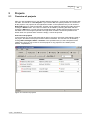
Overview of users
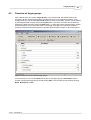
After you log in as an Administrator with the Project Manager, you will see six tabs. One of these
tabs says Users. If you click this tab, the system presents an overview of all the users in the
system. You can see the name of the user, the status (active or inactive) and whether the user has
administrator rights. The overview can be sorted by clicking Name, Status or Rights.
Each user can be either active or inactive. Active users are allowed to login to the Dialogue Server,
whereas inactive users are not. This feature makes it possible to temporarily deny access to the
Dialogue Server.
© 2001 - 2004 Metatude
Installation and modification (for administrators)
8
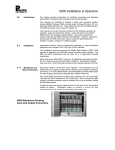
Figure 1: Overview of users
Users can be organized in folders. In the operations bar you can click the New folder button to
create a new folder. A folder can be deleted by selecting the folder and clicking the Delete button.
The name of a folder can be edited by selecting the folder and clicking the Edit button.
Folders can be opened and closed. When a folder is open, all users within that folder are
presented in a list. To open and close a particular folder, double-click the triangle in front of the
folder name. The triangle is pointed to the right when a folder is closed and pointed to the bottom
when it is opened. If a folder is empty, it cannot be opened.
Adding new users
An administrator can create a new user by clicking the Add User button in the operation bar. A
window is displayed in which you can enter username and password. You can enter which rights
the user should have and whether the user is active or not. Only if you make the user 'active' does
he have access to the system. After clicking the OK button, the new user is created. Clicking the
Cancel button cancels the operation: no new user is created. You can organize new users by
dragging them to other folders. You can drag a user by clicking the gray area left of the username
and pressing the mouse while moving it.
© 2001 - 2004 Metatude
9
Project Manager User Manual
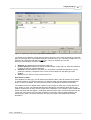
Figure 2: Creating a new user.
Editing and deleting an existing user
You can edit a user if you select it and click the Edit button in the operations bar. A window is
presented (much like the window for creating a user) where you can make the necessary changes.
After clicking the OK button, the changes are saved. At any time you can click the Cancel button to
cancel the operation. In which case, the changes are not saved.
You can delete a user if you select it and click the Delete button in the operations bar. If you delete
a user, the system double-checks if you really want to delete the user. If the status of the user is
active, you can choose to inactivate the user rather than deleting it.
Figure 3: Deleting a user
The system always checks if there is at least one active administrator. Without an active
administrator there is no one that can manage users and user rights. The system will not allow
you to delete the last active administrator.
© 2001 - 2004 Metatude
Installation and modification (for administrators)
2.4
10
Connecting datasources
This section describes how to make connections with databases and directories. These functions
are only accessible for administrators.
With the Project Manager you can connect to LDAP- directories or databases with stakeholder
information in your organization, for example customer relation databases or HRM databases.
Once you have done this, all the people in the directories or databases can be approached for
online feedback.
LDAP
LDAP is short for Lightweight Directory Access Protocol. LDAP is a software protocol to enable
anyone to locate organizations, individuals and other resources in a network, whether on the
internet or on a corporate intranet. A server that supports the LDAP protocol can be addressed in a
standard way by other applications to locate resources. In the case of Metatude it is used to
retrieve information on employees and customers to be able to approach them. Many products and
platforms support the LDAP protocol e.g.: Windows Active Directory, Novell NDS and Lotus Notes.
This means that when users are stored in these applications other applications can use this
information as well.
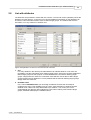
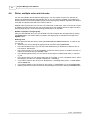
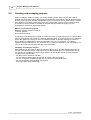
Overview of databases and directories
· Click the tab Dir servers. The system presents an overview of all connected databases and
directories.
· You can see the Name of the directory, the location or name of the server (Host) and how
many People are located in each of the directories. If the information on a server is incorrect,
the Project Manager displays the message: server unavailable instead of the number of
people in the directory. The overview can be sorted by clicking Name, Host or People.
Figure 4: Overview of available directories
© 2001 - 2004 Metatude
11
Project Manager User Manual
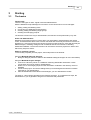
To create a new directory connection, click the Add Server button in the operation bar. A two-step
wizard appears where you can fill out the details of the new directory (step 1) and can indicate what
attributes are present.
Choose database (JDBC) or directory server (LDAP)
The first step in adding a new directory is providing the details to connect to a database or
directory. If you want to connect to a database, you choose the protocol 'JDBC'. If you want to
connect to an LDAP-directory, you choose the protocol 'LDAP'. The other information that needs to
be entered is different for both protocols. First we'll explain how to add an LDAP-directory after
which we will explain how to add a database. The second step is the same for both protocols.
© 2001 - 2004 Metatude
Installation and modification (for administrators)
2.5
12
Custom attributes
Attribute types
Each entry in an LDAP server has various attributes. The different columns in a database record
can also be seen as attributes. Each of these attributes has a data type associated with it. For an
attribute of a record in a database, the Project Manager recognizes the types string, number, date
or boolean. Two additional types are defined. These are the name and e-mail. The Project
manager uses these additional types to personalize the invitations and to send them to the
stakeholders.
Custom attribute types
You can define new attribute types and assign these to attributes in databases and directories
where Metatude connects to. These new attribute types are called 'custom attributes'. Custom
attributes assigned to different databases and directories can be identified as containing the same
information. If in one Metatude project multiple target groups from different databases are involved,
the custom attribute information will identify similar attributes across these different databases. The
Metatude software will store similar attributes of the stakeholders (attributes that have the same
custom type associated with them) in one column and therefore make analysis on the data much
easier.
Personalize invitations
Custom attributes can also be used to personalize the invitations that are sent by e-mail to the
stakeholders. An example is if you have different databases with stakeholder information, but in all
databases there is an attribute that indicates the gender of the stakeholders. If you want this
information to be stored in the same place (column) in the result files or if you want to use this
attribute in an invitation e-mail, you can define the custom attribute 'gender' and assign this custom
attribute to the gender attribute in the different databases.
To define a new custom attribute, click on the button Options in the directory server overview.
This launches a window where all defined attributes are listed.
Figure 5: Overview of custom attributes
© 2001 - 2004 Metatude
13
Project Manager User Manual
To add a new custom attribute, click on the button New type. A new line wil be added in the
overview. You can type the name of the new custom attribute.
Data type
Next to the name, you specify the data type of the custom attribute. The custom attribute can only
be assigned to attributes of stakeholders that have the same data type as the one you specify. You
can choose the data types string, number, date and boolean. Attributes in a directory server are
considered to be of the data type string.
Click the button OK and the new custom attribute has been added to the list. You can remove a
custom attribute from the overview by selecting it and by clicking the button Delete. A custom
attribute can not be removed when it is still in use by directory servers.
When connecting to new directory servers you can assign each custom type to any attribute.
© 2001 - 2004 Metatude
Installation and modification (for administrators)
2.6
14
Adding an LDAP-directory
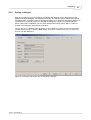
After giving the directory server a name and choosing the protocol 'LDAP', the following information
is required:
· Name: the name under which Metatude will store the connection.
· Protocol: choose LDAP for connecting a directory server
· Host: the location of the server. This can be a name or an IP-address.
· Port: the port the Directory runs on. Only fill this out if this is a different port then the default
value (389).
· Base: where to start looking for people in the LDAP directory tree.
· User: the username to access the directory. Check the manual of the directory server for the
exact format. Usually the username has to be provided as a dn. (distinguished name)
· Password: the password to access the directory.
Figure 6: Adding a new directory step 1: Details of the LDAP directory
License restrictions
The license for the Metatude Dialogue Server (MDS) has a set number of stakeholders that may
be connected. When connecting a new directory, the total entries will be counted, starting from the
'base'. Be sure to enter the correct base. If you are trying to connect a new directory to the project
manager and the total number of stakeholders (of all connected directories) exceeds the licensed
amount, the system will refuse and give an error message. For information on extending your
license go to: http://www.metatude.com
Dialogue Server configuration
On the MDS, the maximum number of stakeholders from LDAP directory servers can be adjusted.
The default number is 5500 stakeholders. If you have more stakeholders in your LDAP directories,
you need to adjust this value on the MDS. Please see the manual of the MDS for more information.
After you have provided this data and click the button next, the application tries to connect to the
LDAP server. When this succeeds, the second step of the wizard will show a list of the attributes
stored in the directory.
© 2001 - 2004 Metatude
15
2.7
Project Manager User Manual
Adding a database
Various databases ship with JDBC drivers. You can use these drivers to connect a database to the
Metatude suite. At this moment, Metatude software ships with JDBC drivers for Oracle, IBM DB2,
Microsoft SQL Server and PostgreSQL databases. Below you find a description of how to
connect these two databases. You can connect to other databases through ODBC. If you use an
ODBC connection to a database, you will have to make use of the JDBC-ODBC driver that is
shipped with the Metatude software. At the end of this chapter, an overview of how to install and
use third party JDBC drivers for connecting other databases to the Metatude suite is presented.
Please note that third party drivers have not been tested extensively, and therefore are not
supported.
The Metatude software supports three different charactersets. These are ISO-8859-1 for western
European languages and UTF-8 and UCS-2 for all languages. Your stakeholder database should
be encoded using one of these charachtersets or an alias or subset. If you use ODBC for
connecting to a database, then the system automatically switches to the ISO-8859-1 characterset.
You cannot use an Unicode database (UTF-8 or UCS-2) when using ODBC.
Connect a database using shipped JDBC drivers
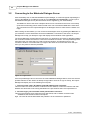
Figure 7: Adding a new directory step 1: Details of the database
Important:
The values you fill out in the Driver: fields are Case-Sensitive, and have to be filled out in the
correct case.
All URLs that you fill out are relative to the location of the Metatude Dialogue Server (MDS). This
means that if you connect to a database that resides on the MDS you can use 'localhost' as the
hostname. Also the MDS needs to be able to connect to the stakeholder databases using TCP/IP
in case of a JDBC connection or ODBC in case of an ODBC connection.
© 2001 - 2004 Metatude
Installation and modification (for administrators)
16
General information:
· Name: The name that you wish to give this connection
· Protocol: Choose JDBC
· Table: the name of the table in the database with the relevant information
· User: the username to access the database.
· Password: the password to access the database.
Oracle Database:
· Driver: Fill out oracle.jdbc.driver.OracleDriver here (case sensitive).
· URL: The URL is as folows: jdbc:oracle:thin:@<hostname>:<port>:<database name>
· Table: The table name needs to be entered in all UPPERCASE characters
The hostname can also be an IP adress. If you called the database StakeholderDB and it is
running on port 1521 (the default Oracle port) on a machine with IP adress 192.168.84.16, the url
is: jdbc:oracle:thin:@192.168.84.16:1521:StakeholderDB.
Microsoft SQL Server database:
· Driver: Fill out com.microsoft.jdbc.sqlserver.SQLServerDriver here (case sensitive).
· URL: The URL is as folows:
jdbc:microsoft:sqlserver://<hostname>:<Port>;databaseName=<database
name>;selectMethod=cursor
The hostname can also be an IP adress. The default port number for Microsoft SQL Server is
1433. So if you called the database StakeholderDB and it is running on a machine with IP adress
192.168.84.16, the url is
jdbc:microsoft:sqlserver://192.168.84.16:1433;databaseName=StakeholderDB;selectMethod
=cursor
Please note that you cannot use Windows authentication to connect to an SQL Server database.
You need to acces any SQL Server database using SQL Server authentication. If your SQL Server
is not installed to use SQL Server authentication, then you can try to use ODBC to connect to this
database (see below).
IBM DB2 database:
· Driver: Fill out com.ibm.db2.jcc.DB2Driver here (case sensitive).
· URL: The URL is as folows: jdbc:db2://<hostname>:<port>/<database name>
The hostname can also be an IP adress. The default port number for IBM DB2 is 50000. So if you
called the database StakeholderDB and it is running on a machine with IP adress 192.168.84.16,
the url is jdbc:db2://192.168.84.16:50000/StakeholderDB
PostgreSQL database:
· Driver: Fill out org.postgresql.Driver here (case sensitive).
· URL: The URL is as folows: jdbc:postgresql://<hostname>:<port>/<database name>
The hostname can also be an IP adress. The port number only has te be given when it is another
value than the default value, which is 5432. So if you called the database StakeholderDB and it is
running on a machine with IP adress 192.168.84.16, the url is
jdbc:postgresql://192.168.84.16:5432/StakeholderDB
© 2001 - 2004 Metatude
17
Project Manager User Manual
Other ODBC databases:
First, create an ODBC connection to your database, then fill out the folowing information:
· Driver: Fill out sun.jdbc.odbc.JdbcOdbcDriver here (case sensitive).
· URL: The URL is as folows: jdbc:odbc:Name
Here Name is the name you have given to your ODBC connection.
Summary:
Database type: Oracle
Driver:
oracle.jdbc.driver.OracleDriver
URL:
jdbc:oracle:thin:@<hostname>:<port>:<database name>
Database type:
Microsoft SQL Server
Driver:
com.microsoft.jdbc.sqlserver.SQLServerDriver
URL:
jdbc:microsoft:sqlserver://<hostname>:<Port>;
databaseName=<database name>;selectMethod=cursor
Database type:
IBM DB2
Driver:
com.ibm.db2.jcc.DB2Driver
URL:
jdbc:db2://<hostname>:<port>/<database name>
Database type:
PostgreSQL
Driver:
org.postgresql.Driver
URL:
jdbc:postgresql://<hostname>:<port>/<database name>
Database Type: ODBC
Driver:
sun.jdbc.odbc.JdbcOdbcDriver
URL:
jdbc:odbc:<connection name>
After you have provided this data and click the button Next, the application tries to connect to the
database. When this succeeds, the second step of the wizard will show a list of the attributes
stored in the database.
Installing JDBC drivers on a Windows OS:
If you installed the Metatude Dialogue Server (MDS) with default options in the installer, then the
MDS resides on your harddrive in the directory C:\Program Files\Metatude\Metatude Dialogue
Server. A Java Runtime Environment (JRE) is also installed when installing the MDS. This is
installed to C:\Program Files\Metatude\Metatude Dialogue Server'\jre per default. To install a JDBC
driver, you have to create a directory called ext in the directory C:\Program
Files\Metatude\Metatude Dialogue Server'\jre\lib\. You then have to copy the JDBC drivers to this
newly created directory (C:\Program Files\Metatude\Metatude Dialogue Server'\jre\lib\ext). The
JDBC drivers for a database are usually one or a few files that can be recognized by the extension
.jar. You now have to restart the MDS. The installed drivers will now automatically be found and
can be used directly.
Installing JDBC drivers on Unix OS'ses uses the same method as described for a Windows OS.
The default installation of the MDS resides in /opt/mds.
© 2001 - 2004 Metatude
Installation and modification (for administrators)
2.8
18
List with attributes
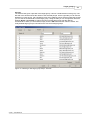
The attributes are presented in a table with five columns. The second column ('attribute') shows the
attributes from the directory. In the other four columns additional information on the attributes can
be entered. This information enables users to define target groups. The software will store the
information, so it only needs to be entered once.
Figure 8: Explanation on the four rows and how to use them
1. Use
For every attribute in the directory the administrator can indicate whether or not users are
permitted to use this information when defining target groups. Users will use these attributes to
define target groups for their projects. If some attributes are not suited for defining target
groups, simply leave the check box unchecked. Users will then not be able to define target
groups based on these attributes. For every attribute that is suited for defining target groups,
simply check the check box.
2. Readable name
In the column Readable name you can assign an attribute a name that can easily be
understood by users. This readable name is a short, clear description of what the specific
attribute mean. LDAP has many abbreviations (for instance 'c' for country and 'ou' for
organizational unit) that are often unfamiliar to users. When making rules to define target
groups, Metatude will display the readable names.
© 2001 - 2004 Metatude
19
Project Manager User Manual
3. Type
In the column Type you can indicate what kind of data the attribute holds. The Metatude
software recognizes the following datatypes:
·
·
·
·
·
·
·
String
Email
Name
Number
Date
Boolean
Custom attribute
When you check the 'use' box for an attribute, the MPM automatically shows what of datatype
it is. You can make different selections for numbers and for textual information. With numbers,
for example, you can define the rule 'more than', which is not possible with textual information.
When custom attributes have been defined, they show in the drop down menu. These custom
attributes can be assigned to any datatype. In order to invite people to give their feedback, the
Metatude software needs to have their name and e-mail address. Please make sure that any
name and e-mail information is in the directory and mark the appropriate attribute with the
name and E-mail types, that are in the drop-down menu also. You can only assign the type email and the type name to a database field of the type string.
4. Value translation
In the last column you can indicate if the attribute has a value that doesn't clearly express the
contents. For example, in a directory the gender of people is stored often using values. In this
case you can indicate that the numerical values used actually stand for 'man' and 'woman'.
Simply indicate that you would like to translate values by clicking the checkbox in this column.
Automatically an Edit button appears to the right of the checkbox. If you click this Edit button,
the system presents a list in which you can indicate the original values (the ones stored in the
directory) and the values that best describe the data. You can enter the values manually, or
you can provide the name of a lookup table in the stakeholder database.
Unique ID
The last step in adding a database server is choosing a unique ID. The Metatude software uses
this unique ID to deduplicate invitations. If multiple target groups are invited to join a particular
questionnaire, these values must be unique. The software filters out duplicates. Take for example
a situation where there are multiple employee databases and some people will be listed in multiple
databases. We can avoid people being invited twice if we would have a unique ID that is the same
for all databases, for instance a phone number or e-mail address.
Only when adding a database the administrator has to choose a unique ID. Be carefull when
choosing the unique ID. Not selecting the rigth unique ID, causes people to be excluded
unintentially. If not sure, use the email-adress, since this is unique to a person.
After all the four columns have been filled out for every attribute, you can store the information by
clicking OK. The system returns to the overview of connected directories, this time including the
directory you just added.
© 2001 - 2004 Metatude
Installation and modification (for administrators)
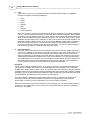
2.9
20
Value Translation
When you choose value translation for an attribute in a directory server, and click the edit button,
you will be provided with an interface to set up value translation.
Figure 9: Value translation
Entering values manually
You can provide the values and their translations manually. To do this, uncheck the use lookup
table checkbox. Click on the button add to add a new value / translation pair. The value is the
value that is present in the stakeholders directory and the translation is the name that you wish to
give this value. When you are done adding value / translation pairs, click the OK button. Each
value that is found in the stakeholder directory will be translated if a matching value is found in the
list that you create.
Using a lookup table
Check the use lookup table checkbox. You can then enter the name of the table that contains the
values and translations for the value translation. This table has to reside in the same database as
the table that contains the stakeholders. The connection url, username and password that you
have provided in the general tab of the directory server will be used to connect to the table. Click
the connect button to connect to the table. You will then be provided with a list of the columns in
the table. You can choose which column holds the values and which column holds the translations.
Click on the preview button to see a preview of the value translation list. Each value for the
attribute in the stakeholder table will be translated using the value and translation columns of the
value translation table that you have provided.
© 2001 - 2004 Metatude
21
2.10
Project Manager User Manual
Editing and deleting directories
You can edit information of a connected database or directory by selecting it and clicking the Edit
button in the operations bar. A window will be presented (much like the window for adding a new
directory) in which you can make the necessary changes. After clicking the OK button, the changes
are saved. At any time you can click the Cancel button to cancel the operation. In this case, the
changes are not saved. You can remove a database or directory from the list of connected
directories if you select it and click the Delete button in the operations bar. A directory can not be
deleted when there are target groups defined from this directory. If there are still target groups,
these must be deleted first.
© 2001 - 2004 Metatude
Starting
3
Starting
3.1
The basics
22
Functionality
There are two types of users: regular users and administrators.
With the Metatude Project Manager four functions on the central server can be managed:
1.
2.
3.
4.
Adding, editing and deleting users.
Connecting new databases and directories.
Creating, editing and deleting target groups.
Creating and managing projects.
The first two functions are only for administrators, the last two can be performed by any user.
Users and Administrators
Metatude recognizes two types of 'users' within your organization: 'administrators' and regular
'users'. An administrator has access to all four functions and will usually be someone from the IS
department. A user has access to the last two functions mentioned above. Users will generally be
HRM managers, marketing managers and consultants that have an interest in collecting
stakeholder feedback. The last two functions can be used to execute a project from start to end
without any help from others.
Steps to complete a project
To succesfully complete your first project, these steps have to be followed:
Using the Metatude Dialogue Designer:
1. Design a dialogue (see the manual for the Metatude Dialogue Designer for more information)
Using the Metatude Project manager:
2. Connect to a directory server or a database containing stakeholder information. These
connections can only be made by administrators.
3. Define one or more target groups from the information contained in the directory server or
database
4. Create a new project. Choose the dialogue that you have designed and write an invitation
message for your stakeholders.
5. After the stakeholders have filled out the dialogue, you can download the results.
The steps 3, 4 and 5 will be described in the following chapters. To complete these steps, the
administrator in your organization will give out usernames and passwords.
© 2001 - 2004 Metatude
23
3.2
Project Manager User Manual
Connecting to the Metatude Dialogue Server
Click the desktop icon to start the Metatude Project Manager, a screen will appear requesting the
name of the Server (or IP address) as well as your Username and Password to connect you to
the Metatude Dialogue Server (this information can be supplied by your administrator).
The MPM is a client of the server. Multiple clients can be connected to the server concurrently
(multi-user functionality) which means several users can work with the MPM at the same time.
The connection from the Project Manager to the Dialogue Server is made via the network over
tcp/ip.
After entering the information you can connect to the dialogue server by pressing the OK button. If
you entered the correct information and have established a connection to the server, the Project
Manager will accept your attempt to login and display the first window of the application.
The Project Manager will remember the last server you logged into and enter by default this data in
the connection window the next time a user tries to make a connection. The Project Manager also
remembers the user name that you used to login the last time, and will also enter it in the
connection window. This means that if you login to the same server as the last server that you
used, you only have to enter the password.
Figure 10: Login screen
If the Project Manager cannot connect to the central Metatude Dialogue Server, there are several
possible reasons for this. When an attempt to login fails or there is no sign of activity, the Project
Manager will display one of the following error reports:
1. "The server with name / IP-address [name/IP-address] was not found."
This error will occur when the server is not found on the network, or when the machine with that
address was found but is not running the MDS on the port number where it is expected to be.
2. "Incorrect login: your username and/or password are incorrect."
This error report will be given when the server was found, and a network connection was
established, but the server did not accept the
login. The user will not be told whether the problem is in the username or password.
© 2001 - 2004 Metatude
Starting
24
Proxy server
Metatude Project Manager can connect to a Metatude Dialogue Server even when the MPM is
located behind a proxy/firewall. In this case, click options in the login window. This will expand the
window and show other connection parameters. If a proxy server address and port is specified,
then MPM will try to connect to MDS using the specified address/port as the proxy server's
address/port.
If MPM is closed then the proxy server address and port are not stored. However, if the user
checks the "Always use proxy" check box, then this value is stored in the preference file when
MPM is shut down and in the subsequent login attempts; MPM uses the previously specified proxy
address and port to connect to MDS.
Figure 11: Login screen when using a proxy server
© 2001 - 2004 Metatude
25
3.3
Project Manager User Manual
Login after connection was broken
After a successful attempt to login, the connection can break down. One of the reasons for this can
be that the Dialogue Server deliberately disconnects if the connection was not used for more than
15 minutes,
Either the Project Manager or the Dialogue Server can interrupt the connection. When the Project
Manager breaks off the connection, an error report is generated explaining why the connection was
broken. In the same window, the application presents an opportunity that allows you to reconnect
to the server.
Figure 12: Login screen after the Metatude Project Manager broke the connection
If the server breaks the connection, the Project Manager cannot tell you what happened. The
Project Manager will remember the state it was in before the connection was broken, and you will
be able to continue your work after you have logged in again.
© 2001 - 2004 Metatude
Starting
3.4
26
Main window
After you have logged into the Metatude Project Manager you'll see the main window which consist
of five parts:
1. The menu bar
2. The tab bar
3. The 'operation bar'
4. The content view area
5. The help bar.
Figure 13: The main window
1. The menu bar contains general menus for opening, editing and saving files as well as a help
menu in which you can find more information on Metatude and the Project Manager.
2. With the tab bar you can switch between the four main functions of the Metatude project
manager.
3. The operation bar consists of buttons to execute the most common operations. The buttons
vary for each tab.
4. The content view area is the largest part of the window and shows all the content depending
on the tab chosen.
5. The help bar provides context sensitive information when performing operations.
© 2001 - 2004 Metatude
27
Project Manager User Manual
4
Target groups
4.1
Creating and editing a target group
Rule based target groups
When collecting stakeholder feedback you need to define those groups of people you want to
participate in your survey. With the Project Manager you can create target groups out of the
connected databases and directories by defining their characteristics. This is done by selection
rules. One rule is, for example, "all employees older than 40". All the attributes in the directories
are available for making these rules. Once a target group has been defined, the Metatude software
stores this definition. In this way target groups only need to be defined once and can be used for
multiple projects.
Dynamic
The target groups are dynamic (the members change over time) because they are rule-based. If,
for example, someone turns 40 they will be added to the target group based on the rule "all
employees older than 40". Changes in the directories are reflected in the target group population.
This means that if the underlying directories are kept up-to-date, the target groups are up-to-date
as well. The advantage of these dynamic target groups is that the characteristics (in terms of
attributes) of the surveyed population are always the same, which makes the outcomes of research
comparable.
© 2001 - 2004 Metatude
Target groups
4.2
28
Overview of target groups
On the tab bar there is a section Target groups. If you click this tab, the system presents an
overview of all the defined target groups. The target groups can be organized in folders. In the
operations bar you can click the New Folder button to create a new folder. A folder can be deleted
by selecting the folder en then clicking the Delete button. The name of a folder can be edited by
selecting the folder and then clicking the Edit button. To open and close a particular folder, doubleclick the triangle in front of the folder name. The triangle is pointed to the right when a folder is
closed and pointed to the bottom when it is opened. When a folder is empty, it cannot be opened.
Figure 14: Overview of the defined target groups
In the overview you can see the Name that is given to the target group, a Description and the
number of people the target group currently holds (Size). The overview can be sorted by clicking
Name, Description or Size.
© 2001 - 2004 Metatude
29
4.3
Project Manager User Manual
Creating a new target group
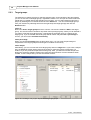
A new target group can be created by clicking the Add Group button in the operation bar. A threestep wizard is displayed which will guide you through the process of defining a target group.
Figure 15: Defining a new target group step 1: Select Database and choose a Name and
Description
In the first step you must indicate the database or directory you want to use for creating a target
group. You can do this by selecting one from the dropdown menu. All connected databases and
directories are listed in this menu. In the first step you can give the target group you are about to
create a Name and a Description. The Name should be relatively short. The Description offers
somewhat more space to indicate what the characteristics of the target group will be.
© 2001 - 2004 Metatude
Target groups
30
Figure 16: Defining a new target group step 2: Defining rules
The actual work of defining a target group is done in step two. In this step you define the rules that
apply to the target group. The system presents a window in which you can make multiple rules. For
example "all employees older than 40 and male". This is an example of a rule set.
Each row in this window consists of four fields:
1. Attribute: the attribute that is the subject of the rule.
2. Inverse operand: this field only has two possible values: empty and 'not'. With this operator it
is simple to select an opposite selection.
3. Operand: field that states the operation you can perform. The different operations you can
perform are listed in a dropdown menu. These choices depend on the data type of the
attribute.
4. Value: here you select or enter a value for the rule
Rule based on dates
If the attribute is a date type, you can make rules based on dates. This can be done in an relative
or absolute manner. The absolute manner is to define a target rule that defines that the date be
prior to or after a fixed date. The user interface will show a calendar to select this fixed date.
The relative manner is to define that the date must be younger or older than a certain amount of
days, weeks or years. The software will take the actual date to calculate the target group. This
makes it relative easy to select recent records from a database. If, for example, I have a database
where help desk calls are logged, I could easily define a project where I would continuously (every
month) ask 100 persons who have had a problem over the last 14 days if these problems are
solved. Every month, the system selects a new group of people in the database that fit this
description.
© 2001 - 2004 Metatude
31
4.4
Project Manager User Manual
Rules, multiple rules and rule sets
You can use multiple rules to define a target group. You can choose to focus your selection by
defining an additional rule that must also be met, or you can choose to broaden your selection by
defining another rule that also qualifies people for the target group. Between separate rules there is
a line with an operand value that can be either 'and'/'or'.
Multiple rules can be a part of a 'rule set'. Like "older than 40 and male". Also a rule set can consist
of multiple rule sets. Rule sets give you the opportunity to treat multiple rules as a single rule when
defining target groups. Think of it as placing parentheses in an equation.
Number of people in a target group
After you have defined rules, you can calculate how many matches the rules generate by clicking
the Update button. The total number of people in the target group is indicated to the right of the
Update button.
Defining rules
You can add rules and rule sets by clicking the Insert rule and Insert set buttons. To insert a rule
in a rule set:
· Select the rule set by clicking the light green bar and then clicking Insert rule.
· In the first dropdown menu you can select the attribute that you would like to define a rule on.
For instance: 'department'
· In the second menu you can choose Not if you want to select a group, for instance 'women' by
making a rule which says: gender Not = Men.
· In the third dropdown menu you can choose several signs to indicate larger than (>), equal to
(=) etc.
· In the fourth 'space' you can type a value such as a number, or if it is a dropdown menu, select
the category you want. For example "department = marketing".
· If you want to make a rule set such as "Department = marketing AND country = United States"
choose Insert set.
· If you want to define a new rule such as "OR country = United States" you choose Insert rule.
· Deleting rules and rule sets can be done by selecting them and then clicking the Delete button.
© 2001 - 2004 Metatude
Target groups
32
Preview
The third window gives a preview of the target group. It shows a small selection of the group. The
left side of the window shows the names of the selected people. On the right side you can see two
attributes for each person. Via a dropdown menu every attribute can be selected. With this preview
you can see the characteristics of the target group. Using the tabs you can change back and forth
between Rules and Preview to change the rules until the target group has the desired
characteristics. When you are finished, simply click the OK button and the rules are saved. The
newly defined target group is now listed in the overview of target groups.
Figure 17: Defining a new target group step 3: Preview
© 2001 - 2004 Metatude
33
4.5
Project Manager User Manual
Editing and deleting target groups
You can edit target groups by selecting them and clicking the Edit button in the operations bar. The
same wizard is displayed as when creating a target group. You can make the necessary changes.
After clicking the OK button, the changes are saved. At any time you can click the Cancel button to
cancel the operation. In this case, the changes are not saved. You can remove a target group from
the overview by selecting one and clicking the Delete button in the operations bar. A target group
can not be deleted when there are inactive or active projects or projects that still have to start that
make use of these target groups.
© 2001 - 2004 Metatude
Projects
5
Projects
5.1
Overview of projects
34
After you click the MPM icon on your desktop and have logged on, you'll see the main window with
four tabs. The first tab is called Projects. If you click this tab, the system presents an overview of
all the projects. The projects can be organized in folders. In the operations bar you can click the
New folder button to create a new folder. A folder can be deleted by selecting the folder and then
clicking the Delete button. The name of a folder can be edited by selecting the folder and then
clicking the Edit button. To open and close a particular folder, double-click the triangle in front of
the folder name. The triangle is pointed to the right when a folder is closed and pointed to the
bottom when it is opened. When a folder is empty, it cannot be opened.
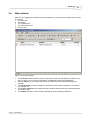
Overview of all projects
In the overview you can see the Name that is given to a project, the name of the Dialogue used in
the project, the Status of the project and the number of Results. The overview can be sorted by
clicking Name, Dialogue, Status or Results. In the operations bar you see a drop down menu
called View. Here you can choose to view all projects or only projects of one status (active,
inactive, completed etc.).
Figure 18: Overview of projects
© 2001 - 2004 Metatude
35
5.2
Project Manager User Manual
Creating and managing projects
When you want to conduct a survey, you need to create a project. Here you can define which
dialogue has to be sent to which target groups and when this must happen. After all the information
about a project has been defined, the Metatude system executes the survey automatically. It sends
out invitations to members of the target group and collects data. It keeps track of response rates
and sends out more invitations if needed. At all times during and after the project you can
download the results in an appropriate format.
Ad-hoc and continuous projects
Metatude supports 2 kinds of projects:
1) Ad-hoc projects
2) Continuous projects
An ad-hoc is a one time project, people are invited only once. A continuous project is a project that
runs for a longer time and people are invited in different periods. A continuous project is a research
project that spans two or more (or even an indefinite number of) periods. Defining a continuous
project allows an organisation to track developments over time. For example: If you want to
measure employee satisfaction, you can do this once a year for everybody in your organization, but
you can also invite every month just a part of the employees.
Flexibility of continuous projects
With Metatude you only have to define a continuous project once, and the software takes care of
the rest. Each period it collects responses from pre-defined target groups in the quantities set by
you. Not only is a continuous project easy to define, it is also flexible enough to meet changing
conditions and requirements:
- You don't have to define an end date
- You can add and delete target groups from an active continuous project
- You can change the quantities of response you want from each target group
- You can change the email invitation text anytime
- All changes take effect immediately
© 2001 - 2004 Metatude
Projects
5.2.1
36
General information
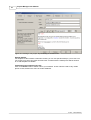
A new project can be created by clicking the Add Project button in the operation bar. A six-step
wizard is presented which will guide you through the process of creating a project.
In the first step you first have to decide if the project is an Ad-hoc Research project or a
Continous Research project. You can select one of these two choices at the very beginning of the
process (on top of the first screen). The general information needed differ among these two type of
projects. Underneath the first step of the wizard expained for both project types.
Ad-hoc Research project
The first step in creating a new project is giving it a Project name, a Start date and a Status. The
default status is Starts at. On the day of the start date you have selected, the status will
automatically change to Active. The status Inactive can be used when some changes need be
made before the survey may be conducted, or to put an active project temporarily on hold.
However the status should always be changed to Starts at before the start date. Otherwise the
survey will not be resumed.
You can choose for which Site the survey should be conducted. Each site has its own look and
feel. The layout of the webpage that contains the survey is taylored to a specific site. Also, a site
can have an e-mail template. When such a template is available, the invitation and reminder emails that are sent out will be in the layout of the site. An administrator configures the different
sites. You can choose any of the sites that has been configured for you.
Figure 19: Creating a new project step 1: General information for an ad-hoc research project
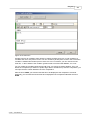
Continous Research project
Also for a continuous project the first step in creating a new project is giving it a Project name, a
Start date and a Status. The default status is Starts at. On the day of the start date you have
selected, the status will automatically change to Active. However for a continuous project, you
should also specify the end date, the interval and the invite respondents again after ...
intervals value.
© 2001 - 2004 Metatude
Project Manager User Manual
37
The end date specifies to which date the project will run. After this date no new intervals of
research are created and no more invitations to participate are sent out. If you are not sure what
the end date will be, you don't have to fill out an end date. You can define an end date later when
the project is active, or you just can stop the project immediately by changing the status to
completed.
The interval specifies the frequency with which new intervals are created and new invitations are
sent. For instance, if you set the value to 'Every month', the system will invite new respondents
every month. The following values can be set:
·
·
·
·
·
·
·
·
Every day
Every week
Every two weeks
Every month
Every two months
Every quarter
Every half year
Every year
The invite respondents again after ... intervals value specifies how long respondents may not
be approached for another interval of the continuous research project. Suppose you specify the
interval 'Every month' and set this value to 6, then respondents are not invited for at least half a
year. Only when there are not enough respondents left to obtain the specified quantities of
responses (see 'Target groups'), this value is automatically decreased by the software.
Figure 20: Creating a new project step 1: General information for a continuous research project
© 2001 - 2004 Metatude
Projects
5.2.2
38
Setting a dialogue
Step two in creating a project is assigning a dialogue (the dialogue can be designed using the
Metatude Dialogue Designer, see 'About this manual'). The dialogue can be assigned by clicking
the Open button. This button opens a window that allows you to select the appropriate dialogue on
your hard drive or network. Once you click OK, the dialogue is copied to the central Dialogue
Server. When this is completed, you see some dialogue information (name, author, number of
questions and language) presented in the window.
You can also copy a dialogue from the server to your hard drive or network (only from an already
created project). To do so, click the Save button. This opens a window were you can select the
drive to copy the dialogue to.
Figure 21: Creating a new project step 2: Assigning a dialogue
© 2001 - 2004 Metatude
39
5.2.3
Project Manager User Manual
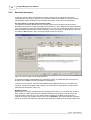
Target groups
The third step in creating a project is selecting target groups. On the left side of the third window
you see an overview of all target groups, organized in folders. You can open and close folders the
regular way, by double-clicking the triangle in front of them. You can select target groups for the
project by selecting them in the left list and click the Add button . You can remove target groups
from your selection by selecting them from the right list (active target groups) and click the
Remove button.
Invite all
Next to the Active Target groups are three columns. The first one states the Size of the target
group. The second column contains a drop-down menu per target group, where you can indicate if
you want to invite the whole target group, a percentage of the target group or a sample of the
target group. If you choose All, the whole group will be invited. Only when All or percentage is
chosen, you can use the reminder functionality.
Invite percentage
When you choose Percentage from the drop-down menu, you can enter the percentage of
respondents in the target group that should get an invitation to the survey.
Invite sample
Alternatively, you can not invite the whole target group and set a Target size. If you enter a sample
size, the Metatude system invites just enough people to collect this volume of response. For
instance if you only need 25 responses from the group 'Asia', you define this as the sample size.
During the project the software monitors the response rate and sends out extra invitations when
needed. To set a sample size, just click the number to edit it.
Figure 22: Creating a new project step 3: Selecting target groups
© 2001 - 2004 Metatude
Projects
5.2.4
40
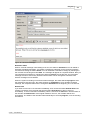
Invitation
The fourth step in creating a project is the Invitation. In this step you enter the text of an e-mail
that will be sent out to the target group when the project starts. On the left side of the wizard is a
checkbox Invite respondents at activation. By default, this is checked; and invitations will only be
sent (by e-mail) when this box is checked.
From e-mail address and name
You can specify the name and the e-mail address that will appear in the e-mail application of the
respondents. This information is entered in the From and name textboxes. You can specify only an
e-mail address or a combination of an e-mail address and a name. When you also specify a name,
this name will show up in the respondent's e-mail application instead of the e-mail address.
Subject
Enter the subject line for the invitation e-mail here. You can use custom attributes in the subject
line.
Attachments
You can send attachments along with the invitation. The maximum size for an invitation can be set
by the administrator. The default size is 250 kB. Click on the Attach button to select the
attachments. Next to this button, you see the name of files attached separated by a semicolon.
Deleting a name from this list will also remove the file from the attachment.
Special tags
In the message text you can use three special instructions: <USER>, <URL> and <EMAIL>. The
first one will be replaced with the name of the recipient. The second one will be replaced with a
unique URL for each recipient. When recipients click this link they will automatically go to the web
address where the dialogue is presented to them. The value <EMAIL> will be replaced by the email address of the respondent. You can manually type the <USER>, <URL> and <EMAIL> tags,
or you can insert them by right clicking your mouse and select these tags.
Using custom attributes
If custom attributes have been defined, these can be inserted in the email (and even in the subject
line). These tags are replaced with the particular value in the database for the respondent. If the
respondent comes from a database where this custom attribute has not been defined, this value is
left blank. You can insert custom attributes by right clicking your mouse. An overview of all the
custom attributes appears from which you can select. The custom attribute tags will appear in blue
on your screen.
© 2001 - 2004 Metatude
41
Project Manager User Manual
Figure 23: Creating a new project step 4: Making an invitation text
Special markup
If a template for the invitation e-mail was created, you can use special markup in your e-mail. You
can choose your fonts, font styles and font sizes. A toolbar with the markup tools will be shown if
an e-mail template is available.
Customizing the invitation with rules
Click on the Rules button to define rules in your invitation. These rules are used to vary certain
pieces of text, based on the value of custom attributes.
© 2001 - 2004 Metatude
Projects
42
Figure 24: E-mail rules
Creating rules for an invitation works similar to creating a target group rule. A rule consists of a
condition and one or two pieces of text. You can choose to put one piece of text in the e-mail if the
condition is satisfied and another piece of text if it is not. For instance, you can choose to write
'Dear Sir,' in the invitation if the condition 'gender=male' is met and 'Dear Madam,' if it is not.
You can create the condition below the word IF. First, you choose a custom attribute. Then you
define the comparison (for instance: equals, larger than or smaller than). After the comparison, you
can input what the custom attribute has to be compared to.
After the word THEN, you write the text that has to be displayed if the comparison succeeds.
Optionally, you can write the text that has to be displayed if the comparison fails after the word
ELSE.
© 2001 - 2004 Metatude
43
5.2.5
Project Manager User Manual
Reminder messages
In this step you can define and schedule reminder messages to your target groups.These
messages will be sent only to persons who have been invited to participate in a survey but didn't
yet participate. When sending out the reminders, the system checks who has participated.
All respondents in a target group must be invited
The reminder messages will only be sent to target groups were everybody has been invited.
Reminders will not be sent when a sample size has been set. This is because the system itself will
sent out messages to reach the desired sample size. You can only access this tab when one of the
selected target groups has been invited completely. Inviting everybody in a target group is done by
checking the All checkbox, when you specify target groups for a project.
Figure 25: The overview of scheduled reminders.
A reminder message can be defined when defining a project, or added later when the project is
already active. Multiple reminder messages can be defined.
To define a new reminder, click the button Add. A window appears where you can define your
message. Just like the original email invitation you must enter an email adress, a subject and a
message with at least the <URL> tag.
Reminder nature
Besides this you need to schedule when the message will be sent. You can define the number of
days, weeks or months after which the reminder should be sent (relative to the date when the
original invitation was sent out). The remind nature is default set to Once. If the project is a
continuous project, the reminder nature can be set to Repetitive. This means that the reminders
will be sent with an interval that is specified by the value that is filled out in the 'Remind After' field.
© 2001 - 2004 Metatude
Projects
44
Figure 26: Reminder message.
Reminder status
When a reminder message is still waiting to be sent, the status is Scheduled. You can delete or
inactivate scheduled messages. You delete a message by selecting it in the reminder message
overview and clicking the button Delete. You can inactivate a reminder message by selecting it in
the overview and clicking the button Edit. The message will appear in a seperate window. Now you
can inactivate the message by changing the status to Inactive and clicking OK. An inactivated
message will not be sent. At any time the inactive status can be changed to scheduled. Also
inactive messages can be deleted.
When the system is sending out reminder email messages, the status will be In progress. After
the messages have been sent, the status changes to Completed. If it is a repetitive reminder
message, the completed status will be changed to Scheduled at the beginning of a new interval.
Remind now
If you want to send out a new reminder immediately, then choose the status Remind Now when
creating a reminder. Each reminder that has the status Scheduled can also be sent out
immediately. To send a reminder immediately, select it, and click the edit button. Set the status of
the reminder to Remind Now. If the original invitations are over, the reminder will be sent
immediately. The status of the reminder will automatically be set to In progress, once the sending
has started.
© 2001 - 2004 Metatude
45
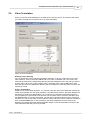
5.2.6
Project Manager User Manual
Results
After you have completed step 5, the project is complete. If you have selected the status 'starts at,
defined a start date and set the invitations, the project will automatically be executed.
Get results any time
Any time during and after the project you can retrieve the results in the fifth step of the project
wizard. Simply select a project, click the Edit button and go the fifth step Results. Here you can
see the number of responses. When you click the Get button the system will download the results
(this may take a while, especially when there are many respondents) and ask you in which file
format you want the results and where you want to save them. After clicking OK, the system
transfers a copy of the results to your system in the chosen file format. For a continuous project
you can select the intervals for which you want to download the results (see figure below).
Figure 27: Selecting and downloading results for a continuous research project
The three available data formats for the results are:
· Microsoft Excel
· SAV /SPSS file; specific file format for statistical software.
· CSV (Comma seperated value)
The SAV data file format was developed by SPSS. This file format contains data as well as meta
information that describes the meaning of the data. If you have analysis software from SPSS or
another package that reads the SAV format you can download this file format and analyze the data
immediately.
The CSV file needs to be imported for use in Excel. You cannot use this file in Excel directly. In
Excel, on the 'Data' menu, choose 'Get External Data' and then choose 'Import Text File ...' to
import the CSV file.
The data files (SPSS and CSV file) generated by the Metatude system not only contain the survey
data, but also the attributes of the person who completed the survey, as well as the name of the
target group. These characteristics are useful in analyzing the data.
© 2001 - 2004 Metatude
Projects
46
The Excel file not only holds the results in numbers, but also contains charts of most of the
questions. For multiple choice questions these are pie charts. For multiple response, scale, matrix
and priority questions these are horizontal bar charts. You can easily change the chart type by
selecting a chart, click with the right mouse button and select 'Chart type'. You can select from a
large variety of charts in Excel.
The generated Excel file has different worksheets:
1) Charts
2) Frequencies
3) Data
4) Intervals (only for continuous projects)
Figure 28: Example of automatically generated Microsoft Excel file including charts
© 2001 - 2004 Metatude
47
5.3
Project Manager User Manual
Editing an existing project
You can edit project information by selecting the project and clicking the Edit button in the
operations bar. The same wizard is presented as when you defined the project. Now it allows you
to make the necessary changes. After clicking the OK button, the changes are saved. At any time
you can click the Cancel button to cancel the operation. In this case, the changes are not saved.
Not all projects can be edited, only those that still have to start or those that are inactive.
You can remove a project from the overview by selecting one and clicking the Delete button in the
operations bar. You can only remove projects that still have to start or projects that have been
completed. The table below presents an overview of the possible operations for each status of a
project.
Possible Operations:
Status Project
Creating
Active
X
Inactive
Starts at
Completed
Editing
Deleting
X
X
X
X
X
X
X
© 2001 - 2004 Metatude
Index
Index
-3389
14
-Aactive 7, 33, 34, 36, 47
active target groups 39
add Group 29
add Project 36
add Server 10
add User 7
ad-hoc Research 36
administrator 3, 7, 10, 18, 22, 23
all 39
attribute 29, 31
attributes 10, 15, 18, 27
-Eedit 21, 33, 47
email 18
empty 29
end date 36
equation 31
error 25
-F-
-Bbase
delete 21, 31
description 28, 29
dialogue 34, 35
directories 10, 22, 27
directory 21, 29
directory tree 14
download 35, 45
driver 15
dropdown menu 29, 31
dynamic 27
dynamic target groups 27
14
-Ccalculate 31
cancel 33, 47
CD-ROM 5, 6
changes 47
characteristics 27, 29, 31
charts 45
client 23
completed 34, 36, 43, 47
connect 23
connection 23, 25
content view area 26
continous Research 36
continuous 35
CSV 45
custom attributes 40
customer satisfaction 2
-Ddata 35
data type 29
database 4, 10, 15, 21, 29
databases 10, 22
date 18
© 2001 - 2004 Metatude
feedback 18
folders 7, 28, 34
format 35
frequencies 45
from 40
-Hhardware 5
help bar 26
host 10, 14
HRM 10, 22
-Iin progress 43
inactive 7, 33, 34, 36, 43, 47
insert rule 31
insert set 31
install 5
installation 6
interval 36, 45
inverse operand 29
invitation 40
invitations 35
IP address 23
IP-address 14
48
49
Project Manager User Manual
-JJDBC
-P10, 15
password 7, 14, 15, 22, 23
people 10, 28
port 14, 23
preview 31
processor 5
project 35, 47
project name 36
projects 18, 22, 27, 34
protocol 10
-LLDAP 10, 14, 18
license 14
license agreement 3
license key 7
Lightweight Directory Access Protocol
login 23, 25
lookup table 20
Lotus Notes 10
10
-Qquestionnaires
-Mmain window 26
matrix questions 4
menu bar 26
Metatude Channel Integration Component
Metatude Dialogue Designer 4
Metatude Dialogue Server 4, 7, 23
Metatude Project Manager 4
Microsoft Excel 45
multiple choice 4
multiple response 4
multiple rules 31
multi-user 23
-Nname 7, 10, 14, 18, 28, 29, 34
network 4, 10, 23
new folder 7, 28, 34
Novell NDS 10
number 18
number of people 31
-OODBC-connection 15
once 43
online feedback 10
operand 29, 31
operating system 5
operation bar 10, 26, 29
operations bar 7, 21, 28, 33, 34, 47
operator 29
opposite selection 29
4
-R4
RAM 5
readable name 18
reconnect 25
reminder 43
repetitive 43
reporting tools 2
response rate 39
response rates 35
results 34, 35, 45
retrieve results 4
rights 7
rule 27
rule set 29, 31
rule-based 27
rules 18, 27, 29, 31
-Ssample 39
sample size 43
scale 4
scheduled 43
selection 31
server 22, 23, 25
server unavailable 10
service level management 2
setup.exe 6
size 28, 39
SPSS file 45
stakeholder 10
stakeholder feedback 27
stakeholders 2, 4
start date 36
© 2001 - 2004 Metatude
Index
starts at 36, 47
status 7, 34, 36
status project 47
string 18
subject 40
suite 2
sun.jdbc.odbc.JdbcOdbcDriver
system requirements 5
-Ttab 7, 28
tab bar 26, 28
tabs 31, 34
tag 40
target group 27, 29, 31, 33, 35
target groups 18, 22, 28, 43
tcp/ip 23
translation column 20
type 18
-Uupdate 31
url 15
use 18
user 3, 7, 14, 15, 22
username 7, 22, 23
-Vvalue 29
value column 20
value translation 18, 20
view 34
-WWindows 2000 5
Windows 95 5
Windows 98 5
Windows Active Directory
Windows application 5
Windows ME 5
Windows NT 5
© 2001 - 2004 Metatude
10
15
50