1
Bull
AIX 5L Guide to Printers and Printing
AIX
ORDER REFERENCE
86 A2 30EF 01
Bull
AIX 5L Guide to Printers and Printing
AIX
Software
October 2002
BULL CEDOC
357 AVENUE PATTON
B.P.20845
49008 ANGERS CEDEX 01
FRANCE
ORDER REFERENCE
86 A2 30EF 01
The following copyright notice protects this book under the Copyright laws of the United States of America
and other countries which prohibit such actions as, but not limited to, copying, distributing, modifying, and
making derivative works.
Copyright
Bull S.A. 1992, 2002
Printed in France
Suggestions and criticisms concerning the form, content, and presentation of
this book are invited. A form is provided at the end of this book for this purpose.
To order additional copies of this book or other Bull Technical Publications, you
are invited to use the Ordering Form also provided at the end of this book.
Trademarks and Acknowledgements
We acknowledge the right of proprietors of trademarks mentioned in this book.
AIXR is a registered trademark of International Business Machines Corporation, and is being used under
licence.
UNIX is a registered trademark in the United States of America and other countries licensed exclusively through
the Open Group.
The information in this document is subject to change without notice. Groupe Bull will not be liable for errors
contained herein, or for incidental or consequential damages in connection with the use of this material.
About This Book
This book contains information for understanding the print process and provides printer
configurations.
Who Should Use This Book
This book is for system administrators and programmers who want to resolve print–related
problems. Before you read this book, you should know basic operating system commands.
This book assumes you are familiar with the information and concepts presented in the
following publications:
•
AIX 5L Version 5.2 System User’s Guide: Operating System and Devices
•
AIX 5L Version 5.2 System User’s Guide: Communications and Networks
•
AIX 5L Version 5.2 Installation Guide and Reference
Highlighting
The following highlighting conventions are used in this book:
Bold
Identifies commands, subroutines,
keywords, files, structures, directories, and
other items whose names are predefined by
the system. Also identifies graphical objects
such as buttons, labels, and icons that the
user selects.
Italics
Identifies parameters whose actual names
or values are to be supplied by the user.
Monospace
Identifies examples of specific data values,
examples of text similar to what you might
see displayed, examples of portions of
program code similar to what you might
write as a programmer, messages from the
system, or information you should actually
type.
Case–Sensitivity in AIX
Everything in the AIX operating system is case–sensitive, which means that it distinguishes
between uppercase and lowercase letters. For example, you can use the ls command to list
files. If you type LS, the system responds that the command is ”not found.” Likewise, FILEA,
FiLea, and filea are three distinct file names, even if they reside in the same directory. To
avoid causing undesirable actions to be performed, always ensure that you use the correct
case.
Preface
iii
ISO 9000
ISO 9000 registered quality systems were used in the development and manufacturing
of this product.
Related Publications
The following publications contain information on system management and the commands
and files used in the operating system.
iv
•
AIX 5L Version 5.2 System Management Guide: Operating System and Devices
•
AIX 5L Version 5.2 Commands Reference
•
AIX 5L Version 5.2 Files Reference
Guide to Printers and Printing
Contents
About This Book . . . . . . . . . . . . . . . . . . . . . . . . . . . . . . . . . . . . . . . . . . . . . . . . . . . . . . . .
Who Should Use This Book . . . . . . . . . . . . . . . . . . . . . . . . . . . . . . . . . . . . . . . . . . . . . . .
Highlighting . . . . . . . . . . . . . . . . . . . . . . . . . . . . . . . . . . . . . . . . . . . . . . . . . . . . . . . . . . . . .
Case–Sensitivity in AIX . . . . . . . . . . . . . . . . . . . . . . . . . . . . . . . . . . . . . . . . . . . . . . . . . . .
ISO 9000 . . . . . . . . . . . . . . . . . . . . . . . . . . . . . . . . . . . . . . . . . . . . . . . . . . . . . . . . . . . . . . .
Related Publications . . . . . . . . . . . . . . . . . . . . . . . . . . . . . . . . . . . . . . . . . . . . . . . . . . . . .
iii
iii
iii
iii
iv
iv
Chapter 1. Printers, Print Jobs, and Queues Overview for Users . . . . . . . . . . .
Printer Terminology . . . . . . . . . . . . . . . . . . . . . . . . . . . . . . . . . . . . . . . . . . . . . . . . . . . . . .
Starting a Print Job (qprt Command) . . . . . . . . . . . . . . . . . . . . . . . . . . . . . . . . . . . . . . .
Prerequisites . . . . . . . . . . . . . . . . . . . . . . . . . . . . . . . . . . . . . . . . . . . . . . . . . . . . . . . . . .
qprt Command . . . . . . . . . . . . . . . . . . . . . . . . . . . . . . . . . . . . . . . . . . . . . . . . . . . . . . . .
smit Command . . . . . . . . . . . . . . . . . . . . . . . . . . . . . . . . . . . . . . . . . . . . . . . . . . . . . . . .
Canceling a Print Job (qcan Command) . . . . . . . . . . . . . . . . . . . . . . . . . . . . . . . . . . . . .
Prerequisites . . . . . . . . . . . . . . . . . . . . . . . . . . . . . . . . . . . . . . . . . . . . . . . . . . . . . . . . . .
Web-based System Manager . . . . . . . . . . . . . . . . . . . . . . . . . . . . . . . . . . . . . . . . . . .
qcan Command . . . . . . . . . . . . . . . . . . . . . . . . . . . . . . . . . . . . . . . . . . . . . . . . . . . . . . .
smit Command . . . . . . . . . . . . . . . . . . . . . . . . . . . . . . . . . . . . . . . . . . . . . . . . . . . . . . . .
Prioritizing a Print Job (qpri Command) . . . . . . . . . . . . . . . . . . . . . . . . . . . . . . . . . . . . .
Prerequisite . . . . . . . . . . . . . . . . . . . . . . . . . . . . . . . . . . . . . . . . . . . . . . . . . . . . . . . . . . .
Web-based System Manager . . . . . . . . . . . . . . . . . . . . . . . . . . . . . . . . . . . . . . . . . . .
qpri Command . . . . . . . . . . . . . . . . . . . . . . . . . . . . . . . . . . . . . . . . . . . . . . . . . . . . . . . .
smit Command . . . . . . . . . . . . . . . . . . . . . . . . . . . . . . . . . . . . . . . . . . . . . . . . . . . . . . . .
Moving a Print Job to Another Print Queue (qmov Command) . . . . . . . . . . . . . . . . .
Prerequisite . . . . . . . . . . . . . . . . . . . . . . . . . . . . . . . . . . . . . . . . . . . . . . . . . . . . . . . . . . .
Web-based System Manager . . . . . . . . . . . . . . . . . . . . . . . . . . . . . . . . . . . . . . . . . . .
qmov Command . . . . . . . . . . . . . . . . . . . . . . . . . . . . . . . . . . . . . . . . . . . . . . . . . . . . . . .
smit Command . . . . . . . . . . . . . . . . . . . . . . . . . . . . . . . . . . . . . . . . . . . . . . . . . . . . . . . .
Holding and Releasing a Print Job (qhld Command) . . . . . . . . . . . . . . . . . . . . . . . . . .
Prerequisite . . . . . . . . . . . . . . . . . . . . . . . . . . . . . . . . . . . . . . . . . . . . . . . . . . . . . . . . . . .
Web-based System Manager . . . . . . . . . . . . . . . . . . . . . . . . . . . . . . . . . . . . . . . . . . .
qhld Command . . . . . . . . . . . . . . . . . . . . . . . . . . . . . . . . . . . . . . . . . . . . . . . . . . . . . . . .
smit Command . . . . . . . . . . . . . . . . . . . . . . . . . . . . . . . . . . . . . . . . . . . . . . . . . . . . . . . .
Checking Print Job Status (qchk Command) . . . . . . . . . . . . . . . . . . . . . . . . . . . . . . . . .
Prerequisites . . . . . . . . . . . . . . . . . . . . . . . . . . . . . . . . . . . . . . . . . . . . . . . . . . . . . . . . . .
Web-based System Manager . . . . . . . . . . . . . . . . . . . . . . . . . . . . . . . . . . . . . . . . . . .
qchk Command . . . . . . . . . . . . . . . . . . . . . . . . . . . . . . . . . . . . . . . . . . . . . . . . . . . . . . .
smit Command . . . . . . . . . . . . . . . . . . . . . . . . . . . . . . . . . . . . . . . . . . . . . . . . . . . . . . . .
Printer Status Conditions . . . . . . . . . . . . . . . . . . . . . . . . . . . . . . . . . . . . . . . . . . . . . . .
Formatting Files for Printing (pr Command) . . . . . . . . . . . . . . . . . . . . . . . . . . . . . . . . . .
Printing ASCII Files on a PostScript Printer . . . . . . . . . . . . . . . . . . . . . . . . . . . . . . . . . .
Prerequisites . . . . . . . . . . . . . . . . . . . . . . . . . . . . . . . . . . . . . . . . . . . . . . . . . . . . . . . . . .
Command Summary for Printers, Print Jobs, and Queues . . . . . . . . . . . . . . . . . . . . .
1-1
1-1
1-4
1-4
1-4
1-7
1-8
1-8
1-8
1-8
1-8
1-9
1-9
1-9
1-9
1-9
1-10
1-10
1-10
1-10
1-10
1-11
1-11
1-11
1-11
1-11
1-12
1-12
1-12
1-12
1-12
1-13
1-14
1-16
1-16
1-17
Preface
v
Chapter 2. Printers, Print Jobs, and Queues for System Administrators . . . .
Printing Processes . . . . . . . . . . . . . . . . . . . . . . . . . . . . . . . . . . . . . . . . . . . . . . . . . . . . . . .
Controlling the Printing Process . . . . . . . . . . . . . . . . . . . . . . . . . . . . . . . . . . . . . . . . .
Print Spooler . . . . . . . . . . . . . . . . . . . . . . . . . . . . . . . . . . . . . . . . . . . . . . . . . . . . . . . . . . . .
Real and Virtual Printers . . . . . . . . . . . . . . . . . . . . . . . . . . . . . . . . . . . . . . . . . . . . . . . . . .
Local and Remote Printers . . . . . . . . . . . . . . . . . . . . . . . . . . . . . . . . . . . . . . . . . . . . . . . .
Printer Backends . . . . . . . . . . . . . . . . . . . . . . . . . . . . . . . . . . . . . . . . . . . . . . . . . . . . . . . .
Formatter Filters . . . . . . . . . . . . . . . . . . . . . . . . . . . . . . . . . . . . . . . . . . . . . . . . . . . . . . . . .
Initial Printer Configuration . . . . . . . . . . . . . . . . . . . . . . . . . . . . . . . . . . . . . . . . . . . . . . . .
Changing the Configuration File . . . . . . . . . . . . . . . . . . . . . . . . . . . . . . . . . . . . . . . . .
Configuring a Local Printer and Adding a Queue . . . . . . . . . . . . . . . . . . . . . . . . . . .
Configuring a Remote Printer and Adding a Queue . . . . . . . . . . . . . . . . . . . . . . . .
Configuring a Network Printer and Adding a Queue . . . . . . . . . . . . . . . . . . . . . . . .
Configuring a Print Queue for a File in the /dev Directory . . . . . . . . . . . . . . . . . . .
Configuring a Printer Port . . . . . . . . . . . . . . . . . . . . . . . . . . . . . . . . . . . . . . . . . . . . . . .
Configuring a Printer without Adding a Queue . . . . . . . . . . . . . . . . . . . . . . . . . . . . . . .
Prerequisites . . . . . . . . . . . . . . . . . . . . . . . . . . . . . . . . . . . . . . . . . . . . . . . . . . . . . . . . . .
smit Command . . . . . . . . . . . . . . . . . . . . . . . . . . . . . . . . . . . . . . . . . . . . . . . . . . . . . . . .
qprt Command . . . . . . . . . . . . . . . . . . . . . . . . . . . . . . . . . . . . . . . . . . . . . . . . . . . . . . . .
Additional Queue Operations . . . . . . . . . . . . . . . . . . . . . . . . . . . . . . . . . . . . . . . . . . . . . .
Adding a Print Queue Device . . . . . . . . . . . . . . . . . . . . . . . . . . . . . . . . . . . . . . . . . . . . . .
Prerequisites . . . . . . . . . . . . . . . . . . . . . . . . . . . . . . . . . . . . . . . . . . . . . . . . . . . . . . . . . .
Web-based System Manager . . . . . . . . . . . . . . . . . . . . . . . . . . . . . . . . . . . . . . . . . . .
Adding Plotter Support with 5080 . . . . . . . . . . . . . . . . . . . . . . . . . . . . . . . . . . . . . . . . . .
Prerequisites . . . . . . . . . . . . . . . . . . . . . . . . . . . . . . . . . . . . . . . . . . . . . . . . . . . . . . . . . .
smit Command . . . . . . . . . . . . . . . . . . . . . . . . . . . . . . . . . . . . . . . . . . . . . . . . . . . . . . . .
Creating a Plotter Setup File . . . . . . . . . . . . . . . . . . . . . . . . . . . . . . . . . . . . . . . . . . . . . .
Adding a Local Printer to an Existing Queue . . . . . . . . . . . . . . . . . . . . . . . . . . . . . . . . .
Prerequisites . . . . . . . . . . . . . . . . . . . . . . . . . . . . . . . . . . . . . . . . . . . . . . . . . . . . . . . . . .
Web-based System Manager . . . . . . . . . . . . . . . . . . . . . . . . . . . . . . . . . . . . . . . . . . .
Adding an ASCII Terminal Printer to an Existing Queue . . . . . . . . . . . . . . . . . . . . . . .
Prerequisites . . . . . . . . . . . . . . . . . . . . . . . . . . . . . . . . . . . . . . . . . . . . . . . . . . . . . . . . . .
smit Command . . . . . . . . . . . . . . . . . . . . . . . . . . . . . . . . . . . . . . . . . . . . . . . . . . . . . . . .
Adding an HP JetDirect Printer to an Existing Queue . . . . . . . . . . . . . . . . . . . . . . . . .
Prerequisites . . . . . . . . . . . . . . . . . . . . . . . . . . . . . . . . . . . . . . . . . . . . . . . . . . . . . . . . . .
Web-based System Manager . . . . . . . . . . . . . . . . . . . . . . . . . . . . . . . . . . . . . . . . . . .
Adding a File to an Existing Queue . . . . . . . . . . . . . . . . . . . . . . . . . . . . . . . . . . . . . . . . .
Prerequisites . . . . . . . . . . . . . . . . . . . . . . . . . . . . . . . . . . . . . . . . . . . . . . . . . . . . . . . . . .
smit Command . . . . . . . . . . . . . . . . . . . . . . . . . . . . . . . . . . . . . . . . . . . . . . . . . . . . . . . .
Configuring Nonsupported Printers . . . . . . . . . . . . . . . . . . . . . . . . . . . . . . . . . . . . . . . . .
Configuration Options . . . . . . . . . . . . . . . . . . . . . . . . . . . . . . . . . . . . . . . . . . . . . . . . . .
Customizing Nonsupported Virtual Printers . . . . . . . . . . . . . . . . . . . . . . . . . . . . . . .
Wiring Nonsupported Printers . . . . . . . . . . . . . . . . . . . . . . . . . . . . . . . . . . . . . . . . . . .
Printing with Terminal–Attached Printers . . . . . . . . . . . . . . . . . . . . . . . . . . . . . . . . . . . .
Supported Hardware . . . . . . . . . . . . . . . . . . . . . . . . . . . . . . . . . . . . . . . . . . . . . . . . . . .
Installing a Terminal–Attached Printer . . . . . . . . . . . . . . . . . . . . . . . . . . . . . . . . . . . .
Commands and Control Sequences . . . . . . . . . . . . . . . . . . . . . . . . . . . . . . . . . . . . . . . .
Terminfo Database . . . . . . . . . . . . . . . . . . . . . . . . . . . . . . . . . . . . . . . . . . . . . . . . . . . .
Printer Backend Commands . . . . . . . . . . . . . . . . . . . . . . . . . . . . . . . . . . . . . . . . . . . .
Terminal–Attached Printing Limitations . . . . . . . . . . . . . . . . . . . . . . . . . . . . . . . . . . . . . .
Configuring a Printer for an ASCII Display Terminal . . . . . . . . . . . . . . . . . . . . . . . . . . .
Prerequisites . . . . . . . . . . . . . . . . . . . . . . . . . . . . . . . . . . . . . . . . . . . . . . . . . . . . . . . . . .
Configuring a Printer . . . . . . . . . . . . . . . . . . . . . . . . . . . . . . . . . . . . . . . . . . . . . . . . . . .
Listing Print Queues and Print Queue Devices . . . . . . . . . . . . . . . . . . . . . . . . . . . . . . .
Prerequisites . . . . . . . . . . . . . . . . . . . . . . . . . . . . . . . . . . . . . . . . . . . . . . . . . . . . . . . . . .
vi
Guide to Printers and Printing
2-1
2-1
2-2
2-3
2-3
2-4
2-4
2-5
2-6
2-6
2-6
2-7
2-7
2-8
2-8
2-9
2-9
2-9
2-9
2-10
2-10
2-10
2-10
2-10
2-10
2-10
2-11
2-11
2-11
2-11
2-12
2-12
2-12
2-12
2-12
2-12
2-12
2-12
2-12
2-13
2-13
2-13
2-14
2-15
2-15
2-17
2-19
2-19
2-20
2-21
2-21
2-21
2-21
2-21
2-21
Showing Status of Print Queues . . . . . . . . . . . . . . . . . . . . . . . . . . . . . . . . . . . . . . . . . . .
Web-based System Manager . . . . . . . . . . . . . . . . . . . . . . . . . . . . . . . . . . . . . . . . . . .
Starting and Stopping a Print Queue . . . . . . . . . . . . . . . . . . . . . . . . . . . . . . . . . . . . . . .
Prerequisites . . . . . . . . . . . . . . . . . . . . . . . . . . . . . . . . . . . . . . . . . . . . . . . . . . . . . . . . . .
Setting the Default Print Queue . . . . . . . . . . . . . . . . . . . . . . . . . . . . . . . . . . . . . . . . . . . .
Prerequisites . . . . . . . . . . . . . . . . . . . . . . . . . . . . . . . . . . . . . . . . . . . . . . . . . . . . . . . . . .
Procedure . . . . . . . . . . . . . . . . . . . . . . . . . . . . . . . . . . . . . . . . . . . . . . . . . . . . . . . . . . . .
Holding and Releasing a Print Job (qhld Command) . . . . . . . . . . . . . . . . . . . . . . . . . .
Prerequisites . . . . . . . . . . . . . . . . . . . . . . . . . . . . . . . . . . . . . . . . . . . . . . . . . . . . . . . . . .
Procedure . . . . . . . . . . . . . . . . . . . . . . . . . . . . . . . . . . . . . . . . . . . . . . . . . . . . . . . . . . . .
Moving a Job between Queues . . . . . . . . . . . . . . . . . . . . . . . . . . . . . . . . . . . . . . . . . . . .
Prerequisites . . . . . . . . . . . . . . . . . . . . . . . . . . . . . . . . . . . . . . . . . . . . . . . . . . . . . . . . . .
Web-based System Manager . . . . . . . . . . . . . . . . . . . . . . . . . . . . . . . . . . . . . . . . . . .
Scheduling Print Jobs . . . . . . . . . . . . . . . . . . . . . . . . . . . . . . . . . . . . . . . . . . . . . . . . . . . .
Prerequisites . . . . . . . . . . . . . . . . . . . . . . . . . . . . . . . . . . . . . . . . . . . . . . . . . . . . . . . . . .
Changing or Showing Queue Characteristics . . . . . . . . . . . . . . . . . . . . . . . . . . . . . . . .
Prerequisites . . . . . . . . . . . . . . . . . . . . . . . . . . . . . . . . . . . . . . . . . . . . . . . . . . . . . . . . . .
Specifying Paper Size . . . . . . . . . . . . . . . . . . . . . . . . . . . . . . . . . . . . . . . . . . . . . . . . . . . .
Prerequisites . . . . . . . . . . . . . . . . . . . . . . . . . . . . . . . . . . . . . . . . . . . . . . . . . . . . . . . . . .
Web-based System Manager . . . . . . . . . . . . . . . . . . . . . . . . . . . . . . . . . . . . . . . . . . .
Changing or Showing Printer Connection Characteristics . . . . . . . . . . . . . . . . . . . . . .
Prerequisites . . . . . . . . . . . . . . . . . . . . . . . . . . . . . . . . . . . . . . . . . . . . . . . . . . . . . . . . . .
Web-based System Manager . . . . . . . . . . . . . . . . . . . . . . . . . . . . . . . . . . . . . . . . . . .
Changing / Showing Pre–Processing Filters . . . . . . . . . . . . . . . . . . . . . . . . . . . . . . . . .
Prerequisites . . . . . . . . . . . . . . . . . . . . . . . . . . . . . . . . . . . . . . . . . . . . . . . . . . . . . . . . . .
Web-based System Manager . . . . . . . . . . . . . . . . . . . . . . . . . . . . . . . . . . . . . . . . . . .
Deleting a Print Queue . . . . . . . . . . . . . . . . . . . . . . . . . . . . . . . . . . . . . . . . . . . . . . . . . . .
Prerequisites . . . . . . . . . . . . . . . . . . . . . . . . . . . . . . . . . . . . . . . . . . . . . . . . . . . . . . . . . .
Procedure . . . . . . . . . . . . . . . . . . . . . . . . . . . . . . . . . . . . . . . . . . . . . . . . . . . . . . . . . . . .
Listing All Supported and Defined Printers . . . . . . . . . . . . . . . . . . . . . . . . . . . . . . . . . .
List All Supported Printers . . . . . . . . . . . . . . . . . . . . . . . . . . . . . . . . . . . . . . . . . . . . . .
List All Defined Printers . . . . . . . . . . . . . . . . . . . . . . . . . . . . . . . . . . . . . . . . . . . . . . . .
Moving a Printer to Another Port . . . . . . . . . . . . . . . . . . . . . . . . . . . . . . . . . . . . . . . . . . .
Prerequisites . . . . . . . . . . . . . . . . . . . . . . . . . . . . . . . . . . . . . . . . . . . . . . . . . . . . . . . . . .
Procedure . . . . . . . . . . . . . . . . . . . . . . . . . . . . . . . . . . . . . . . . . . . . . . . . . . . . . . . . . . . .
Changing or Showing Printer Characteristics . . . . . . . . . . . . . . . . . . . . . . . . . . . . . . . .
Prerequisite . . . . . . . . . . . . . . . . . . . . . . . . . . . . . . . . . . . . . . . . . . . . . . . . . . . . . . . . . . .
Web-based System Manager . . . . . . . . . . . . . . . . . . . . . . . . . . . . . . . . . . . . . . . . . . .
Deleting a Printer . . . . . . . . . . . . . . . . . . . . . . . . . . . . . . . . . . . . . . . . . . . . . . . . . . . . . . . .
Prerequisites . . . . . . . . . . . . . . . . . . . . . . . . . . . . . . . . . . . . . . . . . . . . . . . . . . . . . . . . . .
Web-based System Manager . . . . . . . . . . . . . . . . . . . . . . . . . . . . . . . . . . . . . . . . . . .
Remote Printing Overview . . . . . . . . . . . . . . . . . . . . . . . . . . . . . . . . . . . . . . . . . . . . . . . .
rembak Program . . . . . . . . . . . . . . . . . . . . . . . . . . . . . . . . . . . . . . . . . . . . . . . . . . . . . .
lpd daemon . . . . . . . . . . . . . . . . . . . . . . . . . . . . . . . . . . . . . . . . . . . . . . . . . . . . . . . . . . .
Managing and Using Remote Printers and Queues . . . . . . . . . . . . . . . . . . . . . . . . . . .
Remote Printing and the qconfig File . . . . . . . . . . . . . . . . . . . . . . . . . . . . . . . . . . . . .
Configuring a Remote Host as a Print Server . . . . . . . . . . . . . . . . . . . . . . . . . . . . . .
Using Remote Printers and Queues . . . . . . . . . . . . . . . . . . . . . . . . . . . . . . . . . . . . . .
Using Remote Host Access for Printing . . . . . . . . . . . . . . . . . . . . . . . . . . . . . . . . . . . . .
Prerequisites . . . . . . . . . . . . . . . . . . . . . . . . . . . . . . . . . . . . . . . . . . . . . . . . . . . . . . . . . .
Using the lpd Remote Subsystem . . . . . . . . . . . . . . . . . . . . . . . . . . . . . . . . . . . . . . . . . .
Prerequisites . . . . . . . . . . . . . . . . . . . . . . . . . . . . . . . . . . . . . . . . . . . . . . . . . . . . . . . . . .
Showing Status of Printer Server Subsystem . . . . . . . . . . . . . . . . . . . . . . . . . . . . . . . .
smit Command . . . . . . . . . . . . . . . . . . . . . . . . . . . . . . . . . . . . . . . . . . . . . . . . . . . . . . . .
Printer Queuing System Status Conditions . . . . . . . . . . . . . . . . . . . . . . . . . . . . . . . . . .
Preface
2-22
2-22
2-22
2-22
2-23
2-23
2-23
2-23
2-23
2-23
2-24
2-24
2-24
2-24
2-24
2-25
2-25
2-25
2-25
2-25
2-26
2-26
2-26
2-26
2-26
2-26
2-26
2-26
2-26
2-27
2-27
2-27
2-28
2-28
2-28
2-28
2-28
2-28
2-28
2-28
2-28
2-29
2-29
2-30
2-31
2-31
2-32
2-32
2-33
2-33
2-34
2-34
2-35
2-35
2-36
vii
viii
Chapter 3. Spooler Overview . . . . . . . . . . . . . . . . . . . . . . . . . . . . . . . . . . . . . . . . . . . .
Spooler Introduction . . . . . . . . . . . . . . . . . . . . . . . . . . . . . . . . . . . . . . . . . . . . . . . . . . . . . .
Spooler Concepts . . . . . . . . . . . . . . . . . . . . . . . . . . . . . . . . . . . . . . . . . . . . . . . . . . . . . . . .
Formatter Filters . . . . . . . . . . . . . . . . . . . . . . . . . . . . . . . . . . . . . . . . . . . . . . . . . . . . . . .
Local and Remote Spooler Queues and Spooler Devices . . . . . . . . . . . . . . . . . . .
Local and Remote Printers . . . . . . . . . . . . . . . . . . . . . . . . . . . . . . . . . . . . . . . . . . . . . .
Printer Devices . . . . . . . . . . . . . . . . . . . . . . . . . . . . . . . . . . . . . . . . . . . . . . . . . . . . . . . .
qdaemon . . . . . . . . . . . . . . . . . . . . . . . . . . . . . . . . . . . . . . . . . . . . . . . . . . . . . . . . . . . . .
Real (Physical) and Virtual Printers . . . . . . . . . . . . . . . . . . . . . . . . . . . . . . . . . . . . . .
Spooler . . . . . . . . . . . . . . . . . . . . . . . . . . . . . . . . . . . . . . . . . . . . . . . . . . . . . . . . . . . . . .
Spooler Backends . . . . . . . . . . . . . . . . . . . . . . . . . . . . . . . . . . . . . . . . . . . . . . . . . . . . .
Spooler Job . . . . . . . . . . . . . . . . . . . . . . . . . . . . . . . . . . . . . . . . . . . . . . . . . . . . . . . . . . .
Generic Base Operating System Spooler . . . . . . . . . . . . . . . . . . . . . . . . . . . . . . . . . . .
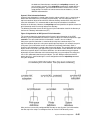
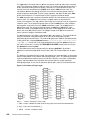
Spooler Parts . . . . . . . . . . . . . . . . . . . . . . . . . . . . . . . . . . . . . . . . . . . . . . . . . . . . . . . . . . .
Spooler Data Flow: Commands and Backend . . . . . . . . . . . . . . . . . . . . . . . . . . . . . . . .
Spooler Data Flow (enq Command) . . . . . . . . . . . . . . . . . . . . . . . . . . . . . . . . . . . . . . . .
Overview of Backend Processing . . . . . . . . . . . . . . . . . . . . . . . . . . . . . . . . . . . . . . . . . .
Datastream Flow for Common Print Jobs . . . . . . . . . . . . . . . . . . . . . . . . . . . . . . . . .
Virtual Printers and Formatter Filters . . . . . . . . . . . . . . . . . . . . . . . . . . . . . . . . . . . . . . .
/etc/qconfig Spooler Configuration File . . . . . . . . . . . . . . . . . . . . . . . . . . . . . . . . . . . . . .
/etc/qconfig File Structure . . . . . . . . . . . . . . . . . . . . . . . . . . . . . . . . . . . . . . . . . . . . . . .
Spooler Queues, Virtual Printers, and Physical Printers . . . . . . . . . . . . . . . . . . . . .
Spooler Queue Names and Status Formats . . . . . . . . . . . . . . . . . . . . . . . . . . . . . . .
3-1
3-1
3-1
3-1
3-2
3-2
3-2
3-2
3-2
3-3
3-3
3-4
3-4
3-4
3-5
3-6
3-7
3-8
3-10
3-12
3-12
3-13
3-14
Chapter 4. Printer, Plotter, and Spooler Subsystem Programming . . . . . . . . . .
Printer Backend Overview for Programming . . . . . . . . . . . . . . . . . . . . . . . . . . . . . . . . .
Printer Backend Data Flow . . . . . . . . . . . . . . . . . . . . . . . . . . . . . . . . . . . . . . . . . . . . .
Virtual Printer Definitions and Attributes . . . . . . . . . . . . . . . . . . . . . . . . . . . . . . . . . . . . .
Working with Virtual Printer Attributes . . . . . . . . . . . . . . . . . . . . . . . . . . . . . . . . . . . .
Printer Colon File Escape Sequences . . . . . . . . . . . . . . . . . . . . . . . . . . . . . . . . . . . . . .
Printer Colon File Conventions . . . . . . . . . . . . . . . . . . . . . . . . . . . . . . . . . . . . . . . . . . . .
Colon File Format . . . . . . . . . . . . . . . . . . . . . . . . . . . . . . . . . . . . . . . . . . . . . . . . . . . . .
Attribute Names . . . . . . . . . . . . . . . . . . . . . . . . . . . . . . . . . . . . . . . . . . . . . . . . . . . . . . .
Attribute Values . . . . . . . . . . . . . . . . . . . . . . . . . . . . . . . . . . . . . . . . . . . . . . . . . . . . . . .
Limits Field . . . . . . . . . . . . . . . . . . . . . . . . . . . . . . . . . . . . . . . . . . . . . . . . . . . . . . . . . . .
Example of Print Formatter . . . . . . . . . . . . . . . . . . . . . . . . . . . . . . . . . . . . . . . . . . . . . . . .
Create the Print Formatter Source File . . . . . . . . . . . . . . . . . . . . . . . . . . . . . . . . . . .
Compile and Link the Print Formatter . . . . . . . . . . . . . . . . . . . . . . . . . . . . . . . . . . . .
Understanding the Interaction between qdaemon and the Backend . . . . . . . . . . . . .
Using the Status File . . . . . . . . . . . . . . . . . . . . . . . . . . . . . . . . . . . . . . . . . . . . . . . . . . .
Printing Extra Copies . . . . . . . . . . . . . . . . . . . . . . . . . . . . . . . . . . . . . . . . . . . . . . . . . .
Updating Job Status Information . . . . . . . . . . . . . . . . . . . . . . . . . . . . . . . . . . . . . . . . .
Charging for the Job . . . . . . . . . . . . . . . . . . . . . . . . . . . . . . . . . . . . . . . . . . . . . . . . . . .
Using Exit Codes . . . . . . . . . . . . . . . . . . . . . . . . . . . . . . . . . . . . . . . . . . . . . . . . . . . . . .
Returning Error Messages . . . . . . . . . . . . . . . . . . . . . . . . . . . . . . . . . . . . . . . . . . . . . .
Setting Queue States . . . . . . . . . . . . . . . . . . . . . . . . . . . . . . . . . . . . . . . . . . . . . . . . . .
Terminating on Receipt of SIGTERM . . . . . . . . . . . . . . . . . . . . . . . . . . . . . . . . . . . . .
Understanding Backend Routines in libqb . . . . . . . . . . . . . . . . . . . . . . . . . . . . . . . . . . .
Printer Code Page Translation Tables . . . . . . . . . . . . . . . . . . . . . . . . . . . . . . . . . . . . . .
Stage–1 Translation . . . . . . . . . . . . . . . . . . . . . . . . . . . . . . . . . . . . . . . . . . . . . . . . . . .
Stage–2 Translation . . . . . . . . . . . . . . . . . . . . . . . . . . . . . . . . . . . . . . . . . . . . . . . . . . .
Printer Code Page Translation for Multibyte Code Sets . . . . . . . . . . . . . . . . . . . . . . .
Printer Code Page Translation Tables for Multibyte Code Sets . . . . . . . . . . . . . . .
Using Xwindows Fonts with the qprt Command . . . . . . . . . . . . . . . . . . . . . . . . . . . .
Translation Table Example . . . . . . . . . . . . . . . . . . . . . . . . . . . . . . . . . . . . . . . . . . . . . .
4-1
4-2
4-2
4-3
4-3
4-13
4-20
4-20
4-21
4-23
4-23
4-24
4-24
4-27
4-27
4-27
4-28
4-28
4-28
4-29
4-29
4-31
4-32
4-32
4-34
4-34
4-35
4-36
4-36
4-37
4-38
Guide to Printers and Printing
Printer Attachment Files . . . . . . . . . . . . . . . . . . . . . . . . . . . . . . . . . . . . . . . . . . . . . . . . . .
4-38
Using the SMIT Interface for Printer Attachment Files . . . . . . . . . . . . . . . . . . . . . .
4-38
Attachment File Naming Conventions . . . . . . . . . . . . . . . . . . . . . . . . . . . . . . . . . . . .
4-39
Structure of Attachment Files . . . . . . . . . . . . . . . . . . . . . . . . . . . . . . . . . . . . . . . . . . .
4-39
Attachment File Field Definitions . . . . . . . . . . . . . . . . . . . . . . . . . . . . . . . . . . . . . . . . .
4-40
Operators for Limits Field in the Printer Colon File . . . . . . . . . . . . . . . . . . . . . . . . . . . .
4-42
Contents of the limits Field . . . . . . . . . . . . . . . . . . . . . . . . . . . . . . . . . . . . . . . . . . . . . .
4-43
limits Field Operators . . . . . . . . . . . . . . . . . . . . . . . . . . . . . . . . . . . . . . . . . . . . . . . . . .
4-43
Adding a Printer Using the Printer Colon File . . . . . . . . . . . . . . . . . . . . . . . . . . . . . . . .
4-48
Prerequisite Tasks or Conditions . . . . . . . . . . . . . . . . . . . . . . . . . . . . . . . . . . . . . . . . .
4-48
Procedure . . . . . . . . . . . . . . . . . . . . . . . . . . . . . . . . . . . . . . . . . . . . . . . . . . . . . . . . . . . .
4-48
Printer–Specific Information . . . . . . . . . . . . . . . . . . . . . . . . . . . . . . . . . . . . . . . . . . . . . . .
4-50
IBM Personal Printer II Models 2380, 2381, 2390, 2391, 2380–2, 2381–2, 2390–2,
2391–2 . . . . . . . . . . . . . . . . . . . . . . . . . . . . . . . . . . . . . . . . . . . . . . . . . . . . . . . . . . . . . . .
4-51
IBM 3812 Model 2 Page Printer . . . . . . . . . . . . . . . . . . . . . . . . . . . . . . . . . . . . . . . . .
4-51
IBM 3816 Page Printer . . . . . . . . . . . . . . . . . . . . . . . . . . . . . . . . . . . . . . . . . . . . . . . . .
4-52
IBM 4019 LaserPrinter and 4029 LaserPrinter . . . . . . . . . . . . . . . . . . . . . . . . . . . . .
4-52
IBM 4037 and IBM 4039 LaserPrinter . . . . . . . . . . . . . . . . . . . . . . . . . . . . . . . . . . . .
4-53
IBM 4072 ExecJet . . . . . . . . . . . . . . . . . . . . . . . . . . . . . . . . . . . . . . . . . . . . . . . . . . . . .
4-53
IBM 4076 InkJet Printer . . . . . . . . . . . . . . . . . . . . . . . . . . . . . . . . . . . . . . . . . . . . . . . .
4-53
IBM Proprinter Models 4201–3, 4202–3, 4207–2, 4208–2 . . . . . . . . . . . . . . . . . . .
4-53
IBM 4208–502, IBM 5572–B02, IBM 5573–H02, and IBM 5579–H02/K02 . . . . .
4-54
IBM 4216 Personal Page Printer, Model 031 . . . . . . . . . . . . . . . . . . . . . . . . . . . . . .
4-54
IBM 4216–510 and IBM 5327–011 . . . . . . . . . . . . . . . . . . . . . . . . . . . . . . . . . . . . . . .
4-54
IBM 4234 Printer . . . . . . . . . . . . . . . . . . . . . . . . . . . . . . . . . . . . . . . . . . . . . . . . . . . . . .
4-54
IBM 5202 Quietwriter III . . . . . . . . . . . . . . . . . . . . . . . . . . . . . . . . . . . . . . . . . . . . . . . .
4-54
IBM 5204 Quickwriter . . . . . . . . . . . . . . . . . . . . . . . . . . . . . . . . . . . . . . . . . . . . . . . . . .
4-55
IBM 5575–B02/F02/H02 and IBM 5577–B02/F02/FU2/G02/H02/J02/K02 . . . . .
4-55
IBM 5584–G02/H02, IBM 5585–H01, IBM 5587–G01/H01 and IBM 5589–H01
4-55
IBM 6252 Impactwriter and IBM 6252 Printer . . . . . . . . . . . . . . . . . . . . . . . . . . . . . .
4-55
IBM Network Color Printer . . . . . . . . . . . . . . . . . . . . . . . . . . . . . . . . . . . . . . . . . . . . . .
4-55
IBM Network Printer 12, 17, and 24 . . . . . . . . . . . . . . . . . . . . . . . . . . . . . . . . . . . . . .
4-57
IBM InfoPrint 20 . . . . . . . . . . . . . . . . . . . . . . . . . . . . . . . . . . . . . . . . . . . . . . . . . . . . . . .
4-59
IBM InfoPrint 32 Printer . . . . . . . . . . . . . . . . . . . . . . . . . . . . . . . . . . . . . . . . . . . . . . . .
4-61
IBM InfoPrint 40 Printer . . . . . . . . . . . . . . . . . . . . . . . . . . . . . . . . . . . . . . . . . . . . . . . .
4-63
Canon LASER SHOT LBP–B404PS/Lite . . . . . . . . . . . . . . . . . . . . . . . . . . . . . . . . . .
4-65
Canon LASER SHOT LBP–B406S/D/E/G, A404/E, A304E . . . . . . . . . . . . . . . . . .
4-65
Dataproducts LZR 2665 Laser Printer . . . . . . . . . . . . . . . . . . . . . . . . . . . . . . . . . . . .
4-65
Hewlett–Packard LaserJets II, III, IIISi, 4, 4Si, 4Plus, 4V, 4000, 5Si/5Si MX, 5Si Mopier,
8000 Color, and 8500 Color . . . . . . . . . . . . . . . . . . . . . . . . . . . . . . . . . . . . . . . . . . . . .
4-65
Lexmark 4227 Forms Printer . . . . . . . . . . . . . . . . . . . . . . . . . . . . . . . . . . . . . . . . . . . .
4-69
Lexmark Optra Laser Printer . . . . . . . . . . . . . . . . . . . . . . . . . . . . . . . . . . . . . . . . . . . .
4-70
Lexmark Optra Plus LaserPrinter . . . . . . . . . . . . . . . . . . . . . . . . . . . . . . . . . . . . . . . .
4-72
Lexmark Optra Color 1200 Printer . . . . . . . . . . . . . . . . . . . . . . . . . . . . . . . . . . . . . . .
4-74
Lexmark Optra Color 40 Printer . . . . . . . . . . . . . . . . . . . . . . . . . . . . . . . . . . . . . . . . .
4-78
Lexmark Optra Color 45 Printer . . . . . . . . . . . . . . . . . . . . . . . . . . . . . . . . . . . . . . . . .
4-81
Lexmark Optra K 1220 Printer . . . . . . . . . . . . . . . . . . . . . . . . . . . . . . . . . . . . . . . . . . .
4-83
Lexmark Optra C Color LaserPrinter . . . . . . . . . . . . . . . . . . . . . . . . . . . . . . . . . . . . .
4-86
Lexmark Optra E LaserPrinter . . . . . . . . . . . . . . . . . . . . . . . . . . . . . . . . . . . . . . . . . . .
4-89
Lexmark Optra N LaserPrinter . . . . . . . . . . . . . . . . . . . . . . . . . . . . . . . . . . . . . . . . . .
4-91
Lexmark Optra E310 Laser Printer . . . . . . . . . . . . . . . . . . . . . . . . . . . . . . . . . . . . . . .
4-95
Lexmark Optra M410 Laser Printer . . . . . . . . . . . . . . . . . . . . . . . . . . . . . . . . . . . . . .
4-98
Lexmark Optra Se Laser Printer . . . . . . . . . . . . . . . . . . . . . . . . . . . . . . . . . . . . . . . . .
4-101
Lexmark Optra T Laser Printer Family . . . . . . . . . . . . . . . . . . . . . . . . . . . . . . . . . . . .
4-104
Lexmark Optra W810 Laser Printer . . . . . . . . . . . . . . . . . . . . . . . . . . . . . . . . . . . . . .
4-107
Preface
ix
x
Lexmark Plus Printer Models 2380–3, 2381–3, 2390–3, 2391–3 . . . . . . . . . . . . .
OKI MICROLINE 801PS/+F, 801PSII/+F, 800PSIILT . . . . . . . . . . . . . . . . . . . . . . .
Printronix P9012 Line Printer . . . . . . . . . . . . . . . . . . . . . . . . . . . . . . . . . . . . . . . . . . . .
QMS ColorScript 100 Model 20 Printer . . . . . . . . . . . . . . . . . . . . . . . . . . . . . . . . . . .
Texas Instruments OmniLaser 2115 Page Printer . . . . . . . . . . . . . . . . . . . . . . . . . .
Printer Support . . . . . . . . . . . . . . . . . . . . . . . . . . . . . . . . . . . . . . . . . . . . . . . . . . . . . . . . . .
Printers . . . . . . . . . . . . . . . . . . . . . . . . . . . . . . . . . . . . . . . . . . . . . . . . . . . . . . . . . . . . . .
Pass–Through Mode . . . . . . . . . . . . . . . . . . . . . . . . . . . . . . . . . . . . . . . . . . . . . . . . . . . . .
Printer Device Driver Pass–Through Mode . . . . . . . . . . . . . . . . . . . . . . . . . . . . . . . .
Formatter Filter Pass–Through Mode . . . . . . . . . . . . . . . . . . . . . . . . . . . . . . . . . . . .
Viewing, Formatting, or Modifying Virtual Printer Definitions . . . . . . . . . . . . . . . . . . .
Modifying the mi, mp, and _d Attributes on a PostScript Queue . . . . . . . . . . . . . . . .
How piobe Uses Printer Colon Files . . . . . . . . . . . . . . . . . . . . . . . . . . . . . . . . . . . . . . . .
Spooler Job Header and Trailer Pages . . . . . . . . . . . . . . . . . . . . . . . . . . . . . . . . . . . . . .
Header and Trailer Page Pipelines . . . . . . . . . . . . . . . . . . . . . . . . . . . . . . . . . . . . . . .
Custom Header Pages . . . . . . . . . . . . . . . . . . . . . . . . . . . . . . . . . . . . . . . . . . . . . . . . .
Modifying the mo Virtual Printer Attribute . . . . . . . . . . . . . . . . . . . . . . . . . . . . . . . . . . . .
Handling Unsupported, IP–Addressable Terminal Servers . . . . . . . . . . . . . . . . . .
Filters . . . . . . . . . . . . . . . . . . . . . . . . . . . . . . . . . . . . . . . . . . . . . . . . . . . . . . . . . . . . . . . . . .
Filter that Maps Linefeeds to Carriage Returns and Linefeeds . . . . . . . . . . . . . . .
Editing the /etc/qconfig File . . . . . . . . . . . . . . . . . . . . . . . . . . . . . . . . . . . . . . . . . . . . . . . .
Modifying the /etc/qconfig File while Jobs are Processing . . . . . . . . . . . . . . . . . . .
Creating Queue with an Editor . . . . . . . . . . . . . . . . . . . . . . . . . . . . . . . . . . . . . . . . . .
4-111
4-112
4-112
4-112
4-112
4-113
4-113
4-118
4-118
4-120
4-121
4-126
4-127
4-129
4-129
4-130
4-133
4-133
4-135
4-136
4-138
4-138
4-138
Chapter 5. Troubleshooting the Base Operating System Spooler . . . . . . . . . . .
Local Printer Checklist . . . . . . . . . . . . . . . . . . . . . . . . . . . . . . . . . . . . . . . . . . . . . . . . . . . .
Inoperative Printer Checklist . . . . . . . . . . . . . . . . . . . . . . . . . . . . . . . . . . . . . . . . . . . . . . .
Remote Printer Checklist . . . . . . . . . . . . . . . . . . . . . . . . . . . . . . . . . . . . . . . . . . . . . . . . .
Adapter Considerations . . . . . . . . . . . . . . . . . . . . . . . . . . . . . . . . . . . . . . . . . . . . . . . . . . .
Resource Considerations . . . . . . . . . . . . . . . . . . . . . . . . . . . . . . . . . . . . . . . . . . . . . . . . .
Printing Problems When the var File System is Full . . . . . . . . . . . . . . . . . . . . . . . . . . .
Reactivating the Queue Daemon . . . . . . . . . . . . . . . . . . . . . . . . . . . . . . . . . . . . . . . .
Clearing a Print Queue Backlog . . . . . . . . . . . . . . . . . . . . . . . . . . . . . . . . . . . . . . . . .
Reallocating Printer Resources . . . . . . . . . . . . . . . . . . . . . . . . . . . . . . . . . . . . . . . . . .
Deleting Unnecessary Directory Files . . . . . . . . . . . . . . . . . . . . . . . . . . . . . . . . . . . .
Terminal–Attached Printer Checklist . . . . . . . . . . . . . . . . . . . . . . . . . . . . . . . . . . . . . . . .
Considerations for 8–Bit Printer Attached to 7–Bit Interface . . . . . . . . . . . . . . . . . . . .
qdaemon Checklist . . . . . . . . . . . . . . . . . . . . . . . . . . . . . . . . . . . . . . . . . . . . . . . . . . . . . . .
Queuing System Problems . . . . . . . . . . . . . . . . . . . . . . . . . . . . . . . . . . . . . . . . . . . . . . . .
Testing the qdaemon . . . . . . . . . . . . . . . . . . . . . . . . . . . . . . . . . . . . . . . . . . . . . . . . . . . . .
Testing a Spooler Queue . . . . . . . . . . . . . . . . . . . . . . . . . . . . . . . . . . . . . . . . . . . . . . . . . .
Copying Spooled Jobs . . . . . . . . . . . . . . . . . . . . . . . . . . . . . . . . . . . . . . . . . . . . . . . . . . . .
Cleaning Up and Starting Over . . . . . . . . . . . . . . . . . . . . . . . . . . . . . . . . . . . . . . . . . . . .
Related Information . . . . . . . . . . . . . . . . . . . . . . . . . . . . . . . . . . . . . . . . . . . . . . . . . . . . . .
5-1
5-2
5-3
5-3
5-4
5-4
5-4
5-4
5-5
5-7
5-8
5-9
5-10
5-10
5-12
5-12
5-14
5-14
5-14
5-15
Guide to Printers and Printing
Chapter 6. System V Printer Configuration . . . . . . . . . . . . . . . . . . . . . . . . . . . . . . . .
Understanding the Print Service . . . . . . . . . . . . . . . . . . . . . . . . . . . . . . . . . . . . . . . . . . .
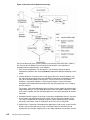
Overview of Print Request Processing . . . . . . . . . . . . . . . . . . . . . . . . . . . . . . . . . . .
Print Request Log . . . . . . . . . . . . . . . . . . . . . . . . . . . . . . . . . . . . . . . . . . . . . . . . . . . . .
Print Service Command Line . . . . . . . . . . . . . . . . . . . . . . . . . . . . . . . . . . . . . . . . . . . .
Customizing Printer Configuration . . . . . . . . . . . . . . . . . . . . . . . . . . . . . . . . . . . . . . . . . .
Setting Default Printer Page Size and Spacing . . . . . . . . . . . . . . . . . . . . . . . . . . . .
Configuring Banners . . . . . . . . . . . . . . . . . . . . . . . . . . . . . . . . . . . . . . . . . . . . . . . . . . .
Administering the /etc/lp/Systems File . . . . . . . . . . . . . . . . . . . . . . . . . . . . . . . . . . . .
Printer Models File . . . . . . . . . . . . . . . . . . . . . . . . . . . . . . . . . . . . . . . . . . . . . . . . . . . . .
Printer Interface Scripts . . . . . . . . . . . . . . . . . . . . . . . . . . . . . . . . . . . . . . . . . . . . . . . .
Using the terminfo Database . . . . . . . . . . . . . . . . . . . . . . . . . . . . . . . . . . . . . . . . . . . .
Creating a Printer Form . . . . . . . . . . . . . . . . . . . . . . . . . . . . . . . . . . . . . . . . . . . . . . . .
Adding a Form to the Print Service . . . . . . . . . . . . . . . . . . . . . . . . . . . . . . . . . . . . . . .
Removing a Form . . . . . . . . . . . . . . . . . . . . . . . . . . . . . . . . . . . . . . . . . . . . . . . . . . . . .
Restricting User Access to Forms . . . . . . . . . . . . . . . . . . . . . . . . . . . . . . . . . . . . . . . .
Mounting a Form . . . . . . . . . . . . . . . . . . . . . . . . . . . . . . . . . . . . . . . . . . . . . . . . . . . . . .
Unmounting a Form . . . . . . . . . . . . . . . . . . . . . . . . . . . . . . . . . . . . . . . . . . . . . . . . . . . .
Examining a Form . . . . . . . . . . . . . . . . . . . . . . . . . . . . . . . . . . . . . . . . . . . . . . . . . . . . .
Providing Filters . . . . . . . . . . . . . . . . . . . . . . . . . . . . . . . . . . . . . . . . . . . . . . . . . . . . . . . . .
Task 1: Converting Files . . . . . . . . . . . . . . . . . . . . . . . . . . . . . . . . . . . . . . . . . . . . . . . .
Task 2: Handling Special Modes . . . . . . . . . . . . . . . . . . . . . . . . . . . . . . . . . . . . . . . . .
Task 3: Detecting Printer Faults . . . . . . . . . . . . . . . . . . . . . . . . . . . . . . . . . . . . . . . . .
Defining a Filter . . . . . . . . . . . . . . . . . . . . . . . . . . . . . . . . . . . . . . . . . . . . . . . . . . . . . . .
Adding a Filter to the Print Service . . . . . . . . . . . . . . . . . . . . . . . . . . . . . . . . . . . . . . .
Removing a Filter . . . . . . . . . . . . . . . . . . . . . . . . . . . . . . . . . . . . . . . . . . . . . . . . . . . . . .
Examining a Filter . . . . . . . . . . . . . . . . . . . . . . . . . . . . . . . . . . . . . . . . . . . . . . . . . . . . .
Restoring Factory Defaults for Filters . . . . . . . . . . . . . . . . . . . . . . . . . . . . . . . . . . . . .
Printer Types . . . . . . . . . . . . . . . . . . . . . . . . . . . . . . . . . . . . . . . . . . . . . . . . . . . . . . . . .
Content Types . . . . . . . . . . . . . . . . . . . . . . . . . . . . . . . . . . . . . . . . . . . . . . . . . . . . . . . .
PostScript Printers . . . . . . . . . . . . . . . . . . . . . . . . . . . . . . . . . . . . . . . . . . . . . . . . . . . . . . .
Using a PostScript Printer . . . . . . . . . . . . . . . . . . . . . . . . . . . . . . . . . . . . . . . . . . . . . .
Supporting Non–PostScript Print Requests . . . . . . . . . . . . . . . . . . . . . . . . . . . . . . .
Additional PostScript Capabilities Provided by Filters . . . . . . . . . . . . . . . . . . . . . . .
Supporting PostScript Printers . . . . . . . . . . . . . . . . . . . . . . . . . . . . . . . . . . . . . . . . . .
Font Cartridges and Character Sets . . . . . . . . . . . . . . . . . . . . . . . . . . . . . . . . . . . . . .
Setting Up Printer Fault Alerts . . . . . . . . . . . . . . . . . . . . . . . . . . . . . . . . . . . . . . . . . . .
Specifying a Printer Fault Recovery Mechanism . . . . . . . . . . . . . . . . . . . . . . . . . . .
Alerting to Mount Forms and Font Cartridges . . . . . . . . . . . . . . . . . . . . . . . . . . . . . .
Setting Printer Port Characteristics . . . . . . . . . . . . . . . . . . . . . . . . . . . . . . . . . . . . . . .
Setting Up a Printer With Multiple Names . . . . . . . . . . . . . . . . . . . . . . . . . . . . . . . . .
Configuring Directory–Enabled (LDAP) System V Print on AIX . . . . . . . . . . . . . . . . .
Prerequisites . . . . . . . . . . . . . . . . . . . . . . . . . . . . . . . . . . . . . . . . . . . . . . . . . . . . . . . . . .
Planning to Set Up the Print Subsystem . . . . . . . . . . . . . . . . . . . . . . . . . . . . . . . . . .
Server Flag Options . . . . . . . . . . . . . . . . . . . . . . . . . . . . . . . . . . . . . . . . . . . . . . . . . . .
Related Information . . . . . . . . . . . . . . . . . . . . . . . . . . . . . . . . . . . . . . . . . . . . . . . . . . . . . .
Preface
6-1
6-1
6-1
6-3
6-4
6-6
6-6
6-7
6-7
6-8
6-9
6-13
6-15
6-15
6-15
6-15
6-16
6-17
6-17
6-18
6-18
6-19
6-19
6-20
6-26
6-26
6-26
6-26
6-26
6-27
6-29
6-29
6-29
6-30
6-31
6-36
6-38
6-39
6-40
6-41
6-42
6-43
6-43
6-43
6-47
6-49
xi
xii
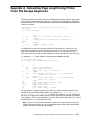
Appendix A. Calculating Page Length Using Printer Colon File
Escape Sequences . . . . . . . . . . . . . . . . . . . . . . . . . . . . . . . . . . . . . . . . . . . . . . . . . . . . .
Why the Stack Language Describing Page Length Works . . . . . . . . . . . . . . . . . . . . .
A-1
A-8
Appendix B. Calculating Page Width Using Printer Colon File
Escape Sequences . . . . . . . . . . . . . . . . . . . . . . . . . . . . . . . . . . . . . . . . . . . . . . . . . . . . .
Why the Stack Language Describing Page Width Works . . . . . . . . . . . . . . . . . . . . . .
B-1
B-7
Index . . . . . . . . . . . . . . . . . . . . . . . . . . . . . . . . . . . . . . . . . . . . . . . . . . . . . . . . . . . . . . . . . .
X-1
Guide to Printers and Printing
Chapter 1. Printers, Print Jobs, and Queues Overview
for Users
Depending on the printer, you can control the appearance and characteristics of the final
output. The printers need not be located in the same area as the system unit and the
system console. A printer can be attached directly to a local system, or a print job can be
sent over a network to a remote system.
To handle print jobs with maximum efficiency, the system places each job into a queue to
await printer availability. The system can save output from one or more files in the queue.
As the printer produces the output from one file, the system processes the next job in the
queue. This process continues until each job in the queue has been printed.
This chapter discusses the following topics:
•
Printer Terminology on page 1-1
•
Starting a Print Job (qprt Command) on page 1-4
•
Canceling a Print Job (qcan Command) on page 1-8
•
Prioritizing a Print Job (qpri Command) on page 1-9
•
Moving a Print Job to Another Print Queue (qmov Command) on page 1-10
•
Holding and Releasing a Print Job (qhld Command) on page 1-11
•
Checking Print Job Status (qchk Command) on page 1-12
•
Formatting Files for Printing (pr Command) on page 1-14
•
Printing ASCII Files on a PostScript Printer on page 1-16
•
Command Summary for Printers, Print Jobs, and Queues on page 1-17
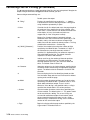
Printer Terminology
The following list defines terms commonly used with printing.
Local Printer
When you attach a printer to a node or host, the printer is referred to as a local
printer.
Print Job
A print job is a unit of work to be run on a printer. A print job can consist of
printing one or more files, depending on how the print job is requested. The
system assigns a unique job number to each job it runs.
Print Spooler
The spooler used for printing provides a generic spooling function that can be used
for queuing various types of jobs, including print jobs queued to a printer.The spooler
does not normally know what type of job it is queuing. When the system administrator
defines a spooler queue, the purpose of the queue is defined by the spooler backend
program that is specified for the queue. For example, if the spooler backend program
is the piobe command (the printer I/O backend), the queue is a print queue.
Likewise, if the spooler backend program is a compiler, the queue is for compile jobs.
When the spooler’s qdaemon command selects a job from a spooler queue, it runs
Printers, Print Jobs, and Queues Overview for Users
1-1
the job by invoking the backend program specified by the system administrator when
the queue was defined.
The main spooler command is the enq command. Although you can invoke this
command directly to queue a print job, three front–end commands are defined for
submitting a print job: the lp, lpr, and qprt commands. A print request issued by one
of these commands is first passed to the enq program, which then places the
information about the file in the queue for the qdaemon to process.
Printer Backend
The printer backend is a collection of programs called by the spooler’s qdaemon
command to manage a print job that is queued for printing. The printer backend
performs the following functions:
. Receives from the qdaemon command a list of one or more files to be printed.
. Uses printer and formatting attribute values from the database, overridden by flags
entered on the command line
. Initializes the printer before printing a file
. Runs filters as necessary to convert the print data stream to a format supported by
the printer
. Provides filters for simple formatting of ASCII documents
. Provides support for printing national language characters
. Passes the filtered print data stream to the printer device driver
. Generates header and trailer pages
. Generates multiple copies
. Reports paper out, intervention required, and printer error conditions
. Reports problems detected by the filters
. Cleans up after a print job is canceled
. Provides a print environment that a system administrator can customize to address
specific printing needs
Printer/Plotter Device
A special file in the /dev directory for the device. This file can be used by
redirection (for example, cat FileName > /dev/lp0 ). Settings for the
device driver can be displayed and changed using Web-based System
Manager (type wsm, then select Devices ) or the lsdev and chdev
commands. Before printer commands can access a printer device, a print
queue must be created for the device or the printer must be configured in
the printer backend in /etc/qconfig.
qdaemon
The qdaemon is a process that runs in the background controling the
queues. It is generally started by the startsrc command when the system is
turned on. startsrc is a command to the srcmstr daemon that is started
from /etc/inittab.
The qdaemon keeps track of the print requests in the /var/spool/lpd/qdir directory
and ensures that the jobs are sent to the proper printer at the proper time. It also
keeps track of the status of the printers and stores printer usage data for system
accounting purposes (for example, lpstat and enq –A commands). This information
is held in the /var/spool/lpd/stat directory.
If the qdaemon is stopped, it will be restarted by the srcmstr.
Note: Do not stop the srcmstr process; it controls other daemons running on your
system.
1-2
Guide to Printers and Printing
The queue is where you direct a print job. It is a stanza in the /etc/qconfig
file whose name is the name of the queue. It points to the associated queue
device. The following is a sample listing:
Queue
Msa1:
device = lp0
Usually, queues are created through Web–based System Manager.
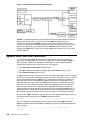
Queue Device
The queue device is the stanza in the /etc/qconfig file that usually follows
the local queue stanza. It specifies the /dev file (printer device) that should
be printed to and the backend that should be used. Following is a sample
listing:
lp0:
file = /dev/lp0
header = never
trailer = never
access = both
backend = /usr/lpd/piobe
In the previous example, lp0 is the device name, and the rest of the lines define
how the device is used.
Adding a printer through Web-based System Manager (type wsm, then select
Devices ) creates a standard queue device entry to an existing queue.
Notes:
1. There can be more than one queue device associated with a single queue.
2. There will not be a file entry in the /etc/qconfig file when you are using a
remote printer. The queue directs the file to the server.
Real Printer
A real printer is the printer hardware attached to a serial or parallel port at a unique
hardware device address. The printer device driver in the kernel communicates with
the printer hardware and provides an interface between the printer hardware and a
virtual printer.
Remote Printer A remote print system allows nodes that are not directly linked to a printer
to have printer access.
To use remote printing facilities, the individual nodes must be connected to a network
using the Transmission Control Protocol/Internet Protocol (TCP/IP) and must support
the required TCP/IP applications.
Virtual Printers A virtual printer, usually called a virtual printer definition is a file containing
a set of attribute values that describe a particular data stream for a
particular printer. Before a print job can be placed in a queue, a virtual
printer definition must exist for both the print queue and the queue device.
See the mkvirprt command for more information.
Printers, Print Jobs, and Queues Overview for Users
1-3
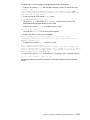
Starting a Print Job (qprt Command)
Use the qprt, or smit commands to request a print job and specify the following:
• Name of the file to print
• Print queue name
• Number of copies to print
• Whether to make a copy of the file on the remote host
• Whether to erase the file after printing
• Whether to send notification of the job status
• Whether to send notification of the job status by the system mail
• Burst status
• User name for ”Delivery To” label
• Console acknowledgment message for remote print
• File acknowledgment message for remote print
• Priority level
Prerequisites
• For local print jobs, the printer must be physically attached to your system or, in the case
of a network printer, attached and configured on the network.
• For remote print jobs, your system must be configured to communicate with the remote
print server.
• Before you can print a file, you must have read access to it. To remove a file after it has
printed, you must have write access to the directory that contains the file.
qprt Command
The qprt command creates and queues a print job to print the file you specify. If you specify
more than one file, all the files together make up one print job. These files are printed in the
order specified on the command line.
The format of the basic qprt command is:
qprt –PQueueName FileName
Some useful qprt command flags are:
1-4
Guide to Printers and Printing
–b Number
Specifies the bottom margin. The bottom margin is the number of blank
lines to be left at the bottom of each page.
–B Value
Specifies whether burst pages (continuous–form pages separated at
perforations) should be printed. The Value variable consists of a
two–character string. The first character applies to header pages. The
second character applies to trailer pages. Each of the two characters
can be one of the following:
a
Always prints the (header or trailer) page for each file in each print
job.
n
Never prints the (header or trailer) page.
g
Prints the (header or trailer) page once for each print job (group of
files).
For example, the –B ga flag specifies that a header page be printed
at the beginning of each print job and that a trailer page be printed
after each file in each print job.
Note: In a remote print environment, the default is determined by
the remote queue on the server.
–e Option
Specifies whether emphasized print is wanted.
+
Indicates emphasized print is wanted.
!
Indicates emphasized print is not wanted.
–E Option
Specifies whether double–high print is wanted.
+
Indicates double–high print is wanted.
!
Indicates double–high print is not wanted.
–f FilterType
A one–character identifier that specifies a filter through which your print
file or files are to be passed before being sent to the printer. The
available filter identifiers are p, which invokes the pr filter, and n, which
processes output from the troff command.
–i Number
Causes each line to be indented the specified number of spaces. The
Number variable must be included in the page width specified by the
–w flag.
–K Option
Specifies whether condensed print is wanted.
+
Indicates condensed print is wanted.
!
Indicates condensed print is not wanted.
–l Number
Sets the page length to the specified number of lines. If the Number
variable is 0, page length is ignored, and the output is considered to be
one continuous page. The page length includes the top and bottom
margins and indicates the printable length of the paper.
Printers, Print Jobs, and Queues Overview for Users
1-5
–L Option
Specifies whether lines wider than the page width should be wrapped to
the next line or truncated at the right margin.
+
Indicates that long lines should wrap to the next line.
!
Indicates that long lines should not wrap but instead should be
truncated at the right margin.
–N Number
Specifies the number of copies to be printed. If this flag is not specified,
one copy is printed.
–p Number
Sets the pitch to Number characters per inch. Typical values for
Number are 10 and 12. The actual pitch of the characters printed is also
affected by the values for the –K (condensed) flag and the –W
(double–wide) flag.
–P Queue [:
QueueDevice ]
Specifies the print queue name and the optional queue device name. If
this flag is not specified, the default printer is assumed.
–Q Value
Specifies paper size for the print job. The Value for paper size is
printer–dependent. Typical values are: 1 for letter–size paper, 2 for
legal, and so on. Consult your printer manual for the values assigned to
specific paper sizes.
–t Number
Specifies the top margin. The top margin is the number of blank lines to
be left at the top of each page.
–w Number
Sets the page width to the number of characters specified by the
Number variable. The page width must include the number of indention
spaces specified with the –i flag.
–W Option
Specifies whether double–wide print is wanted.
+
Indicates double–wide print is wanted.
!
Indicates double–wide print is not wanted.
–z Value
Rotates page printer output the number of quarter–turns clockwise as
specified by the Value variable. The length (–l) and width (–w) values
are automatically adjusted accordingly.
0
Portrait
1
Landscape right
2
Portrait upside–down
3
Landscape left.
–# Value
Specifies a special function.
j
Displays the job number for the specified print job
h
Queues the print job, but puts it in the HELD state until it is released
again.
v
Validates the specified printer backend flag values. This validation is
useful in checking for illegal flag values at the time of submitting a
print job. If the validation is not specified, an incorrect flag value will
stop the print job later when the job is actually being processed.
1-6
Guide to Printers and Printing
The following list contains examples of how to use the qprt command flags:
• To request the file myfile to be printed on the first available printer configured for the
default print queue using default values, type:
qprt myfile
• To request the file myfile to be printed on a specific queue using specific flag values
and to validate the flag values at the time of print job submission, type:
qprt –f p –e + –Pfastest –# v somefile
This passes the myfile file through the pr filter command (the –f p
flag) and prints it using emphasized mode (the –e + flag) on the first
available printer configured for the queue named fastest (the –Pfastest
flag).
• To print myfile on legal–size paper, type:
qprt –Q2 myfile
• To print three copies of each of the files new.index.c, print.index.c, and more.c
at the print queue Msp1, type:
qprt –PMsp1 –N 3 new.index.c print.index.c more.c
• To print three copies of the concatenation of three files new.index.c,
print.index.c, and more.c, type:
cat new.index.c print.index.c more.c | qprt –PMsp1 –N 3
Note: The base operating system also supports the BSD UNIX print command (lpr) and
the System V UNIX print command (lp). See the lpr and lp commands in the AIX 5L
Version 5.2 Commands Reference for the exact syntax.
See the qprt command in the AIX 5L Version 5.2 Commands Reference for the complete
syntax.
smit Command
To start a job using SMIT, type:
smit qprt
Printers, Print Jobs, and Queues Overview for Users
1-7
Canceling a Print Job (qcan Command)
This section discusses how to cancel any job in the print queue. When you cancel a print
job, you are prompted to provide the name of the print queue where the job resides and the
job number to be canceled.
This procedure applies to both local and remote print jobs.
Prerequisites
• For local print jobs, the printer must be physically attached to your system or, in the case
of a network printer, attached and configured on the network.
• For remote print jobs, your system must be configured to communicate with the remote
print server.
Web-based System Manager
To cancel a print job using the Web-based System Manager fast path, type:
wsm printers
In the Printer Queues container, select the print job, then use the menus to cancel it from a
print queue.
qcan Command
The qcan command cancels either a particular job number in a local or remote print queue,
or all jobs in a local print queue. To determine the job number, type the qchk command.
The basic format of the qcan command is:
qcan –PQueueName –x JobNumber
See the qcan command in the AIX 5L Version 5.2 Commands Reference for the complete
syntax.
For example, to cancel job number 123 on whichever printer the job is on, type:
qcan –x 123
For example, to cancel all jobs queued on printer lp0, type:
qcan –X –Plp0
Note: The base operating system also supports the BSD UNIX cancel print command
(lprm) and the System V UNIX cancel print command (cancel). See the lprm and
cancel commands in the AIX 5L Version 5.2 Commands Reference for more information
and the complete syntax.
smit Command
To cancel a print job using SMIT, type:
smit qcan
1-8
Guide to Printers and Printing
Prioritizing a Print Job (qpri Command)
This section discusses how to change the priority of a print job. You can only assign job
priority on local queues. Higher values indicate a higher priority for the print job. The default
priority is 15. The maximum priority is 20 for most users, and 30 for users with root user
privilege and members of the printq group (group 9).
Note: You cannot assign priority to a remote print job.
Prerequisite
The printer must be physically attached to your system.
Web-based System Manager
To change the priority of a queued print job using Web-based System Manager type wsm,
then select Printers.
In the Printer Queues window, select the print job, then use the menus to set the priority for
that job in a local print queue.
qpri Command
The qpri command reassigns the priority of a print job that you submitted. If you have root
user authority or belong to the printq group, you can assign priority to any job while it is in
the print queue.
The basic format of the qpri command is:
qpri –# JobNumber –a PriorityLevel
For example, to change job number 123 to priority number 18, type:
qpri –# 123 –a 18
For example, to prioritize a local print job as it is submitted, type:
qprt –PQueueName –R PriorityLevel FileName
See the qpri command in the AIX 5L Version 5.2 Commands Reference for the complete
syntax.
smit Command
To change the priority of a print job using SMIT, type:
smit qpri
Printers, Print Jobs, and Queues Overview for Users
1-9
Moving a Print Job to Another Print Queue (qmov Command)
This section discussed how you can move a print job to another print queue.
Note: You cannot move a remote print job to another print queue.
Prerequisite
The printer must be physically attached to your system.
Web-based System Manager
To move a print job to another queue using Web–based System Manager, type wsm, then
select Printers.
In the Printer Queues window, select the print job, then use the menus to move it from one
print queue to another.
qmov Command
The qmov command moves a print job to another print queue. You can either move a
particular print job, or you can move all the print jobs on a specified print queue or all the
print jobs sent by a specified user. To determine the print job number, type the qchk
command.
For more information see qchk Command on page 1-12.
The basic format of the qmov command is:
qmov
–mNewQueue {[ –#JobNumber ] [ –PQueue ] [ –uUser ]}
See the qmov command in the AIX 5L Version 5.2 Commands Reference for the complete
syntax.
For example, to move job number 280 to print queue hp2, type:
qmov –mhp2 –#280
For example, to move all print jobs on print queue hp4D to print queue hp2, type:
qmov –mhp2 –Php4D
smit Command
To move a print job using SMIT, type:
smit qmov
1-10
Guide to Printers and Printing
Holding and Releasing a Print Job (qhld Command)
This section discusses how to hold a print job after it has been sent to the print queue. You
can later release the print job for printing with these same commands.
Note: You cannot hold and release remote print jobs.
Prerequisite
The printer must be physically attached to your system.
Web-based System Manager
To hold or release a print job using Web–based System Manager, type wsm, then select
Printers.
In the Printer Queues window, select the print job, then use the menus to put it on hold or to
release a held job for printing.
qhld Command
The qhld command puts a print job on hold after you have sent it. You can either put a
particular print job on hold, or you can hold all the print jobs on a specified print queue. To
determine the print job number, type the qchk command.
For more information see qchk Command on page 1-12.
The basic format of the qhld command is:
qhld [ –r ] {[ –#JobNumber ] [ –PQueue ] [ –uUser ]}
See the qhld command in the AIX 5L Version 5.2 Commands Reference for the complete
syntax.
For example, to hold job number 452 on whichever print queue the job is on, type:
qhld –#452
For example, to hold all jobs queued on print queue hp2, type:
qhld –Php2
To release job number 452 on whichever print queue the job is on, type:
qhld –#452 –r
To release all jobs queued on print queue hp2, type:
qhld –Php2 –r
smit Command
To hold or release a print job using SMIT, type:
smit qhld
Printers, Print Jobs, and Queues Overview for Users
1-11
Checking Print Job Status (qchk Command)
This section discusses how you can display the current status information for specified job
numbers, queues, printers, or users.
Prerequisites
• For local print jobs, the printer must be physically attached to your system or, in the case
of a network printer, attached and configured on the network.
• For remote print jobs, your system must be configured to communicate with the remote
print server.
Web-based System Manager
To check the status of a print job using Web–based System Manager, type wsm, then select
Printers.
In the Printer Queues window, select the print job, then use the menus to check its status.
qchk Command
The qchk command displays the current status information regarding specified print jobs,
print queues, or users.
The basic format of the qchk command is:
qchk –P QueueName –# JobNumber –u OwnerName
See the qchk command in the AIX 5L Version 5.2 Commands Reference for the complete
syntax.
For example, to display the default print queue, type:
qchk –q
For example, to display the long status of all queues until empty, while updating the screen
every 5 seconds, type:
qchk –A –L –w 5
For example, to display the status for print queue lp0, type:
qchk –P lp0
For example, to display the status for job number 123, type:
qchk –# 123
For example, to check the status of all jobs in all queues, type:
qchk –A
Note: The base operating system also supports the BSD UNIX check print queue
command (lpq) and the System V UNIX check print queue command (lpstat). See the
lpq and lpstat commands in the AIX 5L Version 5.2 Commands Reference for the
complete syntax.
smit Command
To check a print job’s status using SMIT, type:
smit qchk
1-12
Guide to Printers and Printing
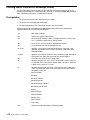
Printer Status Conditions
Some of the status conditions that a print queue can have are:
DEV_BUSY
Indicates that:
• More than one queue is defined to a printer device (lp0) and
another queue is currently using the printer device.
• qdaemon attempted to use the printer port device (lp0), but
another application is currently using that printer device
To recover from a DEV_BUSY, wait until the queue or application
has released the printer device or cancel the job or process that is
using the printer port.
DEV_WAIT
Indicates that the queue is waiting on the printer because the printer
is offline, out of paper, jammed, or the cable is loose, bad, or wired
incorrectly.
To recover from a DEV_WAIT, correct the problem that caused it to
wait. It may be easier for diagnostic testing to use the enq command
to move all queued jobs from the DEV_WAIT queue to another
queue that is either printing or is DOWN. After the problem is
corrected, you can move any unprinted job back to the original
queue.
DOWN
A queue will usually go into a DOWN state after it has been in the
DEV_WAIT state. This situation occurs when the printer device
driver cannot tell if the printer is there due to absence of correct
signalling. However, some printers may not have the capability to
signal the queuing system that it is offline, and instead signals that it
is off. If the printer device signals or appears to be off, the queue will
go into the DOWN state.
To recover from a DOWN state, correct the problem that has brought
the queue down and have the system administrator bring the queue
back up. The queue must be manually brought up before it can be
used again.
HELD
Specifies that a print job is held. The print job will not be processed
by the spooler until it is released.
QUEUED
Specifies that a print file is queued and is waiting in line to be
printed.
READY
Specifies that everything involved with the queue is ready to queue
and print a job.
RUNNING
Specifies that a print file is printing.
Printers, Print Jobs, and Queues Overview for Users
1-13
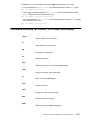
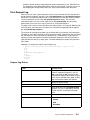
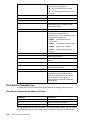
Formatting Files for Printing (pr Command)
The pr command performs simple formatting of the files you sent to be printed. You pipe the
output of the pr command to the qprt command to format your text.
Some useful pr command flags are:
1-14
–d
Double–spaces the output.
–h ”String ”
Displays the specified string, enclosed in ” ” (quotes),
instead of the file name as the page header. The flag and
string should be separated by a space.
–l Lines
Overrides the 66–line default and resets the page length to
the number of lines specified by the Lines variable. If the
Lines value is smaller than the sum of both the header and
trailer depths (in lines), the header and trailer are
suppressed (as if the –t flag were in effect).
–m
Merges files. Standard output is formatted so the pr
command writes one line from each file specified by a File
variable, side by side into text columns of equal fixed
widths, based on the number of column positions. This flag
should not be used with the – Column flag.
–n [ Width ][ Character ]
Provides line numbering based on the number of digits
specified by the Width variable. The default is 5 digits. If
the Character (any non–digit character) variable is
specified, it is appended to the line number to separate it
from what follows on the line. The default character
separator is the ASCII TAB character.
–o Offset
Indents each line by the number of character positions
specified by the Offset variable. The total number of
character positions per line is the sum of the width and
offset. The default value of Offset is 0.
–s Character
Separates columns by the single character specified by the
Character variable instead of by the appropriate number of
spaces. The default value for Character is an ASCII TAB
character.
–t
Does not display the five–line identifying header and the
five–line footer. Stops after the last line of each file without
spacing to the end of the page.
–w Width
Sets the number of column positions per line to the value
specified by the Width variable. The default value is 72 for
equal–width multicolumn output. There is no limit
otherwise. If the –w flag is not specified and the –s flag is
specified, the default width is 512 column positions.
– Column
Sets the number of columns to the value specified by the
Column variable. The default value is 1. This option should
not be used with the –m flag. The –e and –i flags are
assumed for multicolumn output. A text column should
never exceed the length of the page (see the –l flag).
When this flag is used with the –t flag, use the minimum
number of lines to write the output.
+ Page
Begins the display with the page number specified by the
Page variable. The default value is 1.
Guide to Printers and Printing
The following is a list of examples of how pr command flags can be used:
• To print a file named prog.c with headings and page numbers on the printer, enter:
pr prog.c | qprt
This command adds page headings to prog.c and sends it to the qprt
command. The heading consists of the date the file was last modified, the
file name, and the page number.
• To specify a title for a file named prog.c, enter:
pr –h ”MAIN PROGRAM” prog.c | qprt
This prints prog.c with the title MAIN PROGRAM in place of the file name. The
modification date and page number are still printed.
• To print a file named word.lst in multiple columns, enter:
pr –3 word.lst | qprt
This prints the word.lst file in three vertical columns.
• To print several files side by side on the paper:
pr –m –h ”Members and Visitors” member.lst visitor.lst | qprt
This prints member.lst and visitor.lst side by side with the title
Members and Visitors.
• To modify a file named prog.c for later use, enter:
pr –t –e prog.c > prog.notab.c
This command replaces tab characters in prog.c with spaces and puts the
result in prog.notab.c. Tab positions are at columns 9, 17, 25, 33, and so
on. The –e flag tells the pr command to replace the tab characters; the
–t flag suppresses the page headings.
• To print a file named myfile in two columns, in landscape, and in 7–point text, enter:
pr –l66 –w172 –2 myfile | qprt –z1 –p7
See the pr command in the AIX 5L Version 5.2 Commands Reference for the complete
syntax.
Printers, Print Jobs, and Queues Overview for Users
1-15
Printing ASCII Files on a PostScript Printer
The Text Formatting System includes the enscript filter for converting ASCII print files to
PostScript for printing on a PostScript printer. This filter is called by the qprt –da command
when submitting a print job to a PostScript print queue.
Prerequisites
• The printer must be physically attached to your system.
• The printer must be configured and defined.
• The transcript portion of Text Formatting Services must be installed.
Several flags may be specified with the qprt command to customize the output when
submitting ASCII files to a PostScript print queue.
–1+
Adds page headings.
–2+
Formats the output in two columns.
–3+
Prints the page headings, dates, and page numbers in a fancy style.
This is sometimes referred to as ”gaudy” mode.
–4+
Prints the file, even if it contains unprintable characters.
–5+
Lists characters that are not included in a font.
–h string
Specifies a string to be used for page headings. If this flag is not
specified, the heading consists of the file name, modification date,
and page number.
–l value
Specifies the maximum number of lines printed per page. Depending
on the point size, fewer lines per page may actually appear.
–L!
Truncates lines longer than the page width.
–p
Specifies the point size. If this flag is not specified, a point size of 10
is assumed, unless two–column rotated mode (–2+ –z1) is specified,
in which case a value of 7 is used.
–s
Specifies the font style. If this flag is not specified, the Courier font is
used. The PostScript printer must have access to the specified font.
Acceptable values are:
Courier–Oblique
Helvetica
Helvetica–Oblique
Helvetica–Narrow
Helvetica–Narrow–Oblique
NewCenturySchlbk–Italic
Optima
Optima–Oblique
Palatino–Roman
Palatino–Italic
Times–Roman
Times–Italic
–z1
1-16
Guide to Printers and Printing
Rotates the output 90 degrees (landscape mode).
The following is a list of examples of how these qrpt command flags can be used:
• To send the ACSII file myfile.ascii to the PostScript printer named Msps1, enter:
qprt –da –PMsps1 myfile.ascii
• For example, to send the ACSII file myfile.ascii to the PostScript printer named
Msps1 and print out in the Helvetica font, enter:
qprt –da –PMsps1 –sHelvetica myfile.ascii
• To send the ASCII file myfile.ascii to the PostScript printer named Msps1 and print
out in the point size 9, enter:
qprt –da –PMsps1 –p9 myfile.ascii
Command Summary for Printers, Print Jobs, and Queues
cancel
Cancels requests to a line printer.
lp
Sends requests to a line printer.
lpq
Examines the spool queue.
lpr
Enqueues print jobs.
lprm
Removes jobs from the line printer spooling queue.
lpstat
Displays line printer status information.
pr
Writes a file to standard output.
qcan
Cancels a print job.
qchk
Displays the status of a print queue.
qhld
Holds or releases a print job.
qmov
Moves a print job to another print queue.
Printers, Print Jobs, and Queues Overview for Users
1-17
qpri
Prioritizes a job in the print queue.
qprt
Starts a print job.
1-18
Guide to Printers and Printing
Chapter 2. Printers, Print Jobs, and Queues for System
Administrators
The printer subsystem includes a spooler, real printers, virtual printers, backends, and
queues. A print job can be sent to a printer attached directly to a local system, or it can be
sent over a network to a remote system and printed on a printer attached to the remote
system.
The system management information associated with printers include:
•
Printing Processes on page 2-1
•
Print Spooler on page 2-2
•
Real and Virtual Printers on page 2-3
•
Local and Remote Printers on page 2-4
•
Printer Backends on page 2-4
•
Formatter Filters on page 2-5
•
Initial Printer Configuration on page 2-6
Other chapters to review include:
•
Spooler Overview on page 3-1
•
Troubleshooting the Base Operating System Spooler on page 5-1
Printing Processes
When you print a file, the system sends codes to the printer. Some codes print specific
characters, such as a to z or 0 to 9. Other codes print characters or files, such as
underscoring certain characteristics or by adjusting the page length. Edit the file if you want
to send different character codes to the printer, such as to change the word that to this.
You do not have to understand the underlying codes.
To alter the way a printer works, you must understand what happens when you print a file,
which options you have for sending control information to the printer, and which printer
characteristics you can control.
You can use Web-based System Manager (type wsm, then select Printers ), the System
Manager Interface Tool (SMIT), or the qprt command to send a file to a printer. You can also
use Web-based System Manager or SMIT to cancel or prioritize a print job.
A file does not go directly to the printer. Web–based System Manager, SMIT, or the qprt
command calls the enq command and places the print request in a queue. The print request
stays in the queue until a printer becomes available, at which point the qdaemon command
runs the (printer input/output backend) piobe command. The piobe command processes
the file and sends it, along with control information, to the printer. The printer receives a data
stream containing the contents of the file and the control information specified with the qprt
command.
Printers, Print Jobs, and Queues for Systems Administrators
2-1
Controlling the Printing Process
Add printer control information to the printer data stream in the following ways:
• Include printer control codes in the file.
Note: Set the print queue data stream to passthru (that is, d=p). Refer to Printer
Colon File Conventions on page 4-20 for more information.
Include all printer control information that is unique to that file. For example, to
underscore the title of a book or print a paragraph in bold type, insert codes that start
and stop the printer control information at the correct places.
Some application programs, such as word processors, allow you to insert specific printer
controls in the file. However, if the printer cannot be configured from the application
program, you must use a system editor to insert printer control codes. Printer control
codes are available with the printer, from the dealer where the printer was purchased, or
from the printer manufacturer.
• Supply command flags with the qprt command.
The qprt command or the SMIT Start a Print Job option recognize a number of flags
that control printer operations, such as:
– Specifying condensed, emphasized, double–wide, and double–strike printing
– Printing in specified colors
– Setting the margins
– Setting the number of lines per vertical inch
– Maintaining the horizontal position on the print line for a line feed or vertical tab
control
You can specify particular print characteristics for a single print job. For example, the
qprt command flag for setting pitch is –p Number, where Number is the number of
characters per inch. If the standard qprt command setting is 10 characters per inch, but
you need 12 characters per inch for the printtest file, enter the command:
qprt –p 12 printtest
The flag on the command line overrides the standard qprt command setting for this job.
The standard qprt command pitch setting remains 10.
• Change the standard qprt command settings.
Web-based System Manager (type wsm, then select Printers ) allows you to change or
show the print queue characteristics of a printer. You can also use SMIT or the lsvirprt
command.
Note: You must have root authority or be a member of the printq group.
For example, to change the standard pitch to 12 characters per inch, run Web-based
System Manager (type wsm, then select Devices.), the chvirprt command, or SMIT.
Select the printer from the list displayed and enter the attribute name and value,
separated by the equal sign ( = ).
The attribute names for the qprt command flags are the flag letters. You can change the
standard pitch to 12 by specifying p=12.
2-2
Guide to Printers and Printing
Print Spooler
The spooler is not specifically a print job spooler but a generic spooling function that can be
used for queuing various types of jobs, including print jobs queued to a printer.
The spooler does not know what type of job it is queuing. When the system administrator
defines a spooler queue, the purpose of the queue is defined by the spooler backend
program. For example, if the spooler backend program is the piobe command (the printer
I/O backend), the queue is a print queue. Likewise, if the spooler backend program is a
compiler, the queue is for compiler jobs. When the spooler’s qdaemon command selects a
job from a spooler queue, it runs the job by invoking the backend program.
When networks are composed of base operating system machines and other types of
clients and servers, not all remote print requests are supported across the network. In some
instances, you may have to submit print jobs one file at a time or concatenate files before
submitting them as a print job.
The main spooler command is the enq command. Although you can invoke this command
directly to queue a print job, three front–end commands are defined for submitting a print
job: the lp, lpr, and qprt commands. A print request issued by one of these commands is
passed to the enq program that places the information about the file in the queue for the
qdaemon to process. The queue is the /var/spool/lpd/qdir directory.
If the job is not a file (that is, pipe output of a command to enq), a real file is created in
/var/spool/qdaemon that contains the data to be printed. The information in the
/var/spool/lpd/qdir file points to the file in /var/spool/qdaemon.
Real and Virtual Printers
A real printer is the printer hardware attached to a serial or parallel port at a unique
hardware–device address. The printer device driver in the kernel communicates with the
printer hardware and provides an interface between the printer hardware and a virtual
printer. A real printer can be added with Web-based System Manager (type wsm, then select
Printers ) or using the mkdev command at the command line.
A virtual printer is a set of attributes that defines a high–level data stream (such as ASCII or
PostScript) that the printer understands. This does not include information about how the
printer hardware is attached to the host computer or about the protocol used for transferring
bytes of data to and from the printer.
A virtual printer is associated with a print queue. You can define a print queue for each data
stream the printer supports. Multiple print queues can use the same real printer.
• To add print queues, use Web-based System Manager (type wsm, then select Printers ),
the SMIT Add a Print Queue option, or the mkque, mkquedev, and mkvirprt
commands.
• To view a list of print queues and their associated virtual printers, use Web-based
System Manager (type wsm, then select Printers ), the SMIT List All Print Queues
option, or the lsvirprt command.
When you submit a print job, a print queue must be directly or indirectly specified. To specify
a specific printer for a print job, add a colon and the printer device name to the print queue
name. If a printer is not specified for the print job, the spooler selects the first available
printer associated with the print queue. If there are several printers associated with a print
queue, any printer is used.
Proprinters, for example, need only one print queue to be defined for each real printer. This
is because Proprinters support only one data stream, IBM extended ASCII. The 4216 Model
031 Personal Pageprinter needs multiple print queues defined. A print queue can be defined
for each data stream the printer supports. A print queue can be defined for PostScript,
Printers, Print Jobs, and Queues for Systems Administrators
2-3
Proprinter, HP LaserJet, and Diablo 630 emulations. All four print queues output to the
same real printer, the 4216 Model 031.
Local and Remote Printers
A local printer is the printer attached to a node or host. A remote printer allows nodes that
are not directly linked to a printer to have printer access.
To use remote printing facilities, the individual nodes must be connected to a network using
the Transmission Control Protocol/Internet Protocol (TCP/IP) and must support the required
TCP/IP applications. The lpd daemon controls the remote print server and any host on a
network can be designated as a print server. Before a remote server can accept a print
request, the /etc/hosts.lpd or /etc/hosts.equiv file must be configured to accept print
requests from other nodes or hosts. Use Web-based System Manager (type wsm, then
select Printers ) or SMIT Manage Print Server option to configure a print server.
Printer Backends
The printer backend is a collection of programs started by the spooler’s qdaemon
command to manage a print job that is queued for printing. The printer backend performs
the following functions:
• Receives from the qdaemon command a list of one or more files to be printed.
• Uses printer and formatting attribute values from the database, overridden by any flags
specified.
• Initializes the printer before printing a file.
• Provides filters for simple formatting of ASCII documents.
• Uses filters to convert the print data stream to a format supported by the printer.
• Provides support for printing national language characters.
• Passes the filtered print data stream to the printer device driver.
• Generates header and trailer pages.
• Generates multiple copies.
• Reports paper–out, intervention–required, and printer–error conditions.
• Reports problems detected by the filters.
• Cleans up after a print job is canceled.
• Provides a print environment that you can customize to address specific printing needs.
The mkvirprt command defines a virtual printer to the printer backend. The set of
predefined attributes for the particular type of printer is copied to create a customized set of
attributes. The customized attributes can be listed with the lsvirprt command and changed
with the chvirprt command or, by using the Web-based System Manager (type wsm, then
select Devices ), or SMIT Change / Show Print Queue Characteristics option. Each time
the mkvirprt or chvirprt command is used, a digest utility ( piodigest command) is
automatically run to construct a memory image of the attribute values and lookup tables to
be read in and used during the printing process.
The qdaemon command calls the piobe command (the Print Job Manager) and passes the
flag options and the names of one or more files to be printed. The only flag options not
passed are the spooler flag options removed by the enq command. The qdaemon
command has already opened the printer device and redirected standard output to the
printer. A status file provides communication between the qdaemon and the backend.
2-4
Guide to Printers and Printing
If a header page is needed, the piobe command retrieves a header page pipeline used to
generate the header page. The header page pipeline is passed to a shell. In the pipeline,
the standard output from the header page filter becomes the standard input for the formatter
filter. The formatter filter processes the header page and writes the result to standard
output. Standard output for the formatter filter becomes standard input for the device driver
interface program that writes the filtered header page to the printer device driver.
Formatter Filters
A formatter filter provides the capability of either formatting the input print file or passing it
through unmodified, based on an input parameter. Even if the formatter passes the input file
unmodified, it still sends printer commands to initialize the printer before the input file is
printed and restores the printer after printing is complete.
A formatter driver is device independent. There is a formatter for each type (or group of
types) of input data. For example, there is one formatter for all the supported Proprinters.
The formatter filter is made up of the following components:
• A device–independent formatter driver
• A device–dependent formatter
The formatter driver is invoked by a pipeline and is passed the name of a formatter to be
driven. The formatter driver dynamically loads and links the formatter and calls the
formatter’s setup function which indicates whether data formatting or data pass–through is
requested. After the formatter’s setup function performs the necessary functions, it returns
to the formatter driver. The formatter driver calls the initialize function. The initialize
function outputs a string of printer commands to initialize the printer and returns to the
formatter driver.
The formatter driver either calls the passthru function once or calls the lineout function for
each line in the print file based on the return code from the setup function. If the lineout
function is called, the formatter driver performs all vertical spacing, including line spacing,
vertical tabs, form feeds, and top and bottom margins. Line spacing and vertical tabs are
performed by the lineout function. Other vertical spacing functions are performed
automatically.
When processing is complete, the formatter driver calls the restore function. The restore
function outputs a string of printer commands to restore the printer to its default state,
defined by the database attribute values.
For more information about how the print formatter interacts with the printer formatter
subroutines, refer to the Example of Print Formatter on page 4-24.
Printers, Print Jobs, and Queues for Systems Administrators
2-5
Initial Printer Configuration
You can use one process to configure a printer and another process to add a print queue.
The task you use depends on how your printer is attached to the system. You can also
configure a printer without adding a print queue. The following describes how to do these
tasks:
•
Changing the Configuration File on page 2-6
•
Configuring a Local Printer and Adding a Queue on page 2-6
•
Configuring a Remote Printer and Adding a Queue on page 2-7
•
Configuring a Network Printer and Adding a Queue on page 2-7
•
Configuring a Print Queue for a File in the /dev Directory on page 2-8
•
Configuring a Printer without Adding a Queue on page 2-9
The ”Queuing a Print Job” and ”Deleting a Print Queue” procedures can be used after
configuring a print queue.
Changing the Configuration File
Both the enq command and qdaemon command read the /etc/qconfig file when they start.
The qdaemon command starts when you start the system; the enq command starts each
time someone requests a print job. Thus, if you change the /etc/qconfig file, the enq
command reads the new version of the configuration file the next time it runs.
Do not edit the /etc/qconfig file while there are active jobs in any queue. Editing includes
both manual editing and use of the mkque, rmque, chque, mkquedev, rmquedev, or
chquedev commands. It is recommended that all changes to the /etc/qconfig file be made
using these commands. However, if manual editing is desired, first issue the enq –G
command to bring the queuing system and the qdaemon command down after all jobs are
present. Then edit the /etc/qconfig file and restart the qdaemon command with the new
configuration.
Configuring a Local Printer and Adding a Queue
Note: If you want to configure a printer without adding a print queue, see Configuring a
Printer without Adding a Queue on page 2-9.
Prerequisites
• Read the documentation for your printer. You may need printer–specific information to
connect and configure the printer.
• Review the configuration of your system. Determine to which parallel or serial port you
want to connect the printer.
• You must have root authority.
Web-based System Manager
1. Connect the printer directly to the serial or parallel port on the local host:
a. Type shutdown at the system prompt to halt the system.
b. Turn off the system and any external devices.
c. Connect the printer to the appropriate serial or parallel port.
d. Set up your printer as described in the printer documentation.
e. Restart the system.
2. At the system prompt, type wsm, then select Printers.
2-6
Guide to Printers and Printing
In the Web-based System Manager Printer Queues window, use the menus to complete
the steps to configure a printer device and one or more print queues. You can also
perform this step with the SMIT fast path smit mkpq.
Note: If the printer supports more than one type of print data, such as PostScript and
ASCII, enter a print queue name for each print data type.
Note: Before choosing a 7–bit interface, see Considerations for 8–Bit Printer
Attached to 7–Bit Interface on page 5-10.
3. After the printer and print queues are sucessfully created, their names are displayed. Be
sure to note any error messages before you exit.
4. Use the Printer Queues menus to customize the new print queue. You can also perform
this step with the SMIT fast path smit chpq.
Configuring a Remote Printer and Adding a Queue
Prerequisites
The remote host must be configured as a print server.
Web–based Sysytem Manager
1. At the system prompt, type wsm, then select Printers.
In the Web-based System Manager Printer Queues window, use the menus to complete
the steps to configure a print queue for a printer attached to a remote host. You can also
perform this step with the SMIT fast path smit mkpq.
2. After the print queues are successfully created, their names are displayed. Be sure to
note any error messages before you exit.
3. Use the Printer Queues menus to customize the new print queue. You can also perform
this step with the SMIT fast path smit chpq.
Configuring a Network Printer and Adding a Queue
Prerequisites
• Read the documentation for your printer. You may need printer–specific information to
connect and configure the printer.
• Read the documentation for the Hewlett–Packard JetDirect card.
• You must have root authority.
Web–based Sysytem Manager
1. At the system prompt, type wsm, then select Printers.
In the Web-based System Manager Printer Queues window, use the menus to complete
the steps to configure a printer attached to the network with a Hewlett–Packard JetDirect
card and to add a queue. You can also perform this step with the SMIT fast path smit
mkpq.
2. After the print queues are successfully created, their names are displayed. Be sure to
note any error messages before you exit.
3. Use the Printer Queues menus to customize the new print queue. You can also perform
this step with the SMIT fast path smit chpq.
Printers, Print Jobs, and Queues for Systems Administrators
2-7
Configuring a Print Queue for a File in the /dev Directory
Prerequisites
• Read the documentation for your printer. You may need printer–specific information to
connect and configure the printer.
• Review the configuration of your system.
• You must have root authority.
Web–based Sysytem Manager
1. At the system prompt, type wsm, then select Printers.
In the Web-based System Manager Printer Queues window, use the menus to complete
the steps to configure a print queue for a file in the /dev directory and add a queue. You
can also perform this step with the SMIT fast path smit mkpq.
Note: If the printer supports more than one type of print data, such as PostScript and
ASCII, enter a print queue name for each print data type.
2. After the print queues are successfully created, their names are displayed. Be sure to
note any error messages before you exit.
3. Use the Printer Queues menus to customize the new print queue. To use the SMIT fast
path, type smit chpq.
Configuring a Printer Port
The following procedure describes how to configure a printer attached to the local host
without adding a print queue. Use this procedure if you want to add a printer or plotter, but
you do not want to spool print jobs.
Note: If you also want to add print queues when you configure your printer, refer to Initial
Printer Configuration on page 2-6.
Prerequisites
The printer or plotter must be physically attached to your system before configuring the
printer port .
Web–based Sysytem Manager
1. At the system prompt, type wsm, then select Printers.
In the Web-based System Manager Printer Queues window, use the menus to complete
the steps to configure a printer attached to the local host. You can also perform this step
with the SMIT fast path smit pdp.
2. The system displays the printer device name.
2-8
Guide to Printers and Printing
Configuring a Printer without Adding a Queue
Use the following procedure if you want to add a printer or plotter, but you do not want to
spool print jobs.
Note: If you also want to add print queues when you configure your printer, refer to Initial
Printer Configuration on page 2-6.
Prerequisites
The printer or plotter must be physically attached to your system before configuring the
printer port. See Configuring a Printer Port on page 2-8.
smit Command
1. At the system prompt, type:
smit pdp
2. Select Add a Printer/Plotter.
3. Provide additional information as prompted.
qprt Command
The following describes how to queue a print job using the qprt command, the enq
command, the lp command, or the lpr command. The syntax is the same for all three
queuing commands, except that the –d flag (instead of the –P flag) should be specified with
the lp command:
Command –PQueueName FileName
where:
QueueName
Name of the print queue.
FileName
Name of the file to be printed.
The following example demonstrates how to use the qprt command:
qprt –Pfastest myfile
Refer to the individual queuing commands for additional flags that can be specified.
Printers, Print Jobs, and Queues for Systems Administrators
2-9
Additional Queue Operations
This section describes the following procedures:
•
Adding a Print Queue Device on page 2-10
•
Adding Plotter Support with 5080 on page 2-10
•
Creating a Plotter Setup File on page 2-11
•
Adding a Local Printer to an Existing Queue on page 2-11
•
Adding an ASCII Terminal Printer to an Existing Queue on page 2-12
•
Adding an HP JetDirect Printer to an Existing Queue on page 2-12
•
Adding a File to an Existing Queue on page 2-12
Adding a Print Queue Device
Prerequisites
To perform this task, you must have root authority.
Web-based System Manager
1. At the system prompt, type wsm, then select Printers.
2. In the Web-based System Manager Printer Queues window, use the menus to select or
type values for required attributes such as the name of the device, the queue where the
device will be attached, and the path name for the printer backend program.
3. Provide additional information as prompted.
You can also perform this task with the following commands:
smit mkquedev
or
mkquedev –d QueueName –q QueueName –a Attribute = Value
You may need to use the –a flag several times to fully configure a print queue device.
Adding Plotter Support with 5080
Prerequisites
• The plotter must be physically attached to your system.
• The plotter device must have already been added.
smit Command
The 5080 Attachment Adapter plotter backend is accessible with the enq command after
you use this procedure to identify the plotters.
1. At the system prompt, type:
smit pq_mklque
2. At the NAME of Queue to Add prompt, type:
plta
to define serial port a.
3. At the NAME of Device to Add prompt, type:
2-10
Guide to Printers and Printing
plota
to define serial port a:
4. For BACKEND PROGRAM Pathname, type:
/usr/lib/lpd/plotgbe –gswa 9600
5. At the NAME of Queue to Add prompt, enter the following to define serial port b:
pltb
6. At the NAME of Queue to Add prompt, type:
pltb
to define serial port b.
7. For BACKEND PROGRAM Pathname, type:
/usr/lib/lpd/plotgbe –gswa 9600
8. Attach the plotter to either port a or port b.
You can also perform this task with the mkque and mkquedev commands. Additional flags
are required to add plotter support.
Creating a Plotter Setup File
To send plot files to the plotter, you need a special file containing the instructions for the
type of pacing protocol you are using. Instructions for Xon/Xoff Pacing Protocol and Data
Transmit Rate (DTR) Pacing Protocol follow:
For Xon/Xoff Pacing
For DTR Pacing
ESC.R:
ESC.R:
ESC.M2:
ESC.M2:
ESC.N2:
ESC.N2:
ESC.P1:
ESC.P3:
Each line must be entered with no spaces, ESC has the ASCII value 27. The . (period) is
part of the command.
Adding a Local Printer to an Existing Queue
Prerequisites
To perform this task, you must be one of the following:
• User with root authority
• A member of the printq group
Web-based System Manager
1. At the system prompt, type wsm, then select Printers.
2. In the Web-based System Manager Printer Queues window, use the menus to select the
local attachment type, manufacturer, and printer model.
3. Provide additional information as prompted.
You can also perform this task with the SMIT fast path smit mkpqprt.
Printers, Print Jobs, and Queues for Systems Administrators
2-11
Adding an ASCII Terminal Printer to an Existing Queue
Prerequisites
To perform this task, you must be one of the following:
• User with root authority
• A member of the printq group
smit Command
1. At the system prompt, type:
smit mkpqprt
2. Select the ascii attachment type, manufacturer, printer model, and tty name.
3. Provide additional information as prompted.
Adding an HP JetDirect Printer to an Existing Queue
Prerequisites
To perform this task, you must be one of the following:
• User with root authority
• A member of the printq group
Web-based System Manager
1. At the system prompt, type wsm, then select Printers.
2. In the Web-based System Manager Printer Queues window, use the menus to select the
hpJetDirect attachment type, manufacturer, and printer model.
3. Provide additional information as prompted.
You can also perform this task with the smit mkpqprt fast path command.
Adding a File to an Existing Queue
Prerequisites
To perform this task, you must be one of the following:
• User with root authority
• A member of the printq group
smit Command
1. At the system prompt, type:
smit mkpqprt
2. Select the file attachment type, manufacturer, and model.
3. Type the Name of existing FILE in the /dev directory. This is the file where you want print
job output to be stored. The file must already exist and be located in the /dev directory.
4. Provide additional information as prompted.
2-12
Guide to Printers and Printing
Configuring Nonsupported Printers
A nonsupported printer is a device that is not supplied with the operating system.
Configuration Options
Choose one of the following methods to configure and drive a nonsupported printer:
• Configure the device as a supported printer if the nonsupported printer uses the same
hardware interface (serial or parallel) and closely approximates the functions of a
supported printer.
• Configure your printer as a supported printer if there are no supported printers similar to
yours. Change the virtual printer characteristics to accommodate your printer.
• Use generic as the printer type and the appropriate interface type if you are unsure if
your printer emulates a supported device. The operating system supplies two generic
devices, other parallel printer (opp) and other serial printer (osp). Specify one of these
devices by selecting the interface type, such as parallel rs232, and modify the
characteristics according to the specifications in your printer manual.
• Configure your printer device driver and print queue, but set the print subsystem to pass
all print requests transparently to the printer. With this configuration the application must
correctly assemble the printer data stream. The print spooling subsystem is available for
sharing the printer among users, but the virtual printer system does not format the printer
data stream.
• If your output device has special formatting requirements, such as an electrostatic plotter
that requires input as raster graphics, substitute the formatting software for the printer
formatter or the printer backend program.
Customizing Nonsupported Virtual Printers
You must define a virtual printer to support the features of the nonsupported printer and the
print spooling subsystem.
1. You must identify the printer data stream that best matches your printer to customize a
nonsupported printer. The operating system supports the following data streams through
predefined virtual printers:
asc
Extended ASCII
pcl
Hewlett–Packard LaserJet
gl
Plotter
ps
PostScript
630
Diablo 630
855
Texas Instruments 855 dot matrix printer in dp mode
2. Once you have identified the data stream used by your printer, choose either a
supported printer that uses the same data stream or one of the generic printers and
customize the definition for your printer.
Printers, Print Jobs, and Queues for Systems Administrators
2-13
Wiring Nonsupported Printers
You may need to adapt your nonsupported printer so that it functions properly with the base
operating system serial printer device driver:
1. The following chart details what the RS–232 signals mean to the serial printer device
driver:
RS–232 Signal
Serial Printer Device Driver Use
FG
Frame ground. Often used as shield.
TxD ––>
Used to transmit data to printer.
RxD <––
Used to Receive data from printer.
RTS <––
Held high after printer port opened. Provides host status to printer.
Not used for data pacing.
CTS <––
Must be high for printer port to be opened. Used to detect that the
printer is turned on.
DSR
Not used. Usually tied to DCD.
SG
Reference voltage for signals.
DCD <––
Used for data pacing when DTR is set to yes.
DTR ––>
Held high after printer port opened. Provides host status to printer.
2. If you use FG as a cable shield, make sure that it is only connected at one end. It makes
no difference which end is connected. This provides an efficient shield against electrical
noise.
3. If your RTS signal is used to supply voltage to CTS on the printer port, check to see what
your printer does with its RTS signal.
Although RTS and CTS data pacing is not supported on serial printers, the device driver
will block the open of the printer port until the voltage of CTS becomes high. The CTS
signal is usually supplied by the RTS signal from the printer. However, some printers use
the RTS signal for data pacing. These printers drop RTS when they want the system to
stop sending data. Since the queuing system always needs the port opened to check for
status, if the printer drops the RTS signal, the port closes and the queue goes down.
4. Some printers require that you raise the voltage of DCD and DSR or CTS on the printer
side. There are several methods for raising the voltage:
– Use DTR or RTS on the computer side to supply the voltage.
OR
– Obtain the voltage from the printer side.
2-14
Guide to Printers and Printing
Printing with Terminal–Attached Printers
Many asynchronous ASCII terminals have an auxiliary (AUX) port that can be used to
connect a printer. Terminal–attached printing is supported for terminals attached directly to a
host machine or attached remotely by modem to a host machine.
This section discusses configuration, maintenance, and problem determination for
terminal–attached printers, as well as the following topics:
• Supported hardware
•
Installing a Terminal–Attached Printer on page 2-17
•
Terminfo Database on page 2-19
•
Printer Backend Commands on page 2-20
Supported Hardware
The following hardware is supported for terminal–attached printing.
• Cables
– RS–232
– RS–422
• Terminal Devices
– IBM 3151, 3161, 3162, 3163, 3164
– DEC VT100, VT220, VT320, VT330
– WYSE 30, 50, 60, 350
• Printers
– IBM 2380 Personal Printer II
– IBM 2381 Personal Printer II
– IBM 2390 Personal Printer II
– IBM 2391 Personal Printer II
– IBM 2380 Personal Printer II (Model 2)
– IBM 2381 Personal Printer II (Model 2)
– IBM 2390 Personal Printer II (Model 2)
– IBM 2391 Personal Printer II (Model 2)
– IBM 3112 Page Printer
– IBM 3116 Page Printer
– IBM 3130 LaserPrinter
– IBM 4019 LaserPrinter
– IBM 4029 LaserPrinter
– IBM 4037 LaserPrinter
– IBM 4039 LaserPrinter
– IBM 4076 InkJet Printer
– IBM 4201 Model 3 Proprinter III
– IBM 4202 Model 3 Proprinter III XL
Printers, Print Jobs, and Queues for Systems Administrators
2-15
– IBM 4207 Model 2 Proprinter X24E
– IBM 4208 Model 2 Proprinter XL24E
– IBM 4247 Printer
– IBM 5204 Quickwriter
– IBM 6400 Printer
– IBM InfoPrint 40 Printer
– IBM Network Color Printer
– IBM Network Printer 12
– IBM Network Printer 17
– IBM Network Printer 24
– Hewlett–Packard 2500C Color Printer
– Hewlett–Packard LaserJet II
– Hewlett–Packard LaserJet III
– Hewlett Packard LaserJet IIISi
– Hewlett–Packard LaserJet 4
– Hewlett Packard LaserJet 4Si
– Hewlett Packard LaserJet 4 Plus
– Hewlett Packard LaserJet 4V
– Hewlett–Packard LaserJet 5000 D640 Printer
– Hewlett Packard LaserJet 5Si/5Si MX
– Hewlett Packard LaserJet 5Si Mopier
– Hewlett–Packard LaserJet 8000 Printer
– Hewlett–Packard LaserJet 8100 Printer
– Hewlett Packard LaserJet Color
– Hewlett–Packard Color LaserJet 4500
– Hewlett–Packard Color LaserJet 8500
– Lexmark Optra LaserPrinter
– Lexmark Optra E310 LaserPrinter
– Lexmark Optra M410 LaserPrinter
– Lexmark Optra Se LaserPrinter
– Lexmark Optra TLaserPrinter Family
– Lexmark Optra W810 LaserPrinter
– Lexmark Optra Plus LaserPrinter
– Lexmark Optra C Color LaserPrinter
– Lexmark Optra E LaserPrinter
– Lexmark Optra N LaserPrinter
– Lexmark ExecJet IIc
– Lexmark ValueWriter 600
– Lexmark 2380 Plus Printer (Model 3)
2-16
Guide to Printers and Printing
– Lexmark 2381 Plus Printer (Model 3)
– Lexmark 2390 Plus Printer (Model 3)
– Lexmark 2391 Plus Printer (Model 3)
– Lexmark 4039 Plus LaserPrinter
– Lexmark 4079 Color JetPrinter Plus
– Lexmark 4227 Forms Printer
• For more information about certain printers listed above, see the following:
IBM InfoPrint 40 Printer on page 4-63
Lexmark Optra E310 Laser Printer on page 4-95
Lexmark Optra M410 Laser Printer on page 4-98
Lexmark Optra Se Laser Printer on page 4-101
Lexmark Optra T Laser Printer Family on page 4-104
Lexmark Optra W810 Laser Printer on page 4-107
• Asynchronous Communications Adapters
– Native serial port controller
– 8–port controller
– 16–port controller
– 64–port controller
– 128–port controller
– Third–party controller
Note: Third–party asynchronous controllers are also supported. When the base
operating system detects that an ASCII terminal was configured with a third–party
controller, the terminal–attached printer will be configured as thoug h it was
connected to the native port controller. See Native, 8–Port, 16–Port, and
Third–party Controllers on page 2-20 for more information.
Installing a Terminal–Attached Printer
To install a new terminal–attached printer and configure it into the print spooling subsystem,
you must:
• Install the physical ASCII terminal (tty) device and connect it to the system.
• Configure a tty device driver for the ASCII terminal.
• Connect the serial printer to the AUX or PRINT port of your ASCII terminal.
• Configure a virtual printer and print queue.
Installing the Physical ASCII Terminal
To install a the physical ASCII terminal, you must:
1. Review all relevant installation planning information and the terminal’s documentation to
ensure that you have the components required for installation.
2. Review your system’s configuration and select the serial port.
3. Ensure that the communications port is not in use.
4. Connect the terminal to the serial communications port. Be sure to use proper cabling.
Consult your documentation for cabling instructions.
Printers, Print Jobs, and Queues for Systems Administrators
2-17
5. Configure the terminal according to the documentation provided with it. Be sure to record
the settings you choose for baud rate, stop bits, bits per character, and flow control. You
will need this information to configure the base operating system tty device driver.
Configuring the Terminal Device Driver (tty)
To configure the tty, you must:
1. Log on as the root user.
2. At the system prompt type:
Devices
In the Web-based System Manager Devices container, use the menus to complete the
steps to configure the terminal device driver.
3. Select the Add a TTY option and the tty type.
4. Provide additional information as prompted such as the configuration settings you made
on your terminal at installation. If you are not sure of the port number IDs, press the F4
key to display a list of available I Ds. Be sure to enter the correct TERMINAL type. When
you have entered all configuration information, press Enter.
You can also perform this task with the SMIT fastpath smit tty.
Verifying Terminal Output
After you have configured the terminal device, enter the following to verify that the terminal
is working and send output directly to the terminal screen:
cat /etc/qconfig > /dev/ttynn
where nn is the appropriate tty device number. The contents of the /etc/qconfig file should
appear on the terminal screen.
Installing the Physical Printer
To install the physical printer, you must:
1. Review all relevant installation planning information and the printer’s documentation to
ensure that you have the required components and information to install the printer.
2. Review the terminal documentation for information on connecting printers to the auxiliary
port.
3. Verify that the AUX port on the terminal is configured with the same settings as your
printer such as baud rate, parity, data bits, stop bits, and XON/XOFF.
– For information about setting values for the AUX port, consult your terminal
documentation.
– For information about configuring the printer’s serial interface, consult your printer
documentation.
4. Connect the printer to the terminal’s AUX port. Be sure to use the proper cabling.
Consult your documentation for cabling instructions.
Configuring a Virtual Printer and Print Queue
Perform the following steps to configure your terminal–attached printer into the print
spooling subsystem.
1. At the system prompt, type:
Devices
In the Web-based System Manager Devices container, use the menus to complete the
steps to configure a virtual printer and print queue.
2. Select the ascii attachment type, manufacturer, and printer model.
2-18
Guide to Printers and Printing
3. Provide additional information as prompted.
You can also perform this procedure with the /usr/lib/lpd/pio/etc/piomkpq command or
with the SMIT fastpath smit mkpq.
Modem Connections
Terminal–attached printing can also be supported by establishing a queue for a modem line
instead of creating the queue for a specific terminal. Since the terminal type of a dial–in
terminal cannot be guaranteed, set t he PIOTERM environment variable to the terminal type
of the dial–in terminal by entering the following command:
export PIOTERM=Dialin–Terminal–Type
Commands and Control Sequences
Terminfo Database
The terminfo database contains the capabilities and special features of a terminal device,
such as cursor positioning, initialization sequences, and key sequences that control specific
terminal operations. For supporte d terminals, the control sequence values are predefined in
the terminfo database. The control sequences that allow access to the AUX port are:
mc5 =Value
Instructs the terminal to send all data to the
AUX port (Printer ON).
mc4 =Value
Restores output to the terminal (Printer
OFF).
The control sequence values are terminal specific. For example, the printer command
sequences for a 3151 terminal are:
mc5=^P^R
mc4=^P^T
In this example, ^P^R refers to the Ctrl–P Ctrl–R key sequence.
Adding Support for Nonsupported Terminals
The control sequences must be added to the terminfo database in the
/usr/share/lib/terminfo directory. To add the control sequence values for your terminal, edit
the appropriate *.ti file. Then compile th e file using the tic command. Refer to the
documentation supplied with your terminal for more information about control sequence
values.
The virtual printer database is a series of files that describe the way print requests should
be processed, such as the data stream to be delivered to the printer. User–configurable
attributes specific to terminal–at tached printers are defined in the virtual printer database
and are based upon the asynchronous communications adapter being used.
The virtual printer attributes are defined when the virtual printer is configured. The naming
convention for attributes unique to terminal–attached printers is y N, where N is an integer
greater than or equal t o 0. The value of y0 is reserved. It designates that the virtual printer
queue is configured for a terminal–attached printer and contains the hardware line discipline
for the terminal port. The sections that follow detail the adapter–specific virtual printer
attributes for terminal–attached printers.
To change the attribute values on an existing virtual printer, use the Web-based System
Manager Devices fast path. You can also use the smit ps_lsvirprt fast path
command.
Printers, Print Jobs, and Queues for Systems Administrators
2-19
Native, 8–Port, 16–Port, and Third–party Controllers
Native port (S1 or S2), 8–port and 16–port controllers do not provide hardware support for
terminal–attached printers and the hardware support for third–party controllers is unknown .
As a result, print files must be split into small data blocks. The mc5 control sequence
precedes each data block, which is in turn followed by the mc4 control sequence. When the
terminal receives the mc5 control sequence, all subseq uent data is routed to the AUX port
until an mc4 control sequence is received.
Data blocks sent to the terminal must be kept relatively small. Sending too many characters
to the tty at once may cause output to the printer to be mixed with the echo of what is typed
during the sending operation. A delay time between data block transmissions must also be
established to minimize data reception errors.
Native port, 8–port, 16–port, and third–party controllers have the following virtual printer
attributes for specifying block size and delay value:
y1
Indicates the maximum number of characters in a data block.
y2
Indicates the number of microseconds to delay between data block
transmissions.
64–Port Controller
The 64–port controller provides hardware support for terminal–attached printers. The
64–port controller has the following virtual printer attribute:
y1
Sets the priority with which printing will be done over terminal activity.
The larger the number, the greater the priority the printer has over
the terminal.
128–Port Controller
The 128–port controller also provides hardware support for terminal–attached printers. The
128–port controller has the following virtual printer attributes:
y1
Sets the maximum characters per second (CPS) rate at which
characters are sent to the print device. The rate should be just below
the average print speed for your printer. Consult your printer’s
documentation for print speed.
y2
Sets the maximum number of print characters the device driver
places in the output queue. Reducing this number increases system
overhead. Increasing this number delays operator keystroke echo
times when the terminal–attached printer is in use.
y3
Sets the device driver estimate of the size of the terminal–attached
printer’s input buffer. After a period of inactivity, the driver bursts the
designated number of characters to the printer. Consult your printer’s
documentation for input buff er size.
Printer Backend Commands
The piobe command is the normal backend program run by the print spooling subsystem
when printing to a locally attached printer device. The piobe comm and is started via the
qdaemon process. It determines the data stream it is going to create by reading a flag or
querying the virtual printer database. The piobe process then passes the print file through a
pipeline of appropriate filters so that it generates the correct data stream. At the end of this
pipeline, the filtered file is passed to the pioout device driver interface program.
The pioout command is invoked in a pipeline by the piobe command. For locally attached
printers, the pioout command sends the print file to the appro priate printer device driver
(for example, /dev/lp1). However, for terminal–attached printers, the print files are sent to
the printer via the tty device driver (for example, /dev/tty0), after being modified by data
2-20
Guide to Printers and Printing
gathered from the terminf o and virtual printer databases. The terminfo database is queried
for the mc5 and mc4 terminal control attributes. The virtual printer database is queried for
the asynchronous controller–specific attributes.
Terminal–Attached Printing Limitations
1. Only ASCII data should be sent to the printer. Binary data may inadvertently lock the
terminal or cause printing to cease prematurely.
2. Printer status messages, such as out of paper and printer offline, are not supported.
Configuring a Printer for an ASCII Display Terminal
Prerequisites
• You must have connected a serial printer to the AUX or PRINT port on your ASCII
terminal. Refer to the terminal documentation for cabling instructions.
• The tty device for the ASCII terminal must be defined. See ”Adding or changing a TTY
from the command line” in AIX 5L Version 5.2 System Management Guide:
Communications and Networks for more information.
• The printer must be online.
• Verify that the AUX port on the terminal is configured with the same settings as your
printer. To do this, consult your terminal documentation for information about setting
values for the AUX port. Consult your printer documentation for information about
configuring the printer serial interface.
• You must have root user authority.
Configuring a Printer
1. At the system prompt, type:
smit mkpq
2. Select the ascii attachment type, manufacturer, and printer model.
3. Provide additional information as prompted.
You can also perform this task with the /usr/lib/lpd/pio/etc/piomkpq command.
Listing Print Queues and Print Queue Devices
The following procedures apply to both local and remote print queues, as well as print
queue devices.
Prerequisites
• The printer devices must be attached to your system for local print queues and print
queue devices.
• Your system must be configured to communicate with a remote host for remote print
queues and print queue devices.
Listing Print Queues
1. At the system prompt, type wsm, then select Printers.
2. In the Web-based System Manager Printer Queues window, use the menus to complete
the steps to list print queues.
Printers, Print Jobs, and Queues for Systems Administrators
2-21
You can also perform this task with the lsallq command or with the SMIT fast path smit
lspq.
Listing Print Queue Devices
1. At the system prompt, type wsm, then select Printers.
2. In the Web-based System Manager Printer Queues window, use the menus to complete
the steps to list print queue devices.
You can also perform this task with the lsallqdev –q QueueName command or with the
SMIT fast path smit lsallqdev.
Showing Status of Print Queues
Use the Web-based System Manager to perform this task.
Web-based System Manager
1. At the system prompt, type wsm, then select Printers.
2. In the Web-based System Manager Printers window, choose the Queue Status icon.
From the Selected menu choose Properties, then select the ”General” tab within the
”Printer Properties” dialog. Information pertaining to status of print queues will appear in
the ”Print Queue Properties” dialog.
You can also perform this task with the enq –e ”$@” command or with the SMIT fast
path smit qstatus.
Starting and Stopping a Print Queue
Prerequisites
To perform these tasks, you must have root authority.
Starting a Queue
1. At the system prompt, type wsm, then select Printers.
2. In the Web-based System Manager Printer Queues window, select the queue or device
that you want to start.
3. Select Start all Devices for Queue to start a queue. Select Start a Specific Device to
start a device.
You can also perform this task with the following commands:
smit qstart
OR
qadm –U QueueName
Stopping a Queue
1. At the system prompt, type wsm, then select Printers.
2. In the Web-based System Manager Printer Queues window, select the queue or device
that you want to stop.
3. Select Stop all Devices for Queue to stop a queue. Select Stop a Specific Device to
stop a device.
2-22
Guide to Printers and Printing
You can also perform this task with the following commands:
smit qstop
OR
qadm –D QueueName
Setting the Default Print Queue
Prerequisites
To perform this task, you must be one of the following:
• A user with root authority
• A member of the printq group
Procedure
1. At the system prompt, type wsm, then select Printers.
2. In the Web-based System Manager Printer Queues window, select a computer object.
3. Select a queue from the Selected menu.
You can also perform this task with the SMIT fast path smit qdefault.
Holding and Releasing a Print Job (qhld Command)
Prerequisites
To hold or release a print job, you must be one of the following:
• Print job owner
• A user with root authority
• A member of the printq group
Procedure
1. At the system prompt, type wsm, then select Printers.
2. In the Web-based System Manager Printer Queues window, use the menus to complete
the steps to hold a print job or to release a print job currently on hold.
You can also hold a print job using the following commands:
smit qhld
OR
qhld –# JobNumber
OR
qhld –P Queue
OR
qhld –u User
You can release a print job using the following commands:
qhld –r –# Jobnumber
OR
qhld –r –P Queue
OR
Printers, Print Jobs, and Queues for Systems Administrators
2-23
qhld –r –u User
Moving a Job between Queues
Prerequisites
To perform this task, you must be one of the following:
• The print job owner
• A user with root authority
• A member of the printq group.
Web-based System Manager
1. At the system prompt, type wsm, then select Printers.
2. In the Web-based System Manager Printer Queues window, select the job you want to
move.
3. Select Destination Queue.
You can also perform this procedure with the following commands:
smit qmov
OR
qmov –m DestinationQueue –# JobNumber
OR
qmov –m DestinationQueue –P Queue
OR
qmov –m DestinationQueue –u User
Scheduling Print Jobs
Use the SMIT fast path to perform the following tasks.
Prerequisites
Your root user login name must be included in the /var/adm/cron/at.allow file or you must
have root user authority.
Listing All Scheduled Print Jobs
At the prompt, type:
smit lsat
This command displays a list of all the print jobs you have scheduled. If you have root user
authority, the command lists all currently scheduled print jobs.
Scheduling Print Jobs
1. At the prompt, type:
smit sjat
2. Select or type the appropriate date and time fields.
3. Provide additional information as prompted.
Removing a Scheduled Job
At the prompt, type:
2-24
Guide to Printers and Printing
smit rmat
Select List to delete the job number.
Changing or Showing Queue Characteristics
The following procedures apply to both local and remote print queues and print queue
devices.
Prerequisites
• For local print queues, the printer must be physically attached to your system.
• For remote print queues, your system must be configured to communicate with the
remote print server.
• To change queue or queue device characteristics, you must have root authority.
Change or Show Print Queue Characteristics
1. At the system prompt, type wsm, then select Devices.
2. In the Web-based System Manager Devices window, select Queue, Print Processor, or
Print Destination.
3. Select Properties.
4. View or change the desired attributes.
You can also perform this procedure with the chque, chquedev, lsvirprt, and chvirprt
commands or with the SMIT fast path smit chpq.
Specifying Paper Size
Prerequisites
To perform this task, the print queue must already be configured.
Web-based System Manager
1. Load paper in the paper tray.
2. Refer to your printer documentation for information about specifying the paper size, then
use the operator panel buttons to enter the paper size.
3. At the system prompt, type wsm, then select Printers.
4. In the Web-based System Manager Printers window, double–click on the printer icon.
From the Selected menu choose Properties. Information pertaining to paper size will be
displayed in the ”Printer Properties Setup” dialog.
You can also perform this task with the pioevattr –q ”$[Queue]” –d
”$[Printer]” command or with the SMIT fast path smit chpq.
Printers, Print Jobs, and Queues for Systems Administrators
2-25
Changing or Showing Printer Connection Characteristics
Prerequisites
To perform this task, you must be one of the following:
• A user with root authority
• A member of the printq group
Web-based System Manager
1. At the system prompt, type wsm, then select Devices.
2. In the Web-based System Manager Devices window, double–click on a computer object
to open its Properties. Information such as device name, type, interface type, and status
display.
You can also perform this task with the SMIT fast path smit chprtcom.
Changing / Showing Pre–Processing Filters
This procedure describes how to change or show the command strings that you can run to
pre–process print files. A pre–processing filter consists of a command string that you pass
to a Korn shell to filter a file before it prints. There are pre–processing filters for each of the
values that can be specified with the qprt command –f flag or with the lpr command
FilterOption flags.
Prerequisites
To change or show pre–processing filters, you must be one of the following:
• A user with root authority
• A member of the printq group
Web-based System Manager
1. At the system prompt, type wsm, then select Printers.
2. In the Web-based System Manager Printers window, double click on the ”Print Processor
icon. From the Selected menu choose Properties. Information on changing/showing
pre–processing filters will be displayed in the ”Layout” tab of the ”Print Processing
Properties” dialog.
You can also perform this task with the SMIT fast path smit pqfilters.
Deleting a Print Queue
The following procedures apply to both local and remote print queues.
Prerequisites
• For local print queues, the printer must be physically attached to your system.
• For remote print queues, your system must be configured to communicate with the
remote print server.
• To delete a queue or queue device, you must have root authority.
Procedure
1. At the system prompt, type wsm, then select Printers.
2-26
Guide to Printers and Printing
2. In the Web-based System Manager Printer Queues window, select Queue, Print
Processor, or Destination.
If you select a queue, all copies of devices for that printer are removed. If you select a
print processor or destination, only that print processor or destination is removed.
You can also use the rmque, rmquedev, and rmvirprt commands or the SMIT fast path
smit rmpq to perform this task.
Note: If the selected queue has only one printer, the queue and its printer are removed.
If the queue has more than one printer, only the selected printer is removed.
Listing All Supported and Defined Printers
List All Supported Printers
At the system prompt, type wsm, then select Printers. You can also use the smit lssprt
fast path command.
Output similar to the following is displayed:
bull1021
.
.
.
ibm2380
ibm2380
ibm2380
.
.
.
opp
osp
osp
parallel Bull Compuprint Page Master 1021
parallel IBM 2380 Personal Printer II
rs232
IBM 2380 Personal Printer II
rs422
IBM 2380 Personal Printer II
parallel Other parallel printer
rs232
Other serial printer
rs422
Other serial printer
List All Defined Printers
At the system prompt, type wsm, then select Printers. You can also use the smit lsdprt
fast path command.
Output similar to the following is displayed:
lp0 Available 00–04–01–06 Other serial printer
lp1 Available 00–04–01–07 Other serial printer
lp2 Available 00–00–0P–00 Other parallel printer
Printers, Print Jobs, and Queues for Systems Administrators
2-27
Moving a Printer to Another Port
Prerequisites
• The printer must be physically attached to your system.
• You must have root authority.
• You must have previously defined and configured a printer port. See Configuring a
Printer without Adding a Queue on page 2-9.
Procedure
1. At the system prompt, type wsm, then select Devices.
2. In the Web-based System Manager Devices window, select the printer object you want
to move.
3. Select Move To... from the Selected menu.
Changing or Showing Printer Characteristics
Prerequisite
A printer must have been added.
Web-based System Manager
1. At the system prompt, type wsm, then select Printers.
2. In the Web-based System Manager Devices window, double–click on the printer object.
Note: If the printer has a print queue, you can change the printer connection
characteristics through the Devices window or the chprtcom commands.
You can also perform this task with the SMIT fast path smit chgprt.
Deleting a Printer
This procedure removes a printer from the system. Deleting a printer does not remove any
print queues that send print jobs to that printer. See Deleting a Print Queue on page 2-26 if
you want to also delete the print queues.
Prerequisites
• A printer must have been added ( Configuring a Printer without Adding a Queue on page
2-9).
• You must have root authority.
Web-based System Manager
1. At the system prompt, type wsm, then select Devices.
2. In the Web-based System Manager Devices window, select the printer object you want
to delete.
3. Select Delete from the Selected menu.
You can also perform this task with the SMIT fast path smit rmprt.
2-28
Guide to Printers and Printing
Remote Printing Overview
Remote printing allows different computers to share printers. To use remote printing
facilities, the computers must be connected via the Transmission Control Protocol/Internet
Protocol (TCP/IP) protocol and must support the required TCP/IP applications, such as the
lpd daemon.
A remote print request is queued in the same manner as a local print request:
• A front–end print command such as qprt, lpr, or enq initiates the request to the
appropriate queue on the local system.
• The qdaemon on the local system processes the request as it would any locally queued
job, with one exception. The qdaemon passes the request to the rembak backend
program rather than the piobe backend.
• The rembak program transmits the print job to a remote server via the TCP/IP network.
• On the remote server the lpd daemon monitors port 515 for remote print requests.
• When the lpd receives a remote print request, it places the job in the appropriate local
queue.
• The print request is then processed by the qdaemon on the print server.
• The qdaemon passes the request to the piobe backend on the print server.
• The piobe backend formats the data stream for printing on the specified printer.
The following sections discuss how to configure, use and manage a remote printing
environment:
• The rembak Program on page 2-29
• The lpd daemon on page 2-30
rembak Program
The local queue set up to serve remote print requests must be configured to use rembak,
the remote print backend command. When you set up the queue, the system prompts for a
backend program path name. The entry at this prompt tells the qdaemon command which
backend program to use to process print requests. To set up a queue to handle remote print
requests, type /usr/lpd/rembak.
The rembak command also processes status requests, job cancel requests, and requests
to kill a remote queuing system. Status requests such as qchk –A or lpstat query the status
of local print queues and devices by analyzing the qconfig file and the local print spooling
subsystem status files.
In a remote print environment, the qchk –A and lpstat commands use the rembak program
to request queue status information from the print servers. The output of a queue status
command shows two entries for each remote queue. The first entry is the status of the local
queue to which remote jobs are sent. The second entry shows the status of the queue on
the remote print server where the jobs are printed. In the following example, the queue
name rq was used for both the queue on the local system and the queue on the remote
print server:
Queue Dev
Status Job Files
User
PP % Blks Cp
––––– –––
–––––– ––– –––––––––––––––
–––––––––– ––– –– –––– ––
Iago Iago RUNNING 284 mileaf
ann@arctur 15 13 1
1
Pro
asc
READY
bsh
bshde READY
ps
ps
READY
rq
rqd
READY
rq
ps1
RUNNING 297 .deskprint/dsktop sarah@alde 60 22 1
1
QUEUED 298 .deskprint/howtol sarah@alde
60 1
2
Printers, Print Jobs, and Queues for Systems Administrators
2-29
As the preceding example shows, any print jobs currently running or queued show up in the
remote print server entry for the queue.
The rembak program also sends requests to cancel print jobs to the remote print servers.
Each print job is assigned a number. As shown in the previous example, print queue status
requests display the job numbers for currently queued or running print requests. To cancel a
job on a remote queue, use the same commands used to cancel local print jobs. For
example, to cancel job 298 from the queue rq, you can use Web-based System Manager
(type wsm and then select Printers ), or one of the following commands:
qcan –Prq –x298
OR
lprm –Prq 298
lpd daemon
Although local and remote print jobs are submitted with the same commands, they are
processed differently. Once a print job has been transmitted to a remote host, it is no longer
managed by the local print spooling subsystem.
The lpd daemon is part of the TCP/IP system group. Any host on a TCP/IP network can run
the lpd daemon, and any host can send print requests to any other host on the network (if
the host is currently running lpd). As a security measure, the lpd daemon forks a child
process that checks each remote print request against two database files: the
/etc/hosts.equiv file and the /etc/hosts.lpd file. If the name of the host submitting the print
request is not in the /etc/hosts.lpd file, the print request is rejected.
Note: The /etc/hosts.equiv file defines which computers on a network are allowed to
execute certain commands on a local host without supplying a password. The
/etc/hosts.lpd file defines which computers on a network are allowed to execute print
commands on a local host without supplying a password.
The lpd daemon on the remote print server monitors port 515 for print requests. When the
lpd daemon receives a print request from a valid host, it places the request in the specified
queue. The lpd daemon places files specified in print requests in the directory
/var/spool/lpd. The print request is then managed by the qdaemon and the appropriate
backend (usually piobe) on the remote server.
The /etc/locks/lpd file contains the process ID of the currently running instance of the lpd
daemon. If a machine running the lpd daemon becomes inoperable, the ID for the lpd
daemon may have to be removed before the system is restarted. The error messages
lpd: lock file or duplicate daemon indicate that the ID must be removed.
Controlling the lpd Daemon
Controlling the lpd daemon includes starting and stopping the lpd subsystem and changing
the characteristics of the lpd subsystem. You can use Web-based System Manager (type
wsm and then select Printers ), or use the SMIT or System Resource Controller (SRC)
commands to control the lpd daemon.
There are three ways to start the lpd daemon. If it is not currently running, you can start the
daemon at any time. You also have the option of having the lpd daemon start at system
restart or to have it start both at the current time and at system restart. The same options
are available to stop the lpd daemon: stop now, stop at system restart, or stop both now
and at system restart. You can run the lpd daemon with DEBUG, with SYSLOG, with both
DEBUG and SYSLOG, or with neither.
To control the lpd daemon with Web–based System Manager, type wsm and select
Printers, then select the desired options from the Printer Queues window menus. To control
the lpd daemon with SMIT,type smit lpd, then select the desired options from the SMIT
menus. To control the lpd daemon with the SRC, use the following SRC commands:
2-30
Guide to Printers and Printing
startsrc
Starts a subsystem, group of subsystems,
or a subserver.
stopsrc
Stops a subsystem, group of subsystems,
or a subserver.
lssrc
Gets the status of a subsystem, group of
subsystems, or a subserver.
refresh
Causes the subsystem or group of
subsystems to reread the appropriate
configuration file.
traceson
Enables tracing of a subsystem, group of
subsystems, or a subserver.
tracesoff
Disables tracing of a subsystem, group of
subsystems, or a subserver.
Managing and Using Remote Printers and Queues
In order to print to a remote system, you must set up a remote queue on the local system.
This process involves tasks such as naming a queue and a queue device on the local host,
and indicating the name of the remote host and the queue on the remote host to which print
jobs are sent.
You can set up a remote queue with Web-based System Manager (type wsm, then select
Printers ). You can also use the smit mkrque command. For more information, see Adding
a Print Queue Device on page 2-10 .
Note: The queue on the remote host designated to receive remote print requests must
be an active queue.
To start the remote queue, type wsm, select Printers, then select the name of the queue and
queue device you configured for remote printing. You can also use smit qstart to
perform this task.
Remote Printing and the qconfig File
The qconfig file contains stanzas that define queue devices. For a remote printer, some of
the field values in the device stanza differ from those for a local printer. The following table
lists the fields which have particular significance for remote printers. The table also shows
sample values or default values for these fields.
host
sys2
Name of the remote host
(print server) where jobs
will be printed.
rq
q2
Name of the remote queue
on which jobs will be printed.
s_statfilter
/usr/lpd/aixshort
Filter used to translate
remote queue status
information into a short form
for queue status requests
such as qchk. This is the
default value when the
remote print server is
another base operating
system.
Printers, Print Jobs, and Queues for Systems Administrators
2-31
l_statfilter
/usr/lpd/bsdshort
Filter used to translate BSD
lpq command output (short
form) when the remote print
server is a BSD system.
/usr/lpd/attshort
Filter used to translate ATT
lpstat command output
(short form) when the
remote print server is an
ATT system.
/usr/lpd/aixlong
Filter used to translate
remote queue status
information into a long form
for queue status requests
such as qchk. This is the
default value when the
remote print server is
another base operating
system.
/usr/lpd/bsdlong
Filter used to translate BSD
lpq command output (long
form) when the remote print
server is a BSD system.
/usr/lpd/attlong
Filter used to translate ATT
lpstat command output
(long form) when the remote
print server is an ATT
system.
Configuring a Remote Host as a Print Server
The host to be used as a print server must be configured to accept remote print requests. A
host must be listed in the /etc/hosts.lpd file on the print server to have permission to print.
To add a print queue host name to the /etc/hosts.lpd file using Web–based System
Manager:
1. At the system prompt, type wsm, then select Printers.
2. In the Printer Queues window, select a computer object.
3. Select Properties from the Selected menu.
4. To add the host name to the /etc/hosts.lpd file, open and edit the Host Access list.
You can also perform this task with the smit mkhostslpd fast path.
A print request sent from a host not defined in the print server’s /etc/hosts.lpd file will be
rejected. The system displays an error message indicating that the host does not have line
printer access.
A host acting as a print server must also have its lpd process running to service print
requests. The SRC command lssrc –s lpd shows the status of the lpd daemon. If it is not
active, use Web-based System Manager or the startsrc command to start the lpd daemon.
Using Remote Printers and Queues
No special commands are required to print to a remote host. Use any print command that
allows you to specify a queue. The lpr, qprt, and enq commands are examples of print
commands. Use the appropriate flags and options to tailor the print request, including the
flag that specifies the queue. Use the name of the remote queue on your host.
You can also send a remote print request with the smit qprt fast path.
2-32
Guide to Printers and Printing
Queue status commands, such as qchk or lpstat, display information for both local and
remote print queues. The smit qchk command displays a menu that allows you to choose
the type of queue status information you want from both local and remote queues.
To cancel a print job in a remote queue, use Web-based System Manager (type wsm, then
select Printers ), the qcan command, or the lprm command. You can also use the smit
qcan fast path.
Using Remote Host Access for Printing
Prerequisites
• Your system must be configured to communicate as a remote print server.
• The lpd daemon must be installed on your system.
• To add a remote host, you must understand naming conventions for TCP/IP.
Listing All Remote Hosts
1. At the system prompt, type wsm, then select Printers.
2. In the Printer Queues window, select a computer object.
3. From the Selected menu, select Properties to view a list of remote print server hosts.
For detailed information or assistance, see the online help.
You can also perform this task with the following command:
ruser –sP
OR
you can use the following SMIT fast path:
smit lshostslpd
Adding a Remote Host
1. At the system prompt, type wsm, then select Printers.
2. In the Web-based System Manager Printer Queues window, select New queue and
printer from the Printers menu.
3. To complete the steps for adding a remote host, use the menus or provide additional
information as prompted.
For detailed information or assistance, see the online help.
You can also perform this task with the following command:
ruser –a –p HostName
OR
you can use the following SMIT fastpath:
smit mkhostslpd
Deleting a Remote Host
1. At the system prompt, type wsm, then select Printers.
2. In the Web-based System Manager Printer Queues window, select the host you want to
delete.
3. To complete the steps for deleting a remote host, use the menus or provide additional
information as prompted.
Printers, Print Jobs, and Queues for Systems Administrators
2-33
For detailed information or assistance, see the online help.
You can also perform this task with the following command:
ruser –d –p HostName
OR
you can use the following SMIT fast path:
smit rmhostslpd
Using the lpd Remote Subsystem
Prerequisites
• Your system must be configured to communicate with a remote print server. See Using
Remote Host Access for Printing on page 2-33.
• To start or stop the lpd remote subsystem, you must have root authority.
Starting the lpd Remote Subsystem
1. With root authority, at the system prompt, type wsm, then select Printers.
2. In the Printer Queues window, select Overview & Tasks.
3. From the Printer menu, select Start Remote Print Server (lpd).
For detailed information or assistance, see the online help.
You can also perform this task with the following commands:
• To start the lpd remote subsystem now:
startsrc –s lpd
• To start the lpd remote subsystem at the next system restart:
mkitab ”lpd:2:once:startsrc –s lpd”
• To start the lpd remote subsystem both now and at the next system restart:
startsrc –s lpd; mkitab ”lpd:2:once:startsrc –s lpd”
OR
you can use the following SMIT fast path:
smit mkitab_lpd
Stopping the lpd Remote Subsystem
1. At the system prompt, type wsm, then select Printers.
2. In the Printer Queues window, select a computer object.
3. From the Selected menu, select Properties.
4. Select Stop lpd daemon.
For detailed information or assistance, see the online help.
You can also perform this task with the following commands:
• To stop the lpd remote subsystem now:
stopsrc –c –s lpd
• To stop the lpd remote subsystem at the next system restart:
rmtab ”lpd”
2-34
Guide to Printers and Printing
• To stop the lpd remote subsystem both now and at the next system restart:
stopsrc –c –s lpd; rmtab ”lpd”
OR
you can use the following SMIT fast path:
smit rmitab_lpd
Showing Status of Printer Server Subsystem
Use the SMIT fast path to perform this task.
smit Command
1. At the system prompt, type:
smit server
2. Select Show Status of the Print Server Subsystem.
Printers, Print Jobs, and Queues for Systems Administrators
2-35
Printer Queuing System Status Conditions
If a printer/device is added as a tty device, the queuing system looks for carrier detect (CD)
to recognize the printer. If the device is an LP device, the queuing system uses CTS to
detect the printer.
Following is a list of print queue status conditions:
DEV_BUSY
Identifies that:
• More than one queue is defined to a printer device (lp0), and
another queue is currently using the printer device.
•
qdaemon attempted to use the printer port device (lp0), and
another application is currently using that printer device.
Normal recovery: To recover from a DEV_BUSY, wait until the
queue or application has released the printer device, or kill the job or
process that is using the printer port.
DEV_WAIT
Indicates that the queue is waiting for the printer because the printer
is offline, out of paper, jammed, or the cable is loose, bad, or wired
incorrectly.
Normal Recovery: To recover from a DEV_WAIT, you must correct
the problem that caused it to wait. Check to see if the printer is
offline, out of paper, jammed, or loosely cabled. It may be easier for
diagnostic testing to use the enq command to move all queued jobs
from the DEV_WAIT queue to another queue that is either printing or
is DOWN. After the problem is corrected, you can move any
unprinted jobs back to the original queue.
DEV_WAIT can also be caused by improper flow control to the
printer, particularly when using XON/XOFF software control. Use
SMIT to see if you are using the proper flow control (XON/XOFF or
DTR pacing).
Bad or improperly wired cabling can cause a DEV_WAIT situation.
Usually, you cannot recover from this situation except by replacing
the cable.
2-36
Guide to Printers and Printing
DOWN
Specifies that the device driver cannot communicate with the printer
(CD or CTS dropped or is low) after TIMEOUT seconds. The
TIMEOUT value indicates the amount of time, in seconds, that the
queuing system waits for a printer operation to complete. You can
set this value using SMIT.
A queue usually goes into the DOWN state after it has been in the
DEV_WAIT state. If a queue goes directly into the DOWN state,
either the TIMEOUT value is too small or there are cabling problems.
Usually, this situation occurs when the printer device driver cannot
tell if the printer is there due to the absence of correct signaling.
However, some printers cannot signal the queuing system that they
are only offline. These printers signal that they are off; they drop CTS
(if an lp) or drop CD (if a tty).
If the printer device is off, the queue goes into the DOWN state. The
system administrator can bring a queue to the DOWN state for
maintenance with the queuing commands ( qadm, disable, enq,
and others).
Normal recovery: Correct the problem that brought the queue down
and bring the queue back up using the qadm, enable, or enq
commands with appropriate flags. The queue must be manually
brought up before it can be used again.
HELD
Specifies that the job is held and will not be put on the queue until it
is released using the qhld or enq commands
OPR_WAIT
Specifies that the backend program is waiting for the operator to
perform a task such as loading paper. This is usually
software–related.
Normal Recovery: To recover from an OPR_WAIT state, respond
appropriately to the request that is made by the queuing system.
QUEUED
Specifies that a print file is queued and is waiting in line to be
printed.
READY
Specifies that everything involved with the queue is ready to queue
and print a job.
RUNNING
Specifies that a print file is printing.
UNKNOWN
Specifies that a user created a queue on a device file that another
queue is using and that its status is DEV_WAIT. The queue cannot
get a status from the printer device (lp0) when it is on hold
(DEV_WAIT).
Normal recovery: To correct this, bring down the other queue or fix
the problem with the printer. Bring the new queue down and back up
so the queue registers as READY.
The following status conditions apply to remote queues:
Printers, Print Jobs, and Queues for Systems Administrators
2-37
2-38
CONNECT
Specifies that the backend is trying to connect to the remote host.
GET_HOST
Specifies that the backend is getting the host to which the print job
will be sent.
INITING
Specifies that the backend is in the process of establishing a
connection to the network.
SENDING
Specifies that the backend is sending the print job to the remote
host.
Guide to Printers and Printing
Chapter 3. Spooler Overview
The job of the spooler, also called the queuing system, is to manage printer use, especially
on systems that have more than one printer. When you submit a print job to the spooler, you
can continue to use your workstation. This chapter discusses the following topics:
•
Spooler Concepts on page 3-1
•
Generic Base Operating System Spooler on page 3-4
•
Spooler Parts on page 3-4
•
Spooler Data Flow: Commands and Backend on page 3-5
•
Spooler Data Flow (enq Command) on page 3-6
•
Overview of Backend Processing on page 3-7
•
Virtual Printers and Formatter Filters on page 3-10
•
/etc/qconfig Spooler Configuration File on page 3-12
Spooler Introduction
Because the backend piobe, used to process print jobs on local queues, is the most
commonly used and possibly the most complex backend shipped with the base operating
system, it is used as the primary example in this section. Using piobe in this fashion will
allow a better development of the base operating system spooler concepts.
The purpose of this section is to demonstrate that the spooler is a real process with a
beginning, discrete points in between (no black boxes), and an end. The spooler is a series
of components whose interaction is completely dependent upon how a specific queue is
configured. Recognizing this can have the following results:
• Problem determination and resolution can become easier.
• Bending the spooler to your specific business needs can become easier.
• You may see opportunities for spooler modification that you had not considered.
Spooler Concepts
The following terms relate to the spooler overview.
Formatter Filters
A formatter filter is part of the pipeline created and executed by the default backend for local
printer queues, piobe. A formatter filter provides the capability of either formatting an input
file or passing it through unmodified, based on an input parameter. Even if the formatter
passes the input file unmodified, it still sends printer commands to initialize the printer
before the input file is printed and restores the printer to its original state after printing is
complete.
It is the formatter filter that has the capability of using a virtual printer’s colon file to perform
extensive manipulation of a spooler print job.
Spooler Overview
3-1
Local and Remote Spooler Queues and Spooler Devices
A queue is an ordered list of requests for a specific device. A device is something that can
handle requests one at a time, such as a printer. Each queue must be serviced by at least
one device; often it can be serviced by multiple devices.
Local and Remote Printers
A local printer is a real printer attached to a local host, for which there is a local queue. All
jobs submitted to this queue are processed and printed on the host on which the queue
exists. A remote printer is a real printer attached to a remote host. The queue for a remote
printer specifies a backend whose function is to send the spooled job from the local host
across the network to the remote host. All jobs submitted to this queue, on the local host,
are sent across the network to the remote host where they are processed and printed.
Printer Devices
A printer/plotter device is a special file in the /dev/directory for a real printer. This file can
be used by redirection (for example, cat FileName > /dev/lp0) or by user–written, compiled
programs. Settings for this device driver can be displayed and changed using the splp
command. Before any of the spooler commands can access a printer device, a print queue
must be created for the device.
qdaemon
The qdaemon is a process that runs in the background under the auspices of the srcmstr
process. When you turn your system on, the startsrc command starts the qdaemon. While
the qdaemon can be started by the startsrc command or stopped by the stopsrc
command, the qdaemon supports only signal communications and thus cannot be queried
by the lssrc command.
The qdaemon tracks both job requests and the resources necessary to complete the jobs,
where the resources may be a real printer, some other real device, or even a file. The
qdaemon maintains queues of outstanding requests and sends them to the proper device
at the proper time. The qdaemon also records printer usage data for system accounting
purposes. It is the qdaemon that sets the backend for a spooler queue into execution.
If the qdaemon is aborted, it will be restarted by srcmstr.
Note: Please do not attempt to stop the srcmstr daemon; it controls other daemons
running on your system.
Real (Physical) and Virtual Printers
A real (physical) printer is the printer hardware attached to the system via a serial or parallel
port, or through a network connection such as a network terminal server. When the real
printer is attached via a serial or parallel port local to the system, the printer device driver in
the kernel communicates with the printer hardware and provides an interface between the
printer hardware and a virtual printer.
A virtual printer is a set of attributes and their associated values that define a high–level
data stream (such as ASCII or Postscript) and the methods for processing that data stream.
This does not include information about how the real printer is attached to the host
computer or about the protocol used for transferring bytes of data to and from the real
printer. The piobe backend uses information stored in the virtual printer definition to control
print job processing. The physical storage medium of the sets of attributes and their
associated values is called a printer colon file.
3-2
Guide to Printers and Printing
Spooler
The base operating system spooler is a collection of programs, configuration files, and data
files that provide the following functions or services:
• Provides for the construction of queues, which are software entities whose function is to
process jobs in specific ways
• Allows users to submit jobs (usually but not always printer jobs) to a queue for
processing.
• Provides serial access through a queue to a device (such as a real printer), or to a
program (such as a compiler), avoiding simultaneous use of a single device or program
by multiple users
• Allows users to query the status of queues through status files
• Allows users to control the availability of queues and the status of jobs
• Performs extensive manipulation of print job data stream
• Offers a wide–range of delivery mechanisms for the processed job
Spooler Backends
A spooler backend is a collection of programs (a pipeline) started by the spooler’s qdaemon
command to manage a spooler job that is queued for processing. When the backend is for a
print queue, the spooler backend typically performs the following functions:
• Receives from the qdaemon command a list of one or more jobs to be processed.
• For print jobs, uses printer and formatting attributes from the database, overridden by
any flags specified on the command line.
• Initializes the printer before processing a print job.
• Provides filters for simple formatting of ASCII documents.
• Uses filters to convert print job data stream to a format supported by the printer.
• Provides support for printing national language characters.
• Passes the filtered data stream of a print job to the printer device driver.
• Generates header and trailer pages for print jobs, if requested.
• Generates multiple copies of print jobs, if requested.
• Reports paper–out, intervention–required, and printer–error conditions.
• Reports problems detected by the filters.
• Cleans up after a job is cancelled.
• For print jobs, provides an environment that you can customize to address specific
printing needs.
You typically do not run printer backend programs directly, although backends such as
compilers can clearly be run directly from the command line. The qdaemon runs the
backend, sending it the names of files and any job control flags that you specify. The
backend communicates with the qdaemon through a status file in the /var/spool/lpd/stat
directory. You can use a queue status query command such as qchk or lpstat to display
status information, including, in the case of a print job, the printer status, the number of
pages printed, and the percentage of the job that is finished.
In the base operating system, piobe is the standard spooler backend for processing local
print jobs.
Spooler Overview
3-3
Spooler Job
A spooler job is any job that a user submits to the spooler. All job submission commands
must end with the names of one or more files that require processing. You cannot, for
instance, pass a keyword to a backend and have the keyword control the function that
backend will perform; the submitted job must exist in the file system.
The spooler will accept many types of jobs. It is the responsibility of the system
administrator to ensure that the backend for a given queue is capable of processing any job
submitted to that queue.
Printer job types include:
• ASCII
• Postscript
• PCL
• HPGL
• GL
• Diablo 630
• ditroff
Generic Base Operating System Spooler
The base operating system spooler is not specifically a print job spooler but a generic
spooling system that can be used for queuing various types of jobs, including print jobs
queued to a printer queue.
The spooler does not know what type of job it is queuing. When a queue is created, the
function of the queue is defined by the spooler backend for that queue. For example, if a
queue is created and the queue backend is set up to be piobe (the default printer I/O
backend for local printer queues), the queue is a print queue. Likewise, if the queue
backend is set up to be cc (or any other compiler), the queue is for compiler jobs. When the
spooler’s qdaemon component selects a job from a queue, it processes the job by invoking
the queue’s backend.
This section views the spooler as a generic spooling system with an entry point, an exit
point, and points in–between. Jobs submitted to the spooler enter the system (job
submission), travel along a predictable path from point to point (job processing), and then
exit the system (job delivery and cleanup). Understanding the flow of the job through the
system is crucial to both configuring queues to execute complicated tasks and to effective
problem determination and resolution. The following sections describe this job flow in
greater detail, making special note when the queue is a print queue.
Spooler Parts
The base operating system spooler can be viewed as a process or a subsystem with a
beginning, points–in–between, and an ending. To accomplish its tasks, the base operating
system spooler has four basic parts:
1. The enq command is the true entry point to the spooler, and as such is the beginning of
any spooler activity. This command accepts requests for job processing.
2. The qdaemon is responsible for accepting and tracking all jobs submitted to the spooler
by the enq command. It is also responsible, once all the necessary resources are
available, for allowing a queue backend to process a job. The qdaemon is one of the
points–in–between in the spooler process.
3-4
Guide to Printers and Printing
3. The spooler backend is a collection of programs invoked by the spooler’s qdaemon
command to process a job in some queue. The backend sends output to a specific
device, such as a printer. When the backend is piobe, it involves a formatter filter, which
in turn involves a printer colon file. The backend is one of the points–in–between as well
as the ending, since the backend contains the specific process that will deliver the
processed job to its final destination.
4. The configuration file, /etc/qconfig, describes the configuration of available queues and
devices. Both the enq command and the qdaemon command refer to the configuration
file. This configuration file is considered as conceptually important as the other three
spooler parts due to its critical value to the correct operation of the base operating
system spooler as a whole.
Spooler Data Flow: Commands and Backend
Four commands can be used to submit a job to the base operating system spooler. These
are lp, lpr, qprt, and enq. Each of these commands has a specific UNIX origin; lp
originated with AT&T System V, lpr originated with BSD, and both qprt and enq originated
with the base operating system.
While a user can use any one of these four commands to submit a job to the spooler, the
true entry point to the spooler is the enq command. All of lp, lpr, and qprt are front ends to
enq. lp, lpr, and qprt all parse their arguments and compose a call to enq. The front ends
differ from one another in the way each one behaves and in the number and types of flags
each one accepts.
When a job is submitted to the spooler, enq processes the job request. If the job request is
valid, which basically means that the command syntax was correct, the job is placed upon a
queue. enq creates a job description file (JDF) and notifies the qdaemon of the existence of
the new JDF.
The qdaemon reads each new JDF and reads the job parameters specified by the JDF into
an internal data structure that it maintains to track job requests. The qdaemon uses queue
status information to keep track of the status of each queue and, when circumstances are
right, will invoke the backend for the queue to process the job.
The backend for a queue determines precisely how a job placed on that queue will be
processed. The commands that allow users to submit jobs to the spooler can specify flags
requesting certain treatment of the job, the qdaemon can determine which job gets
processed when (shortest–job–next or first–come–first–served), but the backend is the
process that actually does all the work as far as processing the job is concerned. (A
systems administrator can read the stanzas in /etc/qconfig and quickly determine the
function of a given queue simply by examining the backend.)
In the following figure, the two most common backends scenarios are shown: a local printer
queue and a remote printer queue. The local queue uses piobe (Printer Input/Output
BackEnd) as a backend. The remote printer queue uses rembak (REMote BAcKend) as a
backend.
piobe, like all backends, is invoked by the qdaemon. piobe sets up and controls a series of
programs ( a pipeline) that can not only perform extensive manipulation of a print job but
can also send an extensive amount of control data to a printer, for instance to initialize the
printer to a specific mode before the processed job is delivered to the printer. It is piobe that
makes the initial use of the data stored in printer colon files. The last program in the pipeline
set up and controlled by piobe is responsible for the physical delivery of the byte stream
generated earlier in the pipeline. In the context of a local queue, this program opens a
device driver which will deliver the byte stream to a locally attached printer (attached serial
or parallel), or to a network–attached printer.
Spooler Overview
3-5
Figure 1. Printing with the Base Operating System
rembak is a common backend when the remote printer queue simply points to a queue on
another host, better known as a print server. While piobe can perform extensive
manipulation of a print job, rembak just transfers jobs across TCP/IP networks to print
servers. As the Printing with the Base Operating System figure depicts, if the print server is
another base operating system–based machine, rembak transfers the job across the
network to the lpd process, which in turn invokes enq, which creates a JDF, and so on as
described above.
Spooler Data Flow (enq Command)
The commands lp, lpr, qprt, and enq can be used to submit a job to the spooler for
processing. The enq command is the true entry point to the spooler; lp, lpr, and qprt all
parse their own arguments and compose a call to enq. This can be demonstrated by
executing the following steps as the root user at a shell prompt:
1. Type mount /bin/echo /bin/enq and press Enter.
2. Type qprt –Pasc –fp –z1 –p12 –s courier –C –N 3 /etc/motd and press Enter.
3. Type umount /bin/enq and press Enter.
The qprt command in step 2 attempts to submit a print job to the spooler and have it placed
on the queue named asc, requesting three copies of the message–of–the–day in a 12–point
Courier font rotated 90 degrees. qprt parses its command line arguments and builds an
argument vector to pass to enq. When the qprt command tries to invoke enq with the
argument vector, it instead invokes the echo command, which is mounted over the enq
command. Thus the argument vector generated by the qprt command is passed to the
echo command, which in turn simply echoes the argument vector to your display. This
procedure will work with lp and lpr as well. Aside from demonstrating that qprt really is a
front end to enq, this technique is also useful when you are trying to figure out how to get
unsupported flags into the spooler. Refer to Filters on page 4-135 for further information.
Execution of the qprt command in step 2 should cause the following output to be written to
the display element specified by your TERM environment variable:
–P asc –o –o –f –o p –z –o 1 –o –p –o 12 –o –s courier –C –N 3 /etc/motd
This is the argument vector generated by this specific instance of the qprt command. If
echo had not been mounted over enq, the following job submission command would have
been executed:
enq –P asc –o –f –o p –o –z –o 1 –o –p –o 12 –o –s courier –C –N 3
/etc/motd
3-6
Guide to Printers and Printing
A job submission command must end with the name of one or more real files that exist in a
file system accessible by the base operating system. This is true even when the queue is
set up to handle jobs other than print jobs.
Note: Make sure that you execute step 3. Otherwise, the spooler will be disabled.
When the enq command is executed, either directly or by lp, lpr, or qprt, it assigns a job
number to the job. By default, lp will return the job number. lpr and qprt will not return the
job number unless you specifically request it with a flag.
enq creates a JDF and places it in /var/spool/lpd/qdir, then writes the name of the JDF to
a message queue and signals the qdaemon (by sending it a SIGUSR2) that a new JDF
exists. The qdaemon then reads the name of the JDF from the message queue, accesses
the JDF directly, and reads the data contained in the JDF into an internal data structure it
maintains to track all the jobs currently in the spooler. At this point in time, the job has been
accepted by the spooler.
A JDF is created for all spooling system operations other than a queue status query; the
structure of a JDF differs between print requests versus job cancellation requests versus
queue control requests, and so on, but a JDF is created nevertheless. Commands with the
same function as lpstat still call enq to do their work, but neither is a JDF created nor is the
qdaemon involved.
When the qdaemon determines that the device upon which the job is queued is available,
the qdaemon invokes the backend for the queue, passing it arguments specified by the
JDF. The backend processes the job.
Overview of Backend Processing
The backend for a queue is begun by qdaemon; the qdaemon determines that a job’s turn
to be processed has arrived, sets up an execution environment for the queue backend,
constructs an argument vector for the backend, and, via fork and exec, causes the backend
to begin execution.
The number of simultaneous instances of the backend is controlled by the presence or
absence of the file parameter in the stanza for this queue in the /etc/qconfig configuration
file. If the file parameter is present, then only one instance of the backend can exist for this
queue; This is because the qdaemon will only attempt to set the execution environment for
the backend when it has determined that the job can be processed. Part of setting the
backend’s execution environment involves opening stdout of the backend onto the file or
device specified by the file parameter. If the qdaemon has already performed this action for
a previous job, and that job is still executing, then the qdaemon cannot get a lock on the file
or device specified by the file parameter and hence cannot open stdout of the backend onto
that file or device. Thus the qdaemon holds the job in the queue and waits for the previous
job to complete execution and release the file or device. This is how the spooling system
provides and controls serial access to a device.
If the file parameter is absent or set to a value of FALSE, the qdaemon opens stdout of the
backend onto /dev/null and executes the job immediately. In this situation there is no clear
file or device to which serial access should be provided, so jobs will not stack up on the
queue. Jobs submitted to this queue will be processed just as fast as the qdaemon can set
up the execution environment. The absence of the file parameter effectively disables serial
access to any local file or device.
A meaningful and common example of a queue lacking the file parameter is a remote printer
queue. In this situation, the resource to which serial access should be provided actually
exists on another host; there is no reason for the local queue to attempt any type of control.
The backend for this type of queue, by default the rembak program under the base
operating system, simply sends the job across the network to the remote queue and lets it
handle the serial access control.
Spooler Overview
3-7
The default backend for a local print queue under the base operating system is piobe.
Multiple queues can all specify the same backend. In this situation, multiple simultaneous
instances of piobe can exist; each queue that specifies piobe as its backend can potentially
generate an instance of piobe. However if two or more queues also specify the same value
for the file parameter, the serial access restriction is applied. The qdaemon will not be able
to acquire a lock on the specified file or device if the qdaemon has already acquired the
lock for another instance of piobe. A queue that cannot process a job because of this
restriction will show a queue status of DEV_BUSY. The status will change to RUNNING as
soon as the qdaemon can acquire a lock on the file specified by the file parameter.
Datastream Flow for Common Print Jobs
After a job has been submitted to the spooler for processing and after the qdaemon has
accepted the job and determined that its turn to be processed has arrived, the backend for
the queue is invoked. The following figure illustrates the process of how piobe uses a shell
to construct and manage a pipeline of filters to process the job. The flow of a job through
this pipeline of filters, is:
1. backend (piobe) –– (receives arguments through the argc and argv subroutines from
qdaemon).
2. shell
3. optional filter
4. pioformat
5. device–dependent code
6. pioout
7. device driver
Figure 2. Datastream Flow for Common Print Jobs
When the device upon which the job is queued becomes available, the qdaemon invokes
the backend for the queue. In the base operating system world, the backend is commonly
3-8
Guide to Printers and Printing
piobe. The qdaemon invokes piobe and passes it arguments in the normal C programming
language fashion, using argc and argv[].
For instance, using the command in step 2 from Spooler Data Flow (enq Command) on
page 3-6:
qprt –Pasc –z1 –fp –p12 –s courier –C –N3 /etc/motd
piobe is passed the following arguments:
• argc = 10
• argv[0] = /usr/lib/lpd/piobe
• argv[1] – –f
• argv[2] = p
• argv[3] = –z
• argv[4] = 1
• argv[5] = –p
• argv[6] = 12
• argv[7] = –s
• argv[8] = courier
• argv[9] = /etc/motd
argv[0] is the name of the backend itself, as usual. Note that the –Pasc, which specifies the
queue name, was parsed out of the original argument vector, as were the –C and – N3 flags
and arguments.
piobe uses the argv[] values to construct a pipeline of filters that must be executed to
process the job as requested. After determining the structure of the pipeline, piobe passes
the structure to a shell for realization. If the file parameter in the /etc/qconfig entry for this
queue exists, piobe will open the stdout of the last process in the pipeline onto the value
specified by the file parameter. The last process in the pipeline is not prevented from
re–opening stdout onto some other file or device.
Note the parent–child relationship among these processes, which is not apparent from the
figure:
• qdaemon is the parent of piobe.
• piobe is the parent of the shell.
• The shell is the parent of pioout, the last process in the pipeline before the device driver
is accessed. pioout is called the Interface Program for Use With the Device Driver or the
device driver interface program.
• pioout is the parent of pioformat.
• pioformat dynamically loads and links the device–dependent code at runtime; hence the
device–dependent code does not appear as a process in the operating system’s process
table.
• pioformat is the parent of the optional filter (if it exists), such as the pr filter.
An optional filter, such as pr, can be specified on the command–line (or hard–coded in the
colon file) to perform pre–filtering on the job before pioformat processes it.
pioformat is known as a device–independent formatter driver. It will dynamically load, link,
and drive various device–dependent formatters to process jobs of a specific data stream
type (for example, Postscript, ASCII, GL, or PCL).
Device–dependent code is designed to handle the unique properties of combinations of
specific data streams and physical printers. Because combinations of data stream types and
printers can be grouped into classes with common attributes, there are currently less than
Spooler Overview
3-9
20 device–dependent modules. These modules are loaded, linked, and driven by pioformat
at run time.
pioout is the end of the job–processing pipeline, and is called the device driver interface
program. The function of pioout is to take the processed data stream and deliver it to the
device for which it was intended, generally a printer. In the typical local print queue
environment, it is pioout that has its stdout opened onto the character special file in the
/dev directory, as specified by the file parameter in /etc/qconfig.
This is the character special file in the /dev directory that provides access to the device
driver for the printer hardware.
Virtual Printers and Formatter Filters
When the spooler queue backend is piobe, the formatter filter is normally the next–to–last
process in the pipeline of filters processing the print job. The formatter filter is composed of
two pieces of code.
A formatter filter provides the capability of either formatting the input print file or passing it
through unmodified, based on an input parameter. Even if the formatter passes the input file
unmodified, it still sends printer commands to initialize the printer before the input file is
printed and restores the printer after printing is complete.
As shown in the following figure, the formatter filter is made up of the following components:
• A device–independent formatter driver
• A device–dependent formatter
The first is the device–independent formatter driver, pioformat. The second is a
device–dependent formatter, of which there are fewer than 20. Code is device–independent
when its execution is in no way dependent upon specific hardware, such as a certain
physical printer. Similarly, code is device–dependent when its execution is dependent upon
specific hardware, again such as a certain printer. In the base operating system spooler’s
formatter filter, it is the device–dependent formatter that contains code designed to handle
all of the properties of a particular physical printer or class of printers, including supported
data stream, escape sequences, and control codes unique to that printer or printer class.
The device–independent pioformat is called a formatter driver because that is precisely
what it does. When pioformat is set into execution, it expects several arguments. One of
these arguments is the full path name to a device–dependent formatter. At run time,
pioformat dynamically loads, links, and drives the device–dependent formatter. The
following figure depicts this relationship.
3-10
Guide to Printers and Printing
Figure 3. The Formatter Filter
The pioformat command expects to be able to call, if necessary, five subroutines;
pioformat by itself does not contain these subroutines. The subroutines exist in the
device–dependent formatter and are supplied to pioformat at runtime when the loading and
linking of the device–dependent formatter by pioformat occurs.
The formatter driver is invoked by a pipeline and is passed the name of a formatter to be
driven. The formatter driver dynamically loads and links the formatter and calls the
formatter’s setup function which indicates whether data formatting or data pass–through is
requested. After the formatter’s setup function performs the necessary functions, it returns
to the formatter driver. The formatter driver calls the initialize function. The initialize
function outputs a string of printer commands to initialize the printer and returns to the
formatter driver.
The formatter driver either calls the passthru function once or calls the lineout function for
each line in the print file based on the return code from the setup function. If the lineout
function is called, the formatter driver performs all vertical spacing, including line spacing,
vertical tabs, form feeds, and top and bottom margins. Line spacing and vertical tabs are
performed by the lineout function. Other vertical spacing functions are performed
automatically.
When processing is complete, the formatter driver calls the restore function. The restore
function outputs a string of printer commands to restore the printer to its default state,
defined by the database attribute values.
For more information about how the print formatter interacts with the printer formatter
subroutines, refer to the example of a print formatter ( Example of Print Formatter on page
4-24) .
Spooler Overview
3-11
/etc/qconfig Spooler Configuration File
The /etc/qconfig file describes all of the queues defined to the base operating system. A
queue is a named, ordered list of requests for a specific device. A device is something
(either hardware or software) than can handle those requests one at a time. The queue
provides serial access to the device. Each queue must be serviced by at least one device;
often it can be handled by more than one device.
/etc/qconfig File Structure
The /etc/qconfig file is the most important file in the spooler domain:
• It contains the definition of every queue known to the spooler.
• A system administrator can read this file and discern the function of each queue.
• Although it is not recommended, this file can be edited ( Editing the /etc/qconfig File on
page 4-138) to modify spooler queues without halting the spooler.
The qdaemon reads the ASCII version of /etc/qconfig and creates a binary version,
/etc/qconfig.bin. /etc/qconfig must adhere to a specific structured format in order for the
qdaemon to be able to parse it. This format is detailed in the /etc/qconfig File Structure
examples below.
Local Queue
queue_name:
device = device_name
up = TRUE
or
FALSE
discipline = fcfs
or
sjn
device_name:
file = physical_device_name
or
FALSE
header = always
or
group
or
never
trailer = always
or
group
or
never
access = both
or
write
backend = full_path_name_to_backend_program
Remote Queue
queue_name:
device = device_name
up = TRUE
or
FALSE
host = remote_hostname
s_statfilter = full_path_to_short_filter
l_statfilter = full_path_to_long_filter
rq = remote_queue_name
device_name:
backend = full_path_name_to_backend_program
/etc/qconfig is composed of text blocks referred to as stanzas. Each queue is represented
by a pair of stanzas. The first stanza in a pair is referred to as the queue stanza; the second
stanza in a pair is referred to as the device stanza. Stanzas are composed of parameters
and parameter values that describe the queue’s properties and function.
When the qdaemon parses the ASCII version of /etc/qconfig, the first non–commented line
it identifies must be a word followed by a colon; this line represents the beginning of the
queue stanza. This word is the name of a queue to which a user can submit jobs. There
must be one or more lines indented by tabs following this line. One of these lines must be
device = device_name. The value of the device parameter is a link from the queue stanza
to the device stanza; this parameter has no other function. When a queue is initially setup,
the operating system will frequently use the name of a printer, such as lp1, as the value of
the device parameter. While the queue may actually be setup to use lp1, the use of lp1
as the value of the device parameter only means that the device stanza will be named lp1.
This is not related to the fact that there is a real printer known to the operating system as
lp1.
3-12
Guide to Printers and Printing
Following the tab–indented lines, the qdaemon must find the word that is the value of the
device parameter followed by a colon; this line represents the beginning of the device
stanza. This word, which a user normally does not need to know, is the name of a device to
which the corresponding queue stanza provides serial access. There must be one or more
lines indented by tabs following this line. One of these lines must be backend =
full_path_name_to_backend. In a local spooling environment, there are two parameters of
critical importance in this stanza.
The file parameter specifies the real device to which the queue provides serial access. It is
important to note that jobs submitted to the spooling system are queued upon this device. If
a queue is setup to use a printer known to the operating system as lp1, then the value of
the file parameter would be /dev/lp1. The operating system routines that create queues use
the name of the real device as the name of the device stanza by default, and this is why
there is some confusion as to the meaning of the device parameter.
The backend parameter specifies the full path to the program that will process the job
submitted to the spooling system, once the qdaemon determines that the job’s turn to be
processed has arrived.
Spooler Queues, Virtual Printers, and Physical Printers
The Four Queues – Four Virtual Printers – One Physical Printer example depicts an
instance of /etc/qconfig that defines four queues on a single physical printer, in this case
/dev/lp1. Notice that all four pairs of stanzas use the string lp1 to connect a queue stanza
to a device stanza. It is the file parameter in each device stanza that specifies that the
printer known to the base operating system as lp1, and whose device driver entry point is
/dev/lp1, is the actual physical destination of any jobs submitted to any of these queues.
When these queues were defined, via smit, the command that actually creates the queue
definition needed a string to connect the two halves of each stanza pair. Since the physical
printer at hand was lp1, the string lp1 was used as the both the value of the device
parameter in each queue stanza and as the name of each device stanza. This format is
detailed in the /etc/qconfig File Structure examples below.
asc:
device = lp1
lp1:
file = /dev/lp1
header = never
trailer = never
access = both
backend = /usr/lib/lpd/piobe
gl:
device = lp1
lp1:
file = /dev/lp1
header = never
trailer = never
access = both
backend = /usr/lib/lpd/piobe
pcl:
device = lp1
lp1:
file = /dev/lp1
header = never
trailer = never
access = both
backend = /usr/lib/lpd/piobe
Spooler Overview
3-13
ps:
device = lp1
lp1:
file = /dev/lp1
header = never
trailer = never
access = both
backend = /usr/lib/lpd/piobe
Each of these stanza pairs defines a queue. When the backend for a queue is piobe, each
queue also has an associated virtual printer. While it is possible to create virtual printer
definitions the hard way, virtual printer definitions are typically created at the same time as
the queue definition, via smit and the piomkpq command. The virtual printer definition is
not contained in /etc/qconfig. Its presence is implied by the fact the spooler backend for a
given queue is piobe, but it is stored elsewhere in the base operating file system. The name
of the queue is used to identify and access the virtual printer definition.
The physical printer known to the base operating system as lp1 clearly supports at least
four distinct data stream types; they are ASCII ( asc ), Plotter Emulation ( gl ), Printer
Command Language ( pcl ), and PostScript ( ps ). Each queue with its associated virtual
printer definition is designed to process a particular data stream type, hence the four
queues. This is the basis for the base operating system notion of a logical separation of
physical and virtual printers.
Spooler Queue Names and Status Formats
Spooler queue names (the name of a queue stanza) can be over seven characters in length
but only the first seven characters will be displayed in the output of a queue status query.
Device names (the name of a device stanza) are limited to five characters in the output of a
queue status query.
In spooler queue status queries, remote spooler queues will be indicated twice: once for the
local queue, and once for the remote queue on the print server. For instance, if /etc/qconfig
contains this entry:
myps:
device = @kricket
up = TRUE
host = kricket
s_statfilter = /usr/lib/lpd/aixshort
l_statfilter = /usr/lib/lpd/aixlong
rq = myps
@kricket:
backend = /usr/lib/lpd/rembak
the command lpstat –pmyps would return the following:
Queue
Dev
Status
Job Files
User
PP % Blks Cp Rnk
––––––– –––
––––––––– ––– –––––––– ––––––––– –– – –––– –– –––
myps
@krik READY
myps
myps READY
The first line of the output indicates that the local spooler queue named myps, with a device
stanza whose name is listed as @krik, has a status of READY. The second line indicates
that the target remote spooler queue, also named myps, whose device stanza is listed as
myps, also has a status of READY. (It is the author’s habit to make a local spooler queue
name the same as the print server spooler queue name. It’s then easy to visually group the
two lines in the output of a spooler queue status query.)
3-14
Guide to Printers and Printing
Chapter 4. Printer, Plotter, and Spooler Subsystem
Programming
This chapter discusses the following topics:
•
Printer Backend Overview for Programming on page 4-2
•
Virtual Printer Definitions and Attributes on page 4-3
•
Printer Colon File Escape Sequences on page 4-13
•
Printer Colon File Conventions on page 4-20
•
Example of Print Formatter on page 4-24
•
Understanding the Interaction between qdaemon and the Backend on page 4-27
•
Printer Code Page Translation Tables on page 4-34
•
Printer Attachment Files on page 4-38
•
Operators for Limits Field in the Printer Colon File on page 4-42
•
Adding a Printer Using the Printer Colon File on page 4-48
•
Printer–Specific Information on page 4-50
•
Printer Support on page 4-113
•
Pass–Through Mode on page 4-118
•
Viewing, Formatting, or Modifying Virtual Printer Definitions on page 4-121
•
Modifying the mi, mp, and _d Attributes on a PostScript Queue on page 4-126
•
How piobe Uses Printer Colon Files on page 4-127
•
Spooler Job Header and Trailer Pages on page 4-129
•
Modifying the mo Virtual Printer Attribute on page 4-133
•
Filters on page 4-135
Printer, Plotter, and Spooler Subsystem Programming
4-1
Printer Backend Overview for Programming
The base operating system printer backend receives and processes print requests from a
spooler, usually the qdaemon command. The printer backend is a standard feature of the
base operating system. It is implemented by the piobe command
The printer backend supports all of the printers installed in the Object Data Manager (ODM)
Predefined database. You can customize the printer backend to assist in the administration
of the printing subsystem. For more information, see Printers, Print Jobs, and Queues for
System Administrators on page 2-1. You can also modify the printer backend to add
unsupported printers and National Language Support (NLS) code page translation tables.
Adding a printer to the printer backend involves adding a printer colon file for that printer. In
many cases, the printer colon file of a similar printer can be duplicated with little
modification. If modification of an existing printer colon file is not sufficient, you can write a
print formatter. If the modifications exceed the scope of the print formatter, you may need to
write a new printer backend.
Refer to the following sections for more information:
•
Adding a Printer Using the Printer Colon File on page 4-48 provides a procedure for
duplicating a printer colon file.
•
Printer Colon File Escape Sequences on page 4-13 provides information useful in
modifying a printer colon file.
•
Understanding Backend Routines in libqb on page 4-32 and Understanding the
Interaction between qdaemon and the Backend on page 4-27 can assist you in writing a
new printer backend.
The procedure for translating NLS code points in the print file to code points for the printers
varies depending upon whether the code sets are single–byte or multibyte. For more
information, see:
•
Printer Code Page Translation Tables on page 4-34
•
Printer Code Page Translation for Multibyte Code Sets on page 4-36
Third–party vendors may want to customize the printer backend for special purposes.
Printer Backend Data Flow
The primary purpose of a backend is to send characters to a device, usually a printer. The
printer backend is invoked once for every file or group of files to be printed, with the name of
each file passed to the backend as a parameter. The backend opens the file, reads it, and
sends it to the device. The recommended method for a backend to operate is to write to its
standard output, with the qdaemon process opening the device onto the correct file
descriptor. This requires setting the file field in the qconfig file.
The name of the file to be printed can be a direct or relative path name. The user ID and
group ID of the backend are those of the process that invoked the enq command.
When a backend is invoked, it has access to the user’s environment. To access the user’s
environment, the backend may invoke the getenv subroutine. For example, to access the
user’s directory, getenv(PWD) returns a pointer to the directory name. The backend can
use this to read from or write to this directory.
If the backend writes to its standard output, the qdaemon opens the device in root–user
mode. If the backend needs to open the device itself, it must have the correct permissions
to open the device. Since the backend runs under the permissions of the user sending the
print job, you may need to change the protections on the device or install the backend
set–user–ID or set–group–ID.
4-2
Guide to Printers and Printing
By default, stdin, stdout, and stderr are all open to the null device (/dev/null), although it
is possible to override the setting of stdout (and possibly stdin) with the file and access
fields in the qconfig file.
Virtual Printer Definitions and Attributes
A virtual printer definition is a file that pairs the attributes or characteristics of a specific
printer with the attributes of a specific data stream type. If a specific printer supports more
than one data stream type, you must create a virtual printer definition, pairing the attributes
of the printer with each data stream type. Thus, if a printer supports both ASCII and
PostScript data streams, you must create two virtual printer definitions for the printer.
The colon file stores the virtual printer definition for a printer or plotter. Colon files reside in
the predefined and customized database directories. The printer backend uses the attribute
values stored in colon files to format print requests.
All attribute values reside in colon files as character strings, regardless of whether they
represent strings, integers, or Booleans. An attribute value can contain embedded
references to other attribute values or embedded logic that dynamically determines the
content of the value.
For more information on colon files and how embedded references and logic are used in
attribute strings, see Printer Colon File Conventions on page 4-20 and ” Printer Colon File
Escape Sequences on page 4-13 ” .
Working with Virtual Printer Attributes
The commands used to create a virtual printer (the mkvirprt or smit virprt commands)
copy a predefined virtual printer definition and create a customized virtual printer definition
for the specified queue and queue device. The attribute values in the custom definition can
be further changed, with the chvirprt or smit lsvirprt commands.
You must create a virtual printer for each data stream type supported by a specific printer
device. The supported data stream types include:
Data Stream Type
Code for Attribute
Name/Value
Description
asc
a
Extended ASCII
pcl
c
Hewlett–Packard PCL
630
d
Diablo 630
gl
g
Hewlett–Packard GL
p
Pass–through (sent to
printer unmodified)
ps
s
PostScript
855
a
Texas Instruments 855
kji
k
Kanji
When you use the mkvirprt or smit virprt command to create a virtual printer, the system
prompts you to select the desired printer from a list of defined printers. If you have just
configured a printer port for a new printer, select the new printer port. When the virtual
printer command is executed, the system creates a print queue and copies the colon file for
the selected printer in the predefined database directory, /usr/lib/lpd/pio/predef/*, to the
customized database directory /var/spool/lpd/pio/custom/*.
Note: If no flags are specified, the mkvirprt command becomes interactive.
Use the chvirpt or smit lsvirprt command to change or further customize the attribute
values stored in a virtual printer definition. To change an attribute value with smit lsvirprt,
enter attribute_name = attribute_value with no spaces on either side of the = (equal) sign.
Printer, Plotter, and Spooler Subsystem Programming
4-3
Each attribute name in a virtual printer definition must be unique. Attribute names can
contain the characters a through z, A through Z, 0 through 9, and _ (underscore). Attribute
names must not begin with a numeral. All attribute names must be two characters long,
except for group header attribute names, which can be five characters long.
Attribute names for group headers begin with _ _ (two underscores) and must not be longer
than five characters. A group header attribute marks the beginning of a group of related
attributes.
The following is a list of groups of virtual printer attributes addressed in this section.
•
Default Flag Value Attributes on page 4-4
•
System Administration Attributes on page 4-5
•
Input Data Stream Attributes on page 4-6
•
Prohibited Flags Attributes on page 4-7
•
Filter Flag Attributes on page 4-8
•
Directory Attributes on page 4-9
•
Miscellaneous Attributes on page 4-10
•
Work Variable Attributes on page 4-11
•
Command Aggregate Attributes on page 4-11
•
ASCII Control Code Attributes on page 4-12
•
Escape Sequences Attributes on page 4-12
Examples show some of the typical attributes for a supported PostScript laser printer (4029
LaserPrinter). Each example shows how the lsvirprt and smit lsvirprt commands display
virtual printer attributes (with a descriptor for each attribute) and how those same attributes
are stored in the printer colon file.
Default Flag Value Attributes
Default flag value attributes are grouped under the _ _FLG group header attribute. If a flag
corresponding to the attribute is used with a print command, values for these attributes are
overridden from the command line. For example, the _l attribute in a virtual printer definition
contains a value for the number of lines to print on a page. Assume that the default value
stored in the _l attribute is 66. The following print request does not specify a number of lines
per page with the –l flag:
qprt –P Pro myfile
The printer subsystem uses the default _l value of 66 to process the print request. The
following print request uses the –l flag to specify 50 lines of text per page:
qprt –l 50 –P Pro myfile
The –l flag value overrides the default value in the _l attribute of the virtual printer definition
for the Pro printer.
The first character for a default flag value attribute is always the _ (underscore). The second
character corresponds to the command flag for which the default value is stored.
The following example shows some of the attribute values under the _ _FLG group header.
These values are typical for a supported PostScript laser printer.
4-4
Guide to Printers and Printing
Name Description
_ _FLG VALUES THAT MAY BE OVERRIDDEN WITH FLAGS
ON THE COMMAND LINE
_1
Page Headings Wanted For Text Converted
to PostScript? (!: no; +: yes)
_2
Use Two Columns for Text Converted to
PostScript? (!: no; +: yes)
_3
Gaudy Mode Wanted for Text Converted to
PostScript? (!: no; +: yes)
_4
Print Garbage File Anyway for Text
Converted to PostScript? (!: no; +: yes)
_5
List Characters Not In Font When Converting
Text to PostScript? (!: no; +: yes)
_6
Font Name for Header Line of Text Converted
to PostScript
_A
stderr returned? 0:no; 1:yes, & pipelines;
2:yes, & values, pipelines
_H
Name To Replace Host Name On Burst Page
_J
Restore the Printer at the End of the ?
Print Job (!: no; +: yes)
_L
Wrap Long Lines (!: no; +: yes)
Value
!
!
!
!
!
300
1
+
+
The preceding attributes are stored in the colon file as:
:056:_ _FLG::
:466:_1::!
:467:_2::!
:469:_3::!
:470:_4::!
:471:_5::!
:472:_6::300
:013:_A::1
:022:_H::
:027:_J::+
:030:_L::+
System Administration Attributes
The _ _SYS group header attribute stores values for attributes such as the sh, si, and st
attributes. The sh and st attributes store the pipelines for the header page and the trailer
page.
The si attribute identifies who receives printer–intervention messages when the printer
needs attention. A null string specifies that intervention messages should go to the user who
submitted the print job. Separate user names with a comma. Use the SMIT Virtual Printers
option or the chvirprt command to change the attribute as needed.
For example, si= specifies that the user who submitted the print job should receive the
messages, si=mary specifies the user mary should receive the messages, and
si=,jim@server02 specifies that both the user who submitted the print job and jim at
node server02 should receive intervention messages.
The first character for a system administration attribute is s.
Printer, Plotter, and Spooler Subsystem Programming
4-5
Some typical _ _SYS attributes for a supported PostScript laser printer are:
_ _SYS OTHER VALUES OF INTEREST TO THE SYSTEM
ADMINISTRATOR
sh
Pipeline for Header Page
si
sp
st
sw
%Ide/pioburst
%F[H] %Idb/H.p
s | %Ide/piofo
rmat –@%Idd/%I
mm –!%Idf/piof
pt%f[j]
Users, Separated by Commas, to Get Intervention
Messages; Null String Is Job Submitter
Command Line Flags Prohibited For All –d values;
Ignored: cmnrBDMPRT
Pipeline for Trailer Page
%Ide/pioburst
%F[H] %Idb/T.p
s | %Ide/piofo
rmat –@%Idd/%I
mm –!%Idf/piof
pt%f[j]
Width of Attribute Value Area On Header Page
78
(0 means ignore width)
These same attribute values would be stored in the printer colon file as:
:060:_ _SYS::
:321:sh::%Ide/pioburst %F[H] %Idb/H.ps | %Ide/pioformat –@%Idd/%Imm
–!%Idf/piofpt %f[j]
:322:si::
:323:sp::
:324:st::%Ide/pioburst %F[H] %Idb/T.ps | %Ide/pioformat –@%Idd/%Imm
–!%Idf/piofpt %f[j]
:325:sw::78
Input Data Stream Attributes
The _ _IDS group header attribute heads the list of attributes that store pipelines for
different input data streams. Some of the attributes in this group are the ia attribute that
stores the extended ASCII input data stream pipeline, and the is attribute that stores the
PostScript input data stream pipeline. The ip attribute is another typical attribute in this
group. The ip, or pass–through, attribute passes the output from a formatter filter to the
printer unmodified.
The first character for an input data stream attribute is i. The second character designates
the input data stream type.
The following example of _ _IDS attributes shows typical input data stream pipelines for a
supported PostScript laser printer (4029 LaserPrinter).
4-6
Guide to Printers and Printing
_ _IDS PIPELINES FOR INPUT DATA STREAMS (2 char, 1st=”i”,
2nd=data stream name)
ia
Pipeline for Input Data Stream ”a” (extended
/usr/bin/enscr
ASCII)
ipt –p– –q%?%G
_2%t –2%;%?%G_
z%t –r%;%?%G_3
%t –G%;%?%G_1%
t%e –B%;%?%G_L
%t%e –c%;%?%Ch
%t%fbh%e%?%L_h
%t –b’%I_h’%;%
; –L%G_l%d –f%
?%Cs%t%f!s%e%I
_s%;%G_p%d %?%
G_1%t–F%Iw7%G_
p%d%;%?%G_4%t
–g%;%?%G_5%t –
o%;%?%L_f%t%e
%I@1%; | %Iis
il
Command Line Flags Prohibited For Input Data
/interleaf/ile
Stream; Ignored: cmnrBDMPRT
af5/bin/pl2ps
–ppd IBM17521.
PPD –r 1270–nf
–np | %Ide/pio
format –@%Idd/
%Imm–!%Idf/pio
fpt %f[juJZ]
in
Pipeline for Input Data Stream ”n” (troff
/usr/bin/psc |
(ditroff) intermediate output)
s%Ii
ip
Pipeline for Input Data Stream ”p”
%Iis
(pass–through)
is
Pipeline for Input Data Stream ”s” (PostScript) %Ide/pioformat
–@%Idd/%Imm –!
%Idf/piofpt %U
H %f[juJZ]
The colon file stores these same attributes in the following format:
:057:_ _IDS::
:274:ia::/usr/bin/enscript –p– –q%?%G_2%t –2%;%?%G_z%t –r%;%?%G_3%t
–G%;%?%G_1%t%e –B%;%?%G_L%t%e –c%;%?%Ch%t%fbh%e%?%L_h%t –b’%I_h’%;%;
–L%G_l%d –f%?%Cs%t%f!s%e%I_s%;%G_p%d %?%G_1%t–F%Iw7%G_p%d%;%?%G_4%t
–g%;%?%G_5%t –o%;%?%L_f%t%e %I@1%; | %Iis
:001:il::/interleaf/ileaf5/bin/pl2ps –ppd IBM17521.PPD –r 1270 –nf –
np | %Ide/pioformat –@%Idd/%Imm –!%Idf/piofpt %f[juJZ]
:465:in::/usr/bin/psc | %Iis
:277:ip::%Iis
:273:is::%Ide/pioformat –@%Idd/%Imm –!%Idf/piofpt %UH %f[juJZ]
Prohibited Flags Attributes
The attributes grouped under the _ _PFL group header attribute store the names of
command flags to be rejected by the printer backend for a particular data stream. If you use
a prohibited command flag in a front–end print request (such as qprt), the system rejects
the flag and returns a message that the flag is prohibited by system administration. The first
character of a prohibited flag attribute name is I and the second character represents the
data stream type to be rejected.
To prohibit multiple flags for a data stream type, store the single–character flag names with
no spaces, commas, or other delimiters. For example, to reject the –e (emphasized print)
flag and the –E (double–high print) flag for the extended ASCII input data stream, run the
smit lsvirprt command and enter the following to set this attribute:
Ia=eE
The following example shows the Is attribute that sets the prohibited flag attribute for the
PostScript data stream on a supported PostScript printer. The descriptor for the Is attribute
contains the string Ignored: cmnrBDMPRT. This string indicates that the backend ignores
the flags represented by the individual characters cmnrBDMPRT. These flags are flags that
Printer, Plotter, and Spooler Subsystem Programming
4-7
address the spooling subsystem, not the backend. Thus, listing one of these flags as a
prohibited flag has no effect on the backend; the flag is not prohibited.
_ _PFL FLAGS PROHIBITED FOR INPUT DATA STREAMS (2
char,1st=”I”,2nd=data str name)
Is
Command Line Flags Prohibited For Input Data
Stream; Ignored: cmnrBDMPRT
The colon file stores the attributes in the preceding example as follows:
:059:_ _PFL::
:001:Is::
Filter Flag Attributes
Attributes grouped under the _ _FIL group header attribute store command strings for text
filter flags. The first character of the attribute name is always f and the second character
denotes the type of filter. Filter flags, such as –p and –n specify to the backend program the
type of filter used to format the print job. Filter attribute designations are:
fp
pr filter
fn
Formats files containing ditroff (device–independent troff) data
fl
Prints control characters and suppresses page breaks
ft
Formats files containing data produced with troff commands
fd
DVI filter formats files created with tex
fg
Formats standard plot data files (files created with plot)
fv
Formats raster image files
fc
Formats files containing data produced with cifplot
ff
Interprets the first character of each line as a FORTRAN carriage
control character.
fb
Determines the locale support for Arabic and Hebrew. Must be
/usr/bin/bprt. The width must be set to 80 and the data stream
set to a for extended ASCII. Add the flag – tashkeel to print
documents with diacritics.
The value stored in a filter attribute designates the command string for the specified filter.
Entries for a supported PostScript laser printer can include:
_ _FIL COMMAND STRINGS FOR FILTER FLAGS (2 char,
1st=”f”,2nd=flag)
fn
Command String for the ”n” Filter.
fp
Command String for the ”p” Filter
fb
Command String for the ”b” Filter.
/usr/bin/psc
%is
/bin/pr –l%G_l
%d –w%G_w%d%F[
h] %I@1%ia
/usr/bin/bprt
–w%I_w –d%I_d
–tashkeel
These same attribute values are stored in the colon file as follows:
:055:_ _FIL::
:269:fn::/usr/bin/psc%is
:270:fp::/bin/pr –l%G_l%d –w%G_w%d%F[h] %I@1%ia
The fd attribute is a typical filter attribute. It is used to specify a DVI filter for the virtual
printer. Use SMIT or the chvirprt command to specify this filter. For example, to specify a
DVI filter by using SMIT, enter:
smit lsvirprt
Select the desired virtual printer and type the following:
fd=/usr/bin/dvi_to_printer%ip
4-8
Guide to Printers and Printing
where dvi_to_printer specifies the full pathname of the filter that converts the DVI
output from tex to the format expected by the printer. The %ip designation forces the
pass–through pipeline (the ip attribute) to be used to process the print file instead of the
ASCII pipeline ( ia attribute). The pass–through pipeline causes the output from the filter to
be passed to the printer unmodified.
Once the DVI filter has been specified in the fd attribute, you can send a print command
such as lpr –d DviFile or qprt –fd DviFile. The –d and –fd flags for the respective
commands pass DviFile, an output file produced by tex, through the DVI filter and send the
results to the printer.
Directory Attributes
Directory attributes are grouped under the _ _DIR group header attribute. These attributes
store path names to various files needed to process print requests, such as translate tables,
files containing header and trailer page text, downloadable font files, and temporary files.
The first character in a directory attribute name is d, and the second character designates
the directory.
The following example shows some of the directory attribute values for a supported
PostScript laser printer:
_ _DIR
d1 Directory Containing Stage 1
Translate Tables
(data stream to intermed.)
d2 Directory Containing Stage 2
Translate Tables
(intermediate to printer)
dD Directory Containing Dummy Device
Files For Printers Driven By,
But Not Attached To, the dev
Host Computer
dF Directory Containing Flags files
(keeps track of loaded fonts)
DIRECTORIES
/usr/lib/lpd/pio/trans1
/usr/lib/lpd/pio/trans2
/usr/lib/lpd/pio/
/var/spool/lpd/pio/@local/flags
The same attribute values are stored in the colon file as:
:053:_ _DIR::
:160:d1::/usr/lib/lpd/pio/trans1
:161:d2::/usr/lib/lpd/pio/trans2
:509:dD::/usr/lib/lpd/pio/dev
:414:dF::/var/spool/lpd/pio/@local/flags
Printer, Plotter, and Spooler Subsystem Programming
4-9
Miscellaneous Attributes
The _ _MIS group header attribute groups miscellaneous printer attributes. Miscellaneous
attributes begin with the letter m and store values such as the printer description and printer
model number. The device name and queue name are also stored in the miscellaneous
group. The mn attribute stores the device name and the mq attribute stores the queue
name.
Here are some typical miscellaneous attributes for a supported PostScript laser printer:
_ _MIS MISCELLANEOUS
mA
Printer Data Stream Description
mD
Name of message catalog Containing Attribute
Descriptors
mF
Path Name of Font File To Be Downloaded (must
include download commands)
mL
Printer Description
mN
mY
mc
md
mf
mi
mm
mn
mo
mp
mq
Printer model number
Datastream Mode to Which Printer is Restored at
End of Job (0: IBM PPDS; 1: HP PCL; 2:
Plotter; 3: PostScript)
String to Send to Printer ”mz” Times When
Job Is Cancelled
Output Data Stream Type (example: ascii);
Initialized By ”piodigest”
Path Name of the Default Formatter (used when
running standalone)
Input Data Stream Names (1 character,
separated by commas) for mp Attribute
File Name Of (Digested) Data Base; Init. By
”piodigest” (mt.md.mn.mq:mv)
Device name (example: lp0); Initialized By
”piodigest”
Command String to Invoke Device Driver I/F
Program (end of pipeline)
Strings (separated by commas) That Identify
Print File Data Types (see mi)
Queue Name; Initialized By ”piodigest”
PostScript
pioattr1.cat
IBM 4029 Laser
Printer
029
3
\0
ps
%Idf/piofpt
s,l
lp1
%Ide/pioout %v
[ABCDFINOPRS]
%%!,\320OPS
ps1
These same attributes are stored in the colon file in the following format:
:058:_ _MIS::
:330:mA::PostScript
:332:mD::pioattr1.cat
:287:mF::
:331:mL::IBM 4029 LaserPrinter
:295:mN::4029
:516:mY::3
:301:mc::\0
:302:md::ps
:303:mf::%Idf/piofpt
:304:mi::s,l
:305:mm::
:306:mn::lp1
:307:mo::%Ide/pioout %v[ABCDFINOPRS]
:308:mp::%%!,\320OPS
:309:mq::ps1
4-10
Guide to Printers and Printing
Work Variable Attributes
Work variable attributes (values change while formatting) begin with the letter w and are
listed under the _ _WKV group header attribute.
Some typical work variable attributes for a supported PostScript printer are:
_ _WKV WORK VARIABLES
w7
Font Name for Header LIne of Text Converted to
Postscript
wl
wu
Smallest legal sheetfeeder drawer number
Largest legal sheetfeeder drawer number
%?%S_s%”Courie
r”%=%tCourier–
Bold%e%S_s%”Ti
mes–Roman”%=%t
Times–Bold%e%S
_s%”Helvetica”
%=%tHelvetica–
Bold%e%S_s%”Ti
mes–Italic”%=%
tTimes–BoldIta
lic%e%S_s%”Hel
vetica–Oblique
”%=%tHelvetica
–BoldOblique%e
%Iw8%;
0
3
The colon file stores these same values as:
:062:_ _WKV::
:472:w7::%?%S_s%”Courier”%=%tCourier–Bold%e%S_s%”Times–Roman”%=%tTim
es–Bold%e%S_s%”Helvetica”%=%tHelvetica–Bold%e%S_s%”Times–Italic”%=%t
Times–BoldItalic%e%S_s%”Helvetica–Oblique”%=%tHelvetica–BoldOblique%
e%Iw8%;
:370:wl::0
:381:wu::3
Command Aggregate Attributes
Command aggregate attributes, grouped under the _ _CAG group header attribute, store
values such as the command to initialize the printer and the command to restore the printer
after a print job is completed. Attributes in this category begin with the letter c. Typical
command aggregate attributes for a supported PostScript printer are:
_ _CAG COMMAND AGGREGATES
ci
Command To Initialize the Printer
cr
Command To Restore the Printer at Job End
%Iez\4%?%G_j%{
1}%=%tstatusdi
ct begin%Iat %
Iar %?%Gmw%t%I
aF%; end%;
%o\4%Iex
These same attributes are stored in the colon file as:
:051:_ _CAG::
:144:ci::%Iez\4%?%G_j%{1}%=%tstatusdict begin %Iat %Iar %?%Gmw%t%IaF
%; end%;
:152:cr::%o\4%Iex
Printer, Plotter, and Spooler Subsystem Programming
4-11
ASCII Control Code Attributes
The _ _CTL group of virtual printer attributes store ASCII control codes used by the printer.
These attributes begin with the letter a and store such values as the control code used to
advance paper to the next page. The following control codes are typical for a supported
PostScript printer:
_ _CTL CONTROL CODES (ASCII)
aF
PostScript Command to Set Simplex/Duplex and
Tumble Mode
af
ar
ASCII Control Code to Advance the Paper to
Top of Next Page (FF)
Cannot access message catalog pioattr1.cat.
at
Cannot access message catalog pioattr1.cat.
%?%G_Y%ttrue
duplex %?%G_Y%
{1}%=%tfalse t
umble%etrue tu
mble%;%efalse
duplex%;
showpage
%G_6%d setreso
lution
%G_u%d setpape
rtray
The colon file stores these attributes as follows:
:052:_ _CTL::
:512:aF::%?%G_Y%ttrue duplex %?%G_Y%{1}%=%tfalse tumble%etrue tumble
%;%efalse duplex%;
:113:af::showpage
:119:ar::%G_6%d setresolution
:115:at::%G_u%d setpapertray
Escape Sequences Attributes
Escape sequence attributes begin with the letter e and are grouped under the _ _ESC
group header attribute. Typical PostScript printer values are:
_ _ESC ESCAPE SEQUENCES
ex
Command to Restore Printer Datastream Mode
(used only on restore)
ez
(used only on init/restore) Set initial
conditions
\33[K\3\0\4\61
%?%GmY%{2}%>%t
%{8}%c%e%GmY%{
1}%+%c%;
\33[K\5\0\4\61
\10\0\0
These same values are stored in the colon file as:
:054:_ _ESC::
:514:ex::\33[K\3\0\4\61%?%GmY%{2}%>%t%{8}%c%e%GmY%{1}%+%c%;
:263:ez::\33[K\5\0\4\61\10\0\0
4-12
Guide to Printers and Printing
Printer Colon File Escape Sequences
Embedded references and logic for attribute values in the printer backend’s database colon
files are defined with escape sequences placed at appropriate locations in the attribute
string. These escape sequences are not to be confused with printer escape sequences. The
first character of each escape sequence is always the % (percent sign) character, which
indicates the beginning of an escape sequence. The second character (and sometimes
subsequent characters) define the operation to be performed. The remainder of the
characters (if any) in the escape sequence are operands used to perform the specified
operation.
Calculations performed by the escape sequences can use a stack to hold integers or
pointers to strings to be operated on and can use internal variables a through z to save
integer values for later use.
Since the % character is used to define the beginning of an escape sequence, a %
character that is part of the data must be represented in the database as two adjoining %
characters (%%). Only one % character appears in the constructed string.
The escape sequences that can be specified in an attribute string are listed and described
in the following table. They are based on the terminfo file escape sequences for terminals,
which have been modified and extended for printers.
Esc. Seq.
Description
%%
Generates a % (percent sign) character.
ASCII Output from Stack:
%d
Pops an integer value from the stack and converts it to
ASCII, without leading zeros. Produces a field width large
enough to hold the ASCII numeric digits. Similar to %d with
the printf subroutine.
%[1–9]d
Pops an integer value from the stack and converts it to
ASCII. The result is 1 to 9 characters long, depending on
the digit specified before the d. If the value does not fill the
specified field width, it is padded on the left with zeros. If
the value will not fit in the field, excess high–order digits
are discarded. For example, with a value of 243 from the
stack, %4d produces 0243 and %2d produces 43. A stack
value of –243 would cause %5d to produce –0243.
B inary Output From Stack:
%c
Pops an integer value from the stack and discards all but
the low–order byte.
%h
Pops an integer value from the stack and discards all but
the two low–order bytes.
%a
Similar to %h, except that the two bytes from the stack are
in an alternate order: low–order byte, then high–order byte.
Printer, Plotter, and Spooler Subsystem Programming
4-13
Input String:
4-14
%Ixx
Includes the string attribute whose name is xx. %I and can be used
recursively; that is, the included string can also contain a %I. Note
that the included string does not inherit the current stack. Instead, it
is assigned a new stack.
%I[ . . . ]
If multiple, contiguous includes are to be done, the attribute names
can be separated by commas and enclosed with brackets. For
example, the string %Icp%Icc%IeW can be specified as
%I[cp,cc,eW].
%Dxx
Downloads to the printer the contents of the file whose full path
name is specified by the xx attribute. The print job must have read
access to the file. The primary use of this operator is to download
fonts to a printer.
%”sss”
Pushes a pointer to the sss string constant onto the stack. The only
operation that can be performed on the string pointer is to use %= to
compare the string with another string whose pointer is also on the
stack.
%‘xx
Inserts the standard output produced when the command string
specified by the xx attribute is passed to a shell. Note that ‘ is the
grave accent character.
%’ ” String ”
Passes the quoted string as a command to a sub shell. Any double
quotes within the quoted string must be back–quoted to prevent the
internal quotes from being read as delimiters for the string. Note that
‘ is the grave accent character.
Guide to Printers and Printing
Input Integer To Stack:
%#xx”..@..”
Extracts a selected portion of the string attribute named xx. The
selection criteria is defined by the pattern ”...@...”. The selection
pattern consists of three parts:
1. sThe string immediately preceding the string to be extracted. If the
prefix regular expression is missing, the extracted string consists
of the entire string preceding the pattern specified by the suffix
regular expression.
2. The extracted string replaces the %#xx”..@..” operation sequence
in the attribute currently being processed.
3. The string immediately following the string to be extracted. If the
suffix regular expression is missing, the extracted string consists of
the entire string following the pattern specified by the prefix regular
expression.
No string is extracted if the value of the string attribute is null. No
string is extracted if the prefix or suffix regular expression is nonnull
and does not have a corresponding match in the attribute value
string.
Note: The ampersand (@) and quote (”) characters need to be
surrounded with a separate pair of quotes if their meaning is to be
taken literally. Otherwise, the program reads these symbols as
delimiters.
When embedding a %# operator within a regular expression
portion of another %# operator, the ampersand (@) and quote (
” ) characters cannot be used for their literal meaning. To avoid
this situation, place the embedded %# operator in a separate
attribute value and include the new attribute within the regular
expression of the outer %# operator.
%Gxx
Gets the integer attribute whose name is xx and pushes it onto the
stack. If the attribute is a string instead of an integer, the string is
assumed to be an ASCII integer. It is converted to a binary integer
using the atoi subroutine and pushed onto the stack.
%’c’
Pushes character constant c onto the stack, where it becomes the
low–order byte of an integer value. The high–order bytes are set to 0
(zero).
%{nn}
Pushes integer constant nn onto the stack. The constant is a
decimal value and can be either positive or negative.
Printer, Plotter, and Spooler Subsystem Programming
4-15
Internal Variables:
Internal variables a through z are integer variables for use by %P, %Z, and %g. They are
initialized to zero and their values change only if a %P or %Z changes them. There are two
independent sets of these variables: one set is used by the piobe command for building
pipelines, while the other set is used exclusively by a formatter. The values for a formatter’s
set are maintained for the duration of the formatter’s processing.
%P[a–z]
Pops an integer value from the stack and stores it in the specified
internal variable. For example, %Pf moves an integer value from the
stack to variable f.
%Z[a–z]
Zeroes the specified internal variable. For example, %Zg stores a
value of 0 in variable g.
%g[a–z]
Pushes the value of the specified internal variable onto the stack.
The value of the internal variable is not changed. For example, %gb
reads the integer value in variable b and pushes it onto the stack.
Arithmetic Operators:
%+ %– %* %/ %m
Pushes the result onto the stack.
%+
Adds the first two values popped off the stack. For
example, %{5}%{6}%+ pushes a value of 11 onto the
stack.
%–
Subtracts the first value popped off the stack from the
second value popped off the stack. For example,
%{12}%{3}%– pushes a value of 9 onto the stack.
%*
Multiplies the first two values popped off the stack. For
example, %{2}%{3}%* pushes a value of 6 onto the stack.
%/
Divides the first value popped off the stack into the second
value popped off the stack. For example, %{6}%{2}%/
pushes a value of 3 onto the stack.
%m
(modulus) Similar to %/, except that the remainder, instead
of the quotient, is pushed onto the stack. For example,
%{17}%{9}%m pushes a value of 8 onto the stack.
Note: The first value to be popped off the stack is the last one to be pushed onto the
stack, and the second value to be popped off the stack is the one that was pushed onto
the stack first.
Relational and Logical Operators:
4-16
%= %> %< %!
Pushes a value of 1 if true, or 0 if false, onto the stack.
%=
Are the first two values that are popped off the stack
equal? For example, %{2}%{2}%= pushes a value of 1
(true) onto the stack, and %{2}%{3}%= pushes a value of 0
(false) onto the stack.
%>
Is the second value popped off the stack greater than the
first value popped off the stack? For example,
%{2}%{3}%> pushes a value of 0 (false) onto the stack.
Guide to Printers and Printing
%<
Is the second value popped off the stack less than the first
value popped off the stack? For example, %{2}%{3}%<
pushes a value of 1 (true) onto the stack.
%!
Negate the value popped off the stack and push the result
onto the stack: nonzero value to 0; 0 value to 1. For
example, %{0}%! pushes a value of 1 (true) onto the stack,
%{1}%! pushes a value of 0 (false) onto the stack, and
%{2}%! pushes a value of 0 (false) onto the stack.
Note: The first value to be popped off the stack is the last one to be pushed onto the
stack, and the second value to be popped off the stack is the one that was pushed onto
the stack first.
Bitwise Logical Operators:
%& %| %^ %~
Pushes the result onto the stack.
%&
ANDs the first two values popped off the stack. For
example, %{6}%{3}%& pushes a value of 2 onto the stack.
%|
ORs the first two values popped off the stack. For example,
%{6}%{3}%| pushes a value of 7 onto the stack.
%^
EXCLUSIVE ORs the first two values popped off the stack.
For example, %{6}%{3}%^ pushes a value of 5 onto the
stack.
%~
ONE’S COMPLEMENTs the first value popped off the stack
and inverts the value of each bit. For example, %{–1}%~
pushes a value of 0 (all bits off) onto the stack (assumes
two’s complement notation for –1).
Conditional (if–then–else) Operators:
%? expr %t thenpart %e elsepart %;
%t pops a value off the stack and tests it. If
the value is TRUE (nonzero), thenpart is
run. Otherwise, elsepart (if present) is run.
else–if construct
%? c1 %t b1 %e c2 %t b2 %e c3 %t b3 %e b4 %;
where c1, c2, c3 denote conditions and b1, b2, b3, b4 denote bodies. For example,
%?%{1}%t%{2}%e%{3}%; pushes a value of 2 onto the stack, and
%gx%{6}%?%=%t%{2}%e%{3}%;%d outputs a value of 2 if the value of the internal
variable x is 6. If value of x is not 6, a value of 3 is output.
When developing complex logic, it is sometimes useful to show it in structured form. The
preceding example, in structured form, might look like this:
%gx
Pushes the value of x onto the stack
%{6}
Pushes a value of 6 onto the stack
%?%=%t
If the stack values are equal then
%{2}
pushes a value of 2 onto the stack
%e
else
%{3}
pushes a value of 3 onto the stack
%;
endif
%d
Outputs the value in ASCII format
Printer, Plotter, and Spooler Subsystem Programming
4-17
Pass–through:
%x
(The piocmdout subroutine call only.) Pass through from input to
output the number of bytes specified by the passthru argument to
the piocmdout subroutine.
Loops
%wx
While loop. Whenever a matching %; is reached, the value of the
internal variable x (x can be a through z) is decremented by one. If
the result is greater than 0, execution is transferred to the character
following %wx.
Mode:
%o
Starts using only original default values from the database instead of
values that may have been updated from the command line (or
during formatter processing).
%r
Returns to using the values that were being used before %o.
Pipeline Overrides:
4-18
%p
Indicates where to embed the prefix–filter pipeline in the main
pipeline. If not present, it is assumed to be at the beginning of the
main pipeline. Ignored if the first character of the attribute name is
not i (that is it is not a main pipeline)
%z
Indicates where to embed the pioout string (device–driver interface
routine) in the main pipeline. If not present, it is assumed to be at the
end of the main pipeline. If the first character of the attribute name is
not i (that is, it is not a main pipeline), it is ignored.
%ix
Can be specified only in a prefix filter string (that is, the first
character of the attribute’s two–character name is f). The x variable
represents a pipeline identifier character. The %ix variable specifies
that the attribute name for the main pipeline should be ix instead of
iy, where y is the parameter specified (or defaulted) for the –d flag.
As a special case %i! specifies that a null string should be used as
the main pipeline.
Guide to Printers and Printing
Command Line Flags:
These operators are usually used in pipeline definitions, where they apply to flags specified
by the print job submitter. If specified in attribute strings used by a formatter, they apply to
the flags passed to the formatter. Valid flag letters are a through z, A through Z, and 0
through 9.
%Cy
Pushes a value of 1 (true) onto the stack if flag y was specified on
the command line. Otherwise, pushes a value of 0 (false) onto the
stack.
%Fxy or %F[...]
Shorthand for %?%Cy%t–x %I_y%;. If the y flag was specified on
the command line, generates –x yarg, where yarg is the argument
specified for the y flag. If ! is specified for x, –x will not be generated.
If yarg contains an unprotected (not immediately preceded by an
odd number of back slashes) single or double quote, an error
message will be issued and the print job terminated.
If multiple flags are to be specified using %Fxy, and each flag’s x
and y values are identical, a list of flag letters can be specified in
brackets. For example, %Faa%Fbb%Fcc can be specified as
%F[abc].
The values referenced by y or [ . . . ] have attribute names whose
first character is _ (underscore) and whose second character is y or
a character in the string [ . . . ].
%fxy or %f[ . . . ]
Similar to %Fxy and %F[ . . . ], except that no space is placed
between the flag name and the argument, unless the argument is a
null string.
%vxy or %v[...]
Similar to %fxy and %f[ . . . ], but used only in the command string
for the pioout command, the Device Driver Interface Program, to
generate flags and arguments for override values specified by the
piobe command, the Print Job Manager. Flags are not generated
when their arguments are equal to predefined default values.
With %v, the values referenced by y or [ . . . ] have attribute names
whose first character is @ (at sign) and whose second character is y
or a character in the string [ . . . ].
%Ux
or %U[ . . . ]
Indicates to the piobe command that the x flag (or each flag in the
string [ . . .]) is actually referenced even though it is not referenced
by a pipeline; for example, the x flag may be referenced by a printer
command instead of by a filter in a pipeline. This prevents the piobe
command from rejecting the flag when specified on the command
line.
Printer, Plotter, and Spooler Subsystem Programming
4-19
Printer Colon File Conventions
Printer and printer data stream attributes reside in colon files. Colon files reside in the
/usr/lib/lpd/pio/predef and /var/spool/lpd/pio/@local/custom/* directories. The
/usr/lib/lpd/pio/predef directory contains the predefined database and the
/var/spool/lpd/pio/@local/custom/* directory contains the customized database.
The following sections describe the conventions for printer and attribute names and values
in colon files.
•
Colon File Format on page 4-20
•
Attribute Names on page 4-21
•
Attribute Values on page 4-23
Colon File Format
Colon files in both the predefined and customized databases have five fields (separated by
colons) for each attribute. They are:
Message catalog ID
Identifies the message catalog where the attribute
description is stored. The message catalog ID can take any
of three forms:
• Null string: The string value for the mD attribute is
assumed to be the file name of the message catalog (for
example, mydescriptors.cat ).
• One character: An abbreviation for pioattr x.cat, where x
is the one–character catalog ID. This form of the catalog
ID is normally used only by the operating system.
• Catalog file name: The file name of the message catalog
(for example, mydescriptors.cat ).
Either the one–character form or the catalog file name
form of the catalog overrides the catalog file name
specified with the mD attribute.
Message number
Identifies the message index in the catalog that
contains the description of this attribute. Leading zeros
are ignored.
Attribute name
Specifies two characters, except for group header
attributes, which are five characters.
Limits field
Specifies limits for the attributes.
Attribute value string
Specifies zero to 1000 characters.
Following is an example of one line in a colon file:
:023:_w::80
The attribute name is _w, the attribute value string is 80, and the attribute description is
stored in message number 23 in the message catalog specified by the mD attribute.
Note: All attribute descriptions are stored in message catalogs. If an attribute has the
same description for multiple printers, the attribute in each printer’s database can
reference the same catalog and message number. If the same attribute name has a
different description for different printers, separate message numbers are used.
4-20
Guide to Printers and Printing
Attribute Names
The following conventions have been established for virtual printer attribute names:
• Each attribute name must be unique.
• Attribute names can contain the characters a through z, A through Z, 0 through 9, and
_ (underscore). The name cannot begin with a numeral.
• All attribute names must be two characters long (except group header attribute names,
which can be five characters long).
• Attribute names for group headers begin with _ _ (two underscores) and must not be
longer than five characters. A group header attribute (formerly called a comment
attribute) marks the beginning of a group of related attributes. For example, the group
header attribute _ _FLG marks the beginning of a group of attributes that define the
default values for command line flags. The grouping of attributes is for readability
purposes and does not affect how the attributes are processed.
• An attribute name beginning with _ (an underscore), except for group headers, can be
overridden by a command line flag of the same name as the second character of the
attribute name. For example, –w 132, specified with the qprt command, overrides with a
value of 132 the value specified for the _w attribute in the colon file.
Automatic Attributes
Automatic attributes are names and values that are provided automatically and that cannot
be in the database:
@0
Always a null string. This attribute name can be used wherever an
attribute name for a null string is needed.
@1
A string containing the full path name of the file being printed. This
attribute name is available only to attributes that define pipelines and
attributes included by pipelines. The file being printed will be a
temporary file if the –c flag is specified with the qprt command.
@2
An integer containing the number of bytes to be passed through
when %x is found in a command string by the piocmdout subroutine
(obtained from the passthru parameter passed to the piocmdout
subroutine).
@3
An integer value indicating how the printer is attached:
0 Neither parallel nor serial
1 parallel
2 serial
@4
The full path name of the pio directory whose subdirectories (burst,
etc, fmtrs, fonts, predef, trans1, and trans2) contain STATIC data
files and utility programs used to configure virtual printers and
process print jobs. The directory must be a subdirectory of the
directory containing the piobe command invoked by the qdaemon.
The value for @4 is normally the /usr/lib/lpd/pio directory.
@5
The full path name of the pio directory whose subdirectories
(custom, ddi, dev, and flags) contain DYNAMIC data files used to
configure virtual printers and process print jobs. The value for @5 is
normally the /var/spool/lpd/pio directory.
The following attribute names are used for communicating from the piobe command (the
print job manager) to the pioout command (the device driver interface program). The
attribute values are referenced by flag arguments passed to the device driver interface
program as specified in the pipelines.
Printer, Plotter, and Spooler Subsystem Programming
4-21
@A
Number of bytes already printed.
@B
Total number of bytes to print.
@C
Number of times to send the cancel string (@D) to the printer at print
job cancel.
@D
String to send to the printer if the print job is canceled.
@I
User to which to send intervention required messages.
@O
Name of file to be generated by the pioout command in which to
store data instead of sending it to the printer.
@P
Name of file (usually the header page) to be sent to the printer
before the first byte of the print file is sent.
@S
Name of file to be sent to the printer after the last byte of the print file
has been sent.
Reserved Attribute Names
Reserved attribute names are names that are assumed by the print job manager:
First two characters are _
_
Group header attribute.
First character is @
Value is provided automatically.
First character is _
Default value for flag argument.
First character is i
Pipeline for input data stream.
First character is l
Flags prohibited for input data stream.
First character is f
Command string for the filter flag.
First character is z and second character is D, P, or S:
zD
Default state of the colon file when in the
/var/spool/lpd/pio/custom/* directory (+ means
expanded, ! means contracted).
zP
Name of the colon file’s parent colon file. The parent colon
file is assumed to be in the /usr/lib/lpd/pio/predef/*
directory.
zS
Current state of the colon file (+ means expanded, ! means
contracted).
First character is y
Values for terminal–attached printers.
Suggested Attribute Names
Suggested attribute names are names that are assumed by many formatter filters:
4-22
First character is s
System administrator value.
First character is d
Directory path.
First character is m
Miscellaneous value (constant).
First character is w
Work value (changes while formatting).
First character is c
Command aggregate.
First character is a
ASCII control code.
First character is e
Printer escape sequence.
Guide to Printers and Printing
First character is t and second character is 0–9
Full path names of zero or more. Stage 2 translation tables
used by formatter. Multiple values must be separated by
commas.
Attribute Values
The following conventions have been established for attribute values:
• Printer names are of the form 4201–3, reflecting the printer name ( 4201 ) and model
number ( 3 ).
• File names in the Predefined Database are of the form PrinterType. DataStreamType; for
instance, 4216–31.asc indicates a 4216 Model 31 printer and an ASCII data stream.
• File names in the Customized Database are of the form
QueueName:QueueDeviceName, such as proq:mypro.
• Attribute values can contain a \ (backslash) followed by one to three octal digits to
represent non–ASCII values. A \ (backslash) that does not begin an octal sequence
should be represented by either \\ or \134.
• Characters can be represented by hexadecimal notation of the form \xXX, where XX
represents a hexadecimal value.
• Boolean values can be represented by a + (plus sign) for true, and an ! (exclamation
point) for false.
• Because attribute values reside in colon files, a colon character must not appear in the
attribute value. Instead, a colon should be represented by \072.
• An attribute value that references an integer attribute requiring translation from a lookup
table should always appear in a colon file after the referenced integer attribute: For
example, from the string red to an equivalent integer value of 2. Integer values are
created from a colon file in the same order they are defined in the colon file. Listing the
attribute value first ensures that when the integer attribute is referenced, it has been
converted before it is referenced by the %G escape sequence.
• Run all the shell commands using ksh instead of bsh.
Limits Field
The limits field in the colon file contains two types of information. SMIT dialog information
and validation information.
SMIT Dialog Information
Information used in building SMIT objects represent colon file attributes in the object data
manager (ODM). These objects will be used in the Print a File, Printer Setup, and Default
Job Characteristics dialogs.
The limits field gives you some control over the type of sm_cmd_opt ODM object that is built
for every object. You can control whether or not an attribute is always displayed, never
displayed, or displayed only if it is referenced in a pipeline. You can modify the following
fields:
• id_seq_num
• entry_type
• cmd_to_list_mode
• required
• op_type
• multi_select
Printer, Plotter, and Spooler Subsystem Programming
4-23
• disp_values
• aix_values
• values_msg_file
• values_msg_set
• values_msg_id
• help_msg_id
• help_msg_loc
Validation Information
Validation information validates attribute values when the colon file is complete and a print
job is submitted.
Example of Print Formatter
This example shows how print formatters can interact with the documented printer formatter
subroutines. The procedure for writing a print formatter involves four steps:
1. Creating a print formatter source file as shown below
2. Creating an imports file
3. Creating an exports file
4. Compiling and linking the print formatter
Create the Print Formatter Source File
Use an ASCII editor to create a formatter source file named sample.c. The file should
contain the following lines:
#include <stdio.h>
#include <piostruct.h>
/* STRING CONSTANTS */
/* Initialize Printer, Restore Printer, Form Feed */
#define INIT_CMD
”ci”
#define REST_CMD
”cr”
#define FF_CMD
”af”
/* INTEGER and STRING VARIABLES */
/* page length, page width, top margin, bottom margin */
#define Pglen
(*(_Pglen + piomode))
#define Pgwidth
(*(_Pgwidth + piomode))
#define Tmarg
(*(_Tmarg + piomode))
#define Bmarg
(*(_Bmarg + piomode))
/* indentation, begin page, form feed?, pass–through? */
#define Indent
(*(_Indent + piomode))
#define Beginpg
(*(_Beginpg + piomode))
#define Do_formfeed
(*(_Do_formfeed + piomode))
#define Passthru
(*(_Passthru + piomode))
/* initialize printer?, restore printer? */
#define Init_printer
(*(_Init_printer + piomode))
#define Restoreprinter (*(_Restoreprinter + piomode))
4-24
Guide to Printers and Printing
/* Command names: form feed, vertical increment and decrement */
#define Ff_cmd
(*(_Ff_cmd + piomode))
#define Vincr_cmd
(*(_Vincr_cmd + piomode))
#define Vdecr_cmd
(*(_Vdecr_cmd + piomode))
/* Work variables for vertical increment and decrement */
#define Vincr
(*(_Vincr + piomode))
#define Vdecr
(*(_Vdecr + piomode))
/* Variables referenced by above #defines */
int *_Pglen, *_Pgwidth, *_Tmarg, *_Bmarg, *_Indent, *_Beginpg, *_Do_
formfeed, *_Passthru, *_Init_printer, *_Restoreprinter, *_Vincr, *_V
decr;
struct str_info *_Ff_cmd, *_Vincr_cmd, *_Vdecr_cmd;
/* TABLE OF ATTRIBUTE VALUES */
struct attrparms attrtable[] = { /*
name data type lookup address of pointer */
”_b”, VAR_INT,
NULL,
(union dtypes *) &_Bmarg,
”_g”, VAR_INT,
NULL,
(union dtypes *) &_Beginpg,
”_i”, VAR_INT,
NULL,
(union dtypes *) &_Indent,
”_j”, VAR_INT,
NULL,
(union dtypes *) &_Init_printer,
”_l”, VAR_INT,
NULL,
(union dtypes *) &_Pglen,
”_t”, VAR_INT,
NULL,
(union dtypes *) &_Tmarg,
”_w”, VAR_INT,
NULL,
(union dtypes *) &_Pgwidth,
”_J”, VAR_INT,
NULL,
(union dtypes *) &_Restoreprinter,
”_Z”, VAR_INT,
NULL,
(union dtypes *) &_Do_formfeed,
”wp”, VAR_INT,
NULL,
(union dtypes *) &_Passthru,
”wf”, VAR_STR,
NULL,
(union dtypes *) &_Ff_cmd,
”wi”, VAR_STR,
NULL,
(union dtypes *) &_Vincr_cmd,
”wy”, VAR_STR,
NULL,
(union dtypes *) &_Vdecr_cmd,
”wV”, VAR_INT,
NULL,
(union dtypes *) &_Vincr,
”wD”, VAR_INT,
NULL,
(union dtypes *) &_Vdecr,
NULL, 0
,
NULL,
NULL };
int pglen, tmarg, bmarg, vpos, vtab_base;
struct shar_vars sharevars;
struct shar_vars * /*** Setup Processing ***/
setup(argc, argv, passthru)
unsigned argc;
char *argv[];
int passthru:
{
/* Initialize variables and command line values */
(void) piogetvals(attrtable, NULL);
(void) piogetopt(argc, argv, NULL, NULL);
/* (need to verify values entered by user) */
/* Initialize work variables */
pglen = Pglen * Vincr;
tmarg = Tmarg * Vincr;
bmarg = Bmarg * Vincr;
piopgskip = Beginpg – 1;
/* Check for pass–through option */
if (Passthru = passthru)
return(NULL);
Printer, Plotter, and Spooler Subsystem Programming
4-25
/* Initialize pointers to vertical spacing */
/* variables shared with formatter driver */
/* (Refer to /usr/include/piostruct.h)
*/
sharevars._pl
= &pglen;
sharevars._tmarg
= &tmarg;
sharevars._bmarg
= &bmarg;
sharevars._vpos
= &vpos;
sharevars._vtab_base
= &vtab_base;
sharevars._vincr
= &Vincr;
sharevars._vincr_cmd
= (&Vincr_cmd)–>ptr;
sharevars._vdecr
= &Vdecr;
sharevars._vdecr_cmd
= (&Vdecr_cmd)–>ptr;
sharevars._ff_cmd
= (&Ff_cmd)–>ptr;
sharevars._ff_at_eof
= &Do_formfeed;
return(&sharevars);
}
initialize() /*** Initialize the Printer ***/
{
if (Init_printer)
(void) piocmdout(INIT_CMD, NULL, 0, NULL);
return(0);
}
lineout(fileptr) /*** Format a Line ***/
FILE *fileptr;
{
int ch, charcount = 0;
for (ch = 0; ch < Indent; ch++)
pioputchar(’ ’);
while ((ch=piogetc(fileptr)) != ’\n’ && ch != EOF
&& charcount < Pgwidth) {
charcount++;
pioputchar(c);
}
vpos += Vincr;
return(charcount);
}
passthru() /*** Pass–through Option ***/
{
int ch;
while ((ch = piogetc(stdin)) != EOF)
pioputchar(ch);
if (piodatasent && Do_formfeed)
(void) piocmdout(FF_CMD, NULL, 0, NULL);
return(0);
}
restore() /*** Restore the Printer ***/
{
if (Restoreprinter)
(void) piocmdout(REST_CMD, NULL, 0, NULL);
return(0);
}
4-26
Guide to Printers and Printing
Compile and Link the Print Formatter
Use an editor to create an imports file named sample.imp. The file should contain the
following:
#!
main
piogetvals
piogetopt
piomsgout
pioexit
piomode
piodatasent
piopgskip
statusfile
piocmdout
piogetstr
Use an editor to create an exports file named sample.exp. The file should contain the
following:
#!
setup
initialize
passthru
restore
lineout
Enter the following to compile and link the formatter:
cc –o sample –bI:sample.imp –bE:sample.exp sample.c
Understanding the Interaction between qdaemon and the
Backend
The qdaemon and the backend communicate through a status file. Understanding Backend
Routines in libqb on page 4-32 explains the set of library routines that the backend should
use to fulfill these communication requirements. These routines are in the /usr/lib/libqb.a
library.
Using the Status File
When the qdaemon process invokes a backend, it passes the following parameters, in
order:
1. The parameters appearing in the /etc/qconfig file.
2. The flags that the enq command did not recognize, in the order they were given. These
flags will be preceded by the –o option on the command line.
3. The names of one or more files to be printed.
There is a status file for each device and its associated queue. These files are found in the
/var/spool/lpd/stat directory.
The status file provides a means of communication for the qdaemon process and the
backend. The qdaemon passes information such as the date of the file, whether to print
burst pages, and the number of copies to be printed. The backend passes back the charge
for the job it has just finished running. In addition, the backend periodically updates the
number of pages it has printed and what percent of the job is finished. This information is
read by the qchk command.
Note: Backends should never explicitly write into their status file. They should call the
libqb library routines to do this.
Printer, Plotter, and Spooler Subsystem Programming
4-27
The routines are called for the following reason:
• The backend is spared the trouble of accessing the status file directly.
• The format of the status file can be changed without requiring backends to be rewritten.
Should the format of the status file change, the backend only needs to be re–linked.
To initialize certain data common to the library routines, the backend must call the routine
log_init. For more information see Understanding Backend Routines in libqb on page 4-32.
The call is as follows:
log_init();
This routine should be called to initialize the status file interface. The log_init routine, like all
log_ routines in the library, returns a value of –1 if it fails.
Printing Extra Copies
The enq –N command prints extra copies of a file. For example, to print five copies of a file
filename, enter this command:
enq –N5 filename
The enq command passes the information to the qdaemon process, which puts it into the
status file. Backends should get the information by calling the get_copies ( Understanding
Backend Routines in libqb on page 4-32) routine, which returns the total number of copies
requested.
Updating Job Status Information
The qchk command displays information about currently running jobs, including the
originator, title, number of pages to be printed, and percentage completed. All this
information comes from the status file. Most of the information is set up by the qdaemon
when the backend is first invoked, except the pages printed and percent done fields,
which must be filled in by the backend itself.
To provide this information, the backend should periodically call the libqb, see
Understanding Backend Routines in libqb on page 4-32 for the following functions:
• log_progress(pages,percent)
• log_pages(pages), for individual function
• log_percent(percent), for individual function
The backend can call these routines at any time; once at the end of each page is
recommended.
Charging for the Job
When a backend completes a job, the qdaemon reads the status file for a charge. If the
qconfig file has been set up to do so, the charge is written to a file that is eventually
processed by the accounting programs. This results in a bill (real or imaginary) for the user
issuing the print request.
The backend passes the charge back to the qdaemon with the routine
log_charge(charge). See Understanding Backend Routines in libqb on page 4-32. The
backend should call this routine on exit. It should also call the routine along with
log_progress while printing the job. For more information see Updating Job Status
Information on page 4-28. Otherwise, if the job is canceled, no charge will be made for the
pages printed up to that point.
The charge is interpreted by all current accounting programs as the number of pages
printed. However, a backend can set the charge to be based on any multiplier, whole or
fraction, of pages printed.
For more information about job accounting, see Spooler Overview on page 3-1.
4-28
Guide to Printers and Printing
Using Exit Codes
When a backend exits, the qdaemon looks at its exit code for such information as whether
the job was completed successfully and whether the device is still usable. Therefore, it is
important that backends use the same convention for their exit codes. The backend should
use #include <IN/standard.h> for the values of the codes given here.
The permissible exit codes are:
EXITOK
No problems encountered.
EXITBAD
The parameters could not be acted upon. Two common examples
are a flag’s not being valid or a file that could not be opened. The
qdaemon sets the state of the device (displayed by qchk) to OFF,
sends a message to the console, and does not run any further jobs
on that device until someone has explicitly set its state to ON again
(with an enq –Pqueuename –U command).
EXITERROR
The backend could not finish printing the job. The qdaemon restarts
the same job from the beginning on the same device. The qdaemon
enforces a limit on the number of times the job will be restarted.
EXITFATAL
The job could not be finished because of a problem in the device that
requires manual intervention. The qdaemon sets the state of the
device (displayed by qchk) to OFF, sends a message to the console,
and does not run any further jobs on that device until someone has
explicitly set its state to ON again (with an enq –Pqueuename –U
command).
EXITSIGNAL
The backend was interrupted by a SIGTERM signal (#include
<signal.h>).
EXITWARN
The backend has issued a warning to the qdaemon. The job may or
may not be completed successfully, but in either case, when the
qdaemon receives an EXITWARN from the backend, qdaemon
returns a message explaining the problem.
Returning Error Messages
When an error event occurs, the backend should send a message to the user. Before
sending a message, the backend should check the PIO_IPCWRITEFD environment
variable. If it is set, the message is sent to a print supervisor by way of a pipe. The print
supervisor interprets the message and sends it to the user. If the PIO_IPCWRITEFD
environment variable is not set, the backend sends the message to the user with the sysnot
routine.
The qdaemon print spooler always uses the sysnot ( Understanding Backend Routines in
libqb on page 4-32) routine to send messages. Non–base operating system print spoolers
can use sysnot routine or the pipe to send messages.
Using the sysnot Routine
The backend can send messages directly to the user with the sysnot ( Understanding
Backend Routines in libqb on page 4-32) routine. The sysnot routine can either mail the
message to the user or write the message to the user’s terminal. The sysnot routine is
called with the following syntax:
sysnot(
user
,
,
host
char *
user
;
char *
host
;
char *
message
;
unsigned int *
pref
message
,
pref
)
;
The value of the pref parameter should be DOMAIL or DOWRITE. DOMAIL mails the error
message to the user. DOWRITE writes the message to the user’s terminal if the user is
Printer, Plotter, and Spooler Subsystem Programming
4-29
logged on. If the user is not logged on, the message is mailed to the user. The DOMAIL and
DOWRITE constants are defined in the /usr/include/IN/backend.h file.
Using a Pipe
The backend can send messages to the user by sending the message to a print supervisor
by way of a pipe. This mechanism provides a one–way communication path between the
printer backend and the print supervisor.
The print supervisor must open an unnamed pipe and obtain two file descriptors, one for
read operations and one for write operations. The print supervisor must export the write end
in the PIO_IPCWRITEFD environment variable before calling the printer backend with the
fork and exec subroutines. If the PIO_IPCWRITEFD environment variable is set, the printer
backend writes any messages to the write end of the pipe.
The print supervisor typically calls the select subroutine to poll the read side of the pipe for
incoming messages. In addition to checking for exit status of the printer backend using the
waitpid subroutine, the print supervisor polls for I/O on the pipe. The print supervisor sets
up a signal handler for the SIGCHLD signal and performs a block read on the pipe. The
signal handler examines the exit status of the printer backend and performs any action
necessary. When no unread messages remain on the pipe, the print supervisor closes the
pipe and proceeds to other cleanup work.
Message Format
Each message sent by the printer backend consists of a message header frame, zero or
more parameter header frames, a fully expanded message, and text consisting of zero or
more parameters. The message header specifies the message type, message catalog
information, length of expanded message text, and the number of variable message
parameters. The variable message parameters are used to build the expanded message
text from the basic message text that is extracted from the message catalog. The structure
formats for the message header and the message parameter header frames are defined in
the /usr/include/piostruct.h file.
When extracting messages from the pipe, the print supervisor reads the message header
frame, then reads the message parameter header frames (0–9, as specified by the number
of parameters specified in the message header frame). The print supervisor reads the
expanded message text, the length of which is specified in the message header frame,
followed by the parameters (if any). The type and length of any parameters are specified in
the individual message parameter header frames.
The type of message is specified in the message header frame. The message types are as
follows:
• ID_VAL_EVENT_ABORTED_BY_SERVER
• ID_VAL_EVENT_WARNING_RESOURCE_NEEDS_ATTENTION
The actual message text is in expanded format. The parameters are placed in the message
text after the parameters are extracted from the message catalog file in the server’s locale.
The print supervisor can use the message text or build its own message text from the
supplied message catalog information and the message parameters. However, the printer
backend cannot provide message catalog information (message number, set number, and
catalog name) and variable message parameters in all cases. Therefore, the print
supervisor must check for the catalog name field (pm_catnm field) to determine if the
catalog name is a null string. If the catalog name is a null string, the print supervisor must
use the supplied expanded message text.
If a catalog name is provided, the print supervisor can extract the message from the catalog
and place any supplied message parameters in the message. The message parameters
can be integer or string type. However, message parameters are passed from the printer
backend as strings concatenated to the expanded message text. If the print supervisor
extracts the message from the specified catalog and places the parameters in the message,
the following conventions apply:
4-30
Guide to Printers and Printing
• Parameters can be integer or string type, but are always passed in the pipe as strings
with a trailing NUL character. The length of each parameter in string format is supplied in
the parameter’s associated header frame.
• Extracted messages can contain escape sequences recognized by the printf subroutine.
Therefore, while populating the message, the print supervisor checks for escape
sequences such as %s, %d, and %c, and converts the parameters accordingly. Positional
parameters are sometimes specified by using %n$s or %n$d. In such cases, the print
supervisor fills in the parameters in the specified order.
• A maximum of nine parameters can be specified. Therefore, the print supervisor can use
nine variables of *char type and assign the variables to the appropriate supplied
parameter strings. After replacing all positional specifiers and integer specifiers, the
parameters can be passed to the printf subroutine. For example, the extracted message
text might contain the following:
Error %8$d in opening %6$s file
The print supervisor converts the message to the following:
Error %s in opening %s file
and assigns the first variable parameter pointer to the eighth parameter, the second
variable parameter pointer to the sixth parameter, and the remaining variable parameter
pointers to null strings. The print supervisor then calls the sprintf subroutine or a similar
subroutine and passes the nine variable parameter pointers as parameters to the
function.
• The printer backend specifies the correct type (integer or string) for each parameter,
even though all parameters are passed in the pipe as strings. The appropriate type must
be used for handling field width and precision when placing a parameter in an extracted
message.
• The printer backend may or may not pass message catalog information and parameters
for a message. Therefore, the print supervisor must be able to accept the expanded
message itself, or accept the catalog information and parameters and then build the
message accordingly.
Setting Queue States
The qchk command displays the status of a particular device. One of the entries in the table
that is displayed shows the current state of the queue. This information is taken from the
status file. See /usr/include/IN/backend.h in your status file for a list of valid queue states
and their explanation.
Normally, the qdaemon keeps the status file updated. However, some backends may want
to set explicitly the state to WAITING (#include <IN/backend.h>) if they can no longer send
output to the device, and set it back to RUNNING when output resumes. For example, a
backend that paused at the end of each page, waiting for user response, might want to set
the status to WAITING during this time.
The log_status(status) routine can be used to change the status of the job from RUNNING
to WAITING and back again. For more information, see Understanding Backend Routines in
libqb on page 4-32. The parameter is the new status.
In the case of a DEV_WAIT state on a queue device, issue enq –U –Pqueue to attempt to
get the queue to a state of readiness. If this does not work move all the jobs in that queue
and issue enq –G in order to flush the other queues and bring down the qdaemon. Then
restart the qdaemon.
Printer, Plotter, and Spooler Subsystem Programming
4-31
Terminating on Receipt of SIGTERM
When a user cancels a running job with qcan, the command passes the request to the
qdaemon. The backend must stop the print soon after receiving the signal. There are two
ways to accomplish this.
First, the backend cannot do anything special about SIGTERM, in which case the signal
stops the backend process immediately. This option is the simplest, but it does not allow the
backend to do any cleanup (reset line speeds, put paper at top–of–form, hang up the
phone) before it terminates.
Second, the backend can catch SIGTERM, carry out whatever cleanup tasks are required,
and exit EXITSIGNAL (#include <IN/standard.h>). The special exit code tells the
qdaemon that the job was canceled.
Backends that decide to catch SIGTERM should exit very soon after receipt of the signal.
Understanding Backend Routines in libqb
This article defines the set of library routines that the backend should use to communicate
with the qdaemon process. These routines are in the /usr/lib/libqb.a library; they were
designed to make the task of writing a backend as easy as possible. These backend
routines are available using the ld or cc command–line option –lqb.
For information on using these routines with the backend, see Understanding the Interaction
between qdaemon and the Backend on page 4-27.
4-32
get_align()
Returns TRUE or FALSE, telling whether an alignment
form–feed is to be printed. A form–feed is printed only
when the printer has been idle and is about to print a new
job. The form–feed aligns the paper to top–of–form and is
helpful if someone moved the paper while the printer was
idle.
get_cmd_line()
Returns a pointer to an array of characters containing the
enq command line as invoked by the user. The string
returned does not contain the name /usr/bin/enq, any of
the file names specified, or any options that were sent to
the backend using the enq –o option. For example, if the
user enters the command line enq –Plp0 –Bgn –o
–i15 filename, the get_cmd_line function returns the
string –Plp0 –Bgn. This function is useful when the
backend needs to know the command line options a user
provided when the job was submitted.
get_copies()
Returns the number of copies to be printed. Its return value
is of type int.
get_device_name()
Returns a pointer to an array of characters containing the
device name.
get_feed()
Returns the number of feed pages to be printed. Its return
value is of type unsigned int. Feed pages are blank pages
printed only when the printer has become idle. This makes
it easier to tear off paper from the printer.
get_from()
Returns an array of characters containing the name of the
person who made the print request. The return value is of
type char*.
get_header()
Returns NEVER, ALWAYS, or GROUP (#include
<IN/backend.h>). Its return value is of type unsigned int. A
header is a page preceding a file that shows its title, date,
its recipient, and other information.
Guide to Printers and Printing
get_job_number()
Returns job number of current print. Its return value is of
type int.
get_mail_only()
Returns TRUE if the user specifies mail–only.
get_qdate()
Returns a string showing the date that the request was
queued. The return value is of type char*.
get_queue_name()
Returns an array of characters containing the queue name.
get_title()
Returns an array of characters containing the title of the job
being printed. The return value is of type char*.
get_trailer()
Returns NEVER, ALWAYS, or GROUP. Its return value is
of type unsigned int. A trailer is a page following a file that
gives the name of the user of the output.
get_to()
Returns an array of characters containing the name of the
person for whom the job is intended. The return value is of
type char*.
get_was_idle()
Returns TRUE if the printer was idle at job beginning
(useful for paper feed: feed/no feed).
Returns the charge for printing the current job.
log_charge (charge) int charge;
Returns the charge for printing the current job.
log_init
Initializes certain data common to the library routines.
log_pages( pages )
Updates the status file with the number of pages printed.
log_percent( percent )
Updates the status file with the percent of job completed.
log_progress(log_pages ( int ),log_percent( char ))
Updates the status file with the number of pages printed
and percent of job completed. This function uses
log_pages and log_percent.
log_status( status )
Changes the status of the job from RUNNING to WAITING
and back again. The parameter is the new status.
put_header( fnaddr, width )
Prints a header page with no following form–feed and
returns the number of lines printed. The fnaddr and width
parameters are optional.
int (* fnaddr );
The fnaddr parameter defines the format subroutine used
to display characters on the header page. The default is
the putchar subroutine.
int * width;
The width parameter defines the width of the form. The
default value for the width parameter is 80.
put_trailer( user, fnaddr,
width )
Prints a trailer page for user with no following form–feed
and returns the number of lines printed. The fnaddr and
width parameters are optional.
char * user;
int (* fnaddr );
The fnaddr parameter defines the format subroutine used
to display characters on the header page. The default is
the putchar subroutine.
int * width
The width parameter defines the width of the form. The
default value for the width parameter is 80.
Printer, Plotter, and Spooler Subsystem Programming
4-33
sysnot( user, host,
message, pref )
Sends a message to the user if the backend cannot run a
job.
char * user;
char * host;
char * message;
unsigned int * pref;
The value of the pref parameter indicates whether to mail
the message to the user or to write the message on the
user’s terminal. The valid values defined in
/usr/include/IN/backend.h file are:
DOMAIL
Mails the error message to the user.
DOWRITE
Writes the message to the user’s terminal if the user
is logged on. If the user is not logged on, the
message is mailed to the user.
Printer Code Page Translation Tables
Translation of code points in the print file to code points for the printer is a two–stage
process (translation of code points for Oriental languages is handled differently). The first
stage translates code points from the print file to code points in an intermediate code page.
The intermediate code page consists of 16–bit integer code points for all supported
characters. The intermediate code page is defined in the /usr/lib/lpd/pio/etc/codepage.txt
file.
Stage–1 Translation
The example C language code shown below generates a stage–1 translation table to
translate code points from a hypothetical Code Page 123 to the intermediate code page.
#include <piostruct.h>
#include <fcntl.h>
/*** Table to Translate Code Points for Input Code Page ***/
/*** ”123” to Code Points for the Intermediate Code Page
***/
short table[256] = {
/* 00 (000) */ CP, CP, CP, CP,
.
.
.
/* FC (252) */ CP, SC, 126, CP };
/*** Write the Table to a File (Error Processing Not Shown) ***/
main ( ) {
int fildes;
int fmt_type = 1;
fildes = open(”/usr/lib/lpd/pio/transl/123”, O_CREAT | O_WRONLY,\
0664);
write(fildes, ”PIOSTAGE1XLATE00”, 16);
write(fildes, &fmt_type, sizeof(fmt_type));
write(fildes, table, sizeof(table));
return(0);
}
The CP at code point 252 means that the code point should be copied with no change. The
SC at code point 253 means the character is not defined in the intermediate code page and
so a substitute character should be printed instead. The 126 at code point 254 means that
code point 254 should be translated to code point 126.
4-34
Guide to Printers and Printing
The –X flag in the qprt command specifies the print file’s code page name. When this value
is 123, the formatter reads the table from the /usr/lib/lpd/pio/trans1/123 file and uses it for
stage–1 translation.
Stage–2 Translation
In the second stage of code point translation, one or more stage–2 translation tables
convert code points from the intermediate code page to those appropriate for the printer.
The t0 – t9 attributes in the database colon file specify the full path names of stage–2
translation tables. Each of the t0 – t9 attributes can specify multiple stage–2 translation
tables by separating the names with commas. The print formatter reads in the stage–2
translation tables and chains them into a ring. Beginning with the table for the current printer
code page, the formatter processes each character in the input print file. The first
determination is whether the character is defined in that printer code page. In other words,
the code point value is not larger than the number of code points in the table, and the value
is not SC.
If the character is in the code page, the translated code point is sent to the printer. The
formatter selects the printer code page by sending the appropriate printer command string.
By convention, the printer command string’s 2–character attribute name is at index 0 in the
Command Names array. If the character is not in the code page, the formatter repeats the
process for the next stage–2 translation table in the ring. If the formatter cannot find a
translation table in the ring that can print the character, it prints a substitute character
(underscore) instead.
The following example C language code generates a stage–2 translation table named
XYZ.999, which translates code points from the intermediate code page to code points for
the printer’s code page. The c1 attribute is assumed to contain the printer command string
that will cause the printer to select code page XYZ.999.
#include <piostruct.h>
#include <fcntl.h>
/*** Table to Translate Code Points for the Intermediate ***/
/*** Code Page to Code Points for a Printer Code Page ***/
struct transtab table[] = {
/* 00 (000) */ {CP}, {CP}, {CP}, {CP},
.
.
.
/* FC (252) */ {63}, {CP}, {94,1}, {SC} };
/*** Command Names for the Translate Table ***/
char cmdnames[][2] = {
{’c’, ’1’},
/* index 0 – select the code page */
{’e’, ’b’} };
/* index 1 – next byte is graphic */
/*** Write the Table To a File (Error Processing Not Shown) ***/
main() {
int fildes;
int num_commands = sizeof(cmdnames) / 2;
fildes = open(”/usr/lib/lpd/pio/trans2/XYZ.999”, O_CREAT |
O_WRONLY,\ 0664);
write(fildes, ”PIOSTAGE2XLATE00”, 16);
write(fildes, &num_commands, sizeof(num_commands));
write(fildes, cmdnames, sizeof(cmdnames));
write(fildes, table, sizeof(table));
return(0);
}
The {63} at code point 252 means that code point 252 should be translated to code point
63 before being sent to the printer. The {CP} at code point 253 means that code point 253
should be sent to the printer with no translation. The {94,1} at code point 254 means that
code point 254 should be translated to code point 94 before it is sent to the printer. The,1
in {94,1} indicates that the printer command string whose 2–character attribute name is
Printer, Plotter, and Spooler Subsystem Programming
4-35
at index 1 in the Command Names array should be sent to the printer before sending the
code point. The SC at code point 255 indicates that the character at code point 255 in the
intermediate code page cannot be printed by the printer code page described by this
stage–2 translation table.
Printer Code Page Translation for Multibyte Code Sets
Multibyte code set (MBCS) translation from the print file to the code set differs from
translation for single–byte code set (SBCS) code points. Translation from print file to code
set in multibyte environments is a two–stage process.
During the first stage of code–set translation, the input code set of the print file is translated
to a process code set. The process code set must be one of the MBCS code sets supported
by the iconv subroutine and locale database (DB), examples include the IBM–943,
IBM–eucTW, and IBM–eucKR code sets. During the second stage, the process code set is
translated to an appropriate output code set for the printer. The iconv subroutine translates
the code set, if the iconv converter for the translation exists. When the input or output code
set and process code are the same, no code–set translation is performed.
The Ti and To attributes in the printer–dependent colon files define the possible flow of the
translating code set. The Ti attribute specifies the combination of the input and process
code sets:
[Input_code_set, ... ]Process_code_set, ...
The To attribute specifies the combination of the process and output code:
Process_code_set [Output_code_set0, Output_code_set1,
Output_code_set2, Output_code_set3,... ], ...
For example, the To attribute for a Japanese printer is defined as:
::To::IBM–943[IBM–932, IBM–932, IBM–932], ibm–eucJP[IBM–932,
IBM–932, IBM–932,IBM–932]
All characters of the character set ID (CSID) are printed using ROM fonts when an output
code set is specified for each CSID. Otherwise, bitmap images from the Xwindows font are
used. The type of Xwindows font files, including the font image of each CSID, is selected by
reading a file from the /usr/lib/X11/nls directory.
Printer Code Page Translation Tables for Multibyte Code Sets
A translation table consists of maps between code points that are not shared by the two
code sets. A printer backend can communicate with other code sets even if the code set is
not supported by the iconv subroutine by using a translation table provided in the
/usr/lib/lpd/pio/transJP directory.
When an input or an output code set is not supported by the iconv subroutine, the
unsupported code set translates one of the code sets that are supported or directly to a
process code set using the translation tables found in the /usr/lib/lpd/pio/transJP directory.
Users with root authority can add new code sets for printers by creating translation tables.
The naming convention for new translation tables is FromCodeSetName _
ToCodeSetName. All translation tables must be defined in the trans_dir file. The f_cp from
code point in a translation table must be sorted in alphabetical order in advance.
The trans_dir and codeset.alias files are in the /usr/lib/lpd/pio/transJP directory. The
trans_dir file format is:
FromCodeSetName ToCodeSetName NameofTranslationFile
Code set aliases are defined in the codeset.alias file. The codeset.alias file format is:
CodeSetName AliasName ...
For example, to print an MBCS file that was written with a new code set on an IBM–943
printer, use the following steps:
4-36
Guide to Printers and Printing
1. Create a translation table in the /usr/lib/lpd/pio/transJP directory. The naming
convention for the new file is NewCodeSetName _IBM–943.
2. Define the translation table in the trans.dir file. The format to define a new code set
named NewCodeSet is:
newcodeset IBM–943 newcodeset_IBM–943
3. Define the alias name in the trans.alias file, if needed.
4. Append the code set name as input code in a colon file, for example:
::Ti::[NewCodeSetName, ...]IBM–943, ...
Using Xwindows Fonts with the qprt Command
MBCS printer backends use Xwindows fonts defined in the /usr/lib/X11/fonts directory to
print characters that are not stored in the ROM of the printer. The –F and –I (uppercase i)
flags for the qprt command designate Xwindow fonts for the printer. The default value of
these qprt command options are specified in the colon files as the value of the _F and _I
attributes.
The qprt –F flag specifies a font. The full path name, font alias, or the Xwindow Logical
Function Description (XLFD) of an Xwindow font can be used with the –F flag.
The –I flag follows a font path to find the Xwindow fonts and creates the _I attribute entry.
The colon file format for the _I attribute is:
::_I::/usr/lib/X11/fonts/JP,/usr/lib/X11/fonts
If the user specifies another font path with the qprt –I command, the printer backend looks
in the specified font path not in the default paths listed in the _I colon file. If the –I option has
a null value, the backend assumes the default /usr/lib/X11/fonts directory.
To specify a specific Xwindows font file using a full path name, font alias, or XLFD, enter:
$ qprt –F ’*–27–*–ibm_udcjp’ foo.txt
$ qprt –F IBM_JPN17
/* XLFD names list */
/ * Font alias name */
The following example directs the MBCS printer backend to look in the fonts.alias and
fonts.dir files to find the appropriate fonts for the code set specified with the –X option of
the qprt command.
Printer, Plotter, and Spooler Subsystem Programming
4-37
Translation Table Example
#include <fcntl.h>
struct trans_table
/*Translation Table Structure
{
unsigned int reserv1;
/* Reserved
unsigned int f_cp;
/* From code point
unsigned int reserv2;
/* Reserved
unsigned int t_cp;
/* To code point
};
/*
*Table to translate code points for input code set(NewCodeSet)
*to code points for the process code set(IBM–943).
*/
struct trans_table table[] =
{
{0x0,0x81ca,0x0,0xfa54},{0x0,0x9e77,0x0,0x954f},\
{0x0,0x9e8d,0x0,0x938e},
/* ....
*/
[0x0,0xfad0,0x0,0x8d56}
};
/* Write the table. Error processing not shown. */
main()
{
int ftrans;
long hdsize = 32;
/* Header size
long cpsize = 4;
/* Code point size
long rsv1 = 0, rsv2 = 0; /* Reserved area
ftrans = open(”usr/lib/lpd/pio/transJP/newcodeset_IBM–932”,
O_CREAT | O_WRONLY, 0664);
write(ftrans, ”PIOSMBCSXLATE000”, 16);
write(ftrans, &hdsize, sizeof(long));
write(ftrans, &cpsize, sizeof(long));
write(ftrans, &rsv1, sizeof(long));
write(ftrans, &rsv2, sizeof(long));
write(ftrans, table, sizeof(table));
return(0);
}
*/
*/
*/
*/
*/
*/
*/
*/
Printer Attachment Files
Attachment files provide a simple interface for developers of printer attachments to create
System Management Interface Tool (SMIT) screens that support new printer attachments.
To learn more about attachment files, see:
•
Using the SMIT Interface for Printer Attachment Files on page 4-38
•
Attachment File Naming Conventions on page 4-39
•
Structure of Attachment Files on page 4-39
•
Attachment File Field Definitions on page 4-40
Each new attachment type is defined in an attachment file. The attachment file contains the
name of SMIT object IDs used to perform various printing tasks. The name of an attachment
type is limited to 10 characters.
Using the SMIT Interface for Printer Attachment Files
Attachment files direct the branching from SMIT menus to SMIT object IDs. Every
attachment file controls the branching from some or all of these SMIT menu options:
• Start a Print Job
• Add a Print Queue
• Add an Additional Printer to an Existing Queue
• Change/Show Print Queue Characteristics
4-38
Guide to Printers and Printing
• Change/Show Printer Connection Characteristics
• Remove a Print Queue
• Pre–Processing Filters
For example, when the Add a Print Queue menu option is selected from a SMIT dialog
screen, the first information required from the user is which attachment type is being used.
The user selects the desired attachment type, and SMIT searches the attachment type file
to discover which SMIT object ID file to branch to.
SMIT selectors and dialogs for new printer attachments must create dialogs that add,
change, and remove a print queue for the new attachment type. The names of the new
SMIT dialogs are placed in the attachment file. The dialog names in the file are
automatically branched to when creating, changing, or removing queues for the new
attachment type.
Attachment File Naming Conventions
Attachment files must be named according to the following naming convention:
Attachment_type.attach
The Attachment_type string must contain a unique string that identifies the attachment. All
attachment files must be located in the /usr/lib/lpd/pio/etc directory. The following
attachment files are supplied:
local.attach
Contains the local system attached printers
file.
ascii.attach
Contains ASCII–terminal attached printers
file.
file.attach
Contains the output–to–file attachment file.
remote.attach
Contains the remote print queues
attachment file.
Structure of Attachment Files
Attachment files are ASCII files. Each line in an attachment file defines a field using the
following format:
FieldName = Value
The following field names have special meanings in the attachment file:
• description
• seq_num
• supported
• unsupported
The following field names define SMIT selector IDs. The Value variable must contain a
SMIT selector ID. The selector ID value of each field specifies the target of the branch. The
SMIT fields are:
• submit_job
• add_queue
• add_printer
• remove_queue
• printer_conn
• change_queue
• change_filters
Printer, Plotter, and Spooler Subsystem Programming
4-39
Every attachment file should contain the description, add_queue, and remove_queue
fields. All other fields are optional. Fields with a null value are treated as if the field were
missing. There is no restriction on the other contents of an attachment file.
The following example attachment file is named term_serv.attach:
description = term_serv.cat,1,3; Printer Attached to Terminal Server
seq_num = 2
submit_job = term_serv_start_job
add_queue = term_serv_add
add_printer = term_serv_printer
remove_queue = term_serv_remove
printer_conn = term_serv_printer_conn
change_queue = term_serv_change
change_filters = term_serv_change_filters
unsupported = ibm6252,ibm6262
Attachment File Field Definitions
The following field definitions detail the attachment type fields, formats for the field values,
and practical examples of field values.
description
Specifies the description string that appears on the SMIT
Attachment type menu. The SMIT Attachment type menu
lists all supported attachment types on the system. This
field is required in order for the attachment type to appear
on any list of supported types.
The format of the description field value is:
Message_catalog,Set,Message_#; DefaultTextString
Values for Message_catalog, Set, and Message_# are
not required. For example, the two following example
entries create the same menu item in SMIT. The first
example uses the term_serv.cat message catalog, set
number 1, and message number 3. If the message cannot
be found, SMIT uses the default text in quotes. In the
second example, no message catalog is designated, and
the quoted message is used in the menu automatically:
description = term_serv.cat,1,3; Printer
Attached to Terminal Server
description = Printer Attached to Terminal
Server
seq_num
Specifies the order in which a particular attachment type is
displayed in the SMIT Attachment Type Selector menu. If
this field is missing, the attachments are displayed in no
particular order. For example, to display the attachment in
the second position on the menu, type:
seq_num = 2
4-40
Guide to Printers and Printing
supported/unsupported Define a list of printer types that are either supported or not
supported by the attachment. The supported field value
is used to generate the list of printers supported by the
attachment type on the SMIT dialog screen. The two fields
are mutually exclusive.
The format of the value for the supported and unsupported
fields is a comma–separated list of printer types. For
example, to exclude the ibm6252, ibm6262, and
ibm4029 printers from the list of supported printers, enter:
unsupported = ibm6252, ibm6262, ibm4029
To show the hplj–3, hplj–3–si, and hplj–2 printers
on the list of available printer types, type:
supported = hplj–3, hplj–3–si, hplj–2
submit_job
Specifies the name of the SMIT selector ID to branch to in
order to start a print job. If this field is missing, the enq
dialog value is used. For example, to branch to the
term_ser_start_job selector from the Start a Print Job
menu option if the queue selected is of the term_serv
attachment type, type:
submit_job = term_serv_start_job
add_queue
Specifies the name of the SMIT selector ID to branch to in
order to add a print queue. For example, to branch to the
term_serv_add selector ID from the Add a Print Queue
menu option, type:
add_queue = term_serv_add
add_printer
Specifies the name of the SMIT selector ID to branch to in
order to add a printer to an existing queue. Functionally,
this adds an additional queue device to an existing queue.
To branch to the term_serv_printer selector ID from
the SMIT Existing Print Queue menu option, type:
add_printer = term_serv_printer
remove_queue
Specifies the name of the SMIT selector ID to branch to in
order to remove a print queue. The Remove dialog screen
removes any other queues, queue devices, virtual printers,
and printer devices that were created at the time the print
queue was created. To branch from the Remove a Print
Queue menu option to the term_serv_remove selector
ID, type:
remove_queue = term_serv_remove
printer_conn
Specifies the name of the SMIT selector ID to branch to in
order to change the printer connection characteristics of a
print queue. The port communication characteristics would
typically be baud rate, parity, stop bits, and so on. To
branch to the term_serv_printer_conn selector ID
from the SMIT Printer Port Communication Characteristics
menu option, type:
printer_conn = term_serv_printer_conn
Printer, Plotter, and Spooler Subsystem Programming
4-41
change_queue
Specifies the name of the SMIT selector ID to branch to in
order to change the characteristics of a printer queue. To
branch to the term_serv_change selector ID from the
SMIT Change/Show Print Queue Characteristics menu
option, type:
change_queue = term_serv_change
change_filters
Specifies the name of the SMIT selector ID to branch to in
order to change the pre–processing filters defined for a
print queue. To branch to the
term_serv_change_filters selector ID from the
SMIT Change/Show Pre–Processing Filters menu option,
enter:
change_filters = term_serv_change_filters
Operators for Limits Field in the Printer Colon File
The limits field in the colon file contains two types of information:
• SMIT dialog information
• Validation information The SMIT dialog information is used to build SMIT objects
to represent colon file attributes in the Object Data Manager (ODM) database. Objects are
used in the Print a File, Printer Setup, and Default Job Characteristics dialog screens.
The limits field gives the creator of the colon file control over the type of ODM object
built for a given attribute. All objects built for the limits field are part of the sm_cmd_opt
object class. The limits field allows control over the following fields in a sm_cmd_opt
object class:
• id_seq_num
• entry_type
• cmd_to_list_mode
• required
• op_type
• multi_select
• cmd_to_list_mode
• disp_values
• aix_values
• values_msg_file
• values_msg_get
• help_msg_id
• help_msg_loc
These attributes can be set to be displayed always, never, or only if the attribute is
referenced in the pipeline. For detailed descriptions of these fields, see ”sm_cmd_opt (SMIT
Dialog/Selector Command Option) Object Class” in AIX 5L Version 5.2 General
Programming Concepts: Writing and Debugging Programs.
The validation information is used to validate attribute values when the colon file is digested
and when a print job is submitted.
4-42
Guide to Printers and Printing
Contents of the limits Field
The limits field is the fourth field in the colon file. Colon file attributes have the following
format:
Message_Catalog:Message_Number:Attr_Name:Limits:Value
Information in the limits field has two components. The first component is a single letter
operator specifying an action. The letter value can be one of the following values: C, D, E, F,
G, H, I, L, M, Q, R, S, T, or V. The second component is the data. If the data is more than
one character, it should be enclosed in square brackets ( [ ] ).
For example, if the limits field contained ’E#’, the sm_cmd_opt object class
entry_type field equals the numeric value assigned to #. The entry_type field with a
’E#’ value takes only numeric input.
In another example, when the limits field contains ’[none,full,emulator=0,1,2]’
then the sm_cmd_opt object class contains the following values:
Field Name
Values
disp_values
none, full, emulator
aix_values
0,1,2
The limits field operators provide the following types of control in SMIT:
• Attribute display
• Characteristics of the field representing the attribute
• Attribute validation and the type of auxiliary operations (for example, pop–up menus or
ring lists)
For example, in the qprt and admvirprt SMIT dialogs, the following rules apply:
• If D y (the limits operator D with a value of y for yes) is specified in a limits field
for an attribute, then that attribute is always displayed.
• If D n (the limits operator D with a value of n for no) is specified in a limits field for
an attribute, then that attribute is never displayed.
In qprt SMIT dialogs, the following additional rules apply:
• All attributes defined in the printer colon file that begin with a _ (underscore; for example,
_j and _ i) that are referenced in the pipeline are displayed.
• All attributes defined in the printer colon file that begin with a C combination flag (for
example, Cs and Ca ) and have their combination value referenced in the pipeline are
displayed.
Rules specific to the admvirprt SMIT dialog are as follows:
• All attributes defined in the printer colon file beginning with either an _ (underscore) or a
C combination flag are displayed, unless D n is specified in their limits field.
limits Field Operators
Definitions and examples of the limits field operators are organized into the following
groups:
• Display Operators
•
Field Characteristics Operators on page 4-45
•
Auxiliary Operations and Validation Operators on page 4-46
Printer, Plotter, and Spooler Subsystem Programming
4-43
Display Operators
C
Defines how multiple flags relate within the SMIT dialog, how the
options for the flags are displayed, and what flags and options are
available. To support interdependent flags (for example, flags that
affect typestyle and pitch), combinations of flags must be used.
Typically, there is a single match between a SMIT dialog field and a
command line flag. The combination flag operator allows one field in
a SMIT dialog to represent more than one command line flag.
Referenced flags should be marked as non–display ( Dn ) type for
SMIT dialogs, so that only the combination flag is displayed instead
of the individual flags.
The C operator syntax is:
C[xx,yy,...]
The xx and yy values are flag attributes. When a C attribute is
defined, the limits field must also contain an R ring operator to
define the pop–up list that is displayed to SMIT users. The R
operator also defines how the options on the list map to
command–line flags.
:111:Cs:C[_s,_p]R[Courier 10, Prestige 12= –s Courier
–p10, –s Prestige –p12]):–s %I_s –p %I_p
:999:_s:Dn:Courier
:222:_p:Dn:10
In this example, the C operator defines that the –s and –p flags are
combination attributes. The R ring defines that when the Courier 10
option is chosen from the pop up menu, the flags on the command
line are –s Courier –p10. The –s %I_s –p%I_p attribute value
is resolved when the SMIT dialog is built and determines which item
in the ring is displayed as the default.
D
Designates the display mode. If the value is y, an object is built in the
sm_cmd_opt object class. If the value is n, no object is built. The D
operator allows programmers to suppress certain flags from being
displayed in SMIT. If this operator is not specified, the object is built if
the flag is referenced in the input pipeline.
S
Designates the sequence number in the id_seq_num field of the
sm_cmd_opt object class. The sequence number controls the
position of the item in relation to other items in the dialog screen. If
no S operator is specified, the dialog starts with the ID number 100,
and items are numbered in the sequence they are found in the colon
file.
The value for the S operator can be a string with a maximum length
of 16 characters. For example, the following S operator entry places
the item in position 100:
:100:_1:S[100]:60
4-44
Guide to Printers and Printing
Field Characteristics Operators
E
Controls the entry_type field of the sm_cmd_opt object. The
possible values for the E option are:
#
Indicates that numerical entry is allowed.
f
Indicates that a file entry is allowed. A valid file name must be
specified.
n
Indicates no entry is allowed. The field cannot accept typed input.
r
Indicates an alphanumeric entry is allowed.
t
Indicates that text entry is allowed.
x
Indicates that a hexacimal entry is allowed.
To allow numerical entry into the SMIT dialog field, enter:
:100:_L:E#:60
Q
Controls the value of the required filed of the sm_cmd_opt
object. The required field determines if the field value should be
sent to the cmd_to_exec command for this dialog.
A single character specifies the value type. The default value is n
which means that the flag and value for the sm_cmd_opt object is
passed only if the field value is changed. Possible values for the
required field are:
n
Represents no. Do not send flag unless user changes the initially
displayed value. The n value is the default.
y
Represents yes. Always sends the prefix field and value of the
entry field even if it is null.
+
Send the prefix field and value. The value must contain 1
non–blank character.
?
Always send the prefix field and values except when the value
is null.
To ensure that the prefix field and the value of the entry field is
always sent to cmd_to_exec, enter:
:100:_L:Qy:60
Printer, Plotter, and Spooler Subsystem Programming
4-45
Auxiliary Operations and Validation Operators
Auxiliary operations for the SMIT dialog definitions determine the type of list and input
required from the user. The types of lists available in the dialogs are list, multi–select list,
range list, option ring, or multi–select option ring. The limits field operators that specify
the type of auxiliary operation used by an attribute are L, M, G, and R.
Only one type of auxiliary operation is supported at a time. The default is op_type=n. The
n value means that no auxiliary operation is permitted for the field.
F
Allows control of the cmd_to_list_mode field of the sm_cmd_opt
object. The cmd_to_list_mode field specifies how much of an
item from a list should be used. The list is produced by the command
specified in the cmd_to_list field object. For example, if the
cmd_to_list field produced the following list:
60 (6 line per inch)
80 (8 line per inch)
66
Possible values for the F operator are:
a
Get all fields. This is the default value.
1
Get the first field.
2
Get the second field.
To instruct SMIT to retrieve the first field from the list, enter:
:100:_l:F1:60
G
Specifies a range list. The G operator gives the cmd_to_list_mode
an r value. The r value specifies that the information displayed by the
cmd_to_list field is a range of information rather than a list.
Validity checking is always done on a range. The data in a range list
is in the form of x..y (1..30) or..y (..30) or x.. (1..) where x and y are
integers and specify the upper and lower bounds of a range. Validity
checking ensures that the attribute value is in the range specified.
The integer can be negative; however the upper bound (y value)
must be greater than or equal to the lower boundary (x value). To
designate that the field list operation is a range between 50 and 100,
enter:
:100:_l:G[50..100]:60
H
Specifies the message catalog specification for help text for a
corresponding attribute. The message catalog specification includes
message catalog name, set number, and message number. The help
text is used in SMIT dialog that use the attributes for which help is
assigned.
To assign help to a flag, –b, from the pioattrl cat dialog, enter:
:100:_b:H[pioattr1.cat,5,123]:60
I
Specifies the publication specification for help text for a
corresponding attribute. The publication specification includes values
for the help_msg_id, help_msg_base, and help_msg_book
fields in the sm_cmd_opt SMIT object class. The help text is used in
the SMIT dialog that uses the attributes for which help is assigned.
To assign help to a flag, –b, from the publication specification, enter:
:100:_b:I[100145]:60
4-46
Guide to Printers and Printing
L
Specifies that a pop–up list is displayed when the user selects F4.
The pop up list allows users to select only one option from a given
list of options. The pop up list is constructed from the cmd_to_list
field values. The op_type field value for a pop up menu is l
(lowercase L).
Validity checking is done only when typed user input is prohibited.
The entry type for a field that does not allow direct user input is n.
The cmd_to_list field returns a newline–separated list. The
values from that list are compared with the attribute value.
The possible values for the L operator are the shell command strings
for the cmd_to_list field. The list generated from the command is
a list of output values separated by newline characters. For example:
:100:_l:L[print ”50\n55\n60\n65”]:60
M
Specifies a multi–select list which allows users to select more than
one value from a given list of options. The M operator works exactly
like the L operator list except that the multi–select field must be
set to an m value.
An example of a multi–select list operator entry is:
:100:_l:M[print ”50\n55\n60\n65”]:60
R
Specifies an option ring type of list. The op_type field is set to r. A
ring list differs from a regular list in that the user can continue to
display list options by pressing either the tab (forward) or backtab
(reverse) keys. When a ring list reaches the bottom of the options, it
recycles to the top of the list. The ring list recycles in forward or
reverse. A ring list becomes a regular list when the F4 key is
pressed.
The option ring operator can control the disp_values,
aix_values, values_msg_file, values_msg_set, and
value_smg_id fields. The no message ID, just a message ID,
message set and ID, or message set, catalog and ID are valid in a
ring option list.
Validity checking is done if direct entry by the user is prohibited with
the entry type value set to n. The ring has hardcoded values that are
either stand–alone or are mapped to the base operating system
values.
An example of stand–alone values would include a list of possible
baud rates ( ’1200,2400,9600,19200’ ) where the rate values
themselves are used as the flag arguments.
An example of mapped values would be an attribute to designate
which paper drawer on the printer is to be used. In this example, the
three possible display values are lower drawer, upper drawer, and
envelope feed. These possibilities are mapped to the base operating
system flag operands ’0,1,2’. The base operating system values
are passed to the executed command.
Validity checking verifies that the attribute value is within the set of
hardcoded values. The following examples illustrate several types of
option ring lists:
:100:_l:R[0,1,2]:0
:100:_l:R[none,full,emulator=0,1,2]:0
:100:_l:R[;none,full,emulator=0,1,2]:0
:100:_l:R[21,none,full,emulator=0,1,2]:0
:100:_l:R[1,21;none,full,emulator–0,1,2]:0
:100:_l:R[pioattr9.cat,1,21;none,full,emulator=0,1,2]:0
Printer, Plotter, and Spooler Subsystem Programming
4-47
T
Allows multiple selections to be made from a pop up list and works
identical to the R operator. The multi–select field equals m.
To allow multiple choices to be made from a pop up menu, enter:
:100:_l:T[none,full,emulator=0,1,2]:0
V
Specifies additional validation for any attribute. The V operator does
not affect how an ODM stanza is built for an attribute. The data
specified with the V operator is colon file type code (% operators).
The % operators do the validation. The colon file code resolves to
one value. The value is either 0 or non–zero. If the resolved value is
0, then the attribute value is valid. If the value is non–zero, then the
attribute value is invalid.
To verify that the value of _l is in the range 0 to 100, enter:
:100:_l:V[%?%G_l%{100}%>%t1%e%?%G_l%{0}%<%tl%e0%;%;]:60
Adding a Printer Using the Printer Colon File
Prerequisite Tasks or Conditions
• The printer must be physically attached to your system.
• Compare the similarities and differences between the printer you want to add and the
currently supported printers. To see a list of supported printers, use the lsdev (list
devices) command, or refer to Listing All Supported and Defined Printers on page 2-27.
• You must understand the printer colon files and their format. Printer Colon File
Conventions on page 4-20 lists the conventions for printer and attribute names and
values in colon files.
Procedure
1. Select the supported printer that the new printer most closely emulates. You might need
to consult the printer documentation.
2. Use the mkvirprt command to create a virtual printer definition by entering:
mkvirprt
Respond to the prompts, specifying the printer type you selected. Remember that all
device names and queue names must begin with an alphabetic character.
3. Review the attribute values and descriptions with the lsvirprt command. Because you
will need to compare these values in a later step, redirect the output to a temporary file
by entering:
lsvirprt –q QueueName –d QueueDeviceName > tempfile
4. Display the output from the lsvirprt command, either in another window or as a
hardcopy printout.
5. Compare the attribute descriptions and values to those of the printer you are adding.
Determine the changes to be made.
6. Copy the printer colon file from the Predefined Database directory
(/usr/lib/lpd/pio/predef) to the Customized Database directory
(/var/spool/lpd/pio/@local/custom).
7. Change the attribute values in the colon file as described in ”Adding a New Printer Type”
in AIX 5L Version 5.2 Kernel Extensions and Device Support Programming Concepts.
These will include the printer type ( mt attribute), the printer description ( mL attribute),
and the printer–emulation mode ( ep attribute).
4-48
Guide to Printers and Printing
8. Run the chvirprt command, specifying the queue name and the queue device name with
no attribute values. This action causes a digested version of the virtual printer definition
to be built.
9. Verify that the newly defined printer prints correctly.
10.If you want to create a predefined virtual printer definition, do so with the piopredef
command.
%Sxx
Pushes a pointer to the current string value for the xx attribute onto
the stack. The only operation that can be performed on the string
pointer is to use %= to compare the string with another string whose
pointer is also on the stack.
%Lxx
Pushes the length of the xx constant or variable string onto the
stack. For example, if the value of attribute ss is IJKLMN, the
sequence ABC%Lss%dDEFG produces the string ABC6DEFG.
However, if xx is the attribute that contains the %Lxx sequence, the
length will be the length of that part of the string that has been
constructed when the %Lxx is encountered. For example, if the
value of the st attribute is ABC%Lst%dDEFG, the constructed string
for attribute st is ABC3DEFG.
Printer, Plotter, and Spooler Subsystem Programming
4-49
Printer–Specific Information
The format and content of the header and trailer pages can be customized by editing the
files containing the prototype text. These files are in the /usr/lib/lpd/pio/burst directory. The
file names are in the format X.yyy, where X is either H to indicate header pages or T to
indicate trailer pages. yyy indicates the type of data stream: ascii for ASCII, ps for
PostScript, or gl for plotter emulation. For example, the file named H.ascii is the prototype
text for header pages to be printed in ASCII, and T.ps is the prototype text for trailer pages
to be printed in PostScript. The escape sequences used in the text files begin with the %
(percent) character and are described with the pioburst command.
The following sections give you information specific to certain printers that you might need
to configure and set up your printer and queue systems:
4-50
•
IBM Personal Printer II Models 2380, 2381, 2390, 2391, 2380–2, 2381–2, 2390–2,
2391–2 on page 4-51
•
IBM 3812 Model 2 Page Printer on page 4-51
•
IBM 3816 Page Printer on page 4-52
•
IBM 4019 LaserPrinter and 4029 LaserPrinter on page 4-52
•
IBM 4037 and IBM 4039 LaserPrinter on page 4-53
•
IBM 4076 InkJet Printer on page 4-53
•
IBM Proprinter Models 4201–3, 4202–3, 4207–2, 4208–2 on page 4-53
•
IBM 4072 ExecJet on page 4-53
•
IBM 4208–502, IBM 5572–B02, IBM 5573–H02, and IBM 5579–H02/K02 on page 4-54
•
IBM 4216 Personal Page Printer, Model 031 on page 4-54
•
IBM 4216–510 and IBM 5327–011 on page 4-54
•
IBM 4037 and IBM 4039 LaserPrinter on page 4-53
•
IBM 5202 Quietwriter III on page 4-54
•
IBM 5204 Quickwriter on page 4-55
•
IBM 5575–B02/F02/H02 and IBM 5577–B02/F02/FU2/G02/H02/J02/K02 on page 4-55
•
IBM 5584–G02/H02, IBM 5585–H01, IBM 5587–G01/H01 and IBM 5589–H01 on page
4-55
•
IBM 6252 Impactwriter and IBM 6252 Printer on page 4-55
•
IBM Network Color Printer on page 4-55
•
IBM Network Printer 12, 17, and 24 on page 4-57
•
IBM InfoPrint 20 on page 4-59
•
IBM InfoPrint 32 Printer on page 4-61
•
IBM InfoPrint 40 Printer on page 4-63
•
Canon LASER SHOT LBP–B404PS/Lite on page 4-65
•
Canon LASER SHOT LBP–B406S/D/E/G, A404/E, A304E on page 4-65
•
Dataproducts LZR 2665 Laser Printer on page 4-65
•
Hewlett–Packard LaserJets II, III, IIISi, 4, 4Si, 4Plus, 4V, 4000, 5Si/5Si MX, 5Si Mopier,
8000 Color, and 8500 Color on page 4-65
•
Lexmark 4227 Forms Printer on page 4-69
•
Lexmark Optra Laser Printer on page 4-70
Guide to Printers and Printing
•
Lexmark Optra Plus LaserPrinter on page 4-72
•
Lexmark Optra Color 1200 Printer on page 4-74
•
Lexmark Optra Color 40 Printer on page 4-78
•
Lexmark Optra Color 45 Printer on page 4-81
•
Lexmark Optra K 1220 Printer on page 4-83
•
Lexmark Optra C Color LaserPrinter on page 4-86
•
Lexmark Optra E LaserPrinter on page 4-89
•
Lexmark Optra N LaserPrinter on page 4-91
•
Lexmark Optra E310 Laser Printer on page 4-95
•
Lexmark Optra M410 Laser Printer on page 4-98
•
Lexmark Optra Se Laser Printer on page 4-101
•
Lexmark Optra T Laser Printer Family on page 4-104
•
Lexmark Optra W810 Laser Printer on page 4-107
•
Lexmark Plus Printer Models 2380–3, 2381–3, 2390–3, 2391–3 on page 4-111
•
OKI MICROLINE 801PS/+F, 801PSII/+F, 800PSIILT on page 4-112
•
Printronix P9012 Line Printer on page 4-112
•
QMS ColorScript 100 Model 20 Printer on page 4-112
•
Texas Instruments OmniLaser 2115 Page Printer on page 4-50
IBM Personal Printer II Models 2380, 2381, 2390, 2391, 2380–2, 2381–2,
2390–2, 2391–2
Printers purchased in Greece or Turkey have the Greek or Turkish code pages available
with the printer. To print Greek or Turkish characters, you must notify the system that the
code pages are available. To do this:
1. As the root user, type smit chpq.
2. Select the appropriate print queue and select Printer Setup on the Change/Show
Characteristics menu.
3. Change COUNTRY to the appropriate country selection.
IBM 3812 Model 2 Page Printer
The system assumes that a font diskette, Feature #3155, is in the printer’s diskette drive.
For the support of Greek or Turkish characters, the system assumes that a Language Group
3 font diskette is in the drive.
Fonts are loaded into printer memory from a font diskette inside the printer. The system
maintains a record of which fonts have been loaded, and whether the fonts in memory may
have been corrupted by a print job and therefore need reloading from diskette. If the printer
is turned off and then turned back on, run the splp command with the –F ! flag and the
device name. This notifies the system that the fonts need to be loaded into the printer’s
memory.
The 3812 Model 2 Page Printer can print on paper other than the default 8–1/2 by 11 inch
size. You can change the paper size using SMIT. This is described in Specifying Paper Size
on page 2-25. To change paper size for a single print job, specify the –Q flag with the qprt
command.
If you need support for Greek or Turkish characters, complete the following steps:
1. You must have a Language Group 3 font diskette installed in the printer.
Printer, Plotter, and Spooler Subsystem Programming
4-51
2. As the root user, type smit chpq.
3. Select the appropriate print queue and select Printer Setup on the Change/Show
Characteristics menu. For the font diskette, specify:
– CP851 to print Greek characters.
– CP853 to print Turkish characters.
IBM 3816 Page Printer
The system assumes that a font diskette, Feature #7652, is in the printer’s diskette drive.
Fonts are loaded into printer memory from a font diskette inside the printer. The system
maintains a record of which fonts have been loaded, and whether the fonts in memory may
have been corrupted by a print job and therefore need reloading from diskette. If the printer
is turned off and then turned back on, run the splp command with the –F ! flag and the
device name. This notifies the system that the fonts need to be loaded into the printer’s
memory.
The 3816 Page Printer can print on paper other than the default 8–1/2 by 11 inch size. The
paper size can be changed using SMIT. This is described in Specifying Paper Size on page
2-25. To change paper size for a single print job, specify the –Q flag with the qprt
command.
IBM 4019 LaserPrinter and 4029 LaserPrinter
The system selects the IBM ASCII or PCL emulation data stream without manual
intervention.
The LaserPrinter can print on paper other than the default 8–1/2 by 11 inch size and on
envelopes other than the default #10 envelope. The paper or envelope size can be changed
using SMIT and described in Specifying Paper Size on page 2-25. To change paper or
envelope size for a single print job, specify the –Q flag with the qprt command.
If a font card is installed, the system must be alerted. To handle this, do the following:
1. As the root user, type smit chpq.
2. Select the appropriate print queue and select Printer Setup on the Change/Show
Characteristics menu.
– Specify which font card is installed in the top card slot.
– Specify which font card is installed in the bottom card slot.
Note: The value of the nn variable is the font card identifier, which is the two–digit
number just above the arrow on the font card.
If a PostScript option is installed in your 4019 LaserPrinter and the PostScript option
supports automatic emulation/mode switching, the printer can be configured to switch
automatically between PostScript mode and emulation modes, as well as switching between
emulation modes. To determine if the PostScript option installed in your printer supports
this, check the guide to operations manual that came with your PostScript option. Or, verify
that the PostScript interpreter is version 52.3 or later, by checking the PostScript startup
page that is printed when the printer is powered on in PostScript mode (unless it has been
disabled). If automatic emulation/mode switching is indicated, notify the system as follows:
1. As the root user, type smit chpq.
2. Select the appropriate print queue and select Printer Setup on the Change/Show
Characteristics menu. Specify yes in the AUTOMATIC MODE SWITCHING for
PostScript attribute.
Notes:
a. The Japanese Base System Locale Package must be installed to print Japanese
characters.
4-52
Guide to Printers and Printing
b. Japanese characters cannot be printed with PostScript option.
c. To print multibyte characters, specify 16x16 or 32x32 dot font with the –F option
using the qprt command. For example:
qprt –Pkji –F’RomanKn23,Kanji23,IBM_JPN23’ file
IBM 4037 and IBM 4039 LaserPrinter
The system selects the IBM ASCII or PCL emulation data stream without manual
intervention.
The printers can print on paper other than the default 8–1/2 by 11 inch size. The paper size
can be changed using SMIT. This is described in Specifying Paper Size on page 2-25. To
change paper size for a single print job, specify the –Q flag with the qprt command.
Notes:
1. The Japanese Base System Locale Package must be installed to print Japanese
characters.
2. Japanese characters cannot be printed with PostScript option.
3. To print multibyte characters, specify 16x16 or 32x32 dot font with the –F option using
the qprt command. For example:
qprt –Pkji –F’RomanKn23,Kanji23,IBM_JPN23’ file
IBM 4072 ExecJet
If support for Greek or Turkish characters is needed and an NLS I font card is installed, the
system needs to know that the font card is installed:
1. As the root user, type smit chpq.
2. Select the appropriate print queue and select Printer Setup on the Change/Show
Characteristics menu.
– Specify which font card is installed in the left card slot.
– Specify which font card is installed in the right card slot.
Note: The value of the nn variable is the last two digits of the font card part
number.
IBM 4076 InkJet Printer
The system selects the IBM ASCII or PCL emulation data stream without manual
intervention.
The InkJet printer can print on paper other than the default 8–1/2 by 11 inch size and on
envelopes other than the default #10 envelope. The paper and envelope size can be
changed using SMIT as described in Specifying Paper Size on page 2-25. To change paper
or envelope size for a single print job, specify the –Q flag with the qprt command.
IBM Proprinter Models 4201–3, 4202–3, 4207–2, 4208–2
If support for Greek or Turkish characters is needed and the appropriate font diskette is
available, install the fonts by entering, as root user:
piofontin –t PrinterType –c CodePage [–d DeviceName]
Specifically, when issuing this command, the PrinterType parameter is 4201–3, 4202–3,
and the CodePage parameter is 851 (Greek) or 853 (Turkish). The DeviceName
parameter (for example /dev/fd1 ) is needed only if the diskette device is not /dev/fd0,
the standard 3.5–inch diskette drive.
Note: If Greek or Turkish fonts have been installed, you must enter the following to
download the fonts whenever the printer is turned off and on:
Printer, Plotter, and Spooler Subsystem Programming
4-53
splp –F! xxx
where xxx is the device name of the printer, such as lp0. This instructs the system to
download the Greek or Turkish font to the printer.
IBM 4208–502, IBM 5572–B02, IBM 5573–H02, and IBM 5579–H02/K02
The Japanese and Proprinter data streams are supported. To print Japanese characters,
specify 24x24 dot font with the –F option on the qprt command, as follows:
qprt –Pkji –F/usr/lib/X11/fonts/JP/IBM_JPN17.pcf.Z file
IBM 4216 Personal Page Printer, Model 031
The switches on the back of the printer must be set for automatic emulation switching, as
specified in Appendix B of the Personal Page Printer II Model 031 Guide to Operations
manual.
The system selects the PostScript, Proprinter XL emulation, PCL emulation, or Diablo 630
emulation without manual intervention.
ASCII files can also be printed using the PostScript data stream.
If you attach the printer to a serial port, you may need to send a special PostScript file to the
printer to establish the baud rate, parity, and protocol for the printer. The Personal Page
Printer II Model 031 Guide to Operations manual contains a sample file.
Print queues for the Proprinter XL, PCL emulation, and Diablo 630 emulations check the
first two characters of each print file. If the first two characters are %!, the file is assumed to
be a PostScript file, and the virtual printer for PostScript is used instead of the virtual printer
implied by the print queue name. If you have not configured a print queue for PostScript, the
print job will fail.
If you want to print a PostScript file as an ASCII file instead of a PostScript file, specify the
–da flag and parameter with the qprt command when you submit the print job for the IBM
Proprinter XL, PCL emulation, or Diablo 630 emulations.
IBM 4216–510 and IBM 5327–011
The Japanese data stream is supported. To print Japanese characters, specify 24x24 dot
font with the –F option on the qprt command. as follows:
qprt –Pkji –F/usr/lib/X11/fonts/JP/IBM_JPN17.pcf.Z file
IBM 4234 Printer
The system assumes that the appropriate character set (printed language) has been
selected from the printer’s control panel. Refer to the section on setting a printed language
in the printer’s operating instructions manual.
If the selected character set is not 02 (PC Multilingual):
1. Type the SMIT fast path:
smit chpq
2. Select the appropriate print queue, then select Printer Setup on the Change/Show
Characteristics menu.
3. Select the character set for the PRINTED LANGUAGE attribute.
IBM 5202 Quietwriter III
Although this printer detects the presence of a font cartridge, the host system cannot. You
must tell the system about the font cartridge in any of the following instances:
• Plug in a font cartridge that includes a font in Code Page 850.
• Print using the font.
4-54
Guide to Printers and Printing
• Print characters unique to Code Page 850 (European characters).
To tell the system about the font cartridge:
1. Type the SMIT fast path:
smit chpq
2. Select the appropriate print queue and select Printer Setup on the Change/Show
Characteristics menu.
3. Specify yes for the CODE PAGE 850 attribute.
IBM 5204 Quickwriter
If a font cartridge is installed to support Greek or Turkish:
1. Type smit chpq as the root user.
2. Select the appropriate print queue and select Printer Setup on the Change/Show
Characteristics menu.
3. Specify font cartridge part number for the Font Cartridge attribute. Supported values are
1301598 (Greek) and 1301614 (Turkish).
IBM 5575–B02/F02/H02 and IBM 5577–B02/F02/FU2/G02/H02/J02/K02
To print Japanese characters, specify 24x24 dot font with the –F option on the qprt
command, as follows:
qprt –Pkji –F/usr/lib/X11/fonts/JP/IBM_JPN17.pcf.Z file
IBM 5584–G02/H02, IBM 5585–H01, IBM 5587–G01/H01 and IBM
5589–H01
To print Japanese characters, specify 24x24 dot font with the –F option on the qprt
command, as follows:
qprt –Pkji –F/usr/lib/X11/fonts/JP/IBM_JPN17.pcf.Z file
IBM 6252 Impactwriter and IBM 6252 Printer
If the active code page for the installed print band is not Code Page 850, you must notify the
system:
1. Type smit chpq as the root user.
2. Select the appropriate print queue and select Printer Setup on the Change/Show
Characteristics menu.
3. Select the code page for the ACTIVE CODE PAGE attribute.
IBM Network Color Printer
The predefined files support the IBM Network Color Printer 2.0 or higher controller code
level.
Additional qprt option flags that are valid using only the Network Color Printer PS queue:
Printer, Plotter, and Spooler Subsystem Programming
4-55
–e #
Specifies brightness level.
0 Default Printer Setting
1 Lightest
2 Lighter
3 Light
4 Normal
5 Dark
6 Darker
7 Darkest
–E #
Specifies the finish.
0 Default Printer Setting
1 Normal
2 Matte
3 Glossy
–k #
Specifies the color model.
0 Default Printer Setting
1 CMYK
2 Grayscale
–K #
Specifies the color rendering dictionary.
0 Default Printer Setting
1 Scanner
2 Highlight
3 Photographic
4 Presentation
5 Monitor
6 Solid Color
–S #
Specifies the print mode.
0 Default Printer Setting
1 Photo Quality
2 Business Graphics
The following valid queue names are located on the IBM Network Color Printer:
ibmcolor_direct
1.03 or 1.1 controller code and 16MB of memory.
ibmcolor_print
1.03 or 1.1 controller code and 32MB or 48MB of memory.
ibmncp_direct
2.0 or higher controller code and 16MB of memory.
ibmncp_print
2.0 or higher controller code and 32MB or 48MB of
memory.
Note: To determine the controller code level and amount of memory on your IBM
Network Color Printer, print a configuration page from the printer operator panel. See the
configuration page under ”GENERAL INFO.” Memory is the second item, and the third
item is version of the controller code. The predefined files on AIX 4.2.1 or later only
supports the IBM Network Color Printer 2.0 or higher controller code level.
4-56
Guide to Printers and Printing
IBM Network Printer 12, 17, and 24
IBM Network Printers can print on paper other than the default 8 1/2 by 11 inch size. The
paper size can be changed using SMIT as described in Specifying Paper Size on page 2-25
and see IBM Network Color Printer on page 4-55. To change paper size for a single print
job, specify the –Q flag with the qprt command.
To print more lines per page than the line space allows (6 or 8 lines per inch), specify the
number of lines per page. The line spacing is compressed to allow the larger number of
lines to fit on a page. For example, if the line spacing is 6 lines per inch, entering the
command qprt –l 66 FileName causes the file FileName to print at 66 lines per
page instead of the default 60 lines per page.
The IBM Network Printer 12, 17, and 24 support the following fonts and pitches:
courier
10, 12, or 17 pitch
courier–bold
10, 12, or 17 pitch
courier–italic–bold
10, 12, or 17 pitch
lettergothic
10, 12, or 17 pitch
lettergothic–bold
10, 12, or 17 pitch
lettergothic–italic
10, 12, or 17 pitch
lineprinter
17 pitch
For example, entering the following command qprt –s Lineprinter –p 17
FileName causes the file FileName to be printed in lineprinter font at 17 pitch (17
characters per inch).
The following are the type styles for Arabic, Greek, and Hebrew:
Arabic Type Styles
Greek Type Styles
Hebrew Type Styles
typing typing–italic
typing–bold
typing–bold–italic
grcour grcour–oblique
grcour–bold
grcour–bold–oblique
shalom shalom–bold
shalom–italic
shalom–bold–italic
rokaa rokaa–italic
grhelvet grhelvet–bold
rokaa–bold rokaa–bold–italic grhelvet–oblique
grhelvet–bold–oblique
narkisstam narkisstam–bold
narkisstam–italic
narkisstam–bold–italic
setting setting–italic
setting–bold
setting–bold–italic
narkissim narkissim–bold
narkissim–italic
narkissim–bold–italic
grtimesnr grtimesnr–bold
grtimesnr–oblique
grtimesnr–bold–oblique
Note: Be sure to download the fonts to the Flash SIM or to a hard disk drive on the
printer when using the Arabic, Greek, or Hebrew type styles.
The IBM Network Printer 12, 17, and 24 support the following output bins. The output bins
can be accessed using the (–=) flag of the qprt command. The following table shows the
possible values and the corresponding output bin destination.
–= value (#)
destination output bin
IBM Network Printer 12
0
Main output tray
1
Face–up (rear) tray
IBM Network Printer 17
0
Main output tray
1
Mail Box Bin 1
2
Mail Box Bin 2
Printer, Plotter, and Spooler Subsystem Programming
4-57
3
Mail Box Bin 3
4
Mail Box Bin 4
5
Mail Box Bin 5
6
Mail Box Bin 6
7
Mail Box Bin 7
8
Mail Box Bin 8
9
Mail Box Bin 9
10
Mail Box Bin 10
50
Offset Bin
–= value (#)
destination output bin
IBM Network Printer 24
0
Auto Output Bin
1
Main Output Tray
2
Face–up (Rear Bin)
3
Upper Finisher Bin Face–down
4
Middle Finisher Bin Face–down
5
Lower Finisher Bin Face–down
6
Upper Finisher Bin Face–up
7
Middle Finisher Bin Face–up
8
Lower Finisher Bin Face–up
9
Auto Finisher Bin Face–down
The following additional qprt option flags are valid using the PS or PCL queue of the
Network Printer 24 only:
–e #
Specifies staple and collation. The –e #
option flag only works if a face–down
finisher bin is selected. See –= option flag
for more information.
0 Default Printer Setting
1 Portrait Staple
2 Landscape Staple
3 Two Portrait Staples
4 Two Landscape Staples
5 Offset Jog at end of Job
6 Offset Jog at end of Set
7 No Stapling or Collating
Valid queue names located on the IBM Network Printer 12, 17, and 24 include:
4-58
TEXT
Data that requires line feed and
carriage–return processing.
PASS
Data that requires no further processing.
Guide to Printers and Printing
IBM InfoPrint 20
–q #
Specifies print quality options. The –q options for the InfoPrint 20
are:
600Specifies 600 dpi
1200
Specifies 1200dpi. This produces prints that appear to have twice
the actual printer resolution. 1200dpi print quality is recommended
for printing data such as images that were created at 1200dpi.
–u #
Sets the paper source. The –u options for the InfoPrint 20 are:
0 Use current input source selected on printer
1 Tray 1
2 Auxiliary tray – manual feed for paper
3 Auxiliary tray – manual feed for envelopes
4 Auxiliary tray – automatic
5 Tray 2
6 Envelope tray
7 Tray 3
9 2000 sheet input drawer
–= #
Sets type of output paper handling. The –= options for the InfoPrint
20 are:
0 Main
1 Main with Offset Option set
Printer, Plotter, and Spooler Subsystem Programming
4-59
–Q #
Specifies paper size for the print job. The –Q options for the InfoPrint
20 are:
1 Letter
2 Legal
3 Folio
4 11 x 17
5 A4
6 B4
7 A3
8 Universal paper size
9 B5–JIS
10A5
11 Executive
12Statement
13Hagaki
14Monarch envelope
15COM10 envelope
16C5 envelope
17DL envelope
18Universal envelope size
–s Name
Specifies a type style with the Name variable. Typestyles for the
InfoPrint 20 are:
• courier
• courier–bold
• courier–italic
• courier–bold–italic
• gothic
• lineprinter
• gothic–bold
• gothic–italic
• prestige elite
• prestige elite–bold
• prestige elite–italic
• prestige elite–bold–italic
4-60
Guide to Printers and Printing
IBM InfoPrint 32 Printer
–= #
Type of Output Paper Handling.
0 Default Printer Setting
1 Main (Face Down)
2 Face–up (Rear Bin)
3 Finisher Bin 1 (Face Down Top)
4 Finisher Bin 2 (Face Down Middle)
5 Finisher Bin 3 (Face Down Bottom)
9 Any Finisher Bin (Face Down)
–e #
Specifies Staple/Collation.
This option flag only works if a face down finisher bin is selected
(See –= option flag).
0 Default Printer Setting
1 Portrait Staple
2 Landscape Staple
3 Two Portrait Staples
4 Two Landscape Staples
5 Offset Jog at end of Job
6 Offset Jog at end of Set
7 No Stapling or Collating
–k #
Specifies the number of RePro Collated Copies Printer must have a
hard disk drive installed to perform this function.
–s #
Name Specifies a type style with the Name variable.
Examples are courier, courier–bold, courier–italic courier–bold–italic,
lettergothic, lineprinter, lettergothic–bold, lettergothic–italic,
prestigeelite, prestigeelite–bold, prestigeelite–italic, and
prestigeelite–bold–italic.
–u #
Sets the paper source to one of the following:
0 Use Current Input Source Selected on Printer
1 Tray 1
2 Auxiliary Tray – Manual Feed (for papers)
3 Auxiliary Tray – Manual Feed (for envelopes)
4 Auxiliary Tray (automatic)
5 Tray 2
6 Envelope Tray
7 Tray 3
8 Tray 4
9 Tray 5
Printer, Plotter, and Spooler Subsystem Programming
4-61
–z #
Rotates page printer output the number of quarter–turns clockwise
as specified by the Value variable. The length (–l) and width (–w)
values are automatically adjusted accordingly.
0 Portrait
1 Landscape
2 Reverse Portrait
3 Reverse Landscape
–Q #
Specifies paper size for the print job
1 Letter
2 Legal
3 Folio
4 11x17
5 A4
6 B4
7 A3
8 Universal Paper Size
9 B5–JIS
10A5
11 Executive
12Statement
13Hagaki
14Monarch Envelope
15COM10 Envelope
16C5 Envelope
17DL Envelope
18Universal Envelope Size
4-62
Guide to Printers and Printing
IBM InfoPrint 40 Printer
–= #
Type of Output Paper Handling.
0 Default Printer Setting
1 Main (Face Down)
2 Face–up (Rear Bin)
3 Finisher Bin 1 (Face Down Top)
4 Finisher Bin 2 (Face Down Middle)
5 Finisher Bin 3 (Face Down Bottom)
9 Any Finisher Bin (Face Down)
–e #
Specifies Staple/Collation. This option flag only works if a face down
finisher bin is selected (See –= on page 4-63 option flag).
0 Default Printer Setting
1 Portrait Staple
2 Landscape Staple
3 Two Portrait Staples
4 Two Landscape Staples
5 Offset Jog at End of Job
6 Offset Jog at End of Set
7 No Stapling or Collating
–k #
Specifies the number of RePro Collated Copies. Printer must have a
hard disk drive installed to perform this function.
–s #
Name specifies a type style with the Name variable. Examples are
courier, courier–bold, courier–italic, courier–bold–italic, lettergothic,
lineprinter, lettergothic–bold, lettergothic–italic, prestigeelite,
prestigeelite–bold, prestigeelite–italic, and prestigeelite–bold–italic.
–u #
Sets the paper source to one of the following:
0 Use Current Input Source Selected on Printer
1 Tray 1
2 Auxiliary Tray – Manual Feed (for papers)
3 Auxiliary Tray – Manual Feed (for envelopes)
4 Auxiliary Tray (automatic)
5 Tray 2
6 Envelope Tray
7 Tray 3
8 Tray 4
9 Tray 5
Printer, Plotter, and Spooler Subsystem Programming
4-63
–Q #
Specifies the paper size for the print job.
1 Letter
2 Legal
3 Folio
4 11x17
5 A4
6 B4
7 A3
8 Universal Paper Size
9 BJ–JIS
10A5
11 Executive
12Statement
13Hagaki
14Monarch Envelope
15COM10 Envelope
16C5 Envelope
17DL Envelope
18Universal Envelope Size
Queue Names
Valid queue names located on the IBM Network Printer 12, 17, 24,
and InfoPrint 20, 32, and 40 are as follows:
TEXT
Data that requires line feed, carriage return processing
PASS
Data that requires no further processing
4-64
Guide to Printers and Printing
Canon LASER SHOT LBP–B404PS/Lite
The Japanese PostScript and ASCII data streams are supported. Japanese language text
files cannot be printed.
Canon LASER SHOT LBP–B406S/D/E/G, A404/E, A304E
The Japanese code sets are supported. Do not use the IBM 5575 emulation card. The
lips3 queue cannot be used for models LBP–B406S/D,A404 with LIPS II+ mode.
Dataproducts LZR 2665 Laser Printer
The data stream (PostScript, Diablo 630) must be selected manually, using the control
panel. ASCII files can also be printed using the PostScript data stream.
Hewlett–Packard LaserJets II, III, IIISi, 4, 4Si, 4Plus, 4V, 4000, 5Si/5Si
MX, 5Si Mopier, 8000 Color, and 8500 Color
Hewlett–Packard LaserJet printers can print on paper other than the default 8–1/2 by 11
inch size. The paper size can be changed using SMIT as described in Specifying Paper
Size on page 2-25. To change paper size for a single print job, specify the –Q flag with the
qprt command.
To print more lines per page than the line space allows (6 or 8 lines per inch), specify the
number of lines per page. The line spacing is compressed to allow the larger number of
lines to fit on a page. For example, if the lines spacing is 6 lines per inch, entering the
command qprt –l 66 FileName causes the file FileName to print at 66 lines per
page instead of the default 60 lines per page.
The HP LaserJet III, IIISi, and 4 support the following fonts and pitches:
courier
10, 12, or 17 pitch
courier–bold
10 or 12 pitch
courier–italic
10 or 12 pitch
lineprinter
17 pitch
For example, entering the command qprt –s Lineprinter –p 17 FileName causes
the file FileName to be printed in lineprinter font at 17 pitch (17 characters per inch).
Attaching a Hewlett–Packard LaserJet printer to an RS–422A serial port requires a special
cable. You can construct the cable using the following pin–out information:
Socket Connector (System Signal
End)
Pin Connector (Device
End)
shell
Shield Ground
1
2
TxA
3
3
RxA
9
4
TxB
18
5
RxB
10
7
Signal Ground
7
Hewlett–Packard LaserJet 5Si and 5Si Mopier Printers
Output Bins
The base LaserJet 5Si and 5Si Mopier printers have two possible destinations:
• Top output bin that prints face down.
• Left–side output bin that prints face up in reverse order.
Printer, Plotter, and Spooler Subsystem Programming
4-65
If an optional High Capacity Output (HC0) device is installed, the additional trays are
available as well. The base operating system supports up to eight of the HC0 output bins for
the HP 5Si printer, and up to 5 for the HC0 output bins and a stapler bin for the 5Si Mopier.
The output bins can be accessed using the (–=) flag of the qprt command. The following
table shows the possible values and the corresponding output bin destination.
LaserJet 5Si:
–= value (#)
destination output bin
0
Printer top/face–down bin
1
HC0 face–down bin 1
2
HC0 face–down bin 2
3
HC0 face–down bin 3
4
HC0 face–down bin 4
5
HC0 face–down bin 5
6
HC0 face–down bin 6
7
HC0 face–down bin 7
8
HC0 face–down bin 8
50
HC0 face–up
50
Printer left/face–up bin (when HC0 not
installed)
LaserJet 5Si Mopier:
–= value (#)
destination output bin
0
Printer top/face–down bin
1
HC0 face–down bin 1
2
HC0 face–down bin 2
3
HC0 face–down bin 3
4
HC0 face–down bin 4
5
HC0 face–down bin 5
50
HC0 face–up
50
Printer left/face–up bin (when HC0 not
installed)
51
Stapler bin
Number of Copies (LaserJet 5Si Mopier)
The LaserJet 5Si Mopier supports printing copies internal with the –W flag. This differs from
the –N flag supported by the spooler. With the –N flag, copies are processed on the base
operating system machine and then sent to the printer one at a time. However, the –W
option on the LaserJet 5Si Mopier sends only one copy of the print job to the printer and the
copies are then produced by the printer. The basic format is: –W #
4-66
Guide to Printers and Printing
Hewlett–Packard LaserJet 8000 and 8500 Color Printers
Output Bins
The base LaserJet 8500 Color and LaserJet 8000 printers have two possible destinations:
• Top output bin that prints face down.
• Left–side output bin that prints face up in reverse order.
If an optional High Capacity Output (HC0) device is installed, the additional trays are
available as well.
The output bins can be accessed using the (–=) flag of the qprt command. The following
table shows the possible values and the corresponding output bin destination.
LaserJet 8500 Color:
–= value (#)
destination output bin
0
Printer top/face–down bin
1
HC0 face–down bin 1
2
HC0 face–down bin 2
3
HC0 face–down bin 3
4
HC0 face–down bin 4
5
HC0 face–down bin 5
6
HC0 face–down bin 6
7
HC0 face–down bin 7
8
HC0 face–down bin 8
50
HC0 face–up
50
Printer left/face–up bin (when HC0 not
installed)
LaserJet 8000:
–= value (#)
destination output bin
0
Printer top/face–down bin
1
HC0 face–down bin 1
2
HC0 face–down bin 2
3
HC0 face–down bin 3
4
HC0 face–down bin 4
5
HC0 face–down bin 5
6
HC0 face–down bin 6
7
HC0 face–down bin 7
8
HC0 face–down bin 8
50
HC0 face–up
50
Printer left/face–up bin (when HC0 not
installed)
51
Stapler bin
Number of Copies
The LaserJet 8000 and 8500 Color printers support printing copies internal. With the –W
flag, only one copy of the print job is sent to the printer and the copies are then produced by
the printer. The basic format is: –W #
Printer, Plotter, and Spooler Subsystem Programming
4-67
Paper Size
Specifies paper size for the print job.
4-68
–Q 1
Letter
–Q 2
Legal
–Q 4
A4
–Q 5
Exec
–Q 8
A3
Guide to Printers and Printing
Lexmark 4227 Forms Printer
Paper Source
Paper source selection is supported by using the –u flag of the qprt
command.
–u 1
tractor 1
–u2
tractor 2
The banner and trailer pages use the same source as the print job. It
is suggested that the printer be attended when switching between
tractors.
Pitch, Font, and
Quality
Pitch selection is supported by using the –p flag for the pitch, the –s
flag for font name, and –q flag of the qprt command for print quality.
The default values supported include:
10
pitch
courier
font
q uality
1 or draft
The valid font values include:
Font Name
– sfast draft
– sdraft
– scourier
– sgothic
The valid quality values include:
Quality (–q flag)
0 fast draft
1 draft
2 near letter quality
The valid pitch values are 10, 12, 17, and 20.
Notes:
1. Selection of draft or fast draft will override the selected font.
2. Bold font is supported using the –e flag and emphasized print.
Italic font is supported using the –k flag and italic print.
Page Width
The –w flag controls the width of the printable page in characters.
The default is 136.
Printer, Plotter, and Spooler Subsystem Programming
4-69
Lexmark Optra Laser Printer
Paper Source
Paper source selection is supported for both the enhanced PCL (R)
5 emulation and the PostScript Level 2 emulation by using the –u
flag of the qprt command. There are several optional input sources.
The input source number is the same for both PCL and PostScript:
–umanual
0
feed
–utray
1 1
–utray
2 2
–utray
3 3
–ufeeder
4
or feeder 1
–ufeeder
5
2
By default the banner and trailer pages come from the top tray. To
change the default, change the values for the uH and/or uT attributes
respectively in the colon file to the value for the desired paper source
(s0–S5). Use the lsvirprt command.
Paper Size
Paper size selection is supported by using either one or both of the
qprt command flags, –O and –Q. The –O flag controls paper versus
envelopes. A value of 3 indicates a paper size and 4 an envelope
size. Envelopes are only valid for manual feed, feeder, or feeder 2.
The default for –O is 3 or paper. The default for –Q is 1 or Letter for
paper sizes and Com 10 for envelope sizes.
Paper Sizes (–0 3)
Envelope Sizes (–0 4)
–Q 1 Letter
7 3/4 Monarch
–Q 2 Legal
9 (Com 9)
–Q 3 B5 paper
10 (Com 10)
–Q 4 A4
DL
–Q 5 Executive
C5
–Q 6 A5
B5 Envelope
–Q 7
Other Envelope
Paper Type
The Optra printer supports paper types: rough, normal (default),
transparency, labels, and cardstock using the –y parameter of the
qprt command or the _y attribute in the colon file.
–y Rough
1
–y Normal
2
(default)
–y Transparency
3
–y Labels
4
–y Cardstock
5
4-70
Guide to Printers and Printing
Print Resolution
The Optra plus printer supports print resolution of 300, 600, and
1200 dpi using the –q flag of the qprt command. The default is 600
dpi.
–q300
–q600
–q1200
Pitch
Pitch selection is supported for the PCL 5 emulation by using the –p
flag for pitch and the –s flag for font name with the qprt command.
Pitch values between 1 and 100 characters per inch (cpi) in whole
integers are supported. The condensed print flag, –K, is not
supported.
Font Name
Pitch
–s courier
–p (1 to 100)
–s courier–bold
–p (1 to 100)
– s courier–italic
–p (1 to 100)
–s courier–bold italic
–p (1 to 100)
–s gothic
–p (1 to 100)
–s gothic–bold
–p (1 to 100)
– s gothic–italic
–p (1 to 100)
–s lineprinter
–p 17
Note: To format ASCII for other font styles, use the base operating
system enscript utility or the qprt command with the –da, –s, and
–p flags to a PostScript queue. For postscript queues, –p stands
for point size and the valid list of fonts are located in
/usr/lib/ps/fontmap. Valid point sizes are any integer from 1 to
1008.
Note:
Also, only a pitch of 17 is supported for the lineprinter font style.
Duplex Mode
The optional duplex feature is supported by the –Y flag of the qprt
command.
–Ysimplex
0
–Yduplex,
1
long–edge binding
–Yduplex.
2
short–edge binding
Printer, Plotter, and Spooler Subsystem Programming
4-71
Lexmark Optra Plus LaserPrinter
Paper Source
Paper source selection is supported for both the enhanced PCL (R)
5 emulation and the PostScript Level 2 emulation by using the –u
flag of the qprt command. There are several optional input sources.
The input source number is the same for both PCL and PostScript:
–umanual
0
feed
–utray
1 1
–utray
2 2
–utray
3 3
–ufeeder
4
or feeder 1
–ufeeder
5
2
By default the banner and trailer pages come from the top tray. To
change the default, change the values for the uH and/or uT attributes
respectively in the colon file to the value for the desired paper source
(s0–S5). Use the lsvirprt command.
Paper Size
Paper size selection is supported by using either one or both of the
qprt command flags, –O and –Q. The –O flag controls paper versus
envelopes. A value of 3 indicates a paper size and 4 an envelope
size. Envelopes are only valid for manual feed, feeder, or feeder 2.
The default for –O is 3 or paper. The default for –Q is 1 or Letter for
paper sizes and Com 10 for envelope sizes.
Paper Sizes (–0 3)
Envelope Sizes (–0 4)
–Q 1 Letter
7 3/4 Monarch
–Q 2 Legal
9 (Com 9)
–Q 3 B5 paper
10 (Com 10)
–Q 4 A4
DL
–Q 5 Executive
C5
–Q 6 A5
B5 Envelope
–Q 7
Other Envelope
Paper Type
The Optra Plus printer supports paper types: rough, normal (default),
transparency, labels, and cardstock using the –y parameter of the
qprt command or the _y attribute in the colon file.
–y Rough
1
–y Normal
2
(default)
–y Transparency
3
–y Labels
4
–y Cardstock
5
4-72
Guide to Printers and Printing
Print Resolution
The Optra Plus printer supports print resolution of 300, 600, and
1200 dpi using the –q flag of the qprt command. The default is 600
dpi.
–q300
–q600
–q1200
Pitch
Pitch selection is supported for the PCL 5 emulation by using the –p
flag for pitch and the –s flag for font name with the qprt command.
Pitch values between 1 and 100 characters per inch (cpi) in whole
integers are supported. The condensed print flag, –K, is not
supported.
Font Name
Pitch
–s courier
–p (1 to 100)
–s courier–bold
–p (1 to 100)
– s courier–italic
–p (1 to 100)
–s courier–bold italic
–p (1 to 100)
–s gothic
–p (1 to 100)
–s gothic–bold
–p (1 to 100)
– s gothic–italic
–p (1 to 100)
–s lineprinter
–p 17
Note: To format ASCII for other font styles, use the base operating
system enscript utility or the qprt command with the –da, –s, and
–p flags to a PostScript queue. For PostScript queues, –p stands
for point size and the valid list of fonts are located in
/usr/lib/ps/fontmap. Valid point sizes are any integer from 1 to
1008.
Also, only a pitch of 17 is supported for the lineprinter font style.
Duplex Mode
The optional duplex feature is supported by the –Y flag of the qprt
command.
–Ysimplex
0
–Yduplex,
1
long–edge binding
–Yduplex,
2
short–edge binding
Printer, Plotter, and Spooler Subsystem Programming
4-73
Collation
The Optra Plus printer supports collation of multiple copies of a print
job internally. This feature is controlled by the –W and –S flags of the
qprt command.
–Scollation
!
off
–Scollation
+
on
–Snumber
#
of copies
Note: This function is independent of the –N flag of the qprt
command. The –N# flag will cause the printer job to be sent to the
printer # times. The –W# will send the print job once, and # copies
of the job will be printed.
Separator Pages
The Optra Plus printer supports internally generated separator
pages. This feature is controlled by the –E flag of the qprt command.
–ENone
0
–E1
Between Copies
–EBetween
2
Jobs
–EBetween
3
Pages
The paper source defaults to Feeder. To change the default, the uS
attribute must be changed in the virtual printer. The valid values for
uS are the same as the paper source flag –u except that manual
feed is not a valid source.
Note: This function is independent of the –B flag of the qprt
command.
Lexmark Optra Color 1200 Printer
Paper Source
Paper source selection is supported for both the PCL 5 emulation
and the PostScript Language by using the –u flag of the qprt
command.
–umanual
0
feed
–utray
1 1
–utray
2 2
–utray
3 3
–umultipurpose
4
feeder
By default the banner and trailer pages come from the tray 1. To
change the default, change the values for the uH and/or uT attributes
respectively in the colon file to the value for the desired paper
source. Valid values are the same as for the –u flag. Do this by
editing the virtual printer colon file by using the ”chvirprt” command.
4-74
Guide to Printers and Printing
Paper Size
Paper size selection is supported by using the qprt command flags,
–O and –Q. The –O flag controls paper versus envelope. A –O value
of 3 indicates a paper size and 4 an envelope size. The values 1 and
2 were skipped for backward compatibility. The first five paper sizes
are also numbered for backward compatibility. Whenever an invalid
value for the input source is selected, it will be ignored.
Note: Envelopes are available through Manual and MP Tray only.
The default for –O is 3 or paper. The default for –Q is 1 or Letter for
paper sizes and Monarch for envelope sizes.
Paper Sizes (–0 3)
Envelope Sizes (–0 4)
–Q 1 Letter
7 3/4 Monarch
–Q 2 Legal
9 (Com 9)
–Q 3 B5
10 (Com 10)
–Q 4 A4
DL
–Q 5 A5
C5
–Q 6 B4
B5 Envelope
–Q 7 A3
Other Envelope
–Q 8 11 X 17
–
Note: The printer file (lexOptraC1200.pcl) for PCL 5 defaults the
paper size to letter. To change the default size, change the values
for the s0–s3 attributes in the file respectively for the _u (paper
source) attributes. For example, to make legal the default size for
tray 2 change the s2 attribute value to 2.
SPECIAL NOTE: For PCL queues, if the selected size is not in the
selected input source, a search sequence will be used to find the
size requested. If the size is found that source will be used. For
PostScript queues, if the selected size is not in the selected input
source, the printer will prompt the user to load the source with the
appropriate size. This may result in an unexpected paper source
being used or an op–panel message that may not make sense at
first. Please refer to the manual to determine appropriate
responses.
Printer, Plotter, and Spooler Subsystem Programming
4-75
Pitch
Pitch selection is supported for the PCL emulation by using the –p
flag for pitch and the –s flag for font name (or type face). Pitch
values between 1 and 100 characters per inch (cpi) in whole integers
are supported. The condensed print flag, –K, is not supported.
Font Name
Pitch
–s courier
–p (1 to 100)
–s courier–bold
–p (1 to 100)
– s courier–italic
–p (1 to 100)
–s courier–bold italic
–p (1 to 100)
–s gothic
–p (1 to 100)
–s gothic–bold
–p (1 to 100)
– s gothic–italic
–p (1 to 100)
–s lineprinter
–p 17
Note: To format ASCII files for other font styles use the base
operating system enscript utility or the qprt command with the
–da, –s, and –p flags to a Postscript queue. For Postscript
queues, –p stands for point size and the valid list of fonts can be
found in /usr/lib/ps/fontmap. Valid point sizes are any integer
from 1 to 1008.
Only a pitch of 17 is supported for the lineprinter font style.
4-76
Guide to Printers and Printing
Collation
Normally, the –N command line option is used to specify the number
of copies desired. This method will cause that many copies of the
entire print job to be submitted or queued to the print system. Since
the Optra Color 1200 supports collation internally, options were
added to support it and the number of copies of each page internally.
This functionality– is limited by the amount of memory installed in
your printer and the size of the job. The –W# option determines how
many copies of each page is desired, where # is the number of
copies. The –S [!/+] option controls whether collation is desired. The
default is ! (or not). The main advantages of using the –W and –S
options are to conserve printer subsystem usage and allow the
printer to handle multiple copies instead of sending # copies to the
printer. Using the –S! options with –W# also allows # copies of each
page in a row, if that is desired. Note that using –N and –W
simultaneously is allowed. This would result in –N print jobs with –W
copies of each page in each job.
Separator Pages
The –E flag controls separator pages. The valid values are 0, 1, 2,
and 3 which represent NONE, BETWEENCOPIES,
BETWEENJOBS, and BETWEENPAGES respectively. The paper
source for separator pages is set via the colon file attribute uS and
defaults to TRAY 1. The valid values for uS are the same as uH and
uT, except manual feed is not a valid source for separator pages. To
change the default, the uS attribute must be changed in the virtual
printer to one of the valid values (see the ”Paper Source” information
for this printer).
Printer, Plotter, and Spooler Subsystem Programming
4-77
Lexmark Optra Color 40 Printer
Paper Source
Paper source selection is supported for both the PCL 5 emulation
and the PostScript Language by using the –u flag of the qprt
command.
–umanual
0
feed
–utray
1 1
Paper Size
Paper size selection is supported by using the qprt command flags,
–O and –Q. The –O flag controls paper versus envelope. A –O value
of 3 indicates a paper size and 4 an envelope size. The values 1 and
2 were skipped for backward compatibility. The first five paper sizes
are also numbered for backward compatibility. Whenever an invalid
value for the input source is selected, it will be ignored.
Note: Envelopes available from Manual and Tray 1
The default for –O is 3 or paper. The default for –Q is 1 or Letter for
paper sizes and Monarch for envelope sizes.
Paper Sizes (–0 3)
Envelope Sizes (–0 4)
–Q 1 Letter
7 3/4 Monarch
–Q 2 Legal
9 (Com 9)
–Q 3 B5
10 (Com 10)
–Q 4 A4
DL
–Q 5 Executive
C5
–Q 6 A5
B5 Envelope
–Q 7 Universal
Other Envelope
Note: The printer file (lexOptraC40.pcl) for PCL 5 defaults the
paper size to letter. To change the default size, change the values
for the s0–s3 attributes in the file respectively for the _u (paper
source) attributes. For example, to make legal the default size for
tray 2 change the s2 attribute value to 2.
Note: For PCL queues, if the selected size is not in the selected
input source, a search sequence will be used to find the size
requested. If the size is found that source will be used. For
PostScript queues, if the selected size is not in the selected input
source, the printer will prompt the user to load the source with the
appropriate size. This may result in an unexpected paper source
being used or an operator panel message that may not make
sense at first. Refer to the manual to determine appropriate
responses.
4-78
Guide to Printers and Printing
Pitch
Pitch selection is supported for the PCL emulation by using the –p
flag for pitch and the –s flag for font name (or type face). Pitch
values between 1 and 100 characters per inch (cpi) in whole integers
are supported. The condensed print flag, –K, is not supported.
Font Name
Pitch
–s courier
–p (1 to 100)
–s courier–bold
–p (1 to 100)
– s courier–italic
–p (1 to 100)
–s courier–bold italic
–p (1 to 100)
–s gothic
–p (1 to 100)
–s gothic–bold
–p (1 to 100)
– s gothic–italic
–p (1 to 100)
–s lineprinter
–p 17
Note: To format ASCII files for other font styles use the base
operating system enscript utility or the qprt command with the
–da, –s, and –p flags to a Postscript queue. For Postscript
queues, –p stands for point size and the valid list of fonts can be
found in /usr/lib/ps/fontmap. Valid point sizes are any integer
from 1 to 1008.
Only a pitch of 17 is supported for the lineprinter font style.
Printer, Plotter, and Spooler Subsystem Programming
4-79
4-80
Collation
Normally, the –N command line option is used to specify the number
of copies desired. This method will cause that many copies of the
entire print job to be submitted or queued to the print system. Since
the Optra Color 40 supports collation internally, options were added
to support it and the number of copies of each page internally. This
functionality– is limited by the amount of memory installed in your
printer and the size of the job. The –W# option determines how
many copies of each page is desired, where # is the number of
copies. The –S [!/+] option controls whether collation is desired. The
default is ! (or not). The main advantages of using the –W and –S
options are to conserve printer subsystem usage and allow the
printer to handle multiple copies instead of sending # copies to the
printer. Using the –S! options with –W# also allows # copies of each
page in a row, if that is desired. Note that using –N and –W
simultaneously is allowed. This would result in –N print jobs with –W
copies of each page in each job.
Separator Pages
The –E flag controls separator pages. The valid values are 0, 1, 2,
and 3 which represent NONE, BETWEENCOPIES,
BETWEENJOBS, and BETWEENPAGES respectively. The paper
source for separator pages is set via the colon file attribute uS and
defaults to TRAY 1. The valid values for uS are the same as uH and
uT, except manual feed is not a valid source for separator pages. To
change the default the uS attribute must be changed in the virtual
printer to one of the valid values (see paper source above).
Guide to Printers and Printing
Lexmark Optra Color 45 Printer
Paper Source
Paper source selection is supported for both the PCL 5 emulation
and the PostScript Language by using the –u flag of the qprt
command.
–umanual
0
feed
–utray
1 1
Paper Size
Paper size selection is supported by using the qprt command flags,
–O and –Q. The –O flag controls paper versus envelope. A –O value
of 3 indicates a paper size and 4 an envelope size. The values 1 and
2 were skipped for backward compatibility. The first five paper sizes
are also numbered for backward compatibility. Whenever an invalid
value for the input source is selected, it will be ignored.
Note: Envelopes available from Manual and Tray 1
The default for –O is 3 or paper. The default for –Q is 1 or Letter for
paper sizes and Monarch for envelope sizes.
Paper Sizes (–0 3)
Envelope Sizes (–0 4)
–Q 1 Letter
7 3/4 Monarch
–Q 2 Legal
9 (Com 9)
–Q 3 B5
10 (Com 10)
–Q 4 A4
DL
–Q 5 A5
C5
–Q 6 Executive
B5 Envelope
–Q 7 A3
Other Envelope
–Q 8 11 X 17
–
–Q 9 Universal
–
Note: The printer file (lexOptraC45.pcl) for PCL 5 defaults the
paper size to letter. To change the default size, change the values
for the s0–s3 attributes in the file respectively for the _u (paper
source) attributes. For example, to make legal the default size for
tray 2 change the s2 attribute value to 2.
Note: For PCL queues, if the selected size is not in the selected
input source, a search sequence will be used to find the size
requested. If the size is found that source will be used. For
PostScript queues, if the selected size is not in the selected input
source, the printer will prompt the user to load the source with the
appropriate size. This may result in an unexpected paper source
being used or an operator panel message that may not make
sense at first. Refer to the manual to determine appropriate
responses.
Printer, Plotter, and Spooler Subsystem Programming
4-81
Pitch
Pitch selection is supported for the PCL emulation by using the –p
flag for pitch and the –s flag for font name (or type face). Pitch
values between 1 and 100 characters per inch (cpi) in whole integers
are supported. The condensed print flag, –K, is not supported.
Font Name
Pitch
–s courier
–p (1 to 100)
–s courier–bold
–p (1 to 100)
– s courier–italic
–p (1 to 100)
–s courier–bold italic
–p (1 to 100)
–s gothic
–p (1 to 100)
–s gothic–bold
–p (1 to 100)
– s gothic–italic
–p (1 to 100)
–s lineprinter
–p 17
Note: To format ASCII files for other font styles use the base
operating system enscript utility or the qprt command with the
–da, –s, and –p flags to a Postscript queue. For Postscript
queues, –p stands for point size and the valid list of fonts can be
found in /usr/lib/ps/fontmap. Valid point sizes are any integer
from 1 to 1008.
Only a pitch of 17 is supported for the lineprinter font style.
4-82
Guide to Printers and Printing
Collation
Normally, the –N command line option is used to specify the number
of copies desired. This method will cause that many copies of the
entire print job to be submitted or queued to the print system. Since
the Optra Color 45 supports collation internally, options were added
to support it and the number of copies of each page internally. This
functionality– is limited by the amount of memory installed in your
printer and the size of the job. The –W# option determines how
many copies of each page is desired, where # is the number of
copies. The –S [!/+] option controls whether collation is desired. The
default is ! (or not). The main advantages of using the –W and –S
options are to conserve printer subsystem usage and allow the
printer to handle multiple copies instead of sending # copies to the
printer. Using the –S! options with –W# also allows # copies of each
page in a row, if that is desired. Note that using –N and –W
simultaneously is allowed. This would result in –N print jobs with –W
copies of each page in each job.
Separator Pages
The –E flag controls separator pages. The valid values are 0, 1, 2,
and 3 which represent NONE, BETWEENCOPIES,
BETWEENJOBS, and BETWEENPAGES respectively. The paper
source for separator pages is set via the colon file attribute uS and
defaults to TRAY 1. The valid values for uS are the same as uH and
uT, except manual feed is not a valid source for separator pages. To
change the default the uS attribute must be changed in the virtual
printer to one of the valid values (see paper source above).
Lexmark Optra K 1220 Printer
Paper Source
Paper source selection is supported for both the ”enhanced PCL (R)
5e emulation” and the ”PostScript (tm) Level 2 emulation” by using
the –u flag of the qprt command. There are several optional input
sources (see your manual to determine which are installed). These
numbers apply, no matter which ones are present. If one is not
present, choosing one of those will simply default as per the user’s
manual. The input source number is the same for both PCL and
PostScript:
–umanual
0
feed
–utray
1 1
–utray
2 2
–umultipurpose
3
tray
By default the banner and trailer pages come from tray 1. To change
the default, change the values for the uH and/or uT attributes
respectively in the virtual printer to the value for the desired paper
source. Do this using the chvirprt command. Valid values are the
same as for the –u flag.
Printer, Plotter, and Spooler Subsystem Programming
4-83
Paper Size
Paper size selection is supported by using either one or both of the
qprt command flags, –O and –Q. The –O flag controls paper versus
envelope. A value of 3 indicates a paper size and 4 an envelope
size. The values 1 and 2 were skipped for backward compatibility.
Envelopes are only valid for manual feed, envelope feeder, or the
multipurpose tray. The default for –Q is 1 or Letter for paper sizes
and 3 or Com 10 for envelope sizes. To change the defaults change
the s0 – s7 attributes respectively for each of the valid input sources.
Since manual feed and the multipurpose tray support both paper and
envelopes, the default for paper is the ”else” part (%e1) and the
default for envelopes is the ”then” part (%t3) of s0 and s7.
Paper Sizes (–0 3)
Envelope Sizes (–0 4)
–Q 1 Letter
7 3/4 Monarch
–Q 2 Legal
9 (Com 9)
–Q 3 B5 (JIS B5)
10 (Com 10)
–Q 4 A4
DL
–Q 5 Executive
C5
–Q 6 A5
B5 Envelope
–Q 7 Custom (Universal)
Other Envelope
Note: For PCL queues, if the selected size is not in the selected
input source, a search sequence will be used to find the size
requested. If the size is found that source will be used. For
PostScript queues, if the selected size is not in the selected input
source, the printer will prompt the user to load the source with the
appropriate size. This may result in an unexpected paper source
being used or an op–panel message that may not make sense at
first. Please refer to the manual to determine appropriate
responses.
4-84
Guide to Printers and Printing
Pitch
Pitch selection is supported for the PCL emulation by using the –p
flag for pitch and the –s flag for font name (or type face). Pitch
values between 1 and 100 characters per inch (cpi) in whole integers
are supported. The condensed print flag, –K, is not supported.
Font Name
Pitch
–s courier
–p (1 to 100)
–s courier–bold
–p (1 to 100)
– s courier–italic
–p (1 to 100)
–s courier–bold italic
–p (1 to 100)
–s gothic
–p (1 to 100)
–s gothic–bold
–p (1 to 100)
– s gothic–italic
–p (1 to 100)
–s lineprinter
–p 17
Note: To format ASCII files for other font styles use the base
operating system enscript utility or the –da flag to a Postscript
queue with the qprt command. Also, only a pitch of 17 is supported
for the lineprinter font style.
Only a pitch of 17 is supported for the lineprinter font style.
Collation
Normally, the –N command line option is used to specify the number
of copies desired. This method will cause that many copies of the
entire print job to be submitted or queued to the print system. Since
the Optra K 1220 supports collation internally, options were added to
support it and the number of copies of each page internally. This
functionality is limited by the amount of memory installed in your
printer and the size of the job. The –W# option determines how
many copies of each page is desired, where # is the number of
copies. The –S [!/+] option controls whether collation is desired. The
default is ! (or not). The main advantages of using the –W and –S
options are to conserve printer subsystem usage and allow the
printer to handle multiple copies instead of sending # copies to the
printer. Using the –S! options with –W# also allows # copies of each
page in a row, if that is desired. Note that using –N and –W
simultaneously is allowed. This would result in –N print jobs with –W
copies of each page in each job.
Separator Pages
The –E flag controls separator pages. The valid values are 0, 1, 2,
and 3 which represent NONE, BETWEENCOPIES,
BETWEENJOBS, and BETWEENPAGES respectively. The paper
source for separator pages is set via the colon file attribute uS and
defaults to TRAY 1. The valid values for uS are the same as uH and
uT, except manual feed is not a valid source for separator pages. To
change the default the uS attribute must be changed in the virtual
printer to one of the valid values (see paper source above).
Printer, Plotter, and Spooler Subsystem Programming
4-85
Lexmark Optra C Color LaserPrinter
Printing Color Files in
PCL 5 Emulation Mode
To print color files, or any preformatted print job in PCL
language, use the –dp flag of the qprt command. This sets
the base operating system printer backend to passthrough
mode and should be used any time you are printing from
an application in PCL emulation.
The print queue default can be changed to passthrough by
modifying the _d attribute in the colon file. See AIX 5L
Version 5.2 Commands Reference, Volume 3 for
information about the lsvirprt command.
Paper Source
Paper source selection is supported for both the PCL 5
emulation and the PostScript Language by using the –u
flag of the qprt command.
PCL
PostScript
–u 1 Top tray
–u 1 Top tray
–u 2 Bottom tray
–u 2 Bottom tray
–u 3 feeder
–u 3 feeder
Paper Size
Paper size selection is supported for the PCL 5 emulation
by using the –Q flag of the qprt command.
Paper Sizes
Size
–QLetter
1
(default)
–QLegal
2
–QB5
3
–QA4
4
To change the default size, change the values for the
s1–s3 attributes in the file. For example, to make A4 the
default size for all paper sources, change s1, s2, and s3 to
4. This changes the top tray, bottom tray, and feeder tray
sizes respectively.
4-86
Guide to Printers and Printing
Pitch
Pitch selection is supported for the PCL 5 emulation by
using the –p flag for pitch and the –s flag for font name
with the qprt command. Pitch values between 1 and 100
characters per inch (cpi) in whole integers are supported.
The condensed print flag, –K, is not supported.
Font Name
Pitch
–s courier
–p (1 to 100)
–s courier–bold
–p (1 to 100)
– s courier–italic
–p (1 to 100)
–s courier–bold italic
–p (1 to 100)
–s gothic
–p (1 to 100)
–s gothic–bold
–p (1 to 100)
– s gothic–italic
–p (1 to 100)
–s lineprinter
–p 17
Note: To format ASCII for other font styles, use the base
operating system enscript utility or the qprt command
with the –da, –s, and –p flags to a PostScript queue. For
PostScript queues, –p stands for point size and the valid
list of fonts are located in /usr/lib/ps/fontmap. Valid
point sizes are any integer from 1 to 1008.
Also, only a pitch of 17 is supported for the lineprinter font
style.
Printer, Plotter, and Spooler Subsystem Programming
4-87
Collation
The Optra C printer supports collation of multiple copies of
a print job internally. This feature is controlled by the –W
and –S flags of the qprt command.
–Scollation
!
off
–Scollation
+
on
–Snumber
+
of copies
Note: This function is independent of the –N flag of the
qprt command. The –N# flag will cause the print job to
be sent to the printer # times. The –W# will send the print
job once, and # copies of the job will be printed.
Separator Pages
The Optra C printer supports internally generated separator
pages. This feature is controlled by the –E flag of the qprt
command.
–ENone
0
–EBetween
1
Copies
–EBetween
2
Jobs
–EBetween
3
Pages
The paper source defaults to Feeder. To change the
default, the uS attribute must be changed in the virtual
printer. The valid values for uS are the same as the paper
source flag.
Note: This function is independent of the –B flag of the
qprt command.
4-88
Guide to Printers and Printing
Lexmark Optra E LaserPrinter
Paper Source
Paper source selection is supported for both the PCL 5 emulation
and the PostScript Language by using the –u flag of the qprt
command.
PCL
–umanual
1
feed
–utop
2 tray
–ubottom
3
tray
By default the banner and trailer pages come from the top tray. To
change the default, change the values for the uH and/or uT attributes
respectively in the colon file to the value for the desired paper source
(s1–s3). Use the lsvirprt command.
Paper Size
Paper size selection is supported for the PCL 5 emulation by using
the –Q and –O flags of the qprt command. A value of 3 for the –O
flag indicates paper and a value of 4 indicates envelope. Envelopes
are not valid in tray 2.
Paper Sizes (–0 3)
Envelope Sizes (–0 4)
–Q 1 Letter
7 3/4 Monarch
–Q 2 Legal
9 (Com 9)
–Q 3 B5 paper
10 (Com 10)
–Q 4 A4
DL
–Q 5
Executive C5
–Q 6 A5
B5 Envelope
–Q 7
Other Envelope
Note: The printer file (optra_e.pcl) for PCL 5 defaults the paper
size to letter. To change the default size, change the values for the
s1–s3 attributes in the file. For example, to make A4 the default
size for all paper sources, change s1, s2, and s3 to 4. This
changes the top tray, bottom tray, and feeder tray sizes
respectively.
Paper Type
The Optra E printer supports paper types: rough, normal (default),
transparency, labels, and cardstock using the –y parameter of the
qprt command or the _y attribute in the colon file.
–y Rough
1
–y Normal
2
(default)
–y Transparency
3
–y Labels
4
–y Cardstock
5
Note: These values apply only to paper and not envelopes. The
only values supported for tray 2 are rough and normal.
Printer, Plotter, and Spooler Subsystem Programming
4-89
Print Resolution
The Optra E printer supports print resolution of 300 and 600 dpi
using the –q flag of the qprt command. The default is 300 dpi.
–q300
–q600
Pitch
Pitch selection is supported for the PCL 5 emulation by using the –p
flag for pitch and the –s flag for font name with the qprt command.
Pitch values between 1 and 100 characters per inch (cpi) in whole
integers are supported. The condensed print flag, –K, is not
supported.
Font Name
Pitch
–s courier
–p (1 to 100)
–s courier–bold
–p (1 to 100)
– s courier–italic
–p (1 to 100)
–s courier–bold italic
–p (1 to 100)
–s gothic
–p (1 to 100)
–s gothic–bold
–p (1 to 100)
– s gothic–italic
–p (1 to 100)
–s lineprinter
–p 17
Note: To format ASCII for other font styles, use the base operating
system enscript utility or the qprt command with the –da, –s, and
–p flags to a PostScript queue. For postscript queues, –p stands
for point size and the valid list of fonts are located in
/usr/lib/ps/fontmap. Valid point sizes are any integer from 1 to
1008.
Also, only a pitch of 17 is supported for the lineprinter font style.
Number of
Copies for Each
Page
4-90
Guide to Printers and Printing
The –W flag allows the user to control how many copies of each
page is produced by the printer itself. For example, if a three–page
job is submitted with the –W flag of the –qprt command, then 2
copies of page one, followed by 2 copies of page two, followed by 2
copies of page three will be printed. The default value is 1, and the
maximum value is 999.
Lexmark Optra N LaserPrinter
Paper Source
Paper source selection is supported for both the enhanced PCL (R)
5 emulation and the PostScript Level 2 emulation by using the –u
flag of the qprt command. There are several optional input sources
(refer to your printer documentation to determine which are
installed). The optional input sources apply no matter which ones are
installed. If one is not present, choosing one will use the default. The
input source number is for both PCL and PostScript:
–umanual
0
feed
–utray
1 1
–utray
2 2
–utray
3 3
–uenvelope
4
feeder
–umultipurpose
5
tray
Printer, Plotter, and Spooler Subsystem Programming
4-91
Paper Size
Paper size selection is supported by using –O and –Q flags of the
qprt command. The –O flag controls paper versus envelope. A – O
value of 3 indicates a paper size and 4 an envelope size. The values
1 and 2 were skipped for backward compatibility. The first five paper
sizes are also numbered for backward compatibility. Whenever an
invalid value for the input source is selected, it is ignored.
The default for –O is 3 or paper. The default for –Q is 1 or Letter for
paper sizes and Monarch for envelope sizes.
Paper Sizes (–0 3)
Envelope Sizes (–0 4)
–Q 1 Letter
7 3/4 Monarch
–Q 2 Legal
9 (Com 9)
–Q 3 B5 paper
10 (Com 10)
–Q 4 A4
DL
–Q 5 Executive
C5
–Q 6 A5
B5 Envelope
–Q 7 B4
Other Envelope (MPT only)
–QA3
8
–QLedger
9
(11x17)
–QCustom
10
(11.69x17.69)
To change the defaults, change s0 – s5 attributes for each valid input
value. Since manual feed, envelope feeder, and the multipurpose
tray support both paper and envelopes, to change the defaults, edit
s0, s4, or s5. For these three, the default for paper is the ”else” part
(%e1), and the default for envelopes is the ”then” part (%t3).
Notes:
1. Envelopes are only valid for manual feed, envelope feeder, or
the multipurpose tray.
2. Trays 1, 2, and 3 support only paper sizes.
3. The multipurpose tray (MPT) supports both paper and
envelopes.
4. Tray 1 supports sizes –Q 1, 2, 4, and 7 (Letter, Legal, A4, and
B4).
5. Trays 2 and 3 support sizes –Q 1, 2, 4, 7, 8, 9 (Letter, Legal, A4,
B4, A3, Ledger).
6. The multipurpose tray supports all sizes of paper and envelopes.
7. The other envelope size is supported only by the multipurpose
tray.
8. The printer and colon file defaults paper size to Letter for the US
and A4 for Europe, and envelope size to COM10 for the US and
DL for Europe.
4-92
Guide to Printers and Printing
9. Whenever an invalid value for the input source is selected, an
error will be reported.
10.If the selected size is not in the input source selected (wrong
size or empty), a search sequence is used to find the size
Pitch
Pitch selection is supported for the PCL 5 emulation by using the –p
flag for pitch and the –s flag for font name with the qprt command.
Pitch values between 1 and 100 characters per inch (cpi) in whole
integers are supported. The condensed print flag, –K, is not
supported.
Font Name
Pitch
–s courier
–p (1 to 100)
–s courier–bold
–p (1 to 100)
–s courier–italic
–p (1 to 100)
–s courier–bold italic
–p (1 to 100)
–s gothic
–p (1 to 100)
–s gothic–bold
–p (1 to 100)
– s gothic–italic
–p (1 to 100)
–s lineprinter
–p 17
Note: To format ASCII for other font styles, use the base operating
system enscript utility or the qprt command with the –da, –s, and
–p flags to a PostScript queue. For PostScript queues, –p stands
for point size and the valid list of fonts are located in
/usr/lib/ps/fontmap. Valid point sizes are any integer from 1 to
1008.
Also, only a pitch of 17 is supported for the lineprinter font style.
Duplex Mode
The optional duplex feature is supported by the –Y flag of the qprt
command.
–Ysimplex
0
–Yduplex,
1
long–edge binding
–Yduplex,
2
short–edge binding
Collation and
Number of
Copies s
The Optra N printer supports collation of multiple copies of a print job
internally. This feature is controlled by the –W and –S flags of the
qprt command.
–Scollation
!
off
–Scollation
+
on
–W
number
#
of copies
Notes:
1. This function is independent of the –N flag of the qprt command.
The –N# flag causes the printer to send the job to the printer #
times. The –W# sends the print job once, and # copies of the job
are printed.
2. The function is limited by the amount of memory installed in the
printer and the size of the print job.
Printer, Plotter, and Spooler Subsystem Programming
4-93
Separator Pages
The Optra N printer supports internally generated separator pages.
This feature is controlled by the –E flag of the qprt command.
–ENone
0
–EBetween
1
Copies
–EBetween
2
Jobs
–EBetween
3
Pages
The paper source defaults to tray 1. To change the default, the uS
attribute must be changed in the virtual printer. The valid values for
uS are:
uStray
1 1
uStray
2 2
uStray
3 3
uSenvelope
4
feeder
uSmultipurpose
5
tray
Note: This function is independent of the –B flag of the qprt
command.
Output Bin
The equal sign (=) is the command line option for specifying the
output destination. Valid values are:
0 printer top bin
1 finisher bin 1
2 finisher bin 2
3 finisher bin 3
50printer side bin
The printer top bin or 0 is the default value for the output bin.
Note: If the printer side bin is selected and the finisher option is
installed, the output will go to the active bin.
Faceup or
Facedown
4-94
Guide to Printers and Printing
The –U option controls whether paper is output faceup or facedown
for the finisher.
Note: The printer top bin is always facedown. A value of + or true
indicates facedown and is the default. A value of ! or false
indicates faceup. If faceup is selected the staples (–y) and job
offset (–e) are ignored.
Staples
The –y option controls whether staples are desired or not. Only
certain paper sizes are supported for each of the values for this flag.
Also, there are several rules about output quantities and
destinations. Refer to printer documentation for details on all the
possibilities. The valid values are:
0 no staples (default)
1 one staple (top left)
2 two staples (left side)
Job Offset
The –e flag controls whether offsetting the first page of each job in
the finisher bin is desired. The first page is offset toward the front of
the finisher by 1.7 inches. The offset function is ignored if staples are
not off. Separator sheets may be selected independently of offset.
The valid values are:
+ job offset ON
! job offset OFF (default)
Lexmark Optra E310 Laser Printer
Page Rotation
Page rotation selection is supported for the PCL 5 emulation by
using the –z flag of the qprt command.
–z Portrait
0
–z Landscape
1
Paper Source
Paper source selection is supported for both the enhanced PCL 5
emulation and the PostScript Level 2 emulation by using the –u flag
of the qprt command. The input source number is the same for both
PCL and PostScript:
–umanual
0
feed
–utray
1 1
By default, the banner and trailer pages come from the top tray. To
change the default, change the values for the uH and/or uT
attributes respectively in the colon file to the value for the desired
paper source. The valid values are the same as for the –u flag. Do
this by editing the virtual printer colon file by using the chvirprt
command.
Printer, Plotter, and Spooler Subsystem Programming
4-95
Paper Size
Paper size selection is supported by using –O and –Q flags of the
qprt command. The –O flag controls paper versus envelope. A – O
value of 3 indicates a paper size and 4 an envelope size.
Paper Sizes (–0 3)
Envelope Sizes (–0 4)
–Q 1 Letter
7 3/4 Monarch
–Q 2 Legal
9 (Com 9)
–Q 3 B5
10 (Com 10)
–Q 4 A4
DL
–Q 5 Executive
C5
–Q 6 A5
B5 Envelope
–Q 7
Other Envelope (MPT only)
To change the defaults, change the s1, s3 attribute values in the
lexOptraE310.pcl colon file. The default for paper size is 1 or letter,
and the default for envelopes is 3 or Com 10. The letter value is the
else part (%e1) of the s1 and s3 attributes, and the envelope is the
then part (%t3).
Paper Type
The Optra E310 printer supports paper types ROUGH, NORMAL
(default), TRANSPARENCY, LABELS, and CARDSTOCK via the –y
parameter to the qprt command, or the –y attribute in the colon file.
The values to the –y option are 1 through 5 respectively for the
above types.
–y Bond
1
–y Plain
2
–y Transparency
3
–y Labels
4
–y Cardstock
5
Note: These values do not apply to envelopes.
4-96
Guide to Printers and Printing
Pitch
Pitch selection is supported for the PCL emulation by using the –p
flag for pitch and the –s flag for font name (or type face) with the
qprt command. Pitch values between 1 and 100 characters per inch
(cpi) in whole integers are supported. The condensed print flag, –K,
is not supported.
Font Name
Pitch
–s courier
–p (1 to 100)
–s courier–bold
–p (1 to 100)
–s courier–italic
–p (1 to 100)
–s courier–bolditalic
–p (1 to 100)
–s gothic
–p (1 to 100)
–s gothic–bold
–p (1 to 100)
– s gothic–italic
–p (1 to 100)
–s lineprinter
–p 17
Note: To format ASCII for other font styles, use the base operating
system enscript utility or the qprt command with the –da, –s, and
–p flags to a PostScript queue. For PostScript queues, –p stands
for point size and the valid list of fonts is located in
/usr/lib/ps/fontmap. Valid point sizes are any integer from 1 to
1008.
Only a pitch of 17 is supported for the lineprinter font style.
Number of
Copies for Each
Page
The –W flag of the qprt command controls how many copies of each
page is printed. The default is 1 copy, and the maximum value is
999.
–w #
number of copies
Example: If a three–page job is submitted with –W2 on the qprt
command, then two copies of page 1 followed by two copies of
page 2 followed by two copies of page 3 will occur in that order.
Printer, Plotter, and Spooler Subsystem Programming
4-97
Lexmark Optra M410 Laser Printer
Page Rotation
Page rotation selection is supported for the PCL 5e emulation by
using the –z flag of the qprt command.
–z Portrait
0
–z Landscape
1
Paper Source
Paper source selection is supported for both the enhanced PCL (R)
5e emulation and the PostScript Level 2 emulation by using the –u
flag of the qprt command. There are several optional input sources
(see your manual to determine which are installed). These numbers
apply, no matter which ones are present. If one is not present,
choosing one of those will simply default as per the user’s manual.
The input source number is the same for both PCL and PostScript:
–umanual
0
feed
–utray
1 1
–utray
2 2
–umultipurpose
3
tray
By default, the banner and trailer pages come from tray 1. To change
the default, change the values for the uH and/or uT attributes
respectively in the virtual printer to the value for the desired paper
source. The valid values are the same as for the –u flag. Do this by
editing the the chvirprt command.
4-98
Guide to Printers and Printing
Paper Size
Paper size selection is supported by using either one or both of the
qprt command flags, –O and –Q. The –O flag controls paper versus
envelope. A – O value of 3 indicates a paper size and 4 an envelope
size. The values 1 and 2 were skipped for backward compatibility.
Envelopes are only valid for manual feed, envelope feeder, or the
multipurpose tray. The default for –Q is 1 or Letter for paper sizes,
and 3 or Com 10 for envelope sizes. To change the defaults, change
the s0 – s7 attributes respectively for each of the valid input sources.
Since manual feed and the multipurpose tray support both paper and
envelopes, the default for paper is the else part (%e1), and the
default for envelopes is the then part (%t3) of s0 and s7.
Paper Sizes (–O 3)
Envelope Sizes (–O 4)
–Q 1 Letter
7 3/4 Monarch
–Q 2 Legal
9 (Com 9)
–Q 3 B5 (JIS B5)
10 (Com 10)
–Q 4 A4
DL
–Q 5 Executive
C5
–Q 6 A5
B5 Envelope
–Q 7 Custom (Universal)
Other Envelope
Note: For PCL queues, if the selected size is not in the selected
input source, a search sequence will be used to find the size
requested. If the size is found, that source will be used. For
PostScript queues, if the selected size is not in the selected input
source, the printer will prompt the user to load the source with the
appropriate size. This may result in an unexpected paper source
being used or an operator panel message that may not make
sense at first. Refer to the manual to determine appropriate
responses.
Printer, Plotter, and Spooler Subsystem Programming
4-99
Pitch
Pitch selection is supported for the PCL 5 emulation by using the –p
flag for pitch and the –s flag for font name (or type face) with the
qprt command. Pitch values between 1 and 100 characters per inch
(cpi) in whole integers are supported. The condensed print flag, –K,
is not supported.
Font Name
Pitch
–s courier
–p (1 to 100)
–s courier–bold
–p (1 to 100)
–s courier–italic
–p (1 to 100)
–s courier–bolditalic
–p (1 to 100)
–s gothic
–p (1 to 100)
–s gothic–bold
–p (1 to 100)
– s gothic–italic
–p (1 to 100)
–s lineprinter
–p 17
Note: To format ASCII for other font styles, use the base operating
system enscript utility or the –da flag to a PostScript queue with
the qprt command. Only a pitch of 17 is supported for the
lineprinter font style.
4-100
Collation
Normally, the –N command line option is used to specify the number
of copies desired. This method will cause that many copies of the
entire print job to be submitted or queued to the print system. Since
the Optra 410 supports collation internally, options were added to
support it and the number of copies of each page internally. This
functionality is limited by the amount of memory installed in your
printer and the size of the job. The –W # option determines how
many copies of each page is desired, where # is the number of
copies. The –S [!/+] option controls whether collation is desired. The
default is ! (or not). The main advantages of using the –W and –S
options are to conserve printer subsystem usage and allow the
printer to handle multiple copies instead of sending # copies to the
printer. Using the –S! options with the –W # also allows # copies of
each page in a row, if that is desired. Note that using –N and –W
simultaneously is allowed. This would result in –N print jobs with –W
copies of each page in each job.
Separator Pages
The –E flag controls separator pages. The valid values are 0, 1, 2,
and 3, which represent NONE, BETWEENCOPIES,
BETWEENJOBS, and BETWEENPAGES, respectively. The
separator page source defaults to TRAY 1 and is specified via the uS
attribute. The valid values for uS are the same as for header and
trailer pages (uH and uT respectively), except that the Manual
Feeder is not supported. To change the default, the uS attribute must
be changed in the virtual printer to one of the valid values (see the
chvirprt command).
Guide to Printers and Printing
Lexmark Optra Se Laser Printer
Page Rotation
Page rotation selection is supported for the PCL 5e emulation by
using the –z flag of the qprt command.
–z Portrait
0
–z Landscape
1
Paper Source
Paper source selection is supported for both the enhanced PCL (R)
5e emulation and the PostScript Level 2 emulation by using the –u
flag of the qprt command. There are several optional input sources
(see your manual to determine which are installed). These numbers
apply, no matter which ones are present. If one is not present,
choosing one of those will simply default as per the user’s manual.
The input source number is the same for both PCL and PostScript:
–umanual
0
feed
–utray
1 1
–utray
2 2
–utray
3 3
–utray
4 4
–utray
5 5
–uenvelope
6
feeder
–umultipurpose
7
tray
By default, the banner and trailer pages come from tray 1. To change
the default, change the values for the uH and/or uT attributes
respectively in the virtual printer to the value for the desired paper
source. The valid values are the same as for the –u flag. Do this by
editing the the chvirprt command.
Printer, Plotter, and Spooler Subsystem Programming
4-101
Paper Size
Paper size selection is supported by using –O and –Q flags of the
qprt command. The –O flag controls paper versus envelope. A – O
value of 3 indicates a paper size and 4 an envelope size. The values
1 and 2 were skipped for backward compatibility. Envelopes are only
valid for manual feed, envelope feeder, or the multipurpose tray. The
default for –Q is 1 or Letter for paper sizes, and 3 or Com 10 for
envelope sizes. To change the defaults, change the s0 – s7
attributes respectively for each of the valid input sources. Since
manual feed and the multipurpose tray support both paper and
envelopes, the default for paper is the else part (%e1), and the
default for envelopes is the then part (%t3) of s0 and s7.
Paper Sizes (–O 3)
Envelope Sizes (–O 4)
–Q 1 Letter
7 3/4 Monarch
–Q 2 Legal
9 (Com 9)
–Q 3 B5 (JIS B5)
10 (Com 10)
–Q 4 A4
DL
–Q 5 Executive
C5
–Q 6 A5
B5 Envelope
–Q 7 Custom (Universal)
Other Envelope
Note: For PCL queues, if the selected size is not in the selected
input source, a search sequence will be used to find the size
requested. If the size is found, that source will be used. For
PostScript queues, if the selected size is not in the selected input
source, the printer will prompt the user to load the source with the
appropriate size. This may result in an unexpected paper source
being used or an op–panel message that may not make sense at
first. Please refer to the manual to determine appropriate
responses.
Paper Type
4-102
Guide to Printers and Printing
The Optra Se printers support paper types Plain Paper (default),
Bond, Transparency, Card Stock, Labels, Letterhead, Preprinted,
Colored Paper, Envelope (default for envelope feeder) and Custom
Type x, where x can be 1 through 6. This colon file does not attempt
to set these values and will use whatever the printer is set to for that
input source. The user should insure that the proper paper type is
actually installed in the specified source.
Pitch
Pitch selection is supported for the PCL 5 emulation by using the –p
flag for pitch and the –s flag for font name (or type face) with the
qprt command. Pitch values between 1 and 100 characters per inch
(cpi) in whole integers are supported. The condensed print flag, –K,
is not supported.
Font Name
Pitch
–s courier
–p (1 to 100)
–s courier–bold
–p (1 to 100)
–s courier–italic
–p (1 to 100)
–s courier–bolditalic
–p (1 to 100)
–s gothic
–p (1 to 100)
–s gothic–bold
–p (1 to 100)
– s gothic–italic
–p (1 to 100)
–s lineprinter
–p 17
Note: To format ASCII for other font styles, use the base operating
system enscript utility or the –da flag to a PostScript queue with
the qprt command. Only a pitch of 17 is supported for the
lineprinter font style.
Duplex Mode
The qprt command line option –Y supports this.
0 simplex operation
1 duplex, long edge binding
2 duplex, short edge binding
Collation
Normally, the –N command line option is used to specify the number
of copies desired. This method will cause that many copies of the
entire print job to be submitted or queued to the print system. Since
the Optra Se supports collation internally, options were added to
support it and the number of copies of each page internally. This
functionality is limited by the amount of memory installed in your
printer and the size of the job. The –W # option determines how
many copies of each page is desired, where # is the number of
copies. The –S [!/+] option controls whether collation is desired. The
default is ! (or not). The main advantages of using the –W and –S
options are to conserve printer subsystem usage and allow the
printer to handle multiple copies instead of sending # copies to the
printer. Using the –S! options with the –W # also allows # copies of
each page in a row, if that is desired. Note that using –N and –W
simultaneously is allowed. This would result in –N print jobs with –W
copies of each page in each job.
Printer, Plotter, and Spooler Subsystem Programming
4-103
Separator Pages
The –E flag controls separator pages. The valid values are 0, 1, 2,
and 3, which represent NONE, BETWEENCOPIES,
BETWEENJOBS, and BETWEENPAGES, respectively. The
separator page source defaults to TRAY 1 and is specified via the uS
attribute. The valid values for uS are the same as for header and
trailer pages (uH and uT respectively), except that the Manual
Feeder is not supported. To change the default, the uS attribute must
be changed in the virtual printer to one of the valid values (see the
chvirprt command).
Output
Destination
The –= equal sign) is the command line option for specifying the
output destination. Valid values are:
0 standard bin
1 bin 1
2 bin 2
3 bin 3
50active bin
The default value for the output destination is the standard bin (0).
Note that if the active bin is selected, the printer will select the bin
based on the state of output bin capacity sensing and the operator
panel setting for ”Configure Bins” under the PAPER MENU. Please
refer to your printer manual to determine exactly how the printer will
respond.
Lexmark Optra T Laser Printer Family
Page Rotation
Page rotation selection is supported for the PCL 5e emulation by
using the –z flag of the qprt command.
–z Portrait
0
–z Landscape
1
Paper Source
Paper source selection is supported for both the enhanced PCL (R)
5e emulation and the PostScript Level 2 emulation by using the –u
flag of the qprt command. There are several optional input sources
(see your manual to determine which are installed). These numbers
apply, no matter which ones are present. If one is not present,
choosing one of those will simply default as per the user’s manual.
The input source number is the same for both PCL and PostScript:
–umanual
0
feed
–utray
1 1
–utray
2 2
–utray
3 3
–utray
4 4
–utray
5 5
–uenvelope
6
feeder
–umultipurpose
7
tray
By default, the banner and trailer pages come from tray 1. To change
the default, change the values for the uH and/or uT attributes
respectively in the virtual printer to the value for the desired paper
source. The valid values are the same as for the –u flag. Do this by
editing the the chvirprt command.
4-104
Guide to Printers and Printing
Paper Size
Paper size selection is supported by using –O and –Q flags of the
qprt command. The –O flag controls paper versus envelope. A – O
value of 3 indicates a paper size and 4 an envelope size. The values
1 and 2 were skipped for backward compatibility. Envelopes are only
valid for manual feed, envelope feeder, or the multipurpose tray. The
default for –Q is 1 or Letter for paper sizes, and 3 or Com 10 for
envelope sizes. To change the defaults, change the s0 – s7
attributes respectively for each of the valid input sources. Since
manual feed and the multipurpose tray support both paper and
envelopes, the default for paper is the else part (%e1), and the
default for envelopes is the then part (%t3) of s0 and s7.
Paper Sizes (–0 3)
Envelope Sizes (–0 4)
–Q 1 Letter
7 3/4 Monarch
–Q 2 Legal
9 (Com 9)
–Q 3 B5 (JIS B5)
10 (Com 10)
–Q 4 A4
DL
–Q 5 Executive
C5
–Q 6 A5
B5 Envelope
–Q 7 Custom (Universal)
Other Envelope
Note: For PCL queues, if the selected size is not in the selected
input source, a search sequence will be used to find the size
requested. If the size is found, that source will be used. For
PostScript queues, if the selected size is not in the selected input
source, the printer will prompt the user to load the source with the
appropriate size. This may result in an unexpected paper source
being used or an operator panel message that may not make
sense at first. Refer to the manual to determine appropriate
responses.
Paper Type
The Optra T printers support paper types Plain Paper (default),
Bond, Transparency, Card Stock, Labels, Letterhead, Preprinted,
Colored Paper, Envelope (default for envelope feeder) and Custom
Type x, where x can be 1 through 6. This colon file does not attempt
to set these values and will use whatever the printer is set to for that
input source. The user should insure that the proper paper type is
actually installed in the specified source.
Printer, Plotter, and Spooler Subsystem Programming
4-105
Pitch
Pitch selection is supported for the PCL emulation by using the –p
flag for pitch and the –s flag for font name (or type face) with the
qprt command. Pitch values between 1 and 100 characters per inch
(cpi) in whole integers are supported. The condensed print flag, –K,
is not supported.
Font Name
Pitch
–s courier
–p (1 to 100)
–s courier–bold
–p (1 to 100)
–s courier–italic
–p (1 to 100)
–s courier–bolditalic
–p (1 to 100)
–s gothic
–p (1 to 100)
–s gothic–bold
–p (1 to 100)
– s gothic–italic
–p (1 to 100)
–s lineprinter
–p 17
Note: To format ASCII for other font styles, use the base operating
system enscript utility or the –da flag to a PostScript queue with
the qprt command. Only a pitch of 17 is supported for the
lineprinter font style.
Duplex Mode
The qprt command line option –Y supports this.
0 simplex operation
1 duplex, long edge binding
2 duplex, short edge binding
Collation
4-106
Guide to Printers and Printing
Normally, the –N command line option is used to specify the number
of copies desired. This method will cause that many copies of the
entire print job to be submitted or queued to the print system. Since
the Optra T supports collation internally, options were added to
support it and the number of copies of each page internally. This
functionality is limited by the amount of memory installed in your
printer and the size of the job. The –W # option determines how
many copies of each page is desired, where # is the number of
copies. The –S [!/+] option controls whether collation is desired. The
default is ! (or not). The main advantages of using the –W and –S
options are to conserve printer subsystem usage and allow the
printer to handle multiple copies instead of sending # copies to the
printer. Using the –S! options with the –W # also allows # copies of
each page in a row, if that is desired. Note that using –N and –W
simultaneously is allowed. This would result in –N print jobs with –W
copies of each page in each job.
Separator Pages
The –E flag controls separator pages. The valid values are 0, 1, 2,
and 3, which represent NONE, BETWEENCOPIES,
BETWEENJOBS, and BETWEENPAGES, respectively. The
separator page source defaults to TRAY 1 and is specified via the uS
attribute. The valid values for uS are the same as for header and
trailer pages (uH and uT respectively), except that the Manual
Feeder is not supported. To change the default, the uS attribute must
be changed in the virtual printer to one of the valid values (see the
chvirprt command.
Output
Destination
The –= (equal sign) is the command line option for specifying the
output destination. Valid values are:
0 standard bin
1 bin 1
2 bin 2
3 bin 3
4 bin 4
5 bin 5
6 bin 6
7 bin 7
8 bin 8
9 bin 9
10bin 10
The default value for the output destination is the standard bin (0).
Lexmark Optra W810 Laser Printer
Page Rotation
Page rotation selection is supported for the PCL 5 emulation by
using the –z flag of the qprt command.
–z Portrait
0
–z Landscape
1
Paper Source
Paper source selection is supported for both the enhanced PCL (R)
5 emulation and the PostScript Level 2 emulation by using the –u
flag of the qprt command. There are several optional input sources
(see your manual to determine which are installed). These numbers
apply, no matter which ones are present. If one is not present,
choosing one of those will simply default as per the user’s manual.
The input source number is the same for both PCL and PostScript:
–umanual
0
feed
–utray
1 1
–utray
2 2
–utray
3 3
–utray
4 4
By default, the banner and trailer pages come from the top tray. To
change the default, change the values for the uH and/or uT
attributes respectively in the colon file to the value for the desired
paper source. The valid values are the same as for the –u flag. Do
this by editing the the virtual printer colon file by using the chvirprt
command.
Printer, Plotter, and Spooler Subsystem Programming
4-107
Paper Size
Paper size selection is supported by using the –Q flag of the qprt
command. The first five paper sizes are also numbered for backward
compatibility. Whenever an invalid value for the input source is
selected, it will be ignored.
The default for –O is 3 or paper. The default for –Q is 1 or Letter for
paper sizes and Monarch for envelope sizes.
Paper Sizes
–Q 1
Letter
–Q 2
Legal
–Q 3
B5 Paper
–Q 4
A4
–Q 5
Executive
–Q 6
A5
–Q 7
B4
–Q 8
A3
–Q 9
Ledger (11x17)
–Q 10
Universal (11.69x17.69)
To change the defaults, change the s0 –s5 attributes respectively for
each of the valid input valids. The default paper size is the else part
(%e1).
Notes:
1. Manual Feed and Tray 1 support sizes –Q 1, 2, 3, 4, 5, 6, 7, 8, 9,
10 (Letter, Legal, B4, A4, Executive, A5, B4, A3, 11x17,
Universal).
2. Trays 2, 3, and 4 support sizes –Q 1, 2, 4, 7, 8, 9 (Letter, Legal,
A4, B4, A3, 11x17).
3. The printer (and this colon file) defaults paper size to letter for
the US and A4 for Europe.
4. An invalid paper size value for the selected input source will
cause an error to be reported.
5. If the selected size is not in the selected input source, either
wrong size or empty, a search sequence will be used to find the
size requested. Please refer to the printer manual for assistance
4-108
Guide to Printers and Printing
Pitch
Pitch selection is supported for the PCL 5 emulation by using the –p
flag for pitch and the –s flag for font name (or type face) with the
qprt command. Pitch values between 1 and 100 characters per inch
(cpi) in whole integers are supported. The condensed print flag, –K,
is not supported.
Font Name
Pitch
–s courier
–p (1 to 100)
–s courier–bold
–p (1 to 100)
–s courier–italic
–p (1 to 100)
–s courier–bolditalic
–p (1 to 100)
–s gothic
–p (1 to 100)
–s gothic–bold
–p (1 to 100)
– s gothic–italic
–p (1 to 100)
–s lineprinter
–p 17
Note: To format ASCII for other font styles, use the base operating
system enscript utility or the qprt command with the –da, –s, and
–p flags to a PostScript queue. For PostScript queues, –p stands
for point size and the valid list of fonts can be found in
/usr/lib/ps/fontmap. Valid point sizes are any integer from 1 to
1008.
Only a pitch of 17 is supported for the lineprinter font style.
Duplex Mode
The optional duplex feature is supported by the –Y flag of the qprt
command. The default value is 0 or simplex mode.
–Ysimplex
0
–Yduplex,
1
long edge binding
–Yduplex,
2
short edge binding
Collation and
The optra W810 printer supports collation of multiple copies of a print
Number of copies job internally. This feature is controlled by the –W and –S flags of the
qprt command.
–S!collation off
–S+
collation on
–W#
number of copies
Notes:
1. This function is independent of the –N flag of the qprt command.
The –N# flag will cause the print job to be sent to the printer #
times. The –W# flag will send the print job once, and # copies of
the job will be printed.
2. The function is limited by the amount of memory installed in the
printer and the size of the print job.
Printer, Plotter, and Spooler Subsystem Programming
4-109
Separator Pages
The printer supports internally generated separator pages. This
feature is controlled by the –E flag of the qprt command.
–E0
None
–E1
Between Copies
–E2
Between Jobs
–E3
Between Pages
The paper source defaults to Tray 1. To change the default, the uS
attribute must be changed in the virtual printer. The valid values for
uS are:
uSTray
1 1
uSTray
2 2
uSTray
3 3
uSTray
4 4
Note: This function is independent of the –B flag of the qprt
command.
Finisher Stapes
The Optra W810 printer supports this option if it has an optional
Finisher installed. The valid values for y are:
–y Off
0
–y On
1
Finisher Offset
The Optra W810 printer supports this option if it has an optional
Finisher installed. The valid values for e are:
–e Off
0
–e On
1
Hole Punch
The Optra W810 printer supports this option if it has an optional
Finisher installed. The valid values for o are:
–oOff
0
–oOn
1
Output
Destination
The –= (equal sign) is the command line option for specifying the
output destination. Valid values are:
0 standard bin
1 bin 1
2 bin 2
3 bin 3
4 bin 4
5 bin 5
6 bin 6
7 bin 7
8 bin 8
9 bin 9
10bin 10
The default value for the output destination is the standard bin (0).
4-110
Guide to Printers and Printing
Lexmark Plus Printer Models 2380–3, 2381–3, 2390–3, 2391–3
Paper Source
Paper source selection is supported by using the –u flag of the qprt
command.
–utractor
1
1
– utractor
2
2
The banner and trailer pages use the same source as the print job. It
is suggested that the printer be attended when switching between
tractors.
Pitch, Font, and
Quality
Pitch selection is supported by using the –p flag for the pitch, the –s
flag for font name, and –q flag of the qprt command for print quality.
The default values supported include:
10pitch
courier
font
q uality
1 or draft
The valid font values include:
Font Name
– sfast draft
– sdraft
– scourier
– sgothic
– sprestige (239x only)
– spresenter (239x only)
– sorator (239x only)
– sscript (239x only)
The valid quality values include:
Quality (–q flag)
0 fast draft
1 draft
2 near letter quality (238x only)
2 letter quality (239x only)
3 enhanced letter quality (239x only)
The valid pitch values are 10, 12, 17, 20, and 24 for 239x only.
Notes:
1. Selection of draft or fast draft will override the selected font.
2. Bold font is supported using the –e flag and emphasized print.
Italic font is supported using the –k flag and italic print.
Printer, Plotter, and Spooler Subsystem Programming
4-111
Page Width
The –w flag controls the width of the printable page in characters.
Plus Printer
Default
2380 and 2390
80
2381 and 2391
136
OKI MICROLINE 801PS/+F, 801PSII/+F, 800PSIILT
The Japanese PostScript and ASCII data streams are supported. Japanese language text
files cannot be printed. All OKI MICROLINE series printers are connected by RS–232C
cabling.
Printronix P9012 Line Printer
Only the Serial Matrix command set is supported. The P–series command set is not
supported.
QMS ColorScript 100 Model 20 Printer
The QMS ColorScript 100 Model 20 printer can print color PostScript files and HPGL
(Hewlett–Packard Graphics Language) files. The HPGL emulator is shipped on a DOS
diskette with the printer. ASCII files can also be printed using the PostScript data stream.
To print PostScript files, do not enter a print queue name for the HPGL data stream when
making the print queue. To print HPGL files, do the following:
1. Enter a print queue name for the HPGL data stream when making the print queue.
2. Insert the 3–1/2 inch diskette labeled HPGL Emulator in the diskette drive.
3. Make sure you are the root user.
4. Enter the following to copy the HPGL emulator files from the DOS diskette to the
appropriate directory:
/usr/lib/lpd/pio/etc/pioqms100 –Q
When HPGL print files are submitted to the HPGL print queue, the system downloads the
HPGL emulator to the printer and selects the emulator as needed.
PostScript files can also be submitted to the HPGL print queue. The files must begin with
the two–character string %! so the system can recognize them as PostScript instead of
HPGL files.
Texas Instruments OmniLaser 2115 Page Printer
Automatic selection of the printer data stream (PostScript, HP LaserJet+, Diablo 630, TI
855, Plotter) is not supported. The data stream must be selected manually, using the control
panel.
You can also print ASCII files using the PostScript data stream.
Only DP mode is supported for the TI 855 software interface. WP mode is not supported.
Each time the printer controller is turned on, enter the following:
splp –F! lpx
where lpx is the printer device name, such as lp0. This tells the system that the HPGL
emulator needs to be downloaded to the printer again.
When you reboot the system, turn the printer off and on to reinitialize it.
4-112
Guide to Printers and Printing
Printer Support
Support for each printer is provided as a separately installable package. To see a list of
printers for which support has already been installed on your machine, type:
smit lssprt
To install support for additional printers, type:
smit printerinst
If your printer is not supported, you can configure it as a supported printer that is functionally
similar to your printer. Otherwise, you can configure your printer as a generic printer. To do
this:
1. Select Other as the printer manufacturer or printer model when adding a print queue for
the printer.
OR
2. Select Other serial printer or Other parallel printer when adding a printer device
definition for the printer.
Printers
The following is a list of supported printers. References for more information on specified
printers are provided at the end of this list.
• Bull Compuprint 4/51
• Bull Compuprint 4/54
• Bull Compuprint 914
• Bull Compuprint 914 N
• Bull Compuprint 922
• Bull Compuprint 923
• Bull Compuprint 924
• Bull Compuprint 924 N
• Bull Compuprint 956
• Bull Compuprint 970
• Bull Compuprint 1070
• Bull Compuprint PageMaster 200
• Bull Compuprint PageMaster 201
• Bull Compuprint PageMaster 411
• Bull Compuprint PageMaster 413
• Bull Compuprint PageMaster 422
• Bull Compuprint PageMaster 721
• Bull Compuprint PageMaster 815
• Bull Compuprint PageMaster 825
• Bull Compuprint PageMaster 1015
• Bull Compuprint PageMaster 1021
• Bull Compuprint PageMaster 1025
• Bull Compuprint PageMaster 1625
Printer, Plotter, and Spooler Subsystem Programming
4-113
• Bull PR–88
• Bull PR–88 VFU Handling
• Bull PR–90
• Canon LASER SHOT LBP–B404PS/Lite
• Canon LASER SHOT LBP–B406S/D/E/G, A404/E, A304E
• Dataproducts LZR 2665 Laser Printer
• Dataproducts BP2000 Line Printer
• HP 2500C Color Printer
• HP LaserJet II
• HP LaserJet III
• HP LaserJet IIISi
• HP LaserJet 4, 4M
• HP LaserJet 4Si, 4Plus, 4V, 4000
• HP LaserJet 5Si, 5Si MX
• HP LaserJet 5Si Mopier
• HP LaserJet Color
• HP LaserJet 5000 D640 Printer
• HP LaserJet 8000 Printer
• HP LaserJet 8100 Printer
• HP Color LaserJet 4500 Printer
• HP Color LaserJet 8500 Printer
• IBM 2380 Personal Printer II
• IBM 2380 Plus Model 2
• IBM 2381 Personal Printer II
• IBM 2381 Plus Model 2
• IBM 2390 Personal Printer II
• IBM 2390 Plus Model 2
• IBM 2391 Personal Printer II
• IBM 23891 Plus Model 2
• IBM 3112 Page Printer
• IBM 3116 Page Printer
• IBM 3812 Model 2 Page Printer
• IBM 3816 Page Printer
• IBM 4019 LaserPrinter
• IBM 4029 LaserPrinter
• IBM 4037 5E Printer
• IBM 4039 LaserPrinter
• IBM 4070 InkJet Printer
• IBM 4072 ExecJet
4-114
Guide to Printers and Printing
• IBM 4076 InkJet Printer
• IBM 4079 Color JetPrinter
• IBM 4201 Model 2 Proprinter II
• IBM 4201 Model 3 Proprinter III
• IBM 4202 Model 2 Proprinter II XL
• IBM 4202 Model 3 Proprinter III XL
• IBM 4207 Model 2 Proprinter X24E
• IBM 4208 Model 2 Proprinter XL24E
• IBM 4208 Model 502 Proprinter XL24EK
• IBM 4212 Proprinter 24P
• IBM 4216 Model 510
• IBM 4216–510
• IBM 5327–011
• IBM 4224 Printer, Models 301, 302, 3C2, 3E3
• IBM 4226 Printer
• IBM 4234 Dot Band printer Model 013
• IBM 5202 Quietwriter III
• IBM 5204Quickwriter
• IBM 4216–510
• IBM 5327–011
• IBM 5572 Model B02
• IBM 5573 Model H02
• IBM 5575 Model B02/F02/H02
• IBM 5577 Model B02/F02/FU2/G02/H02/J02/K02
• IBM B02/F02/H02
• IBM B02/F02/FU2/G02/H02/J02/K02
• IBM 5579 Model H02/K02
• IBM 5584 Model G02/H01
• IBM 5585 Model H01
• IBM 5587 Model G02/H01
• IBM 5589 Model H01
• IBM Network Printer 12
• IBM Network Printer 17
• IBM Network Printer 24
• IBM 5584–G02/H02
• IBM 5585–H01
• IBM 5587–G01/H01
• IBM 5589–H01
• IBM 6180 Color Plotter
Printer, Plotter, and Spooler Subsystem Programming
4-115
• IBM 6182 Auto Feed Color Plotter
• IBM 6184 Color Plotter
• IBM 6185–1 Color Plotter
• IBM 6185–2 Color Plotter
• IBM 6186 Color Plotter
• IBM 6252 Impactwriter
• IBM 6252 Printer
• IBM 7372 Color Plotter
• Network Color Printer
• IBM InfoPrint 20
• IBM InfoPrint 40 Printer
• Lexmark Optra Laser Printer
• Lexmark Optra Plus Laser Printer
• Lexmark Optra Plus Laser Printer
• Lexmark Optra C Color Laser Printer
• Lexmark Optra E Laser Printer
• Lexmark Optra E310 Laser Printer
• Lexmark Optra M410 Laser Printer
• Lexmark Optra N Laser Printer
• Lexmark Optra Se Laser Printer
• Lexmark Optra T Laser Printer Family
• Lexmark ExecJet IIc
• Lexmark ValueWriter 600
• Lexmark 2380 Plus Printer Model 3
• Lexmark 2381 Plus Printer Model 3
• Lexmark 2390 Plus Printer Model 3
• Lexmark 2391 Plus Printer Model 3
• Lexmark Plus Printer Model 2380–3
• Lexmark Plus Printer Model 2381–3
• Lexmark Plus Printer Model 2390–3
• Lexmark Plus Printer Model 2391–3
• Lexmark 4039 Plus LaserPrinter
• Lexmark 4079 Color JetPrinter Plus
• Lexmark 4227 Forms Printer
• OKI MICROLINE 801PS/+F, 801PSII/+F, 800PSIILT
• Printronix P9012 Line Printer
• QMS ColorScript 100 Model 20 Printer
• Texas Instruments OmniLaser 2115 Page Printer
For more information on certain printers listed above, see:
4-116
Guide to Printers and Printing
•
Canon LASER SHOT LBP–B404PS/Lite on page 4-65
•
Canon LASER SHOT LBP–B406S/D/E/G, A404/E, A304E on page 4-65
•
Dataproducts LZR 2665 Laser Printer on page 4-65
•
Hewlett–Packard LaserJets II, III, IIISi, 4, 4Si, 4Plus, 4V, 4000, 5Si/5Si MX, 5Si Mopier,
8000 Color, and 8500 Color on page 4-65
•
IBM Personal Printer II Models 2380, 2381, 2390, 2391, 2380–2, 2381–2, 2390–2,
2391–2 on page 4-51
•
IBM 3812 Model 2 Page Printer on page 4-51
•
IBM 3816 Page Printer on page 4-52
•
IBM 4019 LaserPrinter and 4029 LaserPrinter on page 4-52
•
IBM 4037 and IBM 4039 LaserPrinter on page 4-53
•
IBM 4072 ExecJet on page 4-53
•
IBM 4076 InkJet Printer on page 4-53
•
IBM Proprinter Models 4201–3, 4202–3, 4207–2, 4208–2 on page 4-53
•
IBM 4208–502, IBM 5572–B02, IBM 5573–H02, and IBM 5579–H02/K02 on page 4-54
•
IBM 4216 Personal Page Printer, Model 031 on page 4-54
•
IBM 4234 Printer on page 4-54
•
IBM 5202 Quietwriter III on page 4-54
•
IBM 5204 Quickwriter on page 4-55
•
IBM 4216–510 and IBM 5327–011 on page 4-54
•
IBM 5575–B02/F02/H02 and IBM 5577–B02/F02/FU2/G02/H02/J02/K02 on page 4-55
•
IBM 5584–G02/H02, IBM 5585–H01, IBM 5587–G01/H01 and IBM 5589–H01 on page
4-55
•
IBM 6252 Impactwriter and IBM 6252 Printer on page 4-55
•
IBM Network Color Printer on page 4-55
•
IBM Network Printer 12, 17, and 24 on page 4-57
•
IBM InfoPrint 20 on page 4-59
•
IBM InfoPrint 40 Printer on page 4-63
•
Lexmark Optra Laser Printer on page 4-70
•
Lexmark Optra Plus LaserPrinter on page 4-72
•
Lexmark Optra C Color LaserPrinter on page 4-86
•
Lexmark Optra E LaserPrinter on page 4-89
•
Lexmark Optra E310 Laser Printer on page 4-95
•
Lexmark Optra M410 Laser Printer on page 4-98
•
Lexmark Optra N LaserPrinter on page 4-91
•
Lexmark Optra Se Laser Printer on page 4-101
•
Lexmark Optra T Laser Printer Family on page 4-104
•
Lexmark Optra W810 Laser Printer on page 4-107
•
Lexmark Plus Printer Models 2380–3, 2381–3, 2390–3, 2391–3 on page 4-111
•
Lexmark 4227 Forms Printer on page 4-69
Printer, Plotter, and Spooler Subsystem Programming
4-117
•
OKI MICROLINE 801PS/+F, 801PSII/+F, 800PSIILT on page 4-112
•
Printronix P9012 Line Printer on page 4-112
•
QMS ColorScript 100 Model 20 Printer on page 4-112
•
Texas Instruments OmniLaser 2115 Page Printer on page 4-50
Pass–Through Mode
Both virtual printers and the printer device driver can operate, or function, either in
pass–through mode or in non–pass–through mode. With Pass–through mode, a data
stream is ”passed through” to the printer, byte by byte, unmodified. The mode of operation
selected for a given job determines how or even if a data stream is processed. It is
important to understand the difference between the two modes, when each mode is in
effect, and if the mode can be changed.
Printer Device Driver Pass–Through Mode
The printer device driver itself, for instance /dev/lp0, by default operates in
non–pass–through mode. A user can query or modify the operating rules for /dev/lp0 by
issuing the splp command. For example, below are the results of issuing the command
splp lp0 on a system with an IBM 4029 LAserPrinter defined as lp0. The results are output
to the display element specified by the TERM environment variable.
device = /dev/lp0
(+ yes
! no)
CURRENT FORMATTING PARAMETERS (ignored by qprt, lpr, and lp commands)
Note: –p + causes the other formatting parameters to be ignored.
–p !
pass–through?
–c +
send carriage returns?
–l 64
page length (lines)
–n +
send line feeds?
–w 80
fee?
page width (columns)
–r +
carriage rtn after line
–i 0
indentation (columns)
–t +
suppress tab expansion?
–W !
wrap long lines?
–b +
send backspaces?
–C !
convert to upper case?
–f +
send form feeds?
CURRENT ERROR PROCESSING PARAMETERS
–T 600 timeout value (seconds)
–e !
return on error?
CURRENT SERIAL INTERFACE PARAMETERS
–B 19200baud rate
–s 8
character size (bits)
–N !
enable parity?
–S !
two stop bits?
–P !
odd parity?
The –p parameter determines whether the printer device driver, /dev/lp0, will default to a
pass–through mode of operation; the mode of operation can be overridden for a specific
data stream. By default, the value of the –p parameter is !, or no. It is important to note that
the question asked by the –p parameter is ”Will the mode of operation be pass–through
mode?”
If the value of the –p parameter is !, then all of the other parameters listed are honored by
the device driver during data stream processing. Likewise, if the value of the –p parameter
is +, or yes, then all of the other parameters are ignored during data stream processing.
Using the splp command to change the parameter values of the printer device driver does
not affect the operation of the spooler. The splp command affects commands such as cat
when they are used to access the device driver directly, bypassing the spooler. For
example, the command
cat /etc/motd > /dev/lp0
4-118
Guide to Printers and Printing
opens /dev/lp0 and writes the contents of the ”message of the day” directly to the printer.
The output on the printer is formatted similar to the following example:
This is a test version of /etc/motd, used to demonstrate what happens when
a
printer device driver, such as /dev/lp0, is placed into or taken out of
passthru mode. Printers will print either exactly what they are sent, if
you
set the job conditions up correctly, or, on the most current printers, you
may
be able to direct the printer to perform certain mappings for you.
There are no carriage returns in this file, and the only blank line occurs
immediately before this one.
Notice that the –r parameter dictates the mapping of each linefeed to a linefeed and
carriage return if the value of –p is !. This is necessary as most UNIX–based operating
systems only use linefeeds; unlike DOS or OS/2 or other operating systems, in UNIX–based
operating systems a linefeed implies a carriage return. While this works well with text editors
and in other similar situations, it does not work with printers. Printers print only the data
which they are sent. For example, issuing the two commands
splp –p+ lp0
cat /etc/motd > /dev/lp0
results in output similar to the following appearing on the printer.
This is a test version of /etc/motd, used to demonstrate what happens when
a
prin
ter device driver, such as /dev/lp0, is placed into or taken out of
passthru mode
. Printers will print either exactly what they are sent, if you
set the
job conditions up correctly, or, on the most current printers, you may
be able to
direct
the printer to perform certain mappings for you.
There are no carriage returns
in
this file, and the only blank line occurs
immediately before this one.
In the first example, all of the device driver settings are honored. In particular, the mapping
of a linefeed to a linefeed and a carriage return is turned on. When the device drivers are
writing characters to the physical printer, it sends a carriage return after each linefeed. It
also honors the settings for page width.
In the second example, the device driver is limited to simply writing each single–byte
character of /etc/motd to the physical printer, without any mapping or other modification of
the data stream occurring. When the first sentence of /etc/motd ends, the linefeed drops
the printhead straight down one line; there is no carriage return to move the printhead back
to the left margin. The first four letters of the word ”printer, prin, are printed. At that point
the printer itself, not the device driver, determines that the right margin has been reached
and so prints a carriage return, returning the printhead to the left margin. Printing continues
with the next character in the data stream.
In the second example, the job does not even print until the reset button on the printer is
pressed. This is because the printer has not received enough date (characters) to
automatically eject a page, and no formfeeds were sent to the printer to cause it to eject the
page; the –f parameter on the device driver is ignored.
Printer, Plotter, and Spooler Subsystem Programming
4-119
Formatter Filter Pass–Through Mode
After a job is submitted to the spooler it eventually passes to the formatter filter for
processing and delivery to the printer device driver. The formatter filter always opens the
printer device driver in pass–through mode. Jobs submitted to the spooler, as opposed to
data streams that are sent directly to the printer device driver, are always processed or
otherwise modified by a formatter filter and not by the printer device driver.
Like the printer device driver, the formatter filter also has two modes of operation:
pass–through and non–pass–through. Again, the mode of operation selected for a given job
determines how or even if a data stream is processed.
The _d attribute in a virtual printer definition (a digested colon file) specifies the input data
stream type for the queue associated with that virtual printer. The virtual printer definition
also specifies the formatter filter for that input data stream type. When the formatter filter is
invoked to process a job, the process that runs the formatter (pioformat) filter checks the
value of the _d attributes and decides whether to invoke the formatter filter in pass–through
mode. If pass–through mode is selected, the formatter filter uses the passthru() subroutine
to read the input stream and send it unmodified to the printer device driver. If pass–through
mode is not selected, the formatter filter uses the lineout subroutine to process the input
data stream line by line. In either case, the printer device driver was opened for writing in
pass–through mode and performs no processing on the output data stream.
Note that input data streams such as PostScript are pass–through by definition; the
processing is performed by the Postscript interpreter hardware on the printer.
Most of the printer device driver parameters that one can display or modify using the splp
command also exist in the formatter filter. These parameters are stored in the digested
version of the colon file for a given virtual printer. For example, the mapping between the
printer device driver parameters and the corresponding parameters in the colon files for an
ASCII queue on an IBM 4029 LaserPrinter is as follows:
pass–through?
–p
_d
page length (lines)
–l
_l
page width (columns)
–w
_w
indentation (columns) –i
_i
wrap long lines?
_L
–W
convert to uppercase? –C
N/A
send carriage
returns?
–c
_x
send linefeeds ?
–n
_x
carriage rtn after
linefeed
–r
_x
suppress tab
expansion?
–t
N/A
send backspaces?
–b
N/A
send formfeeds?
–f
_Z
The values of the parameters in the righthand column can be permanently set in the virtual
printer definition. They can also be overridden at the time a job is submitted by using certain
flags on either the qprt or enq commands.
4-120
Guide to Printers and Printing
Viewing, Formatting, or Modifying Virtual Printer Definitions
An IBM 4029 LaserPrinter supports four distinct data streams. The root user can use the
mkvirprt command to create both a queue and a virtual printer definition for each of the four
data stream types. The root user can further use the lsvirprt command to view and modify
the colon file underlying the virtual printer definition. For a system on which a queue of each
type has been defined, issuing of the lsvirprt command results in the following list and
query being displayed (queue names and device are chosen by the root user at queue
creation time):
No. Queue
1
2
3
4
asc
gl
pcl
ps
Device
lxx
lxx
lxx
lxx
Description
4029
4029
4029
4029
(IBM ASCII)
(Plotter Emulation)
(HP LaserJet II Emulation)
(PostScript)
Enter number from list above (press Enter to terminate):
–>
From this list, the root user enters the number corresponding to the virtual printer that he
wants to view, format, or modify. The following message and prompt are then displayed.
To LIST attributes, enter AttributeName1 ... (* for all attributes)
To CHANGE an attribute value, enter AttributeName=NewValue
To FORMAT and EDIT an attribute value, enter AttributeName~v
To EDIT the attribute file, enter ~v
To terminate, press Enter:
There are several options at this point, one of which is to press Enter and terminate the
lsvirprt command. The other options are as follows:
• Enter an asterisk (*) and press Enter to view a list of all attributes in the colon file along
with their text descriptions from the message catalog.
• Enter the name of an attribute and press Enter to view that attribute only, along with its
text description from the message catalog.
• Enter the name of an attribute, an =, and a value, then press Enter to assign the attribute
that value.
• Enter a ~v and press Enter to engage in a vi session with the raw colon file.
• Enter the name of an attribute, immediately followed (no blank spaces) by a ~v, and
press Enter to engage in a vi session with a heavily formatted version of the attribute.
Each of these five options will be discussed in the context of the asc queue and the
associated virtual printer definition with its underlying colon file.
Entering an asterisk (*) and pressing Enter will result in the following being displayed:
Printer, Plotter, and Spooler Subsystem Programming
4-121
Name
__FLG
_0
_1
_2
_3
_4
_5
_6
_7
_8
_9
_A
_E
_F
_G
_H
_I
_J
_K
_L
_O
_Q
_S
_U
_V
_W
_X
_Y
_Z
Description
VALUES THAT MAY BE OVERRIDDEN WITH FLAGS ON THE
COMMAND LINE
(not used)
(not used)
(not used)
(not used)
(not used)
(not used)
(not used)
(not used)
(not used)
(not used)
stderr returned? 0: no; 1: yes, & pipelines; 2:
yes, & values, pipelines
Double–High Print. (!: no; +: yes)
(not used) Font file name
Page format (!: use only printable page
+: use
entire addressable area)
Name To Replace Host Name On Burst Page
Font ID (overrides pitch and type style)
Restore the Printer at the End of the Print Job?
(!: no; +: yes)
(not used)
Wrap Long Lines (!: no; +: yes)
Type of Input Paper Handling (1: manual, 3:
sheetfeed)
Paper or Envelope Size For the Paper Source
Selected By the –O and –u Flag Values (Refer to
the s0, s1, s2, s3, and s4 attributes); Default
value: %IwQ
High speed printing
Unidirectional printing
Vertical printing
Double–Wide Print (!: no; +: yes)
Code Page Name For Print Data Stream (file with
same name in dir. ”d1”)
Duplex Output (0: Simplex 1: Duplex Long–Edge 2:
Duplex Short–Edge)
Issue Form Feed Between Copies & At Job End (!:
no; +: yes)
Value
1
!
+
+
3
%IwQ
!
IBM–850
0
+
:
The output is formatted by the pg command, hence the full colon (:) at the bottom of the
display. The output above is only the first full screen. The rest is available through the
normal pg subcommands but will not be displayed here for reasons of brevity. This output is
view–only; the attributes cannot be modified.
Entering the name of an attribute, such as _w (page width in columns), and pressing Enter
will result in something like the following being displayed.
Name
_w
Description
Page Width (characters); Default Value: %IwX
(value based on paper size specified with s0 –
s5 attributes)
Value
%IwX
To LIST attributes, enter AttributeName1 ... (* for all attributes)
To CHANGE an attribute value, enter AttributeName=NewValue
To FORMAT and EDIT an attribute value, enter AttributeName~v
To EDIT the attribute file, enter ~v
To terminate, press Enter:
The name of the attribute is displayed, along with its text description from the message
catalog and its current value. The prompt is also redisplayed. Note that you do not have to
type the underscore for attributes whose name begin with an underscore. For example, the
results above could have been obtained by typing w and pressing Enter. This output is
view–only; the attribute cannot be modified.
4-122
Guide to Printers and Printing
Other attributes may be much harder to read in this form. For instance, entering ia at the
prompt and pressing Enter will result in output similar to the following being displayed:
Name
ia
Description
ASCII
Value
%Ide/pioformat –@%
Idd/%Imm –!%Idf/pi
of5202 –l%IwL –w%I
wW %f[begijpqstuvx
yzEGIJLOQWXZ] %Uh
To LIST attributes, enter AttributeName1 ..(* for all attributes)
To CHANGE an attribute value, enter AttributeName=NewValue
To FORMAT and EDIT an attribute value, enter AttributeName~v
To EDIT the attribute file, enter ~v
To terminate, press Enter:
Entering the name of an attribute, an =, and a value, and pressing Enter will result in the
attribute being assigned that value, and the new value being displayed. For instance,
entering _w=60 and pressing Enter, or entering w=60 and pressing Enter, will result in
something like the following being displayed:
To LIST attributes, enter AttributeName1 ..(* for all attributes)
To CHANGE an attribute value, enter AttributeName=NewValue
To FORMAT and EDIT an attribute value, enter AttributeName~v
To EDIT the attribute file, enter ~v
To terminate, press Enter: w=60
Name
_w
Description
COLUMNS per page
Value
60
To LIST attributes, enter AttributeName1 ..(* for all attributes)
To CHANGE an attribute value, enter AttributeName=NewValue
To FORMAT and EDIT an attribute value, enter AttributeName~v
To EDIT the attribute file, enter ~v
To terminate, press Enter:
The new value of w is displayed. (This example would result in the page width for this
queue being permanently set to 60 columns.)
Entering ~v and pressing Enter will result in something like the following being displayed:
Printer, Plotter, and Spooler Subsystem Programming
4-123
:056:__FLG::
:625:CB:S[B]DyEn:
:626:CC:S[C]DyEn:
:627:CD:S[D]DyEn:
:628:CE:S[E]DyEn:
:629:CF:S[F]DyEn:
:630:CG:S[G]DyEn:
:622:Ca:DyS[G500]I[1810532]EnR[pioattr1.cat,1,631;(diag1) – do not print
job; di
splay main pipeline and pre–processing filter,(diag2) – do not pr
int job; displa
y all pipelines and filters,(display) – print job; display all pi
pelines and fil
ters,(ignore) – print job; ignore stderr produced by filters,(nor
mal) – print jo
b; exit if filters produce stderr=–a1,–a0\x27 \x27–A3,–a0\x27 \x2
7–A2,–a0\x27 \x
27–A0,–a0\x27 \x27–A1]:%?%G_a%t–a%I_a%e–a%I_a\x27 \x27–A%I_A%;
:674:Cs:S[B005]I[1810500]EnC[_s,_p]R[%‘W0]:–s%I_s\x27 \x27–p%I_p
:013:_A:DnEnR[0,1,2,3]:1
:789:_E:S[B020]I[1810501]%IWY:!
:790:_G:S[E025]I[1810502]%IWY:!
:621:_H:S[F350]I[1810503]Dy:
:024:_I:Dn:
:791:_J:S[C950]I[1810533]%IWY:+
:792:_K:Dn:
:793:_L:S[D020]I[1810504]%IWY:+
:697:_O:DnEnR[1,3]:3
:683:_Q:S[E020]I[1810505]En%IW6:%IwQ
:794:_W:S[B025]I[1810506]%IWY:!
:795:_X:S[D030]I[1810507]EtL[/usr/bin/ls –1 /usr/lib/lpd/pio/tran
s1 | /usr/bin/s
ed ’/^850$/d’]V[%‘WX]:ISO8859–1
:808:_Y:Dn:
:614:_Z:Dn%IWY:+
:063:_a:DnEnR[0,1]:0
:635:_b:S[D010]I[1810508]E#G[0..%?%G_l%{0}%=%t%e%G_l%G_t%–%{1}%–%
d%;]:0
:658:_d:S[C925]I[1810509]EnL[%IW2]F1:a
:615:_e:S[B010]I[1810510]%IWY:!
:659:_f:S[C930]I[1810535]EtL[%IW3]F1V[%‘W7]Dy:
:623:_g:S[C250]I[1810511]E#G[1..]:1
”/var/spool/lpd/pio/@local/custom/asc:lp1” 318 lines, 15318 chara
cters
As is indicated by the last line of this sample, this is a vi session with the raw, unformatted
version of the undigested printer colon file for this queue. If a write command is issued in
this vi session, the definition is digested by the piodiges t command and a new version of
the digested printer colon file is created.
The most powerful option in lsvirprt is to type an attribute name followed by a ~v. For
instance, entering ia~v and pressing Enter will result in something like the following being
displayed:
ASCII
ia = %Ide/pioformat –@%Idd/%Imm –!%Idf/piof5202 –l%IwL –w%IwW %f[
begijpqstuvxyzEGIJLOQWXZ] %Uh
4-124
Guide to Printers and Printing
%Ide
INCLUDE: (Directory Containing Miscellaneous Modules)
’/pioformat –@’
%Idd
INCLUDE: (Directory Containing Digested Data Base Fil
es)
’/’
%Imm
INCLUDE: (File Name Of (Digested) Data Base; Init. By
”piodigest” (mt.md.mn.mq:mv))
’ –!’
%Idf
INCLUDE: (Directory Containing Loadable Formatter Rou
tines)
’/piof5202 –l’
%IwL
INCLUDE: (Page Length In Chars, Using Length From Dat
a Base (used in pipelines))
’ –w’
%IwW
INCLUDE: (Page Width In Characters, Using Width From
Data Base (used in pipelines))
’ ’
%f[begijpqstuvxyzEGIJLOQWXZ] For Each Flag x on Command Line: ”
–xArgument” –> OUTPUT
’ ’
%Uh
Indicate to piobe: Pass the Following Attributes to s
ubsequent printer commands
/tmp/asc:lp1.ia” 24 lines, 1001 characters
As is indicated by the last line of the sample, this is again a vi session, but this time the
attribute definition has been formatted and annotated. Here the root user can modify the
attribute definition; if a write command is issued in this vi session, the definition is digested
by the piodigest command and a new version of the digested printer colon file is created.
The formatted sample is divided into three parts. The first part is the ia=, followed by the
attribute definition strung out horizontally. The second part is the annotations on the
right–hand side of the vi session, the comments that describe the function of each particular
printer colon file escape sequence. The third part is the formatted printer colon file escape
sequences aligned on the left margin of the vi session. These escape sequences also have
a horizontal formatting component; indentations are used to clarify the flow of if–then–else
statements, nested or otherwise.
The first and second parts can be edited, but the editing changes have no effect and should
therefore not be performed. Any changes made to the initial definition of the attribute or to
the annotations will be ignored by piodigest if you write the file. It is the third part, the
formatted attribute definition, that can be edited. If this part is edited and written, piodigest
will issue an error message if any syntax errors are found. As with normal programming
languages, you can make logic errors, but not syntax errors.
For practical examples of modifying printer colon files, see Modifying the mi, mp, and _d
Attributes on a PostScript Queue on page 4-126.
Printer, Plotter, and Spooler Subsystem Programming
4-125
Modifying the mi, mp, and _d Attributes on a PostScript Queue
Input data stream attributes store the pipelines for different input data stream types. For
more information, see Input Data Stream Attributes on page 4-6. The definition for a generic
PostScript printer has four input data stream pipelines: ia (extended ASCII), in (troff), ip
(passthru), and is (PostScript). The _d attribute in the colon file controls which of the four
input data stream processing pipelines will, by default, be used. The default value for _d on
a generic PostScript queue is s (PostScript), so the pipeline defined by is will be used.
Submitting a non–PostScript ASCII job to a PostScript queue with a generic PostScript
virtual printer definition will result in the loss of the job. The root user can modify the mi, mp,
and _d attributes in the virtual printer definition so that the queue backend can determine
the file type (PostScript or non–PostScript ASCII) and set the print environment accordingly.
The mi attribute uses single, comma–separated characters to name input data stream
types. The mp attribute uses comma–separated strings to identify input data stream types.
There is a one–to–one pairing between the characters of mi and the strings of mp.
The default value of mi for a generic PostScript virtual printer is s. The default value for mp
is %% !; the first two characters of a PostScript file are %!. (Recall that printer colon file
escape sequences all begin with a % so, to use a literal % in an attribute definition, it must
be escaped with another %.) The virtual printer will interpret all files beginning with %! as
being of data stream type s, and use the is pipeline. Since non–PostScript ASCII file do not
begin with a %!, they will not be printed by this queue.
To enable ASCII printing on this queue, the root user can use the lsvirprt command to
modify the referenced attributes as follows:
• mi=a,s
• mp=,%%!
• _d=%mi
Use the lsvirprt command to select the generic PostScript queue. The following prompt will
appear:
To LIST attributes, enter AttributeName1 ..(* for all attributes)
To CHANGE an attribute value, enter AttributeName=NewValue
To FORMAT and EDIT an attribute value, enter AttributeName~v
To EDIT the attribute file, enter ~v
To terminate, press Enter:
At the prompt:
• Type mi=a,s and press Enter.
• Type mp=,%%! and press Enter.
• Type d=%mi and press Enter.
After each attribute redefinition is entered, the attribute’s new value will be displayed,
followed by the prompt.
This new value sets up a pairing of input data stream type a (extended ASCII) with any
string at all, and input data stream type s (PostScript) with the string %!. Input data streams
that do not being with a %! will be processed by the ia pipeline, and all input data streams
that do begin with a %! will be processed by the is pipeline.
Note: With a generic PostScript virtual printer without the modifications described above,
it is possible to print non–PostScript ASCII files by overidding the input data stream type
from the command line. For instance, the d flag fo qprt can be used as follows:
qprt –Pqueue_name –da /etc/motd
This command requests that the file named /etc/motd be printed on the queue named
queue_name and that the input data stream be treated as ASCII (the ia pipeline will be
used).
4-126
Guide to Printers and Printing
How piobe Uses Printer Colon Files
The piobe command is a spooler backend program called by the qdaemon program to
process a print job. It has the ability to generate diagnostic output. A specific example of this
diagnostic output is used in the following discussion to examine these points:
• How piobe uses printer colon files.
• How printer colon file escape sequences are evaluated to resolve path names.
• How printer colon file escape sequences are evaluated to resolve page length.
• How printer colon file escape sequences are evaluated to resolve page width.
This discussion is intended for readers who need to understand printer colon file escape
sequences at a low level, perhaps because they want to write their own colon file for a
unique and unsupported printer. Before reading this discussion, you should be familiar with
these topics:
•
Printer Colon File Escape Sequences on page 4-13
•
Viewing, Formatting, or Modifying Virtual Printer Definitions on page 4-121
The following command uses the –a1 flag/argument to request diagnostic data from the
piobe backend. The remainder of the command specifies that the job be processed by the
queue named asc, that three copies of the file named /etc/motd be printed in a 12–point
Courier font rotated 90 degrees, that the job be pre–processed by the pr filter, and that any
messages generated by the job should be mailed to the user that submitted the job.
qprt –a1 –Pasc –fp –z1 –p12 –scourier –C –N3 /etc/motd
Issuing this command results in mail similar to the following being sent to the user that
issued the command:
Message from qdaemon:
=====> MESSAGE FROM PRINT JOB 31 (/etc/motd) <=====
0782–034 Below is the preview information requested with the –a1
flag.
No files will be printed.
PRINTER:
[devices.cat,71,66;IBM 4029 LaserPrinter] (ASCII)
FLAG VALUES:
a=1, b=0, d=a, e=!, f=p, g=1, h=, i=0, j=1, l=48, p=12, q=, s=cou
rier, t=0,
u=1, v=6, w=128, x=2, y=!, z=1, A=1, B=nn, C=+, E=!, G=!, H=, I=,
J=+, L=+,
N=3, O=3, P=ascx:lxx, Q=1, W=!, X=ISO8859–1, Z=+
PIPELINE OF FILTERS:
/usr/bin/pr
–l48
–w128 /etc/motd |
/usr/lib/lpd/pio/etc/pioformat
–@/var/spool/lpd/pio/@local/ddi/ibm4029.asc.lp1.asc:lp1
–!/usr/lib/lpd/pio/fmtrs/piof5202
–l48
–w128
–p12
–scourier
–z1
Printer, Plotter, and Spooler Subsystem Programming
4-127
The mail specifies several items:
• The physical printer that would have been used.
• The values of the flags that pertain to this spooler queue.
• The pipeline of filters that would have been executed.
The flags values used on the command line, a1, Pasc, fp, z1, p12, scourier, C, and N3,
can be seen in the section of the mail labeled FLAG VALUES.
Of more interest is the section of the mail labeled PIPELINE OF FILTERS. Here the pipeline
of filters determined by piobe and constructed by the shell can be seen. The pr filter will
pre–process the print job (/etc/motd) and send its output to pioformat, the
device–independent formatter driver.
This is a good place to examine how piobe uses the virtual printer definition associated with
the spooler queue named asc. The colon file (which contains the virtual printer definition for
this queue) uses the attribute ia to specify the input data stream pipeline (the PIPELINE OF
FILTERS section above) for ASCII jobs. The value of ia for this queue is:
%Ide/pioformat –@%Idd/%Imm –!%Idf/piof5202 –l%IwL –w%IwW
%f[begijpqstuvxyzEGIJLOQWXZ] %Uh
The lsvirprt command can be used to format ia so it reads as follows:
%Id
INCLUDE: (Directory Containing Miscellaneous Modules)
’/pioformat –@’
%Idd
INCLUDE: (Directory Containing Digested Data Base
Files)
’/’
%Imm
INCLUDE: (File Name Of (Digested) Data Base; Init. By
”piodigest” (mt.md.mn.mq:mv))
’ –!’
%Idf
INCLUDE: (Directory Containing Loadable Formatter
Routines)
’/piof5202 –l’
%IwL
INCLUDE: (Page Length In Chars, Using Length From Data
Base
(used in pipelines))
’ –w’
%IwW
INCLUDE: (Page Width In Characters, Using Width From
Data Base
(used in pipelines))
’ ’
%f[begijpqstuvxyzEGIJLOQWXZ] For Each Flag x on Command
Line:”–xArgument” –>
OUTPUT
’ ’
%Uh
Indicate to piobe: Pass the Following Attributes to
subsequent
printer commands
The %Id resolves to /usr/lib/lpd/pio/etc, the directory that contains miscellaneous
modules. The ’/pioformat –@’ is appended, without the single quotes, to the previous
string, becoming /usr/lib/lpd/pio/etc/pioformat, otherwise known as the full path
name to the formatter driver. The –@ after pioformat is a flag to the pioformat command
which, in this instance, specifies the full path name of the digested database file to be
accessed.
The value of the –@ flag is specified by the concatenation of %Idd, ’/’, and %Imm. The
value of %Idd is defined in the colon file as %I@5/ddi. The @5 is an automatic variable
whose value is /var/spool/lpd/pio/@local, so % Idd resolves to
/var/spool/lpd/pio/@local/ddi. The ’/’, without the single quotes, is appended to
that path. %Imm is defined in the colon file as mt.md.mn.mq.mv, and other virtual printer
attributes. These attributes define:
• mt – Printer type
• md – Output data stream type
4-128
Guide to Printers and Printing
• mn – Device name
• mq – Queue name (name of a queue stanza in /etc/qconfig)
• mv – Virtual printer name (name of a corresponding device stanza in /etc/qconfig)
These file virtual printer attributes are initialized by the piodigest command at the time the
queue and virtual printer are created. The combination of the five is unique in the virtual
printer database.
For this queue, the value of mt.md.mn.mq.mv is ibm4029.asc.lp1.asc.lp1. Thus the value
of the –@ flag to pioformat becomes
/var/spool/lpd/pio/@local/ddi/ibm4029.asc.lp1.asc.lp1, the full path of the
digested database file defining the virtual printer associated with this queue ( asc ).
The ’–!’ is a second flag to pioformat, specifying the full path name of the
device–dependent formatter to be loaded, linked, and driven at runtime by the formatter
driver, pioformat. It is here that you can see how and where the runtime connection
between these two modules occurs.
The value of the –! flag is specified by the concatenation of the remainder of the printer
colon file escape sequences shown in the formatted form of the ia attribute, beginning with
%Idf and ’/piof5202 –l’.
The value of %Idf in defined in the colon file as %I@4/fmtrs. The @4 is an automatic
variable whose value is /usr/lib/lpd/pio, so %Idf resolves to
/usr/lib/lpd/pio/fmtrs. The ’piof5202 –l’, without the single quotes, is appended to
this string, so the value of the –! flag to this point becomes
/usr/lib/lpd/pio/fmtrs/piof5202 –l. The –l is a flag to piof5202, the
device–dependent formatter for an ASCII data stream on an IBM 4029 LaserPrinter, that
specifies page width in characters.
The calculation of the argument to the –l flag, %IwL, is described in Appendix A. Calculating
Page Length Using Printer Colon File Escape Sequences on page A-1.
Spooler Job Header and Trailer Pages
The pipelines for generating header and trailer pages are defined by the system
administation attributes ( System Administration Attributes on page 4-5) sh (header pages)
and st (trailer pages). The printing of header and trailer pages are separate processes from
the spooler print jobs they accompany, even though they are not shown in the output of
queue status queries.
Header and Trailer Page Pipelines
Below is the sh attribute used to define the pipeline for header page generation and printing
for an extended ASCII queue on an IBM 4029 LaserPrinter. The attribute is shown as
formatted by the lsvirprt command. See Viewing, Formatting, or Modifying Virtual Printer
Definitions on page 4-121 for a further explanation.
Pipeline for Header Page
sh = %Ide/pioburst %F[H] %Idb/H.ascii | %Ide/pioformat
–@%Idd/%Imm –!%Idf/piof52
02 –L! –J! %IsH –u%IuH
Printer, Plotter, and Spooler Subsystem Programming
4-129
%Ide
INCLUDE: (Directory Containing Miscellaneous
Modules)
’/pioburst ’
%F[H]
If ”–H] Argument” on Command Line, ”–# Argument”
–> OUTPUT
’ ’
%Idb
INCLUDE: (Directory Containing Header and Trailer
Text Files)
’/H.ascii | ’
%Ide
INCLUDE: (Directory Containing Miscellaneous
Modules)
’/pioformat –@’
%Idd
INCLUDE: (Directory Containing Digested Data Base
Files)
’/’
%Imm
INCLUDE: (File Name Of (Digested) Data Base; Init.
By
”piodigest” (mt.md.mn.mq:mv))
’ –!’
%Idf
INCLUDE: (Directory Containing Loadable Formatter
Routines)
’/piof5202 –L! –J! ’
%IsH
INCLUDE: (FORMATTING FLAGS for header page)
’ –u’
%IuH
INCLUDE: (Input PAPER TRAY for header page)
During spooler job processing, the value of the sh attribute is determined to be:
/usr/lib/lpd/pio/etc/pioburst /usr/lib/lpd/pio/burst/H.ascii |
/usr/lib/lpd/pio/etc/pioformat
–@/var/spool/lpd/pio/@local/ddi/ibm4029.asc.lp1.asc:lp1
–!/usr/lib/lpd/pio/fmtrs/piof5202 –L! –J! –u1
The pioburst command processes the header page template and pipes its output to the
device–independent formatter, pioformat, which in turn loads the digested version of the
colon file for this virtual printer (the argument to the –@ flag) and the device–dependent
formatter, piof5202 (the argument to the –! flag). There are three flags to piof5202:
1. –L! – Long lines should not be wrapped.
2. –J! – The printer should be restored to the state it was in before the header page was
printed.
3. –u1 – The header page should be drawn from paper tray 1.
The value of the st definition is similar to the value of the sh definition.
Custom Header Pages
The root user can create custom header pages for users by modifying the definiton of the
sh attribute. Since the spooler processes have access to the environment of the user that
submitted the job to the spooler, the root user can modify the portion of the sh attribute
definition that specifies which header page template to process.
For example, the H.ascii in the above definition specifies which header page template
should be processed and printed. It can be replaced with a user environment variable of
your choice, such as $MYHEADER, as shown below.
4-130
Guide to Printers and Printing
%Ide
INCLUDE: (Directory Containing Miscellaneous
Modules)
’/pioburst ’
%F[H]
If ”–H] Argument” on Command Line, ”–# Argument”
–> OUTPUT
’ ’
%Idb
INCLUDE: (Directory Containing Header and Trailer
Text Files)
’/
$MYHEADER
| ’
%Ide
INCLUDE: (Directory Containing Miscellaneous
Modules)
’/pioformat –@’
%Idd
INCLUDE: (Directory Containing Digested Data Base
Files)
’/’
%Imm
INCLUDE: (File Name Of (Digested) Data Base; Init.
By
”piodigest” (mt.md.mn.mq:mv))
’ –!’
%Idf
INCLUDE: (Directory Containing Loadable Formatter
Routines)
’/piof5202 –L! –J! ’
%IsH
INCLUDE: (FORMATTING FLAGS for header page)
’ –u’
%IuH
INCLUDE: (Input PAPER TRAY for header page)
To enable the user susan to get custom header pages with this queue, the root user could
use the following procedure:
• cp /usr/lib/lpd/pio/burst/H.ascii /usr/lib/lpd/pio/burst/H.susan
• Edit H.susan to Susan’s taste in header pages.
• Set the environment variable MYHEADER in Susan’s environment to H.susan. (for
instance, in the Korn shell, use export MYHEADER=H.susan ).
When the user susan submits a job to this queue, the sh attribute’s reference to a header
page template will resolve to /usr/lib/lpd/pio/burst/H.susan, and the user susan
will receive a custom header page. The problem with this scenario is that the environment
variable MYHEADER must be defined for anyone that uses the queue associated with this
virtual printer, else the virtual printer cannot resolve the reference to
/usr/lib/lpd/pio/burst/$MYHEADER. An error will result if $MYHEADER is undefined;
the job might print, but the header page will be recyclable at best.
To avoid the problem of everyone that uses this queue having to have MYHEADER defined,
you can integrate some shell code into the sh attribute definition to examine the user
environment before the header page pipeline is created. One method for doing this is shown
below.
Pipeline for Header Page
sh = { if test X”$MYHEADER” = X ; then %Ide/pioburst %F[H]
%Idb/H.ascii | %Ide/pioformat –@%Idd/%Imm –!%Idf/piof5202 –L! –J!
%IsH –u%IuH; else %Ide/pioburst %F[H] %Idb/$MYHEADER |
%Ide/pioformat –@%Idd/%Imm –!%Idf/piof5202 –L! –J! %IsH –u%IuH;
fi; }
Printer, Plotter, and Spooler Subsystem Programming
4-131
’{ if test X”$MYHEADER” = X ; then ’
%Ide
INCLUDE: (Directory Containing Miscellaneous
Modules)
’/pioburst ’
%F[H]
If ”–H] Argument” on Command Line, ”–# Argument”
–> OUTPUT
’ ’
%Idb
INCLUDE: (Directory Containing Header and Trailer
Text Files)
’/H.ascii | ’
%Ide
INCLUDE: (Directory Containing Miscellaneous
Modules)
’/pioformat –@’
%Idd
INCLUDE: (Directory Containing Digested Data Base
Files)
’/’
%Imm
INCLUDE: (File Name Of (Digested) Data Base; Init.
By
”piodigest” (mt.md.mn.mq:mv))
’ –!’
%Idf
INCLUDE: (Directory Containing Loadable Formatter
Routines)
’/piof5202 –L! –J! ’
%IsH
INCLUDE: (FORMATTING FLAGS for header page)
’ –u’
%IuH
INCLUDE: (Input PAPER TRAY for header page)
’; else ’
%Ide
INCLUDE: (Directory Containing Miscellaneous
Modules)
’/pioburst ’
%F[H]
If ”–H] Argument” on Command Line, ”–# Argument”
–> OUTPUT
’ ’
%Idb
INCLUDE: (Directory Containing Header and Trailer
Text Files)
’/$MYHEADER | ’
%Ide
INCLUDE: (Directory Containing Miscellaneous
Modules)
’/pioformat –@’
%Idd
INCLUDE: (Directory Containing Digested Data Base
Files)
’/’
%Imm
INCLUDE: (File Name Of (Digested) Data Base; Init.
By
”piodigest” (mt.md.mn.mq:mv))
’ –!’
%Idf
INCLUDE: (Directory Containing Loadable Formatter
Routines)
’/piof5202 –L! –J! ’
%IsH
INCLUDE: (FORMATTING FLAGS for header page)
’ –u’
%IuH
INCLUDE: (Input PAPER TRAY for header page)
’; fi; } ’
The original st definition is repeated twice in the new st definition. The shell code checks to
see if MYHEADER is defined; if MYHEADER is not defined, then the header page template
H.ascii is used, else the header page template $MYHEADER is used.
4-132
Guide to Printers and Printing
Modifying the mo Virtual Printer Attribute
All virtual printer definitions contain an attribute named mo. The mo attribute specifies the
command string to invoke the device driver interface program. The device driver interface
program is the last process in the input data stream processing pipeline and, in the case of
local spooler queues with piobe as the backend, is usually pioout. It is named the device
driver interface program because, as the last process in the pipeline, it generally opens the
device driver for writing and then writes the processed input data stream to the device
driver. See Datastream Flow for Common Print Jobs on page 3-8 for additional information.
The design of the base operating system spooler allows the root user to replace pieces of
the input data stream processing pipeline with user–written code. In this article an example
of redefining the mo attribute, whose default value is the full path of pioout, to the full path
of a user–written delivery program will be discussed. See Overview of Backend Processing
on page 3-7 for more information.
Handling Unsupported, IP–Addressable Terminal Servers
Suppose that you have an IP–addressable terminal server attached to your Ethernet
network. The terminal server has some number of asynchronous ports to which you can
attach ASCII terminals, modems, printers, or other asynchronous devices. Further suppose
that the terminal server vendor supplied you with a program, named ts_print, that has
the following properties:
• It will read from standard input.
• It accepts a –A flag to specify an IP address.
• It accepts a –P flag to specify a port number.
To turn this into a specific example, suppose that you have an IBM 4029 LaserPrinter that
you want to attach to port 11 on the terminal server and that the terminal server’s IP address
is 9.19.129.101. Your goal is have a queue on a print server to which users can submit
ASCII jobs and have them printed on the 4029 on the terminal server. Though you can use
ts_print from the command line, you would prefer to make use of the formatter filter’s
ability to perform extensive manipulation of both the printer’s mode and the input data
stream. Providing true serial access to the printer is also a goal.
There is more than one way to accomplish this goal. The easiest way involves making a
local ASCII queue on a normal file, instead of on a character–special file in the /dev
directory. After you create the queue and the associated virtual printer, you can modify the
virtual printer to use ts_print.
To begin the queue creation process, type the SMIT fast path smit mkquedev. A menu
similar to the following displays:
Add a Print Queue
Move cursor to desired item and press Enter. Use arrow keys to scroll.
# ATTACHMENT TYPE
local
remote
ascii
hpJetDirect
file
other
DESCRIPTION
Printer Attached to Local Host
Printer Attached to Remote Host
Printer Attached to ASCII Terminal
Network Printer (HP JetDirect)
File (in /dev directory)
User Defined Backend
Choose the file option, then choose a printer type. After you choose the IBM 4029
LaserPrinter (or whatever is correct for your situation), provide the name of an existing file in
the /dev directory. This is the file to which processed jobs submitted to the queue you are
creating are written. The name of the file can be anything that adheres to the base operating
Printer, Plotter, and Spooler Subsystem Programming
4-133
system naming conventions. A reasonable action is to create a file just for the purpose of
being the target of file queues. For instance, the root user can issue the command touch
/dev/lxx to create a file named lxx in the /dev directory.
After you provide the name of a file in the /dev directory, choose a queue name for each
input data stream supported by the printer type you selected earlier. In this example,
suppose the name asc was chosen for an ASCII queue. An entry like the following would
appear in /etc/qconfig:
asc:
device = lxx
lxx:
file = /dev/lxx
header = never
trailer = never
access = both
backend = /usr/lib/lpd/piobe
Any print job submitted to the spooler queue asc is processed by the pipeline set up by
piobe. The processed data stream is written to /dev/lxx. This is not what you want to
happen. Since the goal is to have ts_print write the output to port 11 on the terminal
server, there should in fact not even be a file associated with this queue. To this end, edit
the new stanza pair in /etc/qconfig and change the value of the file parameter to FALSE,
like this:
asc:
device = lxx
lxx:
file = FALSE
header = never
trailer = never
access = both
backend = /usr/lib/lpd/piobe
If you use this queue in this state, you do not see anything written to a file or printed
anywhere, except maybe for error messages. When the qdaemon sets the backend, piobe,
into execution, it passes piobe an open file descriptor based on the value of the file
parameter in /etc/qconfig. When that value is set to FALSE, the file descriptor is not
passed. The eventual recipient and user of the file descriptor is whatever program is pointed
to by the mo attribute. The default program pointed to by the mo attribute is pioout and,
when jobs are put on the queue when it is in this state, pioout will not have a valid value for
stdout, and the processed job will simply vanish.
At this point, you can use lsvirprt to select the asc virtual printer definition for modification (
Viewing, Formatting, or Modifying Virtual Printer Definitions on page 4-121). A prompt
similiar to the following displays:
To LIST attributes, enter AttributeName1 ... (* for all attributes)
To CHANGE an attribute value, enter AttributeName=NewValue
To FORMAT and EDIT an attribute value, enter AttributeName~v
To EDIT the attribute file, enter ~v
To terminate, press Enter:
Assuming the ts_print program was installed in /usr/bin, enter the following at the
prompt:
mo=/usr/bin/ts_print –A 9.19.129.101 –P 11
Jobs submitted to the asc queue will now be processed as if they were local jobs but, when
the end of the pipeline is reached, the ts_print program will deliver the output data
stream to port 11 on the terminal server instead of pioout delivering it to a device driver.
In general, the mo attribute in the virtual printer definition for a queue with piobe as the
backend can be redefined to deliver a processed data stream to any file or device the user
chooses, provided the you can write the code to do it.
4-134
Guide to Printers and Printing
Filters
Virtual printer definitions contain predefined and open (undefined) filter attributes. For
instance, an AIX Version 4.1 ASCII queue on an IBM 4029 LaserPrinter offers the following
filter attributes:
• f1, f2, f3, f4, and f5 – open, user–defined filters
• fb – bidi filter for Hebrew/Arabic.
• fc – cifplot filter
• fd – TeX (DVI) filter
• ff – FORTRAN filter
• fg – plot filter
• fl – passthru filter
• fn – ditroff filter
• fp – pr filter
• fv Raster image filter
• fc, fd, ff, fg, fl, fn ,ft, fv – open, user–defined filters
• fp – pr filter
Filters are the first programs in the input data stream processing pipeline set up by the
piobe command that have an opportunity to selectively manipulate the data stream. A
particular filter can be selected from the command line on a per–job basis, or permanently
selected by modifying the virtual printer definition.
The qprt command uses the –f flag to select a particular filter on a per–job basis. The
argument to the –f flag is the second letter of the two letters that name the filter attribute in
the virtual printer definition. For instance, to select the pr filter for a job on an ASCII queue
named asc on an IBM 4029 LaserPrinter, you could issue this command:
qprt –Pasc –fp /etc/motd
The filter attribute that selects the pr filter is named fp, so the argument to the – f flag is just
p, the second letter.
To permanently select the pr filter, use the lsvirprt command to edit the virtual printer
definition and set the value of the _f attribute to p. The _f attribute selects a filter that will be
used to pre–process any job submitted to the queue associated with this virtual printer
definition.
Since lp, lpr, and qprt are all just front ends to the enq command, the true entry point to the
spooler, you would suppose that enq must support the –f flag. If you issue the enq
command with the –f flag, however, you will receive an error message; enq does not
support the –f flag. This is a situation where the previously described technique ( Spooler
Data Flow (enq Command) on page 3-6) of mounting /bin/echo over /bin/enq proves
useful.
The root user can issue these commands from a shell prompt:
1. mount /bin/echo /bin/enq
2. qprt –Pasc –fp /etc/motd
3. umount /bin/enq
After the second command is issued, the following appears in the display element defined
by your TERM environment variable:
–P asc –o –f –o p /etc/motd
Printer, Plotter, and Spooler Subsystem Programming
4-135
These are the arguments qprt tried to pass to enq. You see them because qprt found echo
instead of enq. The following command is equivalent to the command shown in step 2
above:
enq –P asc –o –f –o p /etc/motd
The –o option specifies that flags specific to the backend should be passed to the backend.
The –o option can be thought of as a free pass through the syntax checking that occurs
before the enq command builds a job description file and notifies the qdaemon of the
existence of a new job.
Suppose that you want to set up a queue that will print a range of lines from an ASCII file.
For instance, suppose you read /usr/lpp/bos/README and find 35 lines that you want to
print so you can fax them to someone or tack them to your wall for reference. You could edit
/etc/qconfig and add the following lines:
partial:
device = partial
partial:
file = FALSE
backend = /usr/bin/partial
The file /usr/bin/partial could be a shell script with ownership of root.printq and with
permissions of 755. Its contents could be as follows:
#!/bin/ksh
BEGIN=$1
END=$2
let DIFF=END–BEGIN+1
FILE=$3
/usr/bin/head –${END} ${FILE} | tail –${DIFF} | /usr/bin/qprt –Pasc
If you wanted to print lines 189 through 223 of /usr/lpp/bos/README, you could use the
partial queue as follows:
qprt –Ppartial –o 189 –o 223 /usr/lpp/bos/README
When the backend executes, BEGIN is assigned 189, END is assigned 223, and DIFF is
assigned 35, which is the number of chosen lines. FILE is assigned /usr/lpp/bos/README.
The head command truncates /usr/lpp/bos/README immediately after the last requested
line. The output is piped to the tail command, which selects the last 35 lines of the truncated
file and pipes them to the qprt command, which will take input from stdin. The qprt
command submits the lines to the queue named asc.
Filter that Maps Linefeeds to Carriage Returns and Linefeeds
Many users have written or purchased applications that prepare data streams to fill in the
blanks on pre–printed checks, invoices, bills–of–lading, or other forms. Printing these data
streams requires precise control of the physical printer. It is often the case that the job
processing pipeline created by piobe inserts or deletes enough data from the original data
stream that the output data no longer falls at the proper position on the pre–printed form.
The root user can frequently use the lsvirprt command to set the value of the _d attribute in
the virtual printer definition to p. On an ASCII queue on an IBM 4029 LaserPrinter, this
would cause piobe to select the ip pipeline to process the job. The ip pipeline is for
passthru printing, which means the formatter filters uses the passthru() routine to simply
pass the input data stream through to the printer without modification.
This frequently removes all the printer control problems that existed, but adds one new one.
When the formatter filter operates in passthru mode, the mapping of linefeeds to carriage
returns and linefeeds is disabled. The forms still do not print correctly.
Suppose that the application does not allow the insertion of carriage returns into the data
stream, you can fix this problem with a simple filter, as follows:
#include <stdio.h>
4-136
Guide to Printers and Printing
main(int argc, char **argv)
{
int ch ;
while (EOF != (ch = fgetc(stdin)))
{
switch (ch)
{
case 10: fputc(ch,stdout) ;
fputc(0x0D,stdout) ;
break ;
default: fputc(ch,stdout) ;
break ;
}
}
}
Compile your program and name it cr_mapper. and install it in an accessible location, such
as /usr/lib/lpd. Assign it ownership of root.printq and permissions 555.
Assuming you have an ASCII queue named asc on an IBM 4029 LaserPrinter, you can use
lsvirprt to select the asc queue and then format the f1 filter attribute. You should see
something like the following:
User defined filter 1
f1 =
As the f1 attribute has a null default value, the definition is sparse.
Edit the f1 attribute so its definition appears as follows:
User defined filter 1
f1 =
’/usr/lib/lpd/cr_mapper’
When you save the new definition of f1, you can again format it with lsvirprt; you should
see something like the following:
User defined filter 1
f1 = /usr/lib/lpd/cr_mapper
’/usr/lib/lpd/cr_mapper’
The f1 filter can now be used from the command line by using commands such as:
qprt –Pasc –f1
filename
enq –Pasc –o –f –o 1
filename
If the _d attribute was not set to p, the –dp flag and argument would have to be added to the
commands.
qprt –Pasc –dp –f1
filename
enq –Pasc –o –d –o p –o –f –o 1
filename
The cr_mapper program reads characters from stdin and writes them to stdout. Whenever
it reads and writes a linefeed (a hex A, or decimal 10), it writes out a carriage return (a hex
D).
Printer, Plotter, and Spooler Subsystem Programming
4-137
Editing the /etc/qconfig File
The /etc/qconfig configuration file can be edited with your text editor of choice. There are
unenforced rules concerning when you can and cannot edit the /etc/qconfig file without
halting or otherwise corrupting the operation of the spooler.
Modifying the /etc/qconfig File while Jobs are Processing
The /etc/qconfig file should never be edited when jobs are processing. This is especially
true when your system has a large number (greater than 25) of printers that are generally
pretty busy. When the qdaemon receives notification from enq that a new Job Description
File (JDF) exists, the qdaemon examines the dates on both /etc/qconfig and
/etc/qconfig.bin, the binary version of /etc/qconfig. If /etc/qconfig is younger than
/etc/qconfig.bin, the qdaemon does not accept any new jobs, including the one that
caused it to examine the aforementioned files, until all currently running jobs have finished
processing. When the jobs have finished processing, the qdaemon creates a new version
of /etc/qconfig.bin.
If you cause the qdaemon to go into this state while jobs are processing, it is possible for
the spooler to hang. If you modify /etc/qconfig under these conditions, and if any printers
are still generating output, your best option is to leave the system alone and see if it comes
back to life after all the jobs have finished processing. If zero printers are producing output
or the spooler appears to be hung, see Cleaning Up and Starting Over on page 5-14.
Attention: Do not cause a change to /etc/qconfig while jobs are processing. Aside from
editing /etc/qconfig and writing a new version of the file to disk with a text editor, you
can cause the same effect by using smit to change a queue property or a parameter
value.
Creating Queue with an Editor
The root user can edit /etc/qconfig and define queues with a text editor. One situation
where this should not be done is when the backend for the spooler queue is piobe. Queues
that use piobe as backend must have an associated virtual printer definition. In this
situation, the root user should use smit to create the queue. Using smit will run several
programs that create the virtual printer definition.
4-138
Guide to Printers and Printing
Chapter 5. Troubleshooting the Base Operating System
Spooler
This chapter contains information on the following topics that help resolve printing problems.
•
Local Printer Checklist on page 5-2
•
Inoperative Printer Checklist on page 5-3
•
Remote Printer Checklist on page 5-3
•
Adapter Considerations on page 5-4
•
Printing Problems When the var File System is Full on page 5-4
•
Terminal–Attached Printer Checklist on page 5-9
•
Considerations for 8–Bit Printer Attached to 7–Bit Interface on page 5-10
•
qdaemon Checklist on page 5-10
•
Queuing System Problems on page 5-12
•
Testing the qdaemon on page 5-12
•
Testing a Spooler Queue on page 5-14
•
Copying Spooled Jobs on page 5-14
•
Cleaning Up and Starting Over on page 5-14
Troubleshooting the base operating system spooler can be done by tracking a spooler job
through the spooler. A job submitted to the base operating system spooler moves from one
spooler component to another in a predictable fashion. The movement is entirely dependent
upon the spooler queue configuration, especially the spooler queue backend.
Note: To perform serious spooler troubleshooting, root authority is required. Users
running without root authority are limited to:
• Submitting jobs to the spooler
• Sending data directly to the device driver entry point in the /dev directory
• Querying the status of spooler queues
• Changing the status (including cancelling) of spooler jobs owned by the user
Note: This troubleshooting information assumes that you have access to a shell
prompt. There are a number of front–ends to the base operating system spooler itself
on the market; troubleshooting in this environment is still very possible, but if the
problem lies in the command or method used to actually submit a job to the spooler,
the application must provide a method for precisely determining the command or
method used to submit the job to the spooler.
Troubleshooting the Base Operating System Spooler
5-1
Local Printer Checklist
Check the following items if you are having problems with your local printer:
• Verify that the qdaemon is running. Make sure there are no forked processes running
from the qdaemon.
• Make sure the system date is correct. The qdaemon automatically rebuilds the
qconfig.bin file when the qconfig file changes. If the date on the qconfig file is earlier
than the date on the qconfig.bin file, the qconfig file is not digested, even if it was just
modified.
• If the dates on the qconfig.bin file and the qconfig file are correct, and changes to the
qconfig file are correct, the /etc/qconfig file is no longer linked to the /usr/lpd/qconfig
file.
• Check that the /tmp directory is not full. The /tmp directory may be full if you receive a
message such as No Virtual Printers Defined.
• If no other user except root can print, check the permissions of the /tmp directory. Also,
check the permissions of the print commands being used (including enq).
• Check for obsolete queue names in the /var/spool/lpd/qdir file. A problem with the
installation of a new /etc/qconfig file occurs when a queue is removed from the new
/etc/qconfig file and a print request is made using the obsolete queue name. The
qdaemon logs an error message. You must determine if the message refers to an old
queue. If so, the problem will exist until you remove the obsolete queue entries from the
/var/spool/lpd/qdir file.
• If operator–attention messages requested by print commands are not being received,
make sure the socket is connected and the host name can be ping ed.
• Operator–attention messages from print commands are routed through the writesrv
command of the TCP/IP subsystem. If messages are not being received, check to see if
the writesrv command is running by entering the command:
lssrc –s writesrv
If the writesrv command is not running, start it with the following command:
startsrc –s writesrv
Finally, make sure that writesrv is listed in the output of one of the following commands:
netstat –a | pg
OR
netstat –a | grep writesrv
5-2
Guide to Printers and Printing
Inoperative Printer Checklist
If you have inoperative printers, check the following items for locally attached printers that
have never worked:
• Run the test pattern for the printer with only the power cable attached to the printer.
• Verify that you have the correct cable for the printer.
• Make sure the cable is securely plugged in.
• Verify that you have created a device for the printer (with Devices, SMIT, or at the
command line).
• Try the following command immediately after a reboot or when you have not tried to
send anything to the printer since a reboot.
echo Does the printer work? > /dev/lpn
where lpn is the name of the printer device you are testing. If the message prints at the
printer, set up the virtual printer definition for the printer. If the statement hangs or returns
an error message, the problem is not the operating system or the queueing system. It is
one or more of the following:
– The cable.
– The setup such as baud rate, handshaking, and port number. The printer and the
computer must have the same settings.
– A bad port on the computer.
– A broken printer.
• If you have trouble getting a serial printer to work on an 8–port, 16–port, or 64–port
adapter or on a modem, try to get the printer working on S1 or S2 directly on the
computer. Once the printer works on S1 or S2, move the printer to the desired port. If S1
and S2 are unavailable, try moving the printer to any other port.
Remote Printer Checklist
Check the following items for the host acting as the remote print server:
• Make sure that all client machines (foreign hosts) are listed in the /etc/hosts.lpd file.
• Make sure that the TCP/IP subsystem is running.
• Check for the existence of the /usr/spool/lpd directory.
• Make sure that the /etc/locks/lpd directory does not exist if the lpd daemon is not
running.
• Make sure that both the lpd daemon and the qdaemon are running.
• Check the Local Printer Checklist on page 5-2.
Check the following items for hosts printing to a remote print server:
• Verify that the queue name and server name for the remote print server are correct in the
/etc/qconfig file.
• Make sure that the TCP/IP subsystem is running.
• Make sure that the qdaemon daemon is running.
Troubleshooting the Base Operating System Spooler
5-3
Adapter Considerations
The 16–port RS–232 adapter does not support clear to send (CTS). A printer connected to
this adapter will not finish printing a job if the printer is powered off while the job is printing.
You must restart the job or delete it manually.
Resource Considerations
Printing generates processes. Printing a job might take up anywhere from one to five
processes in most instances. As with any other activity, it is possible to exhaust the number
of processes on the system. This can happen by submitting a single print job on a very
actively used system, or by submitting large numbers of jobs on a system with little other
activity.
Running out of processes can cause erratic behavior on your system. If you experience
erratic behavior on your system, check your resources to determine if you are running out of
processes.
Printing Problems When the var File System is Full
Printing problems occur when the /var file system is full. This usually happens when print
jobs sent to the print queue begin to back up for some reason, causing the spooling
directory within the file system to grow too large. The spooling directories usually affected
are /var/spool/lpd and /var/spool/qdaemon.
The print queue can back up if the queue daemon has stopped functioning, the printer has
gone down or has been turned off, or a large print job sent to the printer has occupied all
resources. The /var file system can also fill up if other directories in the file system besides
the spooling directory grow too large.
When the /var file system is full, perform one of the following tasks:
•
Reactivating the Queue Daemon on page 5-4
•
Clearing a Print Queue Backlog on page 5-5
•
Reallocating Printer Resources on page 5-7
•
Deleting Unnecessary Directory Files on page 5-8
Reactivating the Queue Daemon
The queue daemon (or qdaemon) process tracks print job requests and the printers
available to handle these requests. The qdaemon maintains queues of outstanding
requests and, as devices become available, sends them to the proper device at the proper
time. If the qdaemon stops functioning, you will experience printing problems and will then
need to restart the qdaemon using the following procedure.
Note: Some commands may require root user or system group authority.
1. Determine if the qdaemon has stopped functioning by entering the following ps
command:
ps –ef | grep qdaemon
If you do not see a process called /var/sbin/qdaemon, qdaemon, or /etc/qdaemon
running, the qdaemon is not running.
2. Restart the qdaemon by entering the following startsrc command:
startsrc –s qdaemon
5-4
Guide to Printers and Printing
If you are not using the system resource controller (SRC), you can also restart the queue
daemon with the qdaemon command.
Let the qdaemon print all the jobs in the print queue.
3. Make sure the lpd daemon is up and running by entering:
startsrc –s lpd
The lpd daemon provides the remote print server on a network.
Clearing a Print Queue Backlog
To clear the queuing system, you must stop qdaemon and check if the /var file system is
full. If so, use the following procedure to clear the queue directories and restart the
qdaemon.
1. Make sure you are logged in as root.
2. If possible, let all current print jobs finish printing or cancel them. To cancel a print job,
issue the lpstat command to get the print job number. Then use the enq command to
cancel each job:
enq –x JobNumber
The lpstat command displays information about the current status of the line printer. The
enq command enqueues a file.
3. Issue the following command to stop qdaemon:
stopsrc –s qdaemon
4. Issue the following commands to verify that qdaemon did not fork other processes:
ps –ef | grep qdaemon
ps –ef | grep pio
The ps command shows the current status of processes. The grep command searches
a file for a pattern.
If you get one line back from each of the above grep commands, skip step 5 and go to
step 6. If you get more than one line, go to step 5.
5. If other qdaemons or pios were returned by the ps –ef command, kill these processes by
issuing the following command with each process ID:
kill –9 pid
The following example shows a qdaemon returned by ps –ef. The process ID is 3357.
root 3357 2288 0 13:32:21 – 0:04 dtterm
To kill this process ID, enter kill –9 3357 at the command line.
6. Perform this step only if it is necessary to save the current print jobs from being deleted.
Otherwise, proceed to step 7.
If your print job is queued in one of the following directories, make a copy of it, and place
it in /tmp; you can print it when the queuing system is running again.
Note: In these directories, the files will have unfamiliar system names.
/var/spool/qdaemon
/var/spool/lpd
7. If the /var file system gets too full, you may experience problems with qdaemon or the
spooler. Large print jobs may fail, or 00root files with zero lengths may appear in your
qdir directory. Rebooting the system in this case may not clear out the files or restart
qdaemon.
Troubleshooting the Base Operating System Spooler
5-5
Enter the df command and look in the %used column for /var to see if the file system
is too full. Free space in the file system as necessary.
The df command displays information about total space and available space on a file
system.
8. Change the directory as follows:
cd /var/spool/lpd/qdir
9. Issue a pwd command to verify that you are in the proper directory. Then, remove all
files in this directory using the rm command:
rm *
The pwd command writes to standard output the full path name of your current directory
(from the root directory). The rm command removes the entries for the specified file or
files from a directory.
10.Change the directory again:
cd /var/spool/lpd/stat
11. Issue a pwd command to verify that you are in the proper directory. Then, remove all
files in this directory:
rm *
12.Change the directory again:
cd /var/spool/qdaemon
13.Issue a pwd command to verify that you are in the proper directory. Then, remove all
files in this directory:
rm *
14.Follow this step if you are having trouble with the remote queue or lpd. Change the
directory:
cd /var/spool/lpd
Issue a pwd to verify that you are in the proper directory. Then, remove all files in this
directory using the rm command:
rm *
Note: The rm command will not remove the subdirectories.
15.Start qdaemon:
startsrc –s qdaemon
The queuing system should start normally. If some queues are still down, bring them up
by entering:
enable QueueName
5-6
Guide to Printers and Printing
Reallocating Printer Resources
Use the following procedures to avoid having one print job use all of the printer resources.
Note: Some commands may require root user or system group authority.
1. Determine if a print job is using all resources in one of two ways:
– Use the following lpq command:
lpq
The lpq command, when entered without flags, reports the status of the default queue.
– Use the following enq command:
enq –q
The enq command enqueues a file to a shared resource, typically a printer (that is, it
puts files into a queue for a particular resource). The –q flag displays the status of the
default queue.
2. Use one of the following commands to remove the job from the print queue (you must
have root user authority to cancel jobs other than your own):
– Use the following enq command.
enq –x 21
In the following example, the enq command uses the –x flag to cancel job number 21.
– Use the following lprm command:
lprm –P lp0 42
In the following example, the lprm command removes job number 42 from the lp0
printer queue, named with the –P flag. You can also remove jobs for a specific user by
naming the user on the command line.
– Use the following qadm command:
qadm –X lp0
In the following example, the qadm command uses the –x flag to cancel all jobs on the
lp0 printer.
– Use the following SMIT fast path for the qcan command:
smit qcan
In the following example, you can choose the By Print Queue option to cancel either all
of a particular user’s jobs or all jobs on a particular printer.
3. Tell the sender of the print job to first divide it into smaller pieces by using the following
split command, and then send the file as a series of jobs:
split –50 bigfile
The split command reads the specified file and writes it into segments to a set of output
files. In the previous example, bigfile is split into 50–line segments named
bigfileaa, bigfileab, bigfileac, and so forth.
Troubleshooting the Base Operating System Spooler
5-7
Deleting Unnecessary Directory Files
Use the following procedures to clean out unnecessary files stored in the spooling directory.
Note: Some commands require root user or system group authority.
1. Determine if there are unnecessary files stored in the spooling directory by entering the
following du command:
du –rs /var/spool
The du command summarizes disk usage. The –s flag instructs the du command to
display only the total disk usage of the /var/spool directory and the files it contains. The
–r flag tells the du command to display an error message if it cannot read a file or
directory.
2. Delete or move files in a full directory by doing either of the following:
– Delete any extraneous files. For example:
rm extrafile
– Move files that are a few hours old to a safe temporary directory. For example:
mv extrafile /u/spoolhold
Note: You must have root user authority to remove or move files other than your
own.
3. Prevent users from storing files in your spooling directories by doing the following:
– Set permissions on the spooling directory using the chmod command. Change the
directory to exclude general users. For example:
chmod go–rw /var/spool/lp0
– Create a cron job to clean out the directory (you must have root user authority). Edit
the crontab file. For example, you might add the following line to your crontab file:
find /spool –mtime +7 –a –exec rm –f
This line removes any file in the /var/spool directory one week after the last
modification.
For more information about creating cron jobs and using the crontab command, see
”How to Set Up an Accounting System” in AIX 5L Version 5.2 System Management
Guide: Operating System and Devices.
– Establish policy for the whole user group.
For example, use e–mail to make a general announcement or add to the message of
the day (/etc/motd) asking users to clean up their files. To change the message of
the day, see ”How to Change the Message of the Day” in AIX 5L Version 5.2 System
Management Guide: Operating System and Devices.
Create a script to identify all users whose disk holdings are above a certain threshold
and send them e–mail requesting that they clean up their files.
– Provide an alternate way to store files, such as a tape drive in a public area, so users
can archive infrequently used files.
4. As a last resort, mount more space to the spool directory by using one of the following
methods:
– Use the mount command, which makes a file system available for use at a specified
location. For example:
mount /var/spool morespool
– Use the smit mount command, choose the Mount a File System option, and specify
the file system name and attributes.
5-8
Guide to Printers and Printing
Terminal–Attached Printer Checklist
Check the following items when the printer attached to an ASCII terminal does not produce
output:
• Verify that the AUX port on the terminal is configured with the same settings as your
printer. To do this, consult your terminal documentation for information about setting
values for the AUX port. Consult your printer documentation for information about
configuring the printer’s serial interface. Relevant values include those for baud rate,
parity, data bits, stop bits, and XON/XOFF.
• If your terminal is emulating a terminal of a different type, you may need to set the
PIOTERM environment variable.
export PIOTERM=TerminalTypeEmulated
• Verify that you have the correct cable for the printer.
• Make sure the cable is securely plugged into the terminal’s auxiliary port.
• Make sure the print queue is READY:
lpstat
If the status for the terminal–attached printer queue does not read READY, enter the
following commands to cancel all jobs on the queue and restart it:
qadm –Xqname
qadm –Uqname
where qname is the name of the terminal–attached printer queue. You must resubmit your
print jobs.
• Verify that the pioout command has the correct permissions:
/usr/lib/lpd/pio/etc/pioout –r–sr–xr–x
To reset permissions, enter the following command:
chmod 4555 /usr/lib/lpd/pio/etc/pioout
• Check Local Printer Checklist on page 5-2.
• Sometimes printer control codes conflict with the terminal’s control codes. If the previous
checklist items do not produce output, reconfigure your virtual printer as an ASCII
Printer. See Configuring a Virtual Printer and Print Queue on page 2-18.
If echoes of keyboard input are mixed with printer output, check the following:
• Adjust the virtual printer attributes specific to terminal–attached printers. To do this, use
the SMIT fast path command:
smit chvirprt
• Resubmit the print request and avoid typing while the request is printing.
• If the ASCII terminal locks, turn the terminal off and on.
Troubleshooting the Base Operating System Spooler
5-9
Considerations for 8–Bit Printer Attached to 7–Bit Interface
Some printers assume an 8–bit (8 bits per byte) interface to the host. Although an 8–bit
printer may print when attached to a 7–bit interface, the printed output may not be
acceptable. To determine if your printer assumes an 8–bit interface, consult your printer
manual.
Incorrect printed output can be produced in the following situations:
• Printer command sequences may contain 8–bit values.
If an 8–bit printer must be attached to a 7–bit interface, follow this procedure to prevent
incorrect printed output.
1. Enter the smit fast path smit lsvirprt.
2. Select the print queue and type:
j=!j=!
3. Press the Enter key to exit.
This prevents print file initialization strings, which may contain 8–bit command
sequences, from being sent to the printer.
Note: This also bypasses printer initialization. So, depending on the pitch, line
spacing, and other attributes left by the previous print file, the output may not print
correctly.
• Printer character code points may be 8–bit values where each graphical character is
represented by an 8–bit integer value causing the wrong character to be printed. To
avoid this problem, all the characters in the print files should be in the portable ASCII
character set.
• Printed graphic files are affected when a 7–bit interface is used because some of the
data points are lost.
qdaemon Checklist
Under normal circumstances, the qdaemon command starts when the system starts, runs
until the system shuts down, and requires no attention from you. Sometimes, however, the
qdaemon command may stop running or be unable to perform its function. The following
article explains what you need to do under these conditions.
Any of the following conditions indicates that the qdaemon command needs maintenance:
• The enq command requests return the following message:
cannot awaken qdaemon (request accepted anyway)
• The qdaemon command detects serious inconsistencies within itself and displays an
error message.
• The ps –ef command (the process status command that gives a full listing of all
processes) does not show a process named /usr/sbin/qdaemon or qdaemon.
To start the qdaemon command, issue the following command:
startsrc –s qdaemon
Generally, only users with root privilege can use this command. The new qdaemon
command goes through an initialization process.
If the qdaemon command does not continue running, make sure that both the qdaemon
command and the enq command have the appropriate permissions. The person with root
authority owns both the qdaemon command and the enq command. The qdaemon
command and the enq command must run as if they are run by the user who owns them.
5-10
Guide to Printers and Printing
The permission bit s sets the effective owner (user ID) of a process to that of the nominal
owner. The appropriate permissions for these two commands are:
qdaemon –r–sr–s–––
To check these permissions, enter aclget
/usr/sbin/qdaemon.
To reset permissions, enter: tcbck –y
/usr/sbin/qdaemon. You must have root
user authority to reset these permissions.
enq –r–sr–sr–x
To check these permissions, enter aclget
/usr/bin/enq.
To reset permissions, enter: tcbck –y
/usr/bin/enq. You must have root user
authority to reset these permissions.
If you continue to have problems with the qdaemon command, you can use the following
procedure to reinitialize the entire queuing system:
1. If the qdaemon command is running (use the ps –ef command to find out), end it by
entering stopsrc –s qdaemon.
2. If any backends are running, use the kill command to stop them.
3. Delete the contents of the following directories:
– /var/spool/lpd/stat
– /var/spool/lpd/qdir
Note: All jobs currently queued for printing are canceled and must be resubmitted.
4. Restart the qdaemon command by entering startsrc –s qdaemon.
Troubleshooting the Base Operating System Spooler
5-11
Queuing System Problems
When the queuing system shows one or more queues in DEV_WAIT and you have verified
that the queue is not waiting on the printer because the printer is offline, out of paper,
jammed, or the cable is loose, bad, or wired incorrectly, and it has not changed to DOWN
within the TIMEOUT period, use the following method to clear and restart the queuing
system. This method stops the qdaemon, removes all queued jobs, and restarts the
qdaemon. You must have root authority.
stopsrc –s qdaemon
ps –e | fgrep qd
kill –9 PIDNumbers
where PIDNumbers are any PIDs resulting from the ps command.
ps –e | fgrep pio
kill –9 PIDNumbers
rm /var/spool/lpd/stat/_dev_DEVICE
where DEVICE is the device that is showing DEV_WAIT.
rm /var/spool/lpd/stat/s.QUEUE.DEVICE
where QUEUE is the queue and DEVICE that is showing DEV_WAIT.
mkdir /tmp QDIR
mv /var/spool/lpd/qdir/NNUSER:QUEUE /tmp QDIR
where NN is a number, USER is the user who queued the job and QUEUE is the queue that
is showing DEV_WAIT.
startsrc –s qdaemon
After the queueing system has been cleared and appears to be functioning properly, you will
need to stop the qdaemon, copy the jdf files from /tmp/QDIR to /var/spool/lpd/qdir, and
then restart the qdaemon.
Testing the qdaemon
Submitting jobs to the spooler causes no discernible spooler activity. Assume a local ASCII
print queue named asc.
Is the qdaemon running?
Issue the command enq –Pasc /etc/motd. If the qdaemon is not active, a variant of the
following message will be displayed:
enq: (WARNING): Cannot awaken qdaemon. (request accepted anyway)
enq: errno = 2:
No such file or directory
enq: (WARNING): Cannot awaken qdaemon. (request accepted anyway)
enq: errno = 2:
No such file or directory
Use the command ps –ef | grep qdaemon to verify that the qdaemon is not active. If the
qdaemon is not active, you should see, at the most, a line of output representing the grep
itself. It should look something like this:
root
2992 18792
0 12:46:39
pts/2
0:00 grep qdaemon
If the qdaemon is active, which it almost certainly will not be, you will see a variant of the
following line:
root
2980 3652
0 12:41:25
–
0:00 /usr/sbin/qdaemon
If the qdaemon is not active, issue the command startsrc –s qdaemon to restart the
qdaemon. If the qdaemon died, it should have been restarted automatically by the srcmstr
5-12
Guide to Printers and Printing
process, but it doesn’t always work, so restart it manually. You should see a variant of this
message:
0513–059 The qdaemon Subsystem has been started. Subsystem PID is 3000.
Wait a minute or so and re–issue the command ps –ef | grep qdaemon. Is the qdaemon
still active or did it start and then quit?
The qdaemon may no longer be active, despite the fact that you just restarted it and
received a message stating the qdaemon ’s process id (PID). Check for the existence of the
file named /var/spool/lpd/stat/pid. You can do this by issuing the command cat
/var/spool/lpd/stat/pid. This file contains the PID of an active qdaemon. When the
qdaemon is not active, the file is supposed to be removed.
If the cat command prints a number on your display, that should be the pid of an active
qdaemon. If you have already determined that the qdaemon is not active, remove the file
/var/spool/lpd/stat/pid because a previous instance of the qdaemon somehow quit without
causing this file to be removed. If the file does not exist, you should see a message like:
cat: cannot open /var/spool/lpd/stat/pid
The qdaemon was inactive, you restarted it, it quit again, the file /var/spool/lpd/stat/pid
existed, and you removed that file. Restart the qdaemon again using the command
startsrc –s qdaemon. Wait a minute or so and issue the command ps –ef | grep qdaemon
again to see if the qdaemon remained active. You can also issue the command cat
/var/spool/lpd/stat/pid again to see if the file was re–created and now contains a valid PID.
If the answer to the original question, Is the qdaemon running?, was yes, it is, then it is
possible that the qdaemon is waiting on all currently running jobs to complete before it
shows any signs of accepting new jobs. This scenario often occurs when a machine running
the base operating system has a large number of printers (more than 25) attached to
asynchronous adapters, such as 64–port or 128–port adapters.
To check to see if the qdaemon is waiting on a job to complete before it runs any more jobs,
use the lpstat command to see if any jobs have a status of RUNNING. If so, physically
examine the printers that show RUNNING jobs and verify that at least one job is actually
running. If one or more printers are showing DEV_WAIT because of paper jams or because
they are out of paper, fix the problem and see if the printers begin printing. If they do not
begin printing, again use the lpstat command to see if the queue status is RUNNING. In
any of these circumstances, the purpose of checking the printers is to verify that at least one
printer is actually printing even though the qdaemon is not starting new jobs.
Now submit a new job to the spooler with the command enq –Pasc /etc/motd.
Use the lpstat command to examine the queue status. If the new job has a job number of
NEW, then the qdaemon is, for some reason, focused on running other jobs and will not
start any new jobs until the current jobs are complete. You can only wait. You can not even
cancel the jobs that are running Job cancellation requests are jobs as well, and the
qdaemon is not taking new jobs.
Troubleshooting the Base Operating System Spooler
5-13
Testing a Spooler Queue
When spooling jobs from an application, it is often not clear if a job is actually getting to the
spooler. Again assume you are having problems with a queue named asc.
Issue the command disable asc to disable the spooler queue. Issue the command lpstat
–pasc to verify that the queue is DOWN. Now submit a job to the queue using the
application.
Use lpstat to verify that the job is on the asc queue (as long as the queue status is in a
temporary DOWN state, the qdaemon will put a job on the queue but will not allow it to be
processed.) If the job is not on the queue, use personal knowledge, application
documentation, or application technical support to determine what might be wrong. If
possible, determine exactly what job submission command or method is being used by the
application and try it from the command line. It is possible that the application is hiding error
messages being returned by either enq or the qdaemon.
Copying Spooled Jobs
Particularly in a remote spooling environment, it can be useful to make a copy of a spooled
print job. When a job is submitted to the spooler, a job description file (JDF) is created and
stored in /var/spool/lpd/qdir. If the queue is a remote queue, with something like rembak
as the backend, the job will be transferred to the print server, where enq will make another
JDF and put the job onto the specified print server queue.
If jobs seem to be vanishing at the print server, disable the print server queue (disable asc,
for the ASCII queue example), and resubmit the job. Since the asc is down,the lpstat
command should show the job as queued, but the queue will be DOWN and so the job will.
not be processed. Look in /var/spool/lpd/qdir for the JDF for this job. The last line of the
JDF is the full path name to the spooled copy of the input data stream. Copy that file to
some temporary file, such as /tmp/myfile. When you copy the file, you lose all of the
flags that were associated with the job; all you are copying is the input data stream itself.
Enable the asc queue (enable asc) and allow the job to be processed. If it vanishes, submit
the copy you made ( enq –Pasc /tmp/myfile ). If this job also vanishes, then you
need to examine the input datastream for errors, as the printer for some reason does not
print it. If the copy prints, then you probably have a problem with flags associated with the
original job.
Cleaning Up and Starting Over
This procedure completely clears and restarts the spooler system. All jobs currently queued
for processing are deleted and must be resubmitted. Use it when you cannot troubleshoot
an inoperative spooler. You must be the root user to perform this task.
1. Stop the qdaemon and associated processes:
stopsrc –s qdaemon
ps–ef | grep qd
2. kill –9 PIDNumbers
where PIDNumbers are PIDs resulting from the ps command. You may find qdfork.
ps –ef | grep pio
kill –9 PIDNumbers
where PIDNumbers are PIDs resulting from the ps command. You may find pioformat
or pioout.
5-14
Guide to Printers and Printing
3. Clean out the queue and device status directory.
rm /var/spool/lpd/stat/*_dev_*
rm /var/spool/lpd/stat/s*
The file /var/spool/lpd/stat/numfile contains an integer representing the last job number
that was assigned. If it is sastisfactory that the job numbering scheme restarts, type:
rm /var/spool/lpd/stat/*
4. Remove spooled jobs:
rm /var/spool/lpd/qdir/*
rm /var/spool/qdaemon/*
5. Restart the qdaemon.
startsrc –s qdaemon
While issuing the ps commands, you may find a process whose parent process ID (PPID) is
1. If these processes cannot be killed by kill –9, you must reboot the system to delete these
processes.
Related Information
For more information about mounting file systems, see ”Mounting or Unmounting a File
System” in AIX 5L Version 5.2 System Management Guide: Operating System and Devices.
Troubleshooting the Base Operating System Spooler
5-15
5-16
Guide to Printers and Printing
Chapter 6. System V Printer Configuration
This chapter discusses advanced print service functions, including:
•
Understanding the Print Service on page 6-1
•
Customizing Printer Configuration on page 6-6
•
Providing Filters on page 6-18
•
PostScript Printers on page 6-29
•
Configuring Directory–Enabled (LDAP) System V Print on AIX on page 6-43
Understanding the Print Service
The System V print service is a collection of utilities that help you, as system administrator
(or printer administrator), to configure, monitor, and control the printers on your system.
The print service:
• Receives files users want to print
• Filters the files (if needed) so they can print correctly
• Schedules the work of one or more printers
• Starts programs that interface with the printers
• Keeps track of the status of jobs
• Alerts you to printer problems
• Keeps track of mounting forms and filters
• Issues error messages when problems arise
When a user sends a file to a printer, the print service assigns to the request (print job) a
unique name, the request ID.
The request ID consists of the name of the printer on which the file is to be printed and a
unique number identifying the file. Use this request ID to find out the status of the print job
or to cancel the print job. The print service keeps track of all the print requests in the request
log.
The print job is spooled, or lined up, with other print jobs to be sent to a printer. Each print
job is processed and waits its turn in line to be printed. This line of pending print jobs is
called a print queue.
Each printer has its own queue; you can hold jobs in the queue, move jobs up in a queue, or
transfer jobs to another queue.
Overview of Print Request Processing
As the following figure illustrates, each print request is sent to a spooling daemon
(background program) that keeps track of all the jobs. (This information is archived in the
request log.) The daemon is created when you start the print service. The spooling daemon
is also responsible for keeping track of the status of the printers and slow filters; when a
printer finishes printing a job, the daemon initiates printing another job if one is queued.
System V Printer Configuration
6-1
Figure 4. Overview of Print Request Processing
You can customize the print service by adjusting or replacing some of the items shown in
the Overview of Print Request Processing figure (the numbers in the following list
correspond to the numbered items in the diagram).
1. Print service configuration: For most printers, you need only change the printer
configuration stored on disk. See the lpadmin command for adding or modifying a local
printer.
2. terminfo database: For printers that are not represented in the terminfo database, you
can add a new entry that describes the capabilities of the printer. See Adding a Printer
Entry to the terminfo Database on page 6-13. The print service uses the terminfo
database in two parallel capacities: screening print requests to ensure that those
accepted can be handled by the desired printer, and setting the printer so it is ready to
print the requests.
For instance, if the terminfo database does not show a printer capable of setting a page
length requested by a user, the spooling daemon rejects the request. However, if it does
show it to be capable, then the interface program uses the same information to initialize
the printer.
3. Standard Interface Program: If you have a particularly complicated printer or if you want
to use features not provided by the print service, you can change the interface script.
This script is responsible for managing the printer: it prints the banner page, initializes
the printer, and invokes a filter to send copies of the user’s files to the printer.
4. Optional filters: To provide a link between the applications used on your system and the
printers, you can add slow and fast filters. Each type of filter can convert a file into
another form, for example, mapping one set of escape sequences into another, and can
6-2
Guide to Printers and Printing
provide a special setup by interpreting print modes requested by a user. Slow filters are
run separately by the spooling daemon to avoid tying up a printer. Fast filters are run so
their output goes directly to the printer; thus, they can exert control over the printer.
Print Request Log
Each time a user sends a job to the printer, the print service creates two files that describe
the job request and places one each in the /usr/spool/lp/temp and /usr/spool/lp/requests
directories. The information about the job is split into two files so that the system can keep
sensitive information secure in the /usr/spool/lp/requests directory. The user who
submitted the job has access to the request file in /usr/spool/lp/temp; only the printer
administrator (or root user) has access to the file in /usr/spool/lp/requests.
The request files remain in these directories only while the job is in the queue. When the job
finishes printing, the information in the two files is combined and appended to the request
log, /usr/spool/lp/logs/requests.
The structure of the request log allows you to extract data using common shell commands.
The requests are listed in the order in which they were printed, separated by lines that begin
with the request ID. Each line below the separator line is marked with a single letter, the
request log code, that identifies the kind of information contained in the line. Each letter is
separated from the data by a single space. The table following the sample entry describes
these codes.
Following is a sample entry from the print request log:
= ps–717, uid 1532, gid 18, size 7872, Tue May 10 14:43:10 1994
z ps
C 1
D ps
F /usr/spool/lp/temp/717–1
P 20
t simple
U hanna
s 0x0010
Request Log Entries
Letter
Content of line
=
The separator line lists the
(comma–separated) request ID, user ID
(uid), and group ID (gid) of the user who
submitted the request, total number of bytes
in the original (unfiltered) file (size), and the
date and time the request was queued.
C
Number of copies printed.
D
Printer or class destination or the word any.
F
Name of the file in the /usr/spool/lp/temp
directory. This line is repeated for each file
printed, and files are printed in the order
given.
f
Form name used (if applicable).
H
Type of special handling used:
• resume
• hold
• immediate
System V Printer Configuration
6-3
N
How the print service notified the user after
printing the file (if applicable):
• M
by an electronic mail message
• W
by a message written to the user’s
terminal
O
Any –o options given to the lp command.
P
Priority of the print request, if applicable.
p
List of pages printed.
r
Any –r options given to the lp command
indicating that the user requested raw
processing of the file.
S
Character set used.
s
Outcome of the job, expressed as a
combination of individual bits in
hexadecimal form. The important bits used
internally by the spooler are:
• 0x0004
Slow filtering finished
successfully.
• 0x0010
Printing finished successfully.
• 0x0040
Request was canceled.
• 0x0100
printing.
Request failed filtering or
T
Title on the banner page.
t
Content type of the file.
U
Name of the user who submitted the print
request.
x
Slow filter.
Y
List of special modes to give to the filters
used to print the request.
y
Fast filter.
z
Printer used for the request. This differs
from the destination (the D line) if the
request was queued for any printer or a
class of printers, or if the printer
administrator transferred the request to
another printer.
Print Service Command Line
In general, you should use Web-based System Manager to manage your print service.
Print Service Commands Available to All Users
Command
Description
cancel
Cancels a request for a file to be printed
lp
Sends a file or files to a printer
lpstat
Reports the status of the print service
The administrator can give users the ability to disable and enable a printer so that if a printer
is malfunctioning, the user can turn the printer off without having to call the administrator.
6-4
Guide to Printers and Printing
(However, in your printing environment, it might not be reasonable to allow regular users to
disable a printer.)
The Administrative Print Service Commands Table lists print service commands available
only to the administrator. To use the administrative commands, you must be logged in as
root user.
The administrative print service commands are located in the /usr/lib directory. If you use
these commands frequently, include /usr/lib in your PATH variable.
Administrative Print Service Commands
Command
Description
accept
reject
Permits jobs to be queued for a specified
destination
Prevents jobs from being queued for a
specified destination
cancel
Cancels requests to a line printer
enable
disable
Activates the named printers
lpadmin
Sets up or changes printer configurations
lpc
Provides (BSD) line printer control
lpfilter
Sets up or changes filter definitions
lpforms
Sets up or changes preprinted forms (use
/usr/sbin/lpadmin to mount a form)
lpmove
Moves output requests from one destination
to another
lpsched
lpshut
Starts the print service
Stops the print service
lpsystem
Registers remote systems with the print
service
lpusers
Sets or changes the default priority and
priority limits that the users of the print
service can request
The accept, reject, cancel, enable, disable, and lpadmin commands can also be run from
the Web-based System Manager interface. To run these commands, start Web–based
System Manager, then select the Printers plug–in from the Contents Area.
System V Printer Configuration
6-5
Customizing Printer Configuration
Although the print service is flexible enough to handle most printers and printing needs, you
might require features that the standard print service does not accommodate.
You can customize the print service by:
•
Setting Default Printer Page Size and Spacing on page 6-6
•
Configuring Banners on page 6-7
•
Administering the /etc/lp/Systems File on page 6-7
•
Printer Models File on page 6-8
•
Creating Printer Interface Scripts on page 6-10
•
Using the terminfo Database on page 6-13
•
Creating a Printer Form on page 6-15
•
Adding a Form to the Print Service on page 6-15
•
Removing a Form on page 6-15
•
Restricting User Access to Forms on page 6-15
•
Mounting a Form on page 6-16
•
Unmounting a Form on page 6-17
•
Examining a Form on page 6-17
Setting Default Printer Page Size and Spacing
When a user submits a request to print a file, the page size, character pitch, and line pitch
(spacing) are normally determined from the form that it is printed on. If the user does not
require a form, he or she can specify the page size and print spacing to use. If the user
gives neither a form to use nor the page size and print spacing, defaults are used.
Note:
The preceding information does not apply to PostScript printers.
By setting defaults for each printer, you can make it easier to submit print requests. For
example, you can designate different printers as having different default page sizes or print
spacing. You can dedicate one printer to printing wide (132–column) output, another to
printing normal (80–columns, 66 lines) output, and yet another to printing letters in
monospaced fonts (12 characters per inch, 8 lines per inch). Users simply route their file to
the appropriate printer to get the style of output they want.
You can specify the following default settings:
• Page width
• Page length
• Character pitch
• Line pitch
Specify the first two in columns and lines respectively (or in inches). Specify character pitch
and line pitch in characters per inch (cpi) and lines per inch (lpi) respectively.
In addition, specify the character pitch as pica for 10 cpi, elite for 12 cpi, or compressed
for the maximum cpi the printer can provide (up to a limit of 30 cpi).
To specify the default settings, use the following commands:
6-6
Guide to Printers and Printing
/usr/sbin/lpadmin –p
printer_name
–o width=
scaled–number
/usr/sbin/lpadmin –p
printer_name
–o length=
/usr/sbin/lpadmin –p
printer_name
–o cpi=
scaled–number
/usr/sbin/lpadmin –p
printer_name
–o lpi=
scaled–number
scaled–number
Note: The lpadmin command uses the printer type to determine whether the settings
are possible for the printer. Therefore, you must first set the printer type before you can
specify these defaults.
For example, to specify a page width of 11 inches, a page length of 14 inches, character
pitch to compressed, and line pitch of 3 lines per inch for the printer barney, type:
/usr/sbin/lpadmin –p barney –o width=11i
/usr/sbin/lpadmin –p barney –o length=14i
/usr/sbin/lpadmin –p barney –o cpi=compressed
/usr/sbin/lpadmin –p barney –o lpi=3
If you do not provide defaults, the page size and print spacing are set to those available
when the printer is initialized. You can determine what the defaults are by first defining the
printer configuration without providing your own defaults, then using the lpstat command to
display the printer configuration. To display the default page size and print spacing, type:
lpstat –p
printer_name
–l
Information similar to the following displays:
Default pitch: compressed CPI 3 LPI
Default page size: Default page size: 11i wide 14i long
If you do not set the defaults, the lpstat command reports defaults from the terminfo
database entry for the printer.
Configuring Banners
A banner is a page describing the print request (for example, printer name, user, date) that
prints with the print job.
Use the following command to permit users to decide whether they want a banner printer:
/usr/sbin/lpadmin –o nobanner
Administering the /etc/lp/Systems File
A default wildcard entry is supplied in the /etc/lp/Systems file that allows connections to
any system using BSD connections. The wildcard entry is as follows:
*:x:–:bsd:–:n:10:–:–:Allow all BSD connections
The presence of this entry allows a print server to accept connections from systems that are
not explicitly configured as known systems.
Entries specifying the remote system name can still be added to the file using the lpsystem
command.
Access to a printer can be controlled from the printer’s users.allow and users.deny files.
See the lpadmin command for more information.
Note: The wildcard entry is only used for incoming connection requests and not for
outgoing requests.
System V Printer Configuration
6-7
If you do not want to separately control access to each printer on your system but you want
the /etc/lp/Systems file to specify which remote systems have access to your printers,
remove the wildcard entry from the file and add entries for the remote systems. To do this,
perform the following:
• To remove the wildcard entry for BSD systems, use:
/usr/sbin/lpsystem –r ”*”
• To add the entry for a specific remote system, use:
/usr/sbin/lpsystem
system–name
Printer Models File
The printer models file /usr/lib/scoadmin/printer/model.stz contains a list of supported
printers and their attributes. Web–based System Manager uses this file to configure a new
printer. The format is as follows:
key1:
attr1 = val1
attr2 = val2
key2:
...
The file includes a text description of each supported make and model, pointers to a printer
interface script, and a terminfo entry. It can also contain additional information such as
required serial line settings or supported content types.
The following attributes are available:
contents
A quoted, comma–separated list of the content types supported for a
printer, usually just PS (for postscript), pcl (for Hewlett–Packard’s
Printer Control Language), or simple (for most other printers).
Additional content types can be supported by creating Print Filters.
See Providing Filters on page 6-18. This attribute is optional.
interface
The Printer Interface Script should be set to standard in most cases.
See Printer Interface Scripts on page 6-9. This attribute is
mandatory.
name
A text description of a printer make/model. This attribute is
mandatory.
terminfo
Is the name of the terminfo entry associated with this printer. See
Using the terminfo Database on page 6-13. This attribute is optional.
stty
Any serial or parallel line settings appropriate for the printer. This
attribute is optional.
In addition, each printer must have a unique key name associated with it, as shown in these
examples:
6-8
Guide to Printers and Printing
canon–jet–10ex:
name=”Canon Bubble Jet 10ex”
terminfo=bj–10ex
interface=standard
hp–laserjet:
name=”HP LaserJet (PCL)”
terminfo=hplaserjet
interface=standard
contents=pcl
stty=”clocal –onlcr”
Printer Interface Scripts
A printer interface script is a program that the print service uses to manage the printer each
time it prints a file. The interface script initializes the printer, takes advantage of its particular
capabilities, prints the file, and reports any errors.
Note: If you have an interface program that you have used with the print service of an
older UNIX system, it should still work. Be aware, though, that several –o options have
been standardized and will be passed to every interface program. These options may
interfere with similarly named options your interface program uses.
The printer interface scripts are associated with the printer model and are located in
/etc/lp/model. For example, the printer interface script for a PostScript printer is called
/etc/lp/model/PS. You can also create your own interface scripts or customize existing ones
to suit your needs. See Creating Printer Interface Scripts on page 6-10.
Interface scripts do the following:
• Initialize the printer port (the connection between the computer and the printer). The
standard (/etc/lp/model/standard) interface script uses the stty command to initialize
the printer port.
• Initialize the physical printer (restore the printer to a normal state in case a previously
printed file has left it in an unusual state), setting the character pitch, line pitch, page
size, and character set requested by the user. The standard interface script uses the
lp.set command to initialize the printer.
• Print banner page (or pages), if required.
• Print the requested files. The standard interface script calls the lp.cat command to print
the files.
• Report any errors to the print service. The standard interface script uses the lp.tell
command to send descriptions of printer faults to the print service. The print service
forwards that information as an alert to the print administrator.
The print service opens the printer port. The print service gives the printer port connection to
the interface script as standard output and sets the printer to be the controlling terminal for
the interface script. If the port experiences a hangup, a SIGHUP signal is sent to the
interface script.
Many of the interface scripts provide special options that the user can specify by using the
–o option with the lp command.
The print service runs the interface script to send the print job to the printer, as shown in the
following example:
/etc/lp/interfaces/
printer id user title copies options file1 file2 ...
Arguments to the interface script are:
System V Printer Configuration
6-9
printer
The name of the interface script (the same as the printer name).
id
Request ID returned by the lp command.
user
Login name of user who made the request.
title
Optional title specified by the user.
copies
Number of copies requested by the user.
options
List of blank–separated options, specified by the user (using lp –o)
or by the print service (from default values specified by the
administrator with the lpadmin command). See the lp command for
the list of options recognized by the standard interface.
file
Full path name of a file to be printed.
When the interface script is invoked:
• Standard input comes from /dev/null.
• Standard output is directed to the printer port.
• Standard error output is directed to a file that will be displayed to the user who submitted
the print request.
The print service passes additional printer configuration information to the interface script as
the following shell variables:
TERM= printer–type
Specifies the printer type. The value is used as a key for
obtaining printer capability information from the extended
terminfo database.
FILTER= pipeline
Specifies the filter to use to send the request content to the
printer; the filter is given control of the printer.
CHARSET= character–set
Specifies the character set to use when printing the content
of a print request. The standard interface script extracts the
control sequences needed to select the character set from
the terminfo database.
Creating Printer Interface Scripts
If you have a printer that is not supported by adding an entry to the terminfo database, or if
your printing needs are not supported by the standard or other interface scripts provided in
the /etc/lp/model file, you can create your own printer interface script.
To create a customized interface script, do the following:
1. Modify the standard interface script (or one of the other scripts in /etc/lp/model). For
example:
cd /etc/lp/model
cp standard okidatanew
2. Make sure that the custom interface script sets the proper stty modes (terminal
characteristics such as baud rate or output options). Look for the section that begins with
this line:
## Initialize the printer port
Modify the code in the standard interface script. It sets both the default modes and the
adjusted modes given by the print service or the user with a line similar to the following:
stty
mode options
0<&1
This command line takes the standard input for the stty command from the printer port.
For example, the following stty command example sets the baud rate to 1200bps and
sets some of the option modes:
6-10
Guide to Printers and Printing
stty –parenb –parodd 1200 cs8 cread clocal ixon 0<&1
3. Set the hardware–flow control printer–port characteristic. The standard interface script
does not set hardware flow control; it is set according to your computer hardware. The
code for the standard interface script suggests where to set this and other printer port
characteristics. Look for the section that begins with this line:
# Here you may want to add other port initialization code.
4. Because different printers have different numbers of columns, make sure the header and
trailer for your interface script correspond to your printer. The standard interface script
prints a banner that fits on an 80–column page (except for the user’s title, which may be
longer). Look for the section in the code for the standard interface script that begins with
this line:
## Print the banner page
Some applications, when run with certain printers, may require that you turn off page
breaking. If you must turn off page breaking, you can modify the standard interface
program (/usr/lib/lp/model/standard) at this line:
if [ –n ”${FF}” –a ”no” = ”${nofilebreak}” ]
Change the no to yes to turn off page breaking.
5. Specify that the custom interface script print all user–related error messages to the
standard output or to the standard error output. The print service prints standard output
errors on the page and mails standard error to the user.
6. Specify that when printing is complete, the interface script exits with a code advising the
status of the print job. The Exit Codes Table, Exit Codes on page 6-12, describes how
the print service interprets exit codes.
One way of alerting the administrator to a printer fault is to exit with a code of 129.
Unfortunately, if the interface script exits, the print service reprints the print job from the
beginning after the fault is cleared. To get an alert to the administrator without reprinting
the entire job, specify that the interface script send a fault message to the print service,
but wait for the fault to clear. When the fault clears, the interface script resumes printing
the job. When the job finishes printing, the interface script can exit with zero as if the fault
never occurred. An added advantage is that the interface script can detect when the fault
is cleared automatically so that the administrator does not have to re–enable the printer.
To specify that fault messages be sent to the print service, use the lp.tell command. The
standard printer interface code calls the lp.tell command with the LPTELL shell
variable. The lp.tell program sends its standard input to the print service. The print
service forwards the message as an alert to the administrator. If its standard input is
empty, lp.tell does not initiate an alert. Examine the code immediately following these
comments in the standard interface script for an example of how to use the lp.tell
(LPTELL) program:
# Here’s where we set up the $LPTELL program to capture
# fault messages.
#
# Here’s where we print the file.
With the special exit code 129 or lp.tell, the interface script need not disable the printer
itself. Your interface script can disable the printer directly, but doing so overrides the
fault–alerting mechanism. Alerts are sent only if the print service detects that the printer
has faulted, and the special exit code and lp.tell program are its main detection tools.
If the print service must interrupt the printing of a file at any time, it kills the interface
script with a signal 15 (see the signal command and the kill command for more
information).
If the interface script stops upon from receipt of any other signal, the print service
assumes that future print jobs are not affected and continues to use the printer. The print
service notifies the person who submitted the print job that the job did not finish
successfully.
System V Printer Configuration
6-11
The signals SIGHUP, SIGINT, SIGQUI, and SIGPIP (trap numbers 1, 2, 3, and 13) are
ignored when the interface is invoked. The standard interface script changes this to trap
these signals at appropriate times, interprets these signals to mean that the printer has a
problem, and issues a fault.
Exit Codes
The following table describes how the print service interprets exit codes:
Code
Description
0
The print job completed successfully.
1 to 127
The print service encountered a problem in
printing the job (for example, there were too
many nonprintable characters or the job
exceeded the printer’s capabilities). This
problem does not affect future print jobs.
The print service should notify the person
who submitted the print job – via write or
mail – that an error occurred in printing the
job. If a printer fault occurred, it was
cleared.
128
Reserved for internal use by the print
service. Interface scripts must not exit with
this code.
129
The print service encountered a printer fault
in printing the job. This problem affects
future print jobs. If the fault recovery for the
printer directs the print service to wait for
the administrator to fix the problem, the print
service should disable the printer. If the fault
recovery is to continue printing, the print
service should not disable the printer, but try
printing again in a few minutes.
> 129
Reserved for internal use by the print
service. Interface scripts must not exit with
codes in this range.
Setting up Printer Interface Scripts
By default, the print service uses the standard interface script, /etc/lp/model/standard. Use
this interface script to handle most of your printing needs.
To change the interface script after you add the printer, you can specify an interface
program using the –i option with the lpadmin command.
The following example adds a new printer called laser on printer port /dev/tty01. It uses a
customized interface program, located in the directory /usr/doceng/laser_intface. It can
handle three file types: i10, i300, and impress, and it can be used only by the users
doceng and docpub. (The following command example is split into multiple lines for
readability.)
lpadmin –p laser –v /dev/tty01 \
–i /usr/doceng/laser_intface \
–I ”i10,i300,impress” \
–u ”allow:doceng,docpub”
6-12
Guide to Printers and Printing
Using the terminfo Database
The print service relies on the standard interface script and the terminfo database to
initialize each printer and set up a selected page size, character pitch, line pitch, and
character set. Thus, it is usually sufficient to have the correct entry in the terminfo database
(/usr/lib/terminfo/terminfo.lp) to add a new printer to the print service.
The terminfo database identifies each printer by a short name, identical to the kind of name
used to set the TERM shell variable. For example, the name in the terminfo database for the
AT&T model 455 printer is 455.
To specify the terminfo type for your printer, use the –T option of the lpadmin command. By
default, the terminfo database includes entries for many popular printers. Select the terminfo
type that corresponds to your printer.
If terminfo does not include an entry for your printer, you might still be able to use the printer
with the print service. However, you will not be able to use automatic selection of page size,
pitch, and character sets, and you might have trouble keeping the printer set to the correct
modes for each print request or using printer forms with the printer. In this case, you can
either add an entry to terminfo ( Adding a Printer Entry to the terminfo Database on page
6-13) for your printer or create a customized interface program ( Creating Printer Interface
Scripts on page 6-10) to use with the printer.
You can define hundreds of items for each terminal or printer in the terminfo database.
However, the print service uses fewer than 50 of these, and most printers need even less
than that. You can check items defined for a specific terminfo entry by typing the following
command:
infocmp
terminfo_name
Adding a Printer Entry to the terminfo Database
To create a terminfo entry for your printer, do the following:
1. Identify an entry in the /usr/lib/terminfo/terminfo.lp file that uses the same commands
as the printer you are adding and copy that information to filename, where filename is
the file containing the terminfo entry you created for the printer.
2. Use the information in the manual for your printer, the terminfo Entry Definitions for
Printers on page 6-13, and terminfo to modify the entry in filename.
3. After you create the new entry, compile it into the database, as follows:
tic
filename
After adding or deleting terminfo entries or changing values that govern pitch settings, page
width and length, or character sets, stop and restart the print service.
terminfo Entry Definitions for Printers
Following are the print service terminfo entries and their definitions:
terminfo entry
Description
Booleans:
daisy
Printer needs operator to change character set
Numbers:
bufsz
Number of bytes buffered before printing
* cols
Number of columns in a line
* it
Tabs initially every # spaces
* lines
Number of lines on a page
orc
Horizontal resolution in units per character
orhi
Horizontal resolution in units per inch
System V Printer Configuration
6-13
orl
Vertical resolution in units per line
orvi
Vertical resolution in units per inch
cps
Average print rate in characters per second
Strings:
* cr
Carriage return
cpi
Change number of characters per inch
lpi
Change number of lines per inch
chr
Change horizontal resolution
cvr
Change vertical resolution
csnm
List of character set names
mgc
Clear all margins (top, bottom, and sides)
* hpa
Horizontal position absolute
* cud1
Down one line
* cuf1
Carriage right
swidm
Enable double–wide printing
rwidm
Disable double–wide printing
* ff
Page eject
* is1
Printer initialization string
* is2
Printer initialization string
* is3
Printer initialization string
* if
Name of initialization file
* iprog
Path name of initializing program
* cud
Move carriage down # lines
* cuf
Move carriage right # columns
* rep
Repeat a character # times
* vpa
Absolute vertical position
scs
Select character set
smgb
Set bottom margin at current line
smgbp
Set bottom margin
* smgl
smglp
* smgr
Set left margin at current column
Set left margin
Set right margin at current column
smgrp
Set right margin
smgt
Set top margin at current line
smgtp
Set top margin
scsd
Start definition of a character set
* ht
Tab to next 8–space tab stop
The items marked with an asterisk (*) are available on your system. The remainder of the
definitions can be added.
6-14
Guide to Printers and Printing
Creating a Printer Form
A preprinted printer form is a blank paper form that you load into your printer. An application
typically generates a file that, when printed on the blank form, fills out the form. The print
service includes facilities to create and administer forms.
To specify the format of forms, create a form description file.
For example, create a file called /tmp/check.desc and include all or any subset of the
following information:
Page length:
66
Page width:
80
Number of pages:
2
Line pitch:
10
Character pitch:
16
Character set choice:
Ribbon color:
blue
Comment:
Check form
Alignment pattern:
any
XXXX XXXXXXXXXXXXX XXXXXXXXX
xxxxxx
xxxxxxxxxxxxxxxxxxxxxxxxx
The print service uses the alignment pattern to line up the forms before printing begins and
prompts you to perform an alignment before printing.
Depending on your printer, specify page length in lines, inches (i), or centimeters (c).
Specify page width in columns, inches (i), or centimeters (c). In the example above, page
length is specified as 66 lines. If the printer recognizes inches, specify the page length as
11i.
Adding a Form to the Print Service
After you have created a form, you must add it to the service. Choose a name that
describes the form, because you use this name when you mount the form. The following
command adds the form previously described:
lpforms –f check –F /tmp/check.desc
This command places the form in the /usr/spool/lp/admins/lp/forms file.
Removing a Form
The print service imposes no fixed limit on the number of forms you may define. It is a good
idea, however, to remove forms that are no longer appropriate. If you do not, users must
examine a long list of obsolete forms when choosing a form. In addition, because the print
service must occasionally look through all the forms listed before performing certain tasks,
the failure to remove obsolete forms may require unnecessary processing by the print
service.
To remove a form, type the following command:
/usr/sbin/lpforms –f
form–name
–x
Restricting User Access to Forms
You can limit the availability of certain forms to selected users. For example, you may want
to limit access to checks to the people in the payroll department or accounts payable
department.
The print service restricts the availability of a form by using the lists (provided by you) of
users allowed or denied access to that form. If a user is not allowed to use a particular form,
the print service will reject the request to print a file with it.
System V Printer Configuration
6-15
The method used to allow or deny users access to a form is similar to the method used to
allow or deny users access to the cron and at facilities. Refer to the crontab command for
more information.
If users on your system can access forms on a remote printer, all users included on the
allow list for the local system must be included on the allow list for the remote system as
well.
If, on the other hand, a local user is to be denied permission to use forms on a remote
printer, it is not necessary for the deny lists in both the local and remote print services to
include that user. By being included in only one of these deny lists, a user can be denied
access to remote forms. As a courtesy to your users, however, make sure that any local
users who are included in a deny list on a remote system are included in the corresponding
deny list on your local system. This ensures that whenever a user on your system requests
a form without authorization, the user is immediately informed that permission to use the
form is being denied. If the local print service does not know that a user is denied
permission to use a particular remote form, there will be a delay before the user receives a
permission denied message from the remote system.
Defining the Forms Access List
To add names to the allow list and remove them from the deny list, run the following:
lpforms –f
form–name
–u allow:
user–list
To add names to the deny list and remove them from the allow list, run the following:
lpforms –f
form–name
–u deny:
user–list
The user–list is a comma– or space–separated list of names of users. If you use spaces to
separate the names, enclose the entire list (including the allow: or deny: but not the –u) in
quotes. Each item in the list can include a system name.
Specifying allow:all allows all users. Specifying deny:all denies all users.
If you do not add user names to the allow or deny lists, the print service assumes that all
users may use the form.
Mounting a Form
Before the print service starts printing files that need a preprinted form, you must mount the
form on a printer. If alerting has been set on the form, you will be alerted when enough print
requests are queued waiting for the form to be mounted (see Alerting to Mount Forms and
Font Cartridges on page 6-40 for information on alerting). Mounting a form involves loading
it onto the printer and then informing the print service that it is mounted. It is sound practice
to disable the printer first.
Until you have mounted a form on a printer, only print requests that do not require the form
will be sent to the printer.
Use the following procedure to inform the print service that the form is mounted:
1. Disable the printer.
2. Load the new form onto the printer.
3. Run the following command to mount a form:
/usr/sbin/lpadmin –p
printer–name
–M –f
form–name
–a –o filebreak
4. Re–enable the printer.
If an alignment pattern has been registered with the form, you can ask that this be
repeatedly printed after you have mounted the form, until you have adjusted the printer so
that the alignment pattern looks correct.
6-16
Guide to Printers and Printing
The –o filebreak option tells the print service to add a form feed after each copy of the
alignment pattern, if there is one. You must press the return key before each copy of the
alignment pattern is printed.
The actual control sequence used for the form feed depends on the printer involved and is
obtained from the terminfo database. If the alignment pattern already includes a form feed,
omit the –o filebreak option.
Unmounting a Form
The lpadmin command allows you to specify that a form or font on a specified printer is to
be unmounted.
To unmount a form, use the following command:
/usr/sbin/lpadmin –p
printer–name
–M –f none
Examining a Form
After you have defined a form to the print service, you can examine it with one of two
commands, depending on the type of information you want to check. The lpforms
command displays the attributes of the form. (The display produced by the lpforms
command can be used as input. You may want to save it in a file for future reference.) The
lpstat command displays the current status of the form.
Note: A form definition that is captured in a file can be used later to redefine the form if
you inadvertently remove the form from the print service.
To display the status of a form, run the following:
lpstat –f
form–name
–l
To receive a shorter version of the output, omit the –l.
The long form of output, an example of which follows, is similar to the output of lpforms –l:
Page length:
scaled–number
Page width:
scaled–number
Number of pages:
integer
Line pitch:
scaled–number
Character pitch:
scaled–number
Character set choice:
character–set [,mandatory]
Ribbon color:
ribbon–color
Comment:
comment
Alignment pattern: [
content–type ]
content
To protect potentially sensitive content, the alignment pattern is not shown if the lpstat
command is used. See Creating a Printer Form on page 6-15 for descriptions of these
characteristics.
System V Printer Configuration
6-17
Providing Filters
A filter is a program that you can use for the following purposes:
• To convert a user file from one data format to another so that it can be printed correctly
on a given printer
• To handle the special modes of printing that users may request with the –y option to the
lp command (such as two–sided printing, landscape printing, draft or letter–quality
printing)
• To detect printer faults and notify the print service of them, so that the print service can
alert you
Not every filter can perform all three tasks. Given the printer–specific nature of these roles,
the print service has been designed so that these roles can be implemented separately. This
separation allows you or a printer manufacturer (or another source) to provide filters without
having to change the print service.
A default filter is provided with the print service to provide simple printer fault detection. It
does not convert files or handle any of the special modes. It may, however, be adequate for
your needs.
You can use the print service to manage the use of filters as described in the following
topics:
•
Defining a Filter on page 6-20
•
Adding a Filter to the Print Service on page 6-26
•
Removing a Filter on page 6-26
•
Examining a Filter on page 6-26
•
Restoring Factory Defaults for Filters on page 6-26
Note: Adding, changing, or removing filters can cause print requests that are still
queued to be canceled. This is because the print service evaluates all print requests still
queued to see which are affected by the filter change. Requests that are no longer
printable, because a filter has been removed or changed, are canceled (with notifications
sent to the users who submitted them). There can also be delays in the responses to
new or changed print requests when filters are changed, due to the many characteristics
that must be evaluated for each print request still queued. These delays can become
noticeable if there is a large number of requests that need to be filtered.
Because of this possible impact, make alterations to filters during periods when the print
service is idle.
Task 1: Converting Files
For each printer (local or remote), you can specify what file content types it can print. When
a user submits a file to print on any printer and specifies its content type, the print service
finds a printer that can handle files of that content type. Because many applications can
generate files for various printers, this is often sufficient. However, some applications
generate files that cannot be printed on your printers.
By defining and creating a filter that converts such files into a type that your printers can
handle, you can support more applications in the print service. (The print service provides a
few filters for converting various types of files into PostScript.) For each filter you add to the
system, you must specify one or more types of input it can accept and the type of output it
can produce (usually only one).
When a user specifies (by executing lp –T) a file content type that no printer can handle, the
print service tries to find a filter that can convert the file into an acceptable type. If the file to
be printed is passed through a filter, the print service then matches the output type of that
filter with a printer type or the input type of another filter. The print service continues to
6-18
Guide to Printers and Printing
match output types to input types in this way, thus passing a file through a series of filters,
until the file reaches a printer that accepts it.
Example: HP DeskJet 500
In this example, the user Chris has run a spreadsheet program and has generated a file
containing a copy of a spreadsheet. Chris now wants to print this file using the print service.
You have only HP DeskJet 500 printers on your system. Fortunately, the spreadsheet
application understands how to generate output for several printers, and Chris knows it is
necessary to request output that can be handled by the HP DeskJet 500. When Chris
submits the file for printing, the print service queues it for one of the printers; no filter is
needed.
Example: Tektronix 4014 Output
In this example, the user Marty created a graphic image that can be displayed on a
Tektronix 4014 terminal. Marty now wants to print this image, but all of the printers are
PostScript printers. Fortunately, your system provides a filter called posttek that converts
Tektronix type files to PostScript. Because you set the printer type to PostScript, the print
service recognizes that it can use the posttek filter to convert Marty’s output before printing
it.
Task 2: Handling Special Modes
Filters can handle special printing modes. Each filter you add to the filter table can be
registered to handle special modes and other aspects of printing, such as:
• Special modes
• Printer type
• Character pitch
• Line pitch
• Page length
• Page width
• Pages to print
• Character set
• Form name
• Number of copies
A filter is required to handle the special modes and printing of specific pages; the print
service provides a default handling for the rest. However, it may be more efficient to have a
filter handle some of the rest, or it is possible that a filter has to know several of these
aspects to fulfill its other roles properly. A filter may need to know, for example, the page
size and the print spacing if it is going to break up the pages in a file to fit on printed pages.
As another example, some printers can handle multiple copies more efficiently than the print
service, so a filter that can control the printer can use the information about the number of
copies to skip the print service default handling of multiple copies.
Task 3: Detecting Printer Faults
Just as converting a file and handling special printing modes is a printer–specific role, so is
detecting printer faults. The print service attempts to detect faults in general, and for most
printers it can do so correctly. The range of faults that the print service can detect by itself,
however, is limited. It can check for hang–ups (loss of carrier, the signal that indicates the
printer is online) and excessive delays in printing (receipt of an XOFF flow–control character
to shut off the data flow, with no matching XON to turn the flow back on). However, the print
service cannot determine the cause of a fault, so it cannot inform you what to look for.
A well–designed filter can provide better fault coverage. Some printers are able to send a
message to the host describing the reason for a fault. Others indicate a fault by using
System V Printer Configuration
6-19
signals other than the dropping of a carrier or the shutting off of data flow. A filter can serve
you by detecting more faults and providing more information about them than you would
otherwise receive.
A filter can wait for a printer fault to clear and then resume printing. This service allows for
more efficient printing when a fault occurs because the print request that was interrupted
does not have to be reprinted in its entirety. Only a real filter, which has knowledge of the
control sequences used by a printer, can know where a file breaks into pages. Thus only
such a filter can find the place in the file where printing should resume.
The print service has an interface that allows a filter to send you fault information and to
restart printing if it can. The alerting mechanism (see Setting Up Printer Fault Alerts on page
6-38) is handled by the print service; the interface program that manages the filter takes all
error messages from the filter and places them in an alert message that can be sent to you.
If you have set the printer configuration so that printing should automatically resume after a
fault is cleared, the interface program keeps the filter active, so that printing can pick up
where it left off.
What Programs Make Good Filters
It is tempting to use a program such as troff, nroff, or a similar word–processing program
as a filter. However, the troff and nroff programs have a feature that allows references to
be made in a source file to other files, known as include files. The print service does not
recognize include files; it will not enqueue any that are referenced by a source file when that
file is in a queue to be printed. As a result, the troff or nroff program, unable to access the
include files, may fail. Other programs may have similar features that limit their use as
filters.
Here are a few guidelines for evaluating a program for use as a filter:
• Only programs capable of reading data from standard input and writing data to standard
output may be used as filters.
• Examine the kinds of files users will submit for printing that will require processing by the
program. A good program is one that stands alone (that is, it does not need to refer to
other files).
Determine if the program expects any files other than those submitted by a user for
printing. If it does, those files must be in the directory of the person using the filter, or
they must be readable by all users authorized to use the filter. The latter prerequisite is
necessary because filters are run with the user ID and group ID of the user who
submitted the print request.
• If referenced files are permitted in the files submitted for printing, or if the program will
need files other than those submitted by a user, then the program, unable to access the
additional files, is likely to fail. Rather than using the program under consideration as a
filter; instead, have users run the program before submitting files for printing.
Referenced files that are always specified by full pathnames may be acceptable, but only if
the filter is used for local print requests. When used on requests submitted from a remote
machine for printing on your machine, the filter may still fail if the referenced files exist only
on the remote machine.
Defining a Filter
When adding a new filter, you must define the characteristics of its use. To do this, issue the
lpfilter command with arguments that specify the values of the following filter
characteristics:
• Name of the filter (that is, a command name)
• Types of input it will accept
• Types of output it will produce
• Types of printers to which it will send jobs
6-20
Guide to Printers and Printing
• Names of specific printers to which it will send jobs
• Type of the filter (whether it is a fast filter or a slow filter)
• Options
See Adding a Filter to the Print Service on page 6-26 for more information.
Filter definitions, which can be stored in a file or entered directly on the command line, have
the following format:
Command:
command–pathname
[
options
Input types:
input–type–list
Output types:
output–type–list
Printer types:
printer–type–list
Printers:
printer–list
Filter type: fast
or
slow
Options:
template–list
]
The information can appear in any order. Not all the information must be provided. When
you do not specify values for the items listed below, default values are assigned.
lpfilter Arguments
Default
Command:
(no default)
Input types:
any
Output types:
any
Printer types:
any
Printers:
any
Filter type:
slow
Options:
(no default)
Default values define a flexible filter, so at minimum you must supply the input and output
type(s). When you enter a list, you can separate the items in it with blanks or commas,
unless it is a template–list. Items in a template–list must be separated by commas.
Each of these characteristics is described as follows:
• Command:
The full path of the filter program.
If there are any fixed options that the program always needs, include them here.
• Input types:
The list of file content types that the filter can process.
The print service does not impose a limit on the number of input types that can be
accepted by a filter, but most filters can take only one. Several file types may be similar
enough so that the filter can handle them. You can use any name having a maximum of
14 alphanumeric characters and dashes (not underscores). Because the print service
uses these names to match a filter with a file type, follow a consistent naming
convention. For example, if more than one filter can accept the same input type, use the
same name for that input type when you specify it for each filter. Advise your users of the
names so they know how to identify the type of a file when submitting that file for
printing.
• Output types:
The list of file types that the filter can produce as output.
For each input type, the filter produces a single output type. The output type may vary,
however, from job to job. The names of the output types are restricted to 14
alphanumeric characters and dashes.
These names should either match the types of printers you have on your system or
match the input types handled by other filters. The print service groups filters together in
a shell pipeline if it finds that several passes by different filters are needed to convert a
System V Printer Configuration
6-21
file. Try to find a set of filters that take (as input types) all the different files your users
may want printed and converts those files directly into types your printers can handle.
• Printer types:
A list of printer types into which the filter can convert files.
For most filters, this list is identical to the list of output types.
For example, you may have a printer that is given a single type for purposes of
initialization, see Printer Types on page 6-26, but which can recognize several different
types of files. In essence, this printer has an internal filter that converts the various types
into one that it can handle. Thus, a filter may produce one of several output types that
match the file types that the printer can handle. Label the filter as working with that
printer type.
As another example, you may have two different models of printers that are listed as
accepting the same types of files. However, due to slight differences in manufacture, one
printer deviates in the results it produces. You label the printers as being of different
printer types, say A and B, where B is the one that deviates. You create a filter that
adjusts files to account for the deviation produced by printers of type B. Because this
filter is needed only for those printer types, you list it as working only on type B printers.
For most printers and filters, you can leave this part of the filter definition blank.
• Printers: You may have some printers that, although they are of the correct type for a
filter, are in other ways not adequate for the output that the filter produces.
For instance, you may want to dedicate one printer for fast turnaround. Only files that the
printer can handle without filtering will be sent to that printer. Other printers, of identical
type, you allow to be used for files that may need extensive filtering before they can be
printed. In this case, label the filter as working with only the latter group of printers.
In most cases, a filter works with all printers that accept its output, so you can usually
skip this part of the filter definition.
• Filter type:
The print service recognizes fast filters and slow filters.
Fast filters are labeled fast because they incur little overhead in preparing a file for
printing and because they must have access to the printer when they run. A filter that is
to detect printer faults must be a fast filter. A filter that uses the PRINTER keyword as a
filter option must be installed as a fast filter.
Slow filters are filters that incur a lot of overhead in preparing a file and do not require
access to a printer. The print service runs slow filters in the background, without tying up
a printer. This allows files that do not need slow filtering to move ahead. Printers will not
be left idle while a slow filter works on a file if other files can be printed simultaneously.
Slow filters that are invoked by modes (using the –y option), must be run on the
computer where the print request was issued. The print service cannot pass values for
modes to server machines. It can, however, match a file content type (specified after the
–T option of the lp command) to a content type on a server machine. Therefore, to
activate special modes on a server machine, you must specify content types that will
allow the print service to match input types and output types.
• Options: Options specify how different types of information is transformed into
command line arguments to the filter command.
This information may include specifications from a user (with the print request), the
printer definition, and the specifications implemented by any filters used to process the
request.
There are 13 sources of information, each of which is represented by a keyword. Each
option is defined in a template, which is a statement in the following format:
keyword pattern
=
replacement
This type of statement is interpreted by the print service to mean: ”When the information
referred to by keyword has the value matched by pattern, take the replacement string,
6-22
Guide to Printers and Printing
replace any asterisks it contains with the pattern specified or expand any regular
expressions it contains, and append the result to the command line.”
The options specified in a filter definition may include none, all, or any subset of these 13
keywords. In addition, a single keyword may be defined more than once, if multiple
definitions are required for a complete filter definition. See Using Templates to Defining
Options on page 6-23.
When you have gathered enough information to define the characteristics of your filter, you
are ready to run the lpfilter command, using your data as arguments. Because there are so
many arguments and because some of them may need to be entered more than once (with
different values), record this information first in a separate file and edit it, if necessary. You
can then use the file as input to the lpfilter command and avoid typing each piece of
information separately.
Using Templates to Defining Options
A template is a statement in a filter definition that defines an option to be passed to the filter
command based on the value of one of the characteristics of the filter. A filter definition may
include more than one template. Multiple templates may be entered on a single line and
separated with commas, or they may be entered on separate lines, preceded by the
Options: prefix.
The format of a template is as follows:
keyword pattern
=
replacement
This type of statement is interpreted by the print service to mean: ”When the information
referred to by keyword has the value matched by pattern, take the replacement string,
replace any asterisks it contains with the pattern specified or expand any regular
expressions it contains, and append the result to the command line.”
As an example, suppose you want to have the print service scheduler assign print requests
to filters on the basis of the following criteria:
• If the type of OUTPUT to be produced by the filter is impress, then pass the –I option to
the filter.
• If the type of OUTPUT to be produced by the filter is postscript, then pass the –P option
to the filter.
To specify these criteria, provide the following templates as options to the lpfilter command:
Options: OUTPUT impress=–I, OUTPUT postscript=–P
If the Options: line becomes too long, put each template on a separate line, as follows:
”Options: OUTPUT impress=–I”
”Options: OUTPUT postscript=–P”
In both templates, the keyword is OUTPUT. In the first template, the value of pattern is
impress and the value of the replacement is –I. In the second template, the value of pattern
is postscript and the value of the replacement is –P.
Keyword Definitions and Examples
The following keywords are available for defining Options in a filter definition:
Characteristic
keyword
Possible pattern s
Example
Content type (input)
INPUT
content–type
troff
Content type (output) OUTPUT
content–type
postscript
Printer type
TERM
printer–type
att495
Printer name
PRINTER
printer–name
lp1
Character pitch
CPI
scaled–decimal
10
Line pitch
LPI
scaled–decimal
6
System V Printer Configuration
6-23
Page length
LENGTH
scaled–decimal
66
Page width
WIDTH
scaled–decimal
80
Pages to print
PAGES
page–list
1–5,13–20
Character set
CHARSET
character–set
finnish
Form name
FORM
form–name
invoice2
Number of copies
COPIES
integer
3
Special modes
MODES
mode
landscape
To find out which values to supply for each type of template (that is, for the pattern and
replacement arguments for each keyword), consider the following:
• The values for the INPUT and OUTPUT templates come from the file type that needs to
be converted by the filter and the output type that has to be produced by the filter,
respectively. They will each be a type registered with the filter.
• The value for the TERM template is the printer type.
• The value for the PRINTER template is the name of the printer that will print the final
output.
• The values for the CPI, LPI, LENGTH, and WIDTH templates come from the user
request, the form being used, or the default values for the printer.
• The value for the PAGES template is a list of pages to be printed. Typically, it is a
comma–separated list of page ranges, each of which consists of a dash–separated pair
of numbers or a single number (such as 1–6,8,10 for pages 1 through 6, 8, and 10).
However, whatever value was given in the –P option to a print request is passed
unchanged.
• The value for the CHARSET template is the name of the character set to be used.
• The value for the FORM template is the name of the form requested by the –f option of
the lp command.
• The value of the COPIES template determines the number of copies made of the file. If
the filter uses this template, the print service will reduce to 1 the number of copies of the
filtered file it will have printed, because this single copy will really be the multiple copies
produced by the filter.
• The value of the MODES template comes from the –y option of the lp command (the
command used to submit a print request). Because a user can specify several –y
options, there may be several values for the MODES template. The values will be
applied in the left–to–right order given by the user.
The replacement part of a template shows how the value of a template is given to the filter
program. It is typically a literal option, sometimes with the place–holder * (asterisk) included
to show where the value goes. The pattern and replacement can also use the regular
expression syntax of the ed command for more complex conversion of user input options
into filter options. All of the regular expression syntax of the ed command is supported,
including the \(. . . \) and \n constructions, which can be used to extract portions of the
pattern for copying into the replacement, and the &, which can be used to copy the entire
pattern into the replacement.
Note: If a comma or an equal sign (=) is included in a pattern or a replacement,
escape its special meaning by preceding it with a backslash (\). Note that some regular
expressions include commas that will have to be escaped this way. A backslash in front
of any of these characters is removed when the pattern or replacement is used.
The following examples show how this works.
Example: col Filter
Suppose you already added a filter called col with the following definition:
6-24
Guide to Printers and Printing
Input types:
Output types:
Command:
Options:
Options:
N37, Nlp, simple
simple
/usr/bin/col
TERM 450 = –b, MODES expand = –x
INPUT simple = –p –f
Note: If you provide more than one definition (that is, more than one line) for any filter
characteristic other than Options, only the last definition will be used by the print service.
After you have registered this definition with the print service by entering it as input with the
lpfilter command, users’ print requests will be handled as follows:
• If a user enters the command
lp –y expand report.dec10
the filter command will run with the following arguments:
/usr/bin/col –x –p –f
• If a user enters the command
lp –T N37 –y expand report.dec10
the filter command will run with the following arguments:
/usr/bin/col –x
Qualifier: The default printer is not of type 450.
• If a user enters the command
lp –y expand –T 450 report.dec10
the filter command will be run with the following arguments:
/usr/bin/col –b –x
Example: dpost Filter
The filter program is called /usr/lib/lp/postscript/dpost. It takes one input type, troff, produces
an output type called postscript and works with any printer of type PS (for PostScript). You
have decided that your users need give just the abbreviations port and land when they ask
for the paper orientation to be portrait mode and landscape mode, respectively. Because
these options are not intrinsic to the print service, users must specify them using the –y
option to the lp command.
The filter definition would look like this:
Input types: troff
Output types: postscript
Printer types: PS
Filter type: slow
Command: /usr/lib/lp/postscript/dpost
Options: LENGTH * = –l*
Options: MODES portrait = –op, MODES land = –ol
A user submitting a file of type troff for printing on a PostScript printer (type PS), with
requests for landscape orientation and a page length of 60 lines, would enter the following
command:
lp –T troff –o length=60 –y land –d any
This filter would be invoked by the print service to convert the file as follows:
/usr/lib/lp/postscript/dpost –l60 –ol –pl
Example: Option Template
You add the following option template to the previous example:
Options:
MODES group\=\([1–9]\) = –n\l
This template is used to convert a MODES option of the form –y group=number into filter
options –nnumber.
System V Printer Configuration
6-25
So if a user gives the command lp –y group=4, the dpost command would include the
option –n4.
For additional examples, run the command
/usr/sbin/lpfilter –f
filter
–l
where filter is the name of the factory–installed PostScript filters. (For a list of PostScript
filters, see PostScript Printers on page 6-29.)
Adding a Filter to the Print Service
To add the filter to the system after it has been defined, use one of the following commands:
/usr/sbin/lpfilter –f
/usr/sbin/lpfilter –f
filter–name
filter–name
–F
–
filename
The first command gets the filter definition from a file, and the second command gets the
filter definition from the standard input. A filter–name can be any string you choose, with a
maximum of 14 alphanumeric characters and underscores.
If you need to change a filter, reenter one of the same commands. You need provide
information only for those items that must be changed. Items for which you do not specify
new information remain the same.
Removing a Filter
The print service imposes no fixed limit on the number of filters you can define. Remove
filters that are no longer applicable to avoid extra processing by the print service, which
must examine all filters to find one that works in a given situation.
To remove a filter, run the following command:
/usr/sbin/lpfilter –f
filter–name
–x
Examining a Filter
After you have added a filter definition to the print service, you can examine it by running the
lpfilter command. The output of this command is the filter definition displayed in a format
that makes it suitable as input. You may want to save this output in a file that you can use
later to redefine the filter if you inadvertently remove the filter from the print service.
To present the definition of the filter on your screen, type the following command:
/usr/sbin/lpfilter –f
filter–name
–l
To capture the definition of the filter in a file for future reference, type the following
command:
/usr/sbin/lpfilter –f
filter–name
–l >
filename
Restoring Factory Defaults for Filters
The software is shipped from the factory with a default set of filters. As you add, change, or
delete filters, you might overwrite or remove some of these original filters.
To restore some or all of the default set of filters to their original form after having changed
them, type this command:
/usr/sbin/lpfilter –f
filter–name
–i
Replace filter–name with the name of the filter to restore or the word all to restore all the
default filters.
Printer Types
The printer–type attribute is defined with the –T printer–type option of the lpadmin
command. A printer type is the generic name for a printer. Typically it is derived from the
manufacturer name. For example, the ACME\ Computer 356 Dot Matrix Printer might have
6-26
Guide to Printers and Printing
the type 356. Assigning a type for each printer is important because the print software
extracts information about printers from the terminfo database on the basis of type. This
information includes a list of the printer capabilities that checks the configuration information
you supply to the print service. (By checking the information you provide against the known
capabilities of the type of printer you are configuring, the print service can catch
inappropriate information you may have supplied.) The terminfo database also specifies the
control data needed to initialize a particular printer before printing a file.
While you are not required to specify a printer type, it is good practice to do so. You
enhance your system’s ability to serve your users by classifying, on the basis of type, the
printers available through the print service.
If you give a list of printer types, separate the names with commas. If you do not define a
printer type, the default unknown is used.
You can assign several types to a printer if your printer is capable of emulating more than
one kind of printer. For example, if your printer can emulate an IBM Proprinter XL, an Epson
FX86e, and an HP LaserJet II, the terminfo database names these types 593ibm, 593eps,
and 593hp, respectively. If you specify more than one printer type, the print service uses
one of them, as appropriate, for each print request.
The following example shows how to use the lpadmin command to associate the type
593ibm with the printer named laser.
/usr/sbin/lpadmin –p laser –T 593ibm
Note: If you specify more than one printer type, you must specify simple as the
content type.
Content Types
The content–type attribute is defined with the –I content–type–list option of the lpadmin
command. Most printers can print files of two types: the same type as the printer type (if the
printer type is defined) and the type simple (meaning an ASCII file), which is the default
content type for all printers.
Files of content type simple are assumed to contain only two types of characters, printable
ASCII characters and the following control characters:
backspace
Moves the carriage back one space, except at the beginning of a line
tab
Moves the carriage to the next tab stop; by default, stops are spaced
every 8 columns on most printers
linefeed
Moves the carriage to the beginning of the next line (may require
special port settings for some printers––see Setting Printer Port
Characteristics on page 6-41
form feed
Moves the carriage to the beginning of the next page
carriage return
Moves the carriage to the beginning of the same line (may fail on
some printers)
The word carriage may be archaic for modern laser printers, but these printers perform
actions similar to those done by a carriage. If a printer can handle several types of files,
including simple, you must include simple explicitly in the content type list. If you do not
want a printer to accept files of type simple, specify a blank content–type–list (–I ””) on
the lpadmin command line. Some printers, though, can accept (and print correctly) several
different types of files. When adding this kind of printer, specify the names of the content
types that the new printer accepts by adding these names to the list. (By default, the list
contains only one type: simple.) If you are adding a remote printer, list the content types
that have been established for it by the administrator of the system on which it resides.
The content–type–list is a list of names separated by commas or spaces. If you use
spaces to separate the names, enclose the entire list (except for the –I) in quotes.
System V Printer Configuration
6-27
Common Types
Content type names might look like printer type names, but you are free to choose names
that are meaningful to you and the people using the printer. The names must contain no
more than 14 characters and may include only letters, digits, and underscores. The
following table lists and describes some accepted content types.
Note: The names simple and any are recognized as having particular meanings by the
print service; be sure to use them consistently. The name terminfo is also reserved, as a
reference to all types of printers.
Commonly Used Content Types
Types
Description
cif
Output of BSD cifpbt
daisy
Print files intended for a Diablo 630 (daisy–wheel) printer
dmd
Print the contents of a bit–mapped display from a terminal
fortran
ASA carriage control format
otroff
CAT typesetter instructions generated by BSD or pre–System V troff
(old troff)
pcl
HP LaserJet native output format
plot
Plotting instructions for Tektronix displays and devices
postscript
PostScript language
raster
Raster bitmap format for Varian raster devices
simple
ASCII file
tek4014
Print files formatted for a Tektronix 4014 device
tex
DVI format files
troff
Device–independent output from troff
When a file is submitted to the print service for printing with the printer specified by the –d
any option of the lp command, the print service searches for a printer capable of handling
the job. The print service can identify an appropriate printer through either the content type
name or the printer type name. Therefore, you may specify either name (or no name) when
submitting a file for printing. If the same content type is printable by several different types of
printers, use the same content type names when you add those printers. This makes it
easier for the people using the printers because they can use the same name to identify the
type of file they want printed, regardless of the printing destination.
Most manufacturers produce printers that accept simple ASCII files. While these printers are
different types (and thus have different initialization control sequences), they may all be
capable of handling the same type of file, which we call simple. Several manufacturers may
produce printers that accept ANSI X3.64 defined escape sequences. However, the printers
may not support all the ANSI capabilities; they may support different sets of capabilities. You
may want to differentiate them by assigning different content type names for these printers.
6-28
Guide to Printers and Printing
Default Content Type
While it may be desirable to list content types for each printer, it is not always necessary. If
you do not, the printer type is used as the name of the content type the printer can handle. If
you have not specified a printer type, the print service assumes the printer can print only
files of content type simple. This may be sufficient if you require users to specify the correct
printer explicitly and if files are correctly prepared for the printer before being submitted for
printing.
PostScript Printers
PostScript is a general–purpose programming language that allows you to specify the
appearance of both text and graphics on a page.
A PostScript printer is equipped with a computer that runs an interpreter for processing
PostScript language files. When a PostScript printer receives a file, it runs that file through
the interpreter and then prints it. Unless special provisions have been made by the
manufacturer, files submitted to a PostScript printer must be written in the PostScript
language.
In addition to providing excellent facilities for managing text and graphics and combining
them, most major applications that support printed output support PostScript. Graphics
operators facilitate the construction of geometric figures that can then be positioned and
scaled with any orientation. The text capabilities allow you to specify a number of different
fonts that can be placed on a page in any position, size, or orientation. Because text is
treated as graphics, text and graphics are readily combined. Moreover, the language is
resolution and device–independent, so that draft copies can be proofed on a low–resolution
device and the final version printed in higher resolution on a different device.
Applications that support PostScript, including word–processing and publishing software,
create documents in the PostScript language without intervention by the user. Thus, it is not
necessary to know the details of the language to take advantage of its features. However,
standard files that some applications or special terminals produce cannot be printed on a
PostScript printer because they are not described in the language. The print service
provides optional filters to convert many of these files to PostScript so that users can take
advantage of PostScript and continue to use their standard applications, such as troff.
Retail Type 1 fonts can be installed for use with applications running on the desktop. These
fonts can be downloaded to PostScript printers if the application generates PostScript output
that uses them. The lp command handles this automatically using the download filter.
Using a PostScript Printer
When the PostScript printers and filters have been installed, the print service manages
PostScript files like any others. If psfile is a file containing a PostScript document and
psprinter has been defined to the print service as a PostScript printer, the command
lp –d psprinter –T PS psfile
schedules the print request and manages the transmission of the request to the PostScript
printer.
Supporting Non–PostScript Print Requests
Because PostScript is a language and PostScript printers are expecting print requests
written in that language, some applications may produce standard print requests that may
not be intelligible to PostScript printers. The following are examples of print requests that
may not be interpreted by some PostScript printers.
System V Printer Configuration
6-29
Non–PostScript Content Types
Content Type
Type of Print Request
simple
Print an ASCII (simple) text file
troff
Print output from the troff command
daisy
Print files intended for a Diablo 630
(daisy–wheel) printer
dmd
Print the contents of a bit–mapped display
from a terminal
tek4014
Print files formatted for a Tektronix 4014
device
plot
Print plot–formatted files
Filters are provided with the print service to translate print requests with these formats to the
PostScript language. For example, to convert a file containing ASCII text to PostScript code,
the filter takes that text and writes a program around it, specifying printing parameters such
as fonts and the layout of the text on a page.
After the PostScript filters are installed, they are invoked automatically by the print service
when a user specifies a content type for a print request with the –T option. For example, if a
user enters the command
lp –d psprinter –T simple report2
the ASCII file report2 (a file with an ASCII or simple format) is converted to PostScript
automatically, as long as the destination printer (psprinter) is defined to the system as a
PostScript printer.
Additional PostScript Capabilities Provided by Filters
The filters described in Providing Filters on page 6-18 also take advantage of PostScript
capabilities to provide additional printing flexibility. Most of these features can be accessed
through the mode option (invoked by the –y option) to the lp command. These filters allow
you to use several unusual options for your print jobs. The following list describes these
options and shows the option to include on the lp command line for each one.
6-30
–y reverse
Reverse the order in which pages are
printed
–y landscape
Change the orientation of a physical page
from portrait to landscape
–y x= number,y= number
Change the default position of a logical
page on a physical page by moving the
origin
–y group= number
Group multiple logical pages on a single
physical page
–y magnify= number
Change the logical size of each page in a
document
–o length= number
Select the number of lines in each page of
the document
–P num_list
Select, by page numbers, a subset of a
document to be printed, where num_list is
page numbers or page ranges separated by
commas (for example, 1,4,6–8,14– prints
pages 1, 4, 6, 7, 8, and 14 through the end)
–n number
Print multiple copies of a document
Guide to Printers and Printing
Note: If these filters are to be used with an application that creates PostScript output,
make sure that the format of the application conforms to the format of the PostScript file
structuring comments. In particular, the beginning of each PostScript page must be
marked by the comment
%%Page:
label ordinal
where ordinal is a positive integer that specifies the position of the page in the sequence
of pages in the document, and label is an arbitrary page label.
For example, you have a file called report2 that has a content type simple (meaning that
the content of this file is in ASCII format). You want to print six pages of this file (pages 4
through 9) with two logical pages on each physical page. Because one of the printers on
your system (psprinter) is a PostScript printer, you can do this by entering the following
command:
lp –d psprinter –T simple –P 4–9 –y group=2 myfile
The filter that groups these logical pages will try to position the pages on the physical page
to maximize space utilization. Thus when you specify group=2, the pages will be printed
side by side, so that the physical page will be landscape orientation. Landscape mode,
which controls the orientation of the logical page rather than the physical page, would cause
the logical pages to be positioned one on top of the other when combined with the group=2
option.
Supporting PostScript Printers
Support of PostScript printers is similar to support of other printers, in that the printers must
be defined to the system with the lpadmin command and the appropriate software must be
installed to manage them. PostScript printers may require some additional effort in
supporting fonts and establishing where slow filtering occurs.
Installing and Maintaining PostScript Printers
PostScript printers, like other printers, are installed with the lpadmin command. These
printers must use the PS interface program, requested by specifying –m PS on the lpadmin
command line.
Note: The printer type and content type of a PostScript printer must be consistent with
the printer type used in PostScript filters. Therefore, install your PostScript printers with a
printer type of PS, PS–b, PS–r, or PS–br, and a content–type of PS.
The PS printer types serve two functions. First, they cause the print service to activate the
correct fast filter to communicate with the printer. PS and PS–r are used to communicate
with printers connected via a serial port; PS–b and PS–br, to communicate with printers
connected through a parallel port. Second, the PS interface creates a PostScript banner
page for PS printers. The banner page is printed last if the printer type is PS–r or PS–br,
and the pages of the document are printed in reverse order. The printer type is specified
with the –T option to the lpadmin command.
System V Printer Configuration
6-31
PostScript Page Order Table
Printer
Connection Type
Page Order
PS
serial
normal
PS–b
parallel
normal
PS–r
serial
reverse
PS–br
parallel
reverse
The –b specification (used when you select PS–b or PS–br) represents batch, which is
typically used for parallel connections but can also be used for serial connections if you do
not want PostScript printer status messages. The PS and PS–r printer types cannot be used
for parallel connections.
By specifying the –I option of the lpadmin command when configuring a PostScript printer,
you can indicate which content types are handled by the printer without slow filtering. For a
printer on a server system, PS is the correct content type to enter. However, for a printer on
a client system, consider where slow filtering is to occur, since network and system resource
management may be of concern.
By specifying valid content types other than PS, you can force the slow filtering of input to
occur on the server system. Conversely, if you specify a content type of PS, the input will be
filtered locally before the print request is forwarded to the server system for fast filtering and
printing.
To configure a printer on a server system:
/usr/sbin/lpadmin –p ps1 –T PS–b –I PS –m PS
To configure a printer on a client system without local filtering:
/usr/sbin/lpadmin –p ps1 –T PS–b –I simple,daisy,dmd,tek4014,plot
To configure a printer on a client system with local filtering:
/usr/sbin/lpadmin –p ps1 –T PS–b –I PS
As part of the installation procedure, you may want to install fonts on the printer or
downloadable fonts on the computer. See Installing and Maintaining PostScript Fonts on
page 6-33 for details.
Installing and Maintaining PostScript Filters
The PostScript filters provided cover the majority of situations. In certain circumstances,
however, you may find it helpful to change the filter descriptions and install the filters
differently. This section describes the location and function of these filters.
PostScript filters are contained in the directory /usr/lib/lp/postscript.
Note: There are two types of filters: fast filters and slow filters. For definitions of these
types, see lpfilter and Defining a Filter on page 6-20.
A prerequisite of communication between any system and a PostScript printer is the
presence of the postio or the lp.cat filter on the system. Those programs are the only
mandatory PostScript filters that communicate directly with the PostScript printer. The
following filters allow other types of documents to be translated to PostScript and to be
printed on a PostScript printer.
6-32
Guide to Printers and Printing
PostScript Filters
File Content Type
Filter
simple
postprint
troff
dpost
daisy
postdaisy
dmd
postdmd
tek4014
posttek
plot
postplot
The following filters perform special functions:
Special Purpose Filters
Function
Filter
Communicate with printer
postio, lp.cat
Download fonts
download
Reverse or select pages
postreverse
Matrix gray scales
postmd
Installing and Maintaining PostScript Fonts
One of the advantages of PostScript is its ability to manage fonts. Fonts are stored in outline
form in the Type 1 format, either on the printer or on a computer that communicates with a
printer. When a document is printed, the PostScript interpreter generates each character as
needed (in the appropriate size) from the outline description of it. If a font required for a
document is not stored on the printer being used, it must be transmitted to that printer
before the document can be printed. This transmission process is called downloading fonts.
Fonts are stored and accessed in several ways.
• Fonts may be stored permanently on a printer. These printer–resident fonts may be
installed in ROM on the printer by the manufacturer. If the printer has a disk, fonts may
be installed on that disk by you (that is, by the Print Service administrator). Most
PostScript printers are shipped with 35 standard fonts, although less expensive models
have only 13.
• A font may be permanently downloaded by being transmitted to a printer using a special
PostScript programming technique using the exitserver operator. A font downloaded in
this way will remain in the printer memory until the printer is turned off. Memory allocated
to this font will reduce the memory available for PostScript print requests. Use of
exitserver programs requires the printer system password and may be reserved for the
printer administrator. This method is useful when there is continual use of a font by the
majority of print requests serviced by that printer.
• Fonts may be prepended to a print request by the user and be transmitted as part of the
user print request. When the document has been printed, the space allocated to the font
is freed for other print requests. The font is stored in the user’s directory. This method is
preferable for fonts with limited usage.
• Fonts may be stored on a system shared by many users. These fonts may be described
as host–resident. This system may be a server for the printer or may be a system
connected to the printer by a network. Each user may request fonts in the document to
be printed. This method is useful when there are a large number of available fonts or
when there is not continual use of these fonts by all print requests. If the fonts will be
used only on printers attached to a server, store them on the server. If the fonts are to be
System V Printer Configuration
6-33
used by users on one system who may send jobs to multiple printers on a network, store
them on the users’ system.
The print service provides a special download filter to manage fonts using the last method in
the list.
The print service can use troff width tables for the 35 standard PostScript fonts that reside
on many PostScript printers, for use by the dpost program.
Obtaining a List of Printer–Resident Fonts
Most PostScript printers come equipped with fonts resident in the printer ROM. Some
printers have a disk on which additional fonts are stored. A list of the Type 1 fonts in ROM or
on disk of an attached PostScript printer can be obtained from the printer manufacturer’s
documentation. For PostScript printers attached through a serial port, a list of these fonts
can also be generated using the postio command and a PostScript program, romfonts.ps.
To obtain a list of printer–resident fonts for a PostScript printer attached to a serial port, do
the following:
1. Obtain the device on which the PostScript printer is connected:
lpstat –v
Given a system on which the PostScript printer prlocal is attached through a serial port,
this command would return output similar to the following:
device for prlocal: /dev/tty01
This output shows the printer to be attached on device /dev/tty01.
2. As root user, run these commands:
cd /usr/lib/lp/postscript
postio –L /tmp/postio.o –l /dev/tty01 –t romfonts.ps
For our sample prlocal printer, this will produce output in the file /tmp/postio.o that
looks similar to the following:
printer startup
%%[ status: waiting; source: serial 25 ]%%
%%[ status: endofjob ]%%
%%[ status: idle ]%%
sending file romfonts.ps
waiting for end of job
%%[ status: busy; source: serial 25 ]%%
/AGaramond–Bold
/AGaramond–BoldItalic
/AGaramond–Italic
/AGaramond–Regular
/AvantGarde–Book
/AvantGarde–BookOblique
/AvantGarde–Demi
/AvantGarde–DemiOblique
. . . more PostScript font
names . . .
/ZapfChancery–MediumItalic
/ZapfDingbats
%%[ status: endofjob ]%%
job complete
This example lists the printer–resident fonts for prlocal.
6-34
Guide to Printers and Printing
Adding Printer–Resident Fonts to a Printer’s Font List
When a printer is installed, the list of printer–resident fonts should be added to the font list
for that printer. This font list file can be edited to contain only the font names in the printer’s
memory (AGaramond–Bold through ZapfDingbats, in the previous example), and placed
into the file /etc/lp/printers/prlocal/residentfonts to prevent downloading of these fonts
from the host computer.
To add printer–resident fonts to a printer’s font list, do the following:
1. Navigate to the printer administration directory in which the font lists are kept. For a
particular printer, this font list is contained in the file
/etc/lp/printers/
printer–name
/residentfonts
where printer–name is the name of the printer.
With the –p option, download checks this file to see what Type 1 fonts are
ROM–resident and disk–resident (some PostScript printers have directly attached fonts
disks) in the printer so that it does not download such fonts.
2. This file is not automatically created when a PostScript printer is first set up on your
system using the lpadmin command. You may need to create this file yourself. (Font–list
files must be edited manually; that is, with the help of a text editor such as vi.)
When fonts are permanently downloaded to the printer, add the font names to this file.
(This will prevent fonts from being downloaded when they are already on the printer, a
time–consuming procedure.)
Note: If the printer is attached to a remote system, this list should include fonts
which reside on that system and are available for downloading to the printer. This
prevents fonts from being transmitted unnecessarily across a network.
Installing and Maintaining Host–Resident Fonts
Some fonts will be resident on the host and transmitted to the printer as needed for
particular print requests. As the administrator, it is your job to make PostScript fonts
available to all the users on a system. To do so, you must know how and where to install
these fonts, using the guidelines described previously. Because fonts are requested by
name and stored in files, the print service keeps a map file that shows the correspondence
between the names of fonts and the names of the files containing those fonts. Both of these
must be updated when fonts are installed on the host.
To install host–resident PostScript fonts, do the following:
1. Copy the font file to the appropriate directory.
The fonts available for use with PostScript printers reside in the
/usr/share/lib/hostfontdir directory or other directories.
2. Add to the map table the name of the font and the name of the file in which it resides.
Also in the hostfontdir directory, you (the administrator) must create and maintain a
map table that shows the correspondence between the name assigned to each font by
the foundry (the company that created the font) and the name of the file in which that
font resides. A file name that begins with a slash (/) is used as is; otherwise the
pathname is relative to the host font directory. Comments in the map table are introduced
by % (as in PostScript) and extend to the end of the line.
For example, to map the font called Palatino Bold, add the following line to the map
table:
Palatino–Bold /usr/share/lib/hostfontdir
(The map table itself is in the /usr/share/lib/hostfontdir/map file.)
After this entry exists in the map table on your system, your users will be able to have a
Palatino Bold font used in their print jobs. When they submit for printing a file containing
a request for this font, the print service will prefix a copy of the file
System V Printer Configuration
6-35
/usr/share/lib/hostfontdir to that file before sending it to the printer, as long as it is not
defined in the residentfonts file.
3. If you will be using troff, you must create new width tables for this font in the standard
troff font directory.
Downloading Host–Resident Fonts
When the PostScript document contains a request for fonts not loaded on the printer, the
download filter manages this request. This filter is invoked as a fast filter; it downloads
fonts automatically if the fonts reside on the same system as the printer. The download
filter may also send fonts to a remote printer. To do this, you can create a new filter table
entry that calls the download filter as a slow filter through the –y option. Alternatively, you
may force selection of this filter by changing the input type.
The download filter does the following:
• It searches the PostScript document to determine which fonts have been requested.
These requests are documented with the following PostScript structuring comments:
%%DocumentFonts:
font1 font2
. . .
in the header comments.
• It searches the list of fonts resident on that printer (in
/etc/lp/printers/printer–name/residentfonts) to see if the requested font must be
downloaded.
• If the font is not resident on the printer, it searches the host–resident font directory to see
if the requested font is available. The only candidates for downloading are fonts listed in
the map table that point download to readable files. A Type 1 font is downloaded once, at
most, for a single document, even if it occurs multiple times in the %%DocumentFonts:
comment or PostScript file. The downloading of fonts occurs only for the duration of the
PostScript job. However, permanent downloading of fonts to the printer’s RAM can be
done with special PostScript programming techniques using the exitserver operator.
Requests for unlisted fonts or inaccessible files are ignored. All requests are ignored if
the map table cannot be read.
• If the font is available, the filter takes the file for that font and prefixes it to the file to be
printed.
• The filter sends the font definition file and the PostScript source file (the file to be printed)
to the PostScript printer.
Font Cartridges and Character Sets
Printers differ in the way they print different font styles. Some have font cartridges, while
others have preprogrammed, selectable character sets.The print service can minimize the
impact of these differences on the users of the print service.
You can specify which font cartridge or character set is available with each printer. When
you list the font cartridges or character sets available, you assign names to them. These
names are for your convenience and the convenience of the users on your system.
Because different printers might have similar font cartridges or character sets, use common
font names on all printers. This allows a user to submit a file for printing and request a
particular font style, without requiring that the user know which printer is used or whether a
font cartridge or selectable character set is used.
If the printer has mountable font cartridges, you need to list only their names. If the printer
has selectable character sets, you must list their names and map each set to a name or
number that uniquely identifies the set in the terminfo database.
6-36
Guide to Printers and Printing
Specifying Character Sets
For printers that allow selectable character sets, determine the names of the character sets
and then map each set to a name or number in the terminfo database.
• To determine the names of the character sets listed in the terminfo database, enter:
tput –T
printer–type
csnm 0
The printer–type is the name of the printer type in question. This
command should display the name of the 0th character set (the character set
obtained by default after the printer is initialized).
• To display the names of the other character sets, repeat the command above, replacing
0 with 1, 2, 3, and so on. In general, the terminfo names should closely match the names
used in the user documentation for the printer. However, because not all manufacturers
use the same names, the terminfo names may differ from one printer type to the next.
• To specify a list of character set names and to map them into terminfo names or
numbers, type:
/usr/sbin/lpadmin –p
printer_name
–S
characterset_list
The characterset_list is a list of names, separated by commas or spaces.
If you use spaces to separate the names, enclose the entire list (but not
the –S ) in quotes. Each item in the list is a character set name mapping
(alias) that looks like one of the following:
cs
N =
characterset_name
characterset_name1 =
characterset_name2
The variable N is a number between 0 and 63 that identifies the number of
the character set in the terminfo database. characterset_name1 identifies
the character set by its name in the terminfo database. In both instances,
the name to the right of the equal sign (=) is the name you choose as an
alias of the character set.
Note: You do not have to provide a list of aliases for the character sets if the
terminfo names are adequate. You can refer to a character set by terminfo name, by
number, or by your alias.
For example, your printer has two selectable character sets (sets #1 and #2) in addition
to the standard character set (set #0). The printer type is 5310. Enter the following
commands to determine the names of the selectable character sets:
tput –T 5310 csnm 1
english
tput –T 5310 csnm 2
finnish
The words english and finnish, which are the names of the selectable character
sets, are the output of the commands. The name finnish is adequate for referring to
character set 2, but better names are needed for the standard set (set 0) and set 1. Type
the following command to define synonyms:
/usr/sbin/lpadmin –p
printer_name
–S ”cs0=american, english=british”
• The following three commands will then produce identical results. (The lp command
routes print jobs to the printer, and in these examples, routes the print job to any printer
capable of handling the cs1 character set.)
lp –S cs1 –d any . . .
lp –S english –d any . . .
lp –S british –d any . . .
If you do not list the character sets that can be used with a printer, the service assumes a
printer that has selectable character sets can take any cs N name or terminfo name
known for the printer.
• To remove the character set mappings, type:
/usr/sbin/lpadmin –p
printer_name
–S none
System V Printer Configuration
6-37
Specifying Font Cartridges to Use With a Printer
Until you specify the font cartridges that can be used with a new printer, the print service
does not consider any font cartridges installable on that printer and rejects any print
requests that require a font cartridge.
To specify a list of font cartridges to use with a printer, ype:
/usr/sbin/lpadmin –p
printer_name
–S
font_cartridge_list
font_cartridge_list is a list of font cartridge names, separated by commas or spaces. If you
use spaces to separate the names, enclose the entire list (but not the –S) in quotes. These
are the only font cartridges considered installable on the printer.
To remove the font cartridge list from the printer, type:
/usr/sbin/lpadmin –p
printer_name
–S none
After you specify the list of font cartridges installable on the printer, you can install them.
See Changing a Font Cartridge on a Printer on page 6-38.
Changing a Font Cartridge on a Printer
Before the print service prints a file that requires a font cartridge, you must install and mount
the font cartridge on the printer.
If you have set up alerting for the font cartridge, the print service alerts you when enough
print jobs are queued for the font cartridge to be installed and mounted. See Alerting to
Mount Forms and Font Cartridges on page 6-40.
Changing a font cartridge involves first removing the current font cartridge from the printer.
Then, install the new font cartridge on the printer and inform the print service that the new
font cartridge is ready to use by mounting it. Because it is difficult to do this on a printer that
is currently printing and because the print service continues to print files that do not require
the font cartridge on the printer, disable the printer first.
To install or change a font cartridge, do the following:
1. Disable the printer.
2. Remove the current font cartridge from the printer (if applicable).
3. Install the new font cartridge on the printer.
4. Mount the new font cartridge by typing:
/usr/sbin/lpadmin –p
printer_name
–M –S
font_cartridge_name
Any print requests that require a font cartridge are printed on printer_name.
5. Re–enable the printer.
To unmount a font cartridge, type:
/usr/sbin/lpadmin –p
printer_name
–M –S none
Note: You do not need to unmount the current font cartridge after physically removing
it from the printer before installing and mounting a new font cartridge.
Setting Up Printer Fault Alerts
The print service provides a method for detecting and alerting you to printer faults. Faults
can range from simple problems, such as running out of paper, ribbon, or toner, to more
serious faults, such as a local power failure or printer failure. The range of fault indicators is
also broad, ranging from dropping the carrier (the signal that indicates that the printer is
online) to sending an XOFF or a message.
The print service itself only recognizes two classes of printer fault indicators: hangups (a
loss of carrier) and excessive delays in printing (an XOFF flow–control character without a
matching XON). For faults other than these, the printer service cannot determine the cause
of the fault, so it cannot alert you. However, you can add filters that can detect other printer
6-38
Guide to Printers and Printing
faults and inform the print service, which in turn alerts you. For more information, see
Providing Filters on page 6-18.
To arrange for the print service to issue an alert in the event of a printer fault, type one of the
following commands:
/usr/sbin/lpadmin –p
/usr/sbin/lpadmin –p
/usr/sbin/lpadmin –p
printer–name
printer–name
printer–name
–A mail –W
minutes
–A write –W
minutes
–A ’
command ’ –W
minutes
The first two commands direct the print service to send you a mail message or write the
message directly to your terminal, respectively, for each alert. The third command directs
the print service to run the command for each alert. The shell environment currently in effect
when you enter the third command is saved and restored for the execution of command.
The environment includes environment variables, user and group IDs, and current directory.
The minutes argument is the number of minutes between repeated alerts.
If you do not want the print service to issue an alert when a fault occurs, type the following:
/usr/sbin/lpadmin –p
printer–name
–A none
If you want mail sent or a message written to another user when a printer fault occurs, use
the third command with the option –A ’mail login–ID ’ or –A ’write login–ID ’. If you do not
specify a login–ID, the mail or message will be sent to your current login name. This may
not be your login if you have used the su command to change it.
After a fault occurs and you start receiving repeated alerts, you can direct the print service
to stop sending you alerts (for the current fault only), by running the following command:
/usr/sbin/lpadmin –p
printer–name
–A quiet
Note: Use the alert type of quiet only to terminate an active alert; do not specify quiet
as the alert type for a new printer.
If the printer–name is all in any of the commands discussed, the alerting condition will
apply to all printers.
If you do not define an alert method, you will receive mail once for each printer fault. If you
define a method without the –W option, you will be alerted once for each fault.
Specifying a Printer Fault Recovery Mechanism
Note: This information does not apply if you are making a remote printer accessible to
users on your system.
When a printer fault has been fixed and the printer is ready for printing again, the print
service will recover in the following ways:
• It will continue printing at the top of the page where printing stopped
• It will restart printing at the beginning of the print request that was active when the fault
occurred
• It will wait for you to tell the print service to re–enable the printer
Note: The ability to continue printing at the top of the page where printing stopped
requires the use of a filter that can wait for a printer fault to be cleared before resuming
properly. Such a filter must have detailed knowledge of the control sequences used by
the printer so it can keep track of page boundaries and know where in a file printing
stopped. None of the filters supplied with the print service can do this. If an appropriate
filter is not being used, you will be notified in an alert if recovery cannot proceed as you
want.
To specify the way the print service will recover after a fault has been cleared, type one of
the following commands:
/usr/sbin/lpadmin –p
/usr/sbin/lpadmin –p
/usr/sbin/lpadmin –p
printer–name
printer–name
printer–name
–F continue
–F beginning
–F wait
System V Printer Configuration
6-39
These commands direct the print service to continue at the top of the page, restart from the
beginning, or wait for you to enter an enable command to re–enable the printer.
If you do not specify how the print service is to resume after a printer fault, it will try to
continue at the top of the page where printing stopped or, failing that, at the beginning of the
print request.
If the recovery is continue, but the interface program does not stay running so that it can
detect when the printer fault has been cleared, printing will be attempted every few minutes
until it succeeds. You can force the print service to retry immediately by issuing an enable
command.
Alerting to Mount Forms and Font Cartridges
If you have printers that accept changeable font cartridges and you have listed the font
cartridges allowed on each, users can submit a print request to use a particular font
cartridge. However, if the font cartridge is not mounted when a user requests to use it, the
job waits in the queue until you mount the font cartridge. See Specifying Font Cartridges to
Use With a Printer on page 6-38. If a form (or font cartridge) is not mounted when you print
a file and specify that form, the job waits in the queue until you mount the appropriate form.
See Mounting a Form on page 6-16.
In these cases, you might want to set up the print system to alert you when you need to
mount a form. You can specify that you are to receive alerts when the number of requests
waiting for a font cartridge or form exceeds some threshold.
To arrange for alerting to the need to mount a form, type:
lpforms –f
form_name
–A
alert_method
–Q
number
–W
minutes
alert_method
alerting method to use (mail, write, or a
desired command)
number
number of waiting requests to restart
alerting
minutes
number of minutes between alerts
For example, to direct the print service to send electronic mail alerts every five minutes
whenever the printer queue contains two or more requests for the check form and it is not
already mounted, type:
lpforms –f check –A mail –Q 2 –W 5
To arrange for alerting to the need to mount a font cartridge, type:
lpadmin –S
minutes
font_cartridge_name
–A
alert_method
–Q
number
–W
For example, to direct the print service to write alerts to your terminal every two minutes
whenever the printer queue contains three or more requests for the dingbat font cartridge
and it is not already mounted, type:
lpadmin –S dingbat –A write –Q 3 –W 2
To arrange for alerting whenever the queue contains requests for any form or font cartridge,
type one of the following:
lpforms –f any –A mail –W 5
lpadmin –S any –A mail –W 5
To stop receiving alert messages to mount a form or font cartridge, type one of the following:
lpforms –f
form_name
lpadmin –S
6-40
Guide to Printers and Printing
–A quiet
font_cartridge_name
–A quiet
To remove alerting when a form or font cartridge needs to be mounted, type one of the
following:
lpforms –f
form_name
lpadmin –S
–A none
font_cartridge_name
–A none
If you do not define an alert method for a form or font cartridge, you do not receive an alert
for it. If you define a method, but do not define the number of minutes between alerts (with
the –W option), you receive one alert for each occasion.
Setting Printer Port Characteristics
Printer port characteristics are attributes defined with the –o ”stty=’ stty–option–list ’”
option of the lpadmin command. Printers connected directly to computers and those
connected over some networks require that the printer port characteristics be set by the
interface program. These characteristics define the low level communications with the
printer. Included are the baud rate; use of XON/XOFF flow control; 7, 8, or other bits per
byte; type of parity; and output postprocessing. The standard interface program uses the
stty command to initialize the printer port, minimally setting the baud rate and a few other
default characteristics.
Default Port Characteristics
The default characteristics applied by the standard interface program are listed in the
following table:
Default
Description
9600
9600 baud rate
cs8
8–bit bytes
–cstopb
1 stop bit per byte
–parenb
No parity generation
ixon
Enable XON/XOFF flow control
–ixany
Allow only XON to restart output
opost
Postprocess data stream as listed below:
–olcuc
Do not map lower case to upper case
onlcr
Map linefeed into carriage return/linefeed
–ocrnl
Do not map carriage return into linefeed
–onocr
Output carriage returns even at column 0
nl0
No delay after linefeeds
cr0
No delay after carriage returns
tab0
No delay after tabs
bs0
No delay after backspaces
vt0
No delay after vertical tabs
ff0
No delay after form feeds
You may find that the default characteristics are sufficient for your printers. However,
printers vary enough that you may have to set different characteristics. See the stty
command for a complete list of characteristics.
If you have a printer that requires printer port characteristics other than those handled by
the stty program, you will have to customize the interface program. See Printer Interface
Scripts on page 6-9 for help.
When you add a new printer, you may specify an additional list of port characteristics. The
list you provide will be applied after the default list so that you do not need to include in your
list items that you do not want to change. Specify the additional list as follows:
System V Printer Configuration
6-41
/usr/sbin/lpadmin –p
printer–name
–o ”stty=’
stty–option–list
’”
Note that both the double quotes and single quotes are needed if you give more than one
item in the stty–option–list.
Suppose your printer is to be used for printing graphical data, where linefeed characters
should be output alone, without an added carriage return. You would type the following
command:
/usr/sbin/lpadmin –p
printer–name
–o ”stty=–onlcr”
Note that the single quotes are omitted because there is only one item in the list.
As another example, suppose your printer requires odd parity for data sent to it. You would
enter the following command:
/usr/sbin/lpadmin –p
printer–name
–o ”stty=’parenb parodd cs7’”
Setting Up a Printer With Multiple Names
The print service allows you to set up a single printer with multiple names to perform
multiple functions. For example, if your printer supports both portrait and landscape modes,
you can set up a different name for each function and then send jobs to each printer name.
These multiple printers are called virtual printers.
The print spooler system differentiates printers by name only, not by the device to which the
printer is connected. To specify different names for the same device and prevent multiple
print jobs from appearing simultaneously, you must set up both the real printer and
additional virtual printers. Thr real printer performs the actual printing and the virtual printers
pass print jobs to the real printer.
For example, to set up two virtual printers, port and land, that use the capabilities of a
Hewlett–Packard LaserJet, use the following procedure:
1. Set up the real printer. Specify the Name as real and set the Model to HPLaserJet.
2. Set up the port and land virtual printers. Set the Model to network. Specify the same
Device to which real is connected.
3. Create the file /usr/spool/lp/remote and add the following lines:
port:
land:
lp –dreal –oportrait
lp –dreal –olandscape
This specifies that when printing to printer land, the print system sends the print job to
printer real using the –olandscape option (to print in landscape mode) and when printing
to printer port, the print system sends the print job to printer real using the –oportrait
option (to print in portrait mode).
Note: The options listed after –dreal depend on the printer model. Check the
interface script in /usr/spool/lp/admins/lp/interface for your printer to determine the
printer– or class–dependent –o options.
To print a file in landscape mode, type:
lp –dland
filename
This procedure translates the –dland option to lp to the necessary options for the printer (in
this example, –dreal –ol).
Another way to accomplish this is to create a simple shell script to perform the type of
printing. For example:
:
# Land – shell script to print in landscape mode
#
# syntax: land <file> <file> ...
#
#
lp –dreal –ol $@
6-42
Guide to Printers and Printing
The reasons for choosing one method over the other depend on how your applications
access the print system. Many applications allow you to specify only the name of the printer,
so virtual printers are the only solution. Other applications might allow complete control over
the commands that submit the print job. In this case, you might use the shell script in the
preceding example.
Configuring Directory–Enabled (LDAP) System V Print on AIX
Lightweight Directory Access Protocol (LDAP) is a distributed hierarchical directory–service
access protocol that is used to access repositories of user information and other
network–related entities. The IBM Directory is an LDAP directory server. The AIX System V
print subsystem’s use of IBM Directory allows for centralized storage of print information.
This functionality can be used to keep printers, print queues, and system information
common in a client–server environment. The mkprtldap command configures IBM Directory
as a server containing System V print information, and one or more clients that use the IBM
Directory (LDAP) for print information.
Beginning with AIX 5.2, the System V print subsystem is directory–enabled, allowing the
System V print subsystem to be managed using the information stored in the LDAP
directory. The System V print subsystem is one of the many AIX subsystems that provide an
option to store information in the directory. The information stored in the directory will be
used by the subsystems to manage the AIX system. Other subsystems that use the LDAP
directory include Security and Network Information Service (NIS).
Prerequisites
• AIX 5.2 or later
• IBM Directory Server and Client v4.1 or later
Note:
IBM Directory is provided with the AIX base operating system media.
Planning to Set Up the Print Subsystem
Setting up the print subsystem to use IBM Directory (LDAP) involves two steps. First,
configure an IBM Directory (LDAP) server to store System V print information. This server
will act as a centralized repository for System V print information. Second, configure the
host systems (clients) to use the IBM Directory server for System V print information.
Note:
The mkprtldap command that is used to set up directory–enabled System
V print on AIX can only be run by the root user. The mkprtldap command
only configures the IBM Directory server and client systems to use the IBM
Directory for System V print information. To add, delete, and manage
printers, print queues, and systems, run the directory–enabled System V
print commands ( dslpaccept, dslpaccess, dslpadmin, dslpdisable,
dslpenable, dslpreject, and dslpsearch). The directory enabled System V
print commands are provided with the bos.svprint file set, which must be
installed on both the client and server. The client side configuration must be
completed with the mkprtldap command before running any of the
directory–enabled System V print commands.
Configuring IBM Directory (LDAP) to Store System V Print Information
To install and configure the IBM Directory server software on the AIX system that will serve
as the centralized repository for System V print information, do the following:
Note:
If the system has the IBM Directory Server installed, go directly to step 2.
1. Install the IBM Directory server software from the AIX base operating system media
software. The IBM DB2 database is required by IBM Directory and is installed by default
when you install the IBM Directory server unless an IBM DB2 database is already
installed on the system.
System V Printer Configuration
6-43
Note:
For detailed instructions on installing and troubleshooting IBM Directory,
refer to the documentation provided with the IBM Directory product.
2. To configure IBM Directory to store System V print information, run the mkprtldap
command with the server flag options. The syntax is as follows:
mkprtldap
[–d
node
–s –a
DN]
AdminDN
–p
Adminpasswd
–w
ACLBindPasswd
[–f]
The server flag options are described in detail in Server Flag Options on page 6-47.
The mkprtldap command works even if the directory server has been set up for other
purposes, for example, for white pages information. In this case, the mkprtldap command
adds the AIX information tree and the print subtree information to the existing database.
This print tree is protected independently from other trees by use of an Access Control List
(ACL). In this case, the LDAP server works as usual. Back up your existing database before
you use the mkprtldap command to configure System V print information to share the same
database.
Configuration Using the –s Flag
During the configuration, if you use the –s flag with the mkprtldap command, the following
occurs:
1. Checks the IBM Directory DB2 configuration on the system. If DB2 is not configured for
IBM Directory, the mkprtldap command creates a DB2 instance with ldapdb2 as the
default instance name, and creates a DB2 database with ldapdb2 as the default
database name if one does not exist. If an existing database is found, the mkprtldap
command adds AIX System V print information to the existing database.
2. Requires the IBM Directory Administrator Distinguished Name (DN) and password if the
directory has been previously configured. If the directory administrator DN and password
have not been set, the mkprtldap command sets them to the values provided to the
command.
3. Adds the IBM Directory server process (slapd) to the /etc/inittab file so that the server
starts after a reboot.
4. Creates the AIX information tree DN (cn=aixdata container object) on the directory if one
is not present. The print subtree will be created under the AIX information subtree. If an
existing AIX information subtree exists on the directory, the print subtree will be created
under it. All System V print information will be stored under the print subtree. The
directory–enabled System V print commands must be run to add printers and print
queues under the print subtree created.
5. Adds the default suffix cn=aixdata to the /etc/sldap32.conf file if the suffix does not
exist. Creates the AIX information tree container object cn=aixdata if it not found in the
Directory. The cn=aixdata is a top–level container object under which the print subtree
(ou=print) is then created.
6. The print subtree is ACL–protected with the value of the ACLBindPasswd parameter
passed to the command. The same value must be used when configuring clients to use
the directory for System V print information.
7. If the –d flag is used and a valid existing node on the directory is passed to the
command, the AIX information subtree is created under the given node. The print
subtree is then created under the AIX information subtree.
8. Starts the IBM Directory server after all the previous steps are completed.
6-44
Note:
If IBM Directory has been configured previously, the Administrator DN and
password are needed to run the mkprtldap command. The LDAP
configuration is saved in the /etc/slapd32.conf file.
Note:
If the IBM Directory (LDAP) server configuration is not successful, no undo
option is provided for the server–side configuration. Refer to the IBM
Directory documentation for any errors that occur during the configuration. If
Guide to Printers and Printing
the database information was created by the mkprtldap command, you
must remove it manually. If the mkprtldap command has added data to a
preexisting database, you must determine how to recover from a failed
setup attempt. For details on how to remove data or databases, see the
IBM DB2 documentation.
System V Print Information Subtree
System V print information is stored under the print subtree, which in turn is stored under a
default AIX Information tree (cn=aixdata) on the directory. The AIX information tree is a
top–level container object under which the different directory–enabled AIX subsystems can
store their information. It is recommended to store the print information in the default
location on the directory. However, the mkprtldap command provides the option to store the
print information under an existing node on the directory.
The following illustration shows the AIX System V print information stored in the directory in
the form of a directory information tree (DIT).
Figure 5. Organization of AIX System V Print Information
This tree chart shows the organization of the System V print information in the LDAP
directory. The AIX Information tree contains a top level object cn=aixdata of objectclass type
container. The suffix under which the information is stored is also cn=aixdata.
Subsystem–specific information is stored under this top–level container object. The
top–level container object has subsystem specific top–level objects ( for example, ou=print
for System V print information and cn=aixsecdb for User/Group information) under it.
System V print information is stored under the ou=print object. The ou=print object has three
objects under it for printer, print queue and system information. Printer definitions are stored
under the ou=printer object. Print Queue definitions are stored under the ou=print queue
object while System information can be found under the ou=system object.The entire print
tree is ACL–protected below the ou=print object. The ACL Bind password used to ACL
protect the tree is specified during the server configuration with the mkprtldap command
using the –w option.
After you have successfully configured IBM Directory to store System V print information,
the next step in the setup is to configure clients to use the LDAP directory server.
System V Printer Configuration
6-45
Because this AIX print subtree is ACL–protected, you may not be able to view the System V
print information in the directory information tree (DIT) under the AIX information tree using
DMT (Directory Management Tool). A client must bind with Print Bind DN (default is
ou=print,cn=aixdata) and the ACL bind password or with the administrator DN to be able to
access the AIX print subtree.
Configuring a Client to Use the IBM Directory Server for System V Print Information
To configure a client, use the IBM Directory (LDAP) for System V Print information, do the
following:
1. Install the IBM Directory Client software on the system that will be set up as a client.
2. Run the mkprtldap command with the client option to configure the client. The syntax is
as follows:
mkprtldap –c –h
DirectoryServerHostname
PrintBindDN
] [–U]
–w
ACLBindPasswd
[ –d
During the client configuration, the mkprtldap command does the following:
• Saves the IBM Directory (LDAP) server host name in the /etc/ldapsvc/server.print file.
• Saves the AIX Print Bind DN in the /etc/ldapsvc/server.print file.
• Saves the ACL Bind Password for the AIX Print Bind DN in the
/etc/ldapsvc/system.print file. The value of the ACL Bind password must be the same
as the one specified during the configuration of the Directory server.
• Undoes a previous client configuration if the –U flag is specified. This option replaces the
/etc/ldapsvc/system.print and /etc/ldapsvc/server.print files with the previous saved
copies of the /etc/ldapsvc/server.print.save and /etc/ldapsvc/system.print.save files.
The client–side configuration files /etc/ldapsvc/server.print and /etc/ldapsvc/system.print
are created to store information about the IBM Directory server and ACL information; that is,
the IBM Directory server name, ACL information (printbindDN and printbindPassword),
LDAP port, and the directory context for print (required by the System V print subsystem).
The default printbindDN is ou=print,cn=aixdata and is used when the –d flag is not
specified. If a DN is specified with the –d flag, the print bind DN will be ou=print,cn=aixdata,
<DN specified>. The following are sample /etc/ldapsvc/server.print and
/etc/ldapsvc/system.print files:
Example of a /etc/ldapsvc/server.print file:
PRINTSERVER=server.ibm.com
LDAPPORT=389
PRINTBINDDN=ou=print,cn=aixdata
where:
PRINTSERVER is the host name of the system with the IBM Directory server
LDAPPORT is the port number to bind to
PRINTBINDN is the ACL Bind DN and also serves as the directory context for print
Example of a /etc/ldapsvc/system.print file:
PRINTBINDPASSWD=ldap
where:
PRINTBINDPASSWD is the ACL bind password for the print subtree.
The ACL bind password specified with the –w flag during client setup should match the ACL
bind password value specified during server configuration. The print directory context is the
same as the printbindDN. The file permissions for the /etc/ldapsvc/server.print file are set
to 644 and the file is owned by root. The file permissions for the /etc/ldapsvc/system.print
file are set to 640. The file is owned by root and members of the lp group are allowed read
access to this file.
6-46
Guide to Printers and Printing
Server Flag Options
The following sections provide flag descriptions and examples for configuring
directory–enabled System V print.
Server–Side Options
Flag
Parameter
Description
–a
AdminDN
Specifies the IBM Directory
(LDAP) administrator DN.
–d
node DN
[Advanced Option] – This
option requires a valid
existing node DN on the
directory under which the
AIX information tree and
print subtree will be created.
–f
–p
The force flag is required by
the mkprtldap command to
force the creation of the print
subtree (and AIX information
subtree if needed) when one
or more AIX information
trees exist on the directory.
adminpasswd
–s
–w
Specifies the directory
(LDAP) administrator’s
password
Indicates the command is
being run to configure the
directory for System V print.
ACLBindPasswd
Specifies the password to
ACL–protect the print
subtree on the directory.
Parameter
Description
Client–Side Options
Flag
–c
Indicates the command is
being run to configure
clients to use the directory
for System V print
information.
–d
PrintBindDN
Specifies the print bind DN.
The default print bind DN is
ou=print,cn=aixdata. The
print bind DN to use during
client configuration is
displayed at the end of the
server setup of the
mkprtldap command.
–h
Directory
Server
Hostname
Hostname of the IBM
Directory server set up to
store System V print
information.
–U
Undo a previous
configuration of a client
System V Printer Configuration
6-47
Usage
Flag
Parameter
?
Description
Displays usage information
for the mkprtldap
command.
Examples
1. To configure a new installation of IBM Directory for System V print with the administrator
DN cn=root and root password, type:
mkprtldap –s –a cn=root –p root –w aclpasswd
where the ACLBindpassword is the password used so that the ACL protects
the print subtree. The ACL bind password is specified during the
configuration of System V print on the directory. This configuration also
sets the directory administrator’s DN and password to cn=root and root.
Running the command sets up a suffix and top–level container object
cn=aixdata. The print subtree (ou=print) is created under this AIX
information tree (cn=aixdata object).
2. To configure System V print on a machine with a configured IBM Directory server, the
administrator DN and password are required. For example, if the existing administrator’s
DN and password are cn=admin and passwd, type:
mkprtldap –s –a cn=admin –p passwd –w pass123wd
3. To configure System V print under a preexisting node on the IBM Directory server (for
example, o=ibm,c=us), the mkprtldap command provided the –d flag option. This is an
advanced option recommended only when it is necessary to store the print information
under an existing node on the directory. The recommended option is to store the print
subtree in the default location on the directory by not specifying the –d option.
The administrator DN and password are required to configure System V print on the
directory. Assume the existing administrator’s DN and password are cn=admin and
passwd. Type:
mkprtldap –a cn=admin –p passwd –w acl123passwd –d o=ibm,c=us
Running the command creates an AIX information tree (cn=aixdata) under the
o=ibm,c=us object. The print subtree is created under this new object (cn=aixdata,
o=ibm, c=us).
4. To configure System V print information under a separate AIX information tree when the
directory contains an existing AIX information tree for other subsystem–specific
information. There could be situations in which the directory may contain an existing AIX
information tree with Security or NIS information. It may be necessary to store the print
information in a separate location on the directory under a different AIX information tree.
By default,the mkprtldap command does not create an AIX information tree if one exists
on the directory. To force the mkprtldap command to create an AIX information tree to
store the print information,use the –f flag.
Consider an example where the security and NIS subsystem information is stored under
the AIX information tree at cn=aixdata,o=ibm,c=us. To create a new AIX information tree
for print information different from the existing one, run the command with the –f flag and
specify the default location or another node.
The Administrator DN and password are required to configure System V print on the
directory. For example, if the existing administrator’s DN and password are cn=admin
and passwd, type:
mkprtldap –a cn=admin –p passwd –w passwd123 –f
Running the command creates an AIX information tree (cn=aixdata) with the suffix
(cn=aixdata) and the print information is stored under this new AIX information tree
(ou=print, cn=aixdata). There will be two AIX information trees on the directory in this
example –> cn=aixdata,o=ibm,c=us and cn=aixdata. The print information will be under
6-48
Guide to Printers and Printing
the cn=aixdata object (suffix – cn=aixdata). For the mkprtldap command, it is
recommended to use the default location to add the print information to the directory.
5. To configure a client to use IBM Directory setup for System V Print on host
server.ibm.com, type:
mkprtldap –c –h server.ibm.com –w passwd
Ensure that the ACL bind password (passwd) is the same as the one specified during the
setup of the Directory server. Running the command without specifying a print bind DN
value with the –d option will cause the command to use the default print bind DN
ou=print,cn=aixdata. The Print Bind DN must match the one displayed as a result end of
running the mkprtldap command when you configure the server.
6. To change the information in the client–side configuration files, run the mkprtldap
command with the new information. Type:
mkprtldap –c –h server.ibm.co.uk –w
ou=print,cn=aixdata,c=uk
aclpasswd
–d
Running this command on a client that has already been configured will change the
information in the /etc/ldapsvc/server.print and /etc/ldapsvc/system.print files to
contain the new configuration information. The original contents of the
/etc/ldapsvc/server.print and /etc/ldapsvc/system.print files will be stored in the
/etc/ldapsvc/server.print.save and /etc/ldapsvc/system.print.save files.
Files Accessed
The following table shows files that are accessed and modified by the mkprtldap command
during server and client configuration and descriptions. It also shows the contents of the
files.
Mode
File
Description
rw
/etc/slapd32.conf
Server setup – Contains the
IBM Directory (LDAP)
configuration information
rw
/etc/ldapsvc/server.print
Client configuration –
Contains information about
the directory server
configured to store System
V Print information (machine
name, location of print
subtree on the directory and
LDAP port)
rw
/etc/ldapsvc/system.print
Client configuration –
Contains the ACL bind
password for the print
subtree on the Directory
Related Information
For more information, see the cancel command in the AIX 5L Version 5.2 Commands
Reference, Volume 1.
For more information, see the dslpaccept, dslpaccess, dslpadmin, dslpdisable,
dslpenable, dslpreject, and dslpsearch commands in the AIX 5L Version 5.2 Commands
Reference, Volume 2.
For more information, see the lp, lpstat, mkprtldap, and mksecldap commands in the AIX
5L Version 5.2 Commands Reference, Volume 3.
System V Printer Configuration
6-49
6-50
Guide to Printers and Printing
Appendix A. Calculating Page Length Using Printer
Colon File Escape Sequences
The printer colon file for an ASCII queue on an IBM 4029 LaserPrinter defines page length,
in lines, with the work attribute wL. Obtaining a numeric value for wL involves evalutating
embedded references in the definition of wL. As formatted by the lsvirprt commmand, wL
is defined as follows:
Page Length In Chars, Using Length From Data Base (used in
pipelines)
wL = %?%Cl%t%f!l%e%I_l%;
%?
%Cl
%t
%f!l
OUTPUT
%e
%I_l
%;
<IF>
PUSH: (1 If –l Flag on Command Line; Otherwise 0)
<THEN>
For Each Flag x on Command Line: ”–xArgument” –>
<ELSE>
INCLUDE: (LINES per page)
<END>
The %Cl checks to see if the l flag was used on the command line; if it was, then a 1 is
pushed onto the stack, else a 0 is pushed onto the stack. In this case, the l flag was not
used on the command line so a 0 is pushed onto the stack. The %t checks for a true
(non–zero) value on the stack and, not finding one, executes the %e (else) construct %I_l.
_l is defined as %IwY, shown below as formatted by the lsvirprt command.
Default Page Length (lines)
wY = %?%G_z%{1}%&%t%GwJ%e%GwK%;%G_v%*%{300}%/%d
%?
%G_z
%{1}
%&
%t
%GwJ
%e
%GwK
%;
%G_v
%*
%{300}
%/
%d
<IF>
PUSH: (Page ORIENTATION)
PUSH: (Integer Constant 1)
PUSH: (pop2 & pop1) –– Bitwise AND
<THEN>
PUSH: (Primary Page Width (–z 0) or Secondary Page
Length (–z1), in pels)
<ELSE>
PUSH: (Primary Page Length (–z 0) or Secondary Page
Width (–z1), in pels)
<END>
PUSH: (LINE DENSITY (lines per inch))
PUSH: (pop2 * pop1)
PUSH: (Integer Constant 300)
PUSH: (pop2 / pop1)
POP –> ASCII String –> OUTPUT
The calculation of _l begins by pushing the value of _z, page orientation, onto the stack.
The job submission command being used in this example, qprt –a1 –Pasc –fp –z1
–p12 –scourier –C –N3 /etc/motd, specifies a z value of 1, so a 1 is pushed onto
the stack. The %{1} pushes another 1 onto the stack, after which the %& pops the top two
values (both 1 s) off the stack and performs a bitwise AND with the two values. The result of
the bitwise AND, a 1, is pushed onto the stack.
Note: The test is a bitwise AND instead of a simple test for equality because the legal
values for the z flag are 0, 1, 2, and 3, correpsonding to the legal number of 90 degree
rotations that can be applied to a printed page.
Calculating Page Lenght Using Printer Colon File Escape Sequence
A-1
The next %t finds a 1 on the stack and so the then clause, %GwJ, is resolved before any
more work is done on resolving _l.
As formatted by lsvirprt, wJ is defined as follows:
Primary Page Width (–z 0) or Secondary Page Length (–z1), in pels
wJ = %G_Q%Pq%?%GWu%{3}%<%t%?%gq%{1}%=%t%{2400}%e%gq%{2}%=%t%{2400
}%e%gq%{3}%=%t%{1999}%e%gq%{4}%=%t%{2330}%e%{2025}%;%e%?%gq%{1}%=
%t%{1012}%e%gq%{2}%=%t%{1012}%e%gq%{3}%=%t%{1087}%e%gq%{4}%=%t%{1
149}%e%gq%{5}%=%t%{1763}%e%{1928}%;%;%d
A-2
Guide to Printers and Printing
%G_Q
%Pq
%?
%t
%e
%;
%d
PUSH: (PAPER SIZE override for input paper source)
POP –> Internal Variable q
<IF>
%GWu
PUSH: (Calculate value for paper source based on _
O and _u.)
%{3}
PUSH: (Integer Constant 3)
%<
PUSH: (pop2 < pop1 ?)
<THEN>
%?
<IF>
%gq
PUSH: (Internal Variable q)
%{1} PUSH: (Integer Constant 1)
%=
PUSH: (pop2 = pop1 ?)
%t
<THEN>
%{2400} PUSH: (Integer Constant 2400)
%e
<ELSE>
%gq
PUSH: (Internal Variable q)
%{2} PUSH: (Integer Constant 2)
%=
PUSH: (pop2 = pop1 ?)
%t
<THEN>
%{2400} PUSH: (Integer Constant 2400)
%e
<ELSE>
%gq
PUSH: (Internal Variable q)
%{3} PUSH: (Integer Constant 3)
%=
PUSH: (pop2 = pop1 ?)
%t
<THEN>
%{1999} PUSH: (Integer Constant 1999)
%e
<ELSE>
%gq
PUSH: (Internal Variable q)
%{4} PUSH: (Integer Constant 4)
%=
PUSH: (pop2 = pop1 ?)
%t
<THEN>
%{2330} PUSH: (Integer Constant 2330)
%e
<ELSE>
%{2025} PUSH: (Integer Constant 2025)
%;
<END>
<ELSE>
%?
<IF>
%gq
PUSH: (Internal Variable q)
%{1} PUSH: (Integer Constant 1)
%=
PUSH: (pop2 = pop1 ?)
%t
<THEN>
%{1012} PUSH: (Integer Constant 1012)
%e
<ELSE>
%gq
PUSH: (Internal Variable q)
%{2} PUSH: (Integer Constant 2)
%=
PUSH: (pop2 = pop1 ?)
%t
<THEN>
%{1012} PUSH: (Integer Constant 1012)
%e
<ELSE>
%gq
PUSH: (Internal Variable q)
%{3} PUSH: (Integer Constant 3)
%=
PUSH: (pop2 = pop1 ?)
%t
<THEN>
%{1087} PUSH: (Integer Constant 1087)
%e
<ELSE>
%gq
PUSH: (Internal Variable q)
%{4} PUSH: (Integer Constant 4)
%=
PUSH: (pop2 = pop1 ?)
%t
<THEN>
%{1149} PUSH: (Integer Constant 1149)
%e
<ELSE>
%gq
PUSH: (Internal Variable q)
%{5} PUSH: (Integer Constant 5)
%=
PUSH: (pop2 = pop1 ?)
%t
<THEN>
%{1763} PUSH: (Integer Constant 1763)
%e
<ELSE>
%{1928} PUSH: (Integer Constant 1928)
%;
<END>
<END>
POP –> ASCII String –> OUTPUT
Calculating Page Lenght Using Printer Colon File Escape Sequence
A-3
The calculation of wJ begins by pushing the value of _Q, the paper size override for the
input paper source, onto the stack. The value of _Q is defined as %IwQ. As formatted by
the lsvirprt command, wQ is defined as follows:
Paper or Envelope Size For the Paper Source Selected By the –O
and –u Flag Values (Refer to the s0, s1, s2, s3, and s4
attributes)
wQ =
%?%GWu%{0}%=%t%Gs0%e%GWu%{1}%=%t%Gs1%e%GWu%{2}%=%t%Gs2%e%GWu%{3}%
=%t%Gs3%e%Gs4%;%d
%?
%GWu
_O and _u.)
%{0}
%=
%t
%Gs0
%e
%GWu
_O and _u.)
%{1}
%=
%t
%Gs1
%e
%GWu
_O and _u.)
%{2}
%=
%t
%Gs2
%e
%GWu
_O and _u.)
%{3}
%=
%t
%Gs3
%e
%Gs4
%;
%d
<IF>
PUSH: (Calculate value for paper source based on
PUSH: (Integer Constant 0)
PUSH: (pop2 = pop1 ?)
<THEN>
PUSH: (PAPER SIZE for manual paper feed)
<ELSE>
PUSH: (Calculate value for paper source based on
PUSH: (Integer Constant 1)
PUSH: (pop2 = pop1 ?)
<THEN>
PUSH: (PAPER SIZE for tray 1 (upper))
<ELSE>
PUSH: (Calculate value for paper source based on
PUSH: (Integer Constant 2)
PUSH: (pop2 = pop1 ?)
<THEN>
PUSH: (PAPER SIZE for tray 2 (lower))
<ELSE>
PUSH: (Calculate value for paper source based on
PUSH: (Integer Constant 3)
PUSH: (pop2 = pop1 ?)
<THEN>
PUSH: (ENVELOPE SIZE for envelope feeder)
<ELSE>
PUSH: (ENVELOPE SIZE for manual envelope feed)
<END>
POP –> ASCII String –> OUTPUT
The calculation of wQ begins by pushing the value of Wu, onto the stack. As formatted by
the lsvirprt command, the value of Wu is defined as follows:
Calculate value for paper source based on _O and _u.
Wu =
%?%CO%t%?%G_O%{1}%=%t%?%Cu%t%?%G_u%{2}%>%t%{4}%e%{0}%;%e%{0}%;%e%
G_u%;%e%G_u%;%d
A-4
Guide to Printers and Printing
%?
<IF>
PUSH: (1 If –O Flag on Command Line; Otherwise 0)
%t
<THEN>
%?
<IF>
%G_O PUSH: (Type of INPUT PAPER HANDLING (backward
compatibility
purpose only))
%{1} PUSH: (Integer Constant 1)
%=
PUSH: (pop2 = pop1 ?)
%t
<THEN>
%?
<IF>
%Cu PUSH: (1 If –u Flag on Command Line; Otherwise 0)
%t
<THEN>
%? <IF>
%G_u PUSH: (Input PAPER SOURCE)
%{2} PUSH: (Integer Constant 2)
%> PUSH: (pop2 > pop1 ?)
%t <THEN>
%{4} PUSH: (Integer Constant 4)
%e <ELSE>
%{0} PUSH: (Integer Constant 0)
%; <END>
%e
<ELSE>
%{0} PUSH: (Integer Constant 0)
%;
<END>
%e
<ELSE>
%G_u PUSH: (Input PAPER SOURCE)
%;
<END>
%e
<ELSE>
%G_u
PUSH: (Input PAPER SOURCE)
%;
<END>
%d
POP –> ASCII String –> OUTPUT
%CO
The calculation for the value of Wu begins by evaluating %CO, which pushes a 1 onto the
stack if the O flag was specified on the command line, else it pushes a 0 onto the stack. The
job submission command being used in this example did not use the O flag, so a 0 is
pushed onto the stack. The next %t, finding a 0 on the stack, skips the next 23 lines of
printer colon file escape sequences and evaluates the %e (else) clause on the fourth line
from the bottom of the formatted form of the Wu attribute. The else clause is %G_u, which
pushes the value of _u, the input paper source, onto the stack. The default value for _u for
this virtual printer is 1, so a 1 is pushed onto the stack. The next %; terminates the original
%?. The only remaining escape sequence, %d, pops the top value (a 1) off the stack and
returns it in ASCII format to the in–progress calculation of wQ.
The 1 returned to the in–progress calculation of wQ is the value of Wu, and is pushed onto
the stack. The next %{0} pushes a 0 onto the stack. %= pops the top two values (a 0 and a
1) off the stack and, checking them for equality, fails; a 0 is pushed onto the stack.
The next %t finds the 0 and so skips the %Gs0 and instead evaluates the %e (else) clause.
Wu (a 1) is again pushed onto the stack. The %{1} pushes another 1 onto the stack. The
%= again pops the top two values ( two 1 s) off the stack and, checking them for equality,
succeeds; a 1 is pushed onto the stack.
The next %t finds the 1 and so evaluates the %Gs1. The s1 attribute is a number
representing the paper size for paper tray 1, the upper paper tray, and its default value in
this virtual printer definition is 1. This 1 is pushed onto the stack. All but the very last of the
remaining printer colon escape sequences in the evaluation of wQ are skipped. The %d
pops the top value (a 1) off the stack and returns it in ASCII format to the in–progress
calculation of wJ.
The 1 returned to the in–progress caclulation of wJ is the value of _Q, and is pushed onto
the stack. It is immediately popped back off the stack and stored in the internal variable q.
Wu, already determined to be 1, is again pushed onto the stack. %{3} pushes a 3 onto the
stack, then the %< pops the top two values off the stack and checks to see if the second
value popped is less than the first value popped. 1 is less than 3, so a 1 is pushed onto the
stack. The %t finds the 1 and so enters the if–then–else–then–else–then–else... sequence
looking for an integer to pair with the paper size value calculated for _Q.
Calculating Page Lenght Using Printer Colon File Escape Sequence
A-5
The %gq fetches the stored value of _Q from the internal variable q, and pushes it onto the
stack. The %{1} pushes another 1 onto the stack. The %= pops the top two values (two 1 s)
off the stack and, checking them for equality, succeeds; a 1 is pushed onto the stack. The
%t finds the 1 and so evaluates the %{2400}, which pushes 2400 onto the stack. The
calculation of wJ then falls through all but the last line of the remaining printer colon file
escape sequences defining wJ. The last escape sequence, %d, pops the top value, 2400,
off the stack and returns it, in ASCII format, to the in–progress calculation of wY.
The 2400 returned to the in–progress calculation of wY is the value of wJ, and is pushed
onto the stack. The %GwK in the else clause is skipped and the %; terminates the
if–then–else sequence. The %G_v fetches the line density (in lines per inch), 6, and pushes
it onto the stack. The %* pops the top two values (a 6 and a 2400) off the stack, multiplies
them together, and pushes the result (14400) back onto the stack. The %{300} pushes a
300 onto the stack. The %/ pops the top two values (a 14000 and a 300) off the stack,
divides the second value popped off the stack by the first value popped off the stack, and
pushes the result (48) onto the stack. The %d pops the top value (48) off the stack and
returns it to the in–progress calculation of wL.
The 48 returned to the in–progress calculation of wL is the value of _l. The value of wL was
originally referenced in the determination of the value of the ia attribute, the input
datastream pipeline for ASCII jobs. The number 48 replaces the %IwL in that determination,
so the value of the –! flag to pioformat becomes /usr/lib/lpd/pio/fmtrs/piof5202
–l48. The –l48 can be seen in the original diagnostic message from piobe that was the
basis of this discussion; it is part of the PIPELINE OF FILTERS section of the mail sent by
the qdaemon on behalf of piobe.
The calculation of the value associated with the –w flag to piof5202 is described in
Appendix B. Calculating Page Width Using Printer Colon File Escape Sequences on page
B-1.
The following ”Calculation of Page Length” figure depicts the stack operations (as described
above) used to obtain a final numeric value for page length in lines. The following numbered
steps correspond to the numbers on the left side of the columns in the figure, and provide a
step–by–step description of the evaluation of the printer colon file escape sequences
defining page length, in lines, for this particlular queue (asc), colon file, and command line.
Figure 6. Calculation of Page Length
Figure 1.
Graphic: Calculation of Page Length.
1. %Cl – Pushes a 0 onto the stack since the l flag was not used on the command line.
2. %I_l – Calls for the evaluation of _l.
3. %G_z – Pushes a 1 onto the stack.
A-6
Guide to Printers and Printing
4. %{1} – Pushes a 1 onto the stack.
5. %& – Pops the top two values (two 1 s) off the stack, performs a bitwise AND on the two
values, and pushes the resultant 1 onto the stack.
6. %t – Pops the 1 off the stack and, since it is a TRUE (non–zero) value, calls for the
evaluation of %GwJ. The stack labeled _ l is now empty.
7. %GwJ – Calls for the evaluation of wJ.
8. %G_Q – Calls for the evaluation of wQ.
9. %GwQ – Calls for the evaluation of %GWu.
10.%GWu – Calls for the evaluation of Wu.
11. %CO – Pushes a 0 onto the stack since the O flag was not used on the command line.
12.%t – Pops the 0 off the stack and, since it is a FALSE (zero) value, calls for the
evaluation of %G_u. The stack labeled Wu is now empty.
13.%G_u – Pushes a 1 onto the stack.
14.%d – Pops the 1 off the stack and returns it, in ASCII format, to the in–progress
calculation of wQ.
15.%{0} – Pushes a 0 onto the stack.
16.%= – Pops the 0 and 1 off the stack, compares them for equality, and pushes the
resultant 0 onto the stack.
17.%t – Pops the 0 off the stack and, since it is a FALSE (zero) value, calls for the
evaluation of %GwU.
18.%GWu – This value is already known, so a 1 is pushed onto the stack.
19.%{1} – Pushes a 1 onto the stack.
20.%= – Pops the two 1 s off the stack, compares them for equality, and pushes the
resultant 1 onto the stack.
21.%t – Pops the 1 off the stack and, since it is a TRUE (non–zero) values, calls for the
evaluation of %Gs1.
22.%Gs1 – Pushes a 1 onto the stack.
23.%d – Pops the 1 off the stack and returns it, in ASCII format, to the in–progress
calculation of wJ.
24.%Pq – Pops the 1 off the stack and stores it in the internal variable q.
25.%GWu – This value is already known, so a 1 is again pushed onto the stack.
26.%{3} – Pushes a 3 onto the stack.
27.%< – Pops the 3 and the 1 off the stack and, since 1 is less than 3, pushes a 1 onto the
stack.
28.%t – Pops the 1 off the stack and, since it is a TRUE (non–zero) values, calls for the
evaluation of %gq.
29.%gq – Pushes the value of the internal variable q, a 1, onto the stack.
30.%{1} – Pushes a 1 onto the stack.
31.%= – Pops the two 1 s off the stack, compares them for equality, and pushes the
resultant 1 onto the stack.
32.%t – Pops the 1 off the stack and, since it is a TRUE (non–zero) values, calls for the
evaluation of %{2400}.
33.%{2400} – Pushes a 2400 onto the stack.
Calculating Page Lenght Using Printer Colon File Escape Sequence
A-7
34.%d – Pops the 2400 off the stack and returns it, in ASCII format, to the in–porgress
calculation of _l.
35.%G_v – Pushes a 6 onto the stack.
36.%* – Pops the 6 and the 2400 off the stack, multiplies them together, and pushes the
resultant 14400 onto the stack.
37.%{300} – Pushes a 300 onto the stack.
38.%/ – Pops the 300 and the 14400 off the stack, divides 14400 by 300, and pushes the
resultant 48 onto the stack.
39.%d – Pops the 48 off the stack and returns it, in ASCII format, to the in–progress
determination of ia, the input data stream pipeline for ASCII jobs.
Why the Stack Language Describing Page Length Works
The IBM LaserPrinter 4029 Series Technical Reference contains a figure and a table that
together describe the printable and unprintable areas on a page, and the paper and
envelope dimensions, in pels, for standard paper and envelope sizes. For instance, the
printable area on an 8.5 x 11 (width by length) inch page is 2400 x 3200 pels (width by
length). Note that if the page is rotated either 90 or 270 degrees for landscape printing, the
dimensions are swapped and become 3200 x 2400 pels (width by length).
The evaluation of %IwL begins by checking to see if the l flag was used on the command
line; if it was, then there are no calculations to perform. The requested value will be used.
(That is not a promise that it will work, just that it will be used.) If the l flag was not used on
the command line, then piobe has to figure out how long the page is under the current job
environment, as determined by other command line flags and by colon file defaults.
The first item checked in the evaluation of _l (page length) is page orientation (_z). As noted
above, rotating the page by odd multiples of 90 degrees flips the page dimensions. Looking
at the if–then–else statement that is the beginning of the definition of wY, it can be seen that
the value of _z is a switch that controls which of wJ and wK will be used for page length. If
the page has a portrait orientation, then wK is length. If the page has a landscape
orientation, then wJ is length. After the page length in pels is resolved, the remainder of the
escape sequences in the definition of wY just take vertical line denisty into account while
converting the number of pels to the number of lines.
The wJ attribute is selected because the page orientation is landscape. Thus far all that is
known is that the dimensions have been flipped; what the dimensions actually are is still
unknown. The evaluation of wJ begins by fetching the value (if any) of a command line
usage of the Q flag, which is a printer–dependent value requesting a specific paper size. If
the Q flag was used on the command line, then that value will be used to select the paper
length in pels, otherwise a value for Q will be determined by evaluating Wu, which is a value
for the paper source based on the attributes _O (type of input paper handling) and _u (input
paper source). Note that _Q is defined as %IwQ, whose definition begins with %IWu.
Since Q was not used on the command line, the evaluation of Wu determines that the O flag
wasn’t used either, and so executes the else clause in the outer if–then–else statement in
the definition of Wu, returning the default colon file value of _u, 1, to the evaluation of wQ.
Since this is as deep as the nesting of escape sequences goes for the evaluation of _l, it is
worth taking a closer look at the logic defining Wu. Keep in mind the definitions and legal
values for O, u, and Q, which are:
• O – type of input paper handling – 1 (manual), 2 (continuous forms), 3 (sheet feed) –
default is sheet feed.
• u – input paper source – 1 (primary), 2 (alternate), 3 (envelope) – default is primary.
• Q – paper size for input paper source – values are printer–dependent – defined by
combination of O and u.
A-8
Guide to Printers and Printing
The escape sequences defining Wu say this:
• Case 1: If the O flag was not used on the command line, then return the colon file default
value for _u. For example, if the user did not specify a type of input paper handling, then
return the input paper source (either from the command line or the default from the colon
file) to the evaluation of %IwQ.
• Case 2: If the O flag was used on the command line but its value was not 1, then return
the colon file’s default value for _u. For example, if the user specified a type of input
paper handling other than manual, then return the input paper source (either from the
command line or the default from the colon file) to the evaluation of %IwQ.
• Case 3: If the O flag was used on the command line and its value was 1, and the u flag
was not used on the command line, then return a 0. For example, if the user–specified
manual paper handling but did not specify an input paper source, then return a 0 to the
evaluation of %IwQ.
• Case 4: If the O flag was used on the command line and its value was 1, and the u flag
was used on the command line and its value was not greater than 2, then return a 0. For
example, if the user specified manual paper handling and also specified either the
primary or alternate input paper source, then return a 0 to the evaluation of %IwQ.
• Case 5: If the O flag was used on the command line and its value was 1, and the u flag
was used on the command line and its value was greater than 2, then return a 4, For
example, if the user specified manual paper handling and also specified an input paper
source of envelope, then return a 4 to the evaluation of %IwQ.
The definition of wQ is an if–then–else–then–else–then–else–then–else statement that
repeatedly compares the value of Wu to the integers 0, 1, 2, and 3, looking for a match. The
match selects the value of one of the attriubes s0, s1, s2, s3, or s4, respectively (s4 is
selected when there is no other match). The items these attributes define are as follows:
• s0 – paper size for manual paper feed
• s1 – paper size for tray 1 (upper)
• s2 – paper size for tray 2 (lower)
• s3 – envelope size for envelope feeder
• s4 – envelope size for manual envelope size
In the virtual printer definition for an ASCII queue on an IBM 4029 LaserPrinter, there are
only two unique values for these five attributes: s0, s1, and s2 are all 1, while s3 and s4 are
both 3.
Looking back up the nested escape sequences, you can see that the definition of wJ is
composed of an outer if–then–else statement. Both the if and the else pieces of this
statement contain a chain of if–then–else–then–else... statements. The value of Wu (which
is a value for paper source, based on O and u) determines whether the if or the else piece
of the outer statment executes; if Wu is 1 or 2 (less than 3), then the if piece executes;
otherwise the else piece executes. It is in the final determination of wJ that the page length,
in pels, is fixed.
The if piece of the outer if–then–else statement defining wJ selects a pel value from a range
of non–envelope paper sizes; the else piece of the outer if–then–else statement selects a
pel value from a range of envelope paper sizes. Wu controls which piece of the if–then–else
statement executes but, once either the if or else piece has been chosen, it is the value of Q
that causes a pel value to be selected. The five cases listed above work like this:
Case 1: Either the command line value of u or the default from the colon file (1, primary
paper tray) is returned to the evaluation of wQ. The remaining escape sequences in the
definiton of wQ test the value of Wu and select the value of one of s0, s1, s2, s3, or s4.
That value is in turn returned to the evaluation of wJ. If u is 1 or 2, then Q will be 1
(non–envelope paper size). If u is 3, then Q will be 3 (envelope paper size). When the
evaluation of wJ is resumed, a u value of 1 or 2 will direct the process into the if piece of the
Calculating Page Lenght Using Printer Colon File Escape Sequence
A-9
outer if–then–else statement, and the Q value of 1 will select a page length of 2400 pels. A
u value of 3 will direct the process into the else piece of the outer if–then–else statement,
and the Q value of 3 will select an envelope page length of 1087 pels.
Case 2: Same as case 1.
Case 3: The user–specified manual paper handling on the command line but did not specify
a paper source so Wu is assigned the value 0, and that value is returned to the evaluation
of wQ. The 0 will cause wQ to be assigned the value of s0 (the paper size for manual paper
feed, a 1). When the evaluation of wJ is resumed, the u value of 0 will direct the process
into the if piece of the outer if–then–else statement, and the Q value of 1 (s0) will select a
page length of 2400 pels.
Case 4: The user specified manual paper handling on the command line and also used the
u flag to specify either the primary or alternate paper source (but definitely not envelopes).
As with case 3, a page length of 2400 pels will be chosen.
Case 5: The user–specified manual paper handling on the command line and also used the
u flag to specify an envelope paper source so Wu is assigned the value 4, and that value is
returned to the evaluation of wQ. The 4 will cause wQ to be assigned the value of s4 (the
envelope size for manual envelope size, a 3). When the evaluation of wJ is resumed, the u
value of 4 will direct the process into the else piece of the outer if–then–else statement, and
the Q value of 3 will select an envelope length of 1087 pels.
Our example is case 1: neither the O nor the u flags were used on the command line, so
Wu is assigned a value of 1, the default _u value for this colon file. When the evaluation of
wQ resumes, the match occurs on s1, and a 1 is returned to the evaluation of wJ. The u
value of 1 direct the process into the if piece of the outer if–then–else statement, and the Q
value of 1 selects a page length of 2400 pels. This value is returned to the evaluation of _l.
The remaining printer colon file escape sequences defining _l reason that if there are 2400
pels available (vertically), and if we want six lines per inch, and if there are 300 pels per inch
(the resolution of the printer), then 48 lines can be printed on a page. The value 48 is
returned to the evaluation of ia. That’s basically where the –l48 in the PIPELINE OF
FILTERS came from.
A-10
Guide to Printers and Printing
Appendix B. Calculating Page Width Using Printer
Colon File Escape Sequences
The printer colon file for an ASCII queue on an IBM 4029 LaserPrinter defines page width,
in characters, with the work attribute wW. As formatted by the lsvirprt ( Viewing,
Formatting, or Modifying Virtual Printer Definitions on page 4-121) command, wW is defined
as follows:
Page Width In Characters, Using Width From Data Base (used in
pipelines)
wW = %?%Cw%t%f!w%e%I_w%;
%?
%Cw
%t
%f!w
OUTPUT
%e
%I_w
%;
<IF>
PUSH: (1 If –w Flag on Command Line; Otherwise 0)
<THEN>
For Each Flag x on Command Line: ”–xArgument” –>
<ELSE>
INCLUDE: (COLUMNS per page)
<END>
The %Cw checks to see if the w flag was used on the command line; if it was, then a 1 is
pushed onto the stack, else a 0 is pushed onto the stack. In this case, the w flag was not
used on the command line so a 0 is pushed onto the stack. The %t checks for a true
(non–zero) value on the stack and, not finding one, executes the %e (else) construct %I_w.
The _w attribute is defined as %IwX, shown below as formatted by the lsvirprt command.
Default Page Width (characters)
wX =
%?%G_z%{1}%&%t%GwK%e%GwJ%;%?%G_p%{17}%=%t%{171}%e%G_p%{10}%*%;%*%
?%G_W%t%{6000}%e%{3000}%;%/%d
Calculatin Page Width Using Printer Colon File Escape Sequence
B-1
%?
<IF>
PUSH: (Page ORIENTATION)
PUSH: (Integer Constant 1)
PUSH: (pop2 & pop1) –– Bitwise AND
%t
<THEN>
%GwK
PUSH: (Primary Page Length (–z 0) or Secondary
Page Width (–z
1), in pels)
%e
<ELSE>
%GwJ
PUSH: (Primary Page Width (–z 0) or Secondary Page
Length (–z
1), in pels)
%;
<END>
%?
<IF>
%G_p
PUSH: (PITCH (characters per inch))
%{17}
PUSH: (Integer Constant 17)
%=
PUSH: (pop2 = pop1 ?)
%t
<THEN>
%{171}
PUSH: (Integer Constant 171)
%e
<ELSE>
%G_p
PUSH: (PITCH (characters per inch))
%{10}
PUSH: (Integer Constant 10)
%*
PUSH: (pop2 * pop1)
%;
<END>
%*
PUSH: (pop2 * pop1)
%?
<IF>
%G_W
PUSH: (DOUBLE–WIDE print?)
%t
<THEN>
%{6000}
PUSH: (Integer Constant 6000)
%e
<ELSE>
%{3000}
PUSH: (Integer Constant 3000)
%;
<END>
%/
PUSH: (pop2 / pop1)
%d
POP –> ASCII String –> OUTPUT
%G_z
%{1}
%&
The calculation of _w begins by pushing the value of _z, page orientation, onto the stack.
The job submission command being used in this example, qprt –a1 –Pasc –fp –p12
–scourier –C –N3 /etc/motd, specifies a z value of 1, so a 1 is pushed onto the
stack. The %{1} pushes another 1 onto the stack, after which the %& pops the top two
values (both 1 s) off the stack and performs a bitwise AND with the two values. The result of
the bitwise AND, a 1, is pushed onto the stack.
Note: The test is a bitwise AND instead of a simple test for equality because the legal
values for the z flag are 0, 1, 2, and 3, corresponding to the legal number of 90 degree
rotations that can be applied to a printed page.
The next %t finds a true (non–zero) value on the stack and so the then clause, %GwK, is
resolved before any more work is done resolving _w.
As formatted by lsvirprt, wK is defined as follows:
Primary Page Length (–z 0) or Secondary Page Width (–z 1), in pels
wK =
%G_Q%Pq%?%GWu%{3}%<%t%?%gq%{1}%=%t%{3200}%e%gq%{2}%=%t%{4100}%e%g
q%{3}%=%t%{2935}%e%gq%{4}%=%t%{3407}%e%{3050}%;%e%?%gq%{1}%=%t%{2
150}%e%gq%{2}%=%t%{2562}%e%gq%{3}%=%t%{2750}%e%gq%{4}%=%t%{2498}%
e%gq%{5}%=%t%{2604}%e%{2852}%;%;%d
B-2
Guide to Printers and Printing
%G_Q
%Pq
%?
PUSH: (PAPER SIZE override for input paper source)
POP –> Internal Variable q
<IF>
PUSH: (Calculate value for paper source based on
%GWu
_O and _u.)
%{3}
PUSH: (Integer Constant 3)
%<
PUSH: (pop2 < pop1 ?)
%t
<THEN>
%?
<IF>
%gq
PUSH: (Internal Variable q)
%{1} PUSH: (Integer Constant 1)
%=
PUSH: (pop2 = pop1 ?)
%t
<THEN>
%{3200} PUSH: (Integer Constant 3200)
%e
<ELSE>
%gq
PUSH: (Internal Variable q)
%{2} PUSH: (Integer Constant 2)
%=
PUSH: (pop2 = pop1 ?)
%t
<THEN>
%{4100} PUSH: (Integer Constant 4100)
%e
<ELSE>
%gq
PUSH: (Internal Variable q)
%{3} PUSH: (Integer Constant 3)
%=
PUSH: (pop2 = pop1 ?)
%t
<THEN>
%{2935} PUSH: (Integer Constant 2935)
%e
<ELSE>
%gq
PUSH: (Internal Variable q)
%{4} PUSH: (Integer Constant 4)
%=
PUSH: (pop2 = pop1 ?)
%t
<THEN>
%{3407} PUSH: (Integer Constant 3407)
%e
<ELSE>
%{3050} PUSH: (Integer Constant 3050)
%;
<END>
%e
<ELSE>
%?
<IF>
%gq
PUSH: (Internal Variable q)
%{1} PUSH: (Integer Constant 1)
%=
PUSH: (pop2 = pop1 ?)
%t
<THEN>
%{2150} PUSH: (Integer Constant 2150)
%e
<ELSE>
%gq
PUSH: (Internal Variable q)
%{2} PUSH: (Integer Constant 2)
%=
PUSH: (pop2 = pop1 ?)
%t
<THEN>
%{2562} PUSH: (Integer Constant 2562)
%e
<ELSE>
%gq
PUSH: (Internal Variable q)
%{3} PUSH: (Integer Constant 3)
%=
PUSH: (pop2 = pop1 ?)
%t
<THEN>
%{2750} PUSH: (Integer Constant 2750)
%e
<ELSE>
%gq
PUSH: (Internal Variable q)
%{4} PUSH: (Integer Constant 4)
%=
PUSH: (pop2 = pop1 ?)
%t
<THEN>
%{2498} PUSH: (Integer Constant 2498)
%e
<ELSE>
%gq
PUSH: (Internal Variable q)
%{5} PUSH: (Integer Constant 5)
%=
PUSH: (pop2 = pop1 ?)
%t
<THEN>
%{2604} PUSH: (Integer Constant 2604)
%e
<ELSE>
%{2852} PUSH: (Integer Constant 2852)
%;
<END>
%;
<END>
%d
POP –> ASCII String –> OUTPUT
Calculatin Page Width Using Printer Colon File Escape Sequence
B-3
The calculation of wK begins by pushing the value of _Q, the paper size override for the
input paper source, onto the stack. The value of _Q is defined as %IwQ. At this point in the
calculation of Wk, we are exactly where we were in the calculation of wJ, that is, trying to
determine a value for wQ and Wu. Within the context of a single job submission command,
the final values of wQ and Wu are not going to change just because a final value was
requested from a different attribute calculation. Thus we’ll use the previously calculated
values of 1 for wQ and 1 for Wu.
The 1 returned to the in–progress calculation of wK is the value of _Q, and is pushed onto
the stack. It is immediately popped back off the stack and stored in the internal variable q.
Wu, already determined to be 1, is again pushed onto the stack. %{3} pushes a 3 onto the
stack, then the %< pops the top two values (a 3 and a 1) off the stack and checks to see if
the second value popped is less than the first value popped. 1 is less than 3 today, so a 1 is
pushed onto stack. The %t find the 1 and so enters the if–then–else–then–else–then–else...
sequence looking for an integer to pair with the paper size value calculated for _Q.
The %gq fetches the stored value of _Q from the internal variable q, and pushes it onto the
stack. The %{1} pushes a 1 onto the stack. The %= pops the top two values (two 1 s) off the
stack and, checking them for equality, succeeds; a 1 is pushed onto the stack. The %t finds
the 1 and so evaluates the %{3200}, which pushes a 3200 onto the stack. The calculation of
wK then falls through all but the last line of the remaining printer colon file escape
sequences defining wK. The last escape sequence, %d, pops the top value, 3200, off the
stack and returns it, in ASCII format, to the in–progress calculation of wX.
The 3200 returned to the in–progress calculation of wX is the value of wK, and is pushed
onto the stack. The %GwJ in the else clause is skipped and the %; terminates the
if–then–else sequence. At this point in the calculation of wJ, the remainder of the attribute
definition dealt with factors that affected page length (in lines), such as vertical line density.
In the calculation of page width, however, we will be interested in pitch and in whether or not
double–wide printing was selected.
The next escape sequence evaluated is %G_p. This fetches the value of the _p attribute,
which defines the pitch in characters per inch for this queue. The default value for this
queue is 10 but the command line being used in this example specified a pitch of 12 (–p12),
so a 12 is pushed onto the stack. The %{17} pushes a 17 onto the stack. The %= pops the
top two values (a 17 and a 12) off the stack and, checking them for equality, fails; a 0 is
pushed onto the stack. The %t finds the 0 (a false value) and the following else clause is
evalutated. %G_p again pushes a 12 onto the stack. The %{10} pushes a 10 onto the stack.
The %* pops the top two values (a 12 and a 10) off the stack and multiplies them together;
the resulting 120 is pushed onto the stack. The %; terminates this if–then–else sequence.
The following %* pops the top two values (a 120 and a 3200) off the stack and multiplies
them together; the resulting 384000 is pushed onto the stack. The %G_W fetches the value
of _W and pushes it onto the stack; _W is a yes (1) or no (0) question concering whether or
not double–wide printing is needed. The default value is 0 and we did not override it on the
command line, so a 0 is pushed onto the stack. The %t finds the 0 and so executes the else
clause. The %{3000} pushes a 3000 onto the stack. The %; terminates this if–then–else
sequence. The following %/ pops the top two values (a 3000 and a 384000) off the stack
and divides the second value popped by the first value popped; the resulting 128 is pushed
onto the stack. The %d pops the top value, 128, off the stack and returns it, in ASCII format,
to the in–progress calculation of wW.
The 128 returned to the in–progress calculation of wW is the value of _w. The value of wW
was originally referenced in the determination of the value of the ia attribute, the input
datastream pipeline for ASCII jobs. The number 128 replaces the %IwW in that
determination, so the value of the –! flag to pioformat becomes
/usr/lib/lpd/pio/fmtrs/piof5202 –l48 –w128. The –w128 can be seen in the
original diagnostic message from piobe that was the basis of this discussion; it is part of the
PIPELINE OF FILTERS section of the mail sent by the qdaemon on behalf of piobe.
The following ”Calculation of Page Width” figure depicts the stacks operations (as described
above) used to obtain a final numeric value for page width in characters. The following
B-4
Guide to Printers and Printing
numbered steps correspond to the numbers on the left side of the columns in the figure, and
provide a step–by–step description of the evaluation of the printer colon file escape
sequences defining page width, in characters, for this particular queue (asc), colon file, and
command line.
Figure 7. Calculation of Page Width
1. %Cw – Pushes a 0 onto the stack since the w flag was not used on the command line.
2. %I_w – Calls for the evaluation of _w.
3. %G_z – Pushes a 1 onto the stack.
4. %{1} – Pushes a 1 onto the stack.
5. %& – Pops the top two values (two 1 s) off the stack, performs a bitwise AND on the two
values, and pushes the resultant 1 onto the stack.
6. %t – Pops the 1 off the stack and, since it is a TRUE (non–zero) value, calls for the
evaluation of %GwK.
7. %GwK – Calls for the evaluation of wK.
8. %G_Q – Calls for the evaluation of _Q.
9. %GwQ – Calls for the evaluation of wQ.
10.%GWu – Calls for the evaluation of Wu.
11. %CO – Pushes a 0 onto the stack since the O flag was not used on the command line.
12.%t – Pops the 0 off the stack and, since it is a FALSE (zero) value, calls for the
evaluation of %G_u. The stack labeled Wu is now empty.
13.%G_u – Pushes a 1 onto the stack.
14.%d – Pops the 1 off the stack and returns it, in ASCII format, to the in–progress
calculation of wQ.
15.%{0} – Pushes a 0 onto the stack.
16.%= – Pops the 0 and 1 off the stack, compares them for equality, and pushes the
resultant 0 onto the stack.
17.%t – Pops the 0 off the stack and, since it is a FALSE (zero) value, calls for the
evaluation of %GWu.
Calculatin Page Width Using Printer Colon File Escape Sequence
B-5
18.%GWu – This value is already known, so a 1 is pushed onto the stack.
19.%{1} – Pushes a 1 onto the stack.
20.%= – Pops the two 1 s off the stack, compares them for equality, and pushes the
resultant 1 onto the stack.
21.%t – Pops the 1 off the stack and, since it is a TRUE (non–zero) values, calls for the
evaluation of %Gs1.
22.%Gs1 – Pushes a 1 onto the stack.
23.%d – Pops the 1 off the stack and returns it, in ASCII format, to the in–progress
calculation of wK.
24.%Pq – Pops the 1 off the stack and stores it in the internal variable q.
25.%GWu – This value is already known, so a 1 is pushed onto the stack.
26.%{3} – Pushes a 3 onto the stack.
27.%< – Pops the top two values off the stack (a 3 and a 1) and, since 1 is less than 3,
pushes a 1 onto the stack.
28.%t – Pops the 1 off the stack and, since it is a TRUE (non–zero) value, calls for the
evaluation of %pq.
29.%pq – Pushes the value of the internal variable q, a 1, onto the stack.
30.%{1} – Pushes a 1 onto the stack.
31.%= – Pops the top two values (two 1 s) off the stack, compares them for equality, and
pushes the resultant 1 onto the stack.
32.%t – Pops the 1 off the stack and, since it is a TRUE (non–zero) value, calls for the
evaluation of %{3200}.
33.%{3200} – Pushes a 3200 onto the stack.
34.%d – Pops the 3200 off the stack and returns it to the in–progress calculation of _w.
35.%G_p – Pushes a 12 onto the stack.
36.%{17} – Pushes a 17 onto the stack.
37.%= – Pops the top two values (a 17 and a 12) off the stack, compares them for equality,
and pushes the resultant 0 onto the stack.
38.%t – Pops the 0 off the stack and, since it is a FALSE (zero) value, calls for the
evaluation of %G_p.
39.%G_p – Pushes a 12 onto the stack.
40.%{10} – Pushes a 10 onto the stack.
41.%* – Pops the top two values (a 10 and a 12) off the stack, multiplies them together, and
pushes the resultant 120 onto the stack.
42.%* – Pops the top two values (a 120 and a 3200) off the stack, multiplies them together,
and pushes the resultant 384000 onto the stack.
43.%G_w – Pushes a 0 onto the stack.
44.%t – Pops the 0 off the stack and, since it is a FALSE (zero) value, calls for the
evaluation of %{3000}.
45.%{3000} – Pushes a 3000 onto the stack.
46.%/ – Pops the top two values (a 3000 and a 384000) off the stack, divides the second
value popped by the first value popped, and pushes the resultant 128 onto the stack.
47.%d – Pops the 128 off the stack and returns it, in ASCII format, to the in–progress
calculation of ia, the input data stream pipeline for ASCII jobs.
B-6
Guide to Printers and Printing
Why the Stack Language Describing Page Width Works
The IBM LaserPrinter 4029 Series technical reference contains a figure and a table that
together describe the printable and unprintable areas on a page, and the paper and
envelope dimensions, in pels, for standard paper and envelope sizes. For instance, the
printable area on an 8.5 x 11 (width by length) inch page is 2400 x 3200 pels (width by
length). Note that if the page is rotated either 90 or 270 degrees for landscape printing, the
dimensions are swapped and become 3200 x 2400 pels (width by length).
The evaluation of %IwW begins by checking to see if the w flag was used on the command
line; if it was, then there are no calculations to perform. The requested value will be used.
(That is not a promise that it will work, just that it will be used.) If the w flag was not used on
the command line, then piobe has to figure out how wide the page is under the current job
environment, as determined by other command line flags and by colon file defaults.
The first item checked in the evaluation of _w (page width) is page orientation (_z). As
noted above, rotating the page by odd multiples of 90 degrees flips the page dimensions.
Looking at the if–then–else statement that is the beginning of the definition of wK, it can be
seen that the value of _z is a switch that controls which of wJ and wK will be used for page
width. If the page has a portrait orientation, then wJ is width. If the page has a landscape
orientation, then wK is width. After the page width in pels is resolved, the remainder of the
escape sequences in the definition of wK just take pitch and character–width (double wide
or not) into account while converting the number of pels to the number of characters.
The wK attribute is selected because the page orientation is landscape. Thus far all that is
known is that the dimensions have been flipped; what the dimensions actually are is still
unknown. The evaluation of wK begins by fetching the value (if any) of a command line
usage of the Q flag, which is a printer–dependent value requesting a specific paper size. If
the Q flag was used on the command line, then that value will be used to select the paper
width in pels, otherwise a value for Q will be determined by evaluating Wu, which is a value
for the paper source based on the attributes _O (type of input paper handling) and _u (input
paper source). Note that _Q is defined as %IwQ, whose definition begins with %IWu.
Since Q was not used on the command line, the evaluation of Wu determines that the O flag
wasn’t used either, and so executes the else clause in the outer if–then–else statement in
the definition of Wu, returning the default colon file value of _u, 1, to the evaluation of wQ.
Since this is as deep as the nesting of escape sequences goes for the evaluation of _w, it is
worth taking a closer look at the logic defining Wu. Keep in mind the definitions and legal
values for O, u, and Q, which are:
• O – type of input paper handling – 1 (manual), 2 (continuous forms), 3 (sheet feed) –
default is sheet feed.
• u – input paper source – 1 (primary), 2 (alternate), 3 (envelope) – default is primary.
• Q – paper size for input paper source – values are printer–dependent – defined by
combination of O and u.
The escape sequences defining Wu say this:
• Case 1: If the O flag was not used on the command line, then return the colon file default
value for _u. For example, if the user did not specify a type of input paper handling, then
return the input paper source (either from the command line or the default from the colon
file) to the evaluation of %IwQ.
• Case 2: If the O flag was used on the command line but its value was not 1, then return
the colon file’s default value for _u. For example, if the user–specified a type of input
paper handling other than manual,then return the input paper source (either from the
command line or the default from the colon file) to the evaluation of %IwQ.
• Case 3: If the O flag was used on the command line and its value was 1, and the u flag
was not used on the command line, then return a 0. For example, if the user–specified
Calculatin Page Width Using Printer Colon File Escape Sequence
B-7
manual paper handling but did not specify an input paper source, then return a 0 to the
evaluation of %IwQ.
• Case 4: If the O flag was used on the command line and its value was 1, and the u flag
was used on the command line and its value was not greater than 2, then return a 0. For
example, if the user–specified manual paper handling and also specified either the
primary or alternate input paper source, then return a 0 to the evaluation of %IwQ.
• Case 5: If the O flag was used on the command line and its value was 1, and the u flag
was used on the command line and its value was greater than 2, then return a 4. For
example, if the user–specified manual paper handling and also specified an input paper
source of envelope, then return a 4 to the evaluation of %IwQ.
The definition of wQ is an if–then–else–then–else–then–else–then–else statement that
repeatedly compares the value of Wu to the integers 0, 1, 2, and 3, looking for a match. The
match selects the value of one of the attriubes s0, s1, s2, s3, or s4, respectively (s4 is
selected when there is no other match). The items these attributes define are as follows:
• s0 – paper size for manual paper feed
• s1 – paper size for tray 1 (upper)
• s2 – paper size for tray 2 (lower)
• s3 – envelope size for envelope feeder
• s4 – envelope size for manual envelope size
In the virtual printer definition for an ASCII queue on an IBM 4029 LaserPrinter, there are
only two unique values for these five attributes: s0, s1, and s2 are all 1, while s3 and s4 are
both 3.
Looking back up the nested escape sequences, you can see that the definition of wK is
composed of an outer if–then–else statement. Both the if and the else pieces of this
statement contain a chain of if–then–else–then–else... statements. The value of Wu (which
is a value for paper source, based on O and u) determines whether the if or the else piece
of the outer statement executes; if Wu is 1 or 2 (less than 3), then the if piece executes,
otherwise the else piece executes. It is in the final determination of wK that the page width,
in pels, is fixed.
Case 1: Either the command line value of u or the default from the colon file (1, primary
paper tray) is returned to the evaluation of wQ. The remaining escape sequences in the
definiton of wQ test the value of Wu and select the value of one of s0, s1, s2, s3, or s4.
That value is in turn returned to the evaluation of wK. If u is 1 or 2, then Q will be 1
(non–envelope paper size). If u is 3, then Q will be 3 (envelope paper size). When the
evaluation of wK is resumed, a u value of 1 or 2 will direct the process into the if piece of
the outer if–then–else statement, and the Q value of 1 will select a page width of 3200 pels.
A u value of 3 will direct the process into the else piece of the outer if–then–else statement,
and the Q value of 3 will select an envelope page width of 2750 pels.
Case 2: Same as case 1.
Case 3: The user–specified manual paper handling on the command line but did not specify
a paper source so Wu is assigned the value 0, and that value is returned to the evaluation
of wQ. The 0 will cause wQ to be assigned the value of s0 (the paper size for manual paper
feed, a 1). When the evaluation of wK is resumed, the u value of 0 will direct the process
into the if piece of the outer if–then–else statement, and the Q value of 1 (s0) will select a
page width of 3200 pels.
Case 4: The user–specified manual paper handling on the command line and also used the
u flag to specify either the primary or alternate paper source (but definitely not envelopes).
As with case 3, a page width of 3200 pels will be chosen.
Case 5: The user–specified manual paper handling on the command line and also used the
u flag to specify an envelope paper source so Wu is assigned the value 4, and that value is
returned to the evaluation of wQ. The 4 will cause wQ to be assigned the value of s4 (the
B-8
Guide to Printers and Printing
envelope size for manual envelope size, a 3). When the evaluation of wK is resumed, the u
value of 4 will direct the process into the else piece of the outer if–then–else statement, and
the Q value of 3 will select an envelope width of 2498 pels.
• Our example is case 1: neither the O nor the u flags were used on the command line, so
Wu is assigned a value of 1, the default _u value for this colon file. When the evaluation
of wQ resumes, the match occurs on s1, and a 1 is returned to the evaluation of wK.
The u value of 1 direct the process into the if piece of the outer if–then–else statement,
and the Q value of 1 selects a page width of 3200 pels. This value is returned to the
evaluation of _w.
The remaining printer colon file escape sequences defining _w reason that if there are 3200
pels available (horizontally), and if we want 12 characters per inch, and if the resolution of
printer is 300 pels per inch, then 128 characters can be printed across the page. Both the
pitch and the printer resolution are multiplied by 10 to account for the possibility of a
17–pitch being specified. A 17–pitch is actually 17.1, so multiplying both the numerator and
the denominator by 10 causes the.1 to be accounted for in the final calculation of page
width. The value 128 is returned to the evaluation of ia. That’s basically where the –128 in
the PIPELINE OF FILTERS came from.
Calculatin Page Width Using Printer Colon File Escape Sequence
B-9
B-10
Guide to Printers and Printing
Index
Symbols
/etc/qconfig file structure, 3-12
Numbers
5080 Attachment Adapter, 2-10
A
ASCII files, printing on PostScript printer, 1-16
ASCII terminal, configuring a printer for, 2-21
attachment files, 4-38
printer, 1-2, 2-4
processing, 3-7
routines libqb, 4-32
C
Canon LASER SHOT printer, 4-65
chmod command, 5-8
code sets, multibyte, 4-36
colon files, 4-3, 4-20
limits field operators, 4-42
to add a printer, 4-48
commands
chmod, 5-8
crontab, 5-8
df, 5-5
du, 5-8
enq, 5-7
grep, 5-5
lpq, 5-7
lprm, 5-7
lpstat, 5-5
mkprtldap, 6-43
mount, 5-8
pr, 1-14
ps, 5-4, 5-5
pwd, 5-5
qcan, 1-8, 5-7
qchk, 1-12
qhld, 1-11
qmov, 1-10
qpri, 1-9
qprt, 1-4
rm, 5-5
smit, 1-7
split, 5-7
startsrc, 5-4
commands list, 1-9, 1-12
crontab command, 5-8
D
Dataproducts printers, 4-65
df command, 5-5
du command, 5-8
E
enq command, 5-7
escape sequences
arithmetic operators, 4-16
ASCII output, 4-13
binary output, 4-13
bitwise logical operators, 4-17
command line flags, 4-19
conditional operators, 4-17
description of, 4-13
input values, 4-14
internal variables, 4-16
logical operators, 4-16
pass through from input to output, 4-18
relational operators, 4-16
F
files, formatting for printing, 1-14
filters, formatter, 3-10
G
grep command, 5-5
H
Hewlett–Packard printer information, 4-65
I
IBM printers, 4-51
iconv subroutine, 4-36
L
LDAP
configure server, 6-43
configure storage, 6-43
Lexmark 4227 Forms Printer, 4-69
Lexmark Optra C Color laserprinter, 4-86
Lexmark Optra E Laser Printer, 4-89
Lexmark Optra laserprinter, 4-70
Lexmark Optra N Laser Printer, 4-91
Lexmark Optra Plus laserprinter, 4-72
Lexmark Plus Printers, 4-111
libqb, backend routines, 4-32
local printers, 1-1
lpd
daemon, 2-30
subsystem, 2-34
lpq command, 5-7
lprm command, 5-7
lpstat command, 5-5
M
mount command, 5-8
specifying for <F0>, 2-25
specifying for Hewlett–Packard printers, 2-25
P
piobe command, 2-20
pioout command, 2-20
Index
X-1
PIOTERM environment variables, 2-19
plotter, 2-9
adding support for, 2-10
PostScript printers, printing ASCII files, 1-16
pr command, 1-14
print formatter, example of, 4-24
print jobs
canceling, 1-8
definition, 1-1
displaying status, 1-12
formatting files for, 1-14
holding, 1-11
moving, 1-10
prioritizing, 1-9
releasing, 1-11
scheduling, 2-24
starting, 1-4
print queue
adding, print queue device, 2-10
characteristics, 2-25
clearing, 5-5
deleting, 2-26
device
characteristics, 2-25
deleting, 2-26
listing
print queue devices, 2-21
print queues, 2-21
mounting more space, 5-8
removing a job, 5-7
setting permissions, 5-8
splitting a job, 5-7
starting and stopping, 2-22
status conditions, 2-36
using disk space, 5-8
working with files, 5-8
print server, remote, 2-32, 5-4
print spooler, 1-1
defined, 2-3
printer, 2-8
adding, 2-9
adding an undefined
commands, 2-20
defined, 1-2, 2-4
procedure of using colon file, 4-48
canceling a job, 1-8
characteristics, 2-28
colon files, 4-20
limits field operators, 4-42
commands for the, 2-1
configuring
printer for an ASCII terminal, 2-21
printer port, 2-9
configuring nonsupported, 2-13
control codes, 2-2
control information, 2-2
defined, listing, 2-27
deleting, 2-28
formatter filters, 2-5
local, described, 1-1, 2-4
moving to another port, 2-28
nonsupported, configuring of, 2-13
physical, 3-13
X-2
AIX 5L Version 5.1 Guide to Printers and Printing
port
configuring, 2-8, 2-9
moving printer, 2-28
qdaemon, 1-2
queue, 1-2
queue device, 1-3
real, 1-3
remote
described, 1-3, 2-4
managing, 2-31
showing status of job, 1-9
specific information, 4-50
Canon LASER SHOT, 4-65
Dataproducts printers, 4-65
Hewlett–Packard printers, 4-65
IBM printers, 4-51
Lexmark 4227 Forms Printer, 4-69
Lexmark Optra, 4-70
Lexmark Optra C Color, 4-86
Lexmark Optra E, 4-89
Lexmark Optra N, 4-91
Lexmark Optra Plus, 4-72
Lexmark Plus Printers, 4-111
Printronix printers, 4-112
QMS printers, 4-112
TI printers, 4-112
spooler defined, 1-1, 2-3
starting a job, 1-4
status conditions, 1-13
supported, 4-113
listing, 2-27
terminal–attached, 2-15, 2-19
installing, 2-17
limitations, 2-21
nonsupported terminals, 2-19
terminology, 1-1
virtual, 1-2, 1-3
attributes, described, 4-3
distinguished from real, 2-3
printer code page, translation table, 4-34
printer troubleshooting, 5-1
8–bit printer attached to 7–bit interface, 5-10
adapter considerations, 5-4
inoperative printers, 5-3
local printer checklist, 5-2
qdaemon problems, 5-10
queuing system, 5-12
remote printer checklist, 5-3
terminal–attached printer checklist, 5-9
printing, 1-1, 1-10
ASCII files on PostScript printer, 1-16
formatting files for, 1-14
holding print jobs, 1-11
moving print jobs, 1-10
releasing print jobs, 1-11
printing problems
clearing print queue, 5-5
deleting files, 5-8
reallocating printer resources, 5-7
Printronix printers, 4-112
processing, backend, 3-7
ps command, 5-4, 5-5
pwd command, 5-5
Q
qcan command, 1-8, 5-7
qchk command, 1-12
qconfig file, 2-31
qdaemon, 1-2
checklist, 5-10
overview, 1-2
restarting, 5-12
qhld command, 1-11
qmov command, 1-10
QMS printers, 4-112
qpri command, 1-9
qprt command, 1-4
using X fonts with, 4-37
queue
device, 1-3
print, 1-3
queue daemon, 5-12
reactivating, 5-4
queuing system, status conditions, 2-36
specifying for Hewlett–Packard printers,
2-25
printing, control of, 1-4
SMIT (System Management Interface Tool)
interface to printer attachment files, 4-38
sm_cmd_obj object class, used with printer
files, 4-42
smit command, 1-7
smit mount command, 5-8
split command, 5-7
spooler, 2-3, 3-1
configuration file, etc/qconfig file structure, 3-12
data flow, 3-5
parts, 3-4
queues, 3-13
terminology, 3-1
spooling directory
mounting more space, 5-8
setting permissions, 5-8
working with files, 5-8
startsrc command, 5-4
R
T
real printers, 1-3
rembak program, 2-29
remote host
adding, 2-33
removing, 2-33
remote print server, 5-4
remote printer
checklist, 5-3
managing, 2-31
remote printers, 1-3
remote printing
overview, 2-29
remote host access, 2-33
rm command, 5-5
RS–232 adapter, printer considerations, 5-4
terminal–attached printer, checklist, 5-9
terminal–attached printing, 2-15, 2-17, 2-21
hardware supported, 2-15
nonsupported terminals, 2-19
using a modem, 2-19
terminfo database, 2-19
TI printers, 4-112
translation tables
example, 4-38
multibyte code sets, 4-36
troubleshooting, printer, 5-1
S
W
SMIT
printer paper size
specifying for <F0>, 2-25
Web–based System Manager, 1-11, 2-1, 2-2
V
virtual printers, 3-10
attributes described, 4-3
Index
X-3
X-4
AIX 5L Version 5.1 Guide to Printers and Printing
Vos remarques sur ce document / Technical publication remark form
Titre / Title :
Bull AIX 5L Guide to Printers and Printing
Nº Reférence / Reference Nº :
86 A2 30EF 01
Daté / Dated :
October 2002
ERREURS DETECTEES / ERRORS IN PUBLICATION
AMELIORATIONS SUGGEREES / SUGGESTIONS FOR IMPROVEMENT TO PUBLICATION
Vos remarques et suggestions seront examinées attentivement.
Si vous désirez une réponse écrite, veuillez indiquer ci-après votre adresse postale complète.
Your comments will be promptly investigated by qualified technical personnel and action will be taken as required.
If you require a written reply, please furnish your complete mailing address below.
NOM / NAME :
SOCIETE / COMPANY :
ADRESSE / ADDRESS :
Remettez cet imprimé à un responsable BULL ou envoyez-le directement à :
Please give this technical publication remark form to your BULL representative or mail to:
BULL CEDOC
357 AVENUE PATTON
B.P.20845
49008 ANGERS CEDEX 01
FRANCE
Date :
Technical Publications Ordering Form
Bon de Commande de Documents Techniques
To order additional publications, please fill up a copy of this form and send it via mail to:
Pour commander des documents techniques, remplissez une copie de ce formulaire et envoyez-la à :
BULL CEDOC
ATTN / Mr. L. CHERUBIN
357 AVENUE PATTON
B.P.20845
49008 ANGERS CEDEX 01
FRANCE
Phone / Téléphone :
FAX / Télécopie
E–Mail / Courrier Electronique :
+33 (0) 2 41 73 63 96
+33 (0) 2 41 73 60 19
[email protected]
Or visit our web sites at: / Ou visitez nos sites web à:
http://www.logistics.bull.net/cedoc
http://www–frec.bull.com
http://www.bull.com
CEDOC Reference #
No Référence CEDOC
Qty
Qté
CEDOC Reference #
No Référence CEDOC
Qty
Qté
CEDOC Reference #
No Référence CEDOC
__ __ ____ _ [__]
__ __ ____ _ [__]
__ __ ____ _ [__]
__ __ ____ _ [__]
__ __ ____ _ [__]
__ __ ____ _ [__]
__ __ ____ _ [__]
__ __ ____ _ [__]
__ __ ____ _ [__]
__ __ ____ _ [__]
__ __ ____ _ [__]
__ __ ____ _ [__]
__ __ ____ _ [__]
__ __ ____ _ [__]
__ __ ____ _ [__]
__ __ ____ _ [__]
__ __ ____ _ [__]
__ __ ____ _ [__]
__ __ ____ _ [__]
__ __ ____ _ [__]
__ __ ____ _ [__]
Qty
Qté
[ _ _ ] : no revision number means latest revision / pas de numéro de révision signifie révision la plus récente
NOM / NAME :
Date :
SOCIETE / COMPANY :
ADRESSE / ADDRESS :
PHONE / TELEPHONE :
FAX :
E–MAIL :
For Bull Subsidiaries / Pour les Filiales Bull :
Identification:
For Bull Affiliated Customers / Pour les Clients Affiliés Bull :
Customer Code / Code Client :
For Bull Internal Customers / Pour les Clients Internes Bull :
Budgetary Section / Section Budgétaire :
For Others / Pour les Autres :
Please ask your Bull representative. / Merci de demander à votre contact Bull.
PLACE BAR CODE IN LOWER
LEFT CORNER
BULL CEDOC
357 AVENUE PATTON
B.P.20845
49008 ANGERS CEDEX 01
FRANCE
ORDER REFERENCE
86 A2 30EF 01
Utiliser les marques de découpe pour obtenir les étiquettes.
Use the cut marks to get the labels.
AIX
AIX 5L Guide to
Printers and
Printing
86 A2 30EF 01
AIX
AIX 5L Guide to
Printers and
Printing
86 A2 30EF 01
AIX
AIX 5L Guide to
Printers and
Printing
86 A2 30EF 01