1
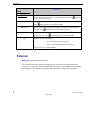
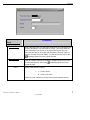
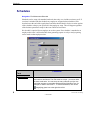
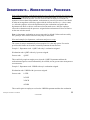
TimExpress™ JobTraK™ User Manual TimExpress JobTraK User Guide . 285 Davidson Ave., Suite 302 • Somerset, NJ 08873 Telephone: 732-560-1377 • Outside NJ 800-524-0430 Fax: 732-560-1594 Internet address: http://www.tbred.com Published by: Thoroughbred Software International, Inc. for ESMI 285 Davidson Ave., Suite 302 Somerset, New Jersey 08873-4153 Copyright 200 by ESMI Licensed by ESMI All rights reserved. No part of the contents of this document may be reproduced or transmitted in any form or by any means without the written permission of the publisher. Document Number: S4JTM001 TimExpress and JobTraK are trademarks of ESMI. The Thoroughbred logo, Swash logo, and Solution-IV Accounting logo, THOROUGHBRED, IDOL, OPEN WORKSHOP, and VIP VISUAL IMAGE PRESENTATION are registered trademarks of Thoroughbred Software International, Inc. Thoroughbred Basic, Thoroughbred Environment, OPENworkshop, IDOL-IV, Inquire-IV, Dictionary-IV, Script-IV, Report-IV, Query-IV, Source-IV, TS Network DataServer, TS ODBC DataServer, TS ODBC R/W DataServer, TS ORACLE DataServer, VIP (Visual Image Presentation), VIP for Dictionary-IV, VIP4, GWW, Gateway for Windows™, TS ChartServer, TS ReportServer, TS WebServer, TbredComm, WorkStation Manager, Solution-IV, Solution-IV Reprographics, TS/Xpress, and DataSafeGuard are trademarks of Thoroughbred Software International, Inc. MS-DOS, Xenix, Windows, Microsoft Windows 98, Windows 2000, NT, and XP are trademarks of Microsoft Corp. IBM, IBM PC, OS/2, PS/2, and PC-DOS are trademarks of International Business Machines Corp. DEC, OPEN VMS, and ULTRIX are trademarks of Digital Equipment Corp. UNIX is a trademark licensed exclusively through X/Open Company LTD.Novell is a registered trademark of Novell, Inc. Oracle is a registered trademark of Oracle Systems Corporation InstallShield is a registered trademark of Stirling Technologies, Inc. Other names, products and services mentioned are the trademarks or registered trademarks of their respective vendors or organizations. Table of Contents SYSTEM SUMMARY 1 Features, Procedures and Notes ....................................................................................................................1 Time and Work Order Entry.........................................................................................................................2 Touch Screen ................................................................................................................................................2 Barcode Scanning .........................................................................................................................................3 CODE FILE MAINTENANCE AND SETUP 5 Employees ....................................................................................................................................................5 Foremen........................................................................................................................................................6 Schedules......................................................................................................................................................8 DEPARTMENTS – WORKSTATIONS - PROCESSES 11 Departments................................................................................................................................................12 Workstations...............................................................................................................................................13 Processes.....................................................................................................................................................14 SYSTEM SETUP 17 System Parameters......................................................................................................................................17 Grace Minutes ............................................................................................................................................18 REPORT MENU 19 Work Order Reports ...................................................................................................................................20 Cost Report (Detail) ............................................................................................................................22 Progress Report (Detail) ......................................................................................................................23 Active Report (Detail) .........................................................................................................................23 Time & Attendance Reports .......................................................................................................................24 Attendance Report ...............................................................................................................................25 Attendance Variations .........................................................................................................................26 Missing Attendance .............................................................................................................................27 History Comparison.............................................................................................................................27 File Maintenance Listing Reports...............................................................................................................28 Employee Listing Report.....................................................................................................................28 Foreman Listing Report.......................................................................................................................28 Schedule Listing Report .............................................................................................................................29 Department Listing Report..................................................................................................................29 Workstation Listing Report .................................................................................................................30 Process Listing Report.........................................................................................................................30 SYSTEM SUMMARY JobTraK work order tracking is designed for your employees to conveniently track their time throughout the workday, on single and multiple jobs and to automatically record their time into the system for reporting purposes. Tracking time, work orders, scheduling and payment of employees is streamlined to save time and expense. The system is divided into two (2) sections Shop Floor work order tracking and Time & Attendance. The systems are integrated so that each part enhances the other. “Direct” employees will use the Shop Floor portion of the system and “Indirect” employees will use the Time & Attendance portion of the system. The system will route them to the correct input screen automatically. Time is tracked, checked, and automatically imported into the payroll system when payroll is run. In addition to the basic system functions, the data collected from this reporting system provides for the output of a variety of displays and printed reports that facilitate the analysis of job and operations cost. All transactions are archived to provide an in-depth history that can be analyzed to improve cost estimates in quoting special jobs. The setup of the system should be carefully planned to provide for the quality of the information generated and for the system to work smoothly with your existing work routines. Features, Procedures and Notes Break down of time – If an employee works on a single work order all day all the employee time for that day is applied against that work order. An employee may concurrently work on different jobs throughout the day, each job starting and stopping at different or the same time. The work order tracking system keeps track of these changes and “splits” the time among the active processes for each employee. If 3 jobs are worked on for one hour each job is “charged” for 20 minutes of the employees time. After the job is completed a precise cost for the workstation and employee time can be generated through the reports section. Payroll Interfacing – Once the employees’ time is in the system a report can be printed that shows each employees time for the period selected. Changes or adjustments can be easily made. If the Solution IV payroll is used, the time is directly imported into the system when the payroll is run. All open job-steps are displayed where the system is accessed. It is important to “End” job steps immediately on completion of each step to assure accurate time distribution to jobs. 1 TimExpress JobTrack User Manual © 200 ESMI Time and Work Order Entry IMPORTANT: Please read carefully through the department, workstation and process steps prior to setting them up. Time and Work Order Entry The touch screen and barcode interfaces allow the employees to quickly enter data. Scanning work orders and employee badges and not entering them manually helps to eliminate data entry errors. This is also a more efficient method and minimizes the time required to execute time keeping routines. Touch Screen Using a touch screen eliminates the need for employees to “know how to use a computer”. They simply select the correct button from the screen. All interaction is simplified and quick. The touch screen is a graphical interface. This will reduce training time for new employees on the use of the system. Since they can “see” their choices and the system leads them to the next selection the learning curve is minimal. 2 Solution-IV Accounting © 200 ESMI Barcode Scanning Barcode Scanning Error Free - Barcode scanning is a virtually error free method of entering data. Simply scan the work order barcode and the Work Order tracking system begins to track data related to that work order. Speed - Barcode scanning also speeds entry of data. No keyboard to punch numbers into, no need to remember the work order number or employee ID number. 3 TimExpress JobTraK User Manual © 200 ESMI Barcode Scanning 4 Solution-IV Accounting © 200 ESMI CODE FILE MAINTENANCE AND SETUP Employees Navigation: Employees “Direct” type employees are the employees whose work is directly related to a work order. They perform specific tasks for the process to produce a product. (i.e. graphics designer, printer, etc.) If they are assigned as direct employees they will be using the shop floor portion of the system and checking into and out of jobs. “Indirect” type employees do not directly produce an item. They can work on the shop floor but do not work directly on the items being produced. (i.e. supervisor, secretary, etc.) 5 TimExpress JobTrack User Manual © 200 ESMI Foremen Comments FIELD Employee Code Enter a 10-digit employee ID number. To view all employees, click on the glass icon to the right of the field. Schedule Here you may choose a schedule to assign to the employee. To view all schedules, click on the Earning Code magnifying glass icon to the right of the field. Here you may choose an earning code to assign to the employee. To view all earnings magnifying glass icon to the right of the field. types, click on the Overtime Code Here you may choose an overtime earning code to assign to the employee. To view all earnings types, click on the Type magnifying magnifying glass icon to the right of the field. Specify the type of employee this is: • Direct – Works directly on item production • Indirect – Does not work directly on item production (See notes above for a further explanation) Foremen Navigation: File Maintenance/Foreman The foreman code allows you to sort employees by the supervisory personnel they are assigned to. Codes may 1-6 digits and should be descriptive of the department or area they are assigned to. The employee assigned to this code may be changed when necessary. 6 Solution-IV Accounting © 200 ESMI Foremen Comments FIELD Foreman Code Enter a foreman Code. You may enter a maximum of 6 characters, both numbers and letters. The code must be unique - you cannot have the same code twice. You can set up as many codes as you like. Use codes that are easy to remember and describe the foreman Type, for example: for Shop floor enter SHOP. To view all foremen, click on the magnifying glass icon to the right of the field. Employee Code Enter the 10-digit employee ID number to assign to this foreman code . To view all employees, click on the right of the field. Active magnifying glass icon to the Specify if the foreman is active: • Y – Code is active • N – Code is not active (When the code is inactive it will not show up as a selection choice.) 7 TimExpress JobTraK User Manual © 200 ESMI Schedules Schedules Navigation: File Maintenance/Schedule Schedules can be setup with standard workweek time only or to include overtime as well. If overtime is included with the schedule any employees assigned to that schedule will be checked out at the end of the regular hours and then checked back in for the overtime portion of the schedule at the pay rate specified in the employees setup. This will happen regardless of the business parameters setup for the Auto Check In/Out feature. No schedule is required for an employee to use the system. If no schedule is attached to an employee their time is still tracked but when generating reports no early or tardy reporting can be made on that employees time. Comments FIELD Schedule Code Enter a Schedule Code. You may enter a maximum of 6 characters, both numbers and letters. The code must be unique - you cannot have the same code twice. You can set up as many codes as you like. Use codes that are easy to remember and describe the Schedule Type, for example: for Shift 1 enter SHFT1. To view all schedules, click on the magnifying glass icon to the right of the field. 8 Solution-IV Accounting © 200 ESMI Schedules Description Start/End Times Overtime Employees Needed Days of the Week Active Enter a description of the schedule. You may enter a maximum of 35 characters, both numbers and letters. Enter the starting and ending time of the schedule for each event. If there is overtime on this schedule specify when the overtime ends. The overtime will automatically start when the regular schedule ends. (See notes above) N/A – For future use with Scheduling Module. Specify which days of the week the schedule is active. A in the box designates the schedule is active that day. checkmark Specify if the schedule is active: • Y – Code is active • N – Code is not active (When the code is inactive it will not show up as a selection choice.) 9 TimExpress JobTraK User Manual © 200 ESMI Schedules 10 Solution-IV Accounting © 200 ESMI DEPARTMENTS – WORKSTATIONS - PROCESSES Setup of the departments, workstations and processes is the most critical for the effective use of the system. Although the system will handle an unlimited number of each type only 10 will fit on the touch screen at one time. (an extra touch will enable an employee to select the 11th department.) If more than 10 departments, workstations or processes are entered, care should be taken to arrange them so that they appear with the 10 most used first. (I.e. 1-Prnt, 2-Bind, etc.) After the employee selects the department only the workstations assigned to that department will show as choices on the next selection touch screen. After the employee selects the workstation only the processes assigned to that workstation will show as choices on the next selection screen. Note: A department, workstation or process may only be deleted if it has not been used by the system yet. After it has been used it may only be inactivated. Hints and examples for department, workstation and process setup. The system is setup to automatically select an option if it is the only option. For certain processes this feature can be used to essentially automate the touch screen. Example 1: Department code: 1-QPRT with only 1 workstation assigned. Workstation code: Q-PRT with only 1 process assigned. Process code: Q-PRT This would only require an employee to select the 1-QPRT department and then the workstation and process would automatically be selected (the only options under that department and workstation). Example 2: Department code: 2-BIND with ony1 workstation assigned. Workstation code: Z-BIND with 4 processes assigned. Process code: 1-STPL 2-GLUE 3-PNCH 4-FLDR This would require an employee to select the 2-BIND department and then the workstation 11 TimExpress JobTrack User Manual © 200 ESMI Departments would automatically be selected, (the only option under that department) then the employee would select the process from the 4 options shown. Departments Navigation: File Maintenance/Departments Departments are the top tier in the selection and reporting process. Prior to entering the departments care should be taken to determine the grouping of all departments, workstations, and processes. See note above. It would be a good idea to write out in outline form the hierarchy you will use before entering the data. Comments FIELD Department Code Enter a Department Code. You may enter a maximum of 6 characters, both numbers and letters. The code must be unique - you cannot have the same code twice. You can set up as many codes as you like. Use codes that are easy to remember and describe the Department, for example: for the copy department, enter COPY. To view all departments, click on the field. Description magnifying glass icon to the right of the Enter a description of the department. You may enter a maximum of 35 characters, both numbers and letters. 12 Solution-IV Accounting © 200 ESMI Workstations Active Specify if the department is active: • Y – Code is active • N – Code is not active (When the code is inactive it will not show up as a selection choice.) Workstations Navigation: File Maintenance/Workstations Workstations are the center tier in the selection and reporting process. Prior to entering the workstations care should be taken to determine the grouping of all departments, workstations, and processes. See note above. It would be a good idea to write out in outline form the hierarchy you will use before entering the data. Comments FIELD Workstation Code Enter a Workstation Code. You may enter a maximum of 6 characters, both numbers and letters. The code must be unique - you cannot have the same code twice. You can set up as many codes as you like. Use codes that are easy to remember and describe the Workstation, for example: for a color copier enter CLRCPY. To view all workstations, click on the magnifying glass icon to the right of the field. 13 TimExpress JobTraK User Manual © 200 ESMI Processes Description Enter a description of the workstation. You may enter a maximum of 35 characters, both numbers and letters. Cost per hour Enter the cost per hour of this workstation. This is the direct cost of the machine. (i.e. lease, mortgage cost / hours per month maximum run time.) Overhead Amount Enter the overhead cost amount of this workstation. This is the indirect cost of the machine. It should include a portion of the entire overhead of the company or plant. Department Code Enter a Department Code to assign this workstation to. To view all departments, click on the field. Active magnifying glass icon to the right of the Specify if the workstation is active: • Y – Code is active • N – Code is not active (When the code is inactive it will not show up as a selection choice.) Processes Navigation: File Maintenance/Processes Processes are the bottom tier in the selection and reporting process. Prior to entering the processes care should be taken to determine the grouping of all departments, workstations, and processes. See note above. It would be a good idea to right out in outline form the hierarchy you will use before entering the data and also to consider which task you may wish to group as one process and which task will be considered a single process. 14 Solution-IV Accounting © 200 ESMI Processes Comments FIELD Process Code Enter a Process Code. You may enter a maximum of 6 characters, both numbers and letters. The code must be unique - you cannot have the same code twice. You can set up as many codes as you like. Use codes that are easy to remember and describe the process, for example: for brochure design enter BDESGN. To view all processes, click on the Description Workstation Code magnifying glass icon to the right of the field. Enter a description of the process. You may enter a maximum of 35 characters, both numbers and letters. Enter a Workstation Code to assign this process to. To view all workstations, click on the field. Active magnifying glass icon to the right of the Specify if the process is active: • Y – Code is active • N – Code is not active (When the code is inactive it will not show up as a selection choice.) 15 TimExpress JobTraK User Manual © 200 ESMI Processes 16 Solution-IV Accounting © 200 ESMI SYSTEM SETUP Navigation: File Maintenance/TimExpress Parameters Care should be taken when choosing the Auto Check In/Out, Auto Lunch In/Out and the Track break settings. The system will use these choices to activate certain screen choices and buttons. (I.E. Tracking breaks requires 2 more buttons on the screen. Start Break & End Break). Also if the auto settings are not activated and an employee forgets a swipe the system does not know the status of that employee. System Parameters Comments FIELD TimExpress Printer Day/Start of Week Enter the default printer for TimExpress reports. Enter the workweek start date. This is used for reporting purposes. Shut-Down ID This is the ID number that will allow shut down of the Touch Screen. Touch Screen Turn on/off the Touch Screen functionality. If this is off screen buttons will have the appropriate keyboard value listed to allow employees to 17 TimExpress JobTrack User Manual © 200 ESMI Grace Minutes will have the appropriate keyboard value listed to allow employees to use a keyboard for the functions. Auto Check Out Auto Lunch In/Out Track Breaks Turn on/off the functionality to have TimExpress automatically check employees out at the end of workday, if you only want employees to punch in. Turn on/off the functionality to have TimExpress automatically check in and out for lunch breaks. Turn on/off the functionality to have the system track breaks. Grace Minutes Comments FIELD Before and After Grace Minutes Enter the different grace periods for each event. For example if when an employee punches in for work at 8:09 and you don’t want to dock their pay you can set up 10 grace minutes and the system will roll back their time to 8:00. 18 Solution-IV Accounting © 200 ESMI REPORT MENU The following reports can be printed from TimExpress: When printing reports in TimExpress if no printer is setup in the TimExpress parameters you have the option to view on the screen or print: Select No to Print to Screen Select Printer and Click OK. 19 TimExpress JobTrack User Manual © 200 ESMI Work Order Reports Work Order Reports Navigation: File Maintenance/Work Order Reports All reports have both a summary and a detail option. Several filtering options are given as well as any range of valid dates. Comments FIELD Report Type Select the report type by using the drop down arrow: • Cost • Progress • Active 20 Solution-IV Accounting © 200 ESMI Work Order Reports Date Range Additional option Work Order Select the Date Range for your report: • Today • Yesterday • This Week • Last Week • This Month • Last Month • Custom - enter specific Start and End Dates Additional selection option for reports dates. You may enter a work order number for a specific work order you want magnifying to print the report for. To view all work orders, click the glass icon to the right of the field. The system default is All to print the report for all work orders. Customer You may enter a customer code number for a specific customer you want to print the report for. To view all customers, click the magnifying glass icon to the right of the field. The system default is All to print the report for all customers. Item You may enter an item code for a specific inventory item you want to print the report for. To view all items in inventory, click the magnifying glass icon to the right of the field. The system default is All to print the report for all items. Employee You may enter an employee ID number for a specific employee you want to print the report for. To view all employees, click the magnifying glass icon to the right of the field. The system default is All to print the report for all employees. Schedule You may enter schedule for a specific schedule you want to print the magnifying glass icon to report for. To view all schedules, click the the right of the field. The system default is All to print the report for all schedules. Earning Code You may enter an earning type you want to print the report for. To view 21 TimExpress JobTraK User Manual © 200 ESMI Work Order Reports all earnings types, click the magnifying glass icon to the right of the field. The system default is All to print the report for all earnings types. Detail On When the detail box is checked will be printed. , details of the individual processes Cost Report (Detail) Cost report – Gives a break down of the workstation time and employee time spent on each process for a work order. This is then summarized at the end as a total cost of work order and average cost per item produced. (I.E. $500 total cost on 1000 color copies: .50 per item) 22 Solution-IV Accounting © 200 ESMI Work Order Reports Progress Report (Detail) Progress report – Similar to the cost report but shows only the processes and time for a work order. Active Report (Detail) Active report – Shows the work orders being worked on at this time in the system. 23 TimExpress JobTraK User Manual © 200 ESMI Time & Attendance Reports Time & Attendance Reports Navigation: Reports/Attendance Reports Comments FIELD Report Type Date Range Select the report type by using the drop down arrow: • Attendance • Variations • Absent • History Comparison Select the Date Range for your report: • Today • Yesterday 24 Solution-IV Accounting © 200 ESMI Time & Attendance Reports Employee • This Week • Last Week • This Month • Last Month • Custom - enter specific Start and End Dates You may enter an employee ID number for a specific employee you want to print the report for. To view all employees, click the magnifying glass icon to the right of the field. The system default is All to print the report for all employees. Schedule You may enter schedule for a specific schedule you want to print the magnifying glass icon to report for. To view all schedules, click the the right of the field. The system default is All to print the report for all schedules. Earning Code You may enter an earning type you want to print the report for. To view magnifying glass icon to the right of the all earnings types, click the field. The system default is All to print the report for all earnings types. Attendance Report Navigation: File Maintenance/Attendance Reports 25 TimExpress JobTraK User Manual © 200 ESMI Time & Attendance Reports Attendance Variations 26 Solution-IV Accounting © 200 ESMI Time & Attendance Reports Missing Attendance History Comparison This report compares the current time record and shows all single swipe records that make up that record. 27 TimExpress JobTraK User Manual © 200 ESMI File Maintenance Listing Reports File Maintenance Listing Reports Employee Listing Report Navigation: Reports/Employee Listing Foreman Listing Report Navigation: Reports/Foreman Listing 28 Solution-IV Accounting © 200 ESMI Schedule Listing Report Schedule Listing Report Navigation: Reports/Schedule Listing Department Listing Report Navigation: Reports/Department Listing 29 TimExpress JobTraK User Manual © 200 ESMI Schedule Listing Report Workstation Listing Report Navigation: Reports/Workstation Listing Process Listing Report Navigation: Reports/Process Listing 30 Solution-IV Accounting © 200 ESMI Schedule Listing Report 31 TimExpress JobTraK User Manual © 200 ESMI Schedule Listing Report 32 Solution-IV Accounting © 200 ESMI USA: Corporate Headquarters Thoroughbred Software International, Inc. 285 Davidson Ave Somerset, NJ 08873 USA Inside New Jersey Tel: (732) 560-1377 Outside New Jersey Tel: (800) 524-0430 Fax: (732) 560-1594 Internet: http://www.tbred.com e-mail: [email protected] [email protected] [email protected] t United Kingdom: International Headquarters Thoroughbred Europe Ltd. 11 Ashton Gate, Ashton Road Harold Hill, Romford Essex, RM3 8UF England Tel: +44 1708 384084 Fax: +44 1708 384499 e-mail: [email protected] S4JTM001