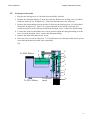
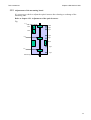
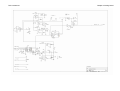
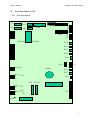
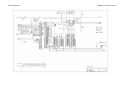
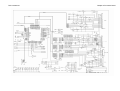
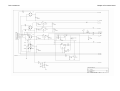
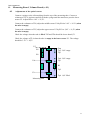
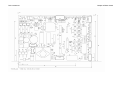
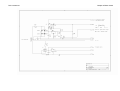
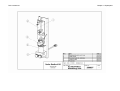
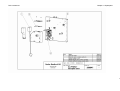
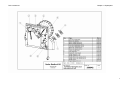
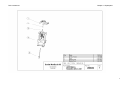
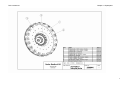
1
Dok nr 00920-01
SERVICE MANUAL
AC920 / AC970EO+
Dok nr 00920-01
1.
1.1
1.2
1.3
1.4
1.5
1.6
1.7
1.8
1.9
1.10
1.11
1.12
1.13
1.14
1.15
1.16
2.
2.1
2.2
3.
3.1
3.2
3.3
3.4
3.5
3.6
3.7
3.8
3.9
3.10
3.11
3.12
3.13
3.14
3.15
3.16
3.17
3.18
3.19
3.20
3.21
3.22
3.23
3.24
3.25
Service menu (v 01)
1
WBC transfer time setup ...................................................................................................................1
Flush pump time setup.......................................................................................................................1
Sample pump time setup....................................................................................................................2
Pump and valve test ...........................................................................................................................2
HGB LED adjustments ......................................................................................................................2
Volume detector test ..........................................................................................................................3
Reagent detector test..........................................................................................................................3
Diluent Syringe motor test.................................................................................................................3
Vacuum pump motor test...................................................................................................................4
Needle motor test AC920EO+...........................................................................................................4
Needle motor test AC970EO+...........................................................................................................4
High altitude compensation setup......................................................................................................5
Blood detector setup ..........................................................................................................................5
Set power line frequency ...................................................................................................................5
Printer port status...............................................................................................................................5
Print machine statistics ......................................................................................................................6
Flow system (v 01)
1
Flow sequence ...................................................................................................................................1
Flow diagram .....................................................................................................................................3
Mechanical Units (v 01)
1
Air pump............................................................................................................................................1
Adjustment of the air valve................................................................................................................1
Exchange of the air filter. ..................................................................................................................2
Mixing beaker Mix1 and Mix2..........................................................................................................2
Blood sensor ......................................................................................................................................3
Exchange of the blood sensor. ...........................................................................................................3
Electric control of the blood sensor ...................................................................................................3
Cap piercer AC920EO+.....................................................................................................................4
Exchange of the needle. .....................................................................................................................5
Cap piercer AC970EO+.....................................................................................................................6
Exchange of the needle in AC970EO+..............................................................................................7
Exchange of the sealing for the needle house....................................................................................7
Adjustment of the sensor plate for the optical sensor. .......................................................................8
Flush and Drain pump .......................................................................................................................9
Exchange of the pumps, cleaning of the pump house......................................................................10
Adjustment of the flush-pump. ........................................................................................................10
Magnetic valves (MV) .....................................................................................................................10
Exchange of magnetic valves ..........................................................................................................11
Test of the magnetic valves .............................................................................................................11
Measuring tube ................................................................................................................................11
Exchange or cleaning of the measuring tube ...................................................................................12
Adjustments of the measuring board ...............................................................................................13
Transducer .......................................................................................................................................14
Exchange or cleaning of the transducer ...........................................................................................14
Peristaltic pumps..............................................................................................................................15
1
Dok nr 00920-01
3.26
3.27
3.28
3.29
3.30
3.31
3.32
3.33
3.34
3.35
3.36
3.37
4.
4.1
5.
5.1
5.2
6.
6.1
6.2
7.
7.1
7.2
8.
8.1
8.2
8.3
9.
9.1
9.2
10.
10.1
11.
11.1
11.2
12.
12.1
12.2
13.
13.1
13.2
13.3
Exchange of pump tubing ................................................................................................................15
Adjustment of the sample pump time ..............................................................................................15
Vacuum pump..................................................................................................................................16
Exchange of the membrane in the vacuum pump............................................................................17
Adjustments of the counting time....................................................................................................17
Rotary valve.....................................................................................................................................18
Exchange/cleaning of the rotary valve, rubber stocking..................................................................19
Syringes ...........................................................................................................................................20
Exchange of pistons and cylinders...................................................................................................22
Adjustments of the volume and the upper end position...................................................................22
Drain valve MV7 .............................................................................................................................22
Exchange of the membrane or valve and cleaning of the valve.......................................................23
Analog board (v 01)
1
Adjustments of the analog board .......................................................................................................1
Processor board (v 01)
1
Processor board..................................................................................................................................1
Processor board diagram....................................................................................................................2
Measuring Board, Volume Board (v 01)
9
Adjustments of the optical sensors ....................................................................................................9
Measuring board Diagram ...............................................................................................................10
Display (v 01) 11
Display layout..................................................................................................................................11
Display Diagram..............................................................................................................................12
Diluter board (v 01)
1
Adjustments of the Diluterboard........................................................................................................1
Diluter board layout...........................................................................................................................2
Diluter board Diagram .......................................................................................................................4
Sensor board (v 01)
1
Adjustments of the Sensorboard AC970EO+ ....................................................................................1
Sensor board Diagram .......................................................................................................................4
Serial Computer (v 01)
1
Serial Computer Data Format ............................................................................................................1
Spareparts (v 01)
1
Sparepart drawings ............................................................................................................................1
Sparepartlist .......................................................................................................................................1
Spareparts for yearly maintenance (v 01) 1
Spareparts for yearly maintenance (approx. 50 samples per day) .....................................................1
Instruction for yearly maintenance AC920/970eo+...........................................................................2
Trouble shooting (v 01)
6
Trouble shooting guide ......................................................................................................................6
Error indications ................................................................................................................................8
Warning flags.....................................................................................................................................9
2
Dok nr 00920-01
1.
1.1
Chapter 1 Service Menu
Service menu (v 01)
WBC transfer time setup
This function is used to adjust the volume of WBC/HGB dilution to be transferred from the
mixing beaker 2 to the counting beaker. The time shall be adjusted to give a small remaining
volume of the dilution in mixing beaker 2. The rest volume goes to waste through MV 1. This
is to prevent air going into the counting beaker.
Select Service menu and pos. 7.1. Press enter and adjust the time by the + and – keys. The
normal time is between 2 – 3 sec.
Note ! If the time is out of range check the air pressure and adjust the air valve if necessary.
1.2
Flush pump time setup
This function is used to check and adjust the last flush volume of diluid into the counting
beaker. The liquid level should be approx. 15 mm from the upper edge of the counting beaker.
Select Service menu and pos. 7.2. Press enter and adjust the time by the + and – keys.The
normal time is between 1,5 – 3 sec.
Note ! To introduce a new value an authorisation code is required. Enter the code 1809 and
the new time will be set.
1
Dok nr 00920-01
1.3
Chapter 1 Service Menu
Sample pump time setup
This function is used to set the sample pump time of the second blood aspiration. When cap
piercer is used the time is adjusted so the end of the blood column stops just before the MV13.
Select Service menu and pos. 7.3. Press enter and set the time using the + and – keys. The
time for Closed tube should be between 2 – 3 sec. The time for Open tube should be 0,5 sec.
1.4
Pump and valve test
This function is used for testing of all MV:s and pumps. Enter pos. 7.4 and select item by the
→ and ← key. Switch on and off by + and – keys or momentary by the Enter key.
1.5
HGB LED adjustments
Using this function it’s possible to check the absorbance of the HGB cuvette in the lower part
of the counting beaker.
The green LED diod current is factory set to 40 mA - max.60mA. The voltage should by
between 4,00 – 4,4V with clean diluid in the beaker. It`s possible to adjust the current by the
+ and – key. If necessary, adjust the HGB gain by the potentiometer R50 on the analogue
board to fit the photocell voltage 4,2V
Note! Enter the code 1809 and the new current will be set.
2
Dok nr 00920-01
1.6
Chapter 1 Service Menu
Volume detector test
Using this function it`s possible to check the function of the optical detectors on the volume
board.. Connect a syringe to the measuring tube and aspirate diluid slowly from the counting
beaker. When the meniscus passes the sensors 1 (0) will appear in each sensor.
1.7
Reagent detector test
This function is used to control the reagent sensors. Enter pos.7.7 and lift up one of the
sensors. Indication should change from 1 to 0. The value should be approx. 100 with reagent
sensor placed in the container.
< 160 = reagent in the container. > 220 alarm= emty reagents ”low reagent” will appear. The
value has to be lower than 160 to reset the alarm.
1.8
Diluent Syringe motor test
With this test it`s possible to run the dilutermotor and the syringe unit.
The motor has two sensors ( switches )to control the positions
Enter pos.7.9 and run the motor with the → and ← keys. Sensor at pos.1= 1, means that the
motor is in home position i.e. Sensor 1 is active. Zero (0) means non active sensor. Pos.2
refers to sensor 2.
3
Dok nr 00920-01
1.9
Chapter 1 Service Menu
Vacuum pump motor test
With this test is possible to run the vacuum pump and check the upper and lower optical
sensors. Upper sensor is pos.1, lower sensor is pos.2. Use the right → key and the left ← key
to run the motor.
Pos.1 = 1 = upper sensor is blocked by the metallic flag, home position.
Pos.2 = 0 = lower sensor is open, 1 = blocked = vacuum position.
1.10 Needle motor test AC920EO+
This function is to test the cap piercer needle motor and to check the two
optical sensors.
Pos.1 = 1 =lower sensor is in home position. The sensor is blocked. Position = 1
Pos.2 = 0 = upper sensor is open.
1.11 Needle motor test AC970EO+
This function is for testing the cap piercer together with function control of the three optical
sensors. The test is similar as in AC920EO+ except for the guard sensor. The guard sensor is
used to prevent damaging of the needle in case the sampler plate is in incorrect position. The
guard sensor is connected to the wash cup which is moving up upon aspiration and down after
aspiration.
Sensor at pos.1 = 1 pos.2 = 0 guard = 1 = lower (home) position of the needle.
Sensor at pos.1 = 0 pos.2 = 1 guard = 0 = upper position of the needle
Pos.1 = lower sensor
Pos.2 = middle sensor
Guard =upper sensor
Position 1 = Home position, Position 2 = Upper pos.
4
Dok nr 00920-01
Chapter 1 Service Menu
1.12 High altitude compensation setup
This function is not used
1.13 Blood detector setup
This is a setup menu for the optical blood detector in AC920/970EO+.
0.0 = The blood detector is active and controls the running time of the sample pump. 2,0
means the pump will aspirate during 2 sec. independent of the sensor setting. Normal setting
for whole blood is =0.0. If the sample material is more or less colour less the setting 2 sec
should be used.
Note! Authorization code is 1809
1.14 Set power line frequency
Option to choose 50 or 60 power line frequency. Authorization code is 1809
1.15 Printer port status
If a problem occurs with the printer it`s possible to check the status of the signals
5
Dok nr 00920-01
Chapter 1 Service Menu
1.16 Print machine statistics
This print out gives information on the status of the AutoCounter.
AC version
ID or serial number
Serial number of the CPU board ( # xxxxx )
Power ON, date and time
Error indication number, date and time
Calibration status, date and time
Sample counter
WBC transfer time
Flush pump time
Sample pump time, open and closed tube
HGB led. current
Power line frequency
Blood detector time
Last RBC and WBC count time
Last HGB blank value. Last HGB sample value
NOTE! The Volumboard have been upgraded from the CPU program version 164008.
It’s a new position in the Service menu. 7.18. Set new volumedetector.
Print machine statistics have now the pos. 7.19.
When ordering volumeboard art.no. 1120013 for sparepart, it will be the upgraded board.
If the CPU program is from 164008, Enter pos.7.18 and Enter 1. 1=New volume board.
If the CPU program is below 164008 ignore above text.
If any reason, it’s a new program in the instrument, but the volumeboard is the old model,
the setting of the position 7.18 should always be 0.
The different of the boards is: Capacitor C2 and C3 have been change from 330nF to 1µF.
This is to prevent frequently NC error problem.
6
Dok nr 00920-01
2.
2.1
Chapter 2 Flow system
Flow system (v 01)
Flow sequence
1. After starting a measurement for closed tube, the sample pump start to aspirate blood through
MV13 to the blood sensor via the rotary valve. When the blood reaches the blood sensor, the
pump stops and MV13 changes and releases the under-pressure between the MV 13 and the
sample pump through the open pipette. When the needle is in the lower position , the sample
pump starts again and aspirates the blood from the needle through the MV13 and the rotary
valve and fill the inside of the valve with 20 µL blood. The blood pump will stop by the pre-set
sample pump time.
(0,5sek.for open tube and approx 2sek.for the closed tubes.)
The end of the blood column from the needle should stop just in front of the MV13.
During this sequence the counting beaker is cleaned by diluid from the flush pump.
2. The syringe motor starts and moves the rotary valve into position 2. The diluid syringe
dispenses 4 ml diluid through the rotary valve, pos.2 and bring the 20 µL blood to MIX 1
(dilution ratio 1/200). The pressure pump starts and MV8 operates in sequences and
produces air for the mixing of the primarily dilution 1:200. The lyse syringe dispense 1,5 ml
lyse to MIX2.
The detergent pump start to fill up the wash cup with detergent.
3. The syringe pistons moves down and are filled with new reagent through the MV6 and
MV16. The rotary valve changes to position 3. The sample pump aspirates 1 ml of the
primarily dilution from MIX 1 and fill through pos.3 the rotary valve with 20 µL. The
pressure pump starts and apply pressure to MIX 1 for the transfer of the remaining primarily
dilution through MV9 to MIX 2. In MIX 2 the dilution is mixed with lyse reagent and the
haemolysing of the red blood cells starts.
4. The syringes moves upwards and the rotary valve change to position 4. The diluid, from the
diluid syringe and MV6, transfer the 20 µL (1/200 dilution) through pos.4 of the rotary valve
to the counting beaker. The RBC/PLT dilution ratio in the counting beaker is now 1/40 000.
MV10 opens sequentially and produces air mixing in the counting beaker. Lyse from the
lyse syringe is directly transferred, via MV16, to MIX 2 for the finally WBC/HGB dilution
of 1:400. The syringes moves down and are filled by new reagents. The rotary valve change
to position 1 and the sample pump starts to aspirate the mixed blood/detergent from the inlet
pipette, needle and tubings,to the waste.
5. Before counting, the MV3 is active and the sample pump start and pressurise the silicon
tubing between the outer left pos. of the pump tubing to the outer part of the MV3. This is
for create air mixing of the MIX 2.
6. The vacuum pump starts to apply vacuum through the MV12 to the measuring tube, the
RBC/PLT dilution in the counting beaker is aspirated through the capillary orifice and the
RBC/PLT start the counts in the transducer when the meniscus reached the lower optical
sensor. When the meniscus have reached the middle sensor, a volume of 200uL have been
counted, the vacuum pump stops and the photometer read the HGB blank value. MV12
changes two times and the rest of the vacuum in the pump is released from the vented air.
The vacuum pumps starts again, now to apply pressure through the MV12 to the measuring
tube. The meniscus is pressed down and the liquid is pressed out through the bypass channel
MV11 directly to the counting beaker. The MV12 and MV11 changes when the meniscus
reached the lower sensor and it stop just below the lower sensor. The MV12 changes two
times to release the rest of the pressure in the pump.
1
Dok nr 00920-01
Chapter 2 Flow system
7. The sample pump stops and the MV3 release and give an air mixing into the MIX 2. The
drain pump starts to drain the counting beaker from the RBC/PLT dilution.
8. The pressure pump starts and apply pressure through MV8 and MV2 to MIX 2. The
WBC/HGB dilution is transferred to the counting beaker through MV1 and MV4. The
pressure is regulated by the air valve. The transfer time is adjusted so the last part of the
WBC/HGB dilution is transferred to waste through MV1 to prevent air bubbles in the
counting beaker. The transfer time (air pressure) is pre-adjusted by the air valve and fine
adjusted by the soft-ware, WBC transfer time. The vacuum pump starts again and the WBC
is counted between the lower and the middle sensor of the volume board.
9. During counting of the WBC , the MIX 1 and MIX 2 is cleaned by diluid from the flush
pump and MV3 and the pressure from the MV2 and MV8 transfer the liquid to the waste
through the MV4 and MV1.
After counting of the WBC, the measurement of the HGB is performed by the photometer.
A capillary cleaning is performed just before the drain pump drains the WBC/HGB dilution
to waste through MV7. The counting beaker is cleaned by diluid through MV1, MV4, MV5,
the WBC nozzle and the RBC nozzle. Finally the counting beaker is filled to a specific level
by the soft-ware adjusted Flush pump time.
10. The sample pump stops after drying the inlet pipette, needle and tubing’s.
2
Dok nr 00920-01
2.2
Chapter 2 Flow system
Flow diagram
Vent
Mv8
Mv9
Vent
Mv2
Reagens Bottles
Mv12
Lyse
Dil
Det
Lyse Syringe Dil. Syringe
Vacuumpump
Mv16
Optical
sensors
Mv6
WBC
Blood sample pump Detergent pump
Measuring Tube
Nc
Mv11
Air valve
Measuring head
Mv
Mix.beaker 2
WBC 1:400
Counting beaker
Mv4
WBC
.
Mv5
Cleaning of
the beaker
through the
RBCnozzle
Capillar
Nc
Air bubbel
Inner part
Closed non activ
Open non activ
RBC 1:40000
Cleaning of the
beaker through the
WBC nozzle.
4
2
3
1
Nc
Mv3
Flushpump
Predilute
pipette
Mv10
Nc
Mv
Rotary
Valve
To the outer
sample pump
tubing
RBC
.
Bloodsensor
Mix.beaker 1
First Dilution 1:200
Mv14
Airpump
Mv7 (Behind the panel)
Lyse
RBC or Blood
Drain
Vacuum
Mv13
Diluid
Detergen
Air pressure
WBC
Waste
Drainpump
Open
Whole
blood
Needle
Washingcups
3
Dok nr 00920-01
3.
3.1
Chapter 3 Mechanical Units
Mechanical Units (v 01)
Air pump
The air pump is mounted on the rear panel by 3 O-rings to prevent vibrations . For
transportation it’s possible to lock the pump by a transport screw from outside.
The function of the air pump is to produce air pressure to the mixing beaker 1 and 2 for
transfer of the liquid between the mixing beakers and from the mixing beaker 2 to the
counting beaker. Pressure for air mixing in mixing beaker 1 and the counting beaker is also
delivered by the air pump.
The pump is supplied by 24V unregulated AC current. The pressure is regulated by an air
valve mounted between the mixing beaker 1 and 2 on the flow panel.
Note!! A small variation of the pressure can occur, depending of variation of the inlet
voltage. (200 – 240V, 100 – 130V)
An air filter 0,45µ is mounted on the outlet of the air pump to prevent dust in the system.
3.2
Adjustment of the air valve
The volume of WBC/HGB dilution transferred from the mixing beaker 2 to the counting beaker
is adjustable by regulated air pressure (Air valve) and fine adjustable by timing of the MV 1.
Service program 7.1 WBC Transfer time, normal range 2-3 sec.
Adjustment.
Set the transferee time to 2,5 sec. Adjust the pressure by the air valve so a small volume in the
mixing beaker, approx. 0,5 ml, will go to waste through the MV1. Increasing of the pressure, by
turning the adjustment screw clockwise, will give higher dilution volume in the counting
beaker .If the pressure is too high, it will cause a spray effect into the counting beaker with a lot
of air bubbles. The results of the WBC can be erratic.
Note!! The adjustment of the valve is very sensitive. Normally adjustment is only a few
millimetres turning.
It’s possible to measure the pressure in serial with the inlet tube to the air valve. The normal
adjusted pressure should be approximately 70 to 90 mbar. (Factory set)
Fig.
Air valve
Adjustment screw (Hexagon 2mm)
1.
Spring
Ball
O-
Air inlet
1
Dok nr 00920-01
3.3
Chapter 3 Mechanical Units
Exchange of the air filter.
To prevent malfunction of the air pressure, it’s recommended to exchange the air filter once a
year. ( the frequency of exchanging the filter is depending on the cleanness of the
environment) The air filter is mounted on the outlet tubing from the pump and it’s connected
by bayonet holder on each side. Note!! The yellow part towards the pump.
3.4
Mixing beaker Mix1 and Mix2
The mixing beakers are used for mixing of the diluted blood. The mixing beaker 1, Mix 1, is
used for the primary dilution from the rotary valve. The diluted blood is transferred through
the Teflon tubing, (Fig. pos.3). The mixing beaker 2, Mix.2, is pressurised sequentially 5
times from MV 8 through tubing (2), the pressure is transferred through the tubing (1) in to
the Mix.1 and the diluted blood will be air mixed.
The tube (4) aspirates approx. 1 ml through the rotary valve, for the secondary dilution
(RBC/PLT) by the sample pump. The rest, approx. 3 ml, of the diluted blood is transferred to
Mix 2 through the tubing (1) by pressure through tubing (2) from Mv2. This dilution will be
mixed with the lyse which is transferred two times from the lyse syringe through tubing (6) to
the Mix. 2. The hemolysing process starts. This dilution is used for counting of WBC and
measurement HGB by the photometer in the bottom part of the counting beaker. The dilution
is transferred into the counting beaker through the tube (7) by pressure from the inner slot of
the MV 8 through the tube (2).
The pressure into the Mix.1 and Mix.2, is regulated by the air valve, the tube (8) is connected
to the outer slot of the MV 5, then to the air pump. When the MV 5 is non- active, there is
regulated pressure into the beakers.
For aspiration of prediluted blood from the pipette, the tube (5) is connected through the inner
slot of the MV 9 to the drain pump, which create vacuum into the Mix. 1. The predilute
pipette is connected to the tube (2) through the outer slot of the MV 2.
2 7 1 6
Mix 2
5 21 3 4
8
Mix 1
2
Dok nr 00920-01
3.5
Chapter 3 Mechanical Units
Blood sensor
The blood sensor is located to the right of the rotary valve. It’s an optical sensor which gives
an analogue high signal (approx. 5V) when blood is entering the sensor. The sensor is
connected to the diluter board by the connector P 210.
The function of the blood sensor is to stop the sample pump in correct position after aspiration
of the blood from the pipette or the cap piercer through the rotary valve. The aspirated volume
of blood is approximately 200µl from the pipette and approx. 350 µl from the cap piercer.
This is indicated by red lamp on the keyboard.
3.6
Exchange of the blood sensor.
Remove the two screws (Fig. pos 1) which are holding the sensor. Remove the short tygon (2)
tubing from the rotary valve. Remove the tygon (3) tubing from the T-connector between the
rotary valve and the sample pump, remove connector P210 from the diluter board. Lift out the
sensor including the tygon tubing. Remove the short tygon tubing (2) from the glass tube and
remove the glass tube including the longer tygon tubing from the sensor.
Assemble the glass tube into the new sensor and mount a new short tygon tubing to the other
end of the glass tube for fixing the position of the glass tube. Enter carefully the tygon tubing
to the metallic tube of the rotary valve so the position of the fixing holes of the sensor will fit
to the holes in the panel. Replace and tighten the two screws which are holding the sensor.
Replace the longer tygon tubing to the T-connector between the rotary valve and the sample
pump.
Fig.
Sample pump
3
Rotary valve
2
Blood sensor
2
3
1
4
1
3.7
Electric control of the blood sensor
Refer to chapter 9.1.1 Test of the blood sensor.
3
Dok nr 00920-01
3.8
Chapter 3 Mechanical Units
Cap piercer AC920EO+
The needle ( Fig. pos.1) in the cap piercer is moved up and down by a motor ( 2)which is
controlled from the diluter board through a sensor board (3), which is mounted inside the
cap piercer unit. There are two cables from the sensor board, which is connected to the
diluter- board. P205 for the optical needle position sensor ( upper and lower position) and
P218 for the motor, 24V AC current. Inside of the upper sample tube holder there is a
micro switch mounted for automatic start of the measurement. When a blood sample tube
is placed in the cap piercer the micro switch is activated and the needle motor starts to
move up and will be stopped by the upper optical sensor (4). The sample pump starts to
aspirate the blood up into the blood sensor. The pump stops and the needle starts to move
down to the lower optical sensor (5). MV13 is released for a short moment and air will be
aspirated through the open pipette into the tubing between the MV13 and the sample pump.
This will restore the vacuum to atmospheric pressure. The second aspiration starts and the
blood between the needle and MV13 is transport into the rotary valve and through the
blood sensor. The second aspiration of blood is controlled by timing of the sample pump.
7.1 Service menu, 7.3 Sample pump time setup. Approx. 2,2 sec. The syringe unit rinses
out and dilutes the 20 µl blood in the rotary valve. The detergent pump starts to fill up the
washing cup (6) with detergent for cleaning of the needle.
After one turn of the rotary valve the sample pump starts again to empty the needle house
and needle of detergent/blood. During counting of WBC and the cleaning of mixing
beaker 1 and 2 the needle moves up approximately 3mm to dry. At the end of the
measurement cycle the needle moves down to the home position.
To P205 Diluter
9
2
5
10
3
1
4
7
8
To P218 Diluter
To the start
micro
6
4
Dok nr 00920-01
3.9
Chapter 3 Mechanical Units
Exchange of the needle.
1. Release the locking screw of the inner door and pull it forward.
2. Remove the detergent tubing (7) from the wash cup. Release the locking screw (8) which
holds the wash cup (6), hexagon key 1,5mm. Pull up and remove the wash cup.
3. Remove the blood tubing from the needle (9). Release the locking screw (10) which hold
the needle, hexagon key 1,5mm. Use a pincer and pull out the needle. Insert the new
needle and push it to the end stop and lock the hexagon screw. Connect the blood tubing.
4. Connect the wash cup and adjust it to correct position (align the detergent tubing to fit the
hole). Lock the hexagon screw. connect the detergent tubing.
5. Replace the inner door and lock the screw.
6. Enter pos.7 Service menu. Enter pos. 7.13 Needle motor test. Run the needle motor up and
down and check that the needle moves smoothly.
Fig.
To P205 Diluter
9
2
5
10
3
1
4
7
8
To P218 Diluter
To the start
micro
6
5
Dok nr 00920-01
Chapter 3 Mechanical Units
3.10 Cap piercer AC970EO+
The sequence of the aspiration is equal to AC920EO++, but the mechanics and the electronics
are different.
The movement of the needle is controlled by 3 optical sensors (Fig. pos1). Lower sensor for
needle home position. Middle sensor for upper (blood aspiration) position. The upper sensor
is a safety sensor to prevent destruction of the needle in case the blood sample tube or the
sample plate is in incorrect position.
Under the wash cup there is a spring (2) which will press the wash cup up during aspiration.
In home position the motor arm keeps the wash cup in down position.
After start of measurement using the cap piercer the arm from the motor moves up the block
(4) in which the needle is mounted. The upper sensor plate (6) including the wash cup leaves
the upper sensor and just thereafter the lower sensor plate (7) leaves the lower sensor.
When the needle is in top position the lower sensor plate covers the middle sensor and the
movement by the motor stops.
If the wash cup is blocked due to incorrect position of the sample plate the wash cup can not
move up and the upper sensor plate will not leave the upper optical sensor. The motor stops
and reverses and the needle moves to home position.
Fig.
Wash cup
1
6
2
1
1
7
4
5
3
6
Dok nr 00920-01
Chapter 3 Mechanical Units
3.11 Exchange of the needle in AC970EO+
Remove the 4 screws on the right hand side of the cap piercer cover.
Remove the screw (4) which holds the motor arm (3) to the needle block.
NOTE!! There is a brass washer between the arm and the block.
Remove the blood tubing from the end of the needle (5). Using a key turn the needle counter
clockwise and remove it.
Replace the needle. Do not tighten the screw too hard (plastic). Connect the tubing and place
the arm in correct position by pressing the needle block down., so the hole with the screw
shall align to the block. Don’t forget the washer between the arm and the block. Don’t
tighten the screw too hard to prevent damage of the plastic groove. Replace the cover.
Run the needle motor up and down and check that the rubber seal of the wash house is in
correct position.
3.12 Exchange of the sealing for the needle house
Remove the 2 screws on the metallic plate on the upper part of the cap pierce cover. Remove
the plate and replace the rubber seal.
Replace the metallic plate. Run the needle motor by the service program and align the seal to
the wash cup. See chapter 3.13
7
Dok nr 00920-01
Chapter 3 Mechanical Units
3.13 Adjustment of the sensor plate for the optical sensor.
Enter pos. 7 service menu from main menu, enter pos. 7.13 Needle motor test.
Run a complete cycle.
1. Lower sensor plate: Adjust the position of the plate so the motor arm is in a straight
vertical position after a complete sequence of the cap pierce.
2. Upper sensor plate: Adjust the position of the plate to straight horizontal position.
A. Check that the needle moves up and down when the sample plate is installed and in correct
position.
B. Stop the up movement of the wash house and check that the needle motor reverses and
moves to the home position.
Electronic checkpoints.
Measure the voltage on IC U32 on the diluter board.
Needle home position.
Lower sensor pin 7: High level (5V) Sensor is covered.
Middle sensor pin 8: Low level
Sensor is open.
Upper sensor pin 9: High level
Sensor is covered.
Needle upper position.
Lower sensor pin 7: Low level, Sensor is open.
Middle sensor pin 8: High level, Sensor is covered.
Upper sensor pin 9: Low level, Sensor is open.
8
Dok nr 00920-01
Chapter 3 Mechanical Units
3.14 Flush and Drain pump
The flush pump is used for cleaning of the counting-beaker with diluid and
also used for cleaning of the mixing beaker 1 and 2.
The drain pump is used for draining of liquid in the counting-beaker.
The flush pump is used to create vacuum in the mixing-beaker 2 for aspiration of prediluted
blood.
Both of the pumps are mounted on a metallic panel inside the instrument together with the
drain valve MV 7. The pumps have a motor which is moving a teflon membrane inside the
pump-house (2). The pump house contains two small rubber membranes (3) which allow the
liquid to flow only in one direction. The connectors of the pump house are marked with
arrows to show the directions of the flow. It’s possible to open and clean the pump house.
The pumps are controlled by regulated DC current from the diluter board. The drain-pump is
supplied by regulated 18 – 19VDC.
The flush-pump is supplied by an adjustable regulated current. It is adjusted to approximately
13V DC by the factory. ( Potentiometer R43, diluter board ).
Fig.
3
1
2
2
Flush
Drain
9
Dok nr 00920-01
Chapter 3 Mechanical Units
3.15 Exchange of the pumps, cleaning of the pump house.
Refer to Fig. 3.14
Release the two screws (Fig. pos 1) on the metallic panel located between the pumps. Lift up
and pull down the unit. On the rear there are two screws holding each pump. Remove the
tubing, connectors and screws of the defective pump. Install a new pump and connect the
tubing, connectors and the panel.
If the motor is running but the flush or the draining is bad probably there is a malfunction of
the pump house.
Remove the four screws which are holding the pump house (2). Remove the house and
separate the two plastic parts to the opposite of the labelled end. Clean the house including the
two small rubber membrane (3). NOTE the position of the membrane. Exchange the
membrane if necessary. Replace the pump-house.
Check the function of the pump by enter 7. Service menu. Enter 7.4 Pump and valve test.
Step by the right arrow→ to Flush pump or Drain pump. Press ON
to activate the pump. Check the flow of diluid and the draining of the counting beaker. When
the flush pump is running, both of the pumps are activated to prevent overflow in the counting
beaker. The level in the beaker should not increase only a whirlpool in the bottom should be
seen.
3.16 Adjustment of the flush-pump.
Turn on the flush-pump in service menu. Check the voltage on TP2 to the ground on the
diluter-board. It should be approximately 13V DC.
Adjust R43 if necessary.
Run a priming or a blank measurement. Check that the level in the counting-beaker at the end
of the cycle is 3 – 5mm below the inlet nozzles.
Enter 7. Service menu. Enter 7.2 Flush pump time setup.
Adjust if necessary the time to 1,5 – 3 sec. Longer time will increase the level.
3.17 Magnetic valves (MV)
The MV contains a magnetic coil made for 24V DC. The resistance is approximately 75 ohm.
One part of the pinch valve is mounted inside the coil. When a current is supplied to the coil,
a magnetic field will move the pinch-valve which squeezes the silicon tubing. When a double
valve is used the inner tubing is squeezed and the outer tubing is released.
All MV:s are controlled by the diluter board from two power integrated circuits.
When the MV is activated a high voltage, approx. 32V DC, controls the MV for 200 ms. This
creates a high pressure onto the tubing. After the 200ms the voltage drops to approx. 22V .
The tubing remains squeezed but with a lower pressure.
10
Dok nr 00920-01
Chapter 3 Mechanical Units
3.18 Exchange of magnetic valves
Exchange of a magnetic coil: Open the cover of the instrument. Locate the defective
magnetic coil. Remove the connector to the coil. Remove the washer on the rear part of the
coil. Pull out the coil from the valve part. Note! Do not remove the distance washer between
the valve and the coil. Install a new coil, replace the locking washer. Replace the connector.
Exchange of a magnetic coil on a MV circuit board. Remove the connector and all the
locking washers. Pull out the MV unit from the valve part. Unsolder and remove the defective
coil. Mount a new coil and make sure to have a correct distance between the coil and the
board. Solder the coil. Replace the MV circuit board with the washer.
Exchange of a pinch -valve. Remove the coil as above, remove the tubing from the valve.
Remove one of the screw on the front panel which is holding the valve lock plate. Release the
other screw. Turn the plate making it possible to pull out the valve from inside of the front
panel. Note the position of the valve. Install a new valve and lock the valve by the plate with
the screw. Replace the MV circuit board. Lock the coils with the washer. Be carefully not to
damage the tubing near the magnetic coil. Replace the silicon tubing in the valve.
3.19 Test of the magnetic valves
Refer to chapter 1.2 Pump and valve test.
3.20 Measuring tube
The measuring tube is used to control the measuring volume during counting.
The volume aspirated from the counting-beaker through the transducer is approximately 200
µl. The counting time is determined by the vacuum created by vacuum pump. The counting
time is factory set to approximately 12,5 sec.
The measuring tube is connected to the transducer via the measuring head. The measuring
tube assembled onto an electric sensor board, the volume board. The board have 3 optical
sensors. The distance between each sensor corresponds to approx. 200µl. The sensor will give
a signal to the processor board when the meniscus of the aspirated liquid passes one of the
sensor. The computer measures the time it takes for the meniscus to travel between two
sensors. In the EO+ instrument only the two lower sensors are used.
11
Dok nr 00920-01
Chapter 3 Mechanical Units
3.21 Exchange or cleaning of the measuring tube
Remove the cover of the volume-board.
Remove the silicon tubing in the top of the measuring tube (glass tube),(1) or from the
connector in the panel.
Release the plastic screw (4) completely by turning it counter clockwise. Lift up the glass tube
including the plastic screw. Remove the silicon seal (3) carefully from the end of the glass
tube. Lift up the glass tube through the optical sensors.
Clean or exchange the glass tube. Insert the glass tube through the sensors. Place the plastic
screw at the end of the tube. Make a new seal of silicon-tubing art.no 1140252, 5mm length
and place the seal at the end of the measuring-tube. Turn the plastic screw clockwise and
tighten.
12
Dok nr 00920-01
Chapter 3 Mechanical Units
3.22 Adjustments of the measuring board
It’s necessary to check or adjust the optical sensors after cleaning or exchange of the
measuring tube.
Refer to chapter 12.1. Adjustment of the optical sensors.
Fig.
U5
R23
Gnd
Tp5
Tp3
R24
Tp6
U4
Tp1
R20
Tp2
U3
Tp4
Measuring tube
13
Dok nr 00920-01
Chapter 3 Mechanical Units
3.23 Transducer
The transducer (8) is used for counting and sizing of the blood cells suspended in the dilutions
which are aspirated through the small( 70µ ) orifice.(9). Inside the transducer there is a
platinum electrode and outside in the counting beaker there is an outer electrode. Both
electrodes are connected to the measuring head (5) and from the head to the analogue board
via a coaxial cable. An electric current is applied to the electrodes.
When a blood cell passes the orifice the resistance will increase. This in turn increases the
voltage across the electrodes. Each passing cell creates a voltage pulse which is proportional
to the volume of the cell. The number of pulses correspond to the number of cells.
3.24 Exchange or cleaning of the transducer
Remove the two screws which are holding the photometer(10) and the counting-beaker(9).
Pull carefully down the beaker to reach the transducer(8).
Remove the plastic screw(6) by turning counter clockwise. Pull down the transducer
including the screw. Clean the transducer inside using cleaning solution (ProClean Plus or
sodium hypochlorit 0.5%) or exchange the transducer including the silicon seal, 5mm length
of silicon-tubing art.no. 1140410.
Fill the transducer with clean diluid. Enter the inner electrode into the transducer and push the
transducer into the measuring head together with the plastic screw. Turn the screw clockwise
and tighten. Check that the end of the inner electrode is located approximately 5 mm above
the orifice.
Replace the photometer including the counting-beaker. Make sure that the silicon tubing of
MV1 and MV10 is in correct slots of the valve.
Enter 8. Maintenance menu 8.1 Prime cycle. Run a prime cycle to fill the transducer and the
measuring tube.
14
Dok nr 00920-01
Chapter 3 Mechanical Units
3.25 Peristaltic pumps
Two peristaltic pumps are used the detergent pump and the sample pump. The detergent
pump is used for cleaning and lubrication of the rotary valve, cleaning of the pipette and cap
piercer needle. The detergent pump transfers the detergent from the container through the
rotary valve to the wash cups. The sample pump removes the detergent via the pipette and
needle.
The sample pump is used for aspiration of the blood from the pipette and needle into and
through the rotary valve and as mentioned above also used for aspiration of detergent.
The sample pump has two pump tubing. The inner tubing is used for aspiration and the outer
tube is used to create air mixing via MV3 in mixing beaker 2.
The pumps are controlled by the diluter board. The detergent pump uses 24V AC current and
the sample pump uses a stepper motor for 24V unregulated DC current. (approx. 32V).
3.26 Exchange of pump tubing
Press two fingers onto the both sides at the lower part of the pump cover(1). The cover will
come lose. Lift up and remove the cover. Pull out the tubing connectors on both sides(2).
Remove the pump tubing. Install new pump tubing into the connectors. Install the connectors
including the tubing into the pump house. Reinstall the cover into the slots of the pump house.
Finally press a finger on the top of the cover to snap it into place.Art.no. pumptubing 90mm is
1090799 3pcs.
Art.no for unspecified lenght is 1140271
3.27 Adjustment of the sample pump time
Check the aspiration of the blood after exchange of the sample pump tubing. Run a blood
measurement using both the pipette and the cap piercer. Check that the blood is aspirated
smoothly through the tubing into the rotary valve and to the blood sensor. After the second
aspiration using the cap piercer check that the end of the blood column has stopped just before
the MV13.
Adjust the blood sample pump time if necessary. Enter 7 Service menu, 7.3 Sample pump
time set up. Closed tube = approx. 2,2 sec. Open tube = 0,5 sec.
15
Dok nr 00920-01
Chapter 3 Mechanical Units
3.28 Vacuum pump
The vacuum pump is connected to the measuring tube in the volume board by a tubing though
MV 12. The vacuum from the pump aspirates the dilution in the counting beaker into the
transducer and up and through the measuring tube. Three optical sensors are attached to the
tube.The distance between the sensors represents a volume of 200µl which is the volume
aspirated and counted. To empty the tube after counting the vacuum pump produces an air
pressure.
The pump is driven by a 24V AC current motor which is controlled by the processor board.
The gearbox of the motor is connected to an eccentric wheel Fig. Pos1) This wheel moves a
piston (2) forward and backward. At the end of the piston there is a membrane(3) inside a
plastic house (pump-house) (4). The tygon tubing to the measuring tube is connected to a
metallic tube(5) of the pump-house. The backward piston movement (vacuum) is controlled
by a pressured spring (6), adjustable by turning the adjustment ring (7). The adjustment ring is
unlocked and locked by a hexagon 1,5mm screw (8).
The movement of the eccentric wheel is controlled by two optical sensors, upper sensor (9),
lower sensor (10) The eccentric wheel have a metallic part with two sensor-plates (11, 12).
Upper sensor(9) controls the stop (home) position after the pump has created pressure. Lower
sensor(10) controls the stop position after the pump has created vacuum.
The signals from the optical sensors are read by the computer from connector P102, pin 8,
pin9. Pin 8 is the upper sensor and Pin 9 is the lower sensor. The signal is logic high level
when one of the sensor plates cover the sensor. The eccentric wheel is locked by a hexagon
screw, 1,5mm (13)..
Fig
15
8
2
9
11
1
4
14
13
5
3
16
6 7
12
10
16
Dok nr 00920-01
Chapter 3 Mechanical Units
3.29 Exchange of the membrane in the vacuum pump
Remove the tygon tubing from the metallic tube of the pump house (Fig.Pos.4) Remove the
two screws which are holding the pump house. Use a short screw- driver. Open the house and
remove the screw (14) holding the membrane. Note the position of the two washers (15).
Remove the membrane and the small o-ring (16) on the screw.
Turn the eccentric wheel counter clockwise by hand to the vacuum position. (The piston
moves to the right). Install the new membrane including the o-ring. Don’t tighten the screw
too hard this will damage the o-ring. Reinstall the pump house.
3.30 Adjustments of the counting time
Before the adjustment check that the transducer is clean. Run a blank measurement.
Enter 8. Maintenance menu, Enter 8.6 Single count test. Press enter to start. The counting
time RBC-CT should be in the range 11,5 –13 sec. Adjust if necessary by the adjustment ring
(7). Clockwise turning will increase the vacuum and shorten the counting time. Lock the
adjustment ring with the hexagon locking screw (8).
Note! If the counting time is too long, > 15, the message LT(long time) will be reported on
the screen. If the counting time is too short, < 11, the message ST (short time)will be reported.
17
Dok nr 00920-01
Chapter 3 Mechanical Units
3.31 Rotary valve
The rotary valve determines the blood volume used in the first dilution, 20 ul blood in 4ml
diluent (1:200) and the volume of blood dilution in the second dilution, 20 ul (1:200) dilution
in 4 ml diluent (1:40 000). The dilution for determination of WBC and HGB is prepared by
mixing 3 ml 1:200 dilution with 3 ml lyse reagent which gives a dilution of 1:400.
The rotary valve has three main parts: the outer metallic part (Fig.pos.1). The plastic valve-tap
(2) and the rear metallic part (3). The two metallic parts are pressed together with the valvetap using two spring-loaded screws (5). The screws are tighten to the final stop. The pressure
on the valve-tap will have the pressure of the spring. The valve tap has a small drilled
channel(6) having a volume of 20µl. This channel determines the blood and blood dilution
volumes.
A motor with a gearbox which drives the syringes and controls the movement of the valve tap
by a big wheel having two taps. These two taps move a four bladed plastic wheel. The wheel
is mounted on an axis which is connected to the valve tap. When the wheel with the taps
moves two turns the plastic wheel moves one turn. The position of the plastic wheel is locked
by an arrow shaped screw.
The plastic wheel is factory adjusted to position the channel of the valve tap in line with the
four channels of the two metallic parts of the rotary valve.
The position is factory adjusted so the volume hole in the valve-tap correspond to the four
different position in the two metallic parts.
Surrounding the valve tap is a rubber seal(4) (rubber stocking) mounted to prevent leakage of
the detergent circulation around the rotary valve.
18
Dok nr 00920-01
Chapter 3 Mechanical Units
3.32 Exchange/cleaning of the rotary valve, rubber stocking
Exchange of rubber stocking and cleaning of the valve.
1. Tilt down the cover plate in front of the syringes. Remove the tygon tubing from position 1
(Fig.B) in the front metallic part of the rotary valve. Remove the two screws including
springs. Remove carefully the front metallic part from the rubber stocking. Carefully hang
the front metallic part onto one of the bars supporting the rotary valve. Remove the rubber
stocking together with the valve tap (2). Clean the surfaces of the rear and front metallic
parts and the valve tap. Use a soft paper or a cotton pin and cleaning solution.
2. Before re-installation wet all surfaces with distilled water. Wet the rubber stocking and place
it into the slot of the rear metallic part. Then insert the valve tap into the rubber stocking.
Position the channel to the right. Push the valve tap, without touching the surfaces, into the
axis. Insert the front metallic part and push it towards the back so the rubber stocking snaps
into the slot of the front metallic part. Tighten the rotary valve by the two spring-loaded
screws. Reconnect the tygon tubing(Pos. 1).
Exchange the complete valve.
Remove the tubing of the front part.(Fig.B.) Use a small screwdriver and carefully bend away
the two teflon tubing (1). Remove the top connector of the 5 ml syringe. Remove the front
part and the valve-tap including the rubber-stocking. Remove the two screws of the bloodsensor (Fig.A pos.3) Remove the blood-sensor tygon tubing (4) from the inner metallic part.
Remove the other tygon tubing. Pull out the inner metallic part.
Reassemble the new inner valve part and connect the tubing in correct position(Fig A).
Reassemble the other parts including the tubing as above.
Fig.A
Fig.B
19
Dok nr 00920-01
Chapter 3 Mechanical Units
3.33 Syringes
Two 5ml syringes are used for dilution and hemolysing of the blood. The left syringe dilutes
the blood with isotonic diluent and the right syringe adds and hemolysing reagents to the
WBC/HGB dilution.
The syringes are driven an AC current motor with a gearbox. A wheel (Fig A, pos.1) is
connected to the axis of the gearbox. The wheel is locked by a 2,5 mm, (2) hexagon screw.
The wheel has two metallic taps (3) which move the four bladed wheel (4) in four steps. The
wheel is mounted on the same axis as the rotary valve. The position of the axis is controlled
by the black cam-wheel and the upper micro switch (7). An arm with a bearing and a plastic
cylinder is mounted on the wheel (5).The other end of the arm is mounted on a plate with four
springs (8). The plastic cylinder activates the lower micro switch (6).When both of the
switches are active (pressed)the rotary valve and the syringes are in home position.) The plate
(8)is mounted on two vertical shafts (9). The syringes are mounted on two shafts of the plate
(10). The function of the spring is to give correct end position of the syringes at the
mechanical stop position. On the shaft of each syringe are two metallic rings (Fig.B,pos.1,2)
mounted and locked by 2 mm hexagon screws. The lower ring (1) is used for volume
adjustment. The upper ring (2) is used for adjustment of the mechanical upper stop position to
prevent the damage of the syringe top. At the top end of the shaft is a teflon piston (3), with
an o-ring.
Fig. A
4
7
3
2
1
3
6
9
10
9
5
8
20
Dok nr 00920-01
Chapter 3 Mechanical Units
Fig.B
1.
syringe
Lyse syringe
3
6
5
2
1
8
7
21
Dok nr 00920-01
Chapter 3 Mechanical Units
3.34 Exchange of pistons and cylinders
Release the locking screw (Fig B, pos.4). Remove the shaft from the slot(4). Remove the top
connector from the syringe. Remove the two screws in the holder (5). Remove the complete
syringe. Pull out the shaft with the piston from the glass cylinder. Use a tool and bend away
the old piston. Save the washer. Clean the glass-cylinder.
Place the new teflon piston upside down on the table. Insert the new o-ring into the piston.
Press by hand the shaft with the washer (Fig.C, 2) into the piston. Finally use a hammer to
lock the piston. Wet the piston and enter it into the cylinder. Replace the complete syringe and
tighten the screws (5). Enter the shaft into the slot and lock the screw (4). Make sure that the
shaft is in vertically position into the cylinder.
Art.no piston 1 pcs is1020331. Set of 5 pcs incl. O-ring, washer is 1090258
Exchange of the cylinder.
Remove the syringe as above. Pull out the shaft from the cylinder. Remove the four screws (6)
of the metallic cover of the holder. Remove the old cylinder (note the position of the O-ring)
and place a new cylinder in the same position. Replace the cover with the four screws.
Replace the syringe as above.
3.35 Adjustments of the volume and the upper end position.
Volume adjustment.
Release the two hexagon, 2mm, locking screws of the lower ring (Fig.B pos.1) Hold you
finger on the upper ring and turn the lower ring. Clockwise turning gives higher volume and
counter clockwise turning gives lower volume. After adjustments, lock the hexagon screws.
The factory settings are approx. 3,8ml for the diluid syringe and 1.5 ml for the lyse syringe on
cylinder scale.
Upper end position adjustments.
Enter 7. Service menu. Enter 7.9 Diluent syringe motor test. Press right arrow, > key. The
syringes move to the top position and stay in that position.
Release the hexagon 2 mm screw of the upper ring and adjust the position so the space
between the slot (Fig B, pos. 4) and the upper ring is approx. 0,1mm. Make the same
adjustments of both syringes. Lock the hexagon screw.
Press left arrow < key. The syringes will move to the home position.
3.36 Drain valve MV7
The drain valve is a membrane valve and used for draining of the solutions to waste. The
valve is activated by 22 V DC current from the diluter board.
The valve is located on the panel as the flush and drain pumps. The valve is attached to the
panel by a brass nut. (fig.pos.1)
The valve contains a magnetic coil (2) which is locked by a nut in the top and a house with a
magnet in the top (3). Inside the house there is a shaft (4) of magnetic material . A spring in
the top (5) will press down the shaft. At the end of the shaft there is a plastic washer (6)
attached to a rubber membrane (7).
The valve is normally closed without current.
22
Dok nr 00920-01
Chapter 3 Mechanical Units
3.37 Exchange of the membrane or valve and cleaning of the valve.
Remove the tubing of the valve. Remove the brass nut (1). Remove the electric connectors
and the complete valve. Remove the nut in the top of the coil. Lift up and remove the coil.
Remove the plastic screw (8) and lift out the house (3). Note! Do not lose the spring in the top
(5). Lift out the shaft (4) including the washer and the membrane. Note the position of the
plastic washer (6).The phased part should be in the position against the membrane. The
membrane is pressed in to the end of the shaft. Replace the membrane. Clean the valve house
and the other details. Reinstall the parts.
2
5
3
4
3
8
6
1
7
23
Dok nr 00920-01
4.
4.1
Chapter 4 Analog board
Analog board (v 01)
Adjustments of the analog board
4.1.1 Adjustments of the capillary voltage
Connect a voltmeter between TP2, gnd and TP7. Analog board. Run a blank measurement
and check the voltage during RBC counting. The voltage should be 15V +/- 0,5V.
NOTE ! The voltage is not adjustable.
4.1.2 Capillary cleaning voltage
Connect an oscilloscope to TP2 and the upper part of the resistor R66. Analog board. Enter 8.
Maintenance menu, 8.5 Start capillary cleaning. Press Enter to start the cleaning. Check that
the relays are clicking. The pulse amplitude should be approx. 250p-p 30mS.
4.1.3 Offset adjustments
Run a blank measurment
Offset 2. Connect a voltmeter between TP2 and TP9 or pin1, U2. Adjust by R27 to 0,000V
+/- 5mV.
Offset 1. Connect a voltmeter between TP2 and TP3. Adjust by R33 to- 0,02V
(-20mV) +/- 5 mV.
4.1.4 Gain adjustments
Run a calibrator or an equal blood with well known MCV value. Enter 5. Cal. QC menu.
Adjust the % value for MCV to 0 %. Run the blood again and check the value. Adjust R 31,
clockwise increasing the MCV. Counter clockwise decreasing the MCV. Run and adjust in
steps until the MCV value is acceptable.
After adjustments, run the blood 5 times and make a calibration.
4.1.5 HGB photometer adjustments
NOTE ! Be sure that the counting beaker is clean before adjustments. Run a blank
measurement before adjustments. Note! Autorization code 1809
Enter 7. Service menu, pos. 7.5 HGB led adjustments. Check that the led. current is40– 60mA.
Adjust by +/- keys. The photocell voltage should be 4,2V +/- 0,2V. If necessary, adjust the
voltage by R50, Analog board.
1
Dok nr 00920-01
Chapter 4 Analog board
4.1.6 Analog board layout
R14
TP8
R66
TP7
K1
K2
R31 Gain
TP9
R27 Offset 2
R33 Offset 1
TP2
TP4
TP3
R50
HGB gain
TP1
TP6
HGB voltage out 4,2V
2
Dok nr 00920-01
Chapter 4 Analog board
4.1.7 Analog board diagram
3
Dok nr 00920-01
Chapter 4 Analog board
4
Dok nr 00920-01
Chapter 4 Analog board
5
Dok nr 00920-01
Chapter 4 Analog board
6
Dok nr 00920-01
5.
Chapter 5 Processor board
Processor board (v 01)
5.1
Processor board
P5
P113
P6
P102
R47
P105
P107
P1
26
P122
P1
04
U20 Drain
U23 Flush
P114
P115
P116
P118
P128
P123 P1
3
MV drive
Battery
P1
P117
17
P121
P127
+12V
P125
T1A
+5V
-12V
P1
12
T3,15A
E-prom
P9
TP gnd
1
Dok nr 00920-01
5.2
Chapter 5 Processor board
Processor board diagram
2
Dok nr 00920-01
Chapter 5 Processor board
3
Dok nr 00920-01
Chapter 5 Processor board
4
Dok nr 00920-01
Chapter 5 Processor board
5
Dok nr 00920-01
Chapter 5 Processor board
6
Dok nr 00920-01
Chapter 5 Processor board
7
Dok nr 00920-01
Chapter 5 Processor board
8
Dok nr 00920-01
6.
6.1
Measuring Board, Volume Board (v 01)
Adjustments of the optical sensors
Connect a syringe to the silicon tubing from the top of the measuring tube. Connect a
voltmeter to TP 4. Aspirate carefully with the syringe until the meniscues pass the lower
sensor U3. Adjust R20 to 1.0V +/- 0,2V.
Connect the voltmeter to TP6, adjust the middle sensor U4 by R24 to 2.0V +/- 0.2V (when
the tube is empty)
Connect the voltmeter to TP5, adjust the upper sensor U5 by R23 to 2,0V +/- 0,2V (when
the tube is empty)
Check the voltage when the tube is filled. TP5 and TP6 should be lower than 0,5V.
Check the voltage at TP 4 when the tube is empty in the lower sensor U3. The voltage
should be 3.5V +/- 0,5V.
U5
R2
Gnd
Tp5 2,0V empty
Tp3
R2
U4
Tp6 2,0V empty
Tp1
R2
Tp2
U3
Tp4 1,0V filled
Measuring tube
9
Dok nr 00920-01
6.2
Chapter 6 Measuring board
Measuring board Diagram
10
Dok nr 00920-01
7.
7.1
Chapter 7 Display
Display (v 01)
Display layout
11
Dok nr 00920-01
7.2
Chapter 7 Display
Display Diagram
12
Dok nr 00920-01
8.
8.1
Chapter 8 Diluter board
Diluter board (v 01)
Adjustments of the Diluterboard
8.1.1 Test of the bloodsensor
1. Connect a voltmeter between TP gnd and TP1. Diluter board.
The voltage should be < 0,5V when the bloodsensor is empty
2. Enter 7.Service menu , pos.7.4 Pump and valve test. Step to Sample pump.
Press + key and aspirate blood from the open pipette until the blood pass the
blood sensor. Turn of the samlepump with the – key and remove the blood
tube. The voltage should increase to 4 – 5V.
3. Fill the wash cup for the open pipette with clean diluid or detergent. Press +
key again and aspirate until the blood sensor is clean and empty. Measure the
voltage at TP1. The voltage should be < 0,5V
8.1.2 Adjustment of the flushpump
1. Connect a voltmeter between TP gnd and TP 2. Diluter board.
2. Enter 7.Service menu, pos. 7.4 Pump and valve test. Step to Flush pump.
Press + key. Adjust with R43 the voltage to 13V +/- 0,5V.
3. Run a blank measurement. Check the level into the counting beaker after the
final cleaning. The level should be approx. 15 mm under the upper edge of
the beaker. If the level is incorrect, enter 7. Service pos. 7.2 Flush pump time
setup. The factory settings is approx. 2 – 3 sec. ( longer time will increase the
level ) NOTE! After new setting value, Enter the code 1809.
1
Dok nr 00920-01
8.2
Chapter 8 Diluter board
Diluter board layout
2
Dok nr 00920-01
Chapter 8 Diluter board
3
Dok nr 00920-01
8.3
Chapter 8 Diluter board
Diluter board Diagram
4
Dok nr 00920-01
Chapter 8 Diluter board
5
Dok nr 00920-01
Chapter 8 Diluter board
6
Dok nr 00920-01
Chapter 8 Diluter board
7
Dok nr 00920-01
Chapter 8 Diluter board
8
Dok nr 00920-01
Chapter 8 Diluter board
9
Dok nr 00920-01
9.
9.1
Chapter 9 Sensor board
Sensor board (v 01)
Adjustments of the Sensorboard AC970EO+
9.1.1 Adjustment of the needle-sensor plate for the optical sensor
Enter pos. 7 service menu from main menu, enter pos. 7.13 Needle motor test.
Run a complete cycle
1. Lower sensor plate: Adjust the position of the plate so the motor arm is in a straight vertical
position after a complete sequence of the cap pierce.
2. Upper sensor plate: Adjust the position of the plate to straight horizontal position.
A. Check that the needle moves up and down when the sample plate is installed and in correct
position.
B. Stop the up movement of the wash house and check that the needle motor reverses and
moves to the home position.
Electronic checkpoints.
Measure the voltage on IC U32 on the diluter board.
Needle home position.
Lower sensor pin 7: High level (5V) Sensor is covered.
Middle sensor pin 8: Low level Sensor is open.
Upper sensor pin 9: High level Sensor is covered.
Needle upper position.
Lower sensor pin 7: Low level, Sensor is open.
Middle sensor pin 8: High level, Sensor is covered.
Upper sensor pin 9: Low level, Sensor is open.
1
Dok nr 00920-01
Chapter 9 Sensor board
9.1.2 Adjustments of the Sampler position sensor
9.1.2.1
Connect a voltmeter to TP1 and TP gnd on the sensorboard. Turn the
sampler wheel by hand in the position with the wide black position, Fig1 (pos. 1) stripe in
front of the position sensor. Turn the wheel slowly to the max. reading voltage at the
voltmeter.
9.1.2.2
Adjust the LED-current with R9 to 3,8V +/- 0,2V. Turn the wheel to reach
the min. voltage. The level should be 1V +/- 0,2V.
3. Connect an oscilloscope to TP1 and gnd. Check the pulswith. Fig2
Pos. 1 (21): > 150 mS
Pos. 2 – 20 (22 – 40): 75 – 100mS
2
Dok nr 00920-01
Chapter 9 Sensor board
9.1.3 Adjustments of the Sampler tube sensor
Adjustments of the tube sensor (Refer to Fig)
1. Load a blood sample tube into one of the position of the sample wheel.
Turn the wheel until the sample tube is in front of the tube sensor (just above the needle,
wash house).
2. Adjust the trim potentiometer R16 maximum counter clockwise or until the green Led is
OFF. Turn the potentiometer clockwise until the green Led is ON. Then continue with 1
turn clockwise.
3. Rotate the wheel one complete turn and check that the green Led is OFF in empty
positions.
4. Change the position of the sample tube or use another sample tubes into diagonal and 45°
positions and check that the Led is ON in these positions.
Note! The jumper JP1 is used together with Diluter board, art.no 1120063
Fig.
P303
P306
Led
TP1TP2
R9
gnd
P304
JP1
R16
TP3
P308
P307
P301
3
Dok nr 00920-01
9.2
Chapter 9 Sensor board
Sensor board Diagram
4
Dok nr 00920-01
Chapter 9 Sensor board
5
Dok nr 00920-01
Chapter 10 Serial Computer
10. Serial Computer (v 01)
10.1 Serial Computer Data Format
The data format is of such an extent that the connected computer system also can trace abnormalities in samples or instrument.
Below an example is given of a typical sample. Note that the parameter transmission is
independent of language settings. The data transmission is always in English. Use a computer
in terminal mode to visualise the output as shown below.
+++++
INSTR= AC920-1875
DATE= 2000/6/6-15:58
MODE= OT-B0-A1-U2-P1-D002
DISC= 15-30-30/095-120
ID= 1234567890
SEQ=
44
RBC=
4.77
O-OK-O
MCV=
102.3
O-OK-H
HCT=
48.8
O-OK-H
PLT=
224
O-OK-O
MPV=
12.5
O-OK-H
WBC=
4.3
O-OK-O
HGB=
148
O-OK-O
MCH=
31.0
O-OK-O
MCHC=
303
O-OK-L
TRBC=
11.7
O-OK-O
TWBC=
11.7
O-OK-O
LYMF=
1.5
O-OK-O
GRAN=
2.1
O-OK-O
MID=
0.7
O-OK-O
LPR=
34.4
O-OK-O
GPR=
49.9
O-OK-O
MPR=
15.7
O-OK-H
RDWR=
30.9
O-OK-H
PDW=
17.8
O-OK-O
PCT=
0.30
O-OK-O
CRBC=
:04:0B:14:1A:1B:18:13:0F
:0B:09:07:06:05:06:07:08
:09:0C:13:1E:32:4E:74:A0
:C9:E9:FA:FF:F6:E2:C8:AB
:94:7E:6A:59:4F:49:47:46
:46:47:49:4A:4A:48:46:43
:3E:37:2F:28:22:1D:18:12
:0E:0B:09:07:05:04:04:04
:03:02:02:02:01:01:01:02
:02:01:01:01:01:01:02:04
CPLT=
:00:00:00:00:00:01:01:02
:03:03:04:05:06:06:07:07
:08:08:09:09:0A:0A:0B:0B
:0B:0C:0C:0C:0B:0B:0B:0A
:0A:09:09:08:08:08:08:08
:08:08:08:08:08:07:07:07
:06:06:06:06:06:05:05:05
:04:04:04:04:04:04:04:04
:03:03:03:03:03:03:03:03
1
Dok nr 00920-01
Chapter 10 Serial Computer
:03:03:03:03:03:03:03:03
CWBC=
:00:00:00:00:00:00:04:0F
:19:1C:1C:1B:19:17:15:13
:12:13:13:13:14:16:17:17
:17:17:15:14:15:15:14:13
:12:11:11:10:0E:0E:0E:0D
:0B:08:07:07:07:07:06:05
:06:05:04:04:03:02:02:02
:02:02:01:01:01:01:00:00
:00:00:00:00:00:00:00:00
:00:00:00:00:00:00:00:00
#####
CRC-16
An explanation of the above transmission format follows below:
+++++
Five + signs are given to indicate a start of transmission
INSTR= AC920-1875
The instrument identification is transmitted. The first part is a string of characters indicating
the type of instrument, followed by a dash and a user selectable 5-digit number. The user
selectable number is chosen in the SETUP-MENU, and is only used in the serial output
format. Study section 6.12 in the user manual for further details.
DATE= 2000/6/6-15:58
The date and time when the sample was analysed. Note that the date is always in the format
YYYY/MM/DD (YEAR/MONTH/DAY) and the time in 00-24 hours
MODE= OT-B0-A1-U2-P1-D002
The MODE is expressed as AA-BB-CC-DD-EE-FFFF and represents the following:
AA= How the sample was measured
OT= open tube
PD= pre-diluted sample
CT= cap piercing device
BB= Bottle status
B0= All bottles (containers) OK
B4= Haemolyzer container empty
B2= Diluent container empty
B1= Detergent container empty
B3= Diluent AND detergent container empty
B5= Detergent AND haemolyser container empty
B6= Diluent AND haemolyser container empty
B7= All bottles (containers) empty
CC=Aspiration status
A0= No blood detected
A1= Blood detected
2
Dok nr 00920-01
Chapter 10 Serial Computer
DD= Used parameter units
U=0 Corresponds to the user manual section 6.8; selection 1
U=1 Corresponds to the user manual section 6.8; selection 2
U=2 Corresponds to the user manual section 6.8; selection 3
U=3 Corresponds to the user manual section 6.8; selection 4
EE= P1
For future expansion. Currently it is P1 when an ordinary sample is analysed, and PA when
an EOS sample is analysed.
FFFF= D002
For future expansion.
DISC= 15-30-30/095-120
The discriminator settings. The first group of three numbers (to the left of the slash-character)
shows the discriminator settings between the platelets and the red blood cell's as follows: the
first digits represent the MIN level, the second the ACTUAL setting and the third the MAX
setting. In this case the minimum level of the RBC discriminator was at 15 fl, the actual
setting of the floating discriminator was at 30 fl and the MAX discriminator level was at 30 fl.
See section 6.6 in the user manual.
The last group of two numbers (to the right of the slash-character) shows the discriminator
settings
for the white blood cell's. The first number is the discriminator level between the LYM region
and the MID region, and the second number is the discriminator level between the MID
region and the GRA region. Study section III and section 6.7 in the user manual for further
details.
ID= 1234567890
This is the sample identification string and it is entered by the user at the time of sample
aspiration. It is a variable length string of 0-15 alphanumeric characters. Numeric characters
are entered from the built-in or optional keyboard, but alphanumeric characters can only be
entered by the use of a barcode reader.
SEQ= 44
The sequential number of the sample. It is automatically incremented for every sample.
RBC=
4.75
O-SE-O
The parameter values has a field width of 5 digits, right justified and a line has a total width
of 40 characters
The flagging system is in the format X-YY-Z
X= Value status
O= OK digit value is available
N= N/A No value available, transmitted as zero (0.00 for RBC )
L= LOW under range
H= HIGH over range
YY= Sample flags
3
Dok nr 00920-01
Chapter 10 Serial Computer
See section VI in the user manual for details.
OK= OK , no sample errors
LT= Long time
NC= No count
ST= Short time
TB= Tube bubbles
DE= Distribution error
FD= Floating discr. warning
LO= Blanking error HGB photometer
HI= Blanking error HGB photometer
NG= Negative HGB error
SE= Statistical error
Z= Sample abnormalities
O= OK , sample value within parameter limits
L= Sample value LOW
H= Sample value HIGH
TRBC and TWBC
These 2 'parameters' are the actual counting times for the RBC and the WBC process.
CRBC=
:04:0B: etc..
Here the size distribution curves are transmitted. 80 numerical HEXADECIMAL values are
given. Note that the size distribution curve for the RBC values ALSO includes the PLT curve.
As the total scale is 250 fl ; each 'channel' represents a value of 250/80 =3.1 fl
CPLT=
See CRBC above. Note that 80 'channels' are transmitted and that the maximum channel
represents 30fl. Each channel represents therefore 30/80 fl
CWBC=
See CRBC above. For WBC the maximum scale is 400 fl. As 80 'channels' are transmitted,
this corresponds to 400/80 = 5 fl / 'channel'. In case of a 2-part diff.; CWBCL and CWBCG
are transmitted which are the LYMF and GRAN curves. In case of a 3-part differential, the
CWBCM (MID) curve is also transmitted.
The cell differential curves, like the other curves, always have a max. channel value of 400fl.
This means that each channel always represents 400/80 = 5 fl.
NOTE that in all cases, the first transmitted channel represents channel number 0 !
The channel values are always in HEXADECIMAL form proceeded with a ':' sign
#####
The end of a transmission is always marked with 5 '#' signs, followed by a CR and LF
CRC-16
A CRC16 containing four hexadecimal digits. It is calculated on all data between the +++++
and ##### marks, excluding all CR and LF.
4
Dok nr 00920-01
Chapter 10 Serial Computer
EOS sample
For an EOS-sample data is transmitted in a similar way as described above. There are a few
differences however which are listed below the sample printout.
+++++
INSTR= AC920-1875
DATE=
2000/6/6-16:42
MODE= PD-B0-A1-U2-PA-D002
DISC= 00-00-00/070-200
ID=
SEQ=
46
EOS=
0.02
O-OK-O
TEOS=
23.7
O-OK-O
CEOS=
:00:00:00:00:00:00:00:00
:00:00:00:00:00:01:02:03
:02:01:00:01:01:01:01:02
:01:01:00:00:00:00:01:01
:01:00:00:00:00:00:00:00
:00:00:00:00:00:00:00:00
:00:00:00:00:00:00:00:00
:00:00:00:00:00:00:00:00
:00:00:00:00:00:00:00:00
:00:00:00:00:00:00:00:00
#####
CRC-16
MODE= PD-B0-A1-U2-PA-D002
The fifth element in the "mode"-string is set to PA when an EOS sample is analyzed.
DISC= 00-00-00/070-200
The last group of two numbers (to the right of the slash-character) shows the discriminator
settings
for the eosinophil white bloodcell's. The EOS value presented is the counted number of cell's
between these two limits. Note that the figures DO NOT correspond to cell volume (due to
several reasons).
EOS= 0.02 O-OK-O
This is the EOS-parameter and it is formatted as described above.
TEOS= 23.7 O-OK-O
This is the countingtime in seconds for the eosinophil bloodcell's. It is about twice as long
compared to the RBC and WBC countingtime, because a larger volume of specimen is
analyzed.
CEOS=
:00:00: etc...
See CRBC above. This is the eosinophil cell size distribution histogram. Note that the x-axis
(or size) has no reference value (the eosinophil cellsize is not related to any kind of reference).
5
Dok nr 00920-01
Chapter 11 Spare parts
11. Spareparts (v 01)
11.1 Sparepart drawings
1
Dok nr 00920-01
Chapter 11 Spareparts
1
Dok nr 00920-01
Chapter 11 Spareparts
2
Dok nr 00920-01
Chapter 11 Spareparts
3
Dok nr 00920-01
Chapter 11 Spareparts
4
Dok nr 00920-01
Chapter 11 Spareparts
5
Dok nr 00920-01
Chapter 11 Spareparts
6
Dok nr 00920-01
Chapter 11 Spareparts
7
Dok nr 00920-01
Chapter 11 Spareparts
8
Dok nr 00920-01
Chapter 11 Spareparts
9
Dok nr 00920-01
Chapter 11 Spareparts
10
Dok nr 00920-01
Chapter 11 Spareparts
11
Dok nr 00920-01
Chapter 11 Spareparts
12
Dok nr 00920-01
Chapter 11 Spareparts
13
Dok nr 00920-01
Chapter 11 Spareparts
14
Dok nr 00920-01
Chapter 11 Spareparts
15
Dok nr 00920-01
Chapter 11 Spareparts
11.2 Sparepartlist
11.2 Sparepartlist AC 920/970EO+
Year 2004
Spare part Description Min.quantity
Air filter
Air pump 50 Hz, AC920/970
Air valve complete
Analog board
Barcode reader
Barcode reader complete with arm
Bearing, vac.unit AC920EO+
Belt wheel,cap-piercer AC920EO+
Blood sensor incl. glass tube
Cable for start switch, cap-piercer AC920EO+
Cable MV1,4,5,10 P214
Cable MV2,9,8,12 P211
Center complete, BD, Greiner, Terumo
Center complete, Sarstedt
Circuit board MV, complete,MV1,4,5,10
Circuit board, Cap-piercer AC920EO+
Circuit board,volume board
Clamp for peristaltic pump
Connectors complete green/white
Connectors complete red/black
Connectors, different models 21pcs
Contact spring-plate cover grounding
Counting beaker
Cover for wash cup,AC920EO+
Crank shaft,complete, needle motor AC970
Crank shaft,Complete,needle motor AC970
Cylinder kit, 5 ml, dil.syringe AC920/970
Cylinder kit, 5 ml, lyse syringe AC920/970
Diluter board
Displayboard, complete
E-prom, latest version, diluterboard
E-prom, latest version, processorboard
External electrode
Flush/drain pump
Folie keyboard AC970, sampler
Gear box sample plate 60 Hz
Gear box, mixing plate
Gear box, sample plate 50 Hz
Gearbox 50 Hz,Syringe,needleAC970
Gearbox,sample and detergent pump,EO/EO+
Gearbox,syringe 60 Hz
Keyboard
Keyboard, circuit board,sampler,970EO,EO+
Keyboard kit AC920/970EO
Lamp, backlight, display
Locking ring, BD, Greiner, Terumo
Kit 10pcs
Kit 10pcs
Part nr.
1 140 068
1 090 090
1 090 085
1 120 051
1 140 533
1 090 749
1 140 474
1 020 284
1 090 205
1 030 087
1 030 014
1 030 091
1 090 039
1 090 274
1 120 058
1 120 047
1 120 013
1 140 544
1 090 263
1 090 262
1 140 064
1 040 017
1 080 025
1 020 338
1 090 001
1 090 771
1 090 774
1 090 775
1 120 063
1 090 203
9 990 217
9 991 026
1 020 016
1 140 102
1 050 026
1 140 370
1 140 220
1 140 237
1 140 058
1 140 224
1 140 073
1 050 061
1 120 014
1 090 758
1 140 434
1 020 141
1
Dok nr 00920-01
Spare part Description Min.quantity
Locking ring, Sarstedt
Locking screw for measuring tube
Locking screw to transducer, EO+
Measuring head, AC920/970,complete
Measuring tube incl, seal
Measuring unit complete exlusive
Membrane kit, vacuum pump
Microswitch
Mixing beaker
2pcs
Motor detergent pump
Motor drive belt,vac. AC920EO+,
Motor mixing plate
Motor sample plate 50 Hz
Motor sample plate 60 Hz
Motor sample pump
Motor,vac. AC920EO+
Motor/gearbox
mixing plate
Motor/gearbox 50 Hz, sample plate
Motor/gearbox 50 Hz,Syringe, needleAC970
Motor/gearbox detergent Pump EO/EO+
Motor/gearbox sample pump EO/EO+
Motor/gearbox,sample plate,60Hz
Motor/gearbox;Syringe/ Needle;AC970 60Hz
MV 7, drainvalve complete
MV complete
Needle AC920EO+
Needle AC970, 1 hole
Needle guide AC920EO+
Needle guide, AC970
One way valve,check valve
O-ring 20,0x1,0 closed tube adapter
5pcs
O-ring air pump
O-ring mixing beaker 16,3*2.4 mm
5 pcs
O-ring, 1,4x1,8 closed tube adapter
10pcs
O-ring, 16,0x3,0 cylinder 5 ml
10pcs
Peristaltic pump, sample, detergent pump
Photometer, AC, EO+
Pipette, whole blood
Piston kit, 5ml
set of 5 pcs
Plastic valve tap, complete
Plug
Plug,cap-piercer, AC920EO+
Processor board Tested
Pump tubing set, peristaltic,incl.conn.
Set of 3 pcs
Pumphead repairkit, flush/drain pump
PVC tubing 1,0 x 2,0
per metre
PVC tubing 4,0 x 6,0
per metre
Reagent sensor, diluid (Red)
Reagent sensor, lyse (White)
Reagent sensor,detergent (Green)
Reducing tube
Rotary valve, complete
Rotor for peristaltic pump
Rubber membrane, drain valve
Rubber ring kit,smp, incl.2 wheel+10 rings
Rubber sheeting, AC970
Rubber stocking
Sample plate 1, BD, Greiner, Terumo
Chapter 11 Spareparts
Part nr.
1 020 248
1 020 054
1 020 515
1 090 096
1 090 080
1 090 097
1 090 261
1 140 038
1 080 020
1 090 301
1 080 022
1 090 307
1 090 306
1 090 326
1 090 318
1 090 436
1 140 071
1 140 070
1 140 055
1 140 391
1 140 390
1 140 437
1 140 074
1 140 037
1 090 079
1 020 279
1 020 275
1 020 280
1 020 061
1 140 069
1 140 525
1 090 260
9 990 400
1 140 036
1 140 029
1 140 488
1 090 504
1 090 253
1 090 258
1 090 069
1 020 077
1 020 332
1 120 031
1 090 799
1 140 524
1 140 253
1 140 259
1 090 801
1 090 803
1 090 802
1 070 019
1 090 065
1 140 547
1 140 400
1 090 269
1 060 009
1 060 012
1 090 037
2
Dok nr 00920-01
Spare part Description Min.quantity
Sample plate 1, Sarstedt
Sample plate 2, BD, Greiner, Terumo
Sample plate 2, Sarstedt
Seal for transducer
10pcs
Sensor board, AC970EO,EO+
Sensor board, AC970EO+fr.ser.no.0308
Silicon sealing,measuring tube
10pcs
Silicon tubing 1,0x2,8
per metre
Silicon tubing 1,5x3,0
15m
Silicon tubing, old pump tubing,
per metre
Socket,smp, BD, Greiner, Terumo
20pcs
Socket,smp,Sarstedt
20pcs
Spring to wash cup
set of 5 pcs
Start switch,cap-piercer incl.pcb board
Syringe Motor
Teflon tubing 0,7x1,6
per metre
Teflon tubing 1,0 x 2,0
per metre
Top cover Mix 1
Top cover Mix 2
Top cover, predilute
Trancducer EO+ 70u
Transducer kit, incl.measur.tube
Tygon tubing 0,8 x 2,4
1m
Tygon tubing 1,6 x 3,2
5m
Tygon tubing 2,4 x 5,6
per metre
Tygon tubing 3,2 x 6,4
per metre
Upper adj.stop, Cap-piercer
Vacuum pump 50 Hz,
Vacuum pump 60 Hz
Wash cup complete
Wash cup, cap-piercer AC920EO+
Wash cup, complete AC970
Chapter 11 Spareparts
Part nr.
1 090 266
1 090 674
1 090 675
1 070 046
1 120 018
1 120 062
1 060 031
1 140 250
9 970 002
1 140 252
1 020 067
1 020 069
1 090 416
1 120 048
1 090 303
9 970 022
1 140 263
1 090 087
1 090 086
1 090 772
1 100 024
1 090 756
9 970 041
9 970 042
1 140 256
1 140 261
1 090 773
1 090 033
1 090 257
1 090 273
1 020 278
1 020 060
3
Dok nr 00920-01
Chapter 11 Spareparts
11.3 Recommended Spareparts
AC920/970EO+
Year 2004
Spec. Rec. quantity
Air filter
2pcs
Air pump
Air valve complete
Analog board
Connectors different models, 21pcs/pac.
Counting beaker
Cylinder, diluent syringe, 5ml
Cylinder, lyse syringe, 5ml
Diluter board, compatible to 920/970EO
Displayboard, complete
Flush/drain pump
Keyboard
Keyboard label for AC920/970EO
Measuring head, AC920/970,complete
Measuring tube incl, seal
Membrane kit, vacuum pump
MV 7, drainvalve complete
MV complete
Needle AC920EO+ with closed tube adapter
One way valve,check valve
O-ring Mixing beaker 16,3x2,4mm
5pcs
Photometer, AC, EO+
Piston kit, 5ml
set of 5 pcs
Plastiv valve tap,rotary valve,complete
Processor board Tested
Pump tubing set, peristaltic,incl.conn.
3pcs
PVC tubing 1,0 x 2,0
1m
Rubber membrane, drain valve
Rubber stocking, rotary valve
2pcs
Silicon tubing 1,0x2,8
5m
Silicon tubing 1,5x3,0
15m
Silicon tubing 2,0x4,0 Old pumptubing
1m
Spring to wash cup
set of 5 pcs
Transducer kit, incl.measur.tube
Tygon tubing 0,8 x 2,4
1m
Tygon tubing 1,6 x 3,2
5m
Volume, measuring board
AC970EO+
Needle AC970, 1 hole
Rubber sheeting, AC970
Rubber ring kit,smp, incl.2 wheel+10 rings
Sensorboard
Part number
1 140 068
1 090 090
1 090 085
1 120 051
1 140 064
1 080 025
1 100 007
1 100 006
1 120 063
1 090 203
1 140 102
1 050 061
1 050 043
1 090 096
1 090 080
1 090 261
1 140 037
1 090 079
1 020 279
1 140 069
9 990 400
1 090 504
1 090 258
1 090 069
1 120 031
1 090 799
1 140 253
1 140 400
1 060 012
1 140 250
9 970 002
1 140 252
1 090 416
1 090 756
9 970 041
9 970 042
1 120 013
1 020 275
1 060 009
1 090 269
1 120 062
4
Dok nr 00920-01
Chapter 13 Trouble shooting
12. Spareparts for yearly maintenance (v 01)
12.1 Spareparts for yearly maintenance (approx. 50 samples per day)
AC920EO+
Qty
1,5 m
0,5m
3x 90mm
1m
Art no
9970002
1140250
1090799
9970042
Denomination
Silicon tubing 1,5x3,0mm
Silicon tubing 1,0x2,8mm
Alipren tubing
Tygon tubing 1,6x3,2mm
For use on
Magnetic valves- general
Magnetic valves - no 3,10,11,13
Peristaltic pumps
Transfer tubing etc.
*2
*2
1
1020331
1140030
1060012
Piston 5 ml
O-ring 5 ml
Rubber stocking, rotary valve
5ml syringes
5ml syringes
Rotary valve
*
1090258
Kit of Piston/O-ring set of 5 pcs
AC970EO+
Qty
1,5 m
0,5m
3x 90mm
1m
*2
*2
1
Art no
9970002
1140250
1090799
9970042
1020331
1140030
1060012
Denomination
Silicon tubing 1,5x3,0mm
Silicon tubing 1,0x2,8mm
Alipren tubing
Tygon tubing 1,6x3,2mm
Piston 5 ml
O-ring 5 ml
Rubber stocking
*
1090258
Kit of Piston/O-ring set of 5 pcs
For use on
Magnetic valves- general
Magnetic valves - no 3,10,11,13
Peristaltic pumps
Transfer tubing etc.
5ml syringes
5ml syringes
Rotary valve
1
Dok nr 00920-01
Chapter 13 Trouble shooting
12.2 Instruction for yearly maintenance AC920/970eo+
Instrument:
AC920/970EO+
Serial no:_____________
Performed by:_________________________
Signature:_____________
Hospital/Lab: _________________________
Date: ________________
12.2.1 General
1. Run a blank sample and have the result printed.
2. Use a fresh blood sample and run it in open and closed mode. Print out and compare the
results.
3. Check the transferring between mixing beaker 2 and the counting beaker. Service manual
1.1
4. a, print the calibration data. 6.Set up menu, 6.14 Print all settings
b, note the blood sample pump time: open_______ closed________7. Service menu, 7.3
Sample pump time. Service Manual 1.3 and 3.26
5. Enter the 6. Set up menu, 6.6 Floating discr. RBC/PLT 6.6 WBC discr.
a, check the setting of the discriminators.
RBC/PLT
15 – 30 WBC
95 – 120 EOS 70 - 200
6. Drain the counting beaker.7.Service menu 7.4 Pump and Valve test, Drain pump ON.
Switch of the instrument. Remove the cover. Front panel. Cleaning, replacement of tubing.
7. Replace all silicon tubing in the magnetic valves.
8. Replace one at a time. Remove the tub, measure the length and replace the new one.
Silicon tube inner ∅ 1,5 mm, outer ∅ 3,0 mm art.no 9970002 Valves 1, 2, 4, 5, 6, 8, 9,
12, 14, 16
Silicon tube inner ∅ 1,0 mm, outer ∅ 2,8 mm art.no 1140250 Valves 3, 10, 11, 13
9. Replace the tygon-tubing on the T-connection between mixing beaker 1 and valve 2, and
between mixing beaker 2 and valve 8. Art.no. 9970042
10.Clean the two mixing beakers.
Check so the metallic transferring tube does not touch the bottom of the mixing beaker
11.Clean the peristaltic pump rotor and replace the tubing. Length 90mm. Art.no. 3pcs
1090799
12.Replace the piston and the O-rings in the syringes. Service manual 3.34
2
Dok nr 00920-01
Chapter 13 Trouble shooting
13.Check the T-connection and the reducing metallic tube inside the T-connector.Replace if
necessary the upper tygon tube. Art.no 9970042 Dismount the Hgb-photometer and the
counting beaker. Lift up and wrench loose the counting beaker.
Clean the Hgb-photometer and the counting beaker.
14.Clean the transducer and the measuring tube. Service manual 3.24 and 3.21 Check the
sealing of the transducer. Art.no 1140410, 5mm length. Sealing for measuring tube, Art.no
1140252 5mm length. Clean the measuring head with distilled water. Fill the transducer
with diluid or distilled water and remount. Assemble the counting beaker and the Hgb
photometer.
15.Check the tygon tubing to the closed and open aspiration system.
Clean the needle and the washing cup in the closed tube system. Service manual 3.9 or
3.11
16.Rotary valve. Service manual 3.31 and 3.32
(Only if there is a problem with RBC or Plt blanks, or if there is leakage around the rubber
stocking).
Unscrew the two spring loaded screws on the front of the rotary valve.
Remove the front part from the rubber stocking.
Note! Do not scratch all contacting surfaces.
Remove the rubber stocking.
Clean the surface of the rotary valve unit as well as both halves of the valve body.
Replace the rubber stocking. Art.no. 1060012
Assemble the details again.
12.2.2 Rear panel Inspection
1. Inspect all tubing and connections.
Replace tubing and T-connections if necessary.
2. Inspect tube connections to the Flush- and the Drain-pump. Check for any leakage.
3. Inspect the tubing to the vacuum pump. Service manual 3.28
If dirty, unscrew the two screws fasten to the pump house and inspect. Clean if necessary.
Inspect the membrane and the O-ring. Replace if necessary.
4. Check the suspension of the air pump. (O-rings). Replace if necessary.
5. Check all electrical connections and fasteners for all electronic boards.
12.2.3 Electronic control and adjustment
12.2.3.1
Turn on the instrument.
12.2.3.2
Run ”Fill system” until the syringes are filled up. Run a blank
measurementuntil the values are accepted.
12.2.3.3
Check the top position of the syringes. Service manual 3.35
3
Dok nr 00920-01
Chapter 13 Trouble shooting
Analog board.
4. Check the voltage between TP2 (gnd) and TP9 (Offset 2) 0,000V +/-5mV, Adjust with
R27
5. Connect the voltmeter between TP2 and TP3 (Offset 1) -20 mV, Adjust with R33
6. Connect a voltmeter between TP2 and TP7 (capillary voltage) Run a blank measurement
and read the voltage during counting of the RBC. Should be 15 V +/- 0,5V
7. Check the blank value and the stability of the Hgb-photometer. (note! Authorization
code: 1809) Service manual 4.1.5
Run a blank. Enter the 7. Service menu, 7.5. HGB led adjustments, check / adjust the
led current to 40-60mA, adjust by the +/- key until the voltage is: 4,2V+/- 0,2V, If
necessary, adjust with the R50 analog board.
8. Check the capillary cleaning.
a.Enter the 8. Maintenance menu, 8.5 Start capillary cleaning.
Press Enter to start the cleaning. You will hear a clicking sound from the relay.
b. If there is a problem with ”clog”.
Check with an oscilloscope that ca 250 V pp, 20 ms pulse are found between TP2, gnd
and R66 analog board.
12.2.4 Measurement
1. Check that the ”Reag.Low” led.lamp does not flash.
If flashing, run a priming. If still flashing, Enter 7 Service Menu, 7.7 Reagent detector
test.
Check the value on the display, Service manual 1.7. Check the reagent connectors etc.
2. Enter the 8. Maintenance Menu, 8.6 Single count test.
Press Enter to start the single count test..
If you get ”LT”, ”ST” or ”TB” repeat the procedure until results are obtained.
Check the counting time
11,5-14,5 sec
If not adjust the vacuum pump. Service manual 3.28 - 3.30
3. Enter the ”Measurement menu”.
Run a blank sample until acceptable values are obtained. During the analyse sequence check
The transferring of liquid between the mixing beakers.
Air mixing in the mixing beaker 1 and in the counting beaker.
The transferring of liquid between the mixing beaker 2 and the counting beaker according to
Service manual, 3.2
7.1 Service menu If necessary adjust the air valve and the WBC transfer time, Servicemanual
1.1 and 3.2
Check that mixing beaker 1 and 2 is completely empty after the last rinsing cycle.
Check that the syringes is complete filled.
Check the liquid level in the counting beaker., approx. 15 mm under the upper edge of the counting
beaker. Service menu 7.2 Flush pump time setup. Service manual 3.16
4
Dok nr 00920-01
Chapter 13 Trouble shooting
4. Run the same blood sample in both the closed and the open mode.
a. During the analyse sequence check that the right pump stops when the blood reaches the
blood sensor.
The end of the blood column stops shortly after MV13 after the second pump sequence.
For adjustment. Enter the 7. Service Menu, 7.3 Sample Pump Time setup. Service
manual 3.25 – 3.27
12.2.5 Run a sample in the Predilute mode. Check the aspiration from the prediluted
pipette. Final blood testing
1. Run the same blood sample as in the beginning, page 1, “General” 2.
Check that the same values are obtained.
If not, run a calibrator or equal and recalibrate the instrument
2. Check the RBC-, the Plt- and the WBC- histogram
If not correct, check or make a more accurate electronic adjustment.
Service manual 4.1
Remount the cover.
3. Run a blood sample 5 to 10 times. Check the precision (CV) by enter the 4. Sample
memory menu. Enter the sequence no. Fr: and To: for the measured 5 to 10 blood samples.
Enter 4.2 Statistical calculations. Note or print out the CV results and compare by below
listed specifications.
Precision for a normal blood
RBC
MCV
HGB
PLT
WBC
<2%
<2%
<2%
<5%
<3%
MCHC
320 – 360
With fresh
normal
blood
sample
5
Dok nr 00920-01
Chapter 13 Trouble shooting
13. Trouble shooting (v 01)
13.1 Trouble shooting guide
Problem
RBC/HGB Unstable
AC920/970
Check
Mixing of the blood sample
Sample pump, pump tubing, sample pump time
Blood sensor, Blood sensor setup
Air mixing in the Mix 1
Remaining detergent in the wash cups
Function of the MV 13
Clog in the pipette or the needle
Diluent syringe, check for leakage
Function MV 6
Draining of the counting beaker, Emptying of the Mixing
beakers after complete cycle
RBC/PLT low, high and/or
unstable
AC920/970
Air mixing in the counting beaker- silicon tubing in the MV
10
Aspiration via the sample pump from the Mix 1 to the
rotary valve (pos 3)
RBC/PLT very low
Check if the reagent tubing’s for Diluent and Lyse are
HGB and WBC quit OK
shifted
PLT unstable, high and very sharp Check and clean the measuring head, the plastic screw for
beginning of the histogram curve the transducer from salted crystallation.
Indication DE(AC+), even high
Check the condition of the outer electrode, contamination.
blank
Check the grounding of the electrode. Coaxial cable to the
Analog board, contamination under the silicon sealing
where the grounding cable is entering into the measuring
head. Check the grounding of the Analog board and Diluter
board.
PLT blank too high
If the histogram curve is a round shape, check for micro
bubbles in the flow system. Diluent syringe, Diluent inlet
tubings.
Exchange the resistor R14 (produce noise) on the Analog
board (only EO+ versions) (located between the relays).
Replace to a metallic resistor 15-16 kOhm on the folieside
of the board.
Contaminated diluent.
ST, TB indications (Air and
MV11 and MV12 and the silicon tubing’s
bubbles)
LT indication (clog)
Too low level into the counting beaker during counting. Check
the transfer from the Mix1 to the Mix2. The transfer from the
Mix2 to the counting beaker.
Air pump and the air valve, transfer time settings (EO+).
Vacuum pump
Leakage in the measuring head, measuring tube.
Silicon sealing.
Contamination of the transducer
Check or clean
Check the capillary cleaning
Check and clean the measuring tube
MV12 function, silicone tube
Check
6
Dok nr 00920-01
Problem
Low/high MCV, unstable
High HGB blank
Indication HI or LO
HGB unstable
WBC / HGB unstable
Chapter 13 Trouble shooting
Incorrect diluent
Transducer
Capillary voltage
Contaminated counting beaker, cleaning
Scratches in the photometer reading area
Adjustment of the photocell voltages, LED current
Air bubble in the counting beaker after air mixing
Air mixing in the Mix2 (Only EO+ version)
Photometer malfunction
Analog board
Transfer from the Mix2 to the counting beaker
Air valve, transfer time settings (AC+)
Max or High PLT, low RBC and
low HGB
Only AC920/970 instruments
The air filter, air pump
Transfer from Mix1 to Mix2 MV2 and MV8, tubing’s
Lyse in the Mix2 from the lyse syringe
Lyse volume
Check the O-ring in the Sample pump.
Transfer from the Mix 2 to the counting beaker
Check in stand by that the Mix2 is empty
Cleaning of the transfer tubing and the metallic tube into the
Mix2
Air valve adjustments, Transfer time settings (AC+)
MV1, MV4, MV8 and MV2 and silicon tubing’s
High RBC blank,
Unstable RBC/HGB
MCHC too high frequently
MCHC decreases
Clean and inspect the two metallic parts of the rotary valve
from blood smear. Exchange if necessary.
Cleaning by the detergent, rubber stocking
The final cleaning of the Mix1 and the Mix2 via the flush
pump and the MV3
Check or calibrate all parameters which are involved in the
calculation of the MCHC (RBC, MCV and HGB)
MCHC = HGB/RBC x MCV = HGB/HCT
Check the RBC blank after repeated blood measurement
No result for WBC, RBC and PLT Check discriminator settings
Only old AC models
Error indication 20X
Communication error between CPU and diluter board.
Only AC920/970EO+ version
Check the cable P105_P216, grounding of the diluter board
(4 screws)
All parameters very low results or Check the Sample pump, tubing
similar blank values
Blood sensor, check at TP1 diluterboard that the voltage is
< 0,3V without blood and > 4,5V with blood in the sensor.
AC 920eo+ -1 –3
Check the wash-up, magnetic sensor, connector P228
Diluter board. Remove the connector and check with Ohmmeter
In the upper position approx. 0 Ohm, In the lower pos.
> 1 Mohm. If not correct, adjust the position of the sensor.
7
Dok nr 00920-01
Chapter 13 Trouble shooting
13.2 Error indications
Indication numbers are displayed when a system failure occurs.
The AutoCounters will stop and will not continue with the process until the indication failure
has been deleted.
Indication numbers in the AutoCounter can occur when it has been a main power and/or
memory failure.
All indication numbers must be deleted by the Menu key. Then by turning off/on the
instrument, the autocounter will be restored and units which not are failed will be restored to
the home position. Each indication number have a specific indication source.
AC type
Indication
numbers
Message
Suggested solutions
General: Delete the errors with Menu key
All AutoCounters
1
Date and time not set
Set date and time in the “6 Setup menu”
“6.4 Set date and time”
All AC
AC910
All AC
AC910 Old
AC910 Old
AC920/970
AC920/970
101
111 – 112
121 – 122
131 – 132
Unspecified motor failure
Pipette motor failed
Diluter motor failed
Lyse syringe motor failed
141 – 142
151 - 152
Vacuum pump failed
Cap piercer/needle motor failed
Turn off and restart the AutoCounter. If the errors still
occur, check the specified unit etc. by enter the Service
program
Check home switches, refer to the displayed indication
of the Service menu
Check for high friction of the moving parts
Check motors and gearboxes
AC920/970 200 - 209
Internal communication error
between the processorboard and
diluterboard
All Auto
Counters
230 - 255
Internal failure in the software
351
352
353
354
355
356
357 – 358
359
360 – 365
366
367
Power on cycle failed
Prime cycle failed
Cleaning cycle failed
Fill cycle failed
Empty Cycle failed
Capillary Cleaning cycle failed
Autoprime cycle failed
Exit-standby cycle failed
Measurement cycle failed
Autosampler cycle failed
Service Cycle failed
These errors occur after a previous 100 – 200 error
Press Menu key and restart the AutoCounter
901 – 905
911
921
931
941
951
999
Configuration failure
Machine statistics lost
Stored samples lost
Normal ranges lost
Calibration raw data lost
X – bar lost
Battery low
Press Menu key and restart the AutoCounter
If not OK, exchange the processorboard
2000 2235
Hardware or software failure
Press Menu key and restart the AutoCounter
If not OK, exchange the processorboard
2500
DSP failure
Press Menu key and restart the AutoCounter
If not OK, exchange the processorboard
3000
Internal failure in the software
Press Menu key and restart the AutoCounter
If not OK, exchange the processorboard
AC920
AC970
Replace/check the cable between Dil. and CPU board,
P216 – P105
Grounding of the diluterboard
Exchange the Diluterboard or Processorboard
8
Dok nr 00920-01
Chapter 13 Trouble shooting
13.3 Warning flags
Warning flags
Description
*
A * (star) will be presented when the results is
outside the specified reference range
####
LT Long time
NC No count
ST Short time
Check the settings in the Setup menu, Set
Reference Range
This will occur when the result is outside the
measurement range
When a electric disturbance during PLT
counting and the PLT results is more than 2000.
This error might be displayed on RBC, PLT,
and/or WBC when the counting time is more
than 15 sec.
When blood measurement, dilute the blood
by Add 10µl blood to 4ml diluent. Rerun the
sample and multiply the results by 2.
This error might be displayed on RBC, PLT,
and/or WBC when the meniscus in the
measuring tube do not reach the lower optical
sensor of the volume board.
This error might be displayed on RBC, PLT,
and/or WBC when the counting time is too
short, lower than 11 sec.
Check / cleaning for clog in the transducer.
Check the vacuum pump
Run single count test
Bubbles in the measuring tube during counting
TB Tube bubbles
DE Distribution error
Suggested solution
Errors from abnormal RBC/PLT and WBC
histogram curve
Check / cleaning for clog in the transducer
Check the function of the Automatic capillary
cleaning in the Maintenance menu
Check the vacuum pump
Check for the level of the dilution RBC/PLT
or WBC during counting. Air bubbles at the
end of the counting.
Check for air in the measuring tube,
Leakage, tubing’s, transducer
Run single count test
Check for air in the measuring tube,
Leakage, tubing’s, transducer
Run single count test
Run a prime cycle
Reanalyse the samples
Check for electric disturbance
Check for micro bubbles in the dilution
Check the offset voltage of the analog board
Check electric connectors to the analog
board, transducer.
Check grounding of the instrument and
analog board
No acceptable minimum found between the
Check if the blood sample is too old
population
of
the
PLT
and
RBC
histogram
curve
Check the settings of the floating discr.
FD Floating Discriminator
Normal settings is 15 / 30 fl
LO Low blank level HGB
HI High blank level HGB
NG Negative HGB
SE Statistical error HGB
The HGB blank level below 3,5V
( Photocell voltage )
The HGB blank level is above 4,6V
( Photocell voltage )
The blank value of the HGB is lower than the
HGB measured value
Cleaning of the counting beaker
Broken beaker,0123 Adjustment of the
photometer
Check/Adjust the photometer
Occur only during blank measurement
Check/clean the counting beaker
The measured pulses from the photometer is too Check/cleaning of the counting beaker and
unstable
photometer
9