1
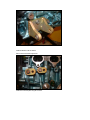
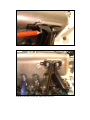
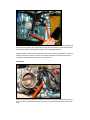
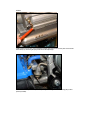
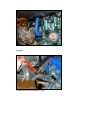
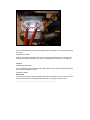
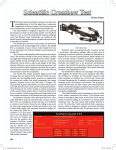
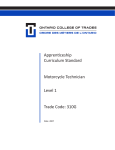
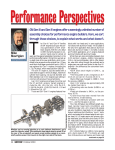
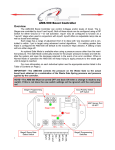
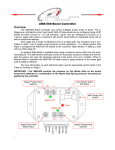
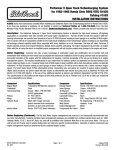
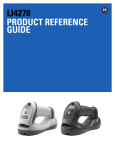
User Manual Honda B16/B18 Supercharger kit
version 1.0
This manual is written for the Honda CRX 1991 (Euro, JDM) B16A1, but also applies to other Honda cars
equipped with the B16/B18 engine. The manual consists of four parts:
•
•
•
•
Installation manual
Performance issues
Tuning guide
Engine building
______________________________________________________________
Installation manual
The B16/B18 Supercharger kit.
Before you start installation
Take some engine bay pictures for later reference.
Make a special drawing of all the coolant hoses going to the different parts of the stock intake, you will need this
later on. The same goes for the vacuum hoses to the different parts of the intake.
Mark the electrical connectors to the MAP sensor and TPS sensor. You will need this later on.
Drain the engine coolant.
The Supercharger kit mounted on a B16A1 Engine.
Removal of parts
Remove factory airbox and plastic intake hose.
Remove the throttle cable from the intake.
Remove all air and water hoses from the intake.
Remove all electrical connectors from the intake.
Remove the fuel pressure line and fuel return line from the fuel rail.
Remove the two bolts underneath the intake (intake bracket).
Remove all nuts holding the intake.
You should now be able to remove the intake.
Remove the plastic wiring clip from the intake bracket.
Bend down these metal wire holders to clear supercharger intake.
Oil system
The oil return drain plug is installed in the block.
Unscrew the stock plug. Install the custom fitting using the stock sealing washer.
The pressurized oil can be taken from the oil pressure sensor. Remove the sensor and fit a suitable fitting/hose/Tpiece etc. in the same manner as a turbo kit uses. Another alternative is to use an adapter plate between the
engine block and oil filter which has an oil outlet.
Install a new oil filter.
Alternator drive system
Remove the alternator drive belt.
Remove the alternator.
Remove the alternator pulley. Replace it with the twin pulley.
Remove the alternator mounting bracket.
Remove the alternator mounting bracket collar (ring-shaped part that the alternator mount bolt passes through).
Install the bracket collar in the new bracket.
Install the new bracket (with the bracket collar installed).
Install the alternator in the new bracket.
Remove the stock tensioner fixing bracket.
Install the two flat offset plates using the stock bolts.
Grind off some material from the tensioner fixing bracket to make it clear the stock bolt heads.
Reinstall the tensioner fixing bracket using the two M10 bolts
Now you shall try if the M8 fixing bolt fits through the alternator and the tensioner fixing bracket. If it doesn't fit you
must adjust the position of the two offset plates until the M8 fixing bolt fits.
Slip the supercharger belt on the inner part of the twin pulley. Just let it hang there until further. Now install the
stock alternator belt on the outer part of the twin pulley and the crank pulley and tension as usual. Tighten the
alternator nuts as usual.
Supercharger install
Remove the air temp sensor from the stock intake and move it to the supercharger intake.
Loosen the two bolts holding the intake bracket to the engine block and let the bracket hang loose.
The supercharger package comes preassembled: Intake/supercharger/intercooler/throttle adapter.
Install a new intake gasket and then install the supercharger package. Make sure the electrical wiring (to injectors
etc) ends up on top of the intake runners. Tighten the intake nuts.
Two of the bottom four nuts are tricky to reach, but it is possible! The nuts can be put in place by hand from above
through the space between the runners.
Wrench with 30cm extension (that can angle a bit).
Use the 30cm extension rod (that can angle a bit) with a suitable socket to tighten the nuts. Do this from below the
car. This exercise can cause a few XXXXs.
Your kit is delivered like this if your car is a CRX 91 (Euro, JDM) the holes are drilled (not through!) and threaded
M8. Otherwise you must mark, drill and thread these yourself. If you by accident drill through the intake, you must
clean out the metal debris from inside the intake.
Install the two M8 pin bolts through the bracket holes by hand.
Install M8 nuts with washers on the pin bolts. Tighten by hand only for now.
Tighten the bracket bolts by hand only first. Make sure the bracket fits properly to the intake (two M8 pin-bolts with
nuts) and the two engine-block bolts. Tighten these nuts and bolts by hand a little bit at a time. When the bracket
is firm both to the intake and the engine block all bolts and nuts can be tightened properly.
Install the fuel injectors and the fuel rail. Connect the fuel lines to the fuel rail. Connect the electrical connectors to
the injectors. Note that some injector connectors must be angled 180 degrees to make them clear the fuel rail
mounting bolts. Connect the electrical connector to the air temp sensor.
Throttle install
Remove the two electrical connectors on the distributor. Also remove the metal bracket holding these connectors.
The two connectors are repositioned lower down to make room for the throttle body. Secure the connectors with
straps.
Remove the throttle body from your stock intake. Remove the four M8 pin-bolts from the stock intake and install
them on the supercharger package. Install the throttle body on the throttle adapter using a suitable gasket.
Remove the metal bracket that holds the throttle cable and the clutch cable (mounted on the shock pillar) if it
interferes with the supercharger drive pulley.
The throttle cable is mounted to a custom bracket which is bolted to the throttle adapter. The bracket is easily
made of a piece of 3mm steel plate. The hole for the throttle cable is 8mm and the cut-out is 6mm wide.
The throttle cable can be reused on some cars, but on others it will be too short. In this case get a longer one for
another Honda car. Your local Honda dealer can help you with this. After the throttle cable is bolted in place you
will need to adjust the length of the wire inside to suit your car. Cut off the stock wire stopper (the one that is inside
the car at the pedal) and install a screw stopper (you can buy this at a bicycle store). Tighten up the wire and
secure the screw stop. Cut off the excess wire. Make sure the throttle opens and closes freely and fully.
Oil lines
Install a pressure oil hose (6mm) to the supercharger oil fitting. Make sure the hose is clean (clean out with solvent
before install), any dirt will clog the spray nozzle and ruin the supercharger.
Install an oil drain hose (the blue hose) from the supercharger drain fitting to the block drain fitting (that you have
previously installed).
Make sure the drain hose has "free fall" from the supercharger to the block.
Fuel System
Reinstall the fuel supply line here using the stock fuel nut.
The fuel pressure regulator shall be installed here.
Fuel pressure regulator Angled type CRX 91.
Fuel pressure regulator Straight type Civic 92-95.
Reinstall the return fuel line to the fuel pressure regulator. Reinstall the fuel pressure regulator vacuum hose. (See
vacuum hoses section).
Coolant hoses
Reconnect the U-shaped stock coolant hose to the intake fitting.
Now it's time to connect the smaller (8mm) coolant hoses. These shall be connected in the same manner and
order as stock, just that you will need longer hoses for most of them.
If you are using the stock idle air units (mounted on a custom adapter plate) these shall also be connected as per
stock. If you are building a pure race car the idle air units are not necessary.
Electrical connectors
Reconnect all the electrical connectors to their relevant position. You might have to lengthen the wiring on some of
the connectors. Make sure you don't mix up the MAP sensor connector and the TPS sensor connector (they are
similar). If your throttle body has a MAP sensor mounted in it, you must remove this sensor and plug the hole. The
MAP sensor is then repositioned to a suitable position and a vacuum hose is routed to the intake plenum.
Vacuum hoses
The supercharger is ventilated here. Install a 6mm vacuum hose; connect it to one of these positions:
•
Valve cover (for example next to the valve cover breather)
•
Air filter piping (between the air filter and throttle body)
•
A separate breather can (can ventilate both valve cover and supercharger)
•
To ambient air (use a small air filter)
Since the stock intake is not used anymore, all the vacuum hoses must be repositioned:
MAP sensor hose - To intake plenum. (plug the stock fitting on throttle body)
Fuel pressure regulator hose - To intake plenum. (on some models this hose is routed via a cut-off valve, in this
case use that valve in the same manner as stock)
Cannister valve hose small - To throttle adapter.
Canister valve hose "red fuel type" - To throttle body as per stock.
Throttle dashpot hose - To air filter piping.
Valve cover breather - To air filter piping.
Vac “C” fitting. This can be used for crank case breather hose and idle air plate connection. If both are used, install
a “Y”-piece in order to connect both.
The brake servo hose is connected here. You might have to lengthen the hose.
Install a vacuum hose to the BC500 and/or boost gauge.
If you are not using one or more vacuum outlets, these must be blocked with a piece of hose and an inserted
blocking part (bolt etc.)
Idle air units
These are normally mounted on the stock intake or on the stock throttle body. If they are mounted on the throttle
body, just leave them there. If they are mounted on the stock intake they must be removed from the stock intake
and mounted to a custom idle plate. This plate has two air fittings: From Air filter and To Vac “C”. These shall be
connected as:
From Air filter connects to the Air filter piping.
Vac “C” connects to the throttle adapter Vac “C” fitting.
The coolant hoses are connected in the same order as per stock (already done, right?).
The custom idle plate can be mounted anywhere you find a suitable space.
Idle air plate Civic 92-95
Idle Air connections on Civic 92-95
Idle Air connections on CRX 91
Drive belts
idle air plate CRX 91
The supercharger is driven by a belt from the alternator which in turn is driven by a belt from the engine
crankshaft. Note the position of the tensioner (standard position).
Reverse position of tensioner.
The supercharger belt is already installed loosely. Now slip it over the supercharger pulley (use the outer tracks).
Use the outer tracks of the twin pulley.
Tension the belt using the manual tensioner. Tighten the M6 bolt on the tensioner carefully. Not too much please
(there is a bearing inside the charger at this position).
If you need to remove the supercharger pulley, make a simple tool like this one to hold the pulley while loosening
the pulley bolt. Note that the pulley bolt is left threaded!!!!!
Air filter
You can use the factory air box if desired but most like to replace it with an open air filter (K&N or equivalent). The
filter (or factory box) is connected to the throttle body with custom pipes and silicon hoses. Make sure that this
piping has vacuum outlets for the relevant hoses (dashpot, valve cover breather, idle air).
Intercooler system
The supercharger intake is equipped with an integrated liquid intercooler. This is connected to a separate radiator
and an electrical pump.
The system is filled through a silicon hose attached to the intake/intercooler endplate.
Remove the stock radiator.
Install the intercooler radiator in front of the stock radiator. Install the electrical pump below the battery (CRX).
Connect the intercooler radiator/pump/intercooler using 3/4" (19mm) hose.
Intercooler connections on the intake.
Connect the electrical wires from the pump to a suitable voltage source (ignition 12V or even better the fuel pump
relay output).
Reinstall the stock radiator.
Fill up the system with pink alu engine coolant. You must top up the coolant until all air is out of the system. This
can take up to 20 fillings with the engine run in-between. Just keep filling up coolant before you run the engine.
Closing up
Fill up the engine with coolant.
Turn on the ignition and make sure the intercooler coolant circulates. Check for leaks. Stop now and then and top
up the coolant as air bubbles are vented.
Fill engine oil if needed.
Engine control
Your engine must obviously be fuelled and ignited by other than stock parameters. How you do this is your choice.
We use and recommend our own designed Civinco BC500. See our tuning guide for more info on this.
______________________________________________________________
Performance issues
If you really want to get the most out of your supercharged engine there are a few thing to consider.
1. Throttle body
The throttle body is a restriction at high rpm, which hinders top Hp. Much more so in a supercharged engine than a
turbo engine since the air passing the throttle body is at atmospheric pressure which means that a lot more
volume of air is passing the throttle body. Therefore it is advisable to upgrade to a bigger throttle body. Use one in
the region 60-65mm if possible. Don’t forget to port the supercharger inlet to match the throttle body if not already
done. Also the piping to the throttle body must be of equal or greater diameter than the throttle body. Use a
suitable open air filter designed for 400Hp, this will give minimal pressure drop.
2. Ignition energy
If you are using high boost your stock Honda ignition system may not be providing enough energy to produce an
adequate spark. You have several options here:
Try one step colder plugs. (We use NGK BKR7E-N-11).
Try Iridium plugs which require less voltage to fire a spark.
Use a voltage booster to the ignition coil power supply.
Install an aftermarket ignition amplifier (MSD etc.)
3. Exhaust
A supercharged engine will benefit from a well designed exhaust in the same manner as a NA engine, but will
require larger diameter piping. Use minimum 2.5".
4. Intercooling temperature
The colder the intercooler water temperature the more power you will be making. Use a good size radiator and
consider a cooling fan. This is particularly useful when standing still with engine running before racing. For drag
racing it is possible to use a small ice-filled tank positioned just before the pump. This will provide you with very
cold intake air for one race.
5. Nitrous
Nitrous is a good way to increase engine power for drag racing. You have two options here:
1. Use a dry system that injects the nitrous before the throttle body. The extra fuel must be supplied by the fuel
injectors.
2. Use a wet system with one nozzle in each intake runner.
6. Engine internals
If you run reasonable boost levels you can use a stock engine, but if you want big Hp, you must strengthen the
engine internals. The most important factor is to lower the compression ratio. How much depends on boost, fuel
quality etc.
The serious racer does a complete rebuild with resleeving, forged rods, forged low compression pistons etc.
A middle way is to keep the engine stock but install a thick head gasket. This will lower the compression ratio and
allow a bit higher boost.
7. Other performance issues
You will need a stronger clutch to handle the increased torque.
The car will handle better with the high torque if you install a limited slip differential.
A brake upgrade can be advisable on some models.
______________________________________________________________
Tuning guide
General tuning requirements
When installing a supercharger there are several tuning issues to consider. These will be explained in this
document. But there are also mechanical issues that affect the tuning of your engine. The obvious one is that your
engine is built strong enough to handle the increased power. This is explained in the engine building section. Then
there is the mechanical design of your engine. The most important things to consider are:
Compression ratio CR
Your stock Honda engine will have a CR of around 9.5 to 11. The higher the compression ratio, the easier your
engine will detonate, but at the same time a higher compression ratio will produce more power (as long as it is
kept from detonating). So you want to have the CR low but also high! OK, we have to compromise. Generally we
recommend that you lower the stock CR by 1 point for medium boost (15 psi) and by 2 points for high boost (20+
psi). If your car is a race only car (or if you are very rich) you can use high octane racing fuel and keep the stock
CR for medium boost and lower one point for high boost.
These are guidelines only, every engine is different, you decide!
Cylinder head porting and camshafts
Honda Vtec cylinder heads flow well even as stock. But there's always some more power to gain by porting,
camshafts and valve jobs. We recommend careful porting together with a sporty type of camshaft (type R or
equivalent) and multi angle valves (preferably stainless to resist heat).
Exhaust system
A supercharged engine reacts well to exhaust headers and large diameter exhaust system with low resistance
mufflers. Exhaust piping is recommended to be of 2.5" diameter or more.
Fuel tuning
When forcing air into the engine you need to match this by adding fuel as well. Normally we run our engines at
lambda 0.80 to 0.85 at full boost. Too lean fuelling will increase heat and possibly damage your engine. Too rich
fuelling will decrease power a bit, but it does lower combustion temperature.
Honda engines are regulated by the O2 sensor until you hit almost full throttle. But in a supercharged engine you
will have boost way before full throttle. So we need to richen the mixture during part throttle but boost conditions.
This is done by a throttle pull-up electric function incorporated in our BC500. If you are using some other brand
engine control, be careful with this as it can quickly ruin your engine. Make sure that you can control the open loop
lambda condition.
There are three ways to add fuel that are acceptable:
1. Larger than stock injectors
2. Four extra injectors, one in each intake runner
3. Increased fuel pressure (only for low boost)
The BC500 can be used in any of these three methods.
When tuning the fuel be sure to have an accurate lambda meter. We recommend installing it prior to
supercharging so you can see the lambda values on the stock engine.
Fuel pump - Fuel pressure
The stock fuel pump can only flow so much at a given pressure. Remember that even though the system pressure
(45psi) is constant, the absolute pump pressure increases with increased boost. Increased fuel pressure means
the flow capacity will go down. On high boost applications you will need to install a high performance fuel pump or
increase the voltage to the stock pump. We have successfully used the stock fuel pump at 17 volts at 24psi boost 400Hp.
Ignition tuning
Stock Honda ignition coils are not high energy. They can be used on low boost engines only. After that you need
to beef up the coil output. One easy method is to use a voltage booster which increases the supply voltage to the
stock coil and thus increases the coil energy. Other alternatives are the use of an aftermarket external coil. The
use of Iridium sparkplugs is recommended, they resist heat and they require less voltage to fire a spark. Otherwise
try using a sparkplug which is one grade colder than stock.
Once you have enough energy in your ignition system, it's time to start tuning. The stock timing curve may be OK
for low boost or high octane, but otherwise you must retard the timing. This is done to avoid detonation. A bit
simplified you can say: retard timing until detonation stops and then another two degrees to be on the safe side.
All engine react differently to timing retard so it's difficult to give guidelines on this, but something like 10 degrees
retard at 15psi is pretty normal.
Nitrous tuning
Nitrous and supercharging are possible to use together, expect very high power levels, make sure your fuel
system and ignition system are adequate. Supercharging and nitrous can be simultaneously controlled by the
BC500.
When using nitrous you need to do the same as when supercharging: add fuel and retard timing. Some nitrous
systems have their own fuel enrichment so you don’t have to worry about this. Just remember that direct port is
fine but if you add fuel before the supercharger (at the throttle body) the fuel will have to pass the intercooler,
which is not very good. If you are using a dry system then the added fuel comes from the fuel injectors. The
BC500 can control fuel enrichment with nitrous.
Ignition timing may need to be retarded, but not in all cases. Nitrous cools the intake air which prevents
detonation, but it also contains more oxygen which increases detonation. Depending on boost, CR and amount of
nitrous you might need some timing retard. The BC500 can control the nitrous timing retard.
_____________________________________________________________
Engine building
Block
For very high boost it is advisable to install stronger cylinder sleeves. Several makes are available, Darton, AEBS
etc.
Rods
Use forged rods. Several makes are available, Eagle, Crower etc.
Pistons
Use forged low compression pistons. Several makes are available, Wiseco, JE, Arias etc.
Head gasket
Use a performance head gasket. We use multi layer steel gaskets, either stock or Cometic.
Cylinder head
The Honda head flows well, but everything can be improved on. Use a sporty type cam (Type R or equivalent).
Don't overdo the porting process. Use stainless valves (multi angle). You can experiment with cam timing to
achieve power gains.