1
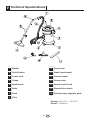
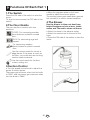
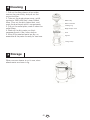
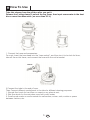
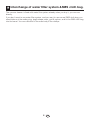
Vacuum Cleaner
Instructions for use
Please read this manual first!
Dear Customer,
We hope that your product which has been manufactured in modem facilitiesand passed
through a strict quality control procedure will give you the best results.
Therefore, we advise you to read through this manual carefully before using your product and
keep it for future reference.
This user manual will...
... help you use your machine in a fast and safe way.
• Please read the User Manual before installing and starting your machine.
• Particularly follow the instructions related to safety.
• Keep this User Manual within easy reach. You may need it in the future.
• Please read all additional documents supplied with this machine.
Please note that this User Manual may be applicable for several other models. Differences
between models will be identified in the manual.
This product has been produced in
environmentally friendly, modern facilities
Contents
1
Important Safety Instructions 2
5
Emptying The Dust Compartment 5
2
Technical Specifications 3
6
Cleaning 5
3
Functions Of Each Part 4
7
Storage 6
4
Unclogging The Hose 5
8
How To Use 6
9
Interchange of water filter system & SMS clotWh bag 1 l EN
9
1 Important Safety Instructions
•The mains voltage in the house must be
the same as that of the appliance, which is
specified on data plate at the bottom of the
cleaner.
Otherwise the cleaner may be damaged.
• If the mains voltage does not suit to the
cleaner, connect a 110/220 V 2.1 kVA
transformer. The vacuum cleaner does not
have to be connected to an earthed socket.
• Do not leave vacuum cleaner when
plugged in. Turn off the switch and unplug
the electrical cord when not in use and
before servicing.
• The vacuum cleaner and other electrical
appliances (e.g. receivers, mobile phones)
may be affected when they are used nearby.
• Do not use the vacuum cleaner outdoors
or on wet surfaces.
• Do not use the vacuum cleaner in
horizontal position.
• Do not allow to be used as a toy.
Close attention is necessary when used by
or near children.
• Do not use with damaged cord or plug. If
vacuum cleaner is not working as it should,
has been dropped, damaged, left outdoors,
or dropped into water, return it to a service
center before using.
• Do not pull or carry by cord, use cord as
a handle, close a door on cord, or pull cord
around sharp edges or corners. Do not run
vacuum cleaner over cord. Keep cord away
from heated surfaces.
• Do not unplug by pulling on cord.
To unplug, grasp the plug, not the cord.
• Do not handle plug or with wet hands.
• Do not put any object into openings. Do
not use with any opening blocked; keep
free of dust, lint, hair, and anything that may
reduce airflow.
• Keep hair, loose clothing, fingers, and
all parts of body away from openings and
moving parts.
• Do not pick up anything that is burning or
smoking, such as cigarettes, matches, or
hot ashes.
• Do not use without dust bag or filter(s) in
place.
• Turn off all controls before unplugging.
• Do not use to pick up flammable or
combustible liquids such as gasoline, or use
in areas where they may be present.
• Always turn off this appliance before
connecting or disconnecting hose, nozzle or
accessory tools.
• Hold plug when rewinding onto cord reel.
Do not allow plug to whip when rewinding.
• For household use only. Use vacuum
cleaner only for its intended use as
described in the instructions.
2 l EN
2 Technical Specifications
1
Handle
9
Floor brush
2
On/off button
10 Small round nozzle
3
Power cord
11 Crevice nozzle
4
Clamp
12 Hose socket
5
Small wheel
13 Speed control knob
6
Body
14 Wooden floor brush
7
Hose
15 Suction power regulator plate
8
Tube
Voltage: 220-240 V ~ 50-60HZ
Power: 1400Wnom
3 l EN
3 Functions Of Each Part 1
1.The Switch
• Move the regulator plate on the hose
handle to adjust the suction power.
The suction power gets weak when opened,
but normally it is used in closed condition.
Press the ON side of the switch to start the
motor.
To stop the motor.press the OFF side of the
switch.
4.The Blower
2.The Floor Nozzle
Use the blower to blow out dust from
behind furniture.on bric-a-brac, inside
radios and TVs.and to clean out hoses.
The two-way floor nozzle is with two
positions.
• Attach the hose to the exhaust outlet.
• Attach the crevice tool to the end of the
hose.
• Press the ON side of the switch to start the
motor.
FLOOR: For vacuuming wooden
floors,linoleum or plastic covered
floor.
RUG: For vacuuming rugs and
carpets.
For vacuuming wooden
floors,linoleum or plastic covered
floor.
Use the crevice nozzle for corner or
edge places. If the water is much on
the floor, you could also use the long
crevice nozzle to absorb.
Use the round nozzle for furniture,
curtain, ceiling, etc.
3.Suction Control
• Turn the speed control knob to adjust the
power & suction power.
The power get minimum when turn the knob
to “MIN”, and the power get maximum when
turn the knob to “MAX”.
4 l EN
4 Unclogging The Hose
When the hose is clogged with
dust,remove it in the following manner.
1. Pull off the hose, and insert the hose
handle into the suction base.
NOTE:
Do not use the hose without the handle
in place.lf the hose is used without the
handle, the hose will bend excessively,
causing it to break
2. Turn on the vacuum cleaner, and the
clogged substances will be exsucted.
5 Emptying The Dust Compartment
When suction power decreases, that
means the dust compartment Is full, turn
off the motor, pull out the hose from the
suction port of the main unit,and clean
out the dirt In the following manner.
1. Remove the cloth filter/water filter
system and clear out the dirt in the dust
compartment.
2. Put back the filter/water filter system to
the previous position and place the top
section to the dust compartment.
NOTE:
The switch and suction inlet in the unit
should face the same direction.
5 l EN
Cleaning
1. Pull out the fixing clamp at two sides,
remove the main body, and pull out the
motor inlet filter.
2. Take out the bugle shape cover, grid &
syphon(or SMS dust filter), clean Swash
them. Pour out the dirty water/dust, and
wash the dust barrel and it’s components.
3. Pull out the outlet plate, wash & clean the
outlet filters.
4. Wash all the dirty parts you think
necessary(brush, tube, hose, etc)too.
5. After all the washed parts are dry, reassemble all the parts correctly for next use.
Main body
Motor inlet filter
Sealing ring
Bugle shape cover
Grid
Syphon
Fixing clamp
7 Storage
When vacuum cleaner is not in use, store
attachments as shown in fig.
6 l EN
8 How To Use
Take this cleaner from the gift box after you get it.
Release the 2 sides clamp to unlock the top cover, then input some water in the dust
bin no more than Max mark ( no more than 2.5 L)
1 .Connect the hose and accessories:
For suck, Insert the hose head into the “hose socket”, and then turn it to be lock for blow,
take off the out-let frame, and connect the hose with the out-let socket
realese
strengthen
2.Connect the tube to the end of hose.
Then Connect different nozzle/brush to the tube for different cleaning purposes:
1. Normal floor brush for hard floor or carpet or any place is wet;
2. Wet floor brush for the wet place, even with much water;
3 .Small round nozzle or crevice nozzle for wall surface, corner, sofa, curtain or space
between furniture, etc.
7 l EN
hose handle
tube
tube
brush
3.Turn on the machine:
Pull out the cord, then insert the plug into the power socket with conforms to that on the
rating label for the power supply. Press the on/off button, then the machine could start
working.
During the cleaning, you could change the power by turning the “speed regulator” button.
pulg it
8 l EN
9 Interchange of water filter system &SMS cloth bag.
The vacuum cleaner is fixed with water filter system already when you buy it, you can use
directly.
If you don’t want to use water filter system, and you want to use normal SMS cloth bag, you
should take out the sealing ring, bugle shape cover, grid & syphon, and fix the SMS cloth bag
into the barrel. You can use after fix the main body & the clamps.
9 l EN