1
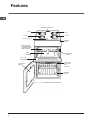
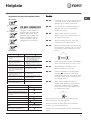
Operating Instructions 50cm Free Standing Electric Cooker Contents GB English, 1 Warning, 2 Introduction, 3 For Your Safety, 4 Installation, 5 Features, 6 Control Panel. 7 Hotplate, 8-10 Grilling, 11 ID50C1 S Grill Chart,12 Top Oven, 13 Main Oven, 14-15 Cooking Charts, 16-17 Care and Cleaning, 18-19 Something Wrong with your cooker?, 20 Cooking not satisfactory?, 21 If it still Won't Work, 22 Disposal of the appliances, 23 Guarantee Information, 24 Service Information, 25 GB WARNING WARNING: The appliance and its accessible parts become hot during use. The internal surfaces of the compartment (where present) may become hot. Care should be taken to avoid touching heating elements. Children less than 8 years of age shall be kept away unless continuously supervised. Never use steam cleaners or pressure cleaners on the appliance. Remove any liquid from the lid before opening it. This appliance can be used by children aged from 8 years and above and persons with reduced physical, sensory or mental capabilities or lack of experience and knowledge if they have been given supervision or instruction concerning use of the appliance in a safe way and understand the hazards involved. Children shall not play with the appliance. Cleaning and user maintenance shall not be made by children without supervision. Do not close the glass cover (if present) when the gas burners or electric hotplates are still hot. WARNING: Unattended cooking on a hob with fat or oil can be dangerous and may result in fire. NEVER try to extinguish a fire with water, but switch off the appliance and then cover flame e.g. with a lid or a fire blanket. ! When you place the rack inside, make sure that the stop is directed upwards and in the back of the cavity. ! VERY HOT SURFACES FOOD OR GREASE ON THESE SURFACES COULD CAUSE SMOKE AND POSSIBLY EVEN BURN YOU MUST KEEP THE OVEN AND GRILL CAVITIES CLEAN ! ATTENTION DURING INSTALLATION THE FEET OF THE APPLIANCE MUST BE LOWERED SO THAT AN AIR GAP OF AT LEAST 10MM (1CM) IS LEFT BETWEEN THE BASE OF THE APPLIANCE AND THE FLOOR. WARNING: Danger of fire: do not store items on the cooking surfaces. WARNING: If the surface in glassceramic is cracked, switch off the appliance to avoid the possibility of electric shock. Do not use harsh abrasive cleaners or sharp metal scrapers to clean the oven door glass since they can scratch the surface, which may result in shattering of the glass. WARNING: Ensure that the appliance is switched off before replacing the lamp to avoid the possibility of electric shock. 2 10 mm GB ! ATTENTION WHEN USING THE MAIN OVEN YOU MUST ENSURE THAT THE BASE OF THE CAVITY IS NOT COVERED WITH ALUMINUM FOIL, UTENSIL OR ANY OTHER FORM OF COVERING. FAILURE TO DO THIS MAY RESULT IN THE CAVITY BEING DAMAGED. Introduction To help you make the best use of your cooker, PLEASE READ THIS BOOKLET CAREFULLY. Your new cooker is guaranteed and will give lasting service. The guarantee is only applicable if the cooker has been installed in accordance with the Installation Instructions. The cooker is designed specifically for domestic use and responsibility will not be accepted for use in any other installation. When first using the cooker ensure that the room is well ventilated (e.g. open a window or use an extractor fan) and that persons who may be sensitive to the odour avoid any fumes. It is suggested that any pets be removed from the room until the smell has ceased. This odour is due to any temporary finish and also any moisture absorbed by the insulation. When the cooker is first used an odour may be emitted. This will cease after a period of use. GB Our policy is one of continual improvement in design and development, therefore strict accuracy of illustrations and descriptions cannot be guaranteed. * The guarantee is subject to the provisions that the appliance: (a) Has been used solely in accordance with the Users Instruction Book. (b) Has been properly connected to a suitable supply voltage as stated on the rating plate attached to this equipment. (c) Has not been subjected to misuse or accident or been modified or repaired by any person other than the authorised employee or agent. (d) Has been correctly installed. Technical Characteristics Top Oven Dimensions (HxWxD): 17,8 x 41,5 x 44,4 cm Volume: 33 Litres Max. Oven Power Absorption: 1900 W ENERGY LABEL and ECODESIGN Regulation (EU) No 65/2014 supplementing Directive 2010/30/EU. Regulation (EU) No 66/2014 implementing Directive 2009/125/EC. Standard EN 60350-1 Standard EN 50564. Declared energy consumption for Natural convection Class heating mode: Static Main Oven Dimensions (HxWxD): Volume: Max. Oven Power Absorption: 37 x39,2 x 41 cm 60 Litres 1700 W SAFETY ADVICE IN CASE OF A CHIP-PAN FIRE In the event of a chip pan fire or any other pan fire. 1. TURN OFF THE COOKER APPLIANCE AT THE WALL SWITCH. 2. COVER THE PAN WITH A FIRE BLANKET OR DAMP CLOTH, this will smother the flames and extinguish the fire. 3. LEAVE THE PAN TO COOL FOR AT LEAST 60 MINUTES BEFORE MOVING IT. Injuries are often caused by picking up a hot pan and rushing outside with it. NEVER USE A FIRE EXTINGUISHER TO PUT OUT A PAN FIRE as the force of the extinguisher is likely to tip the pan over. Never use water to extinguish oil or fat fires. ENERGY LABEL and ECODESIGN Regulation (EU) No 65/2014 supplementing Directive 2010/30/EU. Regulation (EU) No 66/2014 implementing Directive 2009/125/EC. Standard EN 60350-1 Standard EN 50564. Declared energy consumption for Natural convection Class heating mode: Fan oven Hob ECODESIGN Regulation (EU) No 66/2014 implementing Directive 2009/125/EC. Standard EN 60350-2. Standard EN 50564. Voltage and Frequency 240V~ 50/60Hz This appliance conforms to the following EEC Directive: - 2006/95/EC EC of 12/12/06 (Low Voltage) and subsequent modifications; EC of 15/12/04 (Electromagnetic - 2004/108/EC Compatibility) and subsequent modifications; EEC of 22/07/93 and subsequent - 93/68/EEC modifications. EC - 2002/96/EC - 1275/2008/EC (Stand-by/ Off mode) 3 For your Safety GB Please read the precautions below before using your cooker. ALWAYS . . . ALWAYS Remove all packing from inside the oven and grill compartments before switching on for the first time. ALWAYS Understand the controls prior to using the appliance. ALWAYS Keep children away from the appliance when grilling as the surfaces will get extremely hot during and after use. ALWAYS Turn controls off when you have finished cooking and when not in use. ALWAYS Stand back when opening an oven door to allow any build up of steam or heat to disperse. ALWAYS Use dry good quality oven gloves when removing items from the oven/grill. ALWAYS Place pans centrally over the hotplate making sure handles are kept away from the edge of the hob and cannot become heated by other hotplate/pans. ALWAYS Take care to avoid heat/steam burns when operating the controls. ALWAYS Turn off the electricity supply at the wall switch before cleaning and allow the appliance to cool. ALWAYS Make sure the shelves are in the correct position before switching on the oven. ALWAYS Keep the oven and grill doors closed when the appliance is not in use. ALWAYS Take care when removing items from the grill when the lower oven is on as the contents will be hot. ALWAYS Keep the appliance clean, as a build up of grease or fat from cooking can cause a fire. ALWAYS Follow the basic principles of food handling and hygiene to prevent the possibility of bacterial growth. ALWAYS Keep ventilation slots clear of obstructions. ALWAYSl Refer servicing to a qualified appliance service engineer. ALWAYS Take care to avoid touching heating elements inside the oven, as during use the oven becomes hot. ALWAYS The appliance must be used by adults only for the preparation of food, in accordance with the instructions outlined in this booklet. Any other use of the appliance (e.g. for heating the room) constitutes improper use and is dangerous. The manufacturer may not be held liable for any damage resulting from improper, incorrect and unreasonable use of the appliance. 4 NEVER . . . NEVER NEVER NEVER NEVER NEVER NEVER NEVER NEVER NEVER NEVER NEVER NEVER NEVERl NEVER NEVER NEVER NEVER NEVER Never line the interior of the oven with foil as this may cause the appliance to overheat. Never leave children unsupervised where a cooking appliance is installed as all surfaces will be hot during and after its use. Do not allow children or persons who are not familiar with the appliance to use it, without supervision. Never allow anyone to sit or stand on any part of the appliance. Never store items above the appliance that children may attempt to reach. Never leave anything on the hob surface when unattended and not in use. Never remove the oven shelves whilst the oven is hot. Never heat up unopened food containers as pressure can build up causing the container to burst. Never store chemicals/food stuffs, pressurised container in or on the appliance, or in cabinets immediately above or next to the appliance. Never place flammable or plastic items on or near the hob. Never fill a deep fat frying pan more than 1/3 full of oil, or use a lid. DO NOT LEAVE UNATTENDED WHILE COOKING. Never operate the grill with the grill door closed as this will cause the appliance to overheat. Never use the appliance as a room heater. Never use the grill to warm plates. Never dry any items on either the hob or oven doors. Never install the appliance next to curtains or other soft furnishings. Never use steam cleaners. ! The appliance should not be operated by people (including children) with reduced physical, sensory or mental capacities, by inexperienced individuals or by anyone who is not familiar with the product. These individuals should, at the very least, be supervised by someone who assumes responsibility for their safety or receive preliminary instructions relating to the operation of the appliance. Installation WARNING – THIS APPLIANCE MUST BE EARTHED. Positioning the Cooker GB Electric cookers come without a power supply cable. The cooker is designed to operate on an electricity supply which conforms to the electrical data shown on the Rating Plate. The cooker can be connected to the mains only after removing the back panel of the cooker itself with a screwdriver. ! The following installation procedure must be carried out by a qualified electrician. The electrical installation must comply with the IEE Regulations, Building & local By-Lays. For the installation of the feeding cable carry out the following operations: 1 Open the terminal board by inserting a screwdriver into the side tabs of the cover. Use the screwdriver as a lever by pushing it down to open the cover (see diagram). 2 Loosen the cable clamp screw and remove it, using a screwdriver as a lever (see figure). 3 Remove the wire contact screws L-N- , then fasten the wires under the screw heads, respecting the colour code: Black/Blue (N), Red/Brown (L) and Bare Wire/Yellow-Green ( ). Once the connections have been made, tighten all the terminal screws fully. Fasten the supply cable in place with the clamp and close the cover of the terminal board. N.B.: the power supply cable must have these minimum requirements: Type: H05RR-F H05VV-F Section: 3x4 mm2 650 mm Electrical connection 150 mm Moving the Cooker 150 mm The height of the cooker can be adjusted by means of adjustable feet in the plinth (900mm - 915mm). Adjust the feet by tilting the cooker from the side. Then install the product into position. NOTE: This appliance must not be fitted on a platform. The cooker is designed to fit between kitchen cabinets spaced 500mm apart. The space either side need only be sufficient to allow withdrawal of the cooker for servicing. It can be used with cabinets one side or both as well as in a corner setting. It can also be used free- standing. Adjacent side walls which project above hob level, must not be nearer to the cooker than 150mm and should be protected by heat resistant material. Any overhanging surface or cooker hood should not be nearer than 650mm. Before moving your cooker check that it is cool, and switch off at the cooker control unit. Movement of your cooker is most easily achieved by lifting the front as follows: Open the grill door sufficiently to allow a comfortable grip on the underside front edge of the oven roof, avoiding any grill elements. Note: Take care in moving the cooker as it is heavy. Take care to ensure that any floor covering is not damaged. Splashplate optional, apply to Parts Department (see Back Cover for contact number.) 5 Features GB HOB VENTILATION SLOTS 1700W 1200W 1200W 1700W Hob Hot Indicators CONTROL PANEL GRILL/MEAT PAN WITH REMOVABLE HANDLE AND WIRE FOOD SUPPORT GRILL/ TOP OVEN MODEL & SERIAL NUMBER GRILL/ TOP OVEN DOOR INNER GLASS DOOR MAIN OVEN WIREWORK SHELF SUPPORTS OVEN ROD SHELVES 6 Control Panel GRILL MAIN OVEN INDICATOR INDICATOR LIGHT LIGHT TIMER GRILL MAIN OVEN GB PLATE INDICATOR LIGHT LEFT FRONT PLATE LEFT REAR PLATE RIGHT REAR PLATE RIGHT FRONT PLATE Control Knobs Main oven control The knobs for the hotplates can be rotated in either direction to provide variable heat control, the Main Oven knob can only be rotated clockwise from the Off position. Note: Always ensure that all controls are in the OFF position, when the appliance is not in use. The hob hot warning lights will operate soon after each of the heating areas have been switched on. Each warning light will remain illuminated until each heating area has cooled down. Operating the control when the grill is in use In common with all cookers having controls sited above the grill compartment, care must be taken when setting the controls, due to hot air being emitted from the grill compartment. Top oven control This control swiches on the top and bottom heating elements in the top oven.The temperature in the oven can be set anywhere between 100oC and 230oC. The indicator light will glow initially and remain on during all working period of top oven/grill. The top oven thermostat light will come on until the oven reaches the required temperature. It will then cycle off and on as the top oven thermostat maintains the correct temperature.The off position is identified by an “0”. This control switches on the main oven. To select Fan Cooking - Turn the control clockwise and select any temperature between 80 °C and 230 °C. As the control is turned the fan will start, the oven interior light and the main oven thermostat light will come on and the heating element around the fan will start heating. The fan and the oven interior light will remain on throughout cooking. The main oven thermostat light will come on until the oven reaches the required temperature. It will then cycle off and on as the reduce energy usage. Full details of this can be found in the “Slow Cook” section of this book. Cooling ventilation In order to cool down the external temperature of the oven, a cooling fan blows a stream of air between the control panel and the oven door. ! Once cooling cooled cooking has been completed, the fan remains on until the oven has down sufficiently. Top Oven Light Switches on when the top oven is in operation. 7 Hotplate GB CAUTION: IF AT ANY TIME A CRACK IN THE SURFACE BECOMES VISIBLE, DISCONNECT THE APPLIANCE IMMEDIATELY FROM THE SUPPLY. Under no circumstances should the hob be used with aluminium foil in contact with the hob surface as damage can occur. The following boiling plates are located beneath the decorative circular patterned cooking areas:Front left 6 heat: 1200W Rear left 6 heat: 1700W Rear right 6 heat: 1200W Front right 6 heat: 1700W The cooking areas change colour when heated (become red) indicating which heating element is switched on. The cooking area returns to its original colour when the heating element is switched Off. Turn the control to 6 for fast cooking. To cook more slowly or simmer, turn the control to a lower setting according to the size of the saucepan and the amount of liquid. The two small Hotplates are specially for smaller pans, low temperature cooking and simmering. Do Not leave a hotplate switched on without a pan as this wastes energy and may shorten the life of the hotplate. CONTROL SETTINGS GUIDE This is provided only as a guide – settings also depend on the type of pan used and the quality of food. Knob Position Type of food 1 1 or 2 Warning: Even though the cooking area has returned to its original colour it may still be hot. The controls for the hotplates can be turned in either direction. Turn the control to 6 for fast cooking. To reduce the heat to cook more slowly or simmer, turn the control to a lower setting according to the size of the saucepan and the amount of liquid. Pans can be placed on the unheated areas of the panel when cooking is finished and before serving food. It is inadvisable at any time to leave a heating element switched on without a pan in position as this wastes energy, and could make soil or rub-off from aluminium pans more difficult to remove. To protect elements against over-heating, safety cut-outs have been incorporated with each element. After several minutes with the control at setting 6 the safety cutout switches the element Off and On continuously, thus preventing any adverse effects that may be caused by an excessive build-up of heat in the cooking area. Use of Hotplates Note: Under no circumstances should the hob be used with aluminium foil in contact with the hob surface. 8 3 4 or 5 5 or 6 6 To melt butter, chocolate, etc. To To To To heat food gently. keep small amounts of water simmering. heat sauces, containing egg yolks and butter. simmer: stews, meat, fish, vegetables, fruit. To heat solid and liquid foods. Keep water boiling. Thaw frozen vegetables. Make 2-3 egg omelettes. To cook foods, just above simmering. To maintain 'rolling' boil for preserve making. To seal meat and fry fish. Frying potatoes. Bringing water to the boil. Deep fat frying. Dissolve sugar for preserve making. Safety requirements for deep fat frying 1. Use a deep pan, large enough to completely cover the appropriate heating area. 2. Never fill the pan more than one-third full of oil. 3. Never leave oil or fat unattended during the heating or cooking period. 4. Never try to fry too much food at a time, especially frozen food. This only lowers the temperature of the oil or fat too much, resulting in greasy food. 5. Always dry food thoroughly before frying, and lower it slowly into the hot oil or fat. Frozen foods, in particular, will cause frothing and spitting, if added to quickly. 6. Never heat fat, or fry, with a lid on the pan. 7. Keep the outside of the pan clean and free from streaks of oil or fat. Hotplate Hotplates General Information Notes Do Not PANS SHOULD Do not cook directly on the hob surface without a cooking utensil, as this will result in damage to the surface of the hob. Do not use the hob as a worktop surface as damage may occur to the smooth surface of the hob. Do not drag or slide utensils on the hob surface, as this will cause scratches in the surface of the hob. Do not allow a cooking utensil to come into contact with the hob surround. Do not place anything between the base of the utensil and the ceramic hob, e.g. do not use asbestos mats, aluminium or wok stand. Do not leave any utensils, food or combustible items on the hob when it is not in use. Do not place aluminium or plastic foil, or plastic containers on the hob. Do not leave the hotplates or cooking areas switched On unless they are being used. We recommend not to place large preserving pans or fish kettles across two heating areas. Do not leave utensils partly covering the heated areas. Always ensure that they are placet centrally over the heated areas and have the same diameter as the heating area used. Not be concave (bowed in) Not be convex (bowed out) Not be rimmed THE BEST COMBINATIONS This table is a general guide to the types of pan suitable for different types of hobs and cookers. Remember pans should be good quality, with smooth, flat bases. For any further information refer to manufacturers’ instructions. Not be deeply ridged But essentially Flat Always ✓ Use good quality flat-based cookware on all electric heat sources. Always ensure pans have clean, dry bases before use. Ensure pans match size of heating area. Remember good quality pans retain heat well, so generally only a low or medium heat is necessary. Ensure pan handles are positioned safely and away from heat sources. Always lift pans, do not drag. GB Never ✗ Use gauze, metal pan diffusers, asbestos mats and stands e.g. Wok stands - they can cause overheating. Use utensils with skirts or rims e.g. buckets and some kettles. Use badly dented or distorted pans. Leave an element switched on when not cooking. Cook food directly on the ceramic glass. Drag or slide utensils, along the hob surface. Always use pan lids except when frying. Deal with spillages immediately but with care. Ceramic* Aluminium Stainless steel with single layer copper base Stainless steel with sandwich bases of aluminium and stainless or aluminium and copper Enamelled steel With Extra Care We recommend not to use a utensil with a base diameter greater than 25cm (l0ins). Not Recommended Pressure cookers or other large pans should be used on the front cooking areas. Enamelled aluminium Enamelled based cast iron Copper Toughened glass or ceramic / glass / pottery Mild steel, Ferro-magnetic or stainless with a magnetic sandwich base Always ensure that saucepan handles are positioned safely. 9 Hotplate GB Choosing Your Utensils Do not use utensils with rough bases. Do not use lightweight utensils with thin, distorted or uneven bases. Do not use lightweight enamelled steel utensils. Do not use cast iron utensils. Do not use utensils with recessed, scrolled or ridged bases. Do not Do not use a utensil which has a base concavity greater than l mm as this will reduce the performance of the hob. use a utensil with a convex base. Do not use glass ceramic utensils. Do not use use lightweight saucepans with plain thin copper bases on ceramic or halogen hot plates. Note: All copper pans are excellent conductors of heat, and are hard wearing and strong, but need quite a lot of care. They can be very heavy and do not usually have completely flat bases. The interiors are usually lined with a different material such as tin. A stainless steel pan with a sandwich base of aluminium and stainless steel is an excellent conductor of heat and is suitable for use on ceramic and halogen hobs, providing they are used in accordance with the saucepans manufacturers’ recommendations. Stainless steel pans with a sandwich base of aluminium and copper are excellent conductors of heat. If using stainless steel saucepans with aluminium and copper sandwich bases on ceramic and halogen hobs, the use of these pans must be in accordance with the saucepan manufacturers’ recommendations. Extra care should be taken to ensure the base of the pan and the hob is cleaned, and the hob conditioned, after each and every use, when using this type of saucepan. If these recommendations are not followed, the result will be a build up of small copper deposits on the surface of your hob which, if not cleaned after each use, will result in permanent marking of your hob. Always lift the pan from the hob, do not drag or slide across the hob surface as damage may occur. 10 Grilling Grilling A switch operated by the door changes the heating element configuration between grill and oven operation. When the door is open, the top inner element is activated for intense downward heat; when the door is closed, the top outer and lower elements are activated to provide even oven heating. To operate the grill proceed as follows: Open the grill door. Pre-heat the grill on setting MAX for approximately 5 minutes (see chart on guide to grilling). Fix the grill pan handle securely in position. See below. Food which only requires browning should be placed directly on/in the grill pan in the grill pan runner, or on the floor of the grill compartment. (the grill pan grid may be removed.) Leave the control on setting 6 for toast, sealing and fast cooking of foods. For thicker foods requiring longer cooking turn the control to a lower setting after the initial sealing, on both sides, on setting 6. The thicker the food the lower the control should be set. Warning: Take care as the grill will be hot – always wear oven gloves. Always ensure that the grill pan is clean BEFORE use. Excess fat build up in the bottom of the pan could cause a fire hazard. Never line grill pan with foil. 1. Fit the handle to the grill pan so that the external ‘hooks’ embrace the edge of the pan (fig. 1) 2. Make sure that the middle part of the handle fits exactly the protruding support of the pan (fig .2) and holds the pan from the bottom. The food must be placed on the rack in the grill pan. Position the grill pan on top of the oven rack. The best results are achieved by placing the oven rack on the uppermost shelves. Pouring a little water into the grill pan will make the collection of grease particles more efficient and prevent the formation of smoke. The food to be cooked should be placed on the grill pan/grill pan food support. Place the grill pan on the runners and push back to the stop position when the grill pan is correctly positioned beneath the grill element. Plates and dishes placed on the floor of the grill compartment will be heated when the oven is in use. Grill Compartment as a ‘Hotcupboard’ Do not operate the grill control when using the compartment as a hotcupboard. Do take care when removing plates, dishes and utensils from the grill compartment when the oven is in use as they may become quite hot. You may need to use oven gloves when removing warmed items. Fixing the Grill Pan Handle The grill pan handle is detachable from the pan to facilitate cleaning and storage. Fix the pan handle securely before use: 1 2 11 GB Grill Chart GB Pre - heat the grill for 5 minutes on maximum control setting before grilling GRILL CHART Food Grill Setting Approximate Cooking time Toasting of Bread products 6 3 - 10 mins. Small cuts of meat, sausages, bacon, etc. 5-6 15 - 20 mins. Chops etc. Gammon steaks Chicken pieces 5 20 - 25 mins. Wire food support used in upturned position for chicken. Fish: fingers Whole Fillets 5 10 - 20 mins. Whole fish and fillets placed in the base of the grill pan. Fish in breadcrumbs 5 15 - 20 mins. Pre - Cooked potato products 5 15 - 20 mins. Pizzas 5 12 - 15 mins. in the base of the grill pan. Browning of food 6 8 - 10 mins. Dish placed directly on base of the grill pan and pan placed on the base of the grill compartment. The settings in the above guide have been developed to cook food successfully without excessive fat spitting and splashing. 12 Top Oven Top Oven - Conventional Cooking GB The heat for conventional cooking in the top oven is provided by the grill element and the element under the floor of the oven. It is ideal for the slow cooking of cheaper cuts of meat in casseroles etc. but can also be used for small joints of meat up to 1.5kg (3lb). See cooking charts for temperatures and shelf positioning. The top oven can be used either independently to cook small quantities of food or in conjunction with the main oven to provide additional cooking space. The shelf should be positioned on the first or second runner from the bottom. To use the oven proceed as follows: Set the top oven control to the required temperature, the top oven light will come on and wait for the top oven thermostat light to go off, indicating that the oven has reached the right temperature. The food to be cooked should be placed in the centre of the shelf with a gap of at least 25mm (1in) between it and the grill element. This should avoid burning and ensure even cooking. Do not place food or dishes on the floor of the oven. Platewarming in the top oven Plates and dishes placed on the floor of the top oven will be heated when the main oven is in use. When the main oven is not in use, for instance when a meal is being cooked on the hob, place the plates and serving dishes on the shelf using the bottom runner and turn the top oven control to approximately 100 °C. A maximum time of 10-12 minutes is all that is required to heat the plates and dishes. NEVER operate the grill control when using the top oven for cooking or warming plates and dishes. WARNING: DO NOT put delicate items china or items which could be affected by heat into the oven. 13 Main Oven GB Main Oven - Fan Cooking Using the Main Oven for Other Functions ‘S’ SLOW Setting This control switches on the main oven. To select Fan Cooking - Turn thecontrol clockwise and select any temperature between 100°C and Max. As the control is turned the fan will start.The main oven light will immediately come on. The thermostat light indicates that the main oven is heating. When it turns off, the temperature inside the oven has reached the setting made with the thermostat knob. At this point, the light will turn on and off as the oven maintains the temperature at a constant level. The fan and the oven interior light will remain on throughout cooking. The main oven thermostat light will come on until the oven reaches therequired temperature. It will then cycle off and on as the oven thermostat maintains the correct temperature. The heat for fan cooking in the main oven is provided by an element situated at the back of the oven, around the fan. Fan cooking is ideal for large poultry or joints of meat, reducing cooking times and often eliminating the need for pre-heating the oven. It is also ideal for batch cooking where food is cooked on morethan one level, because the forced circulation of hot air gives aneven temperature from the top to the bottom of the oven. This is used for slow cooking, keeping food warm and warming plates for short periods. Extra care should be taken when warming bone china, as it may be damaged in a hot oven. DO NOT place food or plates directly on the oven floor as this could damage both the oven lining and the plates which are being warmed. Advantages of “SLOW” cooking are are: The oven stays cleaner because there is less splashing. Timing of food is not as critical, so there is less fear of overcooking. Inexpensive joints of meat are tenderised. Fully loading the oven can be economical. Cooking times can be extended in some cases by up to 2 hours. Operation: 1. Place the prepared food in the main oven and ensure the door is fully closed. 2. Select ‘S’ (Slow Cooking Temperature) by turning the Main Oven Control clockwise ensuring the oven door is fully closed. To use the oven proceed as follows: Storage and re-heating of food: The shelves should be evenly spaced. To avoid unnecessary cleaning, shelves which are not in use should be removed from the oven. Set the main oven control to the required temperature. Pre-heating is not normally necessary, but some foods such as bread, scones and Yorkshire pudding do benefit from being placed in a hot oven (see cooking charts). Place the food to be cooked in the centre of each shelf to allow for even air circulation around the food. 14 1. If food is to be frozen or not used immediately, place it in a clean container and cool as soon as possible. 2. Always thaw frozen food completely in the refrigerator before re-heating. 3. Always reheat food thoroughly and ensure it is piping hot before serving. 4. Only re-heat food once. Main Oven Points to consider when preparing food for “SLOW” cooking: 1. Make sure that the dishes to be used will fit into the oven ensuring enough room for air to circulate. 2. All dishes cooked on the slow setting will require a minimum of 6 hours, however, if they are cooked for 1 -2 hours longer then deterioration in their appearance may be noticed. 3. Never cook joints of meat over 2.7kg (6 Ib) or poultry over 2.0kg (4lb 8oz). We do not recommend that joints of meat or poultry are stuffed before cooking on the slow setting. 4. To seal in the meat juices, always cook meat or poultry at 170°C for 30 minutes before wrapping in foil and placing on a rack over a tin (to allow good air circulation) before turning the control to the slow setting and cooking immediately. 5. Always ensure that joints of pork and poultry are thoroughly cooked by checking with a meat thermometer before serving. 6. Always thaw frozen foods completely before cooking. We do not recommend placing frozen food in the oven to cook. 7. Always bring soups, liquids and casseroles to the boil before placing in the oven. 8. Ensure that casserole dishes have a good seal (not airtight) and cover to the top with foil to prevent loss of moisture. 9. Ensure that fruit and vegetables are cut into even sized small pieces to cook properly. 10. Always adjust seasoning before serving. 11. If using dried red kidney beans it is important that the beans are soaked and then boiled fora minimum of 10 minutes before using in any dish to destroy any toxins. 12. When cooking fish or egg dishes it may be necessary to check during cooking to avoid overcooking. WARNING! The oven is provided with a stop system to extract the racks and prevent them from coming out of the oven.(1) As shown in the drawing, to extract them completely, simply lift the racks, holding them on the front part, and pull (2). Using the cooking timer 1. To set the buzzer, turn the COOKING TIMER knob clockwise almost one complete revolution. 2. Turn the knob anticlockwise to set the desired time: align the minutes shown on the COOKING TIMER knob with the indicator on the control panel. 3. When the selected time has elapsed, a buzzer sounds and the oven turns off. 4. When the oven is off the cooking timer can be used as a normal timer. ! To use the oven manually, in other words when you do not wish to use the end of cooking timer, turn the COOKING TIMER knob until it reaches the symbol. 15 GB 16 Yes Yes Yes Yes B aked Cus t ar d B r ead Mer ingues 30- 45 150- 180 100 40- 50 90- 120 20- 30 200/ 210 150/ 160 140/ 150 200/ 210 R unner 1 f r om bot t om of oven. 80- 90 140/ 150 R unner 1 f r om bot t om of oven. R unner 2 f r om bot t om of oven. 130/ 140 190/ 200 190/ 200 R unner 1 f r om bot t om of oven. Yes Yes Milk Pudding 200/ 210 R unner 2 f r om bot t om of oven. Yes 180/ 190 30- 40 Yes Individual Yor ks hir e Puddings 190/ 200 R unner 2 f r om bot t om of oven. Yes Yor ks hir e Pudding 190/ 200 R unner 1 f r om bot t om of oven. Time Dependent on r ecipe Yes Puf f Pas t r y 200/ 210 190/ 200 Yes S hor t cr us t Pas t r y 130/ 140 R unner 1 f r om bot t om of oven. 140/ 150 Yes R ich Fr uit Cakes 140/ 150 190/ 200 Time Dependent on r ecipe 150/ 160 Yes S emi- r ich Fr uit cakes Yes 170/ 190 R unner 1 or 2 f r om bot t om of oven 10- 15 200/ 210 Yes S wis s R oll Yes 160/ 170 170/ 180 210/ 220 Temper at ur e C Time Dependent on s ize 20- 25 180/ 190 Yes S ponge S andwich (f at les s ) Yes Pr eheat R unner 1 or 2 f r om bot t om of oven 20- 30 170/ 180 Yes Vict or ia S andwich Pos it ion in Oven R unner 2 f r om bot t om of oven. R unner 2 f r om bot t om of oven. R unner 2 f r om bot t om of oven. R unner 2 f r om bot t om of oven. R unner 2 f r om bot t om of oven. 180- 240 45- 50 40- 50 105- 135 20- 25 30- 45 Dependent on us e Dependent on us e Depending on s ize 60- 75 7 inch 12- 15 15- 20 20- 25 15- 25 9- 12 Time in mins . Fan Oven Cooking 60- 75 7 inch 20- 25 180/ 190 Yes S mall Cakes Time in mins . 10- 15 Yes S cones Temper at ur e C Top Oven Cooking 210/ 220 Pr eheat Food B aking Cooking Chart- Baking GB Not e: If s of t mar gar ine is us ed f or cake making, t emper at ur es r ecommended by t he manuf act ur er s s hould be f ollowed. Temper at ur es r ecommended in t his char t r ef er t o cakes made wit h block mar gar ine only. 190/ 200 170/ 180 190/ 200 170/ 180 190/ 200 170/ 180 190/ 200 150 Yes Por k (s low r oas t ing) Yes Yes Yes Veal (f oil cover ed) Poult r y/ Game Yes (s low r oas t ing) Yes Por k (f oil cover ed) Veal Yes (s low r oas t ing) Yes B eef / Lamb (f oil cover ed) Poult r y/ Game (f oil cover ed) Cas s er ole 2-21/2 hrs 25-30 mins per 450g (1lb) 25-30 mins per 450g (1lb) + 25 mins over 40-45 mins per 450g (1lb) 40-45 mins per 450g (1lb) + 40 mins over 40 mins per 450g (1lb) 40 mins per 450g (1lb) + 40 mins over 35-40 mins per 450g (1lb) 35 mins per 450g (1lb) + 35 mins over. Time (appr ox.) R unner 1 f r om bot t om of oven. Cas s er ole over 5.5kg (12lb) Tur key 4 t o 5.5kg (8 t o 12lb) Chicken/ Tur key up t o 4kg (8lb) Veal Por k Lamb B eef Pos it ion in Meat Oven No No No No No No No 140- 150 160/ 180 160/ 170 160/ 180 160/ 180 160/ 180 Pr e- Temper at ur e heat C Time (appr ox.) 11/ 2 - 2 Hr s allow 12 mins per 450g at 150 oC 13- 15 mins per 450g (1lb) at 150/ 160 oC 18- 20 mins per 450g (1lb) + 20 mins ext r a 25- 30 mins per 450g (1lb) + 25 mins ext r a 25- 30 mins per 450g (1lb) + 25 mins ext r a 20- 30 mins per 450g (1lb) + 25 mins ext r a 20- 25 mins per 450g (1lb) + 20 mins ext r a Fan Oven Cooking The mos t accur at e met hod of t es t ing t he r eadines s of joint s of meat or whole poult r y is t o ins er t a meat t her momet er int o t he t hickes t par t of a joint , or t he t hickes t par t of poult r y t highs , dur ing t he cooking per iod. The meat t her momet er will indicat e when t he r equir ed int er nal t emp has been r eached. B eef - R ar e: 60 C Lamb: 80 C Poult r y: 90 C Medium: 70 C Por k: 90 C Well Done: 75 C Veal: 75 C If us ing aluminium f oil, never : 1. Allow f oil t o t ouch s ides of oven. 2. Cover oven int er ior wit h f oil. 3. Cover s helves wit h f oil. 170/ 180 Pr e- Temper at ur e heat C B eef / Lamb (s low r oas t ing) Yes Meat Top Oven Cooking Cooking Chart- Meat GB 17 Care and Cleaning GB Ceramic hob Decorative Trims To reduce the amount of cleaning always ensure that the hob and cooking utensils are clean and dry before use. Regular use of cleaner conditioner is recommended for proper care and protection of the hob surface. Apply conditioner before using the hob for the first time. It contains a mild cleaning agent, so that subsequent applications may clean off soil and apply a protective film at the same time. For stubborn stains or heavy soiling use any of the following materials, and finish off with conditioner. It is advisable to clean the decorative trims regularly to prevent any build up of soiling. The recommended method of cleaning is to wipe over the trims with a soft cloth wrung out in warm water or mild non-abrasive cleaner. (If in doubt try the cleaner on a small area of trim which is not noticeable in normal use). Then, after wiping with a cloth wrung out in clear water, dry with a soft clean cloth. 1. Cif, non-scratch scouring cream. 2. Liquid Gumption Kitchen Cleanser. 3. Special Powder Cleanser. Remove the rod shelves and grill pan. Use a fine steel wool soap pad to remove stubborn stains from the rod shelves, grill pan and the floor of the oven. Clean the glass part of the oven door using a sponge and a non-abrasive cleaning product, then dry thoroughly with a soft cloth. Do not use rough abrasive material or sharp metal scrapers as these could scratch the surface and cause the glass to crack. Powder Cleanser – Mineral deposits that are present in hard water, and some foods, may cause ‘discolourations’ that appear in the form of grey or brown stains. The stains sometimes appear to be in or under the glass surface. If there are some persistent stains after using any of the other recommended cleaning materials, powder cleanser may be applied, following the manufacturers instructions. Do not use abrasive cleaners or the powder cleanser on the painted metal framework. Cleaner Conditioner – Regular use of the conditioner will make the surface easier to clean thus ensuring that years of heavy abrasive cleaning do not progressively dull the surface. Ovens Oven Shelf Supports The shelf supports are removable and dishwasher safe. To remove hold the support at the front and pull away from the oven side, this can then be cleaned in a sink or a dishwasher. When removed it allows access to the oven side, which can be cleaned with warm soapy water. To refit the support, insert the longer leg into the rear fixing hole and push in the front leg. Grill Oven Lamp Replacement Remove the grill pan and the wire grid food support, it is best to wash these items immediately after use to prevent stains from being burnt on when used again. Wipe out the Grill compartment, use a fine steel wool soap pad to remove stubborn stains from the grill runners and the floor of the compartment. Wipe over the control panel with a damp cloth and polish with a dry cloth. Control Panel Do not use cream cleaners, oven cleaners or aerosols, scouring pads or abrasive powder for cleaning the plastic knobs as damage will occur. 18 Open the oven door and remove the rod shelves. Using a suitable cloth to protect the fingers grip the light glass dome, unscrew anti-clockwise and lift. Reach into the aperture with fingers, and unscrew the lamp anticlockwise. Fit replacement lamp (25W 300°C rated SES), refit dome. WARNING: To avoid electric shocks - please ensure that the electricity supply to the appliance is switched off and the appliance is fully cold, before removing the lamp lens. ! Do not use the oven lamp as/for ambient lighting Care and Cleaning CLEANING THE DOORS GB Take particular care not to damage the inner surface of the door inner glass that is coated with a heat reflective layer. Do not use scouring pads, or abrasive powder,which will scratch the glass. Ensure that the glass panel is not subjected to any sharp mechanical blows. Stubborn stains can be removed by using a fine steel wool soap pad. For slight soiling theinner glass panel may be cleaned, while still warm, without removing it from the door. Aftercleaning, rinse and dry with a soft cloth. SIDE OPENING DOORS Cleaning the door glass is the same as the drop down doors, except take care to support the weight of the inner glass when removing and refitting. DROP DOWN DOORS Wipe over the outer door glass panels with a cloth wrung out in warm soapy water, then after wiping with a cloth wrung out in clear water, dry with a soft clean cloth. Ensure that glass doors are not subjected to any sharp mechanical blows. Glass Inner Door Panel (where fitted) – open the door fully and unscrew the two screws securing the glass panel, taking care not to allow the glass to fall. The glass panel may now be washed at the sink. Stubborn stains can be removed by using a fine steel wool soap pad. Ensure the glass panel is not subjected to any sharp mechanical blows. Take particular care not to damage the inner surface which is coated with a heat reflective layer. After cleaning, rinse and dry with a soft cloth. For slight soiling the inner glass panel may be cleaned, while still warm, without removing it from the door. Warning: Oven must not be operated with inner door glass removed. Take care during cleaning not to damage or distort the door seals. Do not lift the door seal from the oven chassis, if necessary remove the seal by carefully unhooking the corner clips. Take care that the rating label edges are not lifted during cleaning, and furthermore that the lettering is not blurred or removed. 19 Something Wrong with your Cooker GB Before contacting your nearest Service Centre/Installer, check the problem guide below; there may be nothing wrong with your cooker. Problem 20 Slight odour or small amount of smoke when using the cooker for the first time. This is normal and should cease after a short period. Nothing Works Is the main cooker wall switch turned on? There may be no electricity supply. Oven temperature seems too high or too low. Check that the temperature has been set in accordance with the temperature charts. It may be necessary to increase or decrease the recommended temperature by up to 10°C to suit your taste. Oven does not cook evenly. Check that the temperature and shelf position are as recommended in the temperature charts. Check that the containers being used in the oven allow sufficient air flow around them. Check that the cooker is level. Hotplates are slow to boil or will not simmer Check that your pans conform to the recommendations in these instructions. Marks appearing on hotplates. Can not clean hob / hotplates. The hob surround can be cleaned with warm soapy water and a cream cleaner, such as Cif. The sealed hotplates should be cleaned regularly, (please refer to the Care and Cleaning section for further information. Please note that replacement hob cleaning kits are available from our parts department, see Key Contacts, back page. Grill not working. The grill door MUST be open. Grill keeps turning on and off. When the grill control is operated at a setting less than maximum, this is normal regulator operation, not a fault. Condensation on the wall at the rear of the cooker. Steam and/or condensation may appear from the vent at the rear of the appliance when using an oven particularly for foods with a high water content e.g. frozen chips, roast chicken etc. This is normal and any excess should be wiped off. Steam / Condensation in the oven after use. Steam is a by-product of cooking any food with a high water content. To help minimise always: a) Try to avoid leaving food in the oven to cool after being cooked. b) Use a covered container, wherever possible Cooking Results Not Satisfactory? GB Problem Check Grilling Uneven cooking front to back Ensure that the grill pan is positioned centrally below the grill element. Fat splattering Ensure that the grill is not set to too high a temperature. Oven Baking Uneven rising of cake Ensure that the oven shelves are level by using a spirit level on the rod shelf and adjusting, using suitable packing e.g. wood, under the feet of the appliance. This should be checked both left to right and front to back. Ensure that the food is positioned centrally in the oven. Sinking of cakes The following may cause cakes to sink: 1. Cooking at too high a temperature. 2. Using normal creaming method with soft margarine. Over/Under cooking Fast/Slow cooking Refer to the cooking times and temperatures given in the oven temperature charts, however, it may be necessary to increase or decrease temperatures by 10°C to suit personal taste. Do not use utensils greater than 2Ľ ins in height. 21 If it Still Won't Work GB Contact the Service Office If something is still wrong with your appliance after you have been through the 'Something Wrong' list: 1. Switch off and unplug the appliance from the mains. 2. Call your nearest Service Office or local importer. When you contact us we will want to know the following: 1. 2. 3. 4. Your name, address and postcode. Your telephone number. Clear and concise details of the fault. The Model number and the Serial number of your appliance. 5. The date of purchase (please keep the receipt as evidence will be required when an engineer calls) enter the date here: ............................................................................. Please make sure you have all these details ready when you call. Spare Parts Please remember your new appliance is a complex piece of equipment. 'DIY' repairs or unqualified and untrained service people may put you in danger, could damage the appliance and might mean you lose cover under the Parts Guarantee. If you do experience a problem with the appliance don't take risks, call in our Service Engineer. Our Parts are designed exclusively to fit your appliance. Do not use them for any other purpose as you may create a safety hazard. Disposal of your product To minimise the risk of injury to children please dispose of your product carefully and safely. Remove all doors and lids. Remove the mains cable (where fitted) by cutting off flush with the appliance and always ensure that no plug is left in a condition where it could be connected to the electricity supply. To help the environment, Local Authority instructions should be followed for the disposal of your product. Disposal of old electrical appliances The European Directive 2002/96/EC on Waste Electrical and Electronic Equipment (WEEE), requires that old household electrical appliances 22 must not be disposed of in the normal unsorted municipal waste stream. Old appliances must be collected separately in order to optimise the recovery and recycling of the materials they contain and reduce the impact on human health and the environment. The crossed out "wheeled bin" symbol on the product reminds you of your obligation, that when you dispose of the appliance it must be separately collected. Consumers should contact their local authority or retailer for information concerning the correct disposal of their old appliance. Respecting and conserving the environment • Whenever possible, avoid pre-heating the oven and always try to fill it. Open the oven door as little as possible because heat is lost every time it is opened. To save a substantial amount of energy, simply switch off the oven 5 to 10 minutes before the end of your planned cooking time and use the heat the oven continues to generate. • Keep gaskets clean and tidy to prevent any door energy losses • If you have a timed tariff electricity contract, the “delay cooking” option will make it easier to save money by moving operation to cheaper time periods. • Make the most of your hot plate's residual heat by switching off cast iron hot plates 10 minutes before the end of your cooking time and glass ceramic hot plates 5 minutes before the end of cooking time. • The base of your pot or pan should cover the hot plate. If it is smaller, precious energy will be wasted and pots that boil over leave encrusted remains that can be difficult to remove. • Cook your food in closed pots or pans with well-fitting lids and use as little water as possible. Cooking with the lid off will greatly increase energy consumption • Use purely flat pots and pans • If you are cooking something that takes a long time, it's worth using a pressure cooker, which is twice as fast and saves a third of the energy. Guarantee 12 months Parts and Labour Guarantee GB Your appliance has the benefit of our manufacturer's guarantee, which covers the cost of breakdown repairs for twelve months from the date of purchase. This gives you the reassurance that if, within that time, your appliance is proven to be defective because of either workmanship or materials, we will, at our discretion, either repair or replace the appliance at no cost to you. - The guarantee is subject to the following conditions: The appliance has been installed and operated correctly and in accordance with our operating and maintenance instructions. The appliance is only used on the electricity or gas supply printed on the rating plate. The appliance has been used for normal domestic purposes only. The appliance has not been altered, serviced, maintained, dismantled or otherwise interfered with by any person not authorised by us. Any repair work must be undertaken by us or our appointed agent. Any parts removed during repair work or any appliance that is replaced become our property. The appliance is used in the United Kingdom or Republic of Ireland. The guarantee does not cover: - Damage resulting from transportation, improper use, neglect or interference or as a result of improper installation. - Replacement of any consumable item or accessory. These include but are not limited to: plugs, cables, batteries, light bulbs, fluorescent tubes and starters, covers and filters. - Replacement of any removable parts made of glass or plastic. THE GUARANTEE WILL NOT APPLY IF THE APPLIANCE HAS BEEN USED IN COMMERCIAL OR NON-DOMESTIC PREMISES. 5 Year Parts Guarantee Cannon also offers you a FREE 5 year parts guarantee. This additional guarantee is conditional on you registering your appliance with us and the parts being fitted by one of our authorised engineers. There will be a charge for our engineer's time. To activate the extra parts warranty on your appliance, simply call our registration line on 08448 24 24 24 (ROI 01 230 0800) Extended Guarantees We offer a selection of protection plans that enable you to fully cover yourself against the expense of repair bills for the life of your policy. To find the ideal plan for you please call our advice line on 08448 226 226 (ROI 01 230 0233) Free Helpdesk Service We have a dedicated team who can provide free advice and assistance with your appliance if you experience any technical difficulties within the first 90 days of ownership. Simply call our Indesit Service Hotline on 08448 224 224 (ROI 0818 313 413) for telephone assistance, or, where necessary, to arrange for an engineer to call. 23 04/2014 - 195121985.00 XEROX FABRIANO After Sales Service No one is better placed to care for your Indesit appliance during the course of its working life than us - the manufacturer. GB Essential Contact Information Indesit Service We are the largest service team in the country offering you access to 400 skilled telephone advisors and 1100 fully qualified engineers on call to ensure you receive fast, reliable, local service. UK: 08448 224 224 Republic of Ireland: 0818 313 413 www.indesitservice.co.uk Please note: Our advisors will require the following information: Model number Serial number Parts & Accessories We supply a full range of genuine replacement parts as well as accessory products that protect and hygienically clean your appliance to keep it looking good and functioning efficiently throughout its life. UK: 08448 225 225 Republic of Ireland: 0818 313 413 www.indesitservice.co.uk Appliance Registration We want to give you additional benefits of Indesit ownership. To activate your FREE 5 year parts guarantee you must register your appliance with us. UK: 08448 24 24 24 Republic of Ireland: 01 230 0800 www.indesitservice.co.uk As part of Indesit's continued commitment to helping the environment, Indesit reserves the right to use quality, recycled components to keep down customer costs and minimise material wastage. Indesit Company UK Limited, Morley Way, Peterborough, PE2 9JB Indesit Company, Unit 49 Airways Industrial Estate, Dublin 17 Indesit Company S.P.A. Viale Aristide Merloni,47 60044 Fabriano (AN) www.indesit.com 24