1
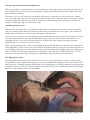
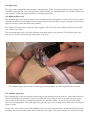
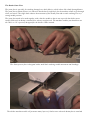
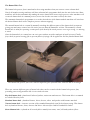
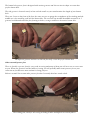
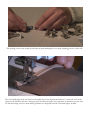
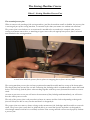
The Sewing Machine Course
Video 8 - Sewing Machine Presser Feet
The essential presser foot.
When it comes to the working of the sewing machine, just like the machine needle or bobbin, the presser foot
is an integral part of the sewing machine, so essential in fact that you cannot sew without one attached.
The presser foot is used when ever a certain task is needed to be executed so for example when you are
sewing on a button onto a shirt or attaching a zipper into a skirt, the appropriate presser foot is selected
and attached to the sewing machine.
A small lever holds the presser foot in place so swapping foot to foot is an easy task
The sewing machine presser foot is always positioned around the needle and sits on top of the throat plate.
The throat plate has various slits cut into it allowing the feed-dogs which sit underneath to rotate above and
below. This will help feed the fabric when working together with the presser foot and the needle to create a
stitch.
As soon as you start to sew you will notice the movement of the feed-dogs and immediately you will notice
how the whole process works.
The sole of the presser foot is the part that is always in contact with the cloth so depending on design the
foot will always be able to carry out the task that it is designed for.
The presser foot never moves, always relying on the movement of the feed-dogs and the needle to create the
stitch. The presser foot is only there to guide the fabric to create that specific task that it is designed for
which might sound trivial but it is extremely essential. Your sewing machine will not work properly without
a presser foot.
The basic presser feet that you will always use.
When you purchase a sewing machine, you will always get a selection of presser feet that will cater for the
basic tasks in sewing. These feet are the Zigzag foot, Zipper foot, Button sewing on foot, Button hole foot
and the Denim jeans foot.
With these 5 feet you will be able to accomplish all the basic sewing that you will come across. Usually
there is a large range of presser feet that can be purchased for your sewing machine at a later date in order
to perform the more elaborate tasks such as attaching a concealed zipper into a garment, working with
leather or binding the edge of a decorative seam.
Attaching the presser foot.
When you are sewing a project, you will most likely have to change the foot at some point. For example if
you were creating a skirt and you come to the point where you need to put in the zipper, you will need to
change the presser foot to be able to attach the zipper to the garment.
This process is a very easy one as modern sewing machines have become extremely user friendly. So in our
case, the machine that we are using (the Bernina), the presser foot is held in place via a small lever, so
releasing the lever will result in releasing the foot. The foot slots onto a small cone shape part and
tightening the lever will secure the foot in place.
Some sewing machines have a snap-on mechanism incorporated into the foot so only the sole of the foot is
interchangeable. A small release part at the back of the machine where the foot sits will release the foot out
of its holding when the presser foot clamp is in the up position above the feed dogs. When the clamp for the
foot is lowered, this will simply snap back onto the foot to secure into place. With all machines, you can
consult the user manual to get full and precise information about the presser foot attachment.
The Zigzag presser foot.
The Zigzag foot is the main presser foot that you will use to create all the basic sewing. As this foot will
compensate for the straight and the zigzag stitch, you will find that the Zigzag foot is the one that you will
most often use. To change from the zigzag stitch to the straight stitch, you simply adjust the sewing machine
via a dial or the on screen if you have a computerised model. The presser foot does not need to be changed
and can remain attached to the sewing machine.
The Zigzag presser foot is used for all the main stitching as it can create straight and zigzag stitching alike.
The Zipper foot.
The zipper foot is designed to attach zippers into garments. There are various different types of zipper foot
available to purchase for your sewing machine which include, the standard zipper foot, standard zipper foot
with a gauge, Teflon sole zipper foot and a concealed zipper foot.
The Different Zipper feet.
The standard zipper foot with the gauge comes attached with a small guide across the sole of the foot which
regulates the distance of the zipper coil away form the foot mainly helping you get a straight, neat stitching
edge on the zipper when attached to the garment.
The Teflon soled zipper foot is what the name suggests. The sole of the foot is made of Teflon which slides
over leather more easily.
The concealed zipper foot is used for attaching concealed zippers into garments. The foot does this with
ease as the coils are turned through the grooves of the foot.
The standard zipper foot is used to attach zippers into garments, its thin design does this with ease
The standard zipper foot.
The standard zipper foot is designed to attach zippers into garments such as trousers, skirts and pockets etc.
With its thin design, the foot has 2 grooves on either side so securing in a left or a right coil of the zipper
can be done easily simply by moving the position of the machine needle. As you can see from the image
above the sewing machine will stitch right along side the zipper coil creating a neat seam when securing the
zipper in place.
Please note, if the needle is left in the middle position this will result in machine needle hitting the foot and
breaking. The position of the needle must be moved to the right or left position before you can start sewing.
The Button Sewing-on Foot.
The button sewing-on foot does precisely what the name suggests in that it will sew buttons onto the garment
for you. This foot is easily used with or without a button sewing programme on your sewing machine.
The button sewing on foot will attach buttons to garments with ease
As you can see in the image above the foot is designed to hold the button while it gets attached. The 2 large
toes hold the button in place securely without any movement what so ever making this foot the number one
choice when it comes to attaching buttons to a garment.
Before you can start sewing the button in place the feed-dogs need to be released and in the down position
so that the fabric will not feed at all resulting in the cloth staying put while the stitch is created. The
machine will set the needle in the zigzag position so that both holes of the button are penetrated resulting in
attachment to the cloth.
If the button has 4 holes, you would simply secure the back 2 holes first and then move the button forward
while still attached and then stitching the final 2 holes. You would need to lift the whole foot very slightly in
order to move the button forward to finish stitching the final 2 holes.
The Denim Jeans Foot.
The jeans foot is specially for stitching through very thick fabrics, which it does like a knife through butter.
The jeans foot or denim foot as it is otherwise known has a single hole for the machine needle to go through
while you stitch. This single hole reduces the movement of the needle from side to side resulting in a very
strong needle position.
The jeans foot needs to be used together with a thicker needle so that it can cope with the thicker more
sturdy cloths such as denim, cotton drill or a heavy weight wool. The machine needles you should use are
the 100’s or 110’s specially designed for the thicker cloths in mind.
The Jeans presser foot is designed with a small hole reducing needle movement and breakage
The thicker machine needle will penetrate many layers of cloth at once when the denim foot is attached
The Button Hole Foot.
The button hole presser foot is attached to the sewing machine when you want to create a button hole.
Nearly all modern sewing machines will have a button hole programme built into the stitch selection. Some
machines will do this automatically making the entire button hole in one single process, other machines will
create the button hole in a manual process, never-the-less the out come is exactly the same.
The automatic button hole programme is set to the desired size of the button and the machine will stitch out
the desired button hole in one complete process without stopping.
The manual button hole is created by manually stitching the different parts of the button hole in sequence
giving you much more control over the entire process than the automatic version. The manually created
button hole is ideal for repairing certain parts of the bead if the stitch process were to go wrong, i.e. missing
a stitch.
Once the button hole is created you can cut it open with an un-picker and pair of small scissors. Finally
fray-check (a special sewing glue to prevent fabrics fraying) can be applied to seal the finished button hole.
The button hole presser foot will create all different types of button holes with ease due to its design
There are various different types of button holes that can be created with the button hole presser foot,
providing your sewing machine has it in its stitch selection.
Key-hole button hole - found on all tailored jackets, waistcoats and trousers. This button hole is so named
as it looks like a key-hole.
Standard button hole - found on blouses, shirts, dresses, skirts and pockets with buttons attached.
Narrow button hole - A narrow version of the standard button hole used for heirloom sewing. This button
hole is found on blouses, shirts, dresses and skirts. Also used for children's and dolls clothes.
Stretch button hole - is found on all stretch fabrics made from cotton, wool, silk and synthetic fibres.
The button hole presser foot is designed with various grooves and slits cut into its shape to create that
perfect button hole.
The side groove is located exactly in-line with the needle so you can determine the length of your button
hole.
There are 3 toes on the front of the foot, the outer toes are to gauge the straightness of the stitching and the
middle toe is for attaching cord into the button hole. The cord will rap around the middle toe and lie in 2
grooves located underneath the foot forming a thicker, stronger and more decorative button hole..
The different grooves and slits cut into the foot help create the perfect button hole
Other essential presser feet.
There is literally a presser foot for every task in sewing and many of them you will never use or even come
across. When you get more into the hobby of sewing you will probably add certain presser feet to your
collection as you discover more and more sewing projects.
Below is a small list to some other presser feet that I certainly think are worth a look.
The walking foot, ideal for all sewing including leather and difficult to control fabrics
The quilting presser foot, made for all kinds of quilt making due to its many aligning grooves on the side
The concealed zipper foot will attach an invisible zipper into a garment with ease, it turns the coils of the
zipper as the machine stitches creating a perfectly inserted zipper into a garment, a must have presser foot
for the discerning sewer as many ladies garments are designed with the concealed zipper in mind