1
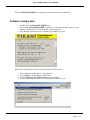
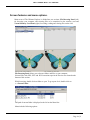
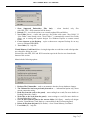
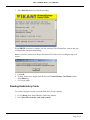
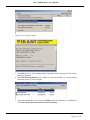
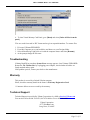
The Ultimate Box User Manual
The
Ultimate
Box
User Manual
Page 1 of 1
The Ultimate Box User Manual
FCC Regulations Compliance (for USA)
This equipment has been tested and found to comply with the limits for Class B digital device pursuant to
Part 15 of FCC Rules. These limits are designed to provide reasonable protection against harmful
interference in a residential installation. This equipment generates, uses and may radiate radio frequency
energy and, if not installed and used in accordance with the instructions, may cause harmful interference
to radio communications. However there is there is no guarantee that interference will not occur in a
particular installation. If this equipment does cause interference to radio or television reception, which can
be determined by turning the equipment off and on, the user is encouraged to try to correct the
interference by one or more of the following measures: (1) Reorient or relocate the receiving antenna (2)
Increase the separation between the equipment and receiver (3) Connect to an outlet on a different circuit.
This equipment has been certified to comply with FCC standards, which are applied to the USA only. A
shielded interface cable should be used according to FCC 15.27(C).
Changes or modifications not expressly approved by the manufacturer could void any assurances of safety
or performance and could result in violation of Part 15 of the FCC Rules.
Canadian Department of Communications Statement
This digital apparatus does not exceed the Class B limits for radio noise emissions from digital apparatus
set out in the Radio Interference Regulations of the Canadian Department of Communications.
This Class B digital apparatus complies with Canadian ICES-003.
Radio Interference (210-240V)
This equipment Complies with EN55022 (CISPER Publication 22)/Class B.
Content:
Page 2 of 2
The Ultimate Box User Manual
•
•
•
•
•
•
•
•
•
•
Introduction
Package Contents
Minimum System Requirements
Hardware Installation
Software Installation
Software Configuration
Screen features and menu options.
Writing to Embroidery Cards
Reading Embroidery Cards
Troubleshooting
Introduction
The Ultimate Box allows you to write to a blank embroidery card as many designs as the card
can hold. The best results are achieved by using The Ultimate Box with The Ultimate Card
(TM pending) that holds about 500,000 stitches total. You can write designs in Brother, Baby
Lock, Bernina Deco and Simplicity formats (.PES, .PEC) or, in Viking/Husqvarna format
(.HUS).
You can save designs to your computer by downloading them from the Internet, CD’s, floppy
disks, etc. Using the browsing software supplied with The Ultimate Box, you will browse to
the Designs folder, select desired patterns and transfer them to the card.
The Ultimate Box writes to and reads from the following cards:
The Ultimate Card
– 1Megabyte (8Megabit) blank memory card, the largest Brother type
embroidery machines can read.
Magic (Amazing) Card – 512Kilobyte blank memory card supplied with the Amazing (Magic)
Box. The Ultimate Box writes more then 6 designs to this card.
Brother Blank card
– 512Kilobyte (4Megabit) blank card supplied for Brother PE Design
4.0 read/write modules.
The Ultimate Box reads and saves designs back to the hard drive of your computer from cards
mentioned above and pre-programmed design cards (except copyrighted design cards).
Any Embroidery software available on the market to create or edit designs can be used with
The Ultimate Box.
Package Contents
•
•
•
•
The Ultimate Box
The Ultimate Card (optional)
Serial Cable
Power Adapter
Page 3 of 3
The Ultimate Box User Manual
•
•
•
Manual
Installation Disk
Warranty Registration Card
Minimum System Requirements
•
•
•
•
•
•
•
IBM PC Compatible*
Pentium 166 MHz
RAM 32 Mb
Serial Port **
MS Windows 95/98/ME/2000/XP
Screen Resolution 800x600
Floppy Disk Drive or CD Rom.
* MAC users must have “Virtual PC” installed to work with The Ultimate Box
** USB port can be used with USB to Serial Converter. Contact manufacturer for currently
supported converter models.
Please, check often for FREE software upgrades at www.vikant-emb.com
Hardware Installation
1.
2.
3.
4.
5.
6.
Verify Package Contents
Connect Serial Cable to the The Ultimate Box
Attach the other side of the cable to a serial port of your Computer
Plug the power adapter into a 110V power outlet
Plug the power adapter cord into the The Ultimate Box
Insert The Ultimate Card
When the green light on the box is ON– proceed with software installation.
Important! Always remember to plug the power adapter into The Ultimate Box after the
computer cable is connected. When disconnecting, unplug power adapter first.
Software Installation
The following procedure will install Ultimate Box software to your computer and create a
shortcut.
1. Insert Installation disk into the drive.
2. Go to the Windows “My Computer”, select and open the drive.
3. Double click on UEsetup.EXE, follow the installation process.
Page 4 of 4
The Ultimate Box User Manual
When “UltimateEXPLORER” icon appears, proceed with software configuration.
Software Configuration
1. Double click on UltimateEXPLORER icon.
2. On opening UltimateEXPLORER, automatic port detection window opens up and
hardware settings for The Ultimate Box & Card are detected.
3. After hardware detection process is finished, press ESC key to exit.
Note: If The Ultimate Box is detected, but the card was NOT inserted,
1.
2.
3.
4.
Insert compatible blank card (see “Introduction”)
Go to [Menu] in Virtual Memory Card Panel,
Click on [Redetect The Ultimate Box](see picture below).
When hardware detection process is finished, press ESC key to exit.
Page 5 of 5
The Ultimate Box User Manual
Screen features and menu options.
Main screen of The Ultimate Explorer is divided into two sections; File Browsing Panel (left)
for browsing your computer and selecting files to be transferred to the memory card and
Virtual Memory Card Panel (right) for writing, reading and viewing files on the card.
File Browsing Panel allows you to browse folders and files on your computer.
Selected files with .PES, .PEC and .HUS extensions open in the Preview area located at the
bottom of this section.
While browsing, double click on folder to open. To go up one level, double click on
<..> Parent Folder.
Full path of current folder is displayed to the left on the Menu line.
Menu includes following options:
Page 6 of 6
The Ultimate Box User Manual
1. Show Supported Embroidery Files Only – when checked, only files
with .PES, .PEC, .HUS extensions will be shown.
2. Refresh (F5) – use refresh option to see currently updated files and folders.
3. New Folder (Insert) – creates and opens up a new folder with a name “New Folder”. If
“New Folder” name already exists, “New Folder 1” is automatically created. New Folder
allows you to catalog and separate designs. Use Windows Explorer to rename created
folder.
4. Create shortcut on the Desktop – copies a shortcut on computer Desktop for an easy
access to UltimateEXPLORER.
5. User Guide (F1) – help file.
Virtual Memory Card Panel allows viewing designs that are read from a card or designs that
are selected for writing to a card.
Selected files with .PES, .PEC and .HUS extensions open in the Preview area located at the
bottom of this section.
Menu includes following options:
1. Redetect The UltimateBox – used as an automatic detection for any hardware changes
2. The Ultimate Box has been previously detected at … - informational option only, shows
current connection setting.
3. Read files from the card (to the panel) – starts reading from a card (For more details see
Reading Embroidery Cards).
4. Write files to the card (from the panel) – starts writing to a card (For more details see
Writing Embroidery Cards).
5. Save all files from the panel to the current folder (Ctrl+Enter) – transfers all designs
from the Virtual Memory Card Panel to a current folder in the File Browsing Panel.
6. Delete all files from the panel (Ctrl+Delete) – clears Virtual Memory Card Panel.
7. User Guide (F1) – help file.
Page 7 of 7
The Ultimate Box User Manual
Writing to Embroidery Cards
To write designs to the card (make sure the card is in The Ultimate Box):
1. In the File Browsing Panel browse to your embroidery designs folder.
2. Select and double click on desired designs to add them to the list of files in the Virtual
Memory Card Panel window.
3. Design information becomes available in the Virtual Memory Card.
Green check mark in front of a design indicates that design is within the default hoop size
4’’x 4”or 100mm x 100mm (Width x Height).
Red X-mark in front of a design indicates that design is larger then the default. You can write these files to the
card, just make sure large hoop designs are appropriate for the model of your sewing machine.
4. Go to [Menu] in the Virtual Memory Card Panel.
5. Select [Write files to the card (from the panel)].
All data on re-writable embroidery cards has to be erased before any new information can be written to it. Make
sure that any valuable data is saved on the hard drive of your computer.
6. As a last reminder, the software will ask you to confirm the “Write” procedure.
Select “YES”
Page 8 of 8
The Ultimate Box User Manual
7.
Press ESCAPE button to finish the procedure.
When WRITE operation is complete, take the card out of The Ultimate Box, insert it into your
sewing machine and start embroidering.
Note: If you have selected more design files then will fit on the card, a warning message will
appear:
1. Click OK.
2. Go back, delete some designs from the list in the Virtual Memory Card Panel window
using Delete key.
3. Try to write again.
Reading Embroidery Cards
To read/save designs from the card to the hard drive of your computer:
1. Go to [Menu] in the Virtual Memory Card Panel window.
2. Select [Read files from the card (to the panel)].
Page 9 of 9
The Ultimate Box User Manual
This process may take about 5 minutes.
3. Press ESCape key to close reading window. Designs from the card appear in the Virtual
Memory Card Panel.
4. In the File Browsing Panel browse to folder or create a new folder (see “Screen features
and Menu options”) to store designs.
5. After destination folder is selected, go to [Menu] in the Virtual Memory Card Panel and
click [Save all files from the panel to the current folder].
Page 10 of 10
The Ultimate Box User Manual
6. To clear Virtual Memory Card Panel, go to [Menu] and select [Delete all files from the
panel].
Files are saved from card in .PEC format and are given sequential numbers. To rename files:
1.
2.
3.
4.
Exit out of UltimateEXPLORER.
From My Computer go to your hard drive and browse to your Designs folder.
Select desired design, right click on it with the computer mouse and select [Rename].
At the prompt change the file name.
Troubleshooting
If during Read/Write procedure System Error message appears, close Ultimate EXPLORER.
Restart the The Ultimate Box by re-plugging power adapter, check whether all cables are
firmly attached and try again.
If the problem persists, contact your dealer or the manufacturer.
Warranty
This product is covered by a limited* lifetime warranty.
Please, check the warranty details in the Owner’s Warranty Registration Card.
* Connector defects are not covered by the warranty.
Technical Support
Technical Support is provided by Vikant Corporation via e-Mail at [email protected]
You can also call us at 888-760-8554, 847-919-9400 or Fax to 847-808-9803
Vikant Corporation
6577 Windham Lane
Long Grove, IL 60047
Page 11 of 11