1
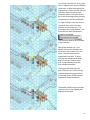
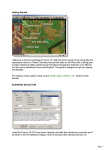
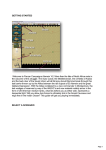
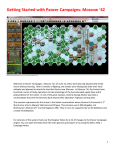
Getting Started with Panzer Campaigns: Kharkov ‘43
Welcome to Panzer Campaigns : Kharkov ‘43. On June 22, 1941, Germany had attacked the Soviet Union
without warning. After 20 months of fighting, the Soviets had recovered from their early setbacks and were
pushing west after the victory at Stalingrad. The Axis forces in quick succession had lost the German 6 th Army
as well as much of the Italian, Rumanian and Hungarian expeditionary forces.
In Kharkov ’43, the Soviets have launched a series of hasty operations to take advantage of the Axis turmoil. In
one of the greatest recoveries, Field Marshall von Manstein launched the ‘Backhand Blow’ and sent the
Soviets back beyond their starting lines.
This scenario represents the first move in the German counter attack where General Buschenhagen’s 15th
Infantry Division tries to recapture Sinel’nikovo, a critical communication hub only 35 kms east of
Dnepropretrovsk on the Dnepr River. The attack was unusual in that the German’s rode the trains they had
travelled from France in, right up to the outskirts of the town.
For veterans of the system check out the Designer Notes for a list of changes to the Panzer Campaigns engine.
You can open the Notes from the main game by pressing F3 or by using the Menu Help | Campaign Notes.
1
SCENARIO SELECTION
Start Kharkov ‘43, if you haven’t already and
you will be taken to the File Selection
Dialog.
Click the scenario #00_Getting_Started and
then OK.
This takes you to the AI Selection Dialog
where you choose the side you wish to
play. For the purposes of this tutorial select
German AI "Manual" for yourself and
"Automatic With Fog of War"(FOW) for the
Russians.
Click OK to get the game underway, you are
now the Axis commander.
The map should now appear along with
your first Command Report will appear
with information relevant to the first
turn.
Note its contents and click OK to close it.
2
OBJECTIVE OF THE GAME
Click Info and then Victory on the Menu Bar. This
shows how many points the first side must earn for
each level of victory.
As you can see, to obtain a major victory in this
battle you must earn 125 Victory Points by the
scenario’s end.
Click OK to close the Victory Dialog.
If you look at the map, you’ll see an oval
shape with ‘100’ inside it. This is your
objective.
To win a major victory, you will need to
hold this objective and inflict enemy
casualties equal to 125 points. As you
incur losses, points are taken away
from you.
There is also one enemy unit visible
west of the objective. The terrain
information box shows visibility is
‘2km’. As this unit was at that range or
less to a German unit at the start of the
turn it is shown on our map.
(Tip: Each hex is 1km across. Visibility and ranges are all expressed in km’s).
Click Info and then Objectives on the Menu Bar to
see a list of the objectives in the scenario. As you
can see, there is 1 objective worth 100 points to
the Axis, it’s currently controlled by the Soviet side.
Click OK to close the Objectives Dialog.
3
TURN 1
In this scenario the Germans move
first. Click on the unit indicated by
the blinking red box or the Hot Spot.
It is a German recon unit known as
an Aufklarung Company (motorized).
Aufklarung is German for
Reconnaissance.
To check any units’ statistics, chain of command, and special unit
abilities, right click the Hex Info Area while the desired hex with the
unit(s) is selected. Right click in the Hex Info Area now to review the
recon unit stats.
You will see the chain of command for the unit on the left; on the right
appear its various combat factors, speed, and abilities, which include
being a specialist recon unit. We want to move a little closer to the
town and see what else we can find.
Double click to select this unit on the map, or click its Unit Box, so that
the Unit Box lights up. It is now "selected" and ready for orders.
4
Let’s move it one hex. To do so, right
click an adjacent hex, the one directly
south east, or down and right of the
selected unit. If able to move, the unit
will obey. Should a unit ever not
follow the order, look to the Status
Bar to see a message telling you why
the movement can’t be performed.
Try right clicking on the next hex to
the south east, in the clear hex
adjacent to the Soviet unit. The
movement will not be allowed – the
Status Bar will state "Movement
allowance exceeded".
This move will have to be continued
in the next turn.
Now select another unit – the
Marder unit on the railroad to the
north west of the recon unit. Let’s
move it several hexes at once
toward the front lines. To do so,
with the left mouse button down,
drag it to the hex 2 hexes north
east, as indicated by the arrow,
then release the button.
The system will determine the
path it follows, so it’s wise to drag
smallish distances to keep control,
as with fog of war (FOW) selected,
movement cannot be undone.
The Marder should move two hexes
north east, be on the highway and
adjacent to the town.
5
Clicking the Reachable Hexes Button on the Toolbar will
highlight where a unit may still potentially move in a turn.
Notice there is still movement
remaining, but the unit is not
able to enter the built up hexes
to its east or west.
This is because tank units may
not enter these terrain types
unless they have their full
movement allowance or if using
a road, and roads may only be
used when a unit is in Travel
Mode.
With the Marder unit selected and the reachable hexes
ON, click the Change Travel Mode button on the Toolbar.
You’ll see a white line appear at
the bottom of the unit and a "T"
next to its movement points in
its Unit Box.
It is now in Travel Mode (T
mode), this gives units a larger
movement allowance,
particularly when using roads,
notice the selected unit can now
move through the Urban hexes
on the roads.
6
Move the Marder unit 1 hex
south east by left click and
dragging it, putting it into the
town.
Moving into the town reveals a
Soviet Infantry Battalion.
This unit may use defensive fire against our Marder - the system handles enemy defensive fire during
your turn and, likewise, may fire your own units during the opposing side’s turn too! You may want to
turn the Reachable Hexes off and only use this when you want to see how far a unit can travel.
(Tip: Some units such as Artillery and Anti-tank Guns cannot move unless they are in T mode – if you try
and move such a unit the status bar will give you the reason – in this case it will likely say "Unit must be
in Travel Mode to move").
Now it is time to fire upon the
Soviets.
Make certain you still have the Marder unit selected and click the change Travel
mode button again. The Marder will change out of T mode and as the
movement is coloured yellow, there is sufficient movement to fire at least once.
7
To do so select your unit exactly as you did for movement. Now with the Control (Ctrl) Button pressed,
place the mouse over the adjacent enemy unit. A crosshairs will appear. Right click to Fire.
The results of your fire will be shown on screen – either there will be no effect, or you’ll cause a loss, or
possibly disrupt the enemy (the results will be yellow), or cause it to be broken (the results will be red).
Most direct fire occurs against adjacent hexes.
In our example above the
Marder unit has fired and
reduced the Soviet Infantry by
four men.
As our unit movement is now
orange we can no longer fire
and probably have insufficient
movement points to move.
(Tip: Enemy unit information, with fog of war active, will be hidden from you and summarized as X = less
than 10 men, XX= 10 to 99 men and XXX = 100 to 999 men. With both direct and indirect fire, if more
than one enemy unit exists in a hex, you are given the option to select a target should your weapons be
appropriate).
Now let’s fire some artillery. Select the Artillery Dialog from the Tool Bar
The Artillery Dialog shows that we have
one available artillery unit in range of an
enemy unit.
Available artillery that are either out of
range or do not have a spotted target are
grayed out.
This status may change during play as
new enemy units are spotted.
(Tip: Always check the Artillery Dialog before ending your turn, to see if any of your artillery can fire on
newly spotted enemy units).
8
With the Artillery
Dialog open, the
selected artillery unit
will be highlighted
and possible enemy
targets shaded with a
red outline.
Your cursor will already be a
crosshair, just move it over the
enemy unit next to your
Marder unit and right click.
Your result may vary from that
shown to the left, but
hopefully you will have
softened up the enemy.
To check any unit’s range, right click its Unit Box, or select the "H" hot
key, with the unit selected, to highlight all hexes in its range. In this
case you will see your artillery unit’s range is 11 hexes.
.
(Tip: Units normally have enough MPs to fire two or three times per turn. This artillery unit can fire twice
at the two visible Soviets units).
9
You may be able to soften the enemy up further with airpower. The Command
Report at the beginning of your turn advised that you have Airpower available.
Click the enemy’s hex again, now click the Call Air Mission Button on the Toolbar.
A dialog will appear showing any air
units available. You will see the 1./StG
2, an air unit made up of 28 Stuka Dive
Bombers, ready for a mission.
Click the air unit line in the dialog and
then OK.
An air mission will be conducted against the selected hex and its combat results will be displayed on
screen, or an air unit interception message will appear. If the air unit gets through, all Anti-Aircraft fire
against your air unit will occur first, with the result of each AA fire displayed, then you will be shown
the result of the bombing. Results shown in yellow letters are disruptions of the target unit.
There are a number of other
units that have not yet moved.
Select the Recon unit shown
here highlighted in red and
move it north east to join the
Marder unit.
10
Hopefully you are not fired at
while moving in and you should
have enough movement points
to fire at the Soviet infantry
adjacent to the German units.
This could soften them up for
the next turn, but is not
without risks, as the defenders
may return fire. This can
weaken, or even disrupt the
German units, and in a city fight
almost anything can happen.
You have a second unit near to
the town that is in a special
movement state – rail
movement. The R next to the
movement value indicates
that the unit is loaded aboard
a train.
If a unit has not moved (a
movement allowance in white)
it can exit the train using its
full movement allowance.
Select the unit so it is highlighted and then click ‘Command’ from the Menu Bar and select Change Rail
Mode from the drop down list.
11
Select the unit so it is highlighted and then click ‘Command’
from the Menu Bar and select ‘Change Rail Mode’ from the
drop down list.
Once clicked you will see the
unit has no movement
allowance left, it has been
unloaded from the train and is
now in Travel mode where it
can take advantage of road
movement or deploy out of
travel mode next turn into
deployed or a combat/fighting
formation.
Finally, you have additional
units arriving by rail that are
in the north west corner of
the map.
To see how far they can go
select the lead unit and
select the reachable hexes
button as you did when
moving previous units.
You will see that the only
valid path is along contiguous
rail hexes and the path stops
when an enemy unit blocks
the railway.
12
Let’s move the lead unit along
the railway until it is 3 hexes
away from the Soviets.
With visibility at 2km we
would hate to be attacked by
artillery or aircraft as we
unloaded from the trains in a
very vulnerable state.
After the move you can see
that though there are
movement points left, we
can’t flip out of rail mode as
that requires no movement
points to have been spent in a
turn. We will have to wait till
turn 2.
You should be able to move
all your remaining rail borne
units up as far as possible,
with them queuing up behind
the leading battalion.
While you cannot predict
what the enemy will do in
their phase of the turn, your
forces have the initiative and
must continue to advance if
you are going to win.
To achieve a victory, the
German forces must drive
from the north west and west
on the objective hex.
This requires pushing back the
Soviet defenders through fire
and assault, following the
arrows on the map.
Fire is used to weaken and
disrupt the defenders, while
assaults are used to push
them out of a hex.
13
When you’ve finished moving and firing all your units, click the Next Turn Button on the
Toolbar and click OK if prompted. The enemy will move and fire its forces. Your units
may fire automatically in reply using Opportunity Fire. Some enemy movement may be
spotted. Your next turn will be announced once the German Command Report appears.
TURN 2
The Command Report contains information,
such as the availability of air units, HQs out
of command, artillery unavailable, and a
host of other details. Your command report
will vary from this one, depending on the
specifics of your game.
Of interest this is a dusk turn and that will
automatically drop visibility down to 1 hex
from the 2 hexes of last turn. Click OK to
remove the dialog.
(Tip: You can recall the Last Command
Report during your turn by selecting the item
under the Info menu).
(Tip: Clicking the Divisional Markings Button on the Toolbar will add
colour to your forces based on the organizations to which they belong).
At the start of this turn, the
situation should be similar to
this. There are actually less
Soviet units visible now than
were spotted during turn 1, this
is due to the visibility drop at
dusk.
(Tip: You only have one artillery unit that can fire, and fortunately
the adjacent units are eligible spotters that can see the target. If
you try to fire on this target unit without a spotter, the Status Bar
will state Target cannot be spotted by subordinate unit).
14
Some of your artillery may be
unavailable this turn, as shown
in the command report above.
Target your available artillery on
the red outlined hex again,
trying to disrupt, or at least
weaken, the defender. As
before, select an eligible artillery
unit, place your mouse over the
target hex and press Control,
then right click. It is always a
good idea to use up any
available artillery in order to
weaken the enemy in
preparation for the next stage of
your attack.
Fire your artillery at the target
available.
Let’s now order an advance
into the hex occupied by the
Soviet unit as shown. To enter
an enemy occupied hex, you
must assault it, using only
undisrupted units.
Select the infantry and Marder
unit that is adjacent to the unit.
In our example above they
have lost a vehicle and some
men in the Soviet turn.
Dragging the selected units
with your mouse into the hex
you want to assault will result
in a dialog box appearing to
announce the initiating of an
assault. The initiation of an
assault can trigger defensive
fire.
To resolve your assault, click the Resolve Assault Button on the Toolbar.
15
Results will appear showing
both sides’ losses. If you’ve
won, and any remaining
enemy retreat, you will
capture its hex.
If you win and the enemy
does not, or is unable to,
retreat, you will capture
some of its forces, but not
enter its hex.
(Remember, do not worry if
your outcome does not
match the one illustrated,
as play will differ.)
In the above example the German player has managed to push the
Soviet battalion out of the hex but with the loss of quite a few men
and vehicles.
It’s important to note that in our example both German units took
heavy casualties. The Infantry unit has become moderately fatigued
(yellow) and has subsequently dropped from B to C morale. The
Marder unit has been heavily fatigued (orange) dropping its morale
from B to D.
Both units will be less effective until they rest.
On the flip side the Soviet unit is now disrupted and will have to rally
up before being able to contest the hex again.
(Tip: When vehicles assault into non-Clear hexes, they may suffer a
penalty for lacking infantry support, so for best results use a combined
arms approach when assaulting. Fortunately in our example we had
German infantry available to work with the Marders).
16
FINISHING THE GAME
You now know how to move your units, fire, and assault with your forces. With the victory conditions
in mind, keep maneuvering your forces in the manner you see fit. The end of the game will be
announced at the conclusion of the enemy’s final turn, at which time, final Victory Points will be
shown.
(Tip: If you capture an objective hex you will earn its Victory Points, but objectives can be recaptured an
endless number of times in a game. Only the side owning it at a scenario’s end receives its points. To
take an objective hex simply enter it. You do not need to remain there).
To restart the scenario, click File and Selection in the Menu Bar. A list of scenarios will appear and you
may select any by double clicking on its entry.
FURTHER INFORMATION
This Guide is designed to make you feel comfortable with what’s going on in Panzer Campaigns, but it
is no substitute for reading the Game Help files. You can access Help from the Game Help Menu. The
Game rules are really in two parts:
Part 1 in the User Manual, which is the series rulebook. You can see this while playing by pressing F2.
The Main Program Manual discusses the various elements of the interface in helpful detail such as
each Menu or Dialog. There is even a list of HOT KEYS Show in the Other Features section of this
manual. You can view this program guide while playing by pressing F1
Pressing F4 invokes a feature called the Parameter Data Table. It provides a host of information
including movement costs, terrain benefits, and stacking limits amongst other things.
Lastly, documentation for the game’s editors may be found in help files accessed from the Help Menu
when you open each editor.
17