1
Random
m Campaiggn and Batttle Generaator Adden
ndum Panzer Command: K
Khark
kov Random
m Campa
aign and B
Battle Gen
nerators Supplemeental Documeentation Introducttion This document is inten
nded to supplement the information inccluded in the main manuaal, as additional ments were m
made to the Random Camp
paign Generattor (RCG) and
d Random Batttle changes aand improvem
Generator (RBG) after the manual layout was co
ompleted and sent for prin
nting. This is n
not a replacement for the infformation in tthe manual aand should bee read after reeading the maanual as an addendum. The Ra
andom Ba
attle Gene
erator (RB
BG) System Reequirements: In
nternet Explorer 7.0 or abo
ove Sccreen resoluttion minimum
m 1024x768 How to ru
un: Shortcut ffrom program
m start menu or game men
nu The RBG aallows you to generate a n
near infinite n
number of batttles for your WW2 tacticaal Ostfront gaaming pleasure. The system is not totally rrandom howeever. You can
n decide whatt type of battlles you wish tto fight, with
h which force
es and at what time. Indeed the RBG can be set up to
o produce som
me very exaccting engagemeents if you wiish, or if you rrather, totallyy surprise you
u! 1 Random Campaign and Battle Generator Addendum The UI of the RBG is mostly mirrored with the German inputs on the left and the Russian on the right. As a general note almost every screen control has an accompanying tool‐tip which clearly explains that controls function or status if you hold the mouse over it without clicking. So the options from top to bottom, left to right. DICE: Click to toggle the dice on or off. This controls whether the other input variables are randomised or not. Even if you don’t globally randomise the inputs (for a totally unknown, random result), you can still individually randomise many of the input options for a more controlled outcome. Note any individual input which has been randomised will be switched back to static mode if you turn global randomisation off. POINTS: This is the size of the force you wish to play with. Left click to increase the value and right click to decrease. Although you can’t enter an arbitrary value, there are many points’ steps available which will represent many force sizes. The very largest point’s forces should be reserved for later war conflicts which obviously use more expensive equipment compared with the early war relatively speaking. HUMAN/AI: Click to toggle if the player of the selected side will be human (brain) or AI (computer). Although Human‐vs‐Human games are allowed via email, AI‐vs‐AI is not. This important input changes many of the RBG behaviours (example the pre battle briefing text) REINFORCEMENTS: Click to toggle the availability of reinforcements for a given side. If you right‐click on the reinforcements button a small pair of dice will appear in the lower right corner of the icon and the status of this input will randomly change. This implies that the availability of not of reinforcements will be randomly determined. To change back to a fixed value simply right click again. MINEFIELDS: Click to cycle between “no” minefields, “sparse” minefields and “dense” minefields. You can also right click on this button to randomly determine minefield availability. Minefields are only available to the defending side. In practice their size and density will also depend on the points size of the defending force (this represents the fact that on average a large defensive force will logically lay a larger minefield than a smaller force). POSTURE: Click to cycle a sides attack / defence posture. These are “Assault”, “Defend”, “Defend with time bonus” (defending side will acquire more victory points the longer it holds). Note if both sides are set to Assault, this would represent a meeting engagement. Obviously both sides can’t defend as that would be a very boring game! This option will automatically affect the minefield status and vice versa. Much like the other options, you can right click to set this value to random. EXPERIENCE: Click to cycle between “Green”, ”Veteran” and “Elite” forces. This option can also be individually randomised with a right click if desired. An explanation of the difference between unit experience levels can be found in the main game manual. This option doesn’t 100% ensure all your force will be comprised of units with the selected experience, but rather changes the odds that they will be. This was done so as to better reflect the realty of likely force composition. Also keep in mind that Elite forces will cost more purchase points than Green forces. 2 Random Campaign and Battle Generator Addendum STRENGTH: Click to cycle between various Platoon strength levels. “Depleted”, “Under”, ”Operational” and “Full”. During the war the ready strength of a given force varied depending on numerous factors (usually date being the most important). This option can be used to reflect that. Depleted or under strength platoons will have few squads, whereas operational or full strength platoons will be bristling to capacity. Obviously a full strength platoon will cost more points to purchase than an under strength one. Right click to randomise. SETUP: Click to cycle between different force setup options. This represents the initial force setup pattern. This pattern can vary depending on if the force it assaulting or defending and setting an option here will also set the opposing sides’ setup option as they are linked. As there are many potential options (they are also user expandable), a complete description can’t be given here. However a tool‐tip will provide a brief comment as to the force disposition. Because always knowing how your force will be initially arrayed can sometimes get boring, there is as always the option to right click and randomise the setup. PRESET: Select a force preset from the drop down box. This preset sets up not only the force points distribution mixes (see below), but also sets up a group of historically compatible equipment / soldiers to work with. For example if you were to select say “5th Panzer Regiment”, then the forces with which you will have to work with will accurately reflect what the 5th Panzer actually used and even their unit naming conventions. This will also be indexed to the date the battle is to be fought on. By right clicking on the portrait of the German or Russian Commander, you can also set this preset option to randomise if you so desire. The force presets are user editable / expandable for use in future modifications. MIX: These sliders can be clicked and dragged to give a user selectable value. The % number represents the percentage of total force size which will be composed of that unit type (in purchase points). For example if you wish to fight a 1000 point battle and have set “heavy vehicles” to 35% then your tank force size will be worth approximately 350 points. Most of the categories are self explanatory. The “light vehicles” option reflects trucks, half tracks, armoured and scout cars etc. The artillery and air power options represent off‐board forces. You can click on a force type icon to “lock” the slider in place so that other slider changes don’t change it. Recall that force preset changes will change the force mix depending on the historical context. At this point in the UI there is a slight divergence in the UI between left (German side) and right (Russian). BATTLE: In many ways this drop down option box is the core of the RBG. You can select a particular battle option here and that will then setup the entire RBG options list to reflect that historical battle. In particular it will set or randomise each input option, as well as choose appropriate force presets, mix them, pick a template (see below) and also set the battle date. Although you are welcome to make any changes to the RBG settings as you see fit after loading a battle, all that really remains is to press the build button to create the actual random battle. These battle plans are user editable and expandable so expect to see many more in the days after release of PCK. As a special note, a particular battle plan will set the RBG up in a particular way depending on how the designer of the battle chooses. He or she may 3 Random Campaign and Battle Generator Addendum choose to randomise some options in a particular way, or limit other options (example the force setup zones may be limited). If you find that you can’t make changes to the RBG as you would like after loading a particular battle plan, you may need to load another or load the default plan (all options available). TEMPLATE: A template which can be loaded from this drop down box defines both the map a given battle will be fought on, as well as how the forces will be “laid out” on this map. For more information about template editing see the chapter “Template Editor” in the main documentation. A Battle plan will often define one or more templates. It is possible to randomise template selection by right clicking on the adjoining mini‐map of the engagement. DATE: (in bold) this is the date the battle will be fought on. This date is normally set either by the battle plan or by changing the season and year (see below). It is possible to change the date manually by clicking individually on each of the month, day and year. Note, because the date must be constrained by the limits of the selected battle plan, season and map type (autumn/winter, spring/summer), then you won’t be able to necessarily select and arbitrary date at this point as some dates will be incompatible with the other RBG settings. DESCRIPTION: This scrollable text box gives you a synthesised summary of the battle and map conditions prior to random battle generation. SEASON: Left click to toggle and right click to randomise a given season. This input is fixed by the given map season. A summer “Khakov” map can have Spring/Summer options, a winter “Winterstorm” map can have Autum/Winter options. Changing the season will also randomise to some extent the Battle Date (as above) YEAR: Again, left click to toggle the year (1941‐1945) and right click to randomise. Depending on the selected battle plan not all years may be available. BUILD: Click this button to “Build” the random battle taking account of all the options specified. Build Sequence During the build phase you will be taken to the build screen which will give you a graphical representation as to the progress of the build process. Depending on your processor and how complex the entered battle plan was, it may take several seconds to a minute to produce your battle. If you feel that the whole process is taking too long, you can cancel the build by clicking anywhere onscreen. You will be asked to confirm if this is what you really want. If the build was successful you will be told via a popup box that the process was completed successfully and on what date the battle will take place. All random battles are called “Random” and can be played via the Set Battle menu option in the game. Recall that the scenarios are sequenced in date order so you may need to scroll down a little to find your random battle if you selected a late date. If you wish to 4 Random Campaign and Battle Generator Addendum keep a Random battle remember to rename it to something else before generating another Random Battle in the RBG as otherwise it will be overwritten and lost forever. You can do this either in windows (the battle resides as “(Main_Kharkov_Directory)/Data/Scenarios/Random.xml”) or in the scenario editor (see the scenario editor documentation for further details). Sometimes it will take many attempts to generate a given battle, or the process may fail altogether. This can occur for several reasons and a popup box will appear and tell you the most likely. Mostly it is because you have attempted to cram too much onto a particular setup zone. A 2000 point battle in the early war kessel breakout zones will almost certainly overload most templates for example. The solution is often to reduce the force purchase points to something a little more manageable, although there are other ways of doing this which will be pointed out to you if the situation arises. Improved user templates can also help. The Random Campaign Generator (RCG) System Requirements: Internet Explorer 7.0 or above Screen resolution minimum 1024x768 How to run: Shortcut from program start menu or game menu The RCG allows you to generate random campaigns, which, much like their static counterparts, are a linked series of battles in which you carry through a core force of units which can gain experience, medals and special abilities during their simulated combat career. PCK ships with several Random Campaigns to choose from. However it is relatively easy to edit existing random campaigns or even make entirely new ones with the supplied campaign editor. See the campaign editor documentation for further details. The operation of the RCG is really very simple. At the top of the screen is the name of the campaign. This should hopefully give you some idea of what to expect if you play through it. Below the campaign name is the information box for the current random campaign. Here is detailed the number of key battles (and a date range during which they occur) and the number of auxiliary battles (and their date range). 5 Random Campaign and Battle Generator Addendum A Key battle is a battle which the campaign designer wants you to fight. It may represent some seminal historical battle or some otherwise interesting contest. You must at the very least play these battles. Auxiliary battles are strictly optional, you may choose to include them in the generated campaign or not. Directly below the info box is the scrollable campaign description display. This area gives extra information on what the campaign entails, its history, which forces it simulates, points spreads, difficulty settings, etc. Finally you can select which random campaign you wish to work with from the campaign selection dropdown box. Once selected you must then choose the dates you wish to fight across, the total number of battles you want to include and the replacement level (which affects your points per battle and how many help requests you will have for the course of the campaign). The build campaign button is pretty self explanatory. Note the dates you choose to fight must be inclusive of the random campaign dates as specified by the random campaign designer. Once you press the “Build Campaign” button you will be taken to the campaign build screen which shows a graphical representation of how the campaign build process is progressing. Obviously depending on your machine specs and the size of the random campaign you have chosen to generate it may take some time. Due to how the RCG works, it actually calls the RBG during the campaign build process so don’t be alarmed if you see the RBG popup occasionally. Further to this if you have the RBG open at the time of generating a random campaign it will be closed down whilst the RCG is working. If you feel the process is taking too long you can cancel random campaign generation by clicking anywhere on the RCG window. Provided no errors were encountered during the build process you will be asked to confirm the creation of the new campaign or the overwriting of an existing campaign with the same name. So ensure you have completed any old campaigns with the same name prior to generating new ones. You can play your new creation by accessing the Campaign menu option at the main menu of the game and then scrolling the list of available campaigns to find it. The HQ Helper (HQH) System Requirements: Internet Explorer 7.0 or above Screen resolution minimum 1024x768 How to run: Shortcut from program start menu or game menu 6 Random Campaign and Battle Generator Addendum The HQ Helper is a small helper program that is designed to allow a player to complete a campaign even if he is stuck at a particularly difficult scenario. Take note of the battle number in the scenario’s description in the game, then launch the HQ Helper and set it to the same campaign and battle number. The HQ Helper allows you to ask for reinforcements, which increases your available points by 25% and also allows an additional bombardment on the enemy forces, which decreases their strength by 25%. For maximum effect if stuck on a scenario, use both and then replay the scenario at the “Easy” level in‐
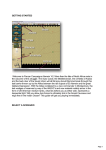
game to further reduce enemy forces by another 25%. Note that each use of either reinforcement or bombardment counts as one help request, so using both counts as two. When you request either type of help, the HQ Helper will inform you how many requests you are allowed in the campaign in total based on your replacement setting. The Random Campaign Editor (RCE) System Requirements: Internet Explorer 7.0 or above Screen resolution minimum 1024x768 How to run: Shortcut from program start menu or game menu The RCE is a special mode of the regular campaign editor which allows a designer to create his own Random Campaigns. Random Campaigns are special xml files which are stored in the “{main Kharkov}/Data/Random Campaigns” directory. Operation of the RCE is almost identical to that of the regular campaign editor, and it is assumed the reader is familiar with the basic operation of the regular campaign editor before attempting to produce random campaigns. In order to enter into the special random campaign mode, press the “R pencil” button in the top left hand corner of the window. This will put the editor in random mode. Now all operations within the editor will be carried out on random as opposed to regular campaigns. You can add battle plans (the random equivalent of scenarios) to the sequence list as you would a scenario in the standard editor. You can add as many duplicates as you like (as one particular battle plan often defines the bulk of the random campaign battles). It is not important that the added battle plans are in sequential date order as the RCG will reorder them during build time. 7 Random Campaign and Battle Generator Addendum If you would like to specify a random battle as a key battle for that campaign simply check the Key battle check box. Unlike regular campaigns you do not need to include any briefing text if you don’t want to. Any briefing text entered will overwrite the automatically generated pre‐battle briefing by the RBG. Further if you do decide to include specific briefing text for a battle then you must also define a media file for that battle. If the briefing is left blank the computer will choose an appropriate (but rather generic) media file for that particular battle. Also of important is setting the Replacement modifier for the various replacement levels in the campaign, as this will directly affect what % of his core points the player receives each scenario, assuming the points in the battle plan have been setup to support it. You should also define the number of “HQ Help” requests available at each level using the HQ Helper. Random campaigns unlike their regular brethren require a Random Campaign description. This can be accessed via the spectacles button next to the campaign name field. This description will be displayed to the player when they select the random campaign from the drop down dialog of the RCG, so it should be rather detailed and include information on the campaign history, likely core forces, points spreads, engagement types, difficulty, etc. Remember that much like regular campaigns, random campaigns also require an epilogue file. Once you have defined your random campaign you should save it. Once saved you can then do a test build by pressing the Test Random Campaign button. This will run the campaign generation sequence through to completion for each battle plan in the sequence list and for the total number of times that was selected in the Count drop down box. Due to the random nature of the RBG it is sometimes beneficial to run the build sequence many times over to ensure there are no likely placement issues with the battle templates. If there is an outright error in the generation sequence which would cause a complete failure of the build, then you will be alerted and the build will be aborted. If only a warning is generated, then you will be informed with an alert, but may continue with the build process. It is still important to take notice of any build warnings as they may detrimentally affect the final output. During normal RCG building, the user is not informed of any warnings by default. Note the Test Random Campaign doesn’t produce an actual random campaign; rather it simulates the success or failure thereof if the player attempted the same with the actual RCG. Random Battle Driving Files This document is for advanced users who want to develop their own modifications to the RBG system. At the heart of random battle generation there are four main input support files (all are xml based) which define the specific input parameters for a specific random battle. These are easily editable with 8 Random Campaign and Battle Generator Addendum either a text editor (eg notepad.exe) or a purpose specific xml editor. They can all be found in their own subdirectories off the {main Kharkov}/Data directory. These four are the battle plan xml which is the master file and defines the others. The template file xml which defines the map the battle will be fought on as well as platoon positioning elements. The force preset xml which defines force % mixes, force names and units. Finally the setups file xml which defines the initial force setup zone placements. Working backwards. 1. Data/Setups Each xml file in this directory defines a specific initial force setup position on the map. There is only one data line in each Setup file, called, somewhat surprisingly setup. Here is an example: <setup
id=“Kessel”
name=“Kessel - Cutoff”
enemyid=”Envelop”
desc=”setup as an isolated pocket in the middle of the map”
icon=”DIRU1”
faceto=”!500,500”
attack=”300,700,700,700,700,300,300,300”
defend=”300,700,700,700,700,300,300,300”
/>
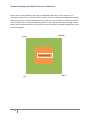
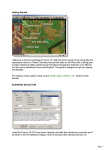
id is the unique identifying field for this setup. name is the human recognizable field. This name is shown on the setup icon within the RBG if this setup is selected. enemyid is the id of the enemy setup which is linked. A particular setup will have a reciprocal enemy setup. This is nominally done so that the enemy side doesn’t setup in the same space as the friendly forces, although this can occur if that is what you want! desc is the description field and always starts as “setup as ...”. This explains the setup zone and is used as a tool‐tip for the player to see what they are getting, and it is also used in the auto generated briefing text. icon is the name of the png file found in the {main Kharkov}/Editor subdirectory. There are two of these files one ending in “r” which denotes random (shows dice). You can have a look at these files, which all start with DIR (due to a historical thing) and choose one of your liking or make your own. 9 Random Campaign and Battle Generator Addendum faceto is the x,y map point which the setup force will face toward. For example if you want the forces to start setup facing north you might give the point as “500,100” (see below for how the map coordinate system works). If you place a “!” before the first number this implies away from. So in the example above faceto=”!500,500” this means face away from 500,500 which corresponds to the very centre of the map. attack is a x,y linked list of closed polygon points which defines the setup area for an attacking (assaulting) force. The first and last points are connected. defend is similar to attack, but is the area defined if the force is defending. This is normally larger than the attack area, but can be anything you want. As a special note, the area between the defined friendly setup zone and the enemy setup zone is used by the RBG to define minefield setups if they have been activated. 10 Random Campaign and Battle Generator Addendum Special note on map coordinates. PCK maps are 1000x1000 meters with 1 meter resolution. The coordinates of each of the “on‐board” corners is shown. The Kessel setup zone example above is shown below. If you wish to include off‐board units in your setup zone, you will need to extend the setup zone to areas outside of the on‐board coordinates (typically at least 100meters off‐board). Although a simple square zone had been defined here, any shape no matter how complex is possible provided that it forms an enclosed polygon. (999,999) (0,999) Kessel Setup Zone
(0,0) 11 (999,0) Random Campaign and Battle Generator Addendum 2. Data/Presets The preset xml files define certain specific data about a particular outfit you want to model in your random battles. Here is an example file: <preset
id=“17panzer”
side=“german”
name=”17th Panzer Division”
title=”17th Panzer Division”
infantry=”10” transport=”5” artillery=”10” air=”5” gun=”0” armour=”70
showinmenu=”false”>
<auxillaryunits>
<unit unitid=”Sd Kfz 222” unitname=”Aufkl Platoon” />
<unit unitid=”MG42 HMG Team” unitname=”HMG Platoon” />
<unit unitid="Sd Kfz 251" unitname="HMG Transport" />
<unit unitid="81mm Mortar" unitname="Heavy Mortar Platoon" />
<unit unitid="JU-87 Stuka" unitname="JU-87 Stuka" />
<unit unitid="Pz Grenadier 41" unitname="PzGren Platoon" />
<unit unitid="105mm Artillery" unitname="Pz Art 105mm Artillery" />
<unit unitid="Pz Kpfw IIF" unitname="Light Panzer Platoon" />
<unit unitid="Pz Kpfw IVE" unitname="Heavy Panzer Platoon" />
<unit unitid="50mm GW36 Mortar" unitname="Light Mortar Platoon" />
</auxillary units>
</preset>
id is the unique identifier for this preset. side is either “german” or “russian” name is used as the drop down selection entry. title is the string which is used in the automatic briefing system. infantry, transport (= light vehicle), artillery (off‐board), air (off‐board), gun (on‐board antitank and anti‐
infantry), armour (= heavy vehicle) are the percentage breakdowns for each force type category. They must obviously total 100%. 12 Random Campaign and Battle Generator Addendum unit list. This list is optional, however it does add much flavour to the game. Each unit has a unitid, this corresponds to the game unitid unique equipment identifier, and a unitname, which the RBG uses as the main stem of each platoon name. The unitid can be found in the scenario editor if required. The RBG will only pick from the unit selection list for the given force preset. It will also only pick those forces which are legal within the limits imposed by the battle input date. For example let’s assume that the 17th used PzKpfw IVEs as heavy tanks in 1943 but upgraded to Panther As by 1944. If both of these are defined in the force preset file than only the correct tanks will be selected depending on the date chosen. In this way a good preset file will define the entire outfit’s OOB across the entire 1941‐1945 date range so that all possible battle dates can be modelled. showinmenu sets whether this preset will be available in the RBG or will be hidden and only used by the RCG when generating campaigns. As a side note, the RBG via the xml service date and prevalence tags for each piece of equipment will accurately pick equipment choices as were reasonably historical. 3. Data/Templates The template xml files define the map which the battle will be fought on, as well as how the forces for both sides will be distributed on the map. These are large files and are edited via the scenario editor whilst in template mode. The details of this can be found in the manual section discussing the template editor. Due to their large size and complexity you will need a rather powerful machine and plenty of patience to work on these files. The quality of the template driving file really impacts upon the final quality of the generated random battle. So it is worth taking a little time and care to edit these well provided you are so inclined. There's a good sample of existing templates in the build you now have. Open up the template editor and open the following template: Winter Map (l1w). It will likely take a while to load and will look incredibly dense and intimidating once it opens. Here's where you learn the first key feature to template editing ‐ the filters. In the bottom left of the template editor are four checkboxes, labeled U, F, O and *. The first three are what matter ‐ Units, Fields and Objectives. Uncheck them and the map will look a lot better. Now you can turn them back on individually. Using these is key to keeping the editor from becoming too slow while you work and add more and more objects to the map. Here are some additional suggestions on how to create a new template: 1. Open the Winter Map (l1w) XML file (it's in /Data/Templates). Clear out the objectives, minefields, infantry, gun, armor and transport platoons. That should leave you with just air and artillery and a bunch of empty sections. Save that file as something like "Blank Template.xml". That's what you'll start with for every new map. Take a good look at how many objectives, units and minefields there are to get 13 Random Campaign and Battle Generator Addendum an idea of template density. 2. Now open the Template Editor and load your Blank Template. Change the level to a new level, rename it, save it and you're ready to go. The artillery and air units are off‐map, so since all maps are the same size right now, doing this keeps you from having to place those every time, you can start with them already placed. 3. Now load Kharkov and load the set battle scenario for the map you are working on. Take a look around, noting the actual buildings and so on. Go back to the Template Editor and start placing objectives. They can be as straightforward as "Village House" or "North Woods" or more elaborate like "Mayor's House" and "Ivanov Farm", etc. The point is to basically cover the map's key points and give every quadrant a good distribution of potential objectives for the RBG to choose from. 4. Now it's time to start placing units. For each unit type, the first thing to do is to place a platoon in a formation you think you'll reuse, then with it selected, click on the Add Platoon button again. Voila, another platoon in the same formation appears. This saves a LOT of placement time. You can do a few typical formations for each general unit type, then select the one you want, Add Platoon and it's effectively like a copy/paste feature. But wait, there's more! If you grab the little red rotation marker with your mouse and move it, the whole platoon will rotate around the leader. This means you can put that formation in a variety of facing directions across the map without having to move each individual unit, just with the rotation tool. These two methods are KEY to making template creation go quickly. If you want, spend some time adding to your blank template with three or four good formations for each type that you might reuse, then save it and use that as your starting point for all future maps. 5. Start with Infantry and then Guns as they generally go in many of the same terrain areas. Infantry formations should have 10 Max, Guns should have 3 Max. Try to keep infantry and guns in cover. Zoom in if you need to place them precisely in places like foxholes. Try to put the HQ squad in places like church towers so that they can spot better for artillery. Keep in mind that for all units the RBG "purchases" from 1 to 10, so the later units in a formation are the least likely to show up. Place 1‐6 in the most important locations to cover (if that platoon were selected for use by the RBG) and fill in with 7‐10. Note that if the RBG runs out of infantry placement locations, it will substitute gun locations for infantry and vice versa. 6. Do Armor and Transport next as they generally get placed in the open areas. Armor formations should be 10 Max, Transport should be 5 Max. As with Infantry and Guns, if the RBG needs extra slots it will treat these two as interchangeable. 7. Minefields are last, these are generally pretty quick. Just place them in logical places for each type and try to provide good coverage across the map. 8. Keep in mind that in the vast majority of battles, forces will be approaching from opposing sides. The RBG automatically faces the individual units once it purchases them, but it will not reorient the formation, just the units within it. So if you have a formation in the SE corner of the map, it's wise to 14 Random Campaign and Battle Generator Addendum make it appear to be oriented NW (towards the opposite side) as that's what it will need to do 99.9% of the time on Turn 1. Basically, everything converges towards the center point of the map. Try to think of all the possible combinations when you're placing. 9. Feel free to use the RBG to generate a battle with a template you've looked at, then open the "Random" scenario in the Scenario Editor to see how it chose from the available formations. 4. Data/Battles The battle plan xml file is the main RBG input file and really ties the whole thing together. You can use battle plans to select a date (or date range), use them to individually adjust input variables, select template(s), and also to define a core series of units and objectives. Consider this example: <battle
id="Kharkov17v9"
name="17th Panzer vs the 9th Army"
template="Summer Map (l2a),Summer Map (l1b),Summer Map(l2c)"
date="5/17/1942”
desc="The 17th panzer is flung against the Russian 9th army on the outskirts of Kharkov.
[cr] [cr] – Overview – [cr] [cr] The Soviet offensive toward Kharkov had been in progress
for 5 days when ..."
icon=”BattleBack0”>
<side
name="german"
player="human"
preset="17Panzer”
posture="attack"
points="400"
reinforcements="random"
exp="vetran,elite"
str="operational"
minefields="none”
setup="north,north east,east"
briefing="Commander it is very important that you smash this line of Soviet
resistance ..." >
<unit unitid="Pz Kpfw IVE" unitname="HQ/3/1-36 Panzer Platoon" exp="elite"
number="2" max="2" />
15 Random Campaign and Battle Generator Addendum <unit unitid="Pz Kpfw IIF" unitname="Le/3/1-36 Panzer Platoon"
exp="Veteran" number="5" max="5" />
<unit unitid="Pz Grenadier 41" unitname="1/2/1-103 PzGren Platoon"
exp="Veteran" number="3" max="3" />
<unit unitid="Sd Kfz 251" unitname="1/2/1-103 PzGren Transport"
exp="Veteran" number="3" max="3" />
<unit unitid="Pz Grenadier 41" unitname="2/2/1-103 PzGren Platoon"
exp="Veteran" number="3" max="3" />
<unit unitid="Sd Kfz 251" unitname="2/2/1-103 PzGren Transport"
exp="Veteran" number="3" max="3" />
<unit unitid="50mm GW36 Mortar" unitname="1/2/1-103 Mortar Platoon"
exp="Veteran" number="2" max="2" probability=”A=0.33;D=0.33”/>
<objective name="This is the Centre of the Map Objective!" points="100" x="500"
z="500" />
</side>
<side
name="russian"
player="ai"
preset="9Army"
posture="defend, defbonus"
points="300"
reinforcements="random"
exp="green,veteran”
str="full,operational"
minefields="sparse,dense"
setup=""
briefing="Comrade, the Fascists are rallying again. They sense a weakness in our
defensive line ..." >
<objective name="This is a BIG Objective" points="100" x="100" z="100"></objective>
</side>
</battle>
Ok there is a lot to take in so let’s go slow. id is as always the unique identifier. name is the name of the battle plan and appears in the selection box of the RBG. 16 Random Campaign and Battle Generator Addendum template is a comma separated list of potential templates ids with which to play this battle on. In this example three templates have been selected and will cycle randomly in the RBG. It is also legal to specify this field as simply “random”. This has the effect of randomly cycling through all available templates. date is the date the battle will be fought on. This value can also be defined as “random”, or as a date range for example “5/7/1941‐19/8/1943”. For random or date ranges the RBG will choose a random date in the specified range. desc is the battle plan description. This is shown in the RBG info box so the player can better determine what this battle is all about. This field follows the normal PCK description based text fields. The string “ [cr] “ is used as a carriage return. In this example a very specific briefing text is used. If you were writing a more generic battle plan then obviously something more generic would also need to be placed here. It is also legal to just use the empty string “” if you don’t want to include this datum. icon is the battle plan graphic displayed in the RBG. BattleBack0 is a Summer graphic, BattleBack1 is a Winter graphic. This is only of importance if showinmenu=”true” which allows the battle plan to appear in the RBG. Otherwise it remains hidden and is only used by the RCG. side, each sides (German and Russian) parameters are setup here. The expected human player’s side should always be listed first in the battle plan. name is either “russian” or “german”. player is either “human” or “ai”. It is legal for both sides to be “human” (a PBEM game), but it is not legal for them to both be “ai”. preset is a comma separated list of potential force presets as described in greater detail above. In this case only one preset has been selected. It is also legal to define this field as “random” in which case the RBG would choose randomly between all available presets for that side. posture is the attacking or defending posture for that given side. The legal options are “attack”, “defend” or “defbonus” (defender has a time bonus). A comma separated list of options is also possible (see the Russian example above). The option “random” is also possible. points is the total force purchase points available to that side and is also the determining factor on how large a force the RBG will generate. This must be a fixed value; there is no list or random option. Legal values are one the following: 0,25,50,75,100,150,200,250,300,350,400,450,500,600,700,800,900,1000,1250,1500,1750,2000 Special note. If you define a core force of units in the battle plan (see below), you will always be given enough points to cover their cost regardless of the setting here. Note that you can also define formulas in the points field. These formulas may use the following variables. 17 Random Campaign and Battle Generator Addendum Side 1 Only: %ON = your num core points (as listed in the scenario xml) %OM = your max core points %OP = calculated points after all equations are solved Side 2 Only: %EN = enemy num core points %EM = enemy max core points %EP = enemy calculated points Universal: %RM = replacement modifier (defined in the RCE) RAND(a,b) = random function %OA = "on Attack" (=1 if Attacker) %OD = "on defense" (=1 if Defender) These can be combined. For example, here is a potential formula for Side 1: points="(%OM * %RM) + (RAND(%ON * %RM *0.25) ‐ RAND(%ON * %RM *0.15)) + (%OA * RAND(%ON * %RM * 0.33))" And here is a potential formula for Side 2 (the AI): points="((%EP + %EM + %EN)/3) + (%OA * ((RAND(%EM) + RAND(%EN) + RAND (%EP)) /3) * 0.5) ‐ (%OD * RAND(%EP * 0.33))" reinforcements either “yes”, “no” or “random”. Defines if they should be available to that side. exp, short for platoon experience. “green”, “veteran” , “elite” or “random”. Once again if you wish to limit this value to a short list that can be defined as well, see the example xml. str, short for platoon strength. “depleted”, “under”, “operational”, “full” or “random”. Also obeys normal listed rules (see example xml). minefields are “none”, ”sparse”, ”dense” or “random”. Obeys normal listed rules (see example xml). Note the attacking side is not allowed minefields even if they have been designated here. setup is a comma separated list of setup ids which are potential deployment zones for that side. “random” is also legal if you want all possible setups to be included. This example gives the German 18 Random Campaign and Battle Generator Addendum player three different setup options (one of which will be randomly selected). Note how the Russian players setup is empty = “”. This is to prevent an option here conflict with the German option as the setup files are linked. In this case the Russian setup zone will be selected depending on which German zone has been chosen. briefing is the specific text briefing which will be incorporated into the automatically generated pre‐
battle briefing text for the player. The above example is only a brief excerpt of a more detailed briefing. This field follows the normal PCK description based text fields. The string “ [cr] “ is used as a carriage return. In this example a very specific briefing text is used. If you were writing a more generic battle plan then obviously something more generic would also need to be placed here. It is also legal to just use the empty string “” if you don’t want to include this datum. unit list. An optional unit core list. These forces will be automatically selected and chosen to appear in the generated battle. If this battle plan is part of a larger random campaign, then these forces also become the campaign core forces. The details of each data tag for the listed platoon are referenced in the main user manual and so will not be repeated here. However due to the nature of the RBG as many or as few data points as needed can be used. Missing data fields will be randomly assigned by the RBG. At a minimum the unitid and unitname must be completed. Everything else is optional. Let’s consider the German example xml above. Most of the platoons listed have data regarding platoon size (num), max size (max) and unit experience (exp). Because these are listed the RBG will use that information to build that particular core force. Notice how exact unit placement, unit heading and reinforcement information is missing. The RBG will fill these values out in accordance with the other data inputs. If you really wanted (a specific key battle for example) you could fix the exact position of these platoons on the map; however that would remove some of the randomness from the resultant output. As a special time saving short‐cut tip, you can use the scenario editor to place down these core forces on a dummy scenario, load up the scenario in notepad and then cut‐&‐paste the required platoon data into the battle plan xml. This is also true for any text description field. Remember this tip as it will save you time. There is an optional probability= field that can be added to any core unit. This can then have a probability defined based on whether the unit is attacking or defending as to whether it will actually show up in the core unit list. This is used to allow additional non‐key core units a chance to show up even if they player could not normally afford to purchase them, as all core units are always available. An example of a unit that is available 50% of the time in an Attack scenario and never in a Defense scenario would look like this: probability=”A=0.5;D=0” objective list. An optional objective(s) list. If a battle plan calls for a fixed objective(s) they can be defined here. It would be rare to define fixed objectives outside of specific key battles. The RBG normally handles generation and placement of objectives. If used they have a name, point value, x and z (y) coordinate. The name is used during random briefing creation. 19