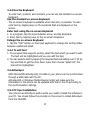
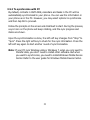
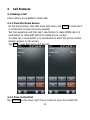
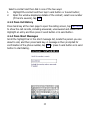
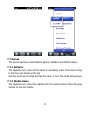
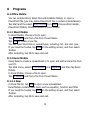
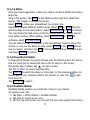
1
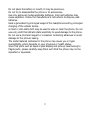
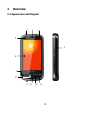
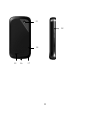
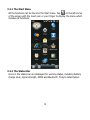
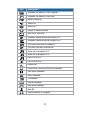
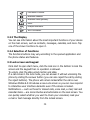
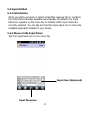
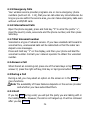
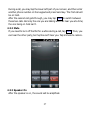
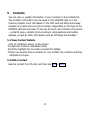
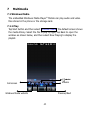
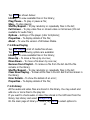
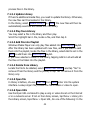
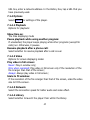
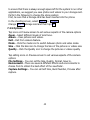
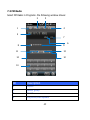
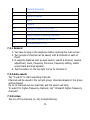
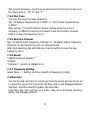
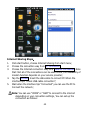
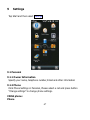
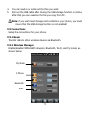
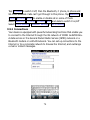
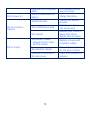
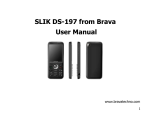
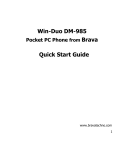
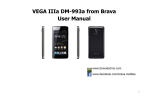
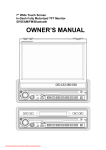
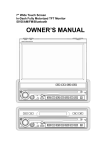
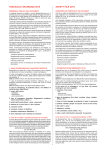
Win-Duo DM-985 Pocket PC Phone from Brava User Manual www.bravatechno.com 1 Thank you for purchasing Win-Duo DM-985 from Brava. Your phone is a communication product running Microsoft® Windows Mobile 6.5 Professional with Dual Mode system GSM/CDMA working simultaneously, in addition to the support of the CDMA third generation technology 1x-EVDO Rev. A with data link speed up to 3.1Mbps. To experience the optimum performance of your mobile phone, please read this users guide thoroughly. Your phone contains numerous powerful office applications and entertainment software which help you at work and also to fulfill your spare time. Please follow the guidelines below: • • • • • • To use this phone safely and legally, read the section “Safety Information” carefully; Before the first time use, charge the battery with the original charger for 8 to 10 hours. A new battery may reach its peak performance only after two or three cycles of fully charging and discharging. Similar to a computer, your phone will perform best when enough memory is present. Reboot the phone to clear the memory to store it peak performance. Running multiple programs at the same time may prolong the response time of the phone. If it starts to react slowly, try rebooting the phone to recover. In the event that the contents of this manual are not consistent with menu options on the phone, follow the prompts on the phone. Some services described in this manual may not be supported by all the networks. Contact your network operator or service provider for details. 2 1 SAFETY INFORMATION 6 OVERVIEW 10 BASIC FUNCTIONS 17 CALL FEATURES 24 CONTACTS 29 1.1 When carrying the phone 1.2 Energy Leak of Radio Frequency 1.3 Electromagnetic Radiation 1.4 In Public 1.5 Compatibility of RF Interference 1.6 In Aircraft 1.7 Pacemakers 1.8 Hearing Aids 1.9 Other Medical Equipments 1.10 Road Safety 1.11 Potentially Explosive Atmospheres 1.12 Battery 1.13 Others 2 2.1 2.2 2.3 2.4 2.5 Appearance and Keypad UIM/SIM Cards Storage Card Accessories The Battery 3.1 3.2 3.3 3.4 3.5 Switching On/Off Home Screen Lock screen and keypad Input Method ActiveSync 3 4 10 13 14 14 15 17 17 20 21 22 4.1 Making a Call 4.2 Answer a Call 4.3 During a Call 5 6 6 6 6 7 7 7 7 7 7 8 8 8 24 26 26 5.1 View Contact Details 5.2 Edit a Contact 5.3 Add New Contact 29 29 30 3 5.4 5.5 5.6 5.7 Speed-dial for Contact Send Contacts via Bluetooth Delete Contacts Contact manager 6.1 6.2 6.3 6.4 6.5 Text Message Outlook MMS Menu for Messaging and Email Folders for Messaging and Email 7.1 7.2 7.3 7.4 7.5 7.6 7.7 Windows Media Camera FM Radio Recorder Pictures and Videos JAVA Games 6 7 8 30 31 31 31 MESSAGING 33 MULTIMEDIA 42 PROGRAMS 54 SETTINGS 67 42 46 49 51 52 52 53 8.1 Office Mobile 8.2 Internet Explorer 8.3 Windows Live 8.4 ActiveSync 8.5 Calendar 8.6 Tasks 8.7 Notes 8.8 Internet Sharing 8.9 Calculator 8.10 Search 8.11 File Explorer 8.12 Getting started 8.13 Task Manager 9 33 36 38 40 41 54 56 57 58 61 61 61 63 65 65 65 66 66 9.1 Personal 67 4 9.2 9.3 9.4 9.5 9.6 9.7 9.8 9.9 10 Bluetooth Lock Clock & Alarms Power Home Sounds & Notifications System Connections 68 69 70 70 70 70 70 73 HELP 77 MAINTENANCE GUIDE 79 10.1 Help 10.2 Troubleshooting 11 77 77 5 1 Safety Information To use your phone safely and effectively, please read these guidelines carefully. 1.1 When carrying the phone When you are using the phone, keep it some distance at least 2.5CM away from your body. In case there is a need of phone slipcover, belt clip, or other accessories to carry your cell phone, it is important to ensure they are approved by the manufacturer. Otherwise, it may exceed the upper limit of radio frequency leakage. 1.2 Energy Leak of Radio Frequency Your phone is a low-power, wireless transmitter and receiver. After being powered on, it will periodically send and receive radio signals whilst its transmission power is controlled by the network. This device complies with the standards restricting energy leak of radio frequency. 1.3 Electromagnetic Radiation Your phone fully complies with standards related to wireless irradiation enacted by the authority of the State and International Health Association. These limitations are part of the comprehensive regulations and constitute public wireless irradiation permission standards. These standards are developed and formed after long-term intensive scientific research by independent scientific organizations such s ICNIRP (International Commission on Non-Ionizing Radiation Protection). These standards contain a large surplus to ensure the safety of all and take the variable factors of various measurement conditions in consideration. 1.4 In Public Some public places, such as hospitals, health resorts, or other medical facilities, post signage prohibiting cell phone usage. Heed such warnings 6 and power off your phone in designated public places. 1.5 Compatibility of RF Interference Your phone may interfere with other devices that are not properly designed for RF shielding or configured for RF compatibility. 1.6 In Aircraft Switch the device off and remove the battery when you are in or near an aircraft. It’s illegal to use cellular equipment on board aircraft since it may cause interference to aircraft navigation systems and/or networks. Violators may be sued or face severe penalties. 1.7 Pacemakers If you are using a pacemaker, do not carry your phone (while switching on) in a breast pocket. A minimum separation of 15 cm should be maintained between the wireless phone and a pacemaker. Use the ear opposite the pacemaker to minimize the potential for interference. If you have any reason to suspect that interference is taking place, switch off your phone immediately. 1.8 Hearing Aids Wireless phones may interfere with some hearing aids. In the event of such interference, you may want to consult your service provider. 1.9 Other Medical Equipments For other personal health care equipments, consult your service provider. Consult a physician or the manufacturer of the medical device to determine if they are adequately shielded from external RF energy or if you have any questions. 1.10 Road Safety Please comply with local traffic laws and regulations. If the driving 7 condition is getting worse, pull off the road before you make or receive calls. If your vehicle has airbags, keep your phone away from where the inflated airbags can reach. Otherwise, you may be seriously hurt by the phone once the airbags expand. 1.11 Potentially Explosive Atmospheres Switch off your phone when in any area with a potentially explosive atmosphere and obey all signs and instructions. These areas include fuel depots (below deck on boats, fuel or chemical transfer or storage facilities), areas where the air contains chemicals or particles, such as grain, dust or metal powders. They are usually marked with signs, but not always so. 1.12 Battery Any contact of the battery’s exposed electrodes with a conductor, such as jewelry or keys, may cause damage to possessions or bodily injury. 1.13 Others The phone is comprised of precise electronic circuits, magnets and a battery system. Caution is advised when handling the components, particularly with regard to the following: Keep the phone and its accessories dry. Your phone is not water-proof. Keep the phone away from extreme temperatures. Do not place it near a flame or a lit cigarette. Do not scratch on it. Avoid tapping or severe knocking of the phone to prevent damage. Keep the device away from computer disks, credit cards, traveling cards, or other magnetic objects, otherwise the message stored in the magnetic disk or credit card may be affected. Do not place it on an automobile dashboard, window or anywhere sunshine can penetrate. Do not remove the battery when it’s powering on. Do not discard the battery in fire. It may explode. 8 Do not place the battery in mouth. It may be poisonous. Do not try to disassemble the phone or its accessories. Use only approved model-applicable batteries. Incorrect batteries may cause explosion. Follow the manufacturer’s instructions to dispose used batteries. Heat is generated by prolonged usage of the headphones and by prolonged charging of the cellular device. A moist or anti-static cloth may be used to wipe or clean the phone. Do not use a dry cloth that attracts static electricity to avoid damage to the phone. Do not use a chemical reagent or a cleanser containing abrasives to avoid damage to the phone’s casing. The metal material contained in the phone may cause you in hyper susceptibility, which depends on your physique or health status. Since that parts such as liquid crystal display and pick-up head belong to fragile parts, please carefully keep them such that the phone may not be impacted or squeezed. 9 2 Overview 2.1 Appearance and Keypad 2 3 4 5 1 6 7 8 9 10 11 12 10 13 18 14 15 16 17 11 No. Item 1 Volume keys 2 Power key 3 Receiver 4 Front camera 5 Status light 6 Touch Screen 7 C Call key 8 G Call key 9 Earphone Jack Function Press Volume keys (Volume Up & Volume Down) to adjust the volume. Press this key to turn off your device temporarily and switch the device to sleep mode. Press and hold this button to turn off your device completely. When your device is in sleep mode, you can still receive calls; however, the phone function is off when you turn the device off completely. Listen to audio media or phone calls. Taking pictures. Remind: flash red light (unanswered call, unread message, alarm or appointment); Bluetooth: flash blue light; Charging: red light; EVDO/1X or GSM: flash green light. Use to write, draw, or make selections with the stylus. Press this key to make a call to the name or number shown on the screen or to answer a call. Press this key to make a call to the name or number shown on the screen or to answer a call. Plug your earphone into the jack. 10 Mike Talk. 11 Return Key Close or hide the current window. 12 End key 13 Back Camera Press this key to end a call or silence the ring from an incoming call. Also, press this button to return to the today screen. Use this built-in camera to take photos or video clips. 14 Reset Key Press this key can reset celerity. 15 External Speaker 16 Sync Connector Allows you listen to the audio media or hands-free calls. Use this connector for synchronizing data or recharging the battery. You can insert USB cable or AC adapter provided with the device to this connector. 12 17 Stylus 18 Storage Card Slot Use the stylus to write, draw, or select items on the touch screen. Insert a storage card (T-Flash) for storing data. 2.2 UIM/SIM Cards The UIM and SIM (Subscriber Identification Module) cards contains the phone number and important information of services. It also may store a phone book and personal information. 2.2.1 Installation 1. The phone facing down; hold it tightly with both of your hands; 2. Press the battery cover with thumbs and slide it, and then remove the battery; 3. Insert the UIM and SIM cards into the slot with the beveled corner of the card fit the one of the slot; The contact area of the card facing down (“1” slot insert C card, “2” slot insert G card); 4. Place the battery back in the groove and make sure it’s properly installed; 5. Attach the back cover, slide it until it clicks. 2.2.2 Cautions If there’s fault with the UIM or SIM card, contact your service provider. Keep all UIM and SIM cards out of the reach of small children. UIM/SIM cards and its metal contact are susceptible to scratches and damaged by bending. Insert and remove the card with care. Keep the UIM and SIM cards away from static electricity, dust and water. 2.2.3 PIN and PUK PIN PIN is an identification code that is provided with the UIM and SIM cards. You are protected by the PIN from unauthorized use of your UIM and SIM 13 cards. After initiating the PIN protection, you are required to enter the PIN every time switching on the phone. After three consecutive incorrect PIN code entries, the UIM and SIM cards is blocked. Nobody can then access the data in the card or use its services. PUK When the UIM/SIM card is locked, a PUK (Personal Unlock Key) is required to unlock it. Ten consecutive incorrect PUK entries will cause permanent lockup of the UIM/SIM card. The PUK is usually provided with the UIM/SIM card. If you have lost your PUK or it’s not provided, contact your service provider. 2.3 Storage Card A storage card can be plugged into your phone to expand the storage capacity. To install a storage card, simply insert it into the slot. To remove the card, push it inward with your finger. It will pop out from the slot. Do not pull it forcefully! 2.4 Accessories 1 3 2 14 ID Item Description 1 Battery charger Charging batteries. 2 Stereo earphone 3 USB cable Stereo output, the Send key can be used to pick up a call. Synchronizing with PC; charging batteries Note: It’s not a recommended way. A battery charger is preferred. 2.5 The Battery 2.5.1 Battery use • Your phone is powered by a battery which has a limited life. When a battery has a significant decrease of working time, replace it. • Switch off your phone before removing the battery. • Do not leave the battery on the charger for too long, since it may reduce the battery’s life. • Excessively high or low temperature will have impact on the charging capability. Maintain its working temperature at 0~45℃. • Do not use the battery for other purposes; do not discard it in fire or in water. • Do not try to disassemble or fix a battery. Choose the certificated or approved batteries by the manufacturer. • Avoid short circuit. Do not use damaged chargers or batteries. • Dispose used batteries properly. Do not throw them into a dustbin. 2.5.2 Battery Charge Level 1. Tap the Status Bar on Idle, and choose the battery icon in Shortcut Icon; 2. To check the charge level, select “Start” -> “Settings”; tap “Power”. 2.5.3 Charging Batteries If the charge level goes lower than the working voltage, a reminder of low battery will be prompted on the screen as the alerting sound played. Data may be lost and the phone will power off if the battery is not being charged 15 or replaced in time. A Lithium-ion battery comes with this phone. It’s recommended to use the manufacturer’s charger and batteries for best performance. 1. Plug the charger carefully into the USB charger slot; 2. Connect the charger to the AC outlet while the phone powering on. The status indicator is in red light; the battery icon on the screen shows charging progress; while the phone can be used normally. When the phone is powering off, the screen shows a charging icon. 3. Before the first time use, charge the battery with the original charger for 8 to 10 hours. A new battery may reach its peak performance only after two or three cycles of fully charging and discharging. 4. After the charging completes, the status indicator shows the state before charging. If the phone is off, the screen displays a notified of completion. 5. Disconnect the charger with the AC outlet and the phone. Note: A USB cable can be used to charge the battery. The voltage on the PC’s USB port, however, does not fully meet the requirement for battery charging, therefore having negative impact on the battery’s life-span. A battery charger is preferred. 16 3 Basic Functions 3.1 Switching On/Off To switch on or off your phone, press and hold the On/Off key for a couple of seconds. If your device is running for the first time, the wizard will guide for screen calibration, setup the regional settings, and date and time. 3.2 Home Screen After the phone is on, the “Today” screens shows. Use the touch pen to select your option. Status bar Displaying area Start menu Function buttons Note All the figures in the manual are for reference only. They may be different from the actual display on your phone. 17 3.2.1 The Start Menu on the left corner All the functions can be found in the Start menu. Tap of the screen with the touch pen or your finger to display the menu which includes all functions. 3.2.2 The Status Bar Icons in the status bar are displayed for working status, including battery charge level, signal strength, GPRS and Bluetooth. They’re listed below: 18 Icon Description Indicates the battery is fully charged. Indicates the battery is very low. Battery charging. Sound on. Sound off. Ringer in vibration mode. No UIM or SIM card. Indicates maximum signal strength of C. Indicates maximum signal strength of G. The CDMA UIM card is turned off. The GSM SIM card is turned off. Voice call in progress of C. Voice call in progress of G. Call on hold of C. Call on hold of G. Missed call. CDMA EVDO and GSM EDGE are available. GSM EDGE available. EVDO available. 1X available. Unread message. New voice message. New IM. Synchronization in progress. 19 Connection is active. Bluetooth enabled. Bluetooth voice gateway. A2DP. Multiple reminders. Wi-Fi connected. 3.2.3 The Display You can see information about the most important functions of your device on the main screen, such as contacts, messages, calendar, and more. Tap one of the shown functions to open it. 3.2.4 Selection of Functions The functions buttons may vary according to the opened application and the phone status and features. 3.3 Lock screen and keypad Click start to open start menu, click the lock icon in the bottom to lock the screen and the keypad then no operation is allowed. To unlock, click the slide unlock button and slide. If a call comes in the lock mode, you can answer it without unlocking the phone by sliding the answer button (you can also reject the call by sliding the reject buttons). The phone will remain locked after the call is over. Windows Mobile 6.5 introduces a new Lock screen so you can now respond to interactive user interface elements even if the device is locked. Notifications — such as those for missed calls, voice mail, e-mail, text and calendar items — are more intuitive and actionable on the Lock screen. You can quickly select whether you want to check your voicemail, read your e-mail or text message directly from the locked screen. 20 3.4 Input Method 3.4.1 Introduction When you start a program or select a field that requires text or numbers, the Input Panel becomes available automatically. By default, the Input Panel icon appears on the menu bar to indicate which input method is currently selected. You can tap and hold the input panel icon to show the available keyboards installed in your device. 3.4.2 Show or hide Input Panel Tap the Input Panel icon on the menu bar. Input Panel (Keyboard) Input Panel icon 21 3.4.3 Use the Keyboard To enter text, symbols, and numbers, you can use the standard on-screen Keyboard. Use the standard on-screen Keyboard The on-screen Keyboard is available when text entry is possible. You can enter text by tapping keys on the keyboard that are displayed on the screen. Enter text using the on-screen Keyboard 1. In a program, tap the Input Selector arrow, and tap Keyboard. 2. Enter text by tapping keys on the on-screen Keyboard. Enlarge the on-screen Keyboard 1. Tap the “CAP” button on the Input keyboard to change the writing status between capital and small. 3.4.4 To edit text 1. In a program that supports writing, select the text which you want to edit. The text will be highlighted and you can edit the text. 2. You can select a text by tapping the required text and sliding over it. Or by tap and hold to get the drop down menu then choose “Select All”, the text will be highlighted. 3.5 ActiveSync With Microsoft® ActiveSync®, the data in your phone can be synchronized through a USB cable with the PC. ActiveSync® or Windows Mobile Device Center will make sure the information in the phone can be updated with that in the PC according to the synchronization settings. 3.5.1 PC Sync Installation Your phone has ActiveSync built-in while you need to install the software in your PC. You should follow the prompts on the screen to install ActiveSync from the CD-ROM. 22 3.5.2 To synchronize with PC By default, contacts in OUTLOOK, calendars and tasks in the PC will be automatically synchronized to your phone. You can use this information in your phone as in the PC. However, you may select options to synchronize and then tap OK to proceed. Follow the prompts on the screen and click Next to start. During the process, a sync icon on the phone will keep rotating, and the sync progress and items are shown. Upon the synchronization is done, the left soft key changes from “Stop” to “Sync”. Press the right soft key to check for the sync information. Press the left soft key again to start another round of synchronization. Note: If your PC runs Windows vista or Windows 7, when you only want to transfer data, you don’t need to install other software. But when you want to synchronize, you need to install Windows Mobile Device Center. Refer to the user guide for Windows Mobile Device Center. 23 4 Call Features 4.1 Making a Call A few options are available to make calls. 4.1.1 From the Home Screen On the Home screen, click start enter start menu, tap Phone or press the C or G Send key to open the phone keypad; Tap the keypad key and then tap C send button to make CDMA call or G send button to make GSM call to the dialed phone number; To redial, tap C send button or G send button to dial if the phone number already appears on the screen; Tap End or press End key to end the call. 4.1.2 From Contact list Tap Contacts on the lower-right of your screen to open the contact list. 24 Select a contact and then dial in one of the two ways: 1. Highlight the contact and then tap C send button or G send button; 2. Open the window displaying details of the contact; select one number (if there’re several), tap Call; 4.1.3 From Call History Press Send key at the main page to open the calling screen, tap Call history to show the call records, including answered, unanswered and dialed calls. Highlight an entry and then press C send button or G send button. 4.1.4 From Short Messages Scroll the highlight bar in the short message list, locate the person you are about to call, and then press Send key. A message is then prompted for confirmation of the phone number, tap Call or press C send button or G send button to start dialing. 25 4.1.5 Emergency Calls Your wireless service provider programs one or more emergency phone numbers (such as 110、112), that you can call under any circumstances. As long as you are within the service area, you can make emergency calls even without a UIM/SIM card. 4.1.6 International Calls Open the phone keypad, press and hold key “0” to enter the prefix “+”, input the country code, area code and the phone number, and then press Send key. 4.1.7 Dial Voicemail number Voicemail is a type of network service. If you have enabled call forward to voicemail box, unanswered calls will be redirected so that the caller can deposit voice messages. Press and hold key “1” on the display, and then your phone will dial the voicemail number. Contact your network operator to obtain the voicemail number. 4.2 Answer a Call When there’s an incoming call, press one of the Send keys or tap Answer to answer it; press the right soft key, End key or tap Ignore button to reject it. 4.3 During a Call During a call, you may select an option on the screen or in the Menu for more functions. Note The availability of these features depends on the service provider and whether you have subscribed them. 4.3.1 Hold If you tap Hold during a call, you will put the party you are talking with in the holding status. However, the call is not hanged up. It will be retrieved after you tap Unhold. 26 During a call, you may tap the lower-left part of your screen, and then enter another phone number on the keypad and press Send key. The first call will be on hold. After the second call gets through, you may tap Swap to switch between these two calls. But only the one you are talking with can hear you at a time; the one being on hold can’t. 4.3.2 Mute If you need to turn off the Mic for a while during a call, tap Mute. Then, you can hear the other party, but he/she can’t hear you. Tap Unmute to restore. 4.3.3 Speaker On After the speaker is on, the sound will be amplified. 27 4.3.4 Hands-free On Select Turn hands-free On in Menu to turn on Hands-free. Both of you can hear clearly without putting the phone on your ear. Select it again to turn it off. Note: you must connect with the blue tooth earphone. 4.3.5 Notes You may make notes during a call. ·Tap Note to open the window as below; write your notes; and then tap OK to save it. ·In the call history, calls with notes show an icon as ·To read notes, select Start – Programs – Note. . 4.3.6 Conference The phone supports conference calls feature, choose Conference in menu when the phone made two-way call, can make Conference calls. Note: CDMA call makes Conference calls only when the second call is originated from your phone, if the second call is incoming call then you can only switch between them. Your phone GSM supports conference call with up to 6 parties involved, CDMA supports conference call with up to 3 parties involved. 28 5 Contacts You can view or update information of your contacts in the contacts list. The contacts’ information can be saved in the UIM/SIM card or in the outlook contacts. Such information in the UIM card and SIM card usually includes one name and one phone number, (depending on the type of the UIM/SIM card and services). There can be much more stored in the phone – contact’s name, multiple phone numbers, email address and mailing address, as well as other information such as birthdays and holidays. 5.1 View Contact Details A list of contacts is shown on the screen. ·Contacts are sorted in alphabetic order; ·Scroll the highlight bar to locate a contact for details; ·If there are several phone numbers for one contact, the numbers and their attribute are shown. 5.2 Edit a Contact Select a contact from the list, and then tap Edit in Menu 29 5.3 Add New Contact Tap New to add a new contact, fill in each item and then tap OK. The new contact will then be shown in the list. 5.4 Speed-dial for Contact A one- or two-digit speed-dial number can be set for contacts stored in the phone. Press and hold the speed-dial number (for two-digit like 26, first press the “2” digit then press and hold the “6” digit until it dials). To set the speed-dial number, select the phone number in the page showing contact details, tap “Add speed-dial” in the menu, and then tap “OK”. Note: The range for speed-dial numbers is between 2 and 99. 0 and 1 are reserved by the system. 30 5.5 Send Contacts via Bluetooth With Bluetooth, you can send the information of contacts to other phones. In the contact list, select Send Contact from the Menu, then tap Beam. The phone will start searching for Bluetooth device. After it’s been detected, tap Send. 5.6 Delete Contacts You may delete contacts either from the contact list or on the page showing details. 5.7 Contact manager Select Contact manager from start menu. The contacts in the UIM and SIM card can be saved into the phone, and vice versa. It may take a while to access contacts information in the UIM and SIM card. The screen displays contacts in the phone with total number at the top-right corner 31 5.7.1 Phone Contacts If there’re one or more contacts in the phone, you may copy all or some of them to the UIM or SIM card or delete all or some of them. 5.7.2 UIM Contacts The contacts in the UIM card are allowed to save only one phone number. To copy a contact to the phone, from the Menu select Settings to choose the destination as “Mobile Tel”, “Home Tel” or “Work Tel”. If there’re one or more contacts in the UIM, you may copy all or some of them to the SIM card or phone or delete all or some of them. 5.7.3 SIM Contacts The contacts in the SIM card are allowed to save only one phone number. Please choose the destination same as the UIM card process. If there’re one or more contacts in the SIM, you may copy all or some of them to the UIM card or phone or delete all or some of them. 32 6 Messaging You may edit, send and receive text messages, MMS or emails. 6.1 Text Message The service for text message is offered by your service provider. Wireless subscribers can send and receive brief text messages. Before sending the first text message from your phone, make sure the number of SMSC has been set. Contact your service provider for the local number. 6.1.1 Read Text Messages Tap Strat button and then select Text. By default, the text message Inbox appears. The message list displays part of the text. In the Inbox, tap Received to sort text messages To open a message, tap it with the touch pen to open the text. 6.1.2 Edit Text Message In the Inbox, tap Menu; select New to open the editing box. Enter the recipient’s phone number in the “To” box, or select Add Recipient… in the Menu and then choose a phone number. Your phone supports group sending to multiple recipients. 33 After specifying the recipient, move the cursor to the editing box. Select My Text in the Menu to display common phrases for you to choose from. 34 At the lower-left of the editing area shows the number of characters already entered and the total number allowed. After finishing your text message, tap Send. By default, the message will be saved in the Sent Items. Note: Before send the message, you can tap the menu and choose use which net to send the message. Note: If you have problems sending or reading text messages check the following settings – tap Menu -> Tools -> Options, tap “Text Messages”, and then make sure “Use Unicode When Necessary” is selected. 35 6.2 Outlook Your phone can send and receive emails as long as your service provider supports this feature. Connect the phone with your PC through a USB cable and use ActiveSync to synchronize with the Outlook. 6.2.1 Add New Email Account Your phone supports POP3/IMAP4. Follow the steps shown below. If you have any questions, contact your service provider. To set up a POP3 mailbox, Select Start -> Messaging -> New E-mail Account; Enter your Email address; The phone will try to set up the Email account; Select your provider; Enter your name and the account display name; 36 Specify the server addresses for sending and receiving Emails. You may obtain these addresses from your provider; Enter your name, Email address and password; Enter the server address for sending Emails; Tap Option on the last screen where you can specify the time interval to connect and check for new mails; To send an Email, you are required to select ID verification; Select to receive either the subject or the whole Email; tap Finish to exit; Tap Send/Receive in the Menu to receive new Emails and send the Email(s) in the Outbox. 6.2.2 Send Email Before you send or receive the first Email from this phone, set up your account (refer to settings) and the network (it’s ready with default values). 1. In Outlook, tap New to edit a new Email; 2. Enter the recipient’s email address. If the contact’s information contains the email address, you may tap Add Recipient… in the Menu. Multiple recipients can be added. 3. After entering the email address and the subject, move the cursor to the editing box. To write an Email, refer to Input method; 4. After compiling the Email, tap Send to move it to the Outbox; select Send/Receive in the Menu before it can be actually sent out. By default, a copy will be kept in Sent Items. Note: Before send the message, you choose use which net to send the message, you can click start button and settings-connections-connections, and then add the network of C or G, choose the network you want, then you can send message use you set network. 6.2.3 Send Email from Outlook If your service provider or the UIM or SIM in your phone does not support Email, you may send it through Outlook on your PC that has access to the 37 Internet. 1. Compile an Email in Outlook E-mail and then tap Send. The Email is kept in the Outbox. 2. Launch ActiveSync in your PC, and connect your phone to the PC through a USB cable. 3. After the PC has detected your phone, it shows the connection on the screen. Tap Next. 4. On the item selection screen, select E-mail and then tap Next until finish. 5. The synchronization starts. After it’s done, the Email(s) in the Outbox are transferred to the Outbox in Outlook. Press Send/Receive in Outlook to start sending. 6.3 MMS MMS contains text, pictures, audio and other multimedia that can be transmitted instantly between mobile devices, or between mobile device and the Internet Before sending or receiving an MMS, configure the MMS center. To configure MMS message settings 1. Tap Start menu->E-mail->MMS. 2. Tap Menu->Options->MMS. 3. Go to the MMS Profile tab, and then tap New. 38 MMS Server Address . MMSC: URL address of the server where MMS messages are stored. . Data Connection: Select the connection that your device uses for MMS messages. . Gateway: Select either WAP 1.0 or WAP 2.0, depending on which one is being used by your other wireless service provider. . IP Address: Location of the MMS server, which is usually in the form of an IP address. . Port: HTTP port number used for connecting to the MMS server and for file transfer. Note: If your device already has preset MMS settings, it is recommended that you do not change these settings. If you change the preset settings, your device may not be able to send and receive MMS messages. If you add several MMS message service providers to the settings 39 screen, you can choose one as your default provider. When send MMS, you can set use which network, you can enter into MMS Settings->MMS Profiles, set what network to send. 6.3.1 Change MMS settings Check your device to see if it is configured with your wireless service provider’s MMS settings. If the MMS settings are not yet configured on your device, you can add the settings while composing an MMS message. To configure MMS message settings 1. Tap Start->Messaging. 2. Tap Menu->Options->MMS. 3. Go to the MMS Profile, tap New. 6.3.2 Receive MMS When there’s an incoming MMS, your phone will alert. Download and read the MMS in the Inbox. 6.4 Menu for Messaging and Email The following options are available in the Menu for messaging and Email: New – To create a new message; Reply – To reply to the sender; Reply All – To reply to the sender and all the recipients; Forward – To forward this message to others; Mark as read (unread) – To mark the message as read or unread; Move – To move this message to another folder (Draft, Outbox, Inbox, Sent Items or Deleted); Switch to – To switch between text message, MMS and Email, or to other folders; Tools – To administrate folders and set up features; Select Messages – Use this function you can choose Several or all messages in the box; Send/Receive – To send and receive messages and emails; MMS Settings – To set features for MMS; 40 Delete all messages – To delete the messages in the box. 6.5 Folders for Messaging and Email Drafts, Inbox, Outbox, Sent Items, Deleted Items Drafts – To store messages to be sent later; Outbox – To store messages failed to send out; Inbox – To store received messages; Sent Items – To store messages already sent out; Deleted Items – To store messages deleted from other folders. Messages deleted in this folder will be permanently removed. Note: To effectively use the storage space, remove old messages in Sent Items regularly. 41 7 Multimedia 7.1 Windows Media The embedded Windows Media Player® Mobile can play audio and video files stored in the phone or the storage card. 7.1.1 Play Tap Start button and then select Windows Media. The default screen shows the media library. Select the file to play by type, tap Back to open the window as shown below, and then select Now Playing to display the playlist. /ﺗﺸﻐﻴﻞ ﺍﻱ Volume Full screen Windows Media website Previous/Next 42 Tap Menu as shown below: Library – To view available files in the library; Play/Pause – To play or pause a file; Stop – To stop playing; Shuffle/Repeat – To play randomly or repeatedly files in the list; Full Screen – To play video files or stream video on full screen (It’s not available for audio files); Options – Settings of the player (refer to Options); Properties – To display details of the file; About – To view the version of Windows Media. 7.1.2 Now Playing Tap Now Playing. A list of media files shows. Tap Menu, the following options are available: Library – To view available files in the library; Move Up – To move a file up by one row; Move Down – To move a file down by one row; Remove from Playlist – To remove a file from the list. But the file remains in the library; Shuffle/Repeat – To play randomly or repeatedly files in the list; Clear Now Playing – To clear all the files in the list. But the files remain in the library; Error Details – To show the details of an error; Properties – To display details of the file; 7.1.3 Library All the audio and video files are stored in the library. You may select and add one or more files to the play list. If you want to check audio or video files stored in the UIM card from the library, tap Library and select Storage Card. On the main page of library or folders, tap Menu to select options to 43 process files in the library. 7.1.3.1 Update Library If there’re additional media files, you need to update the library. Otherwise, the new files can’t be located in the library. In the library, select Update Library… in Menu. The new files will then be automatically searched and added into the library. 7.1.3.2 Play from Library You may select a file in the library and then play. Scroll the highlight bar in the, locate a file, and then tap it. 7.1.3.3 Add File into Playlist Windows Media Player can only play files added into Now Playing playlist. After the library has been updated with new files, and if you want to add them into the playlist, locate the files in the library, select Add to List in the Menu to add them into Now Playing playlist. If you have selected a folder in the library, tapping Add to List will add all the files in the folder into the playlist. 7.1.3.4 Delete from Library Locate the file to be deleted, select Delete from Library, and tap “Yes” to remove it from the library and the phone; or tap “No” to remove it from the library only. 7.1.3.5 Open file In library interface, choose Open file from Menu, enter into file system interface. Lookup object file, choose the file of audio or video to open. 7.1.3.6 Open URL Use the Open URL command to play a song or video stored on the Internet or on a network server. If not on the Library screen, tap Menu > Library, On the Library screen, taps Menu > Open URL, Do one of the following: In the 44 URL box, enter a network address. In the History box, tap a URL that you have previously used. 7.1.4 Options Select Option for settings of the player. 7.1.4.1 Playback Options for playback: Show time as: The time displaying mode Pause playback while using another program: If unselected, the player keeps playing while other programs (except for calls) run. Otherwise, it pauses. Resume playback after a phone call: Select whether to resume playback after a call is over. 7.1.4.2 Video Options for screen displaying mode: Play video in full screen: Never: Play in window only; Only when oversized: Play video in full screen only if the resolution of the file is larger than that of the screen; Always: Always play video in full screen; Scale to fit window: If the resolution of the file is larger than that of the screen, scale the video size to fit the screen. 7.1.4.3 Network Select the connection speed for better audio and video effect. 7.1.4.4 Library Select whether to launch the player from within the library. 45 7.1.4.5 Skins You can choose different skins for the player. 7.1.5 Supported File Formats Video format Extension Windows Media Video MPEG4 H.263 .wmv,.asf . mp4 .3gp Audio format Windows Media Audio WAV MP3 MIDI AMR Narrow Band AMR Wide Band AAC,AAC+ and eAAC+ MPEG4 Extension .wma .wav .mp3 .mid,.midi .amr .awb .aac,.mp4,.m4a .mp4,.m4a 7.2 Camera 7.2.1 Cautions in using Camera • The camera included with your phone is produced and assembled with superior and high precision technologies. However, you should pay particular care when shooting pictures in dimly lit areas to avoid the amount of impurities (e.g., white lines, bright dots, dim dots, etc.). • Fingerprints, debris or oil present on the lens may result in difficulties in focusing or obscurities in picture quality. Before taking pictures, clean the lens with a lens tissue for optimal results. • Exposure to high temperatures may result in extremely poor quality picture output. 46 • • • • • Exposure to sunlight may change colors of the built-in color filter which may lead to poor color quality picture output. Excess motion while focusing may result in poor quality picture output. Do not aim directly into the sun or light source to avoid poor quality picture output. Use caution when taking pictures of copyrighted or restricted materials. Even though some pictures are purely for personal use, laws with regard to photo reproduction may protect entertainment events and similar scenarios. When in doubt, ask or look for posted signage. Use caution to protect others’ privacy while shooting pictures with your phone. 7.2.2 Capturing photos Enter the Camera mode by selecting Camera from the Start Menu. The screen shows the picture captured by the camera. Tap the capture square to capture the photo. If you select not to preview after shooting, the system will save the photo automatically and returns to the preview screen; if you select to preview after shooting, the system opens the preview screen where you can save or delete the photo. To shoot photos for a tiny object or an object close to the camera, select Macro for better quality. 7.2.3 Shooting a Video Clip This phone supports video recording. You need to change to its shooting module when you prepare to shoot a video. Tap Mode icon on preview screen, switch to video mode. Now tap the capture square to start shooting. Length of 30-second, 60-second and no-limit can be selected. Video length of unlimited is determined by the capacity of memory. 7.2.4 Where photos and video files are stored By default, all photos and video files taken are saved to the phone. However, 47 to ensure that there is always enough space left for the system to run other applications, we suggest you save photos and videos to your storage card. Perform the following to change the store position: First, be sure that a storage card has been inserted into the phone. In the shooting screen, select Setting -> Storage; Change Save to storage card and then tap OK 7.2.5 Options Tap icons on Preview screen to set various aspects of the camera options Zoom – Select different levels of lens focus. Album – View pictures and videos. Exit – Exit from camera feature. Mode – Click the mode icon to switch between photo and video mode. Size – Click the Size icon to change the Size of the pictures or videos size. Quality – Click the Quality icon to change the pictures or videos quality. Tap setting icons on Preview screen to set various aspects of the camera options File Settings – You can set the Size, Quality, Format, Save to. Environment –There are several different Effects and environments to choose from to obtain the best effect of the viewfinder. Capture Settings – You can set Self time, Burst Number, Preview after capture. 48 7.3 FM Radio Select FM Radio in Programs, the following window shows: 2 3 4 1 5 7 8 9 13 11 10 12 14 ID Description 1 On/Off 2 Switch group 3 Search 4 Earphone/Loud speaker 49 6 5 Current frequency 6 Current Group 7 Current channel 8 Mute 9 Volume 10 Reduce frequency by 0.1MHz 11 Search lower-frequency channels 12 Search higher-frequency Channels 13 Increase frequency by 0.1MHz 14 Channel button 1-12 7.3.1 General 1. You have to plug in the earphone before opening the main screen. 2. Two groups of channel can be saved, with 8 channels in each of them. 3. It supports features such as auto search, search a channel, volume adjustment, mute, frequency fine-tune, frequency setting, switch sound track and loud speaker. 4. Tap the button on the top-right corner to minimize it. 7.3.2 Auto search Tap “3 search” to start searching channels. Channels will be saved in the current group; channels already in the group will be cleared. Up to 12 channels can be searched, and the search will stop. To search for higher-frequency channels, tap “12 Search higher-frequency channels”. 7.3.3 Listen Tap one of the channels (1~12) to start listening. 50 The current frequency, current group and current channel are shown as in the figure above – “5”, “6” and “7”. 7.3.4 Fine Tune You may fine-tune the radio frequency. Tap “10 Reduce frequencies by 0.1MHz” or “13 Increase frequencies by 0.1MHz”. After tuning, “7 Current channel” shows nothing since the current frequency is different from the one saved. Press and hold any channel button to save the frequency into it. 7.3.5 Search a Channel Tap “11 Search lower-frequency channels” or “12 Search higher-frequency channels” to start searching until one channel found. After stop searching tap and hold any channel button to save the new frequency into it. 7.3.6 Sound “4 Earphone/Loud speaker” “8 Mute” “9 Volume” – level 0~8 (default is 4) 7.3.7 Frequency Setting Select Menu - > Setting, and then specify a frequency (in KHz). 7.4 Recorder You can through recorders to record your favorite sound, and can be set up to record the voice of an Incoming Call Ring, Alarm, and Message Remind. Tap Start, and then select Programs, tap Recorder. Long tap a file, then will pop up a menu, Play, as an Incoming Call Ring, Alarm, and Message Remind. 51 7.5 Pictures and Videos View the images in the phone and the storage card, save one of them as the background, or send it to others. 7.5.1 View Pictures Tap “Pictures and Videos” to display the list of pictures stored in the phone and storage card. Tap a picture to open it. Tap the screen and slide to the left or right to view the previous or the next image. 7.5.2 Options The following options are available in the Menu: Send – To send the image in an MMS or Email; Wireless exchange – To send the image to others via Bluetooth; Save as contact – To set a picture as an icon representing a specified contact. Delete – To delete the image; Edit – To edit the image; Slide show – To view the images as a slide show; Save as “Today” background – To set the image as the desktop background; Go to – To other directories; Tools – To view the details of the image and sort pictures; Upload to shared space – To send the image to a shared space on the Internet. 7.6 JAVA This phone supports JAVA applications. Tap Start select Java; All the JAVA applications show. You may select the installation path or other operations in the menu. 52 7.7 Games The phone had two customization games: Solitaire and Marble Game. 7.7.1 Solitaire The objective is to move all the cards in ascending order, from Ace to King, in the four suit stacks at the top Use the touch pen to drag and tap the card, or turn the cards facing down. 7.7.2 Marble Game The objective is to move the marble with the motion sensor. Move the grey marble to the red marble. 53 8 Programs 8.1 Office Mobile You can compile Word, Excel files and OneNote Mobile, or open a PowerPoint file (you may edit a PowerPoint file in certain circumstances). Tap Start and the select Office Mobile from Start. Choose Word mobile, PowerPoint Mobile, OneNote Mobile or Excel Mobile. 8.1.1 Word Mobile In Word Mobile, choose a file to open. Tap All Folders, and find a file from those folders. Tap New to create a new file. You can open Word files in several types, including .txt, .doc and .psw. If you need the toolbar, tap View on the editing screen, and then select Toolbar. After compiling, tap OK to save and exit. 8.1.2 Excel Mobile Using Excel to create a spreadsheet or to open and edit an Excel file from your PC. Tap Strat menu, select Office Mobile from Programs, and then tap Excel Mobile. In Excel Mobile, choose a file to open. Tap All Folders, and find a file from those folders. 8.1.2.1 New In Excel file list, tap New to open a new spreadsheet. Excel Mobile contains basic tools, such as equation, function and filter. If you need the toolbar, tap View on the editing screen, and then select Toolbar. After compiling, tap OK to save and exit. 54 8.1.2.2 Skills Here are a few suggestions in case you need to use Excel Mobile to create a large file: View in full screen. Tap View on the editing screen and then select Full Screen. Tap it again to cancel Full screen. Select Zoom to scale your spreadsheet to a proper size. Use Split to display different editing areas. Select Split in View; drag the split box edge to a proper position. Select Remove Split in View to restore. You may freeze the split pane so that its column and row number can be seen while scrolling. After splitting, select Freeze Panes in View. To unfreeze, select Unfreeze Panes. You can hide the rows or columns in the spreadsheet. Select a cell in the column or row you are about to hide, select Format in the Menu, choose row or column, and then tap Hide in the submenu. Follow the same steps and select Unhide to restore. 8.1.3 PowerPoint Mobile In PowerPoint Mobile, the system shows a list of slides stored in the phone. Use the touch pen to select and open a file to play it in full screen. to open a menu. During the play of slides, tap Tap “Go to Slide” to view a selected slide. Tap Zoom In to watch the slides in full screen. In the preview window (at lower right corner), drag the slide to the section to view. Tap to exit from Zoom In. Tap End Show to return. 8.1.4 OneNote Mobile OneNote Mobile enables you create the notes on your device. To create a new note: 1. Tap Start > Office Mobile > OneNote Mobile. 2. Tap New to create a new note. 3. On the new note screen you can edit the new note using the functions 55 4. in the Menu. After finished, tap OK button to save it. 8.2 Internet Explorer Using Internet Explorer (IE), you can connect your phone to the Internet or network-based applications. Your phone supports connection to the Internet via a common data call, or surfing the Internet through GPRS on a GSM network. Deploying any of these powerful functions keeps you connected to the world at any given time. To connect your phone to a network with IE, you need to: Make sure that your UIM card supports Internet connection. Contact your service provider for confirmation. Subscribe data or GPRS service from your service provider. Set up the functions for IE on your phone. Note: The ability to access WAP depends on the service provider and whether you have subscribed the service. 8.2.1 Starting Internet Explorer Tap Start and then select Internet Explorer; The system will connect to the homepage; You may enter a website address in Address Bar and then tap the green arrow. 8.2.2 Menu While online, tap Menu for the following options: Zoom Out- Zoom Out the page for displaying web pages. Home – Go back to the homepage; Favorites – To open the list of your favorites; Add to Favorites – To add a new entry, such as a website name or address and the folder’s name; Forward – To go to the next webpage; Refresh – To reload the webpage; 56 History – To show the list of the recently visited WebPages; View - Select a view mode for browsing pages. Tools – To send a hyperlink via Email, view the properties of the webpage, or set up the browser. Edit – To cut, copy or paste text on the webpage. 8.3 Windows Live Tap Start and then select Windows Live. 8.3.1 Messenger Chat with your friends with Messenger. You need to have an account of MSN, Hotmail, or Live . 8.3.2 Sign in Set up your user name and password before signing in to Messenger. • Tap Sign in; • Enter your Email address and password, and then tap Sign in again. 8.3.3 Send a Message • After logging in to MSN, select a friend online; a dialog box appear. You can send your messages now. • To exit, select Menu -> End conversation in the dialog box. 8.3.4 Add Participants While you are chatting with a friend, you may invite another one. Select Menu -> Options -> Add participant, and then tap Add. While there are several people in chatting, select Menu -> End all conversations to go back to the friend list. You may select a friend for a private conversation. 8.3.5 Block and Unblock Contact After you have blocked a contact, he/she can’t view your online status or send you instant messages. 57 Select the contact to be blocked from the list, and then select Menu -> Block; Select Unblock to restore. 8.3.6 Change Online Status Select Menu -> Online Status, choose a status from the list, and then tap OK. Note: You can change your online status only after you have signed in to MSN. 8.3.7 Hotmail You can compile or read your Hotmail. Refer to Messaging for editing, sending or receiving Emails. Write a new Hotmail You may open the editing screen. Refer to Messaging for editing and sending Emails. 8.3.8 Live Mobile Homepage Select to go to Live Mobile homepage. 8.3.9 Windows Live Help Select to get help on Windows Live. 8.4 ActiveSync With Microsoft® ActiveSync®, the data in your phone can be synchronized through a USB cable or Bluetooth with the PC. ActiveSync® will make sure the information in the phone can be updated with that in the PC. You should follow the prompts on the screen to install ActiveSync from the CD-ROM to your PC. Note: If your PC runs Windows vista, when you only want to transfer data, you don’t need to install other software. But when you want to synchronize, you need to install Windows Mobile Device Center. 58 Refer to the user guide for Windows Mobile Device Center. 8.4.1 Use ActiveSync 8.4.1.1 Sync with PC 1. After having ActiveSync installed, connect your phone through a USB cable to the PC. 2. Follow the on-screen instructions to establish the relationship between the PC and the phone. The synchronization process will start automatically when the relationship has been established. Outlook Contacts, Appointments, Tasks, E-Mails, etc. will be synchronized to the phone. 3. “Standard partnership” allows synchronization and transmission of data between your phone and the PC, while “Guest partnership” can be selected if you want to only transmit information. 4. On ActiveSync status window, click “Sync” to start the sync process, or click “Stop” to end syncing. Note: By default, not all the Outlook information will be synchronized. You have to select from the available options. 8.4.1.2 Sync with Server Before synchronization, contact your administrator or service provider for such information as the server name, username and password. 1. From the ActiveSync screen, select Menu -> Add Server Source; 2. Enter the mobile information server’s address in Server Address; 3. Enter User name and Password; 4. Enter the domain name of your Exchange server in Domain; 5. Press Done, and then Synchronize; Hint After setting up a relationship between the phone and the PC, you may connect the server remotely. 59 Note: The password is case-sensitive. 8.4.2 Synchronization 8.4.2.1 Synchronizing Inbox By default, only the mails (each with the first 500 bytes) in Inbox on the PC or on the server that were received in the latest three days will be synchronized. To read the complete email, you have to download it. Mails in the phone and mails in the PC are in-sync. For example, deleting a mail in the phone or in the PC will have the mail deleted in the PC or in the phone during the next-time synchronization. To synchronize mails in other folders or directories, select them in the phone. Note: Text messages and MMS can not be synchronized. 8.4.2.2 Synchronizing Appointment You can synchronize Appointments in the phone with those in Outlook or the Mobile Information Server 2002 (or higher) on the PC. By default, only the Appointments in the past two weeks and the future appointments will be synchronized. 8.4.2.3 Synchronizing Contacts All contacts are synchronized by default. Adding or deleting a contact in the phone or in the PC will have the same result in the PC or in the phone. 8.4.2.4 Synchronizing via Bluetooth Via Bluetooth, your phone can connect and synchronize with other mobile devices or PCs. 8.4.2.5 Installing Software on the phone You may use ActiveSync to install software on the phone from your PC. 1. Connect the phone and the PC through ActiveSync; 2. Run the setup file in the PC; 60 3. Select a setup path in the phone, and then start installing. If there’s a storage card, the system will alert you to choose a location. 8.5 Calendar Use Calendar to remind you of meetings and anniversaries, and to keep track of your tasks and other notes. 8.5.1 Calendar Views Tap Start and then select Calendar to display an appointment list. Tap Day to switch among Day, Week, Month, Year and Agenda; 8.5.2 New Appointment Tap Menu -> New Appointment, and then create an appointment reminder. 8.5.3 Settings Select Options in the menu to change the settings for your calendar. 8.6 Tasks Use Task to track what you have to do. Most of the tasks come from Microsoft Outlook® after synchronization. 8.6.1 Synchronizing Tasks on PC To synchronize Microsoft Outlook’s Task entries from your PC to your phone, launch ActiveSync®, and connect your phone with the PC through a USB cable. The system will automatically start synchronizing. Tap a task entry to view its details. 8.6.2 Adding a Task on your phone Tap Menu -> New Task to open the screen adding a new task. Fill in details, tap OK to save and exit. 8.7 Notes You may take Notes or voice Notes. 61 Tap Start, select Programs -> Notes to display a list of notes in the phone; tap Name to change the sorting type. Tap a file in the list to open it. Tap All Folders to search for a file in those folders. 8.7.1 New Notes Tap New to create a new note. To write a note, you may either use the build-in keyboard, or use the drawing with the touch pen (select Menu -> Draw). Tap Menu -> Draw again to cancel drawing. Tap Menu -> Undo Typing to remove the last character; tap Redo Typing to resume. After compiling, tap OK to save and exit. 8.7.2 Adding Voice in Notes Tap Menu -> View Recording Toolbar; tap to stop. After recording, to start recording. Tap shows in the note. Tap it to playback. 62 8.7.3 Creating Voice Notes To create a voice note, tap Menu -> View Recording Toolbar and then record. 8.8 Internet Sharing After the phone connects to the PC through a USB cable, it can work as an external Modem. 63 Internet Sharing Steps: 1. Click start button, choose Internet Sharing from start menu; 2. Choose the connection way from PC Connection; 3. Choose the Internet connection way form Network Connection, Note that: Not all of the connections can be used online ,the availability of modem function depends on your service provider; 4. Tap the Connect, Insert the data cable to connect PC When the interface tips “Check USB cable connection”; 5. Wait when the interface tips “Connected” you can use the PC to Connect the network; Note: You can use “CDMA” or ”GSM” to connect to the internet depending on your connection settings, You can set up the connection as follows: 64 Tap Start > Settings > Connections > Connections, Set up the network connection configuration. To change the connection priority: Tap start > Settings > Connections > C\G Net Priority Settings, set “CDMA First” or “GSM First” in “While accessing internet” options, click Apply button. Note: Please sure that your phone can access Internet before connection to PC. Note: To connect via Bluetooth, use a Bluetooth adapter. Note: Disable the network connection on your PC before using the connection through the phone. Note: While the Modem mode is on, synchronization is disabled. Note: The availability of modem function depends on your service provider. 8.9 Calculator You can make calculations including addition, subtraction, multiplication, division and percentage. Enter the numbers and operator on the panel, and tap “=” to have the result. “C” key can be used to clear the input number or the result. 8.10 Search You can quickly search any files in the phone. Enter the file name and select the file type, and then tap Search. 8.11 File Explorer You can manage files in the phone. However, it’s recommended not to modify or delete system files. Options are available to change the displaying mode and system operation. 65 8.12 Getting started You can realize some modules function in the phone, include the following function : make a call; set date and time; set up e-mail; set up a device password; set up a Bluetooth headset; set background; set ring tone; transfer music; add/remove getting started. 8.13 Task Manager Task Manager displays detailed application about all running processes; this program will be useful to those looking for an extra layer of system protection. You can look for and end the program. Select start->program->Task Manager, then tap menu, you can switch to or end all tasks; view applications or processes; sort by memory or CPU or name. 66 9 Settings Tap Start and then select Settings. 9.1 Personal 9.1.1 Owner Information Specify your name, telephone number, Email and other information 9.1.2 Phone Click Phone Settings in Personal, Please select a net and press button “Change settings” to change phone settings. CDMA phone: Phone 67 Select the ring type and ring tone, or choose whether to have buzz sound when pressing keys. Security You can require PIN when the phone is used, and change PIN. Services Get settings for Call Forwarding, Call Waiting, and SMS Valid Date. Note: Call Forwarding needs network support and you need to subscribe this service. Consult your service provider for details. Network Searching mode You can set the UIM card Network Searching mode. GSM phone: Phone Select the ring type and ring tone, or choose whether to have buzz sound when pressing keys. Security You can require PIN when the phone is used, and change PIN. Services Get settings for Cell Broadcast, Call Barring, Caller ID, Call Forwarding, Call Waiting, and Voice Mail and Text Messages. Note: Call Forwarding needs network support and you need to subscribe this service. Consult your service provider for details. Note: After enabling Call Barring, you are required to enter the barring code every time. Contact your service provider for the barring code. Three consecutive incorrect inputs of the code will lock your phone. Network Find out the network serving your phone; or tap Find Network or Set Networks to list other available networks. 9.2 Bluetooth As a short-distance wireless transmission technology, Bluetooth can communicate with a phone that is within 10 meters. 68 Enable or disable Bluetooth If Make this device visible to other devices is selected, your phone will receive all the Bluetooth connection requests, both from your Bluetooth device and from others’. Select it with caution. Select Devices -> COM Ports, add new device to search for other Bluetooth devices or a COM port. Bind a Bluetooth device: 1. Switch on the Bluetooth device within effective range; 2. Select Start-> Settings -> Connections -> Bluetooth -> Devices, tap Add new device…; 3. The system starts to search for Bluetooth devices; 4. After a Bluetooth device has been found, you are prompted to enter the secret-key. The key can be obtained from the Bluetooth dealer or specified by you. Once the secret-key is entered, the binding process is done. Beam Files: In the file list, tap Menu -> Beam File…; 2. After the phone has found the Bluetooth device, tap beam File…; Receive a file via Bluetooth: 1. Make sure you have enabled Wireless Data Exchange, and have selected Make this device visible to other devices in Mode; 2. Keep your phone within 10 meters away from the sending device; 1. When the phone prompts there’s an incoming file, tap Yes to start receiving. The received file will be saved in \My Documents. 1. 9.3 Lock Lock the phone automatically after it’s been idle for a while. A password is required every time to activate or switch on your phone. On the password screen, the following message appears after the eighth time of incorrect password input: 69 Several incorrect passwords have been entered. Will to continue password entry, enter’a1b2c3’, In case of emergency, enter an emergency phone number. If you forget your password, you have to clear the memory before you can use the phone again. However, all the files, data and programs in the phone will be removed. 9.4 Clock & Alarms Adjust the date and time or set your alarm. Set the time zone, date and time Set the alarm, select the box to activate it. Your phone will alarm you every day at the time. 9.5 Power Show the battery level and the time to turn off the device if not used. 9.6 Home Select a theme for your device and items on the Today screen. 9.7 Sounds & Notifications Specify the sound and notification for events, programs, screen taps and hardware buttons. 9.8 System Set up functions in System. 9.8.1 Device info View the hardware and software information of your phone. 9.8.2 Memory View the allocation of memory for storage and programs, and memory in-use and remains of the phone and the storage card. 70 9.8.3 Remove Programs Remove unnecessary programs to release storage space. System programs can not be removed. In the program list, select a program and then tap Remove. 9.8.4 Regional Settings Specify the region you are at and the local number, currency, time and date. 9.8.5 Master Clear Your phone will be resumed to default factory settings and all the user data will be formatted. Back up important data. 9.8.6 Backlight Set the time to turn on or off backlight and to adjust the screen brightness. 9.8.7 Certificates Manage certificates in the phone. 9.8.8 Screen Align the screen if it is not responding accurately to stylus taps. Adjust the text size to see more content or increase the readability in many programs. 9.8.9 Error Reporting To help Microsoft improve the products you use, your device can collect information on software operation for later reporting in the event of a serious error. Reporting this information when errors occur is completely voluntary and confidential. 9.8.10 Encryption Encrypt documents when saving to the storage card. 1. Tap Start -> Settings -> System -> Encryption; 2. Select the document to be encrypted to the storage card. 71 Note: Encrypted documents can only be read on the phone encrypts them. If your phone is the one that encrypts the document, you can open the encrypted document normally. 9.8.11 GPS The user of GPS, please consult the help of GPS. 9.8.12 Motion Sensor Select Start -> Settings -> System -> Motion Sensor, Motion sensor property page. Balance Select balance setting…, please put your pocket pc on the horizontal panel and then tap OK button. Switch Switch the motion sensor in corresponding applications. Precision Set the precision of the swing motion. 9.8.13 USB storage Use this function, can change the USB connect style; can Causes the personal computing easily to visit the equipment exterior memory. 1. Choose USB storage in setting, if this time in your phone does not have the storage card will showed prompting message in this interface. 2. If this time in your phone have storage card will haven’t prompting message in this interface, tap the check box can startup USB storage function. 3. After startup USB storage function, connect your phone to PC with USB cable, wait a minute you can see mobile storage in your PC as a USB storage. 72 4. 5. You can read-in or write out the files you want. Pull out the USB cable after closing the USB storage function in phone, after that you can examine the file you copy from PC. Note: if you want read storage card contents in your phone, you must insure that the USB storage function is not enabled! 9.9 Connections Setup the connections for your phone. 9.9.1 Beam Transfer data to other wireless devices via Bluetooth. 9.9.2 Wireless Manager Enable/disable CDMA-GSM networks, Bluetooth, Wi-Fi, and Fly mode, as shown below: Fly Mode C Phone G Phone Bluetooth WIFI 73 Tap Fly Mode to switch it off, then the Bluetooth, C phone, G phone and Wi-Fi are disabled. Calls can’t get through to this phone. Tap Bluetooth, C Phone, G Phone, Wi-Fi, to enable or disable all or some of them. Select Bluetooth, C Phone, G Phone, Wi-Fi and slide to switch it on/off Select Phone Setting, Bluetooth Setting or Wi-Fi Setting; 9.9.3 Connections Your device is equipped with powerful networking functions that enable you to connect to the Internet through the 3G network of CDMA 1x-EVDO Rev. A data service or the General Packet Radio Service (GPRS) network or a Bluetooth modem or a WLAN network. You can set up connections to the Internet or to a corporate network to browse the Internet, and exchange e-mail or instant messages. 74 Your device has two groups of connection settings: My ISP (Internet Service Provider) and My Work Network. The My ISP settings are used to connect to the Internet, while My Work Network settings can be used to connect to any private, corporate network. To connect to the Internet via ISP 1. Obtain the following information from your ISP: • ISP server phone number • User name • Password • Access point name (required for GPRS connection) • Tap Start > Settings > Connections tab > Connections. • Tap Add a new modem connection. • Enter a name for the connection. 2. Select a modem from the list. For example, if you want to use the CDMA network, select Cellular Line. 3. Tap Next. 4. Complete the connection wizard by entering the required information and tap Finish. Note: To view additional information for any screen, tap Help. To modify connection settings, tap Manage existing connections on the Connections screen, and complete the connection wizard. To connect to a private network 1. Obtain the following information from your network administrator: Server phone number User name Password Domain (If provided by an ISP or a network administrator) 2. Tap Start > Settings > Connections tab > Connections. 3. In My Work Network, follow the instructions for each type of connection. 4. Complete the connection wizard, and then tap Finish. 75 Note: To start browsing the Internet or private network, tap Start > Internet Explorer. 9.9.4 Connect to PC through USB Change the type of USB connection your device uses can help with problems connecting ActiveSync. 76 10 Help 10.1 Help Tap Start select Help to open the Help page. You can find help document form Online Help Site. You can also access this information from your desktop PC at:www.windowsphone.com/help. 10.2 Troubleshooting Check these questions first if you have problems with your phone. If you need additional help, contact your dealer or service provider. Question Internet Explorer can’t connect to the Internet. Cause Answer The service provider does not offer such a service or you have not subscribed it. Contact your service provider on subscription and use of the service. Incorrect configurations Refer to the help of Internet Explorer The UIM card has been damaged UIM card error The UIM card is incorrectly inserted Metal surface of UIM card is unclean. Poor signals The area with poor reception of signals, such as vicinity of high rise or the basement, where RF wave can’t reach effectively 77 Consult your service provider Check the UIM card to make sure it is inserted properly. Clean the metal surface with a clean cloth or tissue Receive calls in places where a good signal is available. Fail to power on Peak hour with congested traffic Using an excessively low battery. Invalid UIM card Fail to connect to network Out of GSM service area Poor signals Inconsistent voltage between the AC outlet and the charger Fail to charge Non-standard charger Improperly connected to the main power 78 Try a different time to use your phone Charge the battery Consult your service provider Relocate your phone into service area Relocate your phone to places with strong signals, then try again. Replace a charge with consistent voltage Use a charger designed for this type of phone Check the connection in between 11 Maintenance Guide Should you experience problems using this phone, contact the dealer where it was purchased or refer to the repair center specified. If the phone needs repair, you may send it to the local repair center (see the certificate of three guarantees provided with the phone for specific repair network). If there is no local repair center specified, deliver your phone and copy of purchasing invoice to the dealer for mailing of EMS. Your phone is a product of superior design and artisanship and should be treated with care. The following guidelines may help you maintain the warranty obligations with regard to the terms of Maintenance Clauses, which can extend the useful life of your device. Keep the phone and all its parts and accessories away from children. Keep the phone dry. Precipitation, humidity, and liquids may contain minerals that can corrode electronic circuits. Do not use or store the phone in dusty areas as knock-down components may be damaged? Do not store the phone in extreme temperatures. High temperatures can shorten the life of electronic devices, damage batteries and warp or melt certain plastics components. Cold temperatures may result in moisture forming inside the phone when temperatures rise, which may damage the electronic circuits. Do not attempt to disassemble the phone’s casing. Nonprofessional handling of the phone may cause damage and void the warranty. Do not tap, knock or shake the phone to avoid damage to the internal circuitry. Do not apply or clean the device with chemical products, detergents or scouring products. Do not use paints on or in the phone. Blockage of sundries inside the knock-down components may affect the normal operation of the device. 79 The abovementioned guidelines are applicable to your phone, batteries, charger and accessories. If you experience difficulties with any of these components please contact the nearest qualified repair center. 80