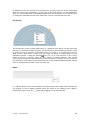
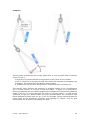
1
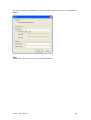
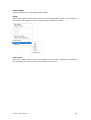
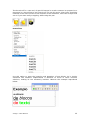
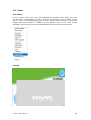
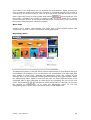
ÍNDICE
1. INTRODUCTION........................................................................3
2. SOME SCENARIOS ..................................................................4
3. INTERACTION MODES ............................................................5
4. MENUS AND OPTIONS ............................................................7
4.1
4.2
4.3
4.4
4.5
4.6
4.7
4.8
4.9
FILE .................................................................................................... 7
EDIT .................................................................................................. 11
VIEW ................................................................................................. 12
INSERT .............................................................................................. 14
FORMAT ............................................................................................ 16
DRAW ............................................................................................... 17
TOOLS............................................................................................... 24
COLLABORATION................................................................................ 31
INTERFACE ........................................................................................ 33
6. CUSTOMIZE ............................................................................34
6.1
FLOATING TOOLBAR ........................................................................... 35
A-migo – User Manual
2
1. Introduction
The A-migo application was conceived to be the ideal compliment to the Clasus
Interactive Board. It is the result of an intense development project which
continually focused on the adaptation of the final application to the necessities of
the potential user.
Its specification was refined in detail, conjugating the statements and opinions from
users of diverse profiles. All of the work was supervised by the Clasus team, with
active participation of agents from universities and companies in order to obtain a
final result as close to perfect as possible.
The result is a product with special characteristics that in conjunction with the ease
of use, provides a noteworthy set of specific tools. In the organizational
environment, it can be used to innovate work methods while stimulating efficiency.
In the educational environment, it should be taken for a test drive. The results will
speak for themselves.
It must not be forgotten that this document is a mere introduction to the
capabilities of the application A-migo. The complete performance will be obtained
with the optimization of your work throughout the exploration of the available tools.
A-migo – User Manual
3
2. Some scenarios
•
•
•
•
•
•
•
•
•
•
Create your traditional slide presentation using the A-migo application as
support. During the presentation, interact while making corrections and
notations about the slides. In the end, automatically send by email a copy of
the presentation with the notations to all of the viewers. You wont need to
concern yourself with this process. The A-migo application will work
autonomously to present the final result.
If you prefer, as an alternative to e-mail, automatically publish the
presentation on your company’s or school’s web server.
Use the advanced tools to teach Geometry, Graphic Computing, or other
subjects. The ruler, the protractor, and the compass will leave you marveled
with the flexibility of the available options.
At the end of your Geometry class, order the A-migo application to
reproduce each of the pages that you have created. In just a few minutes
you can automatically create a summary of the presented resources.
Create your presentations directly in the A-migo application, without the
need of an additional application. All the typical funtionalities of this type of
solution is available, as well as other special tools, such as the curtain, the
magnifying glass, or the floodlight.
Define limitless individual use profiles. Customize your work environment.
Choose which tools to place in the custom floating toolbar, include external
additional tools, and configure pens as you prefer, or even create a gallery of
personal images. Don’t worry about who uses the board and has different
tastes or needs. When you return the A-migo application remembers your
preferences and will automatically replace them.
Use the capabilities of automatic recognition of characters and geometric
figures to empower your work.
Don’t feel limited. Include multimedia files of different types in your
presentation, interact with them in real time, and inversely, export the final
result to Portable Document Format (pdf), image, or Office formats.
Use the network communication capabilities to create collaborative sessions
over the Internet. Interconnect two systems installed in remote locations and
use the video-conferencing and collaborative work capabilities to shorten the
distance between users.
…in addition to many others that you will discover when using the A-migo
application. The reality is that the flexibility is such, that each user tends to
discover his/her form to use and explore it.
A-migo – User Manual
4
3. Interaction Modes
The A-migo application can be used as any other generic application, in “Windows
Mode”. In this situation an interface similar to the one reproduced below can be
used.
This should be the main operating mode when presentations are being created. The
true power of the application A-migo is revealed when operating the “Control” and
“Annotation” modes. To exit the “Window” mode, press the button
bar.
on the tool
In the “Control” or “Annotation” modes, the application’s primary window is hidden,
leaving the work space free for total interaction. The only interface that will be seen
in this situation can be summarized as the Floating toolbar as represented below.
Note the four upper buttons on the toolbar. The button selected
permits entrance into the “Control” mode. This option should be
selected whenever the user wishes to interact with the operating
system or other running applications. In this mode the digital pen
will behave as a pointing device – similar to a traditional mouse, but
capable of functioning by absolute position.
When the
button is pressed, you will enter the “Annotation ”
mode. In this mode it is possible to experiment all the power of the
A-migo application. Use the pens to write or to highlight any portion
of the content, write text over text, activate the compass or
protractor to design or take measurements of didactic web
applications or slides in a presentation, or perform many other
operations using your imagination. The A-migo application gives you
all of the ability to test your limits.
A-migo – User Manual
5
Returning to the original interface of the "Window" mode is easily accessible by
. All the annotations that have been made will be
using the button
automatically saved. The A-migo application will then make available to you a
presentation that can be printed directly, stored in a variety of formats (pdf, ppt,
doc, jpg, ...), sent by email, or transformed into html pages for direct publishing on
a web server.
The last mode "Full Screen” can be activated with the button
can then be shown without any visible interface elements.
. The presentation
Additional notes:
Your work is never subordinated to a unique mode of operation. You may freely
alternate between the different modes during a single session. The A-migo
application will accumulate the results of all stages.
At any moment, the lateral toolbar of the Clasus Interactive board may be used to
perform the same basic functions as those made available in the floating toolbar.
The interface was constructed in a coherent manner, and the association of each
icon to its respective function has been obtained in a direct fashion.
A-migo – User Manual
6
4. Menus and Options
4.1. File
Menu File
The "File" menu contains the functionality typically found in other applications. It
provides the options to manipulate files, preview printing and export presentations.
The exports can be made to files in diverse format, such as those with the
extensions PPT, DOC or Portable Document Format (PDF). In addition this menu
provides the capability for direct publication of the presentations on a web server
for availability over the Internet, or for automatic mailing via email.
New
Affords the creation of a new presentation.
Open
Permits the selection and opening of an existing presentation - in formats BTX, PPT,
DOC, XLS, PPT or PDF.
Save
Saves the current presentation.
Save as
Saves the current presentation in a different file with a name and a location to be
defined.
Save Automatically
Allow the user to define the different automatic saving options of the active
presentation. The functionality associated with each option is explicit. Observe
below an example.
A-migo – User Manual
7
Print Preview
The option opens a traditional window, in which the preview of the print layout can be verified
for printing.
Print
Order the printing of the active presentation.
Export as image
This option is indicated in order to transform presentation slides in a set of image files in JPG
format. Select only the range of pages to export in the window presented and reproduced
below.
Export as Web Page
This option in many cases is of great utility. In reality, although the only request
made by the A-migo application is the name and location of the index file to be
created, the result will be a complete and structured site with page indexing, where
the presentation will be presented.
Export as an Object
This option permits the export of pages as a native object. A file will be created
where all of the page properties and objects contained will be preserved. later, this
object can be inserted in another presentation without losing any of its
characteristics or functionality.
A-migo – User Manual
8
Email
The possibility to send the active presentation by email can be equally of notable
utility. Consider for example that a meeting has finished in which a presentation
was used, and upon which various notations were made. If it is necessary to make
this information available to participants in the meeting, you can simply email them
the final presentation. All of the notation operations can be reviewed, including in a
sequential form. The process, as is typical in the A-migo application, is extremely
simple. Select only the pages to send, the format of submission, and:
- You can automatically open the application from the the client e-mail (Microsoft
Outlook or Mozilla Thunderbird, for example) with a new message containing the
information selected as an attachment;
- A generic window for the insertion of the message text and recipients list can be
shown and the A-migo application can take care of the sending process. Observe an
example in the image reproduced below.
A-migo – User Manual
9
The form of delivery is defined in the actionable window using the "Configuration"
button.
Exit
Terminates the execution of the A-migo application.
A-migo – User Manual
10
4.2. Edit Menu
Edit Menu
The "Edit" menu groups presentation editing operations. Here the movements of content with
the transfer area of the operating system are included, such as copy, cleaning or elimination of
pages.
Undo
Undo the last action performed.
Repeat
Repeat the last action performed.
Cut
Remove the selected objects from the presentation, copying them equally to the
transfer área.
Copy
Copy the selected objects to the transfer area.
Paste
Recover the objects in the transfer area, gluing them to the current page.
Clone
Create clones of the selected objects, pasting them equally on the current page.
Delete
Simply delete the selected items.
Select All
Select in one single operation all of the objects on the page.
Clear Page
Remove all of the objects inserted or created on the selected page.
Delete Current Page
Delete the current page of the current presentation.
A-migo – User Manual
11
4.3. View
View Menu
The View Menu provides access to operations that permit the navigation within the pages of the
presentation, or to control the form in which the presentations are viewed.
Page Preview
Open the lateral toolbar for preview (of ) the pages and to navigate. Select a page
on the lateral toolbar to go directly to it.
Preview Gallery
Shows the toolbar with the gallery preview.
Previous Page
Turns the previous page into the current page.
Next Page
Turns the following page into the current page.
First Page
Turns the first page of the presentation into the current page.
Last Page
Turns the final page of the presentation into the current page.
Repeat Current Page
The A-migo application has the ability to save the sequence of operations
performed during the creation of each page. To review this sequence as though it
were animated, select this option. This capability can be extremely useful in school
environments. If, for example, a professor uses an electronic pen to solve an
equation on the interactive board, the students can later review the resolution stepby-step. All of this without the need of any extra work for the teacher.
Repeat Selected Pages
Repeat the operation described above for the sequence of selected pages.
A-migo – User Manual
12
View Toolbar
Shows or hides the A-migo application toolbar.
Zoom
The "Zoom" option permits the selection of the magnification level of the image on
the screen. The options are those represented in the below image.
Full Screen
This option hides all the menus and toolbars of the A-migo application, permitting
the presentation to be viewed in the entirety of the screen.
A-migo – User Manual
13
4.4. Insert
Insert Menu
The "Insert" menu provides for the addition of diverse resource types to presentations. New
pages, blank or created from copies of prior pages, models applied as page backgrounds,
multimedia content, or hyperlinks for new pages or external resources can all be included.
Insert Page
Before
After
Last
Inserts a page before the current page.
Inserts a page after the current page.
Inserts a page after the last page.
Clone Page
Insere uma cópia integral da página actual.
Insert Content
From the Gallery
From File
From Scanner or
Camera
A-migo – User Manual
Permits the insertion of objects from the gallery onto the
current page...
Permits the insertion onto the current page of an object
contained in a file.
Permits the insertion of objects onto the current page that
were obtained from a scanner or camera.
14
Insert Models
From the Gallery
From File
Permits the insertion as a model of an object from the gallery.
Permits the insertion as a model of an object contained in a file.
Hyperlink
Associates the selected object in a hyperlink to a web page on the Internet, local
file, or another page. In order that the presentation’s cohesion is assured, the Amigo application even allows for the storage of the hyperlink object as an
attachment to the presentation. With this option it is not necessary to worry about
always attaching the different components when copying a presentation to a pen
drive for example.
Everything becomes a part of the presentation, thus
guaranteeing the continual availability of all of its components. Alternately,
Hyperlinks can be created directly from each object. See the example in the below
figure.
A-migo – User Manual
15
4.5. Format
Format Menu
The "Format" menu provides formatting options for the pages of the presentation.
Page Topic
Whenever the creation of a common background for all of the pages is desired,
open the page topic. All of the objects that are inserted in the defined area will be
automatically included as the background for all of the pages.
Grids
The A-migo application permits the user, on an individual basis, per page to apply a
grid to the background. For each grid the type of line, its color and width may be
selected. The vertical and horizontal spacing between the continuous lines can also
be defined. For example, with the selection of no vertical lines, horizontal lines can
be obtained for Calligraphy lessons. By means of the horizontal spacing, in this case
the space between the lines can be controlled.
Background
To select the page background color, select this option.
A-migo – User Manual
16
4.6. Draw
Draw Menu
The “Draw” menu encompasses the tools that will permit you to write or draw on a
page of your presentation, or over any other generic background. Here resources
such as pens, selectors, paintbrushes, stamps, text, and even scratch-off's are
found. The options for the selection of objects – typically related to drawing, are
equally available in this menu.
Although in general the tools can be pre-configured, and the configuration can be
saved and associated with the user profile, the current characteristics such as
thickness, type, color and transparency of the lines can be rapidly changed using
buttons on the tool bar. Note that for each tool, only the
the
buttons whose functionality makes sense in the respective context will be available.
Select Object
Activate the select single object mode
Selecção Múltipla
Activate the mode for simultaneous selection of multiple objects. In this mode, after
selecting the selection tool, all of the objects that are identified will be added to the
list of selected items.
A-migo – User Manual
17
Normal Pen
Directly select one of the two pre-configured pens. The selected pen will become
the active writing tool.
Highlighter
In a format similar to traditional highlighters, here a transparent highlighter can be
selected to highlight aspects of your presentation.
A-migo – User Manual
18
Brushes
The virtual brushes of the A-migo application behave in the same way as real
brushes. If you write slowly, it will release more paint, thus making a thicker line.
The inverse will occur following rapid movements.
Beveled Pen
This tool simulates the writing of a pen with the tip molded in the form of a bevel. In
accordance with the direction of the writing, the thickness of the line will be molded.
Magic Pen
The magic pens use an image as a reference to paint. When these are used over a
page or arbitrary background, it will gradually reveal the content of the associated
image. Small bitmaps can be applied which will be used as standards, repeated
throughout the paint area. Observe below two examples of its use.
A-migo – User Manual
19
Stamp
Use stamps in your presentation. Select an image to apply to each stamp, and apply
it countless times.
Eraser
A-migo – User Manual
20
The eraser permits, as its name suggests, the removal of written objects. However,
it is interesting to note one aspect. In real life, if you write with a pencil or a pen,
you can later remove it with an eraser. However, if you try to use the eraser to
remove an object that you have glued, you will certainly not be successful. In the
scope of the tool A-migo, the same can be verified. You can use the eraser to
remove the result of writing with pens and brushes. However to erase a geometric
figure or an image for example, you will need to expressly remove it. In this case
there are four pre-configured modes. Three associated with different sized erasers
and a last one that permits the selection of an area to be completely delete.
Character Recognition
The A-migo application internally enable the capability to automatically recognize
manuscript characters. Select this option to activate the referred functionality.
Geometric Figure Recognition
The recognition of geometric figures can be obtained in a completely automatic
manner, revealing itself as an extremely practical resource. To use it, activate this
option and try to design a geometric figure of one of the available types – Square,
rectangle, circumference, ellipse, parallelogram, triangle, trapezoid, or hexagon.
When the design is complete, the A-migo application will automatically substitute
your design with the perfect representation of a figure of deduced characteristics. In
addition to geometric figures, this tool permits the recognition of polygonal lines.
Line
A-migo – User Manual
21
The design of lines is simple, when the A-migo application is used. Select the type of
line to apply, press the pen over the starting point of the segment, and drag it to
the ending point and finally release it.
Geometric Figures
The design process of geometric figures is completely intuitive. Select the type of
figure to design, and act in accordance with the above description for line drawing.
Scratch-off (Award reveal)
A-migo – User Manual
22
The Scratch-off is a rare tool, of special interest in certain contexts. Its purpose is to
represent in a virtual form a real scratch-off. To use this tool a silver layer should be
inserted in the area to hide. In the moment of the revelation, select the scraper and
act as if you were really scrapping, while using the pen.
Insert Text
Use this option to open the insertion and alteration of text blocks. As in similar
situations the interface implemented is identical to those of other common
solutions, making its use extremely intuitive. Observe the example reproduced
below.
A-migo – User Manual
23
4.7. Tools
Tools Menu
In the “Tools” menu the user will find different methods with which the user
can maximize presentations. Tools to improve presentations are included in this
menu – such as the Magnifying Glass or the Curtain, those relating to geometric
design and measurement, in addition to the generic tools such as the screen
keyboard. This entire list can be expanded with the inclusion of external tools.
Curtain
A-migo – User Manual
24
The curtain is an interactive tool to optimize the presentation, which permits the
user to hide the screen and reveal its contents in a gradual manner. The curtain is
controlled in an intuitive manner, and can be drug in the intended direction. In the
can be observed. The
lower right-hand corner a small toolbar with buttons
first button configures the curtain in sliding mode. Its size is fixed and it simply
moves along the screen. In the mode selected by the second button, the curtain can
be re-sized. The last button closes the curtain.
Move Page
Sempre que a página seleccionada seja maior que o écran poderá utilizar esta
opção para a mover e, assim, visualizar a região pretendida.
Magnifying Glass
The Magnifying Glass is the tool which permits observation of small details during a
presentation. An example of its use would be the visualization of a web page with
text written in small print. Applying the Magnifying Glass, the content of the
selected area can be increased, revealing what previously was imperceptible. When
the "Magnifying Glass" mode is activated, the user can select different areas to be
amplified. This is done selecting an initial point and dragging the pen to the final
point. The buttons
can then be used respectively to diminish or increase
the degree of amplification, or to close the Magnifying Glass. To exit the
"Magnifying Glass" mode, press the lateral button of the digital pen.
A-migo – User Manual
25
Spotlight
The Spotlight permits the user to darken the screen, creating the effect of lighting
only over the selected area. Its basic use is extremely simple. Select the respective
option and drag the lighted zone to the intended area. The resizing of the
illuminated area can be obtained by pressing the digital pen over the blue line and
dragging in accordance with the intended sizing. In addition the menu access
button
permits the user to access the extra options for the control of the
background transparency, or over the form of the lighted area.
Camara
The A-migo application was conceived to simplify the work of those who use it. The
operations which copy areas of the screen for import into presentations are
frequent, and typically involve the use of external tools in a process which can be
slow. With the integrated Camera, the user can in a direct fashion collect and insert
into the presentation images obtained from the screen. Reflecting on the knowledge
acquired the A-migo application; the Camera affords operation in four modes,
accessible from each button on the toolbar as follows:
-Photography of the content of an arbitrary rectangular area - Select with the
pen the starting point of the intended area, move the pen to the ending point
and select it in the same manner.
-Photography of an object - For example, simply select a window to
photograph and its image will be included in the presentation - within the
selected page.
-Photography of the content of an irregular area - Use the pen to design an
arbitrary area of an irregular shape. When the line becomes closed, the
content of its interior will be included in the selected page of the presentation.
-Photography of the complete screen
A-migo – User Manual
26
Screen Keyboard
For the introduction of text through the interactive board, use the screen keyboard.
A keyboard with a presentation similar to that represented above will be presented
to the user, and it is only necessary to select the desired letters with the digital pen
- exactly as would be done with a conventional keyboard. With the buttons included
in the lower left-hand corner the keyboard model can be selected in accordance
with personal tastes and needs. Respectively default models as represented above
or the reduced models (without navigational keys), or numeric keys only, or
complete versions can be selected.
Calculator
Open the calculator provided by the operating system.
Digital Clock
The A-migo application Digital Clock is very versatile, and can be used in a diverse
array of situations. In simple terms, it can be used as a system clock, chronometer,
or stopwatch. In the above example, it is represented as a stopwatch. The button
permits access to the options configuration window.
A-migo – User Manual
27
In addition to the size and level of transparency on the screen, an action associated
with the end of the countdown - in the case of the stop watch, can be configured.
Thus, as can be observed, a predetermined sound, the execution of an arbitrary file,
or simply the disregard of the time expiration, can be controlled by the user.
Protractor
The Protractor of the A-migo application is a powerful tool which can be used with
precision to measure arbitrary angles. Its specification was carefully studied in order
to make its use as intuitive as possible. Thus, to rotate it, it is sufficient to act as
with a classic protractor - rotate it by the edge. To move it, simply drag it to the
intended location. Using the button
you can, as in the majority of the cases,
obtain access to a specific menu for the control of viewing options. The orange
circle can be moved for the positioning of the line which connects it to the center of
the Protractor. The value of the measurement of the angle between the two orange
lines is automatically shown in the selected unit.
Ruler
In a manner similar to that of the Protractor, the Ruler permits the measurement of distances.
The manner of use is equally coherent. Move the Ruler to any arbitrary point, rotate it,
positioning the pen over it, and
A-migo – User Manual
resize it by dragging it to the final extremity.
28
Compass
The Compass provided by the A-migo application is truly versatile and of intuitive
usage. To use it:
1 -Drag it by the pointed shaft to the position in the center of the rotation.
2 and 3 - Rotate it by the pencil shaft and control the opening by dragging it by
its support, for positioning in the design starting point.
4 - Rotate it by the pencil to design the arc of the intended circumference.
The specific menu permits the selection of drawing modes of the circumference
arc or circular sectors, or to show or hide the radius - in pixels or in centimeters,
during the opening process. While designing the compass will interactively show the
angle of the arc or sector designed up until the current position, as well as the
perimeter of the line. Observe that all of the measurements are consistent with
those obtained by other tools. An arc of 45° for example, will be measured with the
same value by the Protractor. Similarly, and opening of 2.93cm, such as that
represented can be directly verified by the Ruler.
A-migo – User Manual
29
External Tools
The option to include External Tools is of great utility. Suppose that a determined
tool obtained from the Internet is frequently used. In the traditional mold, if its use
becomes necessary during a presentation, the work would require interruption in
order to access the folder where this tool is stored in order to provide the command
for its execution. With the possibility to include it as an external tool, it will remain
directly accessible by the menu option on the A-migo application. In this manner
when the user requires its use all that is necessary is to select the corresponding
option - in a way that the external tools become part of the application. Verify below
the consequent result of the presented configuration.
This functionality is even more valuable as the tool configuration is associated and
stored in a form adapted to the user profile. Thus the External Tools that are
configured are only available for the user that installed them, and these are always
available when required.
A-migo – User Manual
30
4.8. Collaboration
Collaboration Menu
The possibility to develop a group project with the A-migo application is a reality.
The only pre-requisite is the existance of connectivity between the systems
involved. This connectivity can be through a LAN or the Internet.
In the simplest case, the work environment can be shared from a primary system
with one or more remote systems. The most complex options will even permit the
group task on a shared instant of the A-migo application, with the communication
between the diverse entities by means of multi-point videoconferencing. The
possibility to allocate the capabilities attributed to each participant is always
present.
Create Server
This is the option that allow the initiation of a group session between various
systems. In a window similar to that represented below, the name to attribute as
the system service can be defined, in addition to the password, whose knowledge
will be required from those who intend to participate in the session.
Connect to a Server
Each system that intends to join an existing session should select this option. Prior
knowledge of the name or IP address of the server as well as the password for
access to the session is required.
A-migo – User Manual
31
In the event that the location in which the system is installed does not permit direct
connection to the server, a server Socks5 can be used, which will overcome this
limitation. In this case, configure the access through the Proxy server, filling in the
fields required with the adequate content. Consult the responsible systems
administrator to obtain this information.
Disconnect from the Network
Select this option to terminate an active session.
A-migo – User Manual
32
4.9. Interface
Interface Menu
The Interface menu provides for the selection of the color most appreciated by the
user for use in the application interface A-migo. The selection made will be stored in
association with the user profile. In this way when you return to the application Amigo, it will remember your preferred color and will adjust itself accordingly.
A-migo – User Manual
33
5. Customize
The A-migo application provides for the storage of the specific configurations of
each user in such a way that the work environment is always the most adequate.
In educational contexts, for example, this capability is of primordial importance. If
each teacher saves the configurations associated with it's profile, then it will never
run the risk of delaying the beginning of the class due to the work environment
reconfiguration.
According to the philosophy of the A-migo application, the functionality support
process is transparent to the user. Any change that is made in aspects such as pen
configurations, text, or even the floating toolbar, can be stored within the active
user profile. Thus when the user returns to the A-migo application, the entire
environment will be restored without any additional specific actions by the user.
Examples of configurations that may be saved in the individual user profile:
- Configurations related to sending e-mail
- Interface color used
- Preferences in the drawing tools. Here configurations of pens, brushes,
highlighters and others are included
- Pre-defined options for text writing
- Object configurations from the personal gallery
- Default configurations used, in accordance with the definitions made in the
“Options” window of the “Tools Menu "
- External Tools
- Buttons on the floating toolbar
A-migo – User Manual
34
5.1. Floating Toolbar
The A-migo floating toolbar can function in two distinct manners; respectively the
simple user mode, and the advanced user mode.
In the simple mode, the toolbar will present a reduced set of tools. This mode is
intended for users that are not very familiar with the tool, and which may feel
intimidated by a more complex tool bar.
Upon alternating to the advanced mode, the toolbar will become completely
flexible. It is possible to open a menu that is equivalent to the main application and
drag the desired tools to customize the toolbar. In the opposite manner, if tools are
to be removed from the floating bar, press the electronic pen over the tool button to
be removed, wait one second, and drag it off the bar.
A-migo – User Manual
35