1
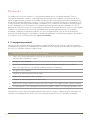
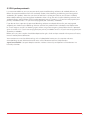
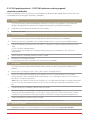
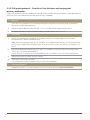
User Guide
Duolink In Situ –
Probemaker
®
sigma.com
Instructions for Duolink In Situ Probemaker PLUS (Cat. No. DUO92009-1KT) and Duolink In Situ Probemaker
MINUS (Cat. No. DUO92010-1KT)
Duolink® In Situ
Table of Contents
Introduction 2
Applications 3
2.1 Use antibodies from the same species 2.2 Use antibodies from any species
Antibody Requirements 4
3.1 Concentration and volume 3.2 Buffer Reagent Preparation and Storage 5
Protocols 6
5.1 Conjugation protocol
6 5.2 PLA probe protocols
7
5.2.1 PLA probe protocol – CUSTOM solutions and
conjugated primary antibodies
5.2.2 PLA probe protocol – CUSTOM solutions and
conjugated secondary antibodies
5.2.3 PLA probe protocol – Duolink In Situ Solutions and
conjugated primary antibodies
5.2.4 PLA probe protocol – Duolink In Situ Solutions and
conjugated secondary antibodies
8
9
10
11
1
Introduction
Duolink® In Situ Probemaker enables quick and convenient conjugation of the PLA® oligonucleotide
arms directly to primary antibodies or secondary antibodies raised against haptens or species other
than mouse, rabbit or goat.
The Duolink In Situ reagents are based on in situ PLA, which is a proximity ligation assay technology.
A pair of oligonucleotide labeled antibodies (PLA probes) generates a signal only when the two PLA
probes, one PLUS and one MINUS, have bound in close proximity. The signal from each detected pair
of PLA probes is visualized as an individual spot. These PLA signals can be quantified (counted) and
assigned to a specific subcellular location based on microscopy images.
With the Probemaker reagents you can create your own PLA probes by conjugating PLA
oligonucleotides to antibodies. To perform a complete Duolink In Situ assay you need one PLA probe
PLUS and one PLA probe MINUS and in addition your choice of Detection reagents, Wash Buffers and
Mounting Medium.
For a complete list of products, visit
sigma.com/duolink
2
Applications
2.1 Use antibodies from the Same Species
Study protein-protein interactions, protein modifications, or single proteins, using two primary
antibodies derived from the same species. Label one of the antibodies with the PLUS oligo and the
other with the MINUS oligo (Fig. 1).
Figure 1. Detection of protein interactions using
primary antibodies from the same species.
2.2 Use Antibodies from any Species
Study protein-protein interactions, protein modifications, or single proteins, using one or both primary
antibodies derived from species other than mouse, rabbit or goat. Label one of your secondary
antibodies with the PLUS oligo and the other with the MINUS oligo. Or, combine one labeled secondary
antibody with a standard secondary Duolink In Situ PLA probe (Fig. 2).
Figure 2. Detection of protein interactions using one or
both primary antibodies derived from species other than
mouse, rabbit or goat.
3
Antibody Requirements
3.1 Concentration and Volume
The antibody to be conjugated must have a concentration of 1 mg/ml. 20 μg (=20 μl) of antibody is
needed per conjugation.
Note: If a monoclonal antibody is used, it should be Protein A or Protein G affinity purified.
3.2 Buffer
The antibody must be in an amine free buffer, ideally PBS. The buffer should be carrier and preservative
free but may contain up to 0.1% BSA, 5% trehalose and 0.02% sodium azide.
If you are unsure about the composition of the buffer your antibodies are stored in, Olink strongly
recommends dialysis or buffer exchange prior to conjugation. Antibodies from various sources and
suppliers vary in residual primary amine content often in the form of remaining glycine from the acidic
elution of the antibody during the antigen-affinity purification step. Even if the supplier states PBS
content, it is likely that there are residual amounts of primary amines.
Olink recommends the following standard procedure for buffer exchange:
Note: Not for reducing high concentrations of BSA or other macromolecules.
• Pre-equilibrate an illustra MicroSpin G-50 Columns spin column (GE Healthcare, Art. no. 275330-01) with 1xPBS by first spinning the column at 3000 rpm for 1 min, then add 400 μl of
1xPBS and spin again for 1 min and repeat 4 times. Place the column in a new microfuge
tube.
• Add your antibody (12–50 μl) to the column and spin again for 2 min at 3000 rpm. The
concentration of the collected antibody should be verified by OD. 1 mg/ml should have an
OD 280 nm of 1.4.
Concentrating very diluted antibodies prior to Duolink In Situ Probemaker conjugation is not
recommended unless you have large amounts since losses are very high with filter type concentrators.
4
Reagent Preparation and Storage
Store the unused Probemaker kit at -20°C. Expiration date is marked on each individual lot. Once you
have conjugated your antibody we recommend storage at +4°C. The Storage Solution contains buffer
and reagents for stabilizing and preserving the conjugated antibody. Please note that you might need
to add other components to preserve your specific antibody.
Each kit contains reagents to conjugate 20 µg antibody at a concentration of 1 mg/ml.
Duolink In Situ oligonucleotide PLUS or MINUS – store at -20°C
• One vial with lyophilized activated oligonucleotide for one conjugation of 20 µg antibody
at a concentration of 1 mg/ml.
Conjugation Buffer – store at -20°C
• Reagents for buffering the conjugation reaction
• Vortex before use
• Ready-to-use solution
Stop Reagent – store at -20°C
• Reagents for stopping the conjugation reaction
• Vortex before use
• Ready-to-use solution
Storage Solution – store at -20°C
• Buffer for preserving the conjugated antibody (PLA probe)
• Vortex before use
• Ready-to-use solution
Assay Reagent (20x) – store at -20°C
• Specific reagent to be added to your own optimized antibody diluent
• Vortex before use
• Dilute 1:20 in your optimized antibody diluent prior to diluting the conjugated antibodies
(PLA probes).
Note: If you do not have a previously optimized blocking solution or antibody diluent for your antibody,
please use the following Blocking Solution and PLA probe Diluent included in the Probemaker kit.
Blocking Solution – store at -20°C to +4°C
• For blocking of your sample prior to staining with Duolink In Situ
• Vortex before use
• Ready-to-use blocking solution, one drop equals approximately 40 µl
PLA probe Diluent – store at -20°C
• Buffer for diluting the conjugated antibody (PLA probe) to the final assay concentration
• Vortex before use
• Ready-to-use solution
5
Protocols
This folder consists of two sections; 5.1 Conjugation protocol and 5.2 PLA probe protocols. The first,
Conjugation protocol in section 5.1, describes how to conjugate your antibody with either the PLUS or
MINUS oligonucleotide, to create a PLA probe. Subsequent to the conjugation procedure, proceed to any
of the four PLA probe protocols in section 5.2: Custom solutions and conjugated primary antibodies (5.2.1),
Custom solutions and conjugated secondary antibodies (5.2.2), Duolink In Situ solutions and conjugated
primary antibodies (5.2.3) or Duolink In Situ solutions and conjugated secondary antibodies (5.2.4). This
depends on if you have your own custom blocking solution and antibody diluent or if you use the supplied
Duolink In Situ solutions and if you have used Probemaker to conjugate your primary or secondary
antibodies. To perform a complete Duolink In Situ assay and generate PLA signals you also need your
choice of Detection Reagents, Wash Buffers and Mounting Medium. The Detection protocol is described in
the Duolink In Situ User Manual found at sigma.com/duolink.
5.1 Conjugation protocol
Ensure that your antibody to be conjugated has a concentration of 1mg/ml. 20 μg (=20 μl) of antibody is
needed per conjugation. The antibody buffer should be carrier and preservative free but may contain up to
0.1% BSA, 5% trehalose and 0.02% sodium azide.
Conjugation of PLA oligonucleotide to antibody
1)
Add 2 µl of Conjugation Buffer to 20 µl of the antibody to be conjugated. The antibody
concentration should be 1 mg/ml.
2)
Mix gently with a pipette.
3)
Transfer the antibody solution to one vial of lyophilized oligonucleotide (PLUS or MINUS).
Note: After opening the vial, add the antibody solution immediately.
4)
Mix gently with a pipette.
5)
Incubate at room temperature over night.
6)
Add 2 µl of Stop Reagent to the reaction.
7)
Incubate at room temperature for 30 minutes.
8)
Add 24 µl of Storage Solution and possibly other reagents for stabilizing your specific antibody.
9)
The conjugation is now completed and your PLA probe is stable in the Storage Solution at +4°C.
Proceed to any of the four PLA probe protocols described in section 5.2 depending on your blocking
solution and antibody diluent and if you have conjugated your primary or secondary antibodies.
6
5.2 PLA probe protocols
It is recommended that you use your previously optimized blocking solution and antibody diluent, or
follow the recommendations from the antibody vendor, when blocking and diluting your conjugated
antibodies (PLA probes). Note that you have to add the Assay Reagent (20x) to your custom antibody
diluent before diluting your conjugated antibodies. When using your own custom blocking solution and
antibody diluent, please follow the PLA probe protocol given in section 5.2.1 if you have conjugated your
primary antibodies and 5.2.2 if you have conjugated your secondary antibodies.
If you do not have a previously optimized blocking solution or antibody diluent for your conjugated
antibody you should use the Blocking Solution and the PLA probe Diluent included in the Probemaker
kit. These reagents use BSA as blocking agent. When using these reagents, please follow the PLA protocol
given in section 5.2.3 if you have conjugated your primary antibodies and 5.2.4 if you have conjugated your
secondary antibodies.
Before you start, your samples should be deposited on glass slides and pre-treated with respect to fixation,
retrieval and/or permeabilization.
Your reaction area must be delimited e.g. with a hydrophobic barrier pen. Use reaction volumes
corresponding to your delimited reaction area, see the Reaction Volume Guide found at
sigma.com/duolink. Use open droplet reactions without a cover slip and perform all incubations in a
humidity chamber.
7
5.2.1 PLA probe protocol – CUSTOM solutions and conjugated
primary antibodies
Follow this protocol if you use your own custom blocking solution and antibody diluent and if you have
used Probemaker to conjugate primary antibodies.
1.
Blocking
Use your previously optimized blocking solution. If you are using Duolink In Situ Detection
Reagents Brightfield we recommend a peroxidase quenching step before blocking.
a)
Add your custom blocking solution to each sample.
b)
Incubate the slides.
2.
PLA probes
Use your previously optimized antibody diluent to dilute your conjugated antibodies (PLA
probes).
a)
Dilute the Assay Reagent (20x) 1:20 in your custom antibody diluent.
b)
Dilute your conjugated antibodies (PLA probes), one PLUS and one MINUS, to a suitable
concentration in your antibody diluent containing 1x Assay Reagent. Allow the mixture to sit for
20 min at room temperature.
Note: You may need to titrate your PLA probes to a suitable concentration; we recommend you
to start with a higher concentration than what you usually use for your primary antibodies in IF
or IHC.
c)
Tap off the blocking solution from the slides. Try to obtain an equal residual volume on each
slide as this will affect reproducibility.
Do not allow the samples to dry before adding the PLA probes as this will cause background.
d)
Add the diluted PLA probes to each sample.
e)
Incubate in a humidity chamber.
Use temperature and time optimal for your antibodies.
3.
Detection protocol
Proceed to section 7.3 in the Duolink In Situ User Manual found at sigma.com/duolink.
8
5.2.2 PLA probe protocol – CUSTOM solutions and conjugated
secondary antibodies
Follow this protocol if you use your own custom blocking solution and antibody diluent and if you have
used Probemaker to conjugate secondary antibodies.
1.
Blocking
Use your previously optimized blocking solution. If you are using Duolink In Situ Detection
Reagents Brightfield we recommend a peroxidase quenching step before blocking.
a)
Add your custom blocking solution to each sample.
b)
Incubate the slides.
2.
Primary Antibodies
Use your previously optimized antibody diluent to dilute your primary antibodies.
a)
Dilute your primary antibodies to a suitable concentration in your custom antibody diluent.
b)
Tap off the blocking solution from the slides. Try to obtain an equal residual volume on each
slide
as this will affect reproducibility.
Do not allow the samples to dry before adding the primary antibodies as this will cause
background.
c)
Add the primary antibody solution to each sample.
d)
Incubate in a humidity chamber.
Use temperature and time optimal for your primary antibodies.
3.
PLA probes
Use your previously optimized antibody diluent to dilute your conjugated antibodies (PLA
probes).
a)
Dilute the Assay Reagent (20x) 1:20 in your custom antibody diluent.
b)
Dilute your conjugated antibodies (PLA probes), one PLUS and one MINUS, to a suitable
concentration in your antibody diluent containing 1x Assay Reagent. Allow the mixture to sit
for 20 min at room temperature.
Note: You may need to titrate your PLA probes to a suitable concentration; we recommend you
to start with the same concentration as you usually use for your secondary antibodies in IF or
IHC.
c)
Tap off the primary antibody solution from the slides.
d)
Wash the slides in a wash buffer suitable for your primary antibodies.
Washing should be performed in a staining jar, with a minimum volume of 70 ml on a shaker
(cradle) with gentle orbital shaking. Bring the wash buffers to room temperature before use.
e)
Add the diluted PLA probes to each sample.
f)
Incubate the slides in a pre-heated humidity chamber for 1 h at +37 °C.
4.
Detection protocol
Proceed to section 7.3 in the Duolink In Situ User Manual found at sigma.com/duolink.
9
5.2.3 PLA probe protocol – Duolink In Situ Solutions and conjugated
primary antibodies
Follow this protocol if you use the Blocking Solution and PLA probe Diluent included in the Probemaker kit
and if you have used Probemaker to conjugate primary antibodies.
1.
Blocking
If you are using Duolink In Situ Detection Reagents Brightfield we recommend a peroxidase
quenching step before blocking.
a)
Add one drop of Blocking Solution per 1 cm2. One drop equals approximately 40 ul.
b)
Incubate the slides in a pre-heated humidity chamber for 30 min at +37 °C.
2.
PLA probes
a)
Dilute your conjugated antibodies (PLA probes), one PLUS and one MINUS, to a suitable
concentration in the PLA probe Diluent.
Note: You may need to titrate your PLA probes to a suitable concentration; we recommend you
to start with a higher concentration than what you usually use for your primary antibodies in IF
or IHC.
b)
Tap off the Blocking Solution from the slides. Try to obtain an equal residual volume on each
slide as this will affect reproducibility.
Do not allow the samples to dry before adding the PLA probes as this will cause background.
c)
Add the diluted PLA probes to each sample.
d)
Incubate in a humidity chamber.
Use temperature and time optimal for your primary antibodies.
3.
Detection protocol
Proceed to section 7.3 in the Duolink In Situ User Manual found at sigma.com/duolink.
10
5.2.4 PLA probe protocol – Duolink In Situ Solutions and conjugated secondary
antibodies
Follow this protocol if you use the Blocking Solution and PLA probe Diluent included in the Probemaker kit
and if you have used Probemaker to conjugate secondary antibodies.
1.
Blocking
If you are using Duolink In Situ Detection Reagents Brightfield we recommend a peroxidase
quenching step before blocking.
a)
Add one drop of Blocking Solution per 1 cm2. One drop equals approximately 40 ul.
b)
Incubate the slides in a pre-heated humidity chamber for 30 min at +37 °C.
2.
Primary Antibodies
a)
Dilute your primary antibodies to a suitable concentration in the Blocking Solution.
b)
Tap off the Blocking Solution from the slides. Try to obtain an equal residual volume on each
slide as this will affect reproducibility.
Do not allow the samples to dry before adding the primary antibodies as this will cause
background.
c)
Add the primary antibody solution to each sample.
d)
Incubate in a humidity chamber.
Use temperature and time optimal for your primary antibodies.
3.
PLA probes
a)
Dilute your conjugated antibodies (PLA probes), one PLUS and one MINUS, to a suitable
concentration in the PLA probe Diluent.
Note: You may need to titrate your PLA probes to a suitable concentration; we recommend you
to start with the same concentration as you usually use for your secondary antibodies in IF or
IHC.
b)
Tap off the primary antibody solution from the slides.
c)
Wash the slides in 1x Wash Buffer A or in a wash buffer suitable for your primary antibodies,
preferably 2 x 5 min.
Washing should be performed in a staining jar, with a minimum volume of 70 ml on a shaker
(cradle) with gentle orbital shaking. Bring the wash buffers to room temperature before use.
d)
Add the diluted PLA probes to each sample.
e)
Incubate in a pre-heated humidity chamber for 1 h at +37°C.
4.
Detection protocol
Proceed to section 7.3 in the Duolink In Situ User Manual found at sigma.com/duolink.
11
This product is for research use only. Not for use in human diagnostic or therapeutic procedures.
This product includes a license for non-commercial use of the Duolink product. Commercial users will require additional licenses.
Please contact Olink AB for details.
There are no warranties, expressed or implied, which extend beyond this description. Olink AB is not liable for property damage,
personal injury, or economic loss caused by this product.
The following trademarks are owned by Olink AB: Olink®, Olink Bioscience, Duolink® and PLA®.
This product is covered by several patents and patent applications including US 6,511,809, US 6,558,928, US 6,878,515,
US 7,074,564, US 5,665,539 and related US and foreign patents.
For use only as licensed by Amersham Biosciences Corp (part of GE Healthcare Bio-Sciences) and Molecular Staging Inc.
The Phi 29 DNA polymerase may not be re-sold or used except in conjunction with the other components of this product.
See U.S. Patent Nos. 5,854,033, 6,124,120, 6,143,495, 5,001,050, 5,198,543, 5,576,204, and related U.S. and foreign patents.
The oligonucleotide labeling components in this kit utilise Lightning-Link™ technology and are provided under license from
Innova Biosciences.
© 2012 Olink AB.
All third party trademarks are the property of their respective owners.
Order/Customer Service (800) 325-3010 • Fax (800) 325-5052
Technical Service (800) 325-5832 • sigma-aldrich.com/techservice
Development/Custom Manufacturing Inquiries
(800) 244-1173
Safety-related Information sigma-aldrich.com/safetycenter
World Headquarters
3050 Spruce St.
St. Louis, MO 63103
(314) 771-5765
sigma-aldrich.com
© 2013 Sigma-Aldrich Co. LLC. All rights reserved. SIGMA and SIGMA-ALDRICH are trademarks of Sigma-Aldrich Co. LLC, registered in the US and other countries. Where bio
begins is a trademark of Sigma-Aldrich Co. LLC. Content and images are © 2012 Olink AB and used with permission. Duolink and PLA are trademarks of Olink AB.
80019-513642
1023