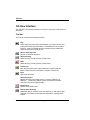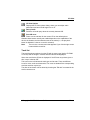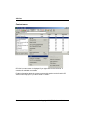
1
RSJ CD-Writer for Windows NT
RSJ CD-Writer for Windows NT
© Copyright 2003 RSJ Software GmbH
1
RSJ CD-Writer for Windows NT
The information in this manual is subject to change without further notice. Although we put great accuracy into the development and
documentation of our products, occasional errors cannot be avoided. RSJ Software will in no case be liable for errors or any
consequential damages, such as loss of data or production deficits.
(c) Copyright 2003 by RSJ Software GmbH Germering. All rights reserved
Kodak and Kodak Photo-CD are trademarks of Eastman Kodak Company
MS, MS-DOS, Windows, Windows NT, Windows 2000, Windows XP, MSC and MSCDEX are trademarks of Microsoft Corporation
ISO and ISO 9660 are trademarks of the International Organization for Standardization
IBM and PC are trademarks of the International Business Machines Corporation
2
© Copyright 2003 RSJ Software GmbH
Preface
Preface
With RSJ CD-Writer you have purchased a product which is totally different to
other existing mastering programs -- you will notice that right from the start.
RSJ CD Writer provides an own drive letter for your CD Recorder. With this drive
letter you can write files on CD by using common commands (COPY, XCOPY,...)
or the Explorer.
Using freedb you can get information about the CD via Internet.
You can write MP3 files to audio CDs and you can print your own CD-Cover
using the RSJ CD Cover Editor.
RSJ CD Writer supports DAO (disk at once) mode. This copy mode allows the
creation of exact copies of audio CDs that do not contain gaps between the
tracks (Live-CDs, Musical-CDs).
You can create data DVDs.
In each chapter you will find many useful tips and examples on how to successfully use this software. We hope that you enjoy working with RSJ CD-Writer.
This documentation offers information on the following subject fields:
Installation
Installation procedure of RSJ CD-Writer for Windows
NT
Operation
General guide for the correct usage of the file system
and CD-View
Technical Details
Basic background information
Reference
Description of commands, settings and programs
Help on errors
Definition and removal of eventual malfunctions
System requirements Hard- and Software requirements for the RSJ CD-Writer
Appendix
Restrictions and Mastering
© Copyright 2003 RSJ Software GmbH
3
Table of contents
Table of contents
RSJ CD-Writer for Windows NT............................................ 1
Preface ................................................................................... 3
Table of contents................................................................... 4
Installation.............................................................................. 7
freedb support.................................................................................................... 7
CD recorder detection....................................................................................... 8
Installation log file .............................................................................................. 9
Registering a demo version ............................................................................. 9
Uninstallation...................................................................................................... 9
Copying files to CD.............................................................. 10
Introduction to the file system ........................................................................ 10
Writing to the CD ............................................................................................. 11
Finalize the CD ................................................................................................ 12
Creating data-DVDs ............................................................. 14
Information about the usage of DVD-RW and DVD+RW: .................... 14
Creating Audio-CDs............................................................. 15
Notes about DAO........................................................................................ 17
Pause times ................................................................................................. 17
CD Writer File System Settings .......................................... 18
General......................................................................................................... 19
File system settings .................................................................................... 19
CD Copy Wizard................................................................... 21
CD-View ................................................................................ 23
Introduction....................................................................................................... 23
Launching CD-View ........................................................................................ 23
Start from the Start menu .......................................................................... 23
Start from the context menu...................................................................... 24
Command line start for CD-ROM or CD-Recorder ................................ 24
Hard disks (temporary storage) ................................................................ 25
CD-View Interface ........................................................................................... 26
Tool bar ........................................................................................................ 26
4
© Copyright 2003 RSJ Software GmbH
Table of contents
Track list .......................................................................................................27
Context menu ..............................................................................................28
Status bar .....................................................................................................29
Copy multimedia files into Audio-tracks .......................................................29
WAV Files ....................................................................................................29
Other file formats.........................................................................................29
Copy tracks.......................................................................................................30
Finalize the CD.................................................................................................32
Track size and required space.......................................................................33
freedb support ..................................................................................................33
Performing freedb queries .........................................................................34
freedb options ..............................................................................................36
Printing CD booklets and labels ....................................................................40
RSJ CD Cover Print ............................................................. 41
User interface...................................................................................................41
CD Cover Print toolbar ...............................................................................42
The format window......................................................................................43
CD Cover Print Options..............................................................................44
CD Cover Printout .......................................................................................44
RSJ CD Boot ........................................................................ 47
TRACKCPY.EXE................................................................... 51
Commands: ......................................................................................................51
help [command]...........................................................................................51
dir <drive> ....................................................................................................51
speed <factor>.............................................................................................51
copy <source drive> <track number> <target drive> .............................52
finalize <drive>.............................................................................................52
eject <drive> ................................................................................................52
blank <drive> <track number> ..................................................................52
quit.................................................................................................................52
Technical details.................................................................. 54
ISO9660 ............................................................................................................54
Format of a CD ................................................................................................54
Track .................................................................................................................54
Multisession CDs .............................................................................................55
Track mode ......................................................................................................56
Audio .............................................................................................................56
Mode 1, Form 1 ...........................................................................................56
Mode 1, Form 2 ...........................................................................................56
© Copyright 2003 RSJ Software GmbH
5
Table of contents
Mode 2, Form 1........................................................................................... 56
Mode 2, Form 2........................................................................................... 56
XA, Photo-CD, Multisession........................................................................... 57
XA ................................................................................................................. 57
Photo-CD ..................................................................................................... 57
Multisession ................................................................................................. 57
Long file names ............................................................................................... 58
Rock Ridge Extensions.............................................................................. 58
Joliet.............................................................................................................. 58
Burn-Proof ........................................................................................................ 59
Tips and tricks ..................................................................... 60
Incorrect SCSI termination or wiring ........................................................ 60
If your recorder is not recognized by RSJ CD Writer............................. 61
Error solutions..................................................................... 63
RSJ CD Writer Error Log................................................................................ 63
Table of errors ............................................................................................. 64
Other errors...................................................................................................... 66
FAQ’s ................................................................................................................ 67
System requirements .......................................................... 69
Hardware .......................................................................................................... 69
Software............................................................................................................ 69
CD-ROM ........................................................................................................... 70
Appendix .............................................................................. 71
Restrictions .................................................................................................. 71
Mastering.......................................................................................................... 71
Conditions of use ................................................................ 72
Glossary ............................................................................... 73
Index ..................................................................................... 75
6
© Copyright 2003 RSJ Software GmbH
Installation
Installation
The CD-Writer installation program will automatically identify your CD recorder
and install the software on your computer.
Note: To install the RSJ CD-Writer software you need to be logged onto the
system with administrator privileges.
If you use an external CD recorder, make sure it was turned on before the
system was started. If not, turn it out and restart the system before installing RSJ
CD Writer.
To start the installation program, please execute the file cdwnt.exe; to do so,
double click it in an Explorer window or use the “Run” command in the Start
menu.
You will be guided through the installation process, simply follow the instructions
on the screen.
Below, you can find a detailed description of the CD Writer specific installation
options.
freedb support
freedb.org is a service that provides a huge database of CD data (CD / track
titles and more).
The freedb support in RSJ CD Writer is designed to work right out of the box –
with one exception. If you access the Internet through a corporate network it is
likely that you have to use a proxy server. If so, you have to provide its name,
port and eventually login information on the server page of the freedb options
dialog before you can access freedb.
So if you are using freedb for the first time, you should perform the following
steps:
•
Enter proxy information on the Server page if necessary
•
Click the Server List button on the server page and get a new server list.
Select a server that is close to you. If you use a proxy, select a server using
the HTTP protocol.
•
Provide a user name and your e-mail address (needed for submissions)
© Copyright 2003 RSJ Software GmbH
7
Installation
CD recorder detection
The installation program automatically detects your CD recorder(s) and displays
them in a list:
To change the drive letter for a recorder, please click its entry in the list using the
right mouse button.
Note: Under certain conditions, you have to restart your computer for the
installation program to be able to detect your recorder. If this is the case,
please reboot your machine and use the “Installation” command under
Startmenu ⇒ Programs ⇒ RSJ CD Writer and click the “Next” button until you come to the above page.
If your recorder is still not recognized, please follow the steps as described under “Tips and Tricks” in the appropriate section.
8
© Copyright 2003 RSJ Software GmbH
Installation
Installation log file
The installation will create a log file “install.log” in the target directory that might
be helpful in case of problems.
Registering a demo version
If you install RSJ CD Writer as a demo, it will run for 30 days. The “Info”
command of the CD icon in the system tray (right bottom corner of the screen,
next to the clock) can be used to display information about the remaining trial
period:
If you decide to get the full version, you will receive a file cdwfs.key that removes
the 30 day limit. To install this file, please proceed as follows:
•
Choose the “Installation” command under Startmenu ⇒ Programs ⇒ RSJ
CD Writer; this will start the installation program.
•
Check the “Register demo” button on the first page and click next.
•
Follow the instructions on the screen.
Alternatively, you can manually install the new key file by copying it to the
WINNT\System32\Drivers
directory. Please make sure the file is named cdwfs.key. You need to reboot
your machine so the new key file is recognized.
Uninstallation
To uninstall RSJ CD Writer, please use the “Uninstall” command under
Startmenu ⇒ Programs ⇒ RSJ CD Writer or use the add/remove programs icon
in Windows’ Control Panel.
© Copyright 2003 RSJ Software GmbH
9
Copying files to CD
Copying files to CD
This chapter describes the usage of RSJ CD-Writer, demonstrated through
simple examples.
Introduction to the file system
After installation, the file system will be started automatically, so you do not need
to start any programs in order to use the file system.
Since the CD-Recorder receives its own drive letter, you can use the recorder
like any other drive. To simplify matters we have assumed the following drive
letters for our examples:
C: = hard disk, D: = CD-ROM, E: = CD-Recorder.
Note that the drive letters on your machine might be different.
Note:
The recorder’s drive letter can be changed using Windows NT’s Disk
Administrator or by our installation program.
Open “My Computer” to check which drive letter is used by the CD recorder.
Your recorder receives a special RSJ CD-R icon. If you do not see it, it might be
necessary to use the “Refresh” command in the “View” menu.
10
© Copyright 2003 RSJ Software GmbH
Copying files to CD
Writing to the CD
You can use any program that is capable of copying or creating files to copy data
to the CD recorder.
To copy a file using Windows’ Explorer, drag the file(s) with the mouse to the CD
recorder object.
As you can see, copying files to CDs using RSJ CD Writer is the same as
copying to hard disks.
© Copyright 2003 RSJ Software GmbH
11
Copying files to CD
Finalize the CD
After you have written the data to the CD you have to finalize the current session.
This ensures that all data in the cache is written to the medium and therefore
prevents data loss. Additionally, to make the CD readable for normal CD-ROM
drives, the session has to be written to the disk.
To finalize the current session, choose “Finalize CD” in the recorder’s context
menu:
12
© Copyright 2003 RSJ Software GmbH
Copying files to CD
The following dialog will appear:
Finalize current session
Closes the current session. Flushes the
cache and writes the table of contents
(TOC) and session information to the CD.
This task takes up approximately 16 – 20
MB of disk space and makes the CD
readable for normal CD-ROM drives.
Finalize session with write
protection
Same as above, but additionally write
protects the CD. To remove the write
protection, choose “Remove write protection” in the recorders context menu.
Temporary close without
finalizing session
Flushes the cache to the CD and writes the
TOC. Use this option if you want to eject the
CD without investing the 16 – 20 MB for
session information right now. Until you
finalize the session, the CD can be read
only by the recorder, not by normal CDROM drives.
Emergency eject
This option discards the cache and can be
used to eject the CD in case of errors. All
data written since the last finalization will be
lost.
© Copyright 2003 RSJ Software GmbH
13
Creating data-DVDs
Creating data-DVDs
Using RSJ CD Writer you can create data-DVDs but at the moment it is not
possible to create video- or audio-DVDs.
To create a data-DVD please use the filesystem and then finalize the DVD.
The supported DVD types are:
•
DVD-R
•
DVD+R
•
DVD-RW
•
DVD+RW
Information about the usage of DVD-RW and DVD+RW:
Before using a rewritable DVD you have to format it. Please do this selecting
“blank CD” in the context menu. This can take about half an hour.
The maximal filesize is 2 GB.
14
© Copyright 2003 RSJ Software GmbH
Creating Audio-CDs
Creating Audio-CDs
If you want to copy only specific tracks (titles) use CD-View. If you want to copy
the whole CD, RSJ CD Copy Wizard is the better solution.
Follow these steps to copy an Audio-CD using CD-View:
•
Insert a blank CD into the CD-Recorder
•
Start CD-View by choosing “RSJ CD-View” in the context menu of the target
drive (CD-Recorder)
•
Start a CD-View session for each source drive; the entry “RSJ CD-View” is
located in the context menu of any CD-Recorder and CD-ROM drive.
•
CD-View should show a blank window for the CD-Recorder (no tracks on the
CD)
•
CD-View’s status bar (at the bottom of the window) shows information about
the number of existing tracks, the MBs used by these tracks, and the CD’s
free space in minutes and MBs.
© Copyright 2003 RSJ Software GmbH
15
Creating Audio-CDs
•
Now select the tracks to be copied in the source session(s). You can also
use Window’s Explorer as a source to copy WAV or other audio files (MP3).
CD-View creates a single track for each file.
•
If you like to copy tracks from CD-ROM, start CD-View by choosing “RSJ
CD-View” in the context menu of the CD-ROM.
•
Using freedb you can receive the CDs’ titles if you want.
•
Drag the selected tracks or files to the target’s CD-View window
•
If you want to write WAV or MP3 files to CD, drag the files from the Explorer
window to the recorders CD-View window.
•
Repeat the previous two steps until all desired tracks (titles) appear in the
target CD-View in the desired order.
•
Verify the target’s recording speed; make sure it is not too fast for the source
device(s). If you copy audio tracks from a CD-ROM drive, note that some
CD-ROMs read audio data with single speed, no matter how fast they can
read data tracks.
•
If you like to avoid the gaps between the tracks please adjust the pause
times using the appropriate context menu commands and press the DAO
copy button when done.
•
For Track at Once mode, press the normal “Record” button in the target CDView’s tool bar.
•
After all tracks have been copied, you must finalize the session. To do so,
press the “Finalize” (CD symbol) button in the target CD-View’s tool bar.
For more information about when to use DAO or TAO mode, see “Notes about
DAO” below.
16
© Copyright 2003 RSJ Software GmbH
Creating Audio-CDs
Notes about DAO
DAO means Disk at Once and allows the creation of exact copies of audio CDs
that do not contain gaps between the tracks (Live CDs or Musical CDs).
Additionally, it allows you to manually adjust pause times.
•
DAO can be used for audio CDs only.
•
After a DAO CD is created, no additional tracks can be added. Therefore, you must collect all source tracks before you start the copy operation.
•
You have to copy the whole CD in one step.
•
If the tracks come from various sources, make sure each source device
is available during the copy operation (ie CDs cannot be changed).
•
If the DAO copy button does not appear, RSJ CD Writer does not support DAO mode for your recorder.
•
Besides this, the DAO copy procedure is the same as the former TAO
copy procedure (which is of course, still supported).
Pause times
For DAO copies, you can adjust a pause time before each track (except for the
first).
Please note:
•
Pause times are used only for DAO copies and are only displayed for
queued (not yet copied) tracks. They have to be adjusted before the
DAO copy operation is started.
•
The first track’s pause is always 2.
•
If a track’s source is located on a CD, the pause time displayed is added
to the actual pause time from the source CD. Use a zero pause time to
preserve the pause time of the source. If the source is a file (MP3 etc.), it
is the absolute pause time which is inserted before the track.
•
Edit a pause time by simply clicking it with your mouse or by using the
appropriate context menu command.
© Copyright 2003 RSJ Software GmbH
17
CD Writer File System Settings
CD Writer File System Settings
The RSJ CD-Writer file system is configured just like any other drive in Windows.
Click on the “Properties” command in the recorder’s context menu; this will open
its settings – dialog that was extended with a page called “CD Writer Settings”:
18
© Copyright 2003 RSJ Software GmbH
CD Writer File System Settings
The individual options are:
General
Speed
Use the arrow buttons to adjust the
recording speed (1x means
150K/sec, 2x means 300K/sec,...)
Cache-size
Size of the memory cache used by
the RSJ CD-Writer file system.
Usually, about 6MB is enough. If you
create CDs with lots of files or
directories, or if you copy at very
high speeds (6x and up), you should
use a larger cache size
Test mode
Check this button to verify if the
source device(s) delivers data fast
enough for the selected recording
speed. If this button is selected, the
recorder does not write to the
medium (but “pretends” to do so)
File system settings
Eject on close
Check this box to automatically eject
the medium after the session is
finalized. Kodak recorders need this
option.
Don’t lock drive
During the write process, the
recorder door must not be opened
since this might destroy the CD. If
this option is not checked, the drive
door is locked until the session is
closed. Otherwise the door can be
opened (i.e. by pressing the
recorder’s eject button) any time
during the write process. Be cautious
with this option.
© Copyright 2003 RSJ Software GmbH
19
CD Writer File System Settings
Automatic tray retraction
If this option is set, the recorder drive
door is automatically closed when
the recorder is accessed. The
command required for this feature
takes a couple of seconds to
complete (depending on the recorder
type); since the recorder is frequently
accessed (file dialogs, context
menus,...), this can be quite
annoying. In this case, leave this
setting turned off. (Please note that
some recorders do not support this
feature.)
Track Mode
Select desired track mode here
(See: “Technical details”)
ISO Level
Choose the desired ISO level (See:
“Track Modes”)
20
© Copyright 2003 RSJ Software GmbH
CD Copy Wizard
CD Copy Wizard
If you want to create a 1:1 copy of a CD, RSJ CD Copy Wizard offers the easiest
solution. This wizard creates copies of Audio-CDs, CD-ROM’s and Data-CDs.
Follow these steps to copy a CD using the CD Copy Wizard:
•
Start the CD Copy Wizard by choosing “RSJ CD Copy Wizard” in the start
menu.
•
Insert the source CD.
•
Select the desired source-drive.
© Copyright 2003 RSJ Software GmbH
21
CD Copy Wizard
•
If your CD-ROM-drive is not able to read Audio-CDs or if you don’t have a
CD-ROM-drive, you can use your CD-recorder as source and target drive.
The CD will be copied to a hard disk and then back to the recorder.
•
If you are using two drives insert the target CD.
•
Select target drive.
•
If you like to avoid the pauses between the tracks, please mark the DAO
option.
•
Then press “Next”.
•
Click on “Finish” to start the copy operation.
During the copy process, a dialog is displayed that shows the operation’s
progress.
22
© Copyright 2003 RSJ Software GmbH
CD-View
CD-View
The RSJ CD-Writer file system copies and processes data on a file basis. Since
there are different CD formats and only the CD-ROM format provides files, the
CD-View application was included in the CD-Writer product.
Introduction
CDs store data in tracks; each CD can hold up to 99 tracks. While CD-ROMs
usually contain only one track that contains all files (data), Audio CDs store each
title in a single track.
CD-View processes data on a track basis no matter what they contain. It copies
all kind of CDs in just a few steps.
However, CD View does not only work with CDs. You can use a hard disk to
emulate a CD recorder or copy supported multimedia file types to CD.
Note:
CD-View is an independent program and can not be used with the
file system at the same time. It works similar to the DOS-command
DISKCOPY and copies whole tracks irrespective of their content.
When you work with CD View, you usually use two instances of the program: one
for the source device and one for the target. The source can be either a CDROM
drive, hard disk directory or CD recorder, while the target must be either a
recorder or a hard disk directory.
Launching CD-View
There are three ways to start CD-View: Use the “RSJ CD-View” entry in the start
menu, the “RSJ CD-View” entry in the device’s context menu or the command
prompt (DOS window)
Start from the Start menu
To start CD-View from the Start menu choose “Start – Programs – RSJ CD
Writer for Windows NT – CD View CD-ROM”.
© Copyright 2003 RSJ Software GmbH
23
CD-View
Start from the context menu
Open “My Computer” on your desktop or Explorer, choose the desired drive,
open the context menu with the right mouse button and select “RSJ CD-View”.
Command line start for CD-ROM or CD-Recorder
In order to start CD-View for a CD-ROM drive or a CD-Recorder, the
corresponding drive letter must be entered on the command line.
Example:
cdview e:
This example will start CD-View and shows the track directory of the CD-ROM
inserted in drive E:
24
© Copyright 2003 RSJ Software GmbH
CD-View
Hard disks (temporary storage)
For temporary track storage CD-View can also work with hard disks. CD-View
simulates a CD recorder in hard disk sub folders and creates a single file for
each track called TRACKxx.TRK or TRACKxx.WAV (xx is the track number
from 01 - 99), respectively.
Notes:
The directory should not be altered with applications other than CDView.
Audio files are very large; expect a file size of about 10 MB for a minute of audio data in CD quality.
Data tracks are stored with the .TRK extension, while audio-tracks are stored
with the .WAV extension. If you have a sound card installed, audio-tracks can be
played back with a media player application.
Note:
Do not use the Windows Sound Recorder to play back CD-View’s
WAV files, since these files usually are very large. Sound Recorder
attempts to load the whole file into memory, which might cause the
system to hang. Use Media Player instead.
Example:
cdview c:\tracks
In this example CD-View will emulate a CD-Recorder in the directory c:\tracks
and will store each track in files called TRACKxx.TRK or TRACKxx.WAV,
respectively. Note that you must provide a full path including drive letter.
© Copyright 2003 RSJ Software GmbH
25
CD-View
CD-View Interface
The CD-View user interface consists of a tool bar, a track list of the CD and a
status bar.
Tool bar
The tool bar contains the following elements:
Play
Starts audio play back of the selected track. You need a sound card
to play back tracks from hard disks or CD-ROM drives or recorders.
However, most CD-ROM drives and recorders have a headphone
connector that can be used as well.
Pause / stop play back
Pauses or resumes play back.
Start recording
Starts the copy (record) process in TAO mode.
DAO
Starts the copy (record) process in DAO mode.
Finalize CD
After all tracks have been copied, finalize the session with this
button. Please note the information in chapter “Finalize CD”.
Eject
Opens the drive door.
Recording speed
Adjusts the current recording speed. (1x means 150K/sec, 2x
300k/sec,...). Make sure that the source drive delivers data fast
enough for the current speed setting.
Delete track
Deletes all selected tracks.
Rescan track directory
Reads the table of contents of the inserted CD (i.e. after the CD was
replaced). All entries of tracks that are prepared for copying will be
erased.
26
© Copyright 2003 RSJ Software GmbH
CD-View
CD View Options
Displays the CD View options dialog, where you can adjust audio
parameters and turn freedb support on or off.
Query freedb
Performs a freedb query about the currently insterted CD.
Print CD cover
Prints a cover and label for the current CD on the default printer.
Whether these buttons actually are enabled depends on the capabilities of the
device, the situation and the selection state of the tracks (i.e., the play back
button is disabled if a data or no track is selected).
Note:
There is also a context menu that appears if you click the right mouse
button within the track list.
Track list
The track list shows each track on the CD with its name, type (Audio, CD-ROM
or CD-XA) and the length in minutes and seconds and in Megabytes.
Above the track list the CD-title is displayed. If the CD has not yet been given a
title, it says “unknown CD”.
The icons on the left indicate the track type and its state. There are different
icons for video, audio and data tracks. The icons are shaded if the corresponding
track has not been copied yet.
The titles of each track can be edited by choosing the “Edit title” command in the
track’s context menu.
© Copyright 2003 RSJ Software GmbH
27
CD-View
Context menu
CD View’s context menu is displayed if you right click into the track list. It
contains all available commands.
Further information about the context menu and its option can be found in CD
View’s online help (hit F1) or above under “Toolbar”.
28
© Copyright 2003 RSJ Software GmbH
CD-View
Status bar
The status bar displays general information about the CD inserted as well as the
current status of the program.
Usually, the status line indicates the number of tracks, the space occupied by the
tracks and the free space on the CD.
Eventual error messages are displayed here as well.
Copy multimedia files into Audio-tracks
You can also copy various multimedia files to CD using CD View. To do so,
simply drag these files from an Explorer window to CD View.
WAV Files
CD-View can copy WAV files to CDs. These files must have the following format:
•
16-Bit
•
Stereo
•
44,1 KHz
•
uncompressed
The WAV-file format is quite versatile and supports many features, including
loops and compression. CD-View supports none of these additional features, so
WAV files that are to be copied by CD-View must be in raw format, just like the
ones created by, i.e., the Windows sound recorder.
Other file formats
If you have Windows Media Player Version 6 and up installed, you can copy any
multimedia file to CD that is supported by Windows Media Player. This includes
MP3 files and WAV files in other formats than the CD audio format.
Windows Media Player is available as part of Internet Explorer 5 or separately at
http://www.microsoft.com/windows/windowsmedia
© Copyright 2003 RSJ Software GmbH
29
CD-View
Copy tracks
In order to copy one ore more tracks, open a CD-View session for the target
device and one for each source device.
The tracks to be copied are selected and then dragged to the target’s CD-View
session using the left mouse button. The tracks will appear in the target window
with their original name and receive a shaded track icon, indicating that the
corresponding tracks have not yet been copied. The source column of the track
list shows from which device the track will be copied.
Note:
When tracks are dragged over the target CD-View, a gray line is
displayed indicating where the dragged track(s) would be inserted. If
this line is not displayed or the mouse pointer turns to a “no drop”
sign, you attempted to either drop the files on a CD-ROM or before
already copied tracks on a recorder. Once tracks are copied you cannot change their order anymore, nor can you place additional tracks
before or between them.
After dropping the tracks on the target CD-View, change their order by simply
picking them up and dropping them at the desired location.
Before pressing the “record” button, verify that the recording speed setting is not
too fast for the source device(s).
After starting the copy process, a window appears where the copy status is
displayed:
The window contains two progress indicators where the gap degree of the
reading buffer and the progress of the copying process are displayed.
30
© Copyright 2003 RSJ Software GmbH
CD-View
The read cache is needed to balance short-term reading delays and ensures a
minimum writing speed while copying tracks. The read cache should have the
following status:
Track type
Source Target
Full reading
buffer
Low reading buffer
Data-track
*
CD
Copying process must be
While writing
minimum speed is truncated if necessary
kept
Data-track
*
HD
Unimportant
Audio-track
HD
CD
Copying process must be
While writing
minimum speed is truncated if necessary
kept
Audio-Track
CD
HD
While reading minimum
Fixed disk too
speed is kept
slowly to store
Audio data
(applies to old CDROM only).
Possible errors in
Audio-files
Audio-Track
CD
CD
Audio data might
not be read with
the minimum
speed; the
copying process
does not have to
be truncated
necessarily
(applies to old CDROM only)
Unimportant
While reading, the
minimum speed is kept,
but it may happen that the
minimum speed cannot be
kept while writing and
therefore the copying
process must be truncated
As this table shows, copying Audio-tracks from CD to CD (e.g. CD-ROM to the
CD-Recorder) means the greatest risk: If both drives do not operate at the same
speed, either the reading or writing speed cannot be kept. If the minimum speed
while reading Audio-tracks cannot be observed, the copying process does not
have to be truncated, but the Audio-data may have defects in the form of jumps
or reruns. (This applies to old CD-ROM only)
Note:
The CD-Recorders have an additional buffer storage, which
sometimes is bigger than the reading buffer used by CD-View.
© Copyright 2003 RSJ Software GmbH
31
CD-View
In that case, the reading buffer will be emptied completely before
copying and may, depending on the speed of the source drive, be refilled very slowly or not at all. Usually, this only happens when copying
from CD-ROM drives to a CD-Recorder.
The copy process can always be aborted by pressing the “Abort copy” button”.
This button displays the following dialog:
If you choose “Immediate abort”, the copy progress is aborted immediately. The
current track on the target device will definitely be unusable.
The second option, “abort after current track is done”, ensures that the current
track is not damaged and copied in its entirety.
Finalize the CD
If you performed a TAO copy operation, you have to finalize the session after all
tracks have been written.
To do so, press the “Finalize CD” button (CD icon) in the target’s CD-View
session. This task may take a couple of minutes. However, to reduce finalizing
time, you can adjust the speed setting to its maximum value, since this task does
not depend on the source device.
Note: Although you can create mutlisession CDs with CD View, it does not
make much sense. CD audio players only recognize audio tracks located
in the first session. This also applies to data tracks copied from normal
data CDs; depending on the CDROM driver, only the files in the last or
first session will be recognized.
32
© Copyright 2003 RSJ Software GmbH
CD-View
Track size and required space
The size of a track is specified in two different units:
•
Play back time of the track
•
Length of the track in Megabytes
For Audio-tracks you may assume a size of approx. 10 MB per minute.
freedb support
freedb support in RSJ CD Writer allows you to
•
query CD data via Internet
•
query CD data from local database (only standard format; see below)
•
edit extended CD information to create your own submissions
•
submit updated or new CD data to freedb
freedb allows anyone to download the current database and install it locally. If
you want to do so, be sure to get in in “standard format”, usually distributed in
bzipped tar format.
To unpack this format, you will need both bzip2 and GNU tar (or a Linux
machine). The “alternate format” (intended for FAT file systems) is not supported
by this software.
© Copyright 2003 RSJ Software GmbH
33
CD-View
Performing freedb queries
Follow these steps to query title information for a CD:
•
Insert the CD into the drive
•
Start CD-View for this drive
If CD View does not know the CD, it will display a track list as shown here:
After a successful freedb query, the track list is updated with the title information
from freedb:
34
© Copyright 2003 RSJ Software GmbH
CD-View
CD View’s context menu contains additional freedb related commands:
Query CD titles via freedb
Performs a freedb query for the
currently inserted CD. This way, you
can access the freedb data base to
retrieve the CD title strings.
Submit new freedb entry
If your CD cannot be found in the
freedb data base, you can submit a
new entry using this command.
freedb options…
Displays a dialog where you can
change freedb specific options.
© Copyright 2003 RSJ Software GmbH
35
CD-View
freedb options
The freedb options dialog allows you to configure the way freedb is accessed.
CD View
The “CD View” page allows you to configure how freedb is accessed by CD
View:
The following options are available:
Automatically query performs a freedb query each time CD View rescans
the track directory
freedb data when
the CD is rescanned
36
© Copyright 2003 RSJ Software GmbH
CD-View
Auto queries use
local cache only
uses only data located in the local cache for queries
Server
The “Server” page allows you to configure a proxy server for freedb access.
Please ask your network administrator if and which proxy settings you need
© Copyright 2003 RSJ Software GmbH
37
CD-View
Submit
At the “Submit” page, please provide a user name and your e-mail address. The
e-mail address is needed for submissons only.
38
© Copyright 2003 RSJ Software GmbH
CD-View
Cache
Specify the hard disk directory that should be used for freedb data caching here.
The local cache is used to avoid duplicate internet queries for already known or
queried CDs.
The “Max size” field allows you to specify a maximum size that should be used
for caching. If you enter 0 here, the cache has no size limit.
The options of the cache usage have the following meaning:
first try local cache, then Internet
performs internet queries if the CD is
not found in the local cache
use Internet only
uses only Internet for queries
use local cache only
uses only data located in the local
cache for queries
© Copyright 2003 RSJ Software GmbH
39
CD-View
Printing CD booklets and labels
You can print CD booklets and labels from within CD View. While the
button
in CD View’s toolbar or the “Print CD cover immediately” command in the context
menu immediately print a cover without any questions asked, you can use the
“RSJ CD Cover Editor” command in the context menu if you want to change the
layout of the cover before you print it.
More information about cover printing can be found in the “RSJ CD Cover Print”
chapter.
40
© Copyright 2003 RSJ Software GmbH
RSJ CD Cover Print
RSJ CD Cover Print
RSJ CD Cover Print allows you to create booklets and labels for your CDs.
If you start RSJ CD Cover Print from within CD View, it will be initialized with the
title data of the currently inserted CD; otherwise, you’ll have to manually enter the
title strings.
User interface
CD Cover Print’s main window basically consists of a tabbed window that allows
you to switch between four different pages:
© Copyright 2003 RSJ Software GmbH
41
RSJ CD Cover Print
The CD title page is used to enter/edit the CD's title, artist and song titles. Of
course, you can also enter general CD information if you want to create a data
CD label.
The Front inlay, Back inlay and CD Label pages allow you to preview the result of
your work. If one of the preview pages is active, you can use the format window
to apply any of the format options to change the look of the label.
CD Cover Print toolbar
CD Cover Print’s toolbar contains the following commands:
CD View’s CDs
This dialog displays all CDs ever edited with CD-View. If you select a
CD in the upper list, its track titles are displayed in the field below.
Print
Prints the booklet and CD label without any questions asked using the
default printer
Show/hide format window
Shows or hides the format window
Save layout as default
Saves the current format options as new default values. The default
values will be active next time you start CD Cover Print. They are also
used by the immediate print function from within CD View
CD Label Position Wizard
This wizard will help you to determine the position of the CD labels
you are using
Help
Displays the online help
42
© Copyright 2003 RSJ Software GmbH
RSJ CD Cover Print
The format window
The format window allows you to adjust standard text attributes and the
background to use. It is accessible only if one of the preview panes is active. Use
button in the toolbar to toggle its visibility state.
the
You can save the current formatting options as default values at any time using
button in the toolbar. The default settings will be restored each time you
the
start CD Cover Print and will be used for the label print option from within CD
View.
© Copyright 2003 RSJ Software GmbH
43
RSJ CD Cover Print
CD Cover Print Options
Use the “Options” command in the View – menu to display the options dialog:
Do not print fold lines
across the cover
Fold lines will be printed only outside the cover
itself
Use window background image
Draw CD Cover Print windows with a background
image
Auto-adjust font point
size
Ensures that text will fit in its field by reducing the
font size if necessary
CD Cover Printout
Pressing the print button on the toolbar will print the booklet and CD label on the
default printer. If you use the “Print” command in the “File” menu, you can specify
a different printer and which parts of the cover you want to print.
If you print a CD label for the first time, you will be asked if you want to run the
CD Label Positioning Wizard. This is necessary to determine the label’s position
on the sheet you are using.
44
© Copyright 2003 RSJ Software GmbH
RSJ CD Cover Print
The CD Label Positioning Wizard
This wizard helps you to determine the label position on the label sheets.
It prints three “rulers” on one of your label sheets; these rulers cross the label
circles at certain points. All you have to do is to determine the values as
indicated by the rulers.
Example:
(The circles mark the CD labels as they are cut into the label sheet)
In this sample, we will determine the position of the left circle.
The following values will be entered:
left A-value (#1)
intersection of the left circle half with the A ruler; the
intersection of the right circle half is discarded
upper B-value (#2) intersection of upper circle half with the B ruler
lower B-value (#3) intersection of lower circle half with the B ruler
In this example we do not use any values from the C-ruler, since the left circle
does not hit it.
© Copyright 2003 RSJ Software GmbH
45
RSJ CD Cover Print
If the label circle intersects both rulers, you can enter all 4 values (two B-values
and two C-values).The Positioning Wizard will automatically choose the value
pair that is the best for the following calculation.
Notes:
•
If your label sheet contains two CD labels, please specify intersections of
one of the two only. The sheets are usually symmetric so you can use the
other label by turning the sheet by 180°
•
Please be as exact as you can when you enter the intersection values and
try to estimate comma values. This will produce in a much better result.
Using The Printout
The front page is folded once at the fold line, cut and then slid into the transparent CD cover lid.
The back page is folded twice, cut and then slid into the back part of the CD
cover. This requires you to remove the usually dark gray CD holder.
For instructions about how to use the CD label please consult the instructions
that came with the label sheets.
46
© Copyright 2003 RSJ Software GmbH
RSJ CD Boot
RSJ CD Boot
RSJ CD Boot allows you to create bootable CDs. Using a bootable CD you can
start an operating system from CD.
In order to make a CD bootable, the following conditions must be met:
•
The CD must not be created by RSJ CD View or RSJ CD Copy Wizard.
•
A boot image file is needed that must be located on the CD that you want to
make bootable. If you have such a file on another medium, RSJ CD Boot
can copy it to the target CD for you.
•
If you do not have a boot image file, RSJ CD Boot can create one for you by
copying a bootable disk (i.e. floppy disk) to a boot image file. Of course, the
disk’s size must not exceed the free space on the target CD.
Follow these steps to create bootable CDs:
•
Choose Start – Programs – RSJ CD Writer – CD Boot
•
Select the CD-R drive that contains the CD you want to make bootable and
press “OK”.
© Copyright 2003 RSJ Software GmbH
47
RSJ CD Boot
•
If you already have a boot image file enter its complete path and file name
in the “Boot image file name” field or use the “browse” button next to the
entry field to select it.
•
Select do not use a source device in the “Source device” field.
•
Press “OK”.
•
RSJ CD Boot will copy the file to the CD if necessary and make it bootable.
•
At the end of the copy process, please finalize the CD.
48
© Copyright 2003 RSJ Software GmbH
RSJ CD Boot
•
If you do not have a boot image file yet enter a name for the boot image
file in the first field; RSJ CD Boot will use this name to create a new file on
the target CD. If you enter an absolute path, it must point to the target CD.
•
Make sure the source disk is available (i.e. insert the floppy disk) and select
a drive in the “Source device” list.
•
Press “OK”.
•
RSJ CD Boot will copy the entire source disk to the boot image file on the
CD and make it bootable.
•
At the end of the copy process, please finalize the CD.
© Copyright 2003 RSJ Software GmbH
49
RSJ CD Boot
Notes:
•
If you specify a boot file name that does not point to the target CD, the file
must exist.
•
If the boot file name points to the target CD and the file does not exist, you
must specify a source device so RSJ CD Boot can create the file.
•
The source disk must not be greater than the available space on the target
CD; note that the physical size of the disk applies, not the space occupied by
files (i.e. if you use a 1.44MB floppy, you need approximately 1.4MB free
space on the target CD).
50
© Copyright 2003 RSJ Software GmbH
TRACKCPY.EXE
TRACKCPY.EXE
Using TRACKCPY.EXE you are able to copy tracks from the command line.
TRACKCPY.EXE offers a similar functionality as RSJ CD View.
Commands:
The following commands are supported:
help [command]
Shows explanations to the entered command. If no command is entered, a list of
all commands is shown.
dir <drive>
Shows the content of a drive.
Example: dir d:
This command shows the track directory of the CD in drive d:
speed <factor>
Sets the writing speed for all of the following write operations. The factor is
entered as a multiple of 150k/sec.
Example: speed 2
Sets the writing speed to 2x (=300 k/sec).
© Copyright 2003 RSJ Software GmbH
51
TRACKCPY.EXE
copy <source drive> <track number> <target drive>
copies the entered track.
Example: trackcpy –copy e: 1 d:
Copies the first track of the CD inserted in drive e: to the recorder (drive d:)
finalize <drive>
Finalizes the current session of a drive.
Example: finalize d:
eject <drive>
Ejects the medium from a drive.
Example: eject d:
blank <drive> <track number>
Deletes the specified track in the drive. Possible only for CD-RW recorders and
harddrives. If the specified track number is 0, all tracks get deleted.
Example: blank d: 0
Deletes all tracks of the CD inserted in drive d.
quit
Exit the program.
52
© Copyright 2003 RSJ Software GmbH
TRACKCPY.EXE
Further examples:
trackcpy –copy e: 1 d: -finalize d: -quit
Using this command the first track of the CD-ROM drive (e:) is copied to the CD
recorder. After that the session gets finalized and the program ends. Please note
the “quit” command at the end of the line; if omitted, Trackcpy.exe shows a
command prompt after finalizing the CD.
trackcpy –copy e: 1 d: -copy e: 2 d: -copy e: 3 d: finalize d: -quit
This command copies track one to three to the recorder and finalizes the
session.
Notes:
The purpose of TRACKCPY.EXE is the automation of track based copy
processes. In general, we recommend the use of CD-View in order to copy
tracks; if the same copy process should be executed repeatedly, trackcpy.exe
can be integrated into a Batch-Program.
To end trackcpy.exe you have to use the Quit command. That’s why every call of
trackcpy.exe should contain the parameter –quit. Otherwise the Batch-Program
is not finished.
If an error occurs during the execution of a command, the program ends in any
case and returns an error code (unequal 0).
© Copyright 2003 RSJ Software GmbH
53
Technical details
Technical details
This chapter describes the format of a CD. In fact, you do not need this
knowledge in order to use the RSJ CD-Writer file system. However, you will get a
deeper insight into the subject.
ISO9660
This standard of ISO (International Organization for Standardization) defines the
method which should be used for storing data on a CD. The CD-Writer file
system writes CDs using this standard, i.e. an operating system able to read
CDs according to ISO9660-standard can read CDs created with RSJ CD-Writer.
Format of a CD
An ordinary CD-ROM consists of a track directory (TOC) and one or more tracks.
T
O
C
Track #1
Track #2
Track #3
Track
#4
Track #5
The track directory actually does not contain names or positions of the files
stored on the CD, but the numbers and positions of the tracks (i.e.songs on
Audio-CDs). The directory of the files is stored in one of these tracks.
Track
Data on CDs is stored in tracks. Each CD can contain up to 99 tracks. On Audio
CDs, each title (song) is stored in a separate track.
Actual CD-Recorders have to write a single track at once, without any breaks.
So, if the input data stream is interrupted (even for a short time), the current
track will be corrupted. That’s why the CD-Writer file system collects as much
data as possible before it starts “burning” the CD. Additionally, the CD Writer file
system has to make sure that the files copied are stored in no more than 99
tracks.
54
© Copyright 2003 RSJ Software GmbH
Technical details
Therefore, the minimum cache size should not be less than 6144 kB (6 MB * 99
= 630 MB, a CDs capacity). Also, a file’s data must not be split into two different
tracks.
Multisession CDs
Since a storage area on a CD can only be written to once, a new table of
contents (TOC) has to be written for each new session.
T
O
C
1
Track #1
T
Track #2 O Track #3
C
2
Track #4
Track
#5
\___________________________/\_______________________________/
Session 1
Session 2
Each session has its own TOC. After closing a CD without finalizing the session
the new data cannot be accessed from normal CD-ROM drives, because the
new TOC was not written to the CD and the CD-ROM drive does not see the new
track(s ) (data).
The CD-Recorder, however, stores this information in an unused space in the
previous TOC and therefore can access the new data.
Note:
A session occupies approx. 12-20MB of space on the CD. So that’s
why a new session should only be closed if the CD should be accessible to normal CD-ROM drives.
© Copyright 2003 RSJ Software GmbH
55
Technical details
Track mode
A track consists of sectors that contain 3234 bytes. 2352 bytes per sector can
be used to store data, the rest is used for CD error correction.
Audio
Audio-tracks do not have any additional error correction. The entire sector is
occupied by digitized music. For music data no error correction is needed, since
data errors are not recognized by the listener.
Mode 1, Form 1
This is the original CD-ROM data format. 2048 of a sector’s bytes are used for
data; the rest is used for system information and error correction data.
This format can be read by all CD-ROM drives.
Mode 1, Form 2
This format lacks error correction data, so error correction is not provided. It
allows 2336 bytes per sector.
This format is used by some (older) Multimedia applications.
Mode 2, Form 1
Similar to Mode 1, Form 1, though 8 unused bytes out of the error correction field
are added to the system data at the beginning of the sectors. This format is used
by Kodak Photo-CDs.
The RSJ CD-Writer also uses this format to guarantee that non-standardconforming CD-ROM drives and drivers identify all sessions.
Mode 2, Form 2
Similar to Mode 1, Form 2. 2324 bytes of user data fit in one sector.
Note:
56
This format can only be read by recent Photo-CD-compatible drives (all
currently sold CD-ROM drives).
© Copyright 2003 RSJ Software GmbH
Technical details
XA, Photo-CD, Multisession
XA
XA was launched by several companies to enable the simultaneous reading of
image and sound data. This is achieved by storing data alternately. Because the
sector formats of image and sound data differ, the more flexible Mode 2, Form 1
resp. 2 is used.
Photo-CD
Besides the additional data for CDI devices, a Photo-CD consists of single files
that contain the image data. Generally, Photo-CDs differ from Writable-CDs only
through their imprint.
Format Mode 2, Form 1 is used, so Photo-CDs cannot be read by older CDROM drives.
Warning:
The RSJ CD-Writer file system accepts Photo-CDs as writable, but
sealed and therefore write-protected CDs. By choosing “Remove
write protection” in the recorders context menu this write protection
can be removed, but the CD might become unusable for CDIplayers. That’s why used Photo-CDs should not be written to with
RSJ CD-Writer. Another option to unseal the CD is the CDWTOOL
command.
Multisession
Multisession CDs became common with the arise of Photo-CDs: each Photo-CD
which is sent in a second time becomes a multisession CD.
Note:
CD-Writer creates Multisession-CDs as well. Some CD-ROM drives
are able to read the new Mode 2, Form 1 sector format, but not necessarily have to be able to read multisession CDs. These drives can
only access the first session of multisession CDs.
© Copyright 2003 RSJ Software GmbH
57
Technical details
Long file names
Long file name support is based on 2 different standards:
Rock Ridge Extensions
This standard is used to store long file names and Unix-attributes especially
within the Unix-area. The RSJ CD-Writer file system (currently) supports file
names up to approx. 160 characters. Generally, the file system writes predefined
UNIX file attributes to the CD, so existing attributes are not used.
Please note that in UNIX environments upper and lowercase characters in file
names are distinguished. When reading Unix-CDs with the RSJ CD-Writer file
system, it may happen that a file cannot be opened if another file in the same
directory has the same name, but different upper or lower case characters.
This standard is the basis of the RSJ CD-Writer file system and is used for
reading and writing.
Joliet
This is the “Windows”-standard for long file names on CDs. It allows up to 64
characters per file name.
Generally, both standards are written to the CD. If a writable CD that already has
been written to is reinserted, always the best possible standard is used to display
directory and file names.
If CDs are to be accessed under DOS, either the ISO-level in the recorder’s
settings dialog has to be set to “1” (8.3-names) or their must not be any file
names that violate the 8.3 file name convention.
58
© Copyright 2003 RSJ Software GmbH
Technical details
Burn-Proof
RSJ CD-Writer supports Burn-Proof. Recorders with that feature will automatically compensate buffer under-runs.
Buffer under-runs occur when a copy source cannot deliver data quickly enough
to the CD as it is recording. This is usually due to heavy system load or a souce
device that is simply not fast enough.
How can I activate the burn-proof feature?
There is no user option concerning the burn-proof feature.
The recorder’s driver checks if burn-proof is supported or not. If burn-proof is
supported, it is automatically activated.
Burn-proof and RSJ CD View or the RSJ CD Copy Wizard:
If the recorder supports burn-proof there will be no more buffer under-run errors.
Burn-proof and the filesystem:
Up to now if there was a buffer under-run the current track was finished and a
new track started when there was enough harddisk cache. Using a recorder
which does not support burn-proof this mechanism still exists.
Using a recorder which supports burn-proof, this mechanism is deactivated.
© Copyright 2003 RSJ Software GmbH
59
Tips and tricks
Tips and tricks
In this section we would like to provide answers and solutions to some known
problems. Please read this chapter before contacting your dealer or our
customer support.
Incorrect SCSI termination or wiring
Our customer support experience showed that many problems are caused by an
incorrect SCSI termination or installation. Please make absolutely sure that your
system is correctly configured and terminated. This especially applies to WIDE or
U2W SCSI adapters.
In the following section we provide a short and hopefully helpful guide concerning
correct termination and wiring.
Termination
A SCSI bus always has to be terminated at both ends. If there is both an external
and an internal wire, the internal cable has to be terminated at its end as well as
the external cable. To do this, activate the termination on the last device or use a
special terminator.
Please also make sure that no device in the chain may be terminated. This
happens for example if the adapter is terminated and a device is attached to the
external slot connector.
If you use a WIDE adapter that has its wide (16 bit) bus connected to a narrow (8
bit) external port you have to make sure that the high order byte of the bus is
properly terminated. This can be achieved using the adapter’s setup program or,
with onboard SCSI adapters, by a special slot adapter.
However, many onboard adapters come with a slot panel that does not provide
proper termination of the high order byte of the wide bus. These slots should not
be used.
Correct wiring
SCSI devices must be connected using a single wire as a „daisy chain“ without
any forks. With WIDE adapters providing three internal connectors you have to
observe that two of these connectors are connected to the same bus. Using
these two connectors at the same time results in a fork that is not allowed and
very likely to cause problems.
60
© Copyright 2003 RSJ Software GmbH
Tips and tricks
SCSI cable length
The maximum cable length differs depending on the interface type:
Number of
devices (incl.
Adapter)
SCSI-1
SCSI-2
Ultra(W)-SCSI U2W-SCSI
1 – 4 devises
6 meter
3 meter
3 meter
12 meters
5 – 7 devices
3 meter
3 meter
1 meter
12 meters
If both external and internal devices are used, the lengths of both cables have to
be added.
Please make sure that there is a minimum cable length of 30 cm (approx 7.5 “)
between each device.
If these explanations do not solve your problem, please ask your hardware
dealer or check the manual of your SCSI adapter.
If your recorder is not recognized by RSJ CD Writer
The RSJ CD Writer Installation program automatically detects any not-too-old
recorder. If your recorder is not recognized, please follow these steps:
-
make sure the recorder is detected by Windows. Under NT4, use the “SCSI
Adapters” control panel applet, under Windows 2000, use “Device Manager”
to verify this.
-
If the recorder is detected by Windows, open the CDDRV.INF file in the
Windows NT installation directory \systems32\drivers\ (make a backup copy
of the file first, because any update RSJ CD Writer will contain a new
CDDRV.INF) with a text editor.
-
After installation, open the CDDRV.INF file in the Windows NT installation
directory \systems32\drivers\ (make a backup copy of the file first, because
any update RSJ CD Writer will contain a new CDDRV.INF) with a text editor.
-
Copy the line of the compatible recorder to the bottom of the file.
-
Modify the first four columns of the new line so they match your recorder.
-
Move the ID string of the compatible recorder to the compatible ID column.
© Copyright 2003 RSJ Software GmbH
61
Tips and tricks
-
Make a backup copy because the installer rewrites the file on the next
update.
-
Start the RSJ CD Writer Installation program using the “Installation”
command in the RSJ CD Writer Start Menu folder.
-
Click “Next” until you see the recorder list. If your recorder is listed, click
“Next” another time and “Finish” to restart your computer. If your recorder is
not listed, contact RSJ Costumer support.
62
© Copyright 2003 RSJ Software GmbH
Error solutions
Error solutions
This chapter will assist you in correcting problems which may arise using the CDWriter file system.
RSJ CD Writer Error Log
All CD-Recorder errors are recorded by the program “CDWPOPUP” and
dumped onto the screen. This information is essential if you contact customer
support, so the program should not be terminated. CDWPOPUP includes also an
integrated Devicetree functionality which can be useful for support.
Note:
A defective CD should not be inserted into the CD-Recorder; already
closed sessions can be read by CD-ROM drives anyway.
RSJ CD Writer Error Log only reports errors returned by the CD recorder. File
system errors are returned and processed with standard Windows error codes. If
you have any problem with RSJ CD-Writer, please send the output of RSJ CD
Writer Error Log to [email protected]
To send the error log please do the following:
•
Click (right mouse button) on the CD symbol in the task bar.
•
Select ‘Show’
© Copyright 2003 RSJ Software GmbH
63
Error solutions
•
Press ‘Save log as Text’. This will generate a file called cdwpopup.txt.
•
Send the file cdwpopup.txt to [email protected]
Table of errors
The following table contains the most important errors that might be reported by
RSJ CD Writer Error Log.
Sense Key
Adl. Sense Key
Cause/Correction
Illegal Request Invalid Block Address
The CD and the file system do
have a different status. Release
CD with “Emergency eject”
command. The reason could be a
buffer underrun. Please reduce
the writing speed.
Medium Error
Unable to read PMA,
TOC or sub code
The CD is either damaged or dirty.
If cleaning does not solve the
problem the CD must be replaced.
Medium Error
Absorption Control
Error
The track could not be written
correctly. In general, this error
arises after the CD was removed
improperly and replaced by
another CD. A system reboot
without closing the CD might
cause this error, too.
The CD is defective and must be
replaced.
Hardware
Error
64
*
The CD-Recorder has located an
internal error. Remove the CD
with “emergency eject”, switch off
and reactivate the recorder and try
again. If the error persists, the
Recorder needs service.
© Copyright 2003 RSJ Software GmbH
Error solutions
Sense Key
Unit Attention
Adl. Sense Key
*
© Copyright 2003 RSJ Software GmbH
Cause/Correction
The CD was manually replaced
(drive door not locked) or the
external recorder was turned off
and back on by accident.
To avoid loss of data, use the
“Emergency eject” command.
65
Error solutions
Other errors
The following table contains a list of errors which cannot be assigned to a special
command. Especially an incorrect configuration may cause these errors.
Errors
CD with write
protection
Drive cannot be
accessed
Cause/Correction
•
CD-ROM is inserted. Only writable CDs can be
written to. You may recognize writable CDs by
their golden (sometimes greenish gleaming)
color.
•
There are too many tracks on the CD. This can
be checked with the “Check CD” command.
•
The CD is full.
•
The CD was released with the “Close with write
protection” command.
•
The drive is not ready (no CD, switched off,
bad connection).
•
Drive was turned off or not connected during
system boot.
•
The drive is defective.
Please send the INSTALL.LOG to [email protected]
CD cannot be finalized An error occured during the write process. If
closing the CD does not work even after a second
try, the CD must be released using the “Emergency
eject” command. The CD might be unusable.
Perhaps there is a
memory fault
66
Usually a memory fault is not recognized at all (no
Parity Bit) or signaled through a complete system
crash. If you are not absolutely sure that the
installed memory is o.k., set the memory access
speed in the BIOS setup to its minimum value and
try again. If it seems ok now, the memory in your
system is either of poor quality or defect. Disabling
nd
the 2 level cache in the BIOS setup might be
helpful for testing, too.
© Copyright 2003 RSJ Software GmbH
Error solutions
FAQ’s
After changing the cache size, the writing process is aborted with an error
message
The maximum cache size mainly depends on the memory (RAM) installed. If the
Cache size exceeds free memory, space must be made available by swapping
other programs and data to the hard disk. This reduces CD-Writers performance
and reliability. If the cache size is way too large, the memory cannot be made
available at all and the writing process will be aborted with an error message.
Self-written CDs cannot be read by some CD-ROM drives
Unfortunately, there is no general solution. The CD-ROM drives have to be able
to recognize multiple sessions and read CD-XA-tracks. Some of the drives
available today are not able to read CD-RW’s. A reason therefore is that they
have other optical features as CD-R’s or CD-ROM’s. In such a case, please try
to use CD-R’s instead of CD-RW’s.
Sometimes certain CD recorder and CD-ROM drive combinations cause
problems. For example, a NEC 6-speed CD-ROM drive CDR502 cannot read
CDs written with Yamaha’s CDR100E. There still are combinations which cause
problems – in these cases, “try and error” is the only help. In rare cases CDROM drives cannot cope with more than approx. 80 tracks; then raise the cache
size to reduce the number of tracks.
Sometimes my CD-ROM drive cannot identify all sessions. But it should be
multi-session capable (at least according to producer’s specification)
Although there is no limit for the maximum number of sessions on a CD, it
seems that more than 10 sessions might not be managed by some CD-ROM
drives. In that case the only solution is to copy the CD from the Recorder to a
hard disk and then back to a new CD (with one single session)
How do I erase a CD-RW?
Erase the CD-RW by opening the context menu of the drive and choosing Blank
CD. Please note that you can only delete the whole CD-RW.
My CD is not copied at the speed I expected.
Most of CD-RW’s are copied with 2x speed. Some can be copied with a higher
speed. Here it depends on the medium. If you write to a CD-R, you can choose
the speed. The software checks the speed and reduces it, if it thinks it’s
necessary.
© Copyright 2003 RSJ Software GmbH
67
Error solutions
The Audio CD I copied does not contain audio, but tracks.
RSJ CD Writer uses the Windows CD-ROM driver to read from the CD-ROM
drive. This driver sometimes is not able to read audio data in a digital mode (but
may be able to play Audio). In this case copy the tracks from the CD-Writer to
the harddisk and then from the harddisk to the CD-Writer.
How do I finalize a data CD from the command line?
Finalize the session with
CDWTOOL E: -S
How can I create a CD from an ISO Image?
Simply drag the ISO file to the recorder’s CD View window and start recording.
This procedure is the same as with WAV and other audio files.
68
© Copyright 2003 RSJ Software GmbH
System requirements
System requirements
This chapter lists the hard- and software requirements for RSJ CD-Writer.
Hardware
The following hardware requirements must be met:
•
PC with Pentium CPU or better
•
64 MB RAM
•
SCSI host adapter with Windows NT/2000/XP driver support (e.g. Adaptec,
Future Domain or NCR) or ATAPI adapter with Windows NT/2000/XP driver
support
•
supported CD-Recorder
Our website http://www.rsj.de shows a list of supported CD recorders.
If your recorder is not in the list of supported drives, the installation program trys
to detect it automatically because RSJ CD Writer does support automatic
detection of MMC and ATAPI compatible drives.
Software
The following software requirements must be met:
•
Windows NT 4.00 (SP 3) or better or Windows 2000 or Windows XP
•
SCSI/IDE host adapter driver support
•
Internet connection for freedb access
•
Microsoft Windows Media Player Version 6.x or higher for MP3 support
(http://www.microsoft.com)
•
does not run with Windows 95/98
© Copyright 2003 RSJ Software GmbH
69
System requirements
CD-ROM
Generally, CDs created by the RSJ CD-Writer file system can be read by all
current CD-ROM drives.
The following restrictions apply:
•
Verify that the driver software used supports multiple sessions (e.g.
MSCDEX.EXE) if you want to read multi session CDs
•
For reading of CD-RWs a CD-RW capable CD-ROM drive is required.
70
© Copyright 2003 RSJ Software GmbH
Appendix
Appendix
The appendix contains general information and specifications concerning
restrictions.
Restrictions
In the current version the following restrictions apply:
•
Only one file may be open for write access at a time.
Mastering
The RSJ CD-Writer file system was not designed for mass production of CDs.
Application examples are, among other things, filing of data, production of
application specific CDs, the use of CDs as transfer medium (e.g. DTP) and the
production of prototypes.
If you want to create a master CD, we recommend to point out to the CDproducer that a new CD should be created that contains all data in one single
track. Otherwise the photo CD-similar format of the CD-Writer CDs might cause
problems creating or using the glass master (several tracks, more than one
session, etc...).
© Copyright 2003 RSJ Software GmbH
71
Conditions of use
Conditions of use
1) The product contains data processing programs and their documentation.
We would like to point out that at the current state of technology it is not
possible to develop data processing programs which work totally free of
errors in all environments (especially if they work with other programs).
2) Object of this contract is, however, a data processing program which is
fundamentally useful as an application. The responsibility for choice, installation and use as well as the results intended exclusively bears the purchaser.
3) The program may be used with or in connection with only one single
machine. If the programs are altered or connected with other programs, they
may also be used only on one machine.
4) The delivered, altered or linked programs may be copied in machinereadable or printed style if the copy serves as a backup or to alter the program. 3 also applies to copies.
5) The program contains a Copyright note. This note must be adopted in every
single copy, every altered version and every part of the program which is
connected with another program.
6) Other usage of the product is not allowed.
7) If you export the program, the export regulations of the Federal Republic of
Germany must be observed.
8) The purchaser may assign his license to a third party in the extent and
restrictions of the above mentioned regulations. With the assignment the
person assigning loses all rights of use for the original, all copies, altered
versions and connections.
72
© Copyright 2003 RSJ Software GmbH
Glossary
Glossary
Burn-Proof
Recorders with the burn-proof
feature will automatically compensate buffer under-runs.
Cache
The cache is a buffer memory.
CD-Copy-Wizard
Copies entire CDs in just a few
steps.
Cover Editor
Creates and prints CD covers for
your CD.
CD-View
CD-View processes data on a track
basis no matter what they contain. It
copies all kind of CDs in just a few
steps.
CDWPOPUP
All CD-Recorder errors are recorded
by the program “CDWPOPUP” and
dumped onto the screen.
DAO
Using Disk At Once you can avoid
the gaps between tracks.
freedb
freedb is an online CD data base
that RSJ CD-Writer accesses to
retrieve CD and track title information.
ISO9660
This standard defines the method
which should be used for storing
data on a CD.
Joliet
This is the “Windows”-standard for
long file names on CDs. It allows up
to 64 characters per file name.
MP3
MP3 is a compressed form of audio
data.
Postgap
Distance between the end of the
song and the end of the track.
© Copyright 2003 RSJ Software GmbH
73
Glossary
Pregap
Distance between the beginning of
the track and the beginning of the
song.
Read Cache
The read cache is needed to
balance short-term reading delays
and ensures a minimum writing
speed while copying tracks.
Rock Ridge Extensions
This standard is used to store long
file names and Unix-attributes
especially within the Unix-area.
Status Bar
The status bar displays general
information about the CD inserted
as well as the current status of the
program.
Track
Data on CDs is stored in tracks.
Track Size
The size of a track describes the
play back time of the track and the
length of the track in megabytes.
.TRK
Data tracks are stored with the .TRK
extension
.WAV
Audio tracks are stored with the
.WAV extension
Windows Media Player
A microsoft program to play
multimeda files. You can download it
from http://www.microsoft.com
74
© Copyright 2003 RSJ Software GmbH
Index
Index
Audio .......................................57
Audio parameters.....................27
Booklets and labels ..................41
Burn-Proof................................60
CD Label Positioning Wizard ...46
CD-View15, 23, 24, 25, 26, 29, 33
CDWPOPUP ............................64
context menu ...........................15
Context menu .........................24
Copy Audio-CDs.....................15
Copy Wizard ............................21
Copying process ................31, 33
Cover Print ...............................42
DAO ...................................16, 17
delete track ..............................26
drive letter ..................................3
DVD..........................................14
Eject ...................................26, 43
Finalize.....................................12
Finalize CD...............................33
finalize session.........................43
Finalize session........................26
freedb.......................................34
freedb options ..........................37
freedb queries ..........................35
freedb support............................7
Glass master............................71
ISO9660 ...................................55
Joliet........................................59
Long file names......................59
Mastering ................................71
© Copyright 2003 RSJ Software GmbH
Mode 1 .................................... 57
Mode 2 .................................... 57
Multisession ..................... 56, 58
Pause....................................... 26
Pause times ............................. 17
Photo-CD ................................ 58
Play back ................................. 26
Play Track ................................ 43
Record ..................................... 43
Recording................................. 26
Recording key.......................... 16
recording speed ....................... 26
Rescan track directory ............. 26
resume..................................... 26
Rock Ridge Extensions......... 59
RSJ CD Boot............................ 48
SCSI termination...................... 61
Speed..................... 26, 30, 31, 33
Status bar................................. 29
Stop.................................... 26, 43
Support of a new recorder ....... 62
System requirements ............ 69
Table of errors........................ 65
Toolbar..................................... 43
Track15, 16, 25, 26, 27, 29, 30, 31,
34, 43, 55, 56, 66, 67, 71, 74
Track list ................................. 27
Track mode............................. 57
Uninstallation ............................. 9
XA ............................................ 58
75