1
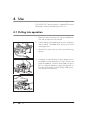
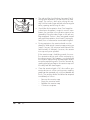
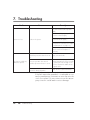
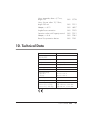
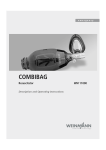
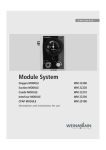
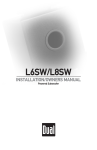
MANUVAC
Suction Pump
Description and instructions for use
Contents
1. Overview . . . . . . . . . . . . . . . . . . . . . . . . . . . . . . .3
1.1 Special symbols on the device . . . . . . . . . . . . 4
2. Description . . . . . . . . . . . . . . . . . . . . . . . . . . . . .5
2.1 Purpose . . . . . . . . . . . . . . . . . . . . . . . . . . . 5
2.2 Function . . . . . . . . . . . . . . . . . . . . . . . . . . 5
3. Safety Instructions . . . . . . . . . . . . . . . . . . . . . . . .6
4. Use
4.1
4.2
4.3
. . . . . . . . . . . . . . . . . . . . . . . . . . . . . . . . . . .8
Putting into operation . . . . . . . . . . . . . . . . . . 8
Aspiration . . . . . . . . . . . . . . . . . . . . . . . . . 9
After aspiration . . . . . . . . . . . . . . . . . . . . . 11
5. Hygienic preparation . . . . . . . . . . . . . . . . . . . . .12
6. Functional check . . . . . . . . . . . . . . . . . . . . . . . .13
7. Troubleshooting . . . . . . . . . . . . . . . . . . . . . . . . .14
8. Maintenance . . . . . . . . . . . . . . . . . . . . . . . . . . .15
8.1 Intervals . . . . . . . . . . . . . . . . . . . . . . . . . . 15
8.2 Disposal . . . . . . . . . . . . . . . . . . . . . . . . . 15
9. Product and accessories . . . . . . . . . . . . . . . . . . .16
9.1 Standard product . . . . . . . . . . . . . . . . . . . 16
9.2 Accessories . . . . . . . . . . . . . . . . . . . . . . . 16
9.3 Spare parts . . . . . . . . . . . . . . . . . . . . . . . 16
10. Technical Data . . . . . . . . . . . . . . . . . . . . . . . . . .17
11. Warranty . . . . . . . . . . . . . . . . . . . . . . . . . . . . . .18
12. Declaration of Conformity . . . . . . . . . . . . . . . . . .19
2
EN
1. Overview
10 Grip bar
9 Housing groove for suction hose
8 Discharge valve
7 Pedal
6 Suction valve
5 Holding clip for secretion bottle
4 Connecting hose
3 Angled hose
connection
2 Secretion cap with overflow
protection and vent flap
1 Secretion bottle
11 Suction pump
12 Retaining
clip
18 Vent flap
17 Adapter n.d.10
16 Thick suction hose
(length 280 mm,
2nd stage)
13 Fine suction hose (length
1020 mm, 1st stage)
14 Adapter n.d.6
15 Secretion socket with
fingertip control
Overview EN
3
1.1 Special symbols on the device
1
No.
Symbol
Meaning
MANUVAC device information plate
SN
Serial number of device
Year of manufacture
1
CE marking
4
EN
Overview
2. Description
2.1 Purpose
The MANUVAC aspirator is a vacuum pump, independent of an energy source, which can be operated
manually or with the foot or knee.
The MANUVAC aspirator is a vacuum device for use
outdoors, used in medical technology, especially
emergency medicine, to aspirate significant accumulations of blood, mucus, saliva etc. as well as viscous
and solid food particles. This prevents airways becoming blocked and eliminates the risk of these substances being aspirated into the lungs.
In addition, the MANUVAC vacuum pump can be
used to evacuate vacuum mattresses.
MANUVAC is not intended to be used for bronchial
aspiration.
2.2 Function
Rhythmic depression of the pedal creates a negative
pressure via a diaphragm, which sucks the material
from the patient’s oral-/pharyngeal cavity through the
2-stage suction hose into the secretion bottle. The 1st
stage of the hose system is used to aspirate blood, secretions, mucus etc., the 2nd stage for effective aspiration of viscous and solid food particles. The two
suction hoses will bridge a distance of 1300 mm between the patient and the device.
Description EN
5
The secretion bottle is portable, i.e. it can be removed
from the pump if required. This means that when aspirating directly via the thick suction hose, the distance
to the patient may be up to approx. 950 mm.
The secretion cap on the secretion bottle is equipped
with an overflow protection device to prevent the contents from overflowing into the vacuum pump.
The pedal automatically returns to the starting position
via a spring.
3. Safety Instructions
For your and your patient's safety as well as in accordance with offi cial Safety Regulations (Directive
93/42 EEC) we may point out the following:
6
EN
Safety Instructions
•
Read these operating instructions carefully. They
belong to the appliance and must be kept available at all times.
•
Any use of the appliance is subject to detailed
knowledge and consideration of these Operating
Instructions.
•
MANUVAC must be used for the designated purpose only (see "2.1 Purpose" on page 5).
•
Observe the section “5. Hygienic preparation” on
page 12 to avoid infection or bacterial contamination.
•
If third-party items are used, functional failures may
occur and fitness for use may be restricted. Biocompatibility requirements may also not be met.
Please note that in such cases, any claim under
warranty and liability will be voided if neither the
accessories nor genuine replacement parts recommended in the instructions for use are used.
•
MANUVAC may only be used by trained staff instructed in aspiration techniques. Incorrect use can
cause serious bodily harm.
•
During the aspiration process, take particular care
not to cause injuries to the patient’s mouth or
throat, e.g. to mucous membrane.
The suction can be interrupted by briefly opening
the fingertip, for example if the nozzle becomes
firmly attached to the skin.
Important!
•
Dispose of fluids such as blood and secretions,
together with any parts contaminated by them, in
accordance with national hygiene guidelines.
Safety Instructions EN
7
4. Use
The MANUVAC vacuum pump is supplied fully assembled and is quickly and easily put into use.
4.1 Putting into operation
1. Place the vacuum pump on a strong, steady base.
The red vent flap must be closed.
2. Gently depress the pedal and push the retaining
clip outwards. The pedal then springs up into the
starting position.
3. Lift the thick suction hose out of the curved housing
groove.
4. Aspiration is carried out by rhythmic depression of
the pedal with the hand,foot or knee. Always operate the pedal as smoothly and steadily as possible. For manual operation, grasp the grip bar on
the front of the pump with the fingers and pump
with the ball of the thumb.
8
EN
Use
4.2 Aspiration
During the aspiration process, take care not to cause
any injury to the patient’s mouth and throat region, and
especially to mucous membrane.
•
For tracheal and nasopharyngeal aspiration, aspiration catheters of various sizes can be fitted to the
suction hose via the conical adapter on the secretion socket.
•
The fingertip on the secretion socket can be
opened to interrupt suction briefly, e.g. if the
nozzle is clinging to the skin.
You can leave the fingertip open all the time and
keep your thumb over it. To release the suction all
you have to do is lift your thumb.
•
For effective aspiration of viscous and solid food
particles, simply insert the thick suction hose (2nd
stage) directly into the patient’s oral-/pharyngeal
cavity, removing the fine suction hose (1st stage)
with the adapter from the thick suction hose (2nd
stage).
•
To bridge a distance between the MANUVAC
vacuum pump and the patient via the thick suction
hose (2nd stage), the secretion bottle can be removed from the clip. The connecting hose does
not affect the suction capacity.
Use EN
9
•
The red vent flap should always be open (Fig.8)
during direct aspiration with the thick hose (2nd
stage). The suction is built up by closing the vent
duct with the index finger and can also be regulated by opening and closing this duct.
•
Should the thick aspiration hose (2nd stage) be
sucked onto the patient’s tongue or mucous membranes, the vent duct in the secretion cap must be
opened by lifting the index finger or the red vent
flap reopened. Suction is then interrupted immediately and the aspiration hose freed. Pumping by
hand, foot or knee can be continued throughout.
•
During aspiration, the secretion bottle must be
placed or held upright (secretion cap pointing upward). If nessary, the secretion bottle can also be
held vertically or obliquely, however, the secretation cap must point upwards.
If the secretion cap is held downwards, the overflow protection device seals off the connection to
the vacuum pump. If this happens, you should hold
the secretion cap pointing upwards again and interrupt the aspiration process for a few seconds by
opening the red vent flap on the secretion cap until
the safety ball falls back again.
•
Once the secretion bottle is full, the overflow protection device cuts off the suction process and the
pedal can be operated only with considerable difficulty. The secretion bottle should then be emptied
immediately as follows:
–
–
–
–
10
EN
Use
Remove the secretion cap
Empty the secretion bottle
Replace the secretion cap
Continue to aspirate.
4.3 After aspiration
1. After completing the aspiration, empty the secretion bottle and rinse it, together with the secretion
cap and the suction hoses with clear water on the
spot.
2. Then replace the secretion cap so that the triangular mark points to the upper middle line of the secretion bottle, then fit the hoses together.
Important
Unless absolutely unavoidable, the vacuum pump
should never be transported with a full secretion bottle,
since the aspirated liquid could run out.
3. Tightly wind the connecting hose in the direction
of the arrow around the bottom of the secretion
bottle and return the bottle to the holding clip.
4. Place the thick suction hose in the housing groove,
depress the pedal and secure it with the retaining
clip.
Use EN
11
5. Hygienic preparation
This product contains disposable items. Disposable items
are intended to be used only once. So use these items
only once and do not reprocess them. Reprocessing
disposable items may impair the functionality and safety of the product and lead to unforeseeable reactions
as a result of ageing, embrittlement, wear, thermal
load, the effects of chemical processes, etc.
After every aspiration process, hygienic preparation of
the MANUVAC aspiration pump and the accessories
used is essential. We recommend immediate cleaning
with clear water (on the spot if possible). Wiping with
disinfectant is sufficient for the external surfaces.
Observe the instructions regarding use of disinfectant.
For immersion disinfection we recommend
GIGASEPT FF and TERRALIN® for wipe disinfection.
You are recommended to wear suitable gloves (e.g.
household or disposable gloves) during disinfection
procedures.
Make sure you perform a functional check after every
hygienic preparation (see "6. Functional check" on
page 13).
If, despite the overflow protection device, secretions,
blood, mucus or the like should pass into the interior of
the pump (the inside of the connecting hose will show
signs of contamination), it is necessary to clean the interior – the pump chamber – with a commercial disinfectant solution (GIGASEPT FF) as follows:
1. Remove the connecting hose with angled hose
connection from the secretion cap and suspend it
in a disinfectant solution.
2. Operate the pedal until the disinfectant solution
emerges from the discharge valve.
12
EN
Hygienic preparation
3. Take the hose out of the disinfectant solution, hold
the vacuum pump high and again operate the
pedal until all the disinfectant solution is forced out
of the pump. In case of serious contamination, we
recommend a precleaning with clear water. Procedure is the same as for rinsing with disinfectant
solution. The pump does not need to be dismantled for this cleaning operation.
Important
The time of exposure to the disinfectant solution must
be adhered to. Unsufficient disinfection can lead to
danger of infection.
The two-part hose system with adapters, the secretion
cap and the secretion bottle can also be cleaned in a
disinfectant solution. All parts must be rinsed thoroughly with clear water and dried sufficiently after every disinfection. The secretion bottle can be autoclaved at up
to 121°C/250°F.
6. Functional check
To guarantee satisfactory operation of the MANUVAC
vacuum pump, the function must be checked every
time the pump is disinfected and sterilised.
Procedure:
•
Ensure that the hose connections are tight.
•
Check that the hoses and rubber parts are in good
condition. Porous and brittle parts must be replaced.
•
Check the aspiration by periodically operating the
pedal and simultaneously opening and closing the
suction opening of the secretion socket with the
thumb.
Functional check EN
13
7. Troubleshooting
Fault
Cause
Remedy
Check that aspiration line, connecting
line and secretion bottle cap all fit
tightly.
Check that the fingertip cap of the
secretion socket fits tightly.
Suction too low.
Leaks in the System.
Check that the red vent flap of the
secretion bottle fits tightly.
Check the disk diaphragm for cracks
and replace if necessary (see chapter
“8. Maintenance” on page 15).
Check the hose system and rubber
parts for cracks and replace if
necessary.
No suction, pedal very
difficult to operate.
Secretion bottle full.
Overflow protection device has cut
in.
Empty secretion bottle.
Incorrect operation has caused
overflow protection device to cut in.
Hold secretion bottle upwards.
Interrupt aspira-tion for a few seconds
by opening the red vent flap on the
secretion cap until the ball float has
dropped down.
Hose system has been blocked with
secretions during aspiration.
Clean the hose system with water.
If the fault cannot be remedied, it is advisable to contact the manufacturer Weinmann or return the set to the
works for overhaul. Do not continue to use the vacuum
pump since this could lead to serious damage.
14
EN
Troubleshooting
8. Maintenance
8.1 Intervals
The MANUVAC vacuum pump requires no maintenance other than observation of the cleaning and function instructions. However, the disk diaphragm should
be examined every 2 years.
Procedure:
•
Unscrew the four support feet and remove the
base plate, so that the disk diaphragm can be
seen.
•
The disk diaphragm should be regarded as
functioning satisfactorily if no cracks or other defects can be seen. Should it be found to be defective, it can easily be changed by authorized
specialist staff.
•
Have servicing and repair work performed only by
the manufacturer, Weinmann, or qualified expert
staff.
8.2 Disposal
Do not dispose of the unit with domestic waste. To dispose of the unit properly, please contact a licensed,
certified electronic scrap disposal merchant. This address is available from your Environment Officer or
from your local authority. The unit packaging (cardboard box and inserts) can be disposed of as waste
paper.
Maintenance EN
15
9. Product and accessories
9.1 Standard product
MANUVAC vacuum pump
with secretion bottle, connecting hose
and suction hoses
WM 10800
9.2 Accessories
The following accessories are not part of the standard
product and must be ordered separately:
Aspiration catheter, sterile pack of 2 pcs.,
50 cm, Ø 2.0 mm, Ch.06
WM
5155
Aspiration catheter, sterile pack of 4 pcs.,
50 cm, Ø 3,3 mm, Ch.10
WM
5157
9.3 Spare parts
16
EN
Suction hose set for the MANUVAC
WM 15116
Secretion bottle
WM 10821
Secretion cap, complete
WM 10822
Secretion cap
WM 10823
Vent flap
WM 10825
Disk diaphragm
WM 10842
Hose, silicone, diam. 6/10 mm,
length 1020 mm
WM 10801
Product and accessories
Hose, steramide, diam. 4/7 mm,
length 740
WM
5776
Hose, silicone, diam.10/15mm,
length 280 mm
WM
2201
Adapter, n. d.10
WM
4627
Angled hose connection
WM
2252
Secretion socket with fingertip control
WM
2251
Adapter, n. d. 6
WM
2261
Return flow protection device
WM
2281
10. Technical Data
MANUVAC
Appliance class
93/42/EEC
I
Dimensions (WxHxD) in mm 205x105x175
Weight
approx. 1.4 kg
Suction volume
160 ml/stroke
Max. negative pressure
–700 mbar
Volume of secretion bottle
370 ml
Temperature range
– Operation
– Storage
–18 °C to +50 °C
–40 °C to +60 °C
Overflow protection device
ball float
Connecting hose
length 740 mm, 4 mm diam.
Suction hose, complete
– Suction hose,1st stage
– Suction hose, 2nd stage
length 1300 mm
length 1020 mm, 6 mm diam.
length 280 mm, 10 mm diam.
(Subject to changes in design and equipment)
Technical Data EN
17
11. Warranty
18
EN
Warranty
•
Weinmann offers a warranty that the product, when
used in accordance with requirements, will remain free
from defects for a period of two years from date of
purchase. For products whose durability is clearly indicated as less than two years, the warranty expires on the
expiration date indicated on the packaging or in the
user’s manual.
•
Claims against the warranty can be made only when
accompanied by the sales receipt, which must show
salesperson and date of purchase.
•
We offer no warranty in the case of:
– Disregard of usage instructions
– Operating errors
– Improper use or improper handling
– Third-party intervention by non-authorized persons for
the purpose of device repair
– Acts of God, e.g., lightning strikes, etc.
– Transport damage as a result of improper packaging
of returned items
– Lack of maintenance
– Operational and normal wear and tear, which includes, for example, the following components.
– Filter
– Batteries / recheargable batteries
– Articles for one-time usage, etc.
– failure to use original spare parts.
•
Weinmann is not liable for consequential harm caused
by a defect if it is not based on intention or gross negligence. Weinmann is also not liable for minor physical
injury to life or limb resulting from negligence.
•
Weinmann reserves the right to decide whether to eliminate defects, to deliver a defect-free item or to reduce
the purchase price by a reasonable amount.
•
If Weinmann rejects a claim against the warranty, it assumes no expense for transport between customer and
manufacturer.
•
Implied warranty claims remain unaffected by these
changes.
12. Declaration of Conformity
Weinmann Geräte für Medizin GmbH + Co. KG declares herewith that the product complies fully with the
respective regulations of the Medical Device Directive
93/42/EEC. The unabridged text of the Declaration
of Conformity can be found on our website at
www.weinmann.de
Declaration of Conformity EN
19
Weinmann
Geräte für Medizin GmbH+Co. KG
P.O.Box 540268 • D-22502 Hamburg
Kronsaalsweg 40 • D-22525 Hamburg
T: +49-(0)40-5 47 02-0
F: +49-(0)40-5 47 02-461
E: [email protected]
www.weinmann.de
Weinmann
Geräte für Medizin GmbH+Co. KG
Siebenstücken 14
D-24558 Henstedt-Ulzburg
T: +49-(0)4193-88 91-0
F: +49-(0)4193-88 91-450
WM 16031h - 11.2010
Center for
Production, Logistics, Service