1
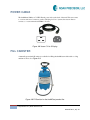
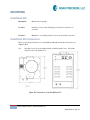
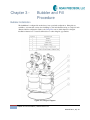
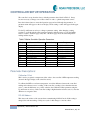
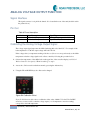
MOCVD
Temperature Control System
Model therMOstat 500
Manual Rev 1, July 14
A message to our customers:
Originally founded in 1985, our company has grown into a recognized leader in
providing temperature-control systems to the global semiconductor industry.
Today, Noah Precision, LLC is a privately held, employee owned and managed
company. We are guided in our belief that prosperity in this competitive industry
stems from providing customers with highly engineered new products and world
class customer service.
We know that great products are often the result of great customer feedback
and the application of innovative technology. We strive to create value for our
customers through a process that lets the customer influence our goals,
objectives, product developments and business practices.
We embrace personal accountability and accept responsibility for prudent risk
taking. We encourage personal values, which guide us to consistently meet the
commitments we make and we endeavor to treat those with whom we interact
with respect as we wish to be treated ourselves.
Sincerely,
Peter Adams, President
Noah Precision, LLC
Manual Rev 1, July 14
COPYRIGHT
This manual and the information contained herein is the proprietary property of Noah Precision,
LLC.
No part of this manual may be reproduced or copied without the express written permission of
Noah Precision, LLC. Any unauthorized use of this manual or its contents is strictly prohibited.
Copyright © 2004-2007 Noah Precision, LLC. All Rights Reserved.
DISCLAIMER AND LIMITATION OF LIABILITY
The information contained in this manual is subject to change by Noah Precision, LLC without
prior notice. Noah Precision, LLC makes no warranty of any kind whatsoever, either expressed or
implied, with respect to the information contained herein. Noah Precision, LLC shall not be liable
in damages, of whatever kind, as a result of the reliance on or use of the information contained
herein.
PRODUCT USAGE STATEMENT
DANGER:
Read this entire manual and all other publications pertaining to the work to be
performed before installing, operating, or maintaining this equipment. Practice all plant
and product safety instructions and precautions. Failure to follow instructions can
cause personal injury and/or property damage. If the equipment is used in a manner
not specified by the manufacturer, the protection provided by the equipment may be
impaired. All personnel who work with or who are exposed to this equipment must
take precautions to protect themselves against serious or possibly fatal bodily injury.
Noah Precision, LLC, provides information on its products and associated hazards,
but it assumes no responsibility for the after-sale operation of the equipment or the
safety practices of the owner or user. This equipment produces or uses potentially
lethal high-voltage, high-current, electrical power. NEVER DEFEAT INTERLOCKS OR
GROUNDS.
3
Components List | Noah Precision LLC
Manual Rev 1, July 14
TRADEMARKS & PATENTS
logo is a registered trademark of Noah Precision, LLC
Noah Precision ® is a registered trademark of Noah Precision, LLC
Point of Use™ is a trademark of Noah Precision, LLC
therMOstat 500 patent # 8,118,939
CUSTOMER FEEDBACK
Noah Precision’s technical writing staff has carefully developed this manual using research-based
document design principles. However, improvement is ongoing, and the writing staff welcomes
and appreciates customer feedback. Please send any comments on the content, organization, or
format of this user manual to
•
[email protected]
To order a manual, please contact Noah Precision (see “Customer Support Locations” on page 6-3
for contact information).
4
Components List | Noah Precision LLC
Manual Rev 1, July 14
Contents
Chapter 1 -
Components List ................................................................................................................... 9
thermostat 500 ......................................................................................................................................... 9
Power cable............................................................................................................................................... 9
Fill Canister.............................................................................................................................................. 10
Chapter 2 -
Facility Requirements.......................................................................................................... 11
General specifications ............................................................................................................................. 11
PCW (Process Cooling Water) ................................................................................................................. 11
Mounting................................................................................................................................................. 12
therMOstat 500................................................................................................................................... 12
therMOstat 500 Dimensions ............................................................................................................... 12
Chapter 3 -
Bubbler and Fill Procedure.................................................................................................. 13
Bubbler Installation ............................................................................................................................. 13
Bubbler Removal ................................................................................................................................. 14
Fill, Prime, and Drain Procedure ............................................................................................................. 15
Fill Procedure ...................................................................................................................................... 15
Pump Priming Procedure .................................................................................................................... 15
Drain Procedure .................................................................................................................................. 16
Chapter 4 -
Cable Connections............................................................................................................... 17
Chapter 5 -
Operation ............................................................................................................................ 18
Operational States .................................................................................................................................. 19
Idle mode ............................................................................................................................................ 19
Active mode ........................................................................................................................................ 19
Front Panel .............................................................................................................................................. 19
System Start-Up ...................................................................................................................................... 19
Step-by-step instructions for normal operation:...................................................................................... 19
Controller Setup/Operation .................................................................................................................... 20
Parameter Descriptions: ............................................................................................................ 20 & 21
Manual Tuning Procedure for the Controller ......................................................................................... 22
Setting DeviceNet Address and Baud Rate ............................................................................................. 22
5
Components List | Noah Precision LLC
Manual Rev 1, July 14
Configuring 485 / Modbus addressing .................................................................................................... 22
Analog Voltage Output Function ............................................................................................................ 23
Signal Interface ................................................................................................................................... 23
Pin Out ................................................................................................................................................ 23
Calibrating the Analog Voltage Output Signal .................................................................................... 23
DeviceNet Operation ................................................................................................................................ 234
DeviceNet Scanner Status / Error Codes........................................................................................... 234
Chapter 6 -
Maintenance ..................................................................................................................... 265
Chapter 7 -
Troubleshooting ................................................................................................................ 266
Types of Alarms....................................................................................................................................... 26
Soft Alarm ........................................................................................................................................... 26
Hard Alarm .......................................................................................................................................... 26
Troubleshooting ...................................................................................................................................... 26
Troubleshooting Guide ..................................................................................................................... 267
Noah Precision World Wide Web Site ................................................................................................ 27
Noah Precision Customer Support.......................................................................................................... 28
Returning Units for Repair ...................................................................................................................... 28
Warranty ................................................................................................................................................. 29
Warranty Statement ........................................................................................................................... 29
6
Components List | Noah Precision LLC
Manual Rev 1, July 14
List of Figures
Figure 1-1
Figure 1-2
Figure 1-3
Figure 2-1
Figure 3-1
Figure 3-2
Figure 4-1
Figure 4-2
Figure 5-1
7
therMOstat 500 Front Panel ........................................................................................... 7
Veeco C13 to C20 plug ................................................................................................. 10
Fill Canister for the therMOstat chiller line ................................................................. 10
Dimensions of the therMOstat 500 .............................................................................. 12
Sizing kit Diagram .......................................................................................................... 13
A:Sizing kit (clamp band hole) installed on B: Adapter Plate mounted to C: Top
Plate. Second picture is flange mounted for 6.6” Bubbler. ...................................... 14
Communiations plate sans DeviceNet. ....................................................................... 17
Communications plate with DeviceNet. ...................................................................... 17
Calibration Offset............................................................................................................ 23
Components List | Noah Precision LLC
Manual Rev 1, July 14
List of Tables
Table 1
Table 2
Table 3
Table 4
Table 5
Table 6
Table 7
Table 8
Table 9
Table 10
8
General Specifications for the therMOstat ................................................................. 11
PCW (Process Cooling Water) Specifications ........................................................... 11
Control Panel Indicators ................................................................................................ 18
Watlow Controller description....................................................................................... 18
Watlow Controller Operation Parameters................................................................... 20
Pin out description.......................................................................................................... 23
DeviceNet Module Status (MS) light table. ................................................................ 24
DeviceNet Network Status (NS) light table. ............................................................... 25
Troubleshooting Guide .................................................................................................. 27
Customer Support locations ......................................................................................... 28
Components List | Noah Precision LLC
Manual Rev 1, July 14
Chapter 1 -
Components List
THERMOSTAT 500
The therMOstat 500 is a thermoelectric (TE) based, sealed chiller which provides temperature
control for a bubbler that is installed within the module. The module is space efficient, water
cooled, and has PID temperature control. An internal pump circulates a cooling medium within
the module for optimum heat transfer and temperature control.
Fluid level indicators
Power Switch
Fill and Drain Port
Figure 1-1
9
Components List | Noah Precision LLC
Manual Rev 1, July 14
POWER CABLE
The therMOstat 500 has a C13 IEC filtered power inlet on the back of the unit. This can connect
to a various amount of connectors, such as C20 plug for Veeco systems, the custom Aixtron
connector, or even an American NEMA 5-15 plug.
Figure 1-2 Veeco C13 to C20 plug
FILL CANISTER
A manually pressurized fill canister is available for filling the therMOstat module with a cooling
medium of choice. See Figure 1-3
Figure 1-3 Fill Canister for the therMOstat product line
10
Components List | Noah Precision LLC
Manual Rev 1, July 14
Chapter 2 -
Facility Requirements
GENERAL SPECIFICATIONS
Table 1 General Specifications for the therMOstat
Description
Specification
AC Supply Power
Maximum: 1000 Watts
Power Line Frequency
50/60 Hz
Line Voltage
90 – 250 VAC, auto-ranging
Inlet Socket
According to IEC/EN 60320-1/C13ii
Power Cord
Cooling Capacity
Veeco (p/n: 275-3606), Aixtron (p/n:275-3612)
500 watts @ 20 °C
Heating Capacity
1000 watts @ 20 °C
Temperature Range
0 °C to +50 °C
Temperature Tolerance
±0.1 °C
Comm. Interface
DeviceNet, RS-485, RS-232, Analog
Chiller Dimensions
12” W x 12” L. x 21” H
Fluid Type
1. Distilled water.
2. Glycol-water mixture
3. Perfluorinated fluid (requires TMO-500-F)
MTBF Target
≥ 30,000 hrs.
PCW (PROCESS COOLING WATER)
Table 2 PCW (Process Cooling Water) Specifications
Description
Specification
Flow Rate
Temperature
≥ 1.0 GPM (3.8 lpm), minimum
Water Pressure
Filtering
Fittings
11
≤ 25°C
50 to 80 psi (30 psi min delta)
340 to 550 kPa (210 kPa min delta)
5 micron particle filtered water recommended
Stainless Steel Swagelok Tube Fitting, Compression
fitting, 3/8 in. Tube OD (Adapter to ½” barb fitting
available.
Facility Requirements | Noah Precision LLC
Manual Rev 1, July 14
MOUNTING
therMOstat 500
Orientation:
Module must be upright.
Location:
Install in a location where the fittings and electrical connections are
accessible.
Clearance:
Minimum 4” surrounding module for water and electrical connections.
therMOstat 500 Dimensions
Below are the physical dimensions for the therMOstat 500 with the handles folded down, see
Figure 1-32-1.
Note:
The figure below shows the height dimension with the handles down.. The width
dimension shows the handles down.
Figure 2-1 Dimensions of the therMOstat 500
12
Facility Requirements | Noah Precision LLC
Manual Rev 1, July 14
Chapter 3 -
Bubbler and Fill
Procedure
Bubbler Installation
The therMOstat is configured from the factory in an open bath configuration. Sizing kits are
available to accommodate various sizes including 2 to 6.6 inch diameter and up to a triple 2.2 inch
diameter bubbler configuration. Refer to the Sizing Kits section of this chapter for sizing kit
installation instructions. Contact Noah Precision for other sizing kit opportunities.
Figure 3-1 Sizing kit Diagram
13
Bubbler and Fill Procedure | Noah Precision LLC
Manual Rev 1, July 14
Follow the procedure below for basic bubbler and sizing kit installation:
1. Loosen the bubbler clamp band by using a flat heat or socket head driver to allow for bubbler
installation, see Figure 3-2.
2. Insert bubbler into the therMOstat 500 chamber.
3. Adjust bubbler for proper height/location. The o-ring may temporarily hold it in place.
4. Tighten the bubbler clamp band to secure the bubbler into its final placement.
CAUTION:
Always use proper precaution when working with gases. This should be done by a
trained and qualified technician.
Figure 3-2 A: Sizing kit (clamp band hole) installed on B: Adapter Plate mounted to C: Top
Plate. Second picture is flange mounted for 6.6” Bubbler.
Bubbler Removal
Follow the procedure below for basic bubbler removal:
Note:
If moving to a larger sizing kit or decommissioning, follow “Drain Procedure” on page
16 before continuing.
1. Turn off the therMOstat 500.
2. Assure gas lines are disconnected from the bubbler.
3. Loosen the bubbler clamp band by using a flat heat or socket head driver to allow for bubbler
removal, see Figure 3-2.
4. Remove the bubbler.
14
Bubbler and Fill Procedure | Noah Precision LLC
Manual Rev 1, July 14
Fill, Prime, and Drain Procedure
Fill Procedure
The required amount of fluid needed to fill the therMOstat will vary depending on the size of the
bubbler and sizing kit installed. The fluid level in the therMOstat 500 should always remain
between the Low and Full indicators on the front of the unit, see Figure 1-31-1. See the
following steps for fill capacity notification via the therMOstat.
Noah sells a fill canister with a capacity just over 3 gallons (11 liters).
CAUTION:
To prevent overflow, the therMOstat 500 must be filled with the bubbler
inserted and the unit turned off.
1. Verify that the therMOstat is off and the bubbler is inserted.
2. Fill the fill canister to the 10 liter mark with the fluid medium of choice.
3. Close the vent valve. Do not overfill the fill canister!
4. Connect fill-hose to the fill/drain coupling on front of the therMOstat.
5. Pressurize canister with hand pump.
6. Press the canister trigger to pump the mixture into the therMOstat module.
7. Continue to slowly pump fluid into the therMOstat until the fluid almost reaches the “Full” level
as seen on the front of therMOstat.
8. Release the fill-canister trigger and disconnect the fill-hose
9. While unit is in operation, fluid level will drop. Ensure that fluid level is filled sufficiently such
that fluid is visible while in operation.
Pump Priming Procedure
Once the unit has been filled, the pump must be manually primed to purge all remaining air from
the process loop.
1. Immediately after filling, turn the system on with the rocker switch on the front of the unit.
2. Place the unit in RUN mode for 10 seconds.
3. Then place the unit in IDLE mode for 10 seconds.
4. Repeat steps 2 and 3 (5) times.
5. System is now ready for constant operation.
15
Bubbler and Fill Procedure | Noah Precision LLC
Manual Rev 1, July 14
Drain Procedure
1. Turn the therMOstat off.
2. Raise the therMOstat above the fill canister.
3. Depressurize the fill canister by opening the vent valve (turn clockwise until it latches open)
4. Connect the fill tube to the drain coupling on the therMOstat.
5. Press the fill-canister trigger to drain the fluid into the canister.
16
Bubbler and Fill Procedure | Noah Precision LLC
Manual Rev 1, July 14
Chapter 4 -
Cable Connections
Figure 4-1 Communications plate sans DeviceNet.
1.
2.
3.
4.
5.
RS 485 termination switch (Up is on, Down is off)
RS-232 communication port
RS-485 communication port
Analog communication
Noah Precision service port
Figure 4-2 Communications plate with DeviceNet.
17
Cable Connections | Noah Precision LLC
Manual Rev 1, July 14
Chapter 5 -
Operation
Table 3 Control Panel Indicators
LED Name
System OK
Color
Green
Alarm
Red
Heat
Yellow
Cool
Blue
Run
Green
Idle
Yellow
Description
Active during normal
operation
Active when an alarm
condition is met.
Active when TE array is
heating process water in
bath.
Active when TE array is
cooling process water in
bath.
Active when bath
temperature is being
actively controlled.
Active when bath
temperature is not being
actively controlled.
Table 4 Watlow Controller description
Description
Upper Display
Output Activity
Communications
Activity
Up and Down
Keys
Infinity Key
Lower Display
18
Functionality
In the Operations Menu, displays the process
value, otherwise displays the value of the
parameter in the lower display
Number lights indicate activity of
outputs 1 and 2.
Flashes when another device is communicating
with this controller
In the Operations Menu, adjusts the set point in
the lower display. In other pages, changes the
upper display to a higher or lower value, or
changes a parameter selection.
Clears and silences alarms, press to back up
one level, or press and hold for two seconds to
return to the Operations Menu.
Indicates the set point or output power value
during operation, or the parameter whose value
appears in the upper display.
Operation | Noah Precision LLC
Manual Rev 1, July 14
OPERATIONAL STATES
Upon power on, the system operates in Idle mode until the Run button is pressed.
Idle mode
Pump and TE are disabled, but the controller is active and monitors temperature and alarms. The
system is put into the Idle state manually (through a switch) or goes into it during a hard alarm
condition.
Active mode
Pump and TE supplies are enabled, and the controller actively maintains temperature setpoint.
FRONT PANEL
There are three functional items on the front panel of the therMOstat 500, see Figure 1-2), these
include:
•
•
•
Power Switch – toggles the system on/off
Fill Port – Drains or fills the bubbler bath.
Fluid Level – Indicates if bubbler-bath fluid level is within acceptable range.
SYSTEM START-UP
Step-by-step instructions for normal operation:
1. Turn the Power switch on. Control panel and Watlow controller should turn on in idle state.
2. Press the Run button on the control panel.
3. Program the set-point temperature by using the Up and Down arrow keys on the controller. The
set-point temperature is shown as the lower number in the controller display.
4. Press the Run button to enable temperature control. The process fluid temperature is indicated by
the upper number in the controller display.
5. If there are no alarm conditions, the green System On LED will light up.
6. If there is an alarm condition, the red Alarm LED will light up.
19
Operation | Noah Precision LLC
Manual Rev 1, July 14
CONTROLLER SETUP/OPERATION
The controller is set up from the factory with the parameter values listed in Table 5. It may
become necessary to change some of these values in order to optimize temperature control.
Press the Advance button to enter the Operations page and scroll through the parameters. A
parameter name will appear on the lower display, and its setting or value will appear in the upper
display.
Use the Up and Down arrow keys to change a parameter setting. After changing a setting,
continue to scroll through the other parameters using the Advance button or press the Infinity
button to return to the home page at any time. The home page shows the actual temperature
reading and the setpoint.
Table 5 Watlow Controller Operation Parameters
Display
i.CA1
Ad.1
o.CA3
h.Pb1
C.Pb1
ti1
td1
db1
AUt
h.Pr1
c.Pr1
Parameter Name
Calibration Offset
RS-485 Address
Analog Calibration Offset
Heat Proportional Band
Cool Proportional Band
Time Integral
Time Derivative
Dead Band
Autotune Request
Heat Power
Cool Power
Default Setting
0.0
1
0.0
2.8
1.4
240
40
0.00
no
Info only
Info only
Range
-1110.55 to 5555.00 ºC
1-247
-1110.55 to 5555.00 ºC
-1110.55 to 5555.00 ºC
-1110.55 to 5555.00 ºC
0 to 9999 sec per repeat
0 to 9999 sec
-556 to 556 ºC
No or Yes
0-100%
0-100%
Parameter Descriptions:
Calibration Offset
This is used to program in a temperature offset value to the controller’s RTD temperature reading
(shown in the upper display of the controller screen).
To calibrate the RTD to a reference temperature, record the difference between the controller’s
reading and a reference sensor’s reading. If the controller’s reading is lower than the reference
sensor’s, enter the difference as a positive value into the Calibration Offset parameter using the
Up and Down arrow keys. If the controller reading is higher than the reference sensor’s, enter the
difference as a negative value.
RS-485 Address
This denotes the address of the system when communicating in RS-485 mode. If this setting is
changed, the unit must undergo a full power cycle for this change to come into effect.
20
Operation | Noah Precision LLC
Manual Rev 1, July 14
Analog Calibration Offset
Similar to the calibration offset, this calibrates the voltage signal coming from the analog
communication port.
Heat Proportional Band
Sets the PID proportional band for the heat output
Cool Proportional Band
Sets the PID proportional band for the cool output
Time Integral
Sets the PID integral for the heat and cool outputs
Time Derivative
Sets the PID derivative time for the heat and cool outputs
Dead Band
Sets the offset to the proportional band
Autotune Request
Start an Autotune to calculate PID values if the default settings or manual tuning results in poor
temperature control. For the majority of applications the default PID settings work well and can
easily be adjusted manually if temperature control needs to be optimized – see manual tuning
procedure on the next page.
Heat power
Heat output level
Cool power
Cool output level
21
Operation | Noah Precision LLC
Manual Rev 1, July 14
MANUAL TUNING PROCEDURE FOR THE
CONTROLLER
If the default PID parameters do not effectively maintain setpoint, the PID values can be adjusted
to compensate. There are two sets of PID values, one for heating and one for cooling. The
proportional band settings are independently adjustable for heat and cool, but the same values for
time integral and derivative are used for both sets.
The PID parameters are accessed through the Operations page, see Table 5, and adjusted using
the Up and Down arrow keys.
Manual-tune controller procedure
1. Enter a temperature setpoint.
2. Monitor the temperature response as setpoint is reached.
3. If the temperature fluctuates around the setpoint, increase the Heat and/or Cool proportional
bands until the temperature stabilizes.
4. When the temperature has stabilized, it may be at a point other than the setpoint. The
difference between the setpoint and temperature can be eliminated with integral control.
Decrease the integral setting until the temperature reaches setpoint. If the temperature
becomes unstable, increase the integral value until it becomes stable.
5. Change the setpoint by 15 ºC and monitor the temperature approach to setpoint. If the
temperature overshoots the setpoint and the overshoot value is undesirable, increase the
derivative value. Go back to the original setpoint and try the new value, if necessary. If this
value is increased too much, the approach to the setpoint may be too sluggish. Repeat the
adjustment as necessary until the temperature approaches setpoint without sluggishness or
excessive overshoot.
SETTING DEVICENET ADDRESS AND BAUD RATE
DeviceNet setup instructions are available upon request.
CONFIGURING 485 / MODBUS ADDRESSING
1.
2.
3.
4.
Address can be changed by accessing the Ad.1 setting on the home screen of the controller.
Using the UP and DOWN keys, this number can be changed from the default (1) to the desired address.
Press the green Advance key (button below the ∞ key) on the controller until the home screen is displayed.
Unit must be shut down, and all status indicator lights must fully turned off after changing the address.
5. Once the unit is powered on, the address change will be in effect.
22
Operation | Noah Precision LLC
Manual Rev 1, July 14
ANALOG VOLTAGE OUTPUT FUNCTION
Signal Interface
The signal connector is a 9 pin D-sub female. It is located in the rear of the unit (circled in red in
the picture below).
Pin Out
Table 6 Pin out description
Pin Number
1
3
Signal Description
Chiller Bath Temperature
Chiller Bath Temperature Return
Signal Type
Analog voltage output, 10 mV/ºC
Signal Ground (0 V reference)
Calibrating the Analog Voltage Output Signal
The voltage output signal represents the chiller bath using this scale: 10 mV/ºC. For example, if the
bath temperature is 17.0C the output voltage will be 0.170 volts.
If the voltage value (or temperature reading of the host tool) does not correspond exactly to the chiller
temperature value the voltage signal can be offset to match by following the procedure below:
1. Observe the temperature of the chiller bath on the upper line of the controller display (see Table 4
Watlow Controller description). When it is stable go to step 2.
2. Access the o.CA3 screen from the home menu by pressing the Advance key.
3. Using the UP and DOWN keys, the offset can be changed.
Figure 5-1 Calibration Offset
Figure 5-1 Calibration Offset shows a calibration offset value of 0.00 ºC. Use the UP or DOWN
arrow keys to enter a value so that the voltage output (or tool temperature conversion reading)
corresponds to the bath temperature.
23
Operation | Noah Precision LLC
Manual Rev 1, July 14
For example:
If the bath temperature is 17.00 ºC but the output voltage value is 0.174 V (temperature conversion =
17.4 ºC), enter a calibration value of -0.40 ºC so that the output voltage will match the bath
temperature reading.
If the voltage value is lower than desired, then enter a positive value equal to the difference between
the actual temperature and temperature conversion value.
When done with calibration, press the ∞ key repeatedly until the home page is displayed.
DEVICENET OPERATION
The two toggle switches (Mode Selector) should be in the DOWN position for DeviceNet operation.
(The UP position is for RS485)
The baud rate selection (BR) should match the baud rate of the network or can be set for AUTO
Detect as noted on silkscreen just below the switch. The baud rate is selectable at 125Kb(00),
250Kb(01), 500Kb(10) or Auto Detect(11).
The MACID needs to be set for the specific channel ID of this specific TMO500 in the network. The
MACID can go from 0 to 63.
DeviceNet Status is determined by the two LEDs labeled NS (Node Status) and MS (Module Status).
These are bi-color LEDs that indicate a non-error condition by GREEN illumination and error by RED
illumination.
DeviceNet Scanner Status / Error Codes
The bicolor (GREEN/RED) Module Status(MS) indicator displays device status. It indicates whether
the device has power and is functioning properly.
Table 7 – DeviceNet Module Status (MS) light table.
LED INDICATOR
Off
Green
Flashing Green
Flashing Red
Means
There is no power applied to the device
The device is operating in normal
condition
The device needs configuring
There is an invalid configuration.
Action Needed
Apply power.
N/A
Configure the device
Verify dip switch settings. Check
configuration setup.
The Network Status (NS) indicator is a bicolor (GREEN/RED) LED. The following table provides
troubleshooting information about communication links.
24
Operation | Noah Precision LLC
Manual Rev 1, July 14
Table 8 – DeviceNet Network Status (NS) light table.
LED INDICATOR
Off
Green
Flashing Green
Red
Means
There is no power applied to the device
The device is operating in normal
condition
The device needs configuring
Communication Channel Failure
Flashing Red
There is an invalid configuration.
Chapter 6 -
Action Needed
Apply power.
N/A
Configure the device
Verify dip switch settings. Check
configuration setup.
Verify dip switch settings. Check
configuration setup.
Maintenance
The TMO-500 chiller does not require daily maintenance if used in conjunction with the correct
sizing kit. However, it is necessary to prevent buildup of any minerals, salts, or algae within the
system’s tank. These contaminants can cause issues in the vein of early component failures, improper
alarms, or even complete loss of temperature control.
It is therefore recommended that every month, or every bubbler change at minimum, the water
is drained completely from the system and refilled with fresh distilled/deionized water for operation.
No other maintenance is required if this schedule is adhered to.
25
Maintenance | Noah Precision LLC
Manual Rev 1, July 14
Chapter 7 -
Troubleshooting
TYPES OF ALARMS
Soft Alarm
A soft alarm is informative only and does not affect the temperature control capability of the
system. A soft alarm condition occurs when the alarm light is illuminated but remains in Run
mode. This will happen when the system is running low on fluid. The system should be refilled
as soon as possible.
A soft alarm is not latching and will clear itself once the alarm condition is taken care of. Soft
alarm presence is dependent on TMO revision.
Hard Alarm
A hard alarm will put the system into the Idle state by disabling the pump and TE. A hard alarm
condition occurs when the buzzer emits a tone and the therMOstat switches into Idle mode.
Additionally, this type of alarm will cause the controller to signal the host tool, through RS-485,
RS-232, and DeviceNet, that this condition is active.
A hard alarm is latching. After taking care of the alarm condition, the Run button will need to be
pressed to reset the system.
TROUBLESHOOTING
This section discusses the following topics to help troubleshoot any problems that might occur
when operating either unit. A troubleshooting guide is provided in Table 9. If following these
procedures does not solve the problem, do not hesitate to call Noah Precision Customer Support
(displayed later on in this chapter).
Troubleshooting Guide
DANGER:
High voltage is active in the system. Safety covers provide protection for the user and
the machine. If bypassed, only authorized and qualified personnel should repair or test
the system.
26
Troubleshooting | Noah Precision LLC
Manual Rev 1, July 14
Table 9 Troubleshooting Guide
Symptom
Probable Cause
Corrective action
Hard alarm – system
goes into idle mode.
1. Liquid Level is too low for
operation.
2. Tank or PCW temperature
exceeds spec.
3. Pump is inoperative
4. Power Supply failure
Soft Alarm – Alarm
light is active, but
system remains in run
mode.
System won’t reach
temperature setpoint
1. Liquid level is low.
1. Add fluid until liquid level
indicator is within Low and
Full bounds.
2. Check that PCW flowrate
and temperature is within
specifications.
3. Replace or troubleshoot
pump.
4. Replace Power Supply.
1. Add fluid until liquid level
indicator is within Low
and Full bounds
RS-485 communication
is intermittent
Unit does not power on
when power switch is
toggled to on.
1. System in Idle mode.
2. PID parameters are not
properly tuned for the
process.
3. TE array is inoperative
1. Last module in RS-485
chain is not terminated
correctly.
1. AC Power source does not
meet specification.
2. Check power plug
connection between
therMOstat 500 and
cabinet.
3. Fuse is blown
1. Switch to Active mode.
2. Manually tune PID
parameters.
3. Repair technician to
preform inspection.
1. Flip communicationtermination toggle to the
on position, on the last
chiller in the
communication bus. All
other modules should have
termination off.
1. Check that power meets
requirements.
2. Check power cable
connection.
3. Replace fuse located in the
fuse drawer on the power
plug, see Figure 4-1.
Noah Precision World Wide Web Site
For additional product information, consult Noah Precision’s World Wide Web site at
http://www.noahprecision.com
27
Troubleshooting | Noah Precision LLC
Manual Rev 1, July 14
NOAH PRECISION CUSTOMER SUPPORT
Please contact one of the following offices in Table 10 for technical support.
Note:
When calling Noah Precision Customer Support, make sure to have the unit serial
number and part number. These numbers are available on the individual unit labels.
Table 10 Customer Support locations
Office
Contact
Noah Precision, LLC
2501 SE Columbia Way
Suite 140
Vancouver, WA 98661
Phone: +1 360 993 1395
Fax:
+1 360 993 1399
Email: [email protected]
[email protected]
Web:http://www.noahprecision.com
China – Challenge Technology
Shanghai
Phone: 86 21 6847 1388
Fax: 86 21 6847 1339
Taiwan – Challentech International
Corp.
Phone: 88 63 5536525
Fax: 88 63 5536515
RETURNING UNITS FOR REPAIR
Detailed information regarding returns, repairs and warranty can be found at:
http://www.noahprecision.com/rma-information.html
An RMA Request Form can be completed at:
http://www.noahprecision.com/support/form_RMA.php
BEFORE returning any product for repair or adjustment, follow all troubleshooting procedures. If,
after following these procedures, the problem still exists, or if the procedure instruction advises
contacting Noah Precision Customer Support, call and discuss the problem with a representative or
visit the links listed above. Be prepared to give the model number and serial number of the unit, as
well as the reason for the proposed return. This consultation call allows Noah Precision Customer
Support to determine whether the problem can be corrected in the field or if the unit must be returned.
Such technical consultation is always free of charge.
If a unit is returned without first getting authorization from Noah Precision Customer Support
and that unit is found to be functional, there is a re-test and calibration fee plus shipping
charges.
To ensure years of dependable service, Noah Precision products are thoroughly tested and designed to
be among the most reliable and highest quality systems available worldwide.
28
Troubleshooting | Noah Precision LLC
Manual Rev 1, July 14
WARRANTY
Noah Precision, LLC products are warranted to be free from failures due to defects in material
and workmanship after they are shipped from the factory (please see warranty statement below,
for details) for the period of time defined in the purchase order.
To claim shipping or handling damage, inspect the delivered goods and report such damage to
Noah Precision within 30 days of receipt of the goods. Please note that failing to report any
damage within this period is the same as acknowledging that the goods were received undamaged.
For a warranty claim to be valid, it must:
•
•
•
Be made within the applicable warranty period
Include the product serial number and a full description of the circumstances giving rise to the
claim
Have been assigned return material authorization number (see below) by Noah Precision
Customer Support
All warranty work will be performed at an authorized Noah Precision service center (see list of
contacts at the beginning of this chapter). You are responsible for obtaining authorization to return
any defective units, prepaying the freight costs, and ensuring that the units are returned to an
authorized Noah Precision service center.
Warranty Statement
The seller makes no express or implied warranty that the goods are merchantable or fit for
any particular purpose except as specifically stated in printed Noah Precision specifications.
The sole responsibility of the Seller shall be that it will manufacture the goods in accordance
with its published specifications and that the goods will be free from defects in material and
workmanship. The seller's liability for breach of an expressed warranty shall exist only if
the goods are installed, started in operation, and tested in conformity with the seller's
published instructions. The seller expressly excludes any warranty whatsoever concerning
goods that have been subject to misuse, negligence, or accident, or that have been altered or
repaired by anyone other than the seller or the seller's duly authorized agent. This warranty
is expressly made in lieu of any and all other warranties, express or implied, unless
otherwise agreed to in writing. The warranty period is defined in the purchase order and
begins on the date the goods are shipped from Noah Precision. In all cases, the seller has sole
responsibility for determining the cause and nature of the failure, and the seller's
determination with regard thereto shall be final. The Noah Precision Warranty Statement
may be superseded by a service agreement entered into between Noah Precision and the
buyer.
29
Troubleshooting | Noah Precision LLC
Manual Rev 1, July 14