1
FX Series
Split Mode for AIX
Overview and User’s
Guide
FXSPLTA/UM1
First Edition (April 1998)
This edition of the Split Mode Overview and UserÕs Guide applies toFX
Series systems running AIX4.1.5r3 and to all subsequent releases of
this product until otherwise indicated in new releases or technical
newsletters.
THIS MANUAL IS PROVIDED ÒAS ISÓ WITHOUT WARRANTY
OF ANY KIND, EITHER EXPRESS OR IMPLIED, INCLUDING,
BUT NOT LIMITED TO, THE IMPLIED WARRANTIES OF
MERCHANTABILITY AND FITNESS FOR A PARTICULAR
PURPOSE. The laws of some states and countries do not allow the
disclaimer of express or implied warranties in certain transactions;
therefore, this statement may not apply to you. As such, the above
warranty disclaimer shall only apply to the extent permitted by
law.
While reasonable efforts have been made to assure the accuracy of
this document, Motorola, Inc. assumes no liability resulting from
any omissions in this document, or from the use of the information
obtained therein. It is not warranted that the contents of this
publication or the accompanying source code examples, whether
individually or as one or more groups, will meet your requirements
or that the publication or the accompanying source code examples
are error-free. This publication could include technical inaccuracies
or typographical errors.
Motorola reserves the right to revise this document and to make
changes from time to time in the content hereof without obligation
of Motorola to notify any person of such revision or changes
It is possible that this publication may contain references to, or
information about Motorola products (machines and programs),
programming or services that are not announced or released in
your country or region. Such references or information may not be
construed for any purpose to mean that Motorola intends to
announce or release such products, programming or services in
your country or region.
Any reference to a licensed program in this publication is not
intended to state or imply that you can use only that licensed
program. You can use any functionally equivalent program
instead.
No part of this material may be reproduced or copied in any
tangible medium, or stored in a retrieval system, or transmitted in
any form, or by any means, radio, electronic, mechanical,
photocopying, recording or facsimile, or otherwise, without the
prior written permission of Motorola, Inc.
If the documentation contained herein is supplied, directly or
indirectly, to the U.S. Government, the documentation is provided
only as Òrestricted computer softwareÓ as defined in FAR 52.227-19
Commercial Computer Software--Restricted Rights.
© COPYRIGHT MOTOROLA, INC. 1998. ALL RIGHTS
RESERVED. Printed in the United States of America.
Contents
Overview ..................................................................................................................... 1-1
Who Should Use this Manual ........................................................................... 1-1
When to Use Split Mode .................................................................................... 1-1
Prerequisites......................................................................................................... 1-2
Overview of Contents ........................................................................................ 1-3
Terms Used in this Manual................................................................................ 1-4
Related Information............................................................................................ 1-6
FX Series Documentation ........................................................................... 1-6
Motorola Hardcopy AIX Documentation ................................................ 1-7
IBM AIX Documentation ............................................................................ 1-8
Getting Help for System Problems................................................................... 1-8
Overview ..................................................................................................................... 2-1
The Purpose of Split Mode ................................................................................ 2-1
The Split Mode Process ...................................................................................... 2-2
Making the System Simplex and Upgrading CPU Module Hardware on
the Offlined System ..................................................................................... 2-3
Splitting the System and Upgrading Software on SYSNEW................. 2-5
Switching Service to SYSNEW................................................................... 2-6
Verifying Service on SYSNEW................................................................... 2-9
Unsplitting the System and Upgrading SYSOLD ................................... 2-9
Inter-System Communications (ISC).............................................................. 2-10
System Monitoring and NotiÞcation ............................................................. 2-12
Overview ..................................................................................................................... 3-1
The Split Mode State Machine.................................................................................. 3-2
The Splitstate Utility .................................................................................................. 3-5
Determining the System State ........................................................................... 3-5
Overview of the Split Mode Procedure ................................................................. 3-7
General Procedure .............................................................................................. 3-7
Switchover ........................................................................................................... 3-9
Logging The Split Mode Process .................................................................... 3-10
Overview ..................................................................................................................... 4-1
Preparing the System for Split Mode ...................................................................... 4-2
List System Information..................................................................................... 4-2
Assign System Resources................................................................................... 4-2
Managing Volume Groups ................................................................................ 4-4
Managing Data Volume Groups that are not Stolen During Split Mode..
4-4
Managing Nonftvgs that are Split across SYSOLD and SYSNEW ....... 4-6
ConÞguring Ethernet.......................................................................................... 4-6
Loading Firmware Updates from CD .............................................................. 4-7
Managing Swap Partitions ................................................................................ 4-8
v
Making Sure the Inter-System Communications Service Provider (ISC SP) is
Inactive ..................................................................................................................4-8
Adding a Second Console ..................................................................................4-8
System at FT_START prior to beginning the split mode process .........4-8
System Split, but not yet Switched ..........................................................4-10
System Switched.........................................................................................4-12
System at FT_COMPLETE after the Process has Completed ..............4-14
Add Directories to PATH Variable ..................................................................4-15
Handling Asynchronous Ports ........................................................................4-15
Set Global Split Mode Variables in the split_cfg Þle.....................................4-16
The Global Split mode Variables..............................................................4-16
Overriding the global variables................................................................4-25
Overview......................................................................................................................5-1
Upgrading your System via Split Mode..................................................................5-2
Start the Inter-System Communications Service Provider (ISC SP).............5-2
Check for Readiness ............................................................................................5-2
Split the System....................................................................................................5-3
Splitting the System without Hardware or Firmware Upgrades..........5-4
Splitting the System with CPU Module Firmware (but not Hardware)
Upgrades .......................................................................................................5-4
Splitting the System with Hardware and Firmware Upgrades.............5-5
Falling Back to Original Firmware.............................................................5-7
Upgrading the System while Split ....................................................................5-8
CPU Upgrades ..............................................................................................5-9
Operating System Upgrades without CPU Module Upgrades ...........5-10
CPU and Operating System Upgrades ...................................................5-14
Application Only Upgrades......................................................................5-16
Manual Switchover Procedure ........................................................................5-17
Completing the Split Mode Process................................................................5-18
Verifying Application Performance on SYSNEW .................................5-19
Completing the Split Mode Process.........................................................5-19
Managing Nonsteal Datavgs ....................................................................5-20
Overview......................................................................................................................6-1
Fallback Strategies ......................................................................................................6-2
Overview ..............................................................................................................6-2
Fallback Datavgs..................................................................................................6-2
The Fallback Process ...........................................................................................6-3
Overriding the Default Fallback Procedure.....................................................6-3
Recovering from a System Failure............................................................................6-5
Overview ..............................................................................................................6-5
The CATASTROPHIC_RECOVERY System State ..........................................6-5
vi
Contents
Symptoms and Recovery: ........................................................................... 6-6
Advanced Recovery .................................................................................. 6-11
Troubleshooting the Split Mode Process............................................................... 6-12
Overview............................................................................................................ 6-12
General Recovery Strategies............................................................................ 6-12
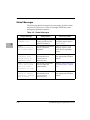
Global Messages................................................................................................ 6-14
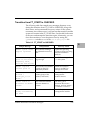
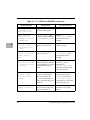
Transition from FT_START to CHECKED..................................................... 6-15
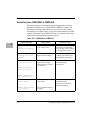
Transition from CHECKED to SIMPLEX ...................................................... 6-18
Transition from SIMPLEX to SPLIT................................................................ 6-19
Transition from SPLIT to QUIESCEDAPPS_SYSNEW................................ 6-22
Transitions from QUIESCEDAPPS_SYSNEW to EXPORTEDVGS_SYSNEW.
6-24
Transition from EXPORTEDVGS_SYSNEW to QUIESCEDAPPS_SYSOLD 625
Transition from QUIESCEDAPPS_SYSOLD to EXPORTEDVGS_SYSOLD. 627
Transition from EXPORTEDVGS_SYSOLD to SWITCHED ....................... 6-28
Transition from SWITCHED to RESUMEDAPPS_SYSNEW...................... 6-29
Transition from RESUMEDAPPS_SYSNEW to STOLEVGS....................... 6-31
Transition from STOLEVGS to RESUMEDVGAPPS_SYSNEW................. 6-32
Transition from RESUMEDVGAPPS_SYSNEW to UNSPLIT .................... 6-34
Transition from UNSPLIT to FT_COMPLETED........................................... 6-35
Overview ..................................................................................................................... 7-1
Managing Switchover ........................................................................................ 7-1
Registering with the Service Provider ...................................................... 7-2
Receiving and Responding to the Switchover Notifications................. 7-4
Using the ISC to Communicate between Applications on SYSOLD and on
SYSNEW............................................................................................................... 7-6
ISC API functions......................................................................................... 7-6
ISC Utility functions .................................................................................... 7-9
Overview .................................................................................................................... A-1
vii
Figures
Figure 2-1.
Figure 2-2.
Figure 2-3.
Figure 2-4.
Figure 2-5.
Figure 2-6.
Figure 3-1.
Figure 4-1.
Figure 4-2.
Figure 4-3.
Figure 4-4.
Figure 4-5.
Figure 4-6.
Figure 5-1.
Figure 5-2.
Figure 5-3.
Figure 7-1.
Figure 7-2.
viii
Initial Fault Tolerant ConÞguration .................................2-2
Simplex conÞguration ........................................................2-4
Split ConÞguration .............................................................2-5
Switched ConÞguration.....................................................2-6
Datavg stealing ...................................................................2-8
ISC Architecture ................................................................ 2-11
General Split Mode Flowchart..........................................3-8
Console0: SYSOLD as Primary .........................................4-9
Console0: SYSOLD Primary (System Split,
but not yet Switched) .......................................................4-10
Console1: SYSNEW Secondary (System Split,
but not yet Switched) ....................................................... 4-11
Console0: System Switched, SYSNEW Primary...........4-12
Console0: System Switched, SYSOLD Secondary........4-13
Console0: System FT_COMPLETED .............................4-14
Splitting the System............................................................5-3
Upgrading the System while Split ...................................5-8
Completing the Split Mode Process...............................5-18
Registering with the ISC SP ..............................................7-3
Resuming Applications After Switchover.......................7-5
List of Tables
Table 4-1.
Table 4-2.
Table 4-3.
Table 4-4.
Table 4-5.
Table 4-6.
Table 5-1.
Table 5-2.
Table 5-3.
Table 5-4.
Table 5-5.
Table 6-1.
Table 6-2.
Table 6-3.
Table 6-4.
Table 6-5.
Table 6-6.
Table 6-7.
Table 6-8.
Table 6-9.
Table 6-10.
Table 6-11.
Table 6-12.
Table 6-13.
Table 6-14.
Table 6-15.
ix
System Information ............................................................................. 4-2
Resources on Mbus0 ............................................................................ 4-3
Resources on Mbus1 ............................................................................ 4-3
Datavgs.................................................................................................. 4-5
Global Variables ................................................................................. 4-17
Upgrade Variables ............................................................................. 4-24
Splitting the System According to Type of Upgrade ...................... 5-4
Upgrading the System while Split .................................................... 5-9
Selecting an OS Upgrade Procedure ............................................... 5-10
Completing the Split Mode Process ................................................ 5-19
Managing Datavgs............................................................................. 5-21
Failure Symptoms and Responses..................................................... 6-6
Global Messages................................................................................. 6-14
FT_START to CHECKED .................................................................. 6-15
CHECKED to SIMPLEX.................................................................... 6-18
SIMPLEX to SPLIT............................................................................. 6-19
SPLIT to QUIESCEDAPPS_SYSNEW............................................. 6-23
QUIESCEDAPPS_SYSNEW to EXPORTEDVGS_SYSNEW........ 6-24
EXPORTEDVGS_SYSNEW to QUIESCEDAPPS_SYSOLD......... 6-26
QUIESCEDAPPS_SYSOLD to EXPORTEDVGS_SYSOLD .......... 6-27
EXPORTEDVGS_SYSOLD to SWITCHED .................................... 6-28
SWITCHED to RESUMEDAPPS_SYSNEW................................... 6-30
RESUMEDVGAPPS_SYSNEW to STOLEVGS .............................. 6-31
STOLEVGS to RESUMEDVGAPPS_SYSNEW .............................. 6-33
RESUMEDVGAPPS_SYSNEW to UNSPLIT ................................. 6-34
UNSPLIT to FT_COMPLETED........................................................ 6-35
x
1About this Manual
1
Overview
The Split Mode Overview and UserÕs Guide provides a general
overview of the Split Mode process, procedures for running Split
Mode, and information on adapting your applications to fully
capitalize on Split Mode functionalities.
Who Should Use this Manual
This book is intended for persons who are using splitmode to
upgrade the software or CPU modules on an FX System or who are
modifying applications to take advantage of Split Mode.
When to Use Split Mode
Split Mode is intended to be used during CPU module and software
upgrades. Because Split Mode requires the system to be made
simplex, you should not use it to simply replace existing hardware
or to upgrade modules for which other means of upgrade exist.
1-1
1
Prerequisites
This manual presumes that you are familiar with AIX and with the
general practices and procedures concerning the FX Series,
including the information contained in:
¥ Motorola FX Series Fault Tolerant Systems Architecture Overview
¥ Administering Your Fault Tolerant System
¥ FX Series Release Notes
¥ FX Series Diagnosing and Troubleshooting
¥ FX Series Operating Installation Guide
¥ FX Series System Hardware Installation Guide.
1-2
Overview
1
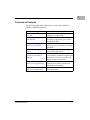
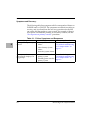
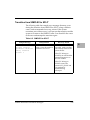
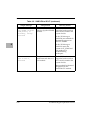
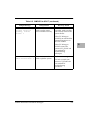
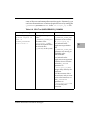
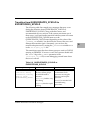
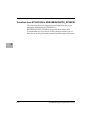
Overview of Contents
The following table details the topics covered in the different
chapters within this manual.
This Chapter...
Chapter 2, ÒSplit Mode
OverviewÓ
Chapter 3, ÒThe Split Mode
State MachineÓ
Chapter 4, ÒPreparing Your
System for Split ModeÓ
Chapter 5, ÒRunning Split
ModeÓ
Chapter 6, ÒProblem
Resolution and Fallback
Strategies
Chapter 7, ÒWriting Split
Mode-Aware ApplicationsÓ
Appendix A, ÒSample Split
Mode Aware ApplicationÓ
About this Manual
Discusses...
general information on the purpose and
architecture of Split Mode
the different system states and a general
procedure for upgrading your system
through Split Mode
information and procedures for
preparing your system prior to running
Split Mode
detailed procedures for upgrading FX
systems using Split Mode
detailed procedures for recovering from
system failures, troubleshooting the Split
Mode process, and for returning to the
original system conÞguration
guidelines for designing and modifying
applications in order to capitalize on
Split Mode functionalities
source code for sample Split Mode
aware application
1-3
1
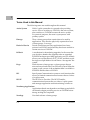
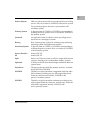
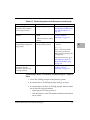
Terms Used in this Manual
The following terms are used throughout this manual.
Active System
Half of a split system that is expected to be providing
service. Prior to switchover, SYSOLD is the active system;
after switchover, SYSNEW becomes the active system.
For practical purposes, the term is synonymous with
primary system.
Datavgs
Those volume groups that contain data to be used by
applications. They must be physically separate from root
volume groups, or rootvgs.
Denial of Service
Period of time between when applications have been
quiesced on SYSOLD and when they have been notified to
resume service on SYSNEW.
Fallback
A mechanism for abandoning upgrades. In the event that
you decide to abandon the upgrades after an upgraded
SYSNEW has begun providing application service, fallback
allows you to return directly to FT_START and thus avoids
having to use Split Mode a second time to ÒdowngradeÓ the
system.
Ftvgs
Fault tolerant volume groups--volume groups that are
mirrored across both sides of an FX Series system. When the
system is split, one set of the redundant data is available to
SYSNEW and the other to SYSOLD.
ISC
Inter-System Communication system-a set of functions that
allows for limited communications between the two halves
of a split system.
ISC SP
The ISC Service Provider--The ISC SP handles
communications between the two sides of a split system
and manages application notification during switchover.
Nondatavg Applications
Applications that do not depend on steal datavgs and which
can therefore begin providing service on SYSNEW before
datavg stealing has completed.
Nonftvgs
1-4
Non-fault tolerant volume groups.
Overview
1
Passive System
Half of a split system which is not expected to be providing
service. Prior to switchover, SYSNEW is the passive system.
For practical purposes, the term is synonymous with
secondary system.
Primary System
A physical state of SYSOLD or SYSNEW corresponding to
its being the active system. Prior to switchover, SYSOLD is
the primary system.
Quiesced
An application state in which it ceases providing service
and waits for a message to resume.
Rootvg
Root volume group--a physical volume group containing
operating system and application software.
Secondary System
A physical state of SYSOLD or SYSNEW corresponding to
its being the passive system. Prior to switchover, SYSNEW
is the secondary system.
Service Provider
Same as ISC SP.
SP
Same as ISC SP.
Split
State of an FX Series system in which a single fault tolerant
system is running as two independent simplex systems.
Splitstate
A utility on the FX Series that manages transitions between
system states.
Switchover
The process during which the primary system is switched
from SYSOLD to SYSNEW.
SYSNEW
The half of a split system that is upgraded while the other
half continues providing service with original hardware,
firmware, and software. Initially, SYSNEW is the
passive/secondary system.
SYSOLD
The half of a split system that continues providing service
with original hardware, firmware, and software, while the
other half is upgraded. Initially, SYSOLD is the
active/primary system.
About this Manual
1-5
1
Related Information
FX Series Documentation
The following documentation contains additional information on
various aspects of the FX Series. These documents are all available
through Motorola and may be ordered by calling the Motorola
Computer Group Literature Center at 888-432-1877 or at 602-8047378.
Alternately, PDF versions of the documents are available on the
web at:
http://www-public.phx.mcd.mot.com/ext/literature/PDFLibrary/
¥ Administering Your Fault Tolerant System
¥ Configuring and Maintaining the System
¥ Operating System Installation Guide
¥ Operating System Installation Troubleshooting
¥ FX Series Release Notes
¥ Managing System Storage
¥ FX Series Diagnostics and Troubleshooting
¥ FX Series LED and Alarm Quick Reference
¥ Making and Using Backups
¥ FX Series System Hardware Installation Manual
¥ Writing Fault Tolerant Device Drivers
¥ FXBug Firmware Package UserÕs Manual, Volumes 1 and 2
¥ FXBug Diagnostics Manual
¥ Motorola FX Series Fault Tolerant Systems Architecture Overview
¥ Application DeveloperÕs Guide to CMS
1-6
Overview
1
Motorola Hardcopy AIX Documentation
Custom hardcopy documentation for general AIX and for FX Series
systems can be ordered by calling the Motorola Computer Group
Literature Center at 888-432-1877 or at 602-804-7378.
AIX Version 4.1 Documentation for all Systems
The following documents may be especially useful to novice AIX
users:
¥ Guide to System Information
¥ Getting Started
¥ Quick Reference
¥ iFOR/LS System Management Guide
¥ iFOR/LS Tips and Techniques
¥ Problem Solving Guide
¥ Messages Guide and Reference
¥ Performance Tuning Guide
Other MCG titles for generic AIX include:
¥ Installation Checklist
¥ Quick Installation Guide
¥ Network Installation Management Guide and Reference
¥ Network Installation Management Tips and Techniques
¥ VMEbus Device Driver Reference
¥ SVR4 Porting Guide
¥ Managing System Storage
¥ Configuring and Maintaining the System
About this Manual
1-7
1
IBM AIX Documentation
Additional hardcopy titles pertaining to AIX 4.1 are directly
available from IBM. A list of current IBM titles and ordering
information is available at:
http://www.rs6000.ibm.com/resource/aix_resource/Pubs/
on the Web.
Getting Help for System Problems
If you encounter difficulties contact your Motorola Computer
Group Sales office or Motorola Computer GroupÕs customer
support group at:
¥ U.S.A. 1-800-551-1017
¥ Canada 1-800-387-2416
¥ Maidenhead, U.K. 44-1628-39121
¥ Paris, France 33-1-467-43560
¥ Duesseldorf, Germany 49-211-65899-55
When you call, please be prepared to provide the following
information:
¥ the type and configuration of your FX Series system
¥ the level of AIX that you are running
¥ your system serial number
¥ the name of your company, your name, and a telephone
number
¥ a brief description of the problem, including the severity of its
impact on your ongoing efforts
1-8
Overview
2Split Mode Overview
2
Overview
This chapter provides an overview of Split Mode, including a highlevel look at the Split Mode architecture and process.
The Purpose of Split Mode
Split Mode allows applications running on FX Series systems to
achieve 99.999% availability by minimizing downtime that must be
scheduled for CPU module and software upgrades.
FX Series systems are designed so hardware modules may be Òhot
swappedÓ while the system continues to provide service. For
example, a Multi-Function I/O (MFIO) module containing active
disks can be replaced with a new MFIO module without
interrupting service. Similarly, CPU modules may be hot swapped.
Since the CPU modules run synchronously, their hardware must be
identical. Therefore, CPU modules cannot be upgraded by being
hot swapped. Similarly, the operating system cannot be upgraded
while the system is fault tolerant.
Split Mode allows you to take a fully redundant fault tolerant FX
Series system and divide it into two simplex systems. This
temporarily removes the need for the CPU modules to run
synchronously and allows you to upgrade one half of the system
while the other continues providing service. Split Mode also offers
an avenue for upgrading operating system and application
software.
Because Split Mode requires the system to be made simplex, you
should not use it to replace existing hardware or to upgrade
modules for which other means of upgrade exist. Split Mode is
intended to be used only during CPU module upgrades and
software upgrades.
2-1
2
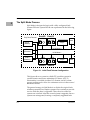
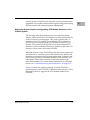
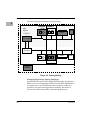
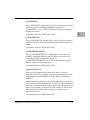
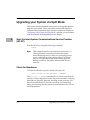
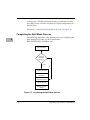
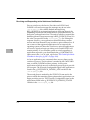
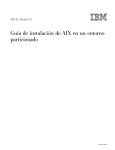
The Split Mode Process
Split Mode is designed to begin with a fully configured fault
tolerant FX Series system like the one represented in the following
figure.
Fully Fault Tolerant
RootVG
MFIO
DataVG
MFIO
Other
CPU 0
(Master)
Async
I/O & Mbus 0
CPU 1
(Checker)
CPU 2
(Checker)
I/O & Mbus 1
MFIO
RootVG
MFIO
Async
Other
DataVG
Figure 2-1. Initial Fault Tolerant Configuration
This figure shows a system in which CPU modules operate in
synchronization and access redundant I/O buses. All I/O
functionality is available in either I/O domain, and all volume
groups are mirrored to allow for continuous service in the event of
hardware failures.
The general strategy in Split Mode is to divide the original fault
tolerant system into two simplex systems. One continues to provide
service while the other is upgraded. Then, the roles of the two
systems are switched. After the second system is upgrade, the two
systems are reintegrated, forming a completely upgraded fault
2-2
Overview
tolerant system. Until the point when the second system has been
upgraded, it is possible to return to the original configuration using
fall back scripts with minimal operator adjustments.
Making the System Simplex and Upgrading CPU Module Hardware on the
Offlined System
The first step in the Split Mode process is to make the system
simplex. Thus, the checker CPU modules are taken off line and one
of the I/O buses is unconfigured. This process offlines the I/O
modules in that I/O domain. The remaining CPU continues to
provide service using the online I/O modules in the active I/O
domain. This system will be SYSOLD. One of the offlined CPU
modules is paired with the offlined I/O modules in the other I/O
domain to form what will become SYSNEW.
When the system is split, SYSOLD becomes the active system and
provides service, controls system LEDs and the telco alarms, and
monitors power supplies and system temperature. In Service and
Out of Service LEDs on individual modules, such as MFIOs and
individual CPU modules continue to reflect the status of the
individual modules. For a more detailed discussion of LEDs and
alarms, see ÒSystem Monitoring and NotificationÓ on page 2-12.
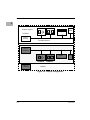
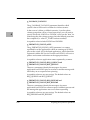
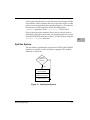
Figure 2-2 shows the simplex situation, in which SYSOLD is
providing service and SYSNEW is offlined, but not yet split. This is
the point at which to upgrade the CPU module hardware on
SYSNEW.
Split Mode Overview
2-3
2
2
RootVG
Simplex System
MFIO
DataVG
MFIO
Other
Async
SYSOLD
CPU 0
(Active)
Providing Service
CPU 1
(Passive)
SYSNEW
MFIO
RootVG
CPU 2
(Offlined)
MFIO
Async
Other
DataVG
Offlined
Figure 2-2. Simplex configuration
2-4
Overview
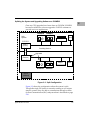
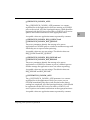
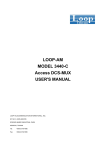
Splitting the System and Upgrading Software on SYSNEW
2
Once any CPU upgrades have been done on SYSNEW, SYSNEW
becomes available for software upgrades. SYSOLD continues to
provide service to applications.
RootVG
Split
System
MFIO
DataVG
MFIO
Other
Async
SYSOLD
CPU 0
(Active)
Providing Service
I
S
C
Upgraded
CPU 1
(Passive)
SYSNEW
MFIO
RootVG
MFIO
Async
Other
DataVG
CPU 2
(Offlined)
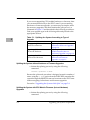
Figure 2-3. Split Configuration
Figure 2-3 shows the configuration when the system is split.
Though the single FX System is currently running as two unique
simplex systems, they are able to communicate through an InterSystem Communication (ISC) subsystem that is described on page
2-10.
Split Mode Overview
2-5
2
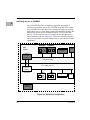
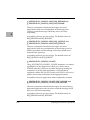
Switching Service to SYSNEW
Once SYSNEW has been completely upgraded and tested, a
switchover procedure allows for SYSNEW and SYSOLD to trade
roles. SYSNEW becomes the active system and begins providing
application service, controlling system LEDs and telco alarms, and
monitoring system power and temperature. SYSOLD becomes
passive, i.e. discontinues service to applications, and becomes a
warm backup as shown in Figure 2-4. Because SYSOLD remains
online, it is possible to quickly fallback and to provide file transfer
capabilities.
RootVG
Split
System
MFIO
DataVG
MFIO
Other
Async
SYSOLD
CPU 0
(Passive)
I
S
C
Warm Backup
Providing Service
CPU 1
(Active)
SYSNEW
MFIO
RootVG
MFIO
Async
Other
DataVG
CPU 2
(Offlined)
Figure 2-4. Switched Configuration
2-6
Overview
2
As with other parts of the Split Mode procedure, the switchover
process can be adapted depending on your specific situation and
needs. Major areas to be considered at this point include managing
data, managing applications, and managing Ethernet connections
with the outside world.
Managing Data
Because the FX Series uses disk mirroring, SYSNEW and SYSOLD
typically have identical disks when the Split Mode procedure
begins. However, at the beginning of the Split Mode process, the
mirrors are broken. As SYSOLD continues providing service and
SYSNEW is being upgraded and tested, data on SYSOLD is
continuously updated while that on SYSNEW becomes stale. For
some applications, reverting to stale data on switchover may
completely undo the benefits of Split Mode. To counter this
problem, Split Mode enables SYSNEW to steal volume groups from
SYSOLD. This means that the new instances of the application,
running on SYSNEW, are able to work from the most current data
which has been maintained by SYSOLD.
Thus, as part of the switchover process, SYSNEW accesses the
current data volume groups (datavgs) from SYSOLD, without
corrupting the newly upgraded root volume group (rootvg).
If you intend to ÒstealÓ data from SYSOLD to SYSNEW, the volume
groups on the original fault tolerant system must be divided
between a root volume group (rootvg) and data volume group
(datavg) or groups on different I/O modules. For similar reasons,
all swap partitions must be on the rootvg rather than on the
datavgs.
An alternative to using datavg stealing is to pass small amounts of
data through the ISC subsystem which is described on page 2-10.
Using the non-datavg method can reduce the denial of service
during switchover.
Split Mode Overview
2-7
The following figure illustrates datavg stealing.
2
RootVG
Split
System
MFIO
DataVG
MFIO
Other
Async
SYSOLD
CPU 0
(Secondary)
I
S
C
CPU 1
(Primary)
SYSNEW
MFIO
RootVG
MFIO
Async
Other
DataVG
CPU 2
(Offlined)
Figure 2-5. Datavg stealing
Managing Applications During Switchover
Applications on both SYSOLD and SYSNEW need to be quiesced
before service is switched from SYSOLD to SYSNEW and then have
to resume service on SYSNEW after the switchover. While it is
possible to stop and start applications manually, the denial of
service time can be decreased by automating the process.
2-8
Overview
It is recommended that you make at least one of your applications
ÒSplit Mode aware.Ó Such applications register with the Split Mode
ISC Service Provider (ISC SP) via sockets. The ISC SP then is
responsible for telling the application when to quiesce and when to
restart on SYSNEW. The application, in turn, should manage any
applications which are not Split Mode aware. For more information
on how to add Split Mode awareness to your application, see
Chapter 7.
Managing Ethernet Connections
The Split Mode architecture allows for the active and the passive
systems to have unique IP and MAC addresses. The active system
retains the system name, while the passive system must be
referenced by its IP address. During switchover, SYSNEW becomes
the active system and accordingly takes on the active IP address,
the associated MAC address, and the system name. Thus, all
external ethernet traffic is directed to the system that is currently
providing service, and both systems can exist on the network
without confusing applications on remote systems.
Verifying Service on SYSNEW
After switchover, but before upgrading SYSOLD, you should take
the opportunity to verify that SYSNEW is providing adequate
service. Once you upgrade SYSOLD, it will be much more difficult
to fall back to the original configuration. Once you are satisfied with
the service being provided by SYSNEW, you should unsplit the two
systems, making them into a single fault tolerant system and
upgrade SYSOLD.
Unsplitting the System and Upgrading SYSOLD
Unsplitting the system results in a simplex system in which
SYSNEWÕs CPU module has access to both I/O domains. Disk
mirrors are reestablished and all I/O redundancy is restored. At
this point, you should upgrade the remaining CPU module
hardware and reintegrate them. It is not necessary to upgrade
software on SYSOLD, because this will be accomplished by
reestablishing disk mirrors.
Split Mode Overview
2-9
2
2
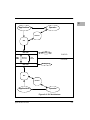
Inter-System Communications (ISC)
The Split Mode Inter-System Communications (ISC) subsystem
allows for communications between SYSOLD and SYSNEW.
Utilities and applications on one system are able to interact with
data or applications on the other system. For example, an
application that is running on SYSOLD is able to relay data to an
application that is running on SYSNEW. It also allows operators to
execute programs and utilities on the remote system, and provides
logging for all commands and application responses.
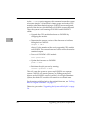
The ISC architecture allows for separate channels for messages and
for data, so that commands can be executed quickly, rather than
having to sit in a data queue.
The following figure illustrates the ISC architecture.
2-10
Overview
2
Applications
Operator
Utilities
API
ISC SP
Message Log
SYSOLD
PRI
RAM
Message
Channels
Data
Channels
SYSNEW
ISC SP
Message Log
API
Utilities
Applications
Operator
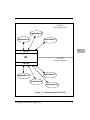
Figure 2-6. ISC Architecture
Split Mode Overview
2-11
The most important ISC utilities include SMFT, SMMT, and SMPE.
All three utilities can be executed from the command line or via an
Application ProgrammerÕs Interface (API).
2
SMFT is a file transfer utility that provides a ready-made tool for
transferring files between the two systems. You can transfer files in
either direction--either from SYSOLD to SYSNEW or from
SYSNEW to SYSOLD.
SMMT is a message transfer utility that allows you to send direct
messages to registered applications, or to broadcast messages to all
registered applications. Messages can also be directed to the ISCÕs
message log.
SMPE is a program execution utility that allows you to execute
commands on SYSOLD or SYSNEW, or on both simultaneously
In addition to these utilities, applications are able to establish data
transfer connections between themselves via the ISC SP. The
initiating application provides the SP with its own name and the
name of the second application. The SP then establishes a data
socket from one application to the other.
Chapter 7, ÒWriting Split Mode-Aware Applications,Ó provides
information on how to tailor your application to take advantage of
the ISC subsystem.
System Monitoring and Notification
In normal FT mode, the master CPU module, in coordination with
the checker CPU module(s), uses the system maintenance bus
(mbus) to monitor module and system status. In Split Mode,
however, mbus restrictions which are put in effect in order to split
the system prevent the primary/active CPU module from accessing
the modules in the secondary/passive domain. Thus, the systemlevel LEDs and alarms reflect the status of the primary system only.
Indicators on individual modules, in each domain, continue to
reflect the current module status.
2-12
Overview
The primary system is still able to power down the system through
an unrestricted power maintenance bus. If a failure occurs that
requires system shutdown, the primary will power down every
module in the system, including the secondary's devices and CPU.
The behavior of the system LEDs during the Split Mode process is
described below. It is assumed that the process starts in FT mode
with only the System-In-Service (SIS) light on:
¥ As the system transitions to the SIMPLEX state, the system
LEDs and telco alarms are set accordingly when modules go
out of service.
¥ As the system transitions from the SIMPLEX state to the
SPLIT state, mbus access to SYSNEW's (secondary) modules
from SYSOLD (primary) is disabled. After that event, the
state of SYSNEW's modules is no longer taken into account
by the lights daemon, since only the primary's lights daemon
actively controls the system lights. Thus, the system LEDs
reflect the status of the modules managed by the primary
(SYSOLD). Only the SIS LED is on, unless there is a fault on
SYSOLD.
¥ As modules are takend offline on one side of the system and
control transferred to the other side, module LEDs switch
from the module In-Service LED being lit, to the module Outof-Service LED being lit, to the module In-Service LED being
lit again.
¥ After switchover, the system LEDs reflect the status of the
modules managed by SYSNEW (the new primary). The SIS
LED will be on. The Component-Out-Of-Service (COOS) LED
will be on, if datavg stealing is to be used, because the disks
belonging to the datavgs will have been taken offline to
prepare to steal the volume groups.
¥ Before returning to FT mode, mbus access is re-enabled to all
modules, and the system LEDs again reflect the state of all
modules. The SIS, COOS and telco LEDs will be illuminated
until everything is reintegrated.
Split Mode Overview
2-13
2
Note
2
2-14
During state transitions, and especially during the
switchover, the system LEDs will always reflect the
state of one of the systems. There should not be any
spurious telco alarms.
Overview
3The Split Mode State Machine
3
Overview
This chapter provides an overview of the Split Mode state machine
and presents a general procedure for upgrading your system via
Split Mode. The chapter also includes a brief description of the
steps involved in the switchover process and details of how to log
Split Mode commands.
3-1
The Split Mode State Machine
The Split Mode process is designed around a state machine that
corresponds to different steps in the Split Mode procedure and to
differences in system and resource availability. The state machine is
comprised of the following system states:
3
¥ FT_START
The FT_START state is the initial system state, before you
have started the Split Mode process.
¥ CHECKED
Between FT_START and CHECKED, the system is checked to
ensure that it is ready for Split Mode. The process includes:
verifying that disks are properly mirrored; checking for the
presence of at least dual redundant CPU modules; checking
for outstanding faults; and ensuring that the system contains
sufficient Fan, Power, and ICM modules.
¥ SIMPLEX
Between the CHECKED and the SIMPLEX states, SYSNEW is
powered off while SYSOLD continues providing service as a
simplex system. This is the state during which to upgrade
SYSNEW CPU hardware (if necessary).
¥ SPLIT
During the SPLIT state, SYSOLD is primary and continues to
provide service. SYSNEW is available as a separate system
for OS, application, and firmware upgrades and testing.
During the SPLIT state, it is possible to service applications
from both SYSOLD and SYSNEW, though such an
arrangement would require a detailed strategy for managing
data.
¥ QUIESCEDAPPS_SYSNEW
Between the SPLIT and the QUIESCEDAPPS_SYSNEW
states, applications running on SYSNEW receive notification
from the ISC Service Provider to quiesce themselves in
anticipation of switchover.
3-2
The Split Mode State Machine
¥ EXPORTEDVGS_SYSNEW
During the transition to EXPORTEDVGS_SYSNEW datavgs
on SYSNEW that correspond to datavgs to be stolen from
SYSOLD are exported.
¥ QUIESCEDAPPS_SYSOLD
The QUIESCEDAPPS_SYSOLD state corresponds to
applications running on SYSOLD having received a message
from the Service Provider and having quiesced themselves in
anticipation of switchover. This state marks the beginning of
denial of service.
¥ EXPORTEDVGS_SYSOLD
During the transition to EXPORTEDVGS_SYSOLD datavgs
that are to be stolen from SYSOLD are exported.
¥ SWITCHED
The SWITCHED state corresponds to a low level switchover
in which SYSNEW is made primary and SYSOLD is made
secondary. Note: at this point the systems exchange consoles:
SYSNEW becomes active on console0 and SYSOLD becomes
active on console1.
¥ RESUMEDAPPS_SYSNEW
The RESUMEDAPPS_SYSNEW state marks the point at
which nondatavg applications have been notified to resume
providing service on SYSNEW, the primary system.
¥ STOLEVGS
The STOLEVGS state corresponds to when datavgs from
SYSOLD have been stolen and are available to applications
running on SYSNEW.
¥ RESUMEDVGAPPS_SYSNEW
The RESUMEDVGAPPS_SYSNEW state marks the point at
which datavg applications have been notified to resume
providing service on SYSNEW, the primary system.
The Split Mode State Machine
3-3
3
This is the appropriate state to do final verification of system
performance.
Transitioning forward from the
RESUMEDVGAPPS_SYSNEW state will commit the
upgrades. Transitioning backwards from the UNSPLIT state
will abandon any upgrades and return the system to
FT_START.
3
¥ UNSPLIT
Between RESUMEDAPPS_SYSNEW and the UNSPLIT state,
the system is unsplit, SYSNEW gains control of SYSOLDÕs
I/O domains, and the SYSOLD CPU modules are off-lined.
This state is similar to having an otherwise fault tolerant
system running with only a single CPU.
This is the appropriate state in which to upgrade SYSOLDÕs
CPU modules.
¥ FT_COMPLETED
FT_COMPLETED is identical to FT_START. A different name
is used to distinguish the direction of transitions during the
Split Mode process (a transition to FT_START reverts to the
original system while a transition to FT_COMPLETED
completes the upgrade). The system state reverts to
FT_START as soon as you complete the Split Mode process.
3-4
The Split Mode State Machine
The Splitstate Utility
The splitstate utility guides the system between the various states.
Transitions between the states can be made by using the splitstate
command with a -s option and the target state. For example, if the
system is in the FT_START state, you can make it go to the
CHECKED state by using:
splitstate -s CHECKED
From any state prior to UNSPLIT, you can return to any previous
state via the same algorithm. For example, you can go from the
SIMPLEX state back to FT_START by running
splitstate -s FT_START
Note
It may be necessary to undo hardware and firmware
upgrades before returning to FT_START. For
directions on regressing your firmware to the original
version, see ÒFalling Back to Original FirmwareÓ on
page 5-7.
Once you have reached the UNSPLIT state, any backward
transition will revert the system back to FT_START--will make the
system ÒfallbackÓ to the original state. For more information on
fallback, see ÒFallback StrategiesÓ on page 6-2.
Determining the System State
You can check to see which state the system is in by running
splitstate -l
The -l option will provide a list of valid states and mark the current
state with an arrow (-->).
-->FT_START
CHECKED
SIMPLEX
SPLIT
The Split Mode State Machine
3-5
3
QUIESCEDAPPS_SYSNEW
EXPORTEDVGS_SYSNEW
QUIESCEDAPPS_SYSOLD
3
EXPORTEDVGS_SYSOLD
SWITCHED
RESUMEDAPPS_SYSNEW
STOLEVGS
RESUMEDVGAPPS_SYSNEW
UNSPLIT
FT_COMPLETED
Alternately, splitstate -L returns only the current system state.
FT_START
3-6
The Splitstate Utility
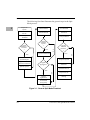
Overview of the Split Mode Procedure
The following section contains an overview of a standard upgrade
procedure for split mode.
General Procedure
The split mode procedure consists of the following general steps,
which are described in more detail as part of the specific procedures
which begin on page 5-2:
¥ Check that the system is ready to split
¥ Start the Inter-System Communications Service Provider (ISC
SP)
¥ Make the system simplex
¥ Perform any hardware or firmware upgrades on the offlined
side of the system
¥ Split the system into SYSOLD and SYNEW
¥ Upgrade the operating system on SYSNEW (if applicable)
¥ Upgrade applications on SYSNEW (if applicable)
¥ Test SYSNEW
¥ Switch the roles of SYSOLD and SYSNEW (SYSNEW
becomes primary and begins providing service)
¥ Execute further tests on SYSNEW
¥ Upgrade hardware on SYSOLD (if applicable)
¥ Reintegrate the system
The Split Mode State Machine
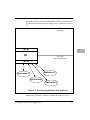
3-7
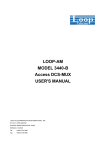
3
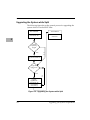
The following flowchart illustrates the general steps in the Split
Mode process.
3
Prepare the
System
Boot SYSNEW
Test SYSNEW
Start the
ISC SP
Start the ISC SP
Switchover
Check System
Readiness
Verify SYSNEW
Upgrade
Operating
System
?
Upgrade
Hardware or
Firmware
?
YES
N
O
Upgrade
SYSOLD
Hardware
?
YES
Upgrade SYSNEW OS
YES
N
O
Make the
System Simplex
N
O
Unsplit the System
Upgrade SYSNEW
Hardware or Firmware
Upgrade
Applications
?
Upgrade SYSOLD
Hardware
Split the System
Complete the
Split Mode Process
YES
N
O
Upgrade
Applications
Stop the ISC SP
Manage Nonsteal
Datavgs
Start the ISC SP
on SYSNEW
(if necessary)
Figure 3-1. General Split Mode Flowchart
3-8
Overview of the Split Mode Procedure
Switchover
Up through the SPLIT state, SYSOLD continues providing service
exactly as if the system were in the original fault tolerant
configuration. Once you reach the SPLIT state, it is also possible to
have applications running on SYSNEW.
In order to make SYSNEW the primary system, and in order to
upgrade SYSOLD, however, applications on both systems must be
halted for a brief time. This time, during which applications are
being stopped on SYSOLD and started on SYSNEW, is known as
denial of service.
If you have adapted your applications to take advantage of the FX
SeriesÕ split mode capabilities, then the system will automate the
tasks associated with switching. If you initiate a transition from the
SPLIT state to RESUMEDVGAPPS_SYSNEW or a later state, the
system will:
¥ send a message to all registered applications on SYSNEW
telling them to quiesce,
¥ export SYSNEWÕs datavgs (as specified in /var/ft/split_cfg),
¥ send a message to all registered applications on SYSOLD
telling them to quiesce,
¥ export SYSOLDÕs datavgs (as specified in /var/ft/split_cfg),
¥ make SYSNEW the primary system,
¥ send a message to registered nondatavg applications to
resume on SYSNEW,
¥ steal the current datavgs from SYSOLD and give them to
SYSNEW,
¥ send a message to registered data-dependent applications on
SYSNEW telling them to resume service.
The Split Mode State Machine
3-9
3
Logging The Split Mode Process
The split mode process is performed using the splitstate utility,
which sends output to the console. Since the Service Provider is
running during the split mode process, the Service Provider
operation utility, spope, can be used in conduction with the
splitstate utility to log the split mode process to the Service
Provider log file, /var/ft/isc_sp.log.
3
To log the splitstate output, run all splitstate operations under
spope:
spope "/bin/ksh /usr/sbin/splitstate -s <state>"
If a state transition occurs on the secondary when the secondary is
about to go away, i.e. when the system is unsplit, the splitstate
utility will automatically run the transition on the primary, and log
the output to the primary Service Provider log file. Additionally,
just before the secondary is unsplit, the primary retrieves the
secondary Service Provider log file and copies it to
/var/ft/isc_sp.log.SECONDARY.
For simplicity, most of the commands in this chapter will be shown
without the spope utility syntax.
3-10
Overview of the Split Mode Procedure
4Preparing Your System for
Split Mode
4
Overview
This chapter provides instructions for preparing your FX Series
system prior to running Split Mode.
4-1
Preparing the System for Split Mode
The following discussions provides details on how to customize the
split mode process to your system.
4
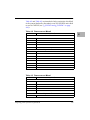
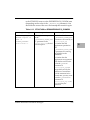
List System Information
Fill in the table below with the appropriate system information.
This information will be valuable in the event that the upgrades
need to be abandoned or reversed.
Table 4-1. System Information
System Name
Current BOS Version
Date
Time
Bug Version
Note
You must be running AIX 4.1.5r3 or a later AIX FX
Series release and must be running version 1.3 or later
of the FX Series Debugger in order to run Split Mode.
See the FX Series Installation Guide and the AIX 4.1.5r3
Release Notes for information on installing these
products.
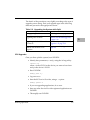
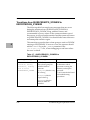
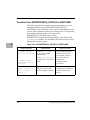
Assign System Resources
In order to do the upgrades while the system is split, you need to
ensure that necessary devices are available to SYSNEW. For
example, if you intend to use a DAT drive to upgrade the OS, and
if your system only contains one DAT drive, then you need to
assign it to SYSNEW.
4-2
Preparing the System for Split Mode
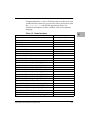
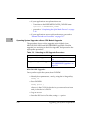
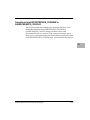
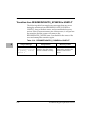
Table 4-2 and Table 4-3 are intended to help you decide which half
of the system (defined by the mbus) to use for SYSNEW and which
to use for SYSOLD (see Òg_SYSOLD and g_SYSNEWÓ on page
4-18).
Table 4-2. Resources on Mbus0
Slotid
Module/Resource
Main Chassis
4
c1-1
c1-2
c1-3
c1-4
c1-5
Expansion Chassis
c2-1
c2-2
c2-3
c2-4
c2-5
c2-6
c2-7
c2-8
.
Table 4-3. Resources on Mbus1
Slotid
Module/Resource
Main Chassis
c1-12
c1-13
c1-14
c1-15
c1-16
Expansion Chassis
c2-9
Preparing Your System for Split Mode
4-3
Table 4-3. Resources on Mbus1 (continued)
Slotid
c2-10
c2-11
c2-12
c2-13
c2-14
c2-15
c2-16
4
Module/Resource
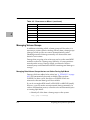
Managing Volume Groups
In addition to deciding which volume groups will be stolen, it is
necessary to create a plan for dealing with any data volume groups
(datavgs) which you do not want to be automatically stolen.
Handling noncritical datavgs manually will decrease the total
denial of service time.
Datavgs that are going to be stolen may not be on the same MFIO
modules as the root volume group. Similarly, all swap partitions
must be on the rootvg. Datavgs which you intend to retrieve
manually may not be attached to MFIOs containing steal datavgs or
rootvgs.
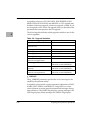
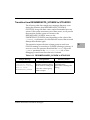
Managing Data Volume Groups that are not Stolen During Split Mode
Datavgs which are tabbed to be stolen (see Òg_STEALVGÓ on page
4-23) will automatically be made available when you boot
SYSNEW. In other words, the disks on SYSNEW which are
mirrored to the steal datavgs will be available.
If you do a complete BOS install (a BOS-NEW or MKSYSB install),
however, you will need to mount nonsteal datavgs manually. In
order to facilitate that process, collect the relevant information prior
to running Split Mode:
¥ Identify all of the data volume groups on the system:
lsvg | grep -v "rootvg"
4-4
Preparing the System for Split Mode
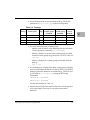
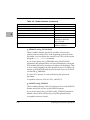
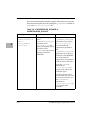
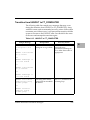
¥ List all datavgs that are not specified in the g_STEALVG
parameter in /var/ft/split_cfg in the following table.
Table 4-4. Datavgs
datavg
mount point
ftvg
physical
volume group
SYSNEW
physical
volume group
SYSOLD
Reactivation
method
Y/N
Y/N
Y/N
Y/N
¥ For each remaining data volume group,
Ð Identify and record all of the mount points for each data
volume group by examining /etc/filesystems.
Ð Identify whether or not the data volume group is a fault
tolerant volume group (ftvg) and circle Y or N in Table 4-4:
lsvg <vg>
Ð Identify all physical volume groups associated with the
datavg:
lsvg -p <vg>
¥ For each physical volume in the data volume group, identify
and record whether the hdisk is in the SYSOLD or SYSNEW
domain (where the domains are defined by g_SYSOLD and
g_SYSNEW in /var/ft/split_cfg) using the following
commands:
lsdomain -d0 | grep hdisk
lsdomain -d1 | grep hdisk
List the information in Table 4-4.
¥ Identify and record when and how the data volume group is
to be reactivated. There are five possible reactivation
methods:
Preparing Your System for Split Mode
4-5
4
1. Retrieve an ftvg from the SYSNEW disk during the SPLIT
state (see ÒThe Split Mode State MachineÓ on page 3-2 for an
explanation of system states).
2. Retrieve a nonftvg from SYSNEW during the SPLIT state.
3. Retrieve an ftvg from the SYSNEW disk after reaching
FT_COMPLETED.
4
4. Retrieve a nonftvg after reaching FT_COMPLETED.
5. Retrieve an ftvg from the SYSOLD disk after reaching
FT_COMPLTED.
Managing Nonftvgs that are Split across SYSOLD and SYSNEW
Nonftvgs that are split across SYSOLD and SYSNEW must be
exported before starting Split Mode and then imported once you
have completed the Split Mode process. Such volume groups will
not be accessible during Split Mode.
Export the nonftvgs using the following commands:
¥ umount fs
where fs is the name of the file system that contains the
volume group.
¥ varyoff vg
where vg is the name of the volume group.
¥ export vg
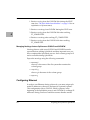
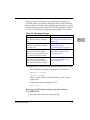
Configuring Ethernet
In order to run Ethernet during split mode, you must assign split
mode IP addresses to the active and passive (optional) systems.
This configuration allows SYSOLD, which is primary at the
beginning of the Split Mode process, and SYSNEW to exchange IP
addresses during switchover and thus ensures that the outside
4-6
Preparing the System for Split Mode
world is always in contact with the active system. With respect to
ethernet, the active system correlates to a hardware state known as
primary, while the passive system correlates to a secondary state.
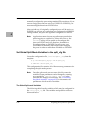
1. Enter the smit fastpath for TCP/IP:
smit tcpip
2. Select "Split Mode Ethernet Configuration" from the TCP/IP
menu.
3. Select ent0 from the Logical Ethernet Device menu.
4. On the Split mode Ethernet Configuration menu, enter the IP
addresses for the primary (active) and secondary (passive)
systems.
5. Repeat this procedure for each logical ethernet device on the
system.
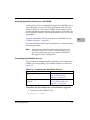
Loading Firmware Updates from CD
If you will be updating firmware as part of an OS upgrade, insert
the new OS installation media and use SMIT to install/update the
devices.xrft.flash package. This package contains the most recent
version of the firmware.
This is an essential step, as having the wrong firmware on the
SYSOLD CPU will result in the wrong firmware being
automatically applied to the SYSOLD CPUs.
Note
Because of the significance of the firmware revision,
and the problems that can be caused by having the
wrong firmware installed on a CPU, it is recommended
that all CPU hardware upgrades include a firmware
upgrade. All the procedures in this book are written
under the assumption that CPU module upgrades are
accompanied by firmware upgrades.
Preparing Your System for Split Mode
4-7
4
Managing Swap Partitions
Ensure that there are no swap partitions on any of the data volume
groups. All swap partitions must be on root volume groups.
4
Making Sure the Inter-System Communications Service
Provider (ISC SP) is Inactive
If the ISC SP from a previous Split Mode session is running when
you start a new session and a new SP, it can result in both service
providers running on the same system. To prevent this, you should
run spstop prior to beginning the new Split Mode process.
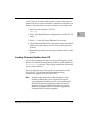
Adding a Second Console
Prior to starting split mode, you need to attach a second console to
the system. The console attached to port0 will be used to manage
the primary system, while the console attached to port1 will be used
to manage the secondary system.
Note
This means that during switchover, SYSNEW will
switch from console1 to console0 and SYSOLD will
switch from console0 to console1.
The following sections describe and illustrate the activity on the
different consoles at various points in the split mode process. For
clarity, console0 and console1 are used as shell prompts on the
respective systems.
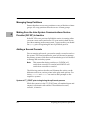
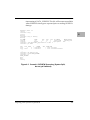
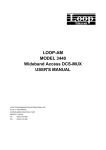
System at FT_START prior to beginning the split mode process
While the system is in the FT_START state, all standard input and
output is associated with console0. The additional console,
console1, is inactive.
4-8
Preparing the System for Split Mode
console0:
FT_START
console0:
rootvg
datavg
console0:
datavg:
LV NAME
testlv1
loglv00
console0:
splitstate -L
lsvg
lsvg -l datavg
TYPE
jfs
jfslog
LPs
10
1
PPs
20
2
PVs
2
2
TTY
0
TIME
1:45
0:00
0:03
0:00
0:00
0:00
0:00
0:00
0:00
0:00
LV STATE
open/syncd
open/syncd
MOUNT POINT
/datavg-jfs1
N/A
ps -deaf
UID
PID
root
1
root 3740
root 3894
root 4168
root 4376
root 4800
root 5038
root 5300
root 5574
root 5962
...
...
root 5962
...
...
PPID
0
1
1
1
1
3740
3740
3740
3740
1
1
C
0
0
0
0
0
0
0
0
0
0
STIME
08:09:34
08:12:26
08:12:11
08:12:15
08:13:01
08:12:46
08:12:40
08:12:43
08:12:50
09:01:39
0 08:00:00
CMD
/etc/init
/usr/sbin/srcmstr
/usr/sbin/syncd 60
/usr/lib/errdemon -B 32768
/usr/sbin/cron
/usr/sbin/portmap
/usr/sbin/syslogd
/usr/lib/sendmail -bd -q30m
/usr/sbin/inetd
/usr/sbin/isc_sp
0 9:32 /usr/sbin/data_application -s db.1
console0: cd /datavg-jfs1
console0: ls
db.1
db.2
config
Figure 4-1. Console0: SYSOLD as Primary
Figure 4-1 shows representative output from the still fault tolerant
system, including a list of current applications and the contents of
the /datavgs-jfs1 directory. At this point, console1 would remain
blank and inactive.
Preparing Your System for Split Mode
4-9
4
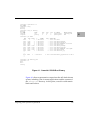
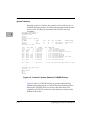
System Split, but not yet Switched
Once the system is split, console0 is associated with whichever
system is primary. Prior to the SWITCHED state, that means that
console0 is associate with SYSOLD while console1 is associated
with SYSNEW.
console0:
SPLIT
console0:
rootvg
datavg
console0:
datavg:
LV NAME
testlv1
loglv00
console0:
4
UID
root
root
root
root
root
root
root
root
root
root
...
...
splitstate -L
lsvg
lsvg -l datavg
TYPE
jfs
jfslog
LPs
10
1
PPs
10
1
PVs
1
1
LV STATE
open/syncd
open/syncd
MOUNT POINT
/datavg-jfs1
N/A
ps -deaf
PID PPID
1
0
3740
1
3894
1
4168
1
4376
1
4800 3740
5038 3740
5300 3740
5574 3740
5962
1
C
0
0
0
0
0
0
0
0
0
0
STIME
08:09:34
08:12:26
08:12:11
08:12:15
08:13:01
08:12:46
08:12:40
08:12:43
08:12:50
09:01:39
TTY TIME CMD
- 1:45 /etc/init
- 0:00 /usr/sbin/srcmstr
- 0:03 /usr/sbin/syncd 60
- 0:00 /usr/lib/errdemon -B 32768
- 0:00 /usr/sbin/cron
- 0:00 /usr/sbin/portmap
- 0:00 /usr/sbin/syslogd
- 0:00 /usr/lib/sendmail -bd -q30m
- 0:00 /usr/sbin/inetd
0 0:00 /usr/sbin/isc_sp
console0: cd /datavg-jfs1
console0: touch DATA_SYSOLD
console0: ls
DATA_SYSOLD
db.1
db.2
config
Figure 4-2. Console0: SYSOLD Primary (System Split,
but not yet Switched)
Figure 4-2 shows representative standard input and output on
console0/SYSOLD. Note, that the operator has created a file,
DATA_SYSOLD, in one of SYSOLDÕs data directories. This file will
appear on SYSNEW after datavg stealing.
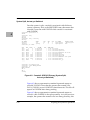
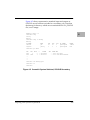
Figure 4-3 shows representative standard input and output on
console1 while SYSNEW is the split secondary. As in the previous
example, the operator has created a file in a datavg directory, this
4-10
Preparing the System for Split Mode
time naming it DATA_SYSNEW. This file will become unavailable
when SYSNEWÕs datavgs are exported prior to stealing SYSOLDÕs
datavgs.
FX-Bug-> pboot 5 0
<boot>
console1: lsvg
rootvg
datavg
console1: lsvg -l datavg
datavg:
LV NAME
TYPE
LPs
PPs
PVs LV STATE
testlv1
jfs
10
10
1
open/syncd
loglv00
jfslog
1
1
1
open/syncd
console1: /usr/sbin/data_application -s db.1 &
console1: ps -deaf
UID
PID PPID
C
STIME
root
1
0
0 09:29:44
root 4351
1
0 09:30:01
...
...
console1: cd /datavg-jfs1
console1: touch DATA_SYSNEW
console1: ls
DATA_SYSNEW
db.1
db.2
config
4
MOUNT POINT
/datavg-jfs1
N/A
TTY TIME CMD
- 1:45 /etc/init
- 0:00 /usr/sbin/srcmstr
Figure 4-3. Console1: SYSNEW Secondary (System Split,
but not yet Switched)
Preparing Your System for Split Mode
4-11
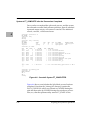
System Switched
After the system is switched, the consoles will switch as well. As
SYSNEW becomes primary, it will become associated with console0
and console1 will become associated with SYSOLD, the new
secondary.
console0: splitstate -L
RESUMEDVGAPPS_SYSNEW
console0: lsvg
rootvg
datavg
console0: lsvg -l datavg
datavg:
LV NAME
TYPE
testlv1
jfs
loglv00
jfslog
console0: ps -deaf
4
UID
PID
root
1
root 3740
root 3894
root 4168
root 4376
root 4800
root 5038
root 5300
root 5574
root 5962
...
...
root 5962
...
...
PPID
0
1
1
1
1
3740
3740
3740
3740
1
1
C
STIME
0 08:09:34
0 08:12:26
0 08:12:11
0 08:12:15
0 08:13:01
0 08:12:46
0 08:12:40
0 08:12:43
0 08:12:50
0 09:01:39
0 08:00:00
LPs
10
1
PPs
10
1
TTY
0
0
PVs
1
1
LV STATE
open/syncd
open/syncd
MOUNT POINT
/datavg-jfs1
N/A
TIME CMD
1:45 /etc/init
0:00 /usr/sbin/srcmstr
0:03 /usr/sbin/syncd 60
0:00 /usr/lib/errdemon -B 32768
0:00 /usr/sbin/cron
0:00 /usr/sbin/portmap
0:00 /usr/sbin/syslogd
0:00 /usr/lib/sendmail -bd -q30m
0:00 /usr/sbin/inetd
0:00 /usr/sbin/isc_sp
0:02 /usr/sbin/data_application -s db.1
console0: cd /datavg-jfs1
console0: ls
DATA_SYSOLD
db.1
db.2
config
Figure 4-4. Console0: System Switched, SYSNEW Primary
Figure 4-4 shows SYSNEW running as primary and directing
standard input and output to console0. Because the datavgs have
been stolen, SYSNEW now has access to the data which was
originally on SYSOLD, as shown by the directory contents at the
bottom of the screen.
4-12
Preparing the System for Split Mode
Figure 4-5 shows representative standard input and output on
SYSOLD once it has been switched to a secondary role. Note that
the datavg-jfs directory which once contained the DATA_SYSOLD
file, is now empty.
FX-Bug-> pboot 5 0
console1: lsvg
rootvg
datavg
console1: lsvg -l datavg
datavg:
LV NAME
TYPE
testlv1
jfs
loglv00
jfslog
console1: ps -deaf
UID
PID PPID
C
STIME
root
1
0
0 09:29:44
root 4351
1
0 09:30:01
...
...
...
console1: cd /datavg-jfs1
console1: ls
console1:
4
LPs
10
1
PPs
10
1
PVs
1
1
LV STATE
open/syncd
open/syncd
MOUNT
/datav
N/A
TTY TIME CMD
- 1:45 /etc/init
- 0:00 /usr/sbin/srcmstr
Figure 4-5. Console0: System Switched, SYSOLD Secondary
Preparing Your System for Split Mode
4-13
System at FT_COMPLETE after the Process has Completed
Once you have completed the split mode process, and the system
has returned to normal fault tolerant operations, then all standard
input and output activity will return to console0. The additional
console, console1, will become frozen.
4
console0:
FT_START
console0:
rootvg
datavg
console0:
datavg:
LV NAME
testlv1
loglv00
console0:
UID
root
root
root
root
root
root
root
root
root
root
...
...
root
...
...
splitstate -L
lsvg
lsvg -l datavg
TYPE
jfs
jfslog
LPs
10
1
PPs
20
2
PVs
2
2
LV STATE
open/syncd
open/syncd
MOUNT POINT
/datavg-jfs1
N/A
ps -deaf
PID PPID
1
0
3740
1
3894
1
4168
1
4376
1
4800 3740
5038 3740
5300 3740
5574 3740
5962
1
C
0
0
0
0
0
0
0
0
0
0
5962
0 08:00:00
1
STIME
08:09:34
08:12:26
08:12:11
08:12:15
08:13:01
08:12:46
08:12:40
08:12:43
08:12:50
09:01:39
TTY TIME CMD
- 1:45 /etc/init
- 0:00 /usr/sbin/srcmstr
- 0:03 /usr/sbin/syncd 60
- 0:00 /usr/lib/errdemon -B 32768
- 0:00 /usr/sbin/cron
- 0:00 /usr/sbin/portmap
- 0:00 /usr/sbin/syslogd
- 0:00 /usr/lib/sendmail -bd -q30m
- 0:00 /usr/sbin/inetd
0 0:00 /usr/sbin/isc_sp
0
0:03 /usr/sbin/data_application -s db.1
console0: cd /datavg-jfs1
console0: ls
DATA_SYSOLD
db.1
db.2
config
Figure 4-6. Console0: System FT_COMPLETED
Figure 4-6 shows console0 after the Split Mode process has been
completed. Note that the /datavg-jfs1 directory contains the
DATA_SYSOLD file which was created on SYSNEW during the
split and then stolen by SYSNEW during the switchover process.
Note, too, that the splitstate utility returns FT_START for the
4-14
Preparing the System for Split Mode
system state. This is because FT_START and FT_COMPLETED are
identical states and the split state utility makes the translation to
FT_START as soon as you reach FT_COMPLETED.
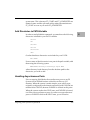
Add Directories to PATH Variable
In order to run Split Mode commands, you must have the following
directories included in your PATH variable:
/usr/bin
/etc
/usr/sbin
/usr/ucb
/usr/bin/X11
/sbin
Confirm that these directories are included in your PATH:
echo $PATH
If one or more of the directories is not part of the path variable, add
them using the following syntax:
PATH=$PATH:/directory1:/directory2; export PATH
where directory1 and directory2 are the absolute path for the
directories you wish to add.
Handling Asynchronous Ports
Prior to entering Split Mode, the asynchronous ports on an FX
System will be divided between controllers on the two I/O
domains. When the system is made simplex, ports which were
originally configured on the domain associated with SYSNEW are
transferred to SYSOLD, because SYSNEW is offlined at this point.
When the system reaches the SPLIT state, and SYSNEW is booted,
it will have no asynchronous ports. In order to use asynchronous
ports on SYSNEW while in the SPLIT state, you will need to
Preparing Your System for Split Mode
4-15
4
manually configure the ports using standard FX procedures. If you
want to assign ports that are active on SYSOLD to SYSNEW, you
must unconfigure them from SYSOLD first.
After switchover, all originally configured ports will be active on
SYSNEW, as will any new ports that you configured on SYSNEW.
During fallback, the ports will again be configured on SYSOLD.
4
Note
Applications must close any asynchronous ports before
quiescing prior to switchover. If they fail to do so, the
splitstate utility will be unable to unconfigure the
ports on SYSOLD and will, therefore, be unable to
reconfigure them on SYSNEW. In such a case, you
would need to manually unconfigure and configure
the ports in order to make them available on SYSNEW.
Set Global Split Mode Variables in the split_cfg file
Create the configuration file, /var/ft/split_cfg from the
template:
# cp /usr/sbin/split_cfg.tpl /var/ft/split_cfg
# chmod 600 /var/ft/split_cfg
This configuration file contains all of the necessary parameters for
completing the split mode process.
Note
Once the split mode process starts, this file cannot be
modified. Some parameters can be changed by creating
an override file, /var/ft/split_cfg.ovr, at the
time that the changes are necessary. See ÒOverriding
the global variablesÓ on page 4-25 for information on
parameters which can be overridden.
The Global Split mode Variables
The following table lists the variables which may be configured in
the /var/ft/split_cfg file. The variables and possible values are
discussed below.
4-16
Preparing the System for Split Mode
Using the table below, circle or fill in the values you choose for each
variable (default values are given in bold). Once you are done, edit
the /var/ft/split_cfg and add the appropriate values. For
additional information on these variables, refer to the splitstate
manpage.
Table 4-5. Global Variables
Variable
g_PRIMARY
g_SECONDARY
g_SYSOLD
g_SYSNEW
g_FORCESPLIT
g_FORCESWITCH
g_FORCEREINTEGRATE
g_FALLBACK_ONE
g_FALLBACK_DATAVGS
g_PRESWITCH_SYSOLD_APPS
g_PRESWITCH_SYSOLD_APPS_REQ_QUIESCE
g_PRESWITCH_SYSOLD_APPS_RSP_QUIESCE
g_PRESWITCH_SYSOLD_APPS_REQ_RESUME
g_PRESWITCH_SYSOLD_APPS_RSP_RESUME
g_PRESWITCH_SYSNEW_APPS
g_PRESWITCH_SYSNEW_APPS_REQ_QUIESCE
g_PRESWITCH_SYSNEW_APPS_RSP_QUIESCE
g_PRESWITCH_SYSNEW_APPS_REQ_RESUME
g_PRESWITCH_SYSNEW_APPS_RSP_RESUME
g_POSTSWITCH_SYSNEW_APPS
g_POSTSWITCH_SYSNEW_APPS_REQ_QUIESCE
g_POSTSWITCH_SYSNEW_APPS_RSP_QUIESCE
g_POSTSWITCH_SYSNEW_APPS_REQ_RESUME
g_POSTSWITCH_SYSNEW_APPS_RSP_RESUME
g_POSTSWITCH_SYSNEW_VGAPPS
g_POSTSWITCH_SYSNEW_VGAPPS_REQ_QUIESCE
Preparing Your System for Split Mode
4
Value
CPU-0, CPU-1, CPU-2
CPU-0, CPU-1, CPU-2
0, 1
0, 1
TRUE, FALSE
TRUE, FALSE
TRUE, FALSE
TRUE, FALSE
SYSOLD, SYSNEW
4-17
Table 4-5. Global Variables (continued)
4
Variable
g_POSTSWITCH_SYSNEW_VGAPPS_RSP_QUIESCE
g_POSTSWITCH_SYSNEW_VGAPPS_REQ_RESUME
g_POSTSWITCH_SYSNEW_VGAPPS_RSP_RESUME
g_APPTIME
g_STEALVG
g_UPGRADE
g_VERBOSE
Value
CPU, BOS-NEW, BOSPRESERVE, MKSYSB,
BOS_ONLINE
INFO, WARN, CRIT,
DEBUG, DEBUG2
g_PRIMARY and g_SECONDARY
These variables identify which CPU modules will act as the
primary and secondary CPUs at the beginning of the split mode
procedure. You can display the current list of CPUs on the system
using the ftctl -status command.
If you do not specify the g_PRIMARY and g_SECONDARY
parameters, the splitstate utility will choose defaults by pairing the
CPU module physically closest to each mbus with that mbus. That
is, if no value is supplied, the CPU module closest to SYSNEW will
become g_SECONDARY and the CPU module closest to SYSOLD
will become g_PRIMARY.
If a 3rd CPU is present, it is not used during the split mode
procedure.
Acceptable values are CPU-0, CPU-1, and CPU-2.
g_SYSOLD and g_SYSNEW
These variables identify which I/O domain will act as the SYSOLD
domain and which will act as the SYSNEW domain.
If you do not specify the g_SYSOLD and g_SYSNEW parameters,
default values will be selected for you by the splitstate utility.
Acceptable values are 0 and 1.
4-18
Preparing the System for Split Mode
g_FORCESPLIT
The g_FORCESPLIT variable allows you to force the system to split
even if an error is encountered during the transition. If
g_FORCESPLIT is set to TRUE, then the transition will continue
despite most errors.
4
Acceptable values are TRUE and FALSE.
g_FORCESWITCH
The g_FORCESWITCH variable allows you to force the system to
switch even if one of the registered applications fails to quiesce or
resume.
Acceptable values are TRUE and FALSE.
g_FORCEREINTEGRATE
The g_FORCEREINTEGRATE variable allows you to force the
system to reintegrate SYSOLD and SYSNEW even if an error is
encountered in the reintegration process. If
g_FORCEREINTEGRATE is set to TRUE, then the datavgs will
begin to remirror despite any errors.
Acceptable values are TRUE and FALSE.
g_FALLBACK_ONE
In general, the splitstate utility transitions back one state in
response to errors. For example, if the system encounters an error
in the transition from SIMPLEX to SPLIT, then it will return to
SIMPLEX.
When transitioning back to a state that would result in a denial of
service, such as transitioning back to STOLEVGS, then the default
behavior is to transition back all the way to before denial of service
began. If you set the g_FALLBACK_ONE variable to TRUE, then
the system will always transition back only a single state in
response to an error.
Acceptable values are TRUE and FALSE.
Preparing Your System for Split Mode
4-19
g_FALLBACK_DATAVGS
The g_FALLBACK_DATAVGS parameter identifies which
systemÕs data will be used in a fallback or failure scenario.
In the event of a failure or fallback scenario, if you have data
volume groups that will be or have been stolen, you will need to
specify which side, SYSOLD or SYSNEW, will act as the "base" for
remirroring the data volume groups when the fallback procedure
has completed (i.e. when FT_START has been reached).
4
Acceptable values include SYSOLD and SYSNEW.
g_PRESWITCH_SYSOLD_APPS
The g_PRESWITCH_SYSOLD_APPS parameter is a commaseparated list of the applications which are running on SYSOLD
prior to the switch. All of the listed applications, which should be
registered with the ISC Service Provider on SYSOLD, will receive
quiesce and resume notifications at the appropriate times.
Acceptable values are application names separated by commas.
g_PRESWITCH_SYSOLD_REQ_QUIESCE and
g_PRESWITCH_SYSOLD_RSP_QUIESCE
These two parameters identify the message to be sent to
applications on SYSOLD prior to switchover and the message with
which they are to respond when quiescing.
Acceptable values are any text strings. The default values are
REQ_QUIESCE and RSP_QUIESCE.
g_PRESWITCH_SYSOLD_REQ_RESUME and
g_PRESWITCH_SYSOLD_RSP_RESUME
These two parameters identify the message to be sent to
applications on SYSOLD to resume as part of a fallback process and
the message the applications are to use when responding.
Acceptable values are any text strings. The default values are
REQ_RESUME and RSP_RESUME.
4-20
Preparing the System for Split Mode
g_PRESWITCH_SYSNEW_APPS
The g_PRESWITCH_SYSNEW_APPS parameter is a commaseparated list of the applications which are running on SYSNEW
prior to the switch. All of the listed applications, which should be
registered with the ISC Service Provider on SYSOLD, will receive
quiesce and resume notifications at the appropriate times.
Acceptable values are application names separated by commas.
g_PRESWITCH_SYSNEW_REQ_QUIESCE and
g_PRESWITCH_SYSNEW_RSP_QUIESCE
These two parameters identify the message to be sent to
applications on SYSNEW prior to switchover and the message with
which they are to respond when quiescing.
Acceptable values are any text strings. The default values are
REQ_QUIESCE and RSP_QUIESCE.
g_PRESWITCH_SYSNEW_REQ_RESUME and
g_PRESWITCH_SYSNEW_RSP_RESUME
These two parameters identify the message to be sent to
applications on SYSNEW to resume as part of a fallback process
and the message the applications are to use when responding.
Acceptable values are any text strings. The default values are
REQ_RESUME and RSP_RESUME.
g_POSTSWITCH_SYSNEW_APPS
The g_POSTSWITCH_SYSNEW_APPS parameter is a commaseparated list of the applications which you want to run on
SYSNEW immediately after the switch--but before the datavg
stealing has completed. All of the listed applications, which should
be registered with the ISC Service Provider on SYSOLD, will
receive quiesce and resume notifications at the appropriate times.
Acceptable values are application names separated by commas.
Preparing Your System for Split Mode
4-21
4
g_POSTSWITCH_SYSNEW_APPS_REQ_RESUME and
g_POSTSWITCH_SYSNEW_APPS_RSP_RESUME
These two parameters identify the message to be sent to
applications which are not dependent on the datavgs after
switchover and the message which they are to use when
responding.
4
Acceptable values are any text strings. The default values are
REQ_RESUME and RSP_RESUME.
g_POSTSWITCH_SYSNEW_APPS_REQ_QUIESCE and
g_POSTSWITCH_SYSNEW_APPS_RSP_QUIESCE
These two parameters identify the message to be sent to
applications which are not dependent on the datavgs prior to a
fallback procedure and the message which they should use to
respond when quiescing.
Acceptable values are any text strings. The default values are
REQ_QUIESCE and RSP_QUIESCE.
g_POSTSWITCH_SYSNEW_VGAPPS
The g_POSTSWITCH_SYSNEW_VGAPPS parameter is a commaseparated list of the applications which you want to run on
SYSNEW after the switchover and after the datavg stealing has
completed. All of the listed applications, which should be
registered with the ISC Service Provider on SYSOLD, will receive
quiesce and resume notifications at the appropriate times.
Acceptable values are application names separated by commas.
g_POSTSWITCH_SYSNEW_VGAPPS_REQ_RESUME and
g_POSTSWITCH_SYSNEW_VGAPPS_RSP_RESUME
These two parameters identify the message to be sent to datavgdependent applications after switchover and the message which
they are to use when responding.
Acceptable values are any text strings. The default values are
REQ_RESUME and RSP_RESUME.
4-22
Preparing the System for Split Mode
g_POSTSWITCH_SYSNEW_VGAPPS_REQ_QUIESCE and
g_POSTSWITCH_SYSNEW_VGAPPS_RSP_QUIESCE
These two parameters identify the message to be sent to datavgdependent applications prior to a fallback procedure and the
message which they should use to respond when quiescing.
4
Acceptable values are any text strings. The default values are
REQ_QUIESCE and RSP_QUIESCE.
g_APPTIME
The g_APPTIME parameter specifies how many seconds the
system will wait to receive responses from applications after
sending a quiesce or resume request.
Acceptable values are positive integers. The default time is five
seconds.
g_STEALVG
The g_STEALVG parameter identifies which volume groups are
going to be stolen during the switchover process. Use the
command:
lsvg
to list out the current volume groups.
Note
The rootvg volume group, or any volume group with
hdisks physically located on rootvg MFIOs, cannot be
stolen during switchover. Only fault-tolerant volume
groups can be stolen.
Acceptable values include a space-separated list of volume group
names.
g_UPGRADE
The g_UPGRADE parameter allows you to specify the type of
system upgrade you are performing.
Preparing Your System for Split Mode
4-23
Acceptable values are: CPU, BOS-NEW, BOS-PRESERVE, BOSMIGRATION, BOS-ONLINE, and MKSYSB. A CPU upgrade may
be either a hardware upgrade, a firmware upgrade, or both. If you
are doing both a CPU and an OS upgrade, then you should use the
parameter that corresponds to the OS upgrade.
The following table indicates which upgrade variable to use for the
various upgrades.
4
Table 4-6. Upgrade Variables
If you are upgrading the...
application only
CPU module hardware or
Þrmware only
OS using a MKSYSB tape
OS using complete overwrite
OS using a preservations install
OS using an on-line process
CPU module hardware or
Þrmware and applications
OS and applications
OS and CPU module hardware or
Þrmware
OS, CPU module hardware or
Þrmware, and applications
Use...
CPU
CPU
MKSYSB
BOS-NEW
BOS-PRESERVE
BOS-ONLINE
CPU
the relevant OS variable (MKSYSB,
BOS-NEW, or BOS-PRESERVE)
the relevant OS variable (MKSYSB,
BOS-NEW, or BOS-PRESERVE)
the relevant OS variable (MKSYSB,
BOS-NEW, or BOS-PRESERVE)
g_VERBOSE
The g_VERBOSE parameter specifies the level of messages to be
output by the splitstate utility.
Acceptable values include a space-separated combination of INFO,
WARN, CRIT, DEBUG, and DEBUG2. Using INFO as a value
causes splitstate to return general informational messages during
state transitions. The WARN flag displays warning messages; the
CRIT flag displays failure messages; the DEBUG flag displays
4-24
Preparing the System for Split Mode
general debugging messages; and the DEBUG2 flag displays the
commands being executed during datavg stealing and recovery.
The recommended minimum setting is ÒINFO WARN CRIT.Ó
Overriding the global variables
You cannot change the values in the /var/ft/split_cfg file once you
have made the transition from FT_START to CHECKED. It is
possible, however, to override the following parameters by creating
a /var/ft/split_cfg.ovr file:
¥ g_FORCESPLIT
¥ g_FORCESWITCH
¥ g_APPTIME
¥ g_VERBOSE
¥ g_FORCEREINTEGRATE
¥ g_FALLBACK_DATAVGS
The syntax should be identical to that used in the original
/var/ft/split_cfg file. For example, to force the system to split
despite errors, you would add the following line to the override file:
g_FORCESPLIT=”TRUE”
If you need to change one of the other parameters in the
/var/ft/split_cfg file, you must return the system to FT_START,
make the changes, and begin the split mode process from the
beginning. You must also stop and restart the ISC Service provider
using the spstop and spstart commands.
Preparing Your System for Split Mode
4-25
4
4
4-26
Preparing the System for Split Mode
5Running Split Mode
5
Overview
This chapter discusses the different procedures which can be used
to invoke and manage the split mode process while upgrading CPU
module hardware and firmware as well as the operating system or
application software on an FX Series system.
5-1
Upgrading your System via Split Mode
This section contains detailed instructions for using split mode to
upgrade your system. These procedures assume that you have
completed the preparation steps which are detailed in Chapter 4,
ÒPreparing Your System for Split ModeÓ and that you are familiar
with the material at the beginning of this chapter.
5
Start the Inter-System Communications Service Provider
(ISC SP)
Start the ISC SP by using the following command:
spstart
Note
This command must be run from the root directory (/).
This requirement is necessary because the system
aborts the datavg steal if it discovers a running process
in one of the datavgs that is being stolen. For similar
reasons, all applications that are not being quiesced
during switchover, should be initiated from the root
directory.
Check for Readiness
To make sure that the system is ready to be split, run
spope "/bin/ksh /usr/sbin/splitstate -s CHECKED”
The splitstate -s CHECKED command allows you to verify that the
system is ready to begin split mode. The process includes: verifying
that disks are properly mirrored; checking for the presence of at
least dual redundant CPU modules; checking for outstanding
faults; and ensuring that the system contains sufficient Fan, Power,
and ICM modules.
5-2
Upgrading your System via Split Mode
If the system fails the check, it will return an error message and the
list of failures will be written to the service provider log file. At this
point, you can remedy the failures and begin again, or you can force
the system to switch despite the failure by changing the
g_FORCESPLIT parameter in the /var/ft/split_cfg file to TRUE.
If the system passes the readiness check, but you do not want to
immediately split the system, then you should transfer the system
from the CHECKED state back to the FT_START state by using the
splitstate -s FT_START command.
Split the System
The procedure for splitting the system into SYSOLD and SYSNEW
depends on whether or not you intend to upgrade CPU module
hardware or firmware.
Upgrade
Hardware or
Firmware
?
YES
Make the
System Simplex
N
O
Upgrade SYSNEW
Hardware or Firmware
Split the System
Figure 5-1. Splitting the System
Running Split Mode
5-3
5
If you are not upgrading CPU module hardware or firmware, then
you can transition directly to the SPLIT state. If you are making
hardware or firmware upgrades, you must stop in simplex, make
the necessary upgrades, and then reinitiate the split process, as
illustrated in Figure 5-1 and described in the following procedures.
Find your upgrade type in the following table and proceed to the
appropriate section.
Table 5-1. Splitting the System According to Type of
Upgrade
5
If you are...
not upgrading CPU module
hardware or Þrmware
upgrading CPU module Þrmware
but not the hardware
upgrading the CPU module
hardware and Þrmware
Go to...
ÒSplitting the System without
Hardware or Firmware UpgradesÓ
on page 5-4
ÒSplitting the System with CPU
Module Firmware (but not
Hardware) UpgradesÓ on page 5-4
ÒSplitting the System with
Hardware and Firmware
UpgradesÓ on page 5-5
Splitting the System without Hardware or Firmware Upgrades
¥ Initiate the splitting process by using the following
command:
console0: splitstate -s SPLIT
Because the split mode procedure is designed around a number of
states, using the -s SPLIT option from the CHECKED state takes the
system through the SIMPLEX state and continues to the SPLIT state
without stopping for hardware and firmware upgrades.
Proceed to ÒUpgrading the System while SplitÓ on page 5-8.
Splitting the System with CPU Module Firmware (but not Hardware)
Upgrades
¥ Initiate the splitting process by using the following
command:
5-4
Upgrading your System via Split Mode
console0: splitstate -s SIMPLEX
As the -s SIMPLEX option suggests, this command causes the system
to become simplex. All mirrored volume groups are broken; CPU
modules other than that belonging to SYSOLD are unconfigured;
and all of the devices which belong to SYSNEW are unconfigured.
Thus, the system is still running on SYSOLD and SYSNEW is
offline.
¥ Determine the current version of the firmware to facilitate
falling back to SYSOLD:
5
ftbugver -l CPU-Y
where Y corresponds to the number of SYSOLDÕs CPU
module. The current firmware version will be directed to
standard output.
¥ Update the firmware on SYSNEW
pflash -l CPU-X
where X corresponds to the number of SYSNEWÕs CPU
module.
¥ Reinitiate the split process by running:
console0: splitstate -s SPLIT
This will cause the system to power up SYSNEW as a separate
system. SYSOLD will remain primary; an FX-Bug prompt will
appear on the SYSNEW console (console1). In a triple redundant
system, the third CPU module will remain in an offlined state.
For directions on falling back to the original firmware, see ÒFalling
Back to Original FirmwareÓ on page 5-7.
Otherwise, proceed to ÒUpgrading the System while SplitÓ on page
5-8.
Splitting the System with Hardware and Firmware Upgrades
¥ Initiate the splitting process by using the following
command:
console0: splitstate -s SIMPLEX
Running Split Mode
5-5
As the -s SIMPLEX option suggests, this command causes the system
to become simplex. All mirrored volume groups are broken; CPU
modules other than that belonging to SYSOLD are unconfigured;
and all of the devices which belong to SYSNEW are unconfigured.
Thus, the system is still running on SYSOLD and SYSNEW is
offline.
¥ Upgrade the CPU module hardware on SYSNEW by
swapping the module.
5
¥ Determine the current version of the firmware to facilitate
falling back to SYSOLD:
ftbugver -l CPU-X
where X is the number of the newly upgraded CPU module
on SYSNEW. The current firmware version will be directed to
standard output.
¥ Power off SYSNEWÕs CPU module
ftctl -pwroff CPU-X
¥ Update the firmware on SYSNEW
pflash -l CPU-X
¥ Reinitiate the split process by running:
console0: splitstate -s SPLIT
This will cause the system to power up SYSNEW as a separate
system. SYSOLD will remain primary; an FXBug prompt will
appear on the SYSNEW console (console1). In a triple redundant
system, the third CPU module will remain in an offlined state.
For directions on falling back to the original firmware, see ÒFalling
Back to Original FirmwareÓ on page 5-7.
Otherwise, proceed to ÒUpgrading the System while SplitÓ on page
5-8.
5-6
Upgrading your System via Split Mode
Falling Back to Original Firmware
If for some reason it becomes necessary to return to FT_START, you
should return SYSNEW to the original firmware version before
transitioning backwards from the SPLIT state.
¥ Make sure that SYSNEWÕs CPU module is offline. If it is online, take it off line:
ftctl -pwroff CPU-X
5
where X is the number of SYSNEWÕs CPU module.
¥ Fall back to the original firmware by running:
pflash -l CPU-X -V version
where X is the number of SYSNEWÕs CPU module and
version is the original firmware version (which was obtained
earlier using the ftbugver command).
Running Split Mode
5-7
Upgrading the System while Split
The following figure shows the general process for upgrading the
system while it is in the SPLIT state.
Boot SYSNEW
Test SYSNEW
Start the ISC SP
Switchover
5
Upgrade
Operating
System
?
YES
N
O
Upgrade SYSNEW OS
Upgrade
Applications
?
YES
N
O
Upgrade
Applications
Start the ISC SP
on SYSNEW
(if necessary)
Figure 5-2. Upgrading the System while Split
5-8
Upgrading your System via Split Mode
The details of the procedures vary slightly according to the type of
upgrade you are doing. Find your upgrade type in the following
table and proceed to the appropriate section.
Table 5-2. Upgrading the System while Split
If you are...
not upgrading the OS
doing OS upgrades without
upgrading CPU modules
upgrading both the CPU modules
and the OS
upgrading application software
without CPU module or OS
upgrades
Go to...
ÒCPU UpgradesÓ on page 5-9
ÒOperating System Upgrades
without CPU Module UpgradesÓ
on page 5-10
ÒCPU and Operating System
UpgradesÓ on page 5-14
ÒApplication Only UpgradesÓ on
page 5-16
CPU Upgrades
Once you have split the system, boot SYSNEW:
¥ Identify boot parameters, x and y, using the ioi bug utility:
console1: ioi
where x is the CLUN for the device you want to boot from
and y is the deviceÕs DLUN.
¥ Boot SYSNEW:
FX-Bug: pboot x y
¥ Log on as root.
¥ Start the ISC Service Provider, using a -S option:
FX-Bug: spstart -S
¥ If you are upgrading applications, do so now.
¥ Start any other Service-Provider registered applications on
SYSNEW.
¥ Thoroughly test SYSNEW
Running Split Mode
5-9
5
¥ If your applications are split mode aware:
Ð Transition to the RESUMEDVGAPPS_SYSNEW state:
splitstate -s RESUMEDVGAPPS_SYSNEW
Ð proceed to ÒCompleting the Split Mode ProcessÓ on page
5-18.
¥ If your applications are not split mode aware, proceed to
ÒManual Switchover ProcedureÓ on page 5-17.
5
Operating System Upgrades without CPU Module Upgrades
The procedure for an on-line upgrade varies slightly from
MKSYSB, BOS-NEW and BOS-PRESERVE upgrades. Find the
upgrade you are doing in the following table, and proceed to the
appropriate procedure.
Table 5-3. Selecting an OS Upgrade Procedure
If you are...
doing an on-line OS upgrade
Go to...
ÒBOS-ONLINE UpgradesÓ on page
5-10
doing another type of OS upgrade
ÒMKSYSB, BOS-NEW, and
BOS-PRESERVE UpgradesÓ on
page 5-11
BOS-ONLINE Upgrades
Once you have split the system, boot SYSNEW:
¥ Identify boot parameters, x and y, using the ioi bug utility:
FX-Bug: ioi
¥ Boot SYSNEW:
FX-Bug: pboot x y
where x is the CLUN for the device you want to boot from
and y is the deviceÕs DLUN.
¥ Log on as root.
¥ Start the ISC Service Provider, using a -S option:
5-10
Upgrading your System via Split Mode
FX-Bug: spstart -S
¥ Perform the on-line upgrade on console1 using standard AIX
techniques.
¥ If necessary, perform a reboot on SYSNEW at this point:
Ð Boot SYSNEW:
FX-Bug: pboot x y
Ð Log on as root.
5
Ð Start the ISC Service Provider:
console1: spstart
¥ If applicable, upgrade your application using console1.
¥ Start any other Service-Provider registered applications on
SYSNEW.
¥ Thoroughly test the new OS and any new applications on
SYSNEW
¥ If your applications are split mode aware:
Ð Transition to the RESUMEDVGAPPS_SYSNEW state:
splitstate -s RESUMEDVGAPPS_SYSNEW
Ð Proceed to ÒCompleting the Split Mode ProcessÓ on page
5-18.
¥ If your applications are not split mode aware, proceed to
ÒManual Switchover ProcedureÓ on page 5-17.
MKSYSB, BOS-NEW, and BOS-PRESERVE Upgrades
¥ Identify boot parameters, x and y, using the ioi bug utility:
FX-Bug: ioi
where x is the CLUN for the device you want to boot from
and y is the deviceÕs DLUN.
¥ Boot SYSNEW:
FX-Bug: pboot x y
¥ Log on as root.
Running Split Mode
5-11
¥ Start the ISC Service Provider, using a -S option:
console1: spstart -S
The system will reboot in order to save SYSNEWÕs ODM
information.
¥ Upgrade your OS using the appropriate media.
¥ Boot SYSNEW:
FX-Bug: pboot x y
5
¥ Log on as root.
¥ Start the ISC Service Provider, using a -R option:
console1: spstart -R
This will restore the ODM entries and reboot the system.
¥ Boot SYSNEW:
FX-Bug: pboot x y
¥ Log on as root.
¥ If there are datavgs on SYSNEW which you have not listed to
be stolen, but which you would like to make available to
applications manually at this point, complete the following
subprocedure. If not, skip to ÒStart the Service Provider:Ó.
Note: In order to import nonftvgs at this point, they must
reside entirely on SYSNEW. If you have nonftvgs that are
split between SYSOLD and SYSNEW, you must reach
FT_COMPLETED before importing them.
The following subprocedure corresponds to retrieval
methods 1 and 2 from ÒManaging Volume GroupsÓ on page
4-4. For nonftvgs, skip step c:
a. Activate the disks within the datavgs which you want to
retrieve on SYSNEW:
modchange -r -l hdiskx
where x is the number of the disk you want to activate.
5-12
Upgrading your System via Split Mode
b. Import the data volume group using any one of the hdisks
on SYSNEW:
console1: importvg -y vg hdiskx
where vg is the volume group name and x is the number
for the hard disk.
c. If the datavg you are retrieving was originally part of a
mirrored ftvg:
Varyoff the data volume group:
5
console1: varyoffvg vg
Change the quorum value for the datavg to no:
console1: chvg -Qn vg
d. Varyon on the data volume group:
console1: varyonvg vg
e. Mount the file systems by running mount for each file
system in the data volume group:
console1: mount fs
where fs is the name of each file system.
¥ Start the Service Provider:
console1: spstart
¥ If applicable, upgrade your application using console1.
¥ Thoroughly test the new OS and any new applications on
SYSNEW
¥ Start other Service-Provider registered applications on
SYSNEW.
¥ If your applications are split mode aware:
Ð Transition to the RESUMEDVGAPPS_SYSNEW state:
splitstate -s RESUMEDVGAPPS_SYSNEW
Ð Proceed to ÒCompleting the Split Mode ProcessÓ on page
5-18.
Running Split Mode
5-13
¥ If your applications are not split mode aware, proceed to
ÒManual Switchover ProcedureÓ on page 5-17.
CPU and Operating System Upgrades
¥ Identify boot parameters, x and y, using the ioi bug utility:
FX-Bug: ioi
where x is the CLUN for the device you want to boot from
and y is the deviceÕs DLUN.
5
¥ Boot SYSNEW:
FX-Bug: pboot x y
¥ Log on as root.
¥ Start the ISC Service Provider, using a -S option:
console1: spstart -S
The system will reboot in order to save SYSNEWÕs ODM
information.
¥ Upgrade your OS using the appropriate media.
¥ Boot SYSNEW:
FX-Bug: pboot x y
¥ Log on as root.
¥ Start the ISC Service Provider, using a -R option:
spstart -R
This will restore the ODM entries and reboot the system.
¥ Boot SYSNEW:
FX-Bug: pboot x y
¥ Log on as root.
¥ If you have done a BOS-NEW, a MKSYSB, or a BOSPRESERVE upgrade, and there are datavgs on SYSNEW
which you have not listed to be stolen, but which you would
like to make available to applications manually at this point,
5-14
Upgrading your System via Split Mode
complete the following subprocedure. If not, skip to ÒStart
the Service Provider.Ó
Note: In order to import nonftvgs at this point, they must
reside entirely on SYSNEW. If you have nonftvgs that are
split between SYSOLD and SYSNEW, you must reach
FT_COMPLETED before importing them.
The following subprocedure corresponds to retrieval
methods 1 and 2 from ÒManaging Volume GroupsÓ on page
4-4. For nonftvgs, skip step c:
a. Activate the disks within the datavgs which you want to
retrieve on SYSNEW:
modchange -r -l hdiskx
where x is the number of the disk you want to activate.
b. Import the data volume group using any one of the hdisks
on SYSNEW:
console1: importvg -y vg hdiskx
where vg is the volume group name and x is the number
for the hard disk.
c. If the datavg you are retrieving was originally part of a
mirrored ftvg:
Varyoff the data volume group:
console1: varyoffvg vg
Change the quorum value for the datavg to no:
console1: chvg -Qn vg
d. Varyon on the data volume group:
console1: varyonvg vg
e. Mount the file systems by running mount for each file
system in the data volume group:
console1: mount fs
where fs is the name of each file system.
¥ Start the Service Provider:
Running Split Mode
5-15
5
spstart
¥ If applicable, upgrade your application using console1.
¥ Thoroughly test the new OS and any new applications on
SYSNEW
¥ Start other Service-Provider registered applications on
SYSNEW.
¥ If your applications are split mode aware:
5
Ð Transition to the RESUMEDVGAPPS_SYSNEW state:
splitstate -s RESUMEDVGAPPS_SYSNEW
Ð Proceed to ÒCompleting the Split Mode ProcessÓ on page
5-18.
¥ If your applications are not split mode aware, proceed to
ÒManual Switchover ProcedureÓ on page 5-17.
Application Only Upgrades
¥ Identify boot parameters, x and y, using the ioi bug utility:
console1: ioi
where x is the CLUN for the device you want to boot from
and y is the deviceÕs DLUN.
¥ Boot SYSNEW:
FX-Bug: pboot x y
¥ Log on as root.
¥ Start the ISC Service Provider, using a -S option:
FX-Bug: spstart -S
¥ Upgrade your application using console1.
¥ Thoroughly test the application on SYSNEW
¥ Start other Service-Provider registered applications on
SYSNEW.
5-16
Upgrading your System via Split Mode
¥ If your applications are split mode aware:
Ð Transition to the RESUMEDVGAPPS_SYSNEW state:
splitstate -s RESUMEDVGAPPS_SYSNEW
Ð Proceed to ÒCompleting the Split Mode ProcessÓ on page
5-18.
¥ If your applications are not split mode aware, proceed to
ÒManual Switchover ProcedureÓ on page 5-17.
5
Manual Switchover Procedure
If your applications are not split mode aware, you need to manage
the switchover process to allow you to manually kill and restart the
applications at the appropriate times.
The following steps detail the manual switchover procedure.
¥ Transition the system from the SPLIT state to the
QUIESCEDAPPS_SYSNEW state:
console0: splitstate -s QUIESCEDAPPS_SYSNEW
¥ Manually halt applications running on SYSNEW.
¥ Transition the system to the QUIESCEDAPPS_SYSOLD state:
console0: splitstate -s QUIESCEDAPPS_SYSOLD
¥ Manually halt applications running on SYSOLD.
¥ Transition the system to the RESUMEDAPPS_SYSNEW state:
console0: splitstate -s RESUMEDAPPS_SYSNEW
¥ Manually restart nondatavg applications on SYSNEW
¥ Transition the system to the RESUMEDVGAPPS_SYSNEW
state:
console0: splitstate -s RESUMEDVGAPPS_SYSNEW
¥ Manually restart data applications on SYSNEW.
Running Split Mode
5-17
At this point, SYSNEW will be the primary system and it will be
providing service. SYSOLD will be in its original configuration in a
standby state.
Proceed to ÒCompleting the Split Mode ProcessÓ on page 5-18.
Completing the Split Mode Process
The following figure shows the general process for completing the
Split Mode process once you have reached the
RESUMEDVGAPPS_SYSNEW state.
5
Verify SYSNEW
Upgrade
SYSOLD
Hardware
?
YES
N
O
Unsplit the System
Upgrade SYSOLD
Hardware
Complete the
Split Mode Process
Stop the ISC SP
Manage nonsteal
Datavgs
Figure 5-3. Completing the Split Mode Process
5-18
Upgrading your System via Split Mode
Verifying Application Performance on SYSNEW
At this point, you have completed the upgrade of SYSNEW and it
is providing full service to all of the applications. This is the last
point at which you will be able to fallback to the original system.
You should therefore take the time at this point to verify that your
newly upgraded system is providing adequate service to all of the
applications.
If you are unsatisfied with the performance of SYSNEW, refer to
ÒFallback StrategiesÓ on page 6-2.
If you are satisfied with the system performance, continue with the
following procedure.
Note
Any backward transition will automatically take you
all the way back to FT_START. Do not transition to any
previous system state unless you intend to fallback to
the original system configuration.
Completing the Split Mode Process
The procedure for completing the Split Mode process depends on
whether you are upgrading CPU module hardware, as shown in
Figure 5-3.
Table 5-4. Completing the Split Mode Process
If you are...
Go to...
Upgrading CPU module hardware ÒCompleting the Split Mode
Process with Hardware
UpgradesÓ on page 5-19
Not upgrading CPU module
ÒCompleting the Split Mode
hardware
Process without Hardware
Upgrades.Ó on page 5-20
Completing the Split Mode Process with Hardware Upgrades
¥ Transition to the UNSPLIT state
¥ splitstate -s UNSPLIT
Running Split Mode
5-19
5
¥ Upgrade SYSOLDÕs CPU module by swapping CPU
modules. If there is a third CPU module which has been
offlined, upgrade it at this point as well.
¥ Transition the system to FT_COMPLETED
¥ splitstate -s FT_COMPLETED
¥ Stop the ISC Service Provider
spstop
5
If your system includes datavgs which were not stolen, then
proceed to ÒManaging Nonsteal DatavgsÓ on page 5-20. If your
system does not contain nonsteal datavgs, then you have now
completed the CPU upgrade on your system.
Completing the Split Mode Process without Hardware Upgrades.
Ð Transition to FT_COMPLETED:
splitstate -s FT_COMPLETED
Ð Stop the ISC Service Provider
spstop
If your system includes datavgs which were not stolen, then
proceed to ÒManaging Nonsteal DatavgsÓ on page 5-20. If your
system does not contain nonsteal datavgs, then you have now
completed the OS and/or firmware upgrade of your system.
Managing Nonsteal Datavgs
You have now completed the Split Mode process and are in the
FT_COMPLETED state. However, you may need to clean up
datavgs which were not identified to be stolen.
5-20
Upgrading your System via Split Mode
If the only nonsteal datavgs on your system were nonftvgs on
SYSNEW which you retrieved during the SPLIT state, then those
datavgs will be available on the upgraded system and you can skip
the rest of this procedure. Otherwise, find the applicable situation
in Table 5-5 and follow the appropriate procedure or procedures.
Table 5-5. Managing Datavgs
If...
your system includes ftvgs which
were retrieved during the SPLIT
state
your system includes nonftvgs
which were not retrieved during
the SPLIT state
your system includes ftvgs which
were not retrieved during the
SPLIT state, and you want to use
the data from SYSOLDÕs hdisks
your system includes ftvgs which
were not retrieved during the
SPLIT state, and you want to use
the data from SYSNEWÕs hdisks
Proceed to...
ÒConfiguring FTVGs that were
retrieved during the SPLIT StateÓ
on page 5-21
ÒRetrieving nonFTVG data volume
groups after reaching
FT_COMPLETEDÓ on page 5-21
ÒRetrieving FTVG data volume
groups using SYSOLD as the
base:Ó on page 5-22
ÒRetrieving FTVG data volume
groups using SYSNEW as the
base:Ó on page 5-23
ConÞguring FTVGs that were retrieved during the SPLIT State
¥ For each hdisk in the data volume group on SYSOLD:
modchange -r -l hdiskx
extendvg -f vg hdiskx
where x is the number of the hdisk and vg is the volume
group name.
¥ Convert the volume group back to FT:
chftvg -Ty vg &
Retrieving nonFTVG data volume groups after reaching
FT_COMPLETED
¥ For each hdisk in the data volume group:
Running Split Mode
5-21
5
modchange -r -l hdiskx
where x is the number of the hdisk.
¥ Import the data volume group using one of the hdisks:
importvg -y vg hdiskx
where vg is the name of the volume group.
¥ Varyon on the data volume group:
varyonvg vg
5
¥ Mount the file systems: For each file system in the data
volume group:
mount fs
where fs is the file system name.
Retrieving FTVG data volume groups using SYSOLD as the base:
¥ Offline each hdisk in the data volume group on SYSNEW:
modchange -o -l hdiskx
where x is the number of the hdisk.
¥ Activate each hdisk in the data volume group on SYSOLD:
modchange -r -l hdiskx
¥ Import the data volume group using any one of the hdisks
from SYSOLD:
importvg -y vg hdiskx
where vg is the name of the volume group.
¥ Varyoff the data volume group:
varyoffvg vg
¥ Change quorum to no on the data volume group:
chvg -Qn vg
¥ Varyon the data volume group:
varyonvg vg
5-22
Upgrading your System via Split Mode
¥ Mount the file systems: For each file system in the data
volume group:
mount fs
where fs is the name of the file system.
¥ For each hdisk in the data volume group on SYSNEW:
modchange -r -l hdiskx
extendvg -f vg hdiskx
5
¥ Convert the data volume group to FTVG:
chftvg -Ty vg &
Retrieving FTVG data volume groups using SYSNEW as the
base:
¥ Offline each hdisk in the data volume group on SYSOLD:
modchange -o -l hdiskx
where x is the number of the hdisk.
¥ Activate each hdisk in the data volume group on SYSNEW:
modchange -r -l hdiskx
¥ Import the data volume group using any one of the hdisks
from SYSNEW:
importvg -y vg hdiskx
where vg is the name of the volume group.
¥ Varyoff the data volume group:
varyoffvg vg
¥ Change quorum to no on the data volume group:
chvg -Qn vg
¥ Varyon the data volume group:
varyonvg vg
¥ Mount the file systems: For each file system in the data
volume group:
Running Split Mode
5-23
mount fs
where fs is the name of the file system.
¥ For each hdisk in the data volume group on SYSOLD:
modchange -r -l hdiskx
extendvg -f vg hdiskx
¥ Convert the data volume group to FTVG:
chftvg -Ty vg &
5
5-24
Upgrading your System via Split Mode
6Problem Resolution and
Fallback Strategies
6
Overview
This chapter contains information on falling back to the original
system configuration, recovering from a system failure, and
interpretations and suggestions for handling possible error
messages.
6-1
Fallback Strategies
Overview
Until the RESUMEDVGAPPS_SYSNEW state is reached, you can
transition the system backward to any previous state. For example,
if your system is in the SPLIT state, you can transition backward to
SIMPLEX, to CHECKED, or to FT_START. In a functional sense,
transitioning backwards through states essentially reverses what
was done going forward.
However, once you reach the RESUMEDVGAPPS_SYSNEW state,
any backward transition automatically returns the system to
FT_START state. This one-way, backward transition is referred to
as fallback, and is intended to provide a direct way to abandon the
upgrades after an upgraded SYSNEW has begun providing
application service. If, for example, you decide that the service
being provided by the newly upgraded SYSNEW is inadequate,
fallback allows you to return to FT_START in an automated fashion
and thus avoids having to manage the backward path or having to
use Split Mode a second time in order to ÒdowngradeÓ the system.
6
Note
Once the system has transitioned to the UNSPLIT state,
no backward transitions are permitted. An UNSPLIT
system must eventually go forward to the
FT_COMPLETED state.
Fallback Datavgs
It is possible to use either SYSOLDÕs datavgs or SYSNEWÕs datavgs
during the fallback procedure, depending on the value of the
g_FALLBACK_DATAVGS variable in the /var/ft/splt_cfg file. The
default behavior is to use SYSOLDÕs datavgs, because data on
SYSNEW is presumed to have become stale during the upgrades.
However, in the case that the data on SYSOLD may be corrupt, you
may want to fall back using SYSNEWÕs datavgs. You can change
the g_FALLBACK_DATAVGS variable by creating a
/var/ft/splt_cfg.ovr file with a different value.
6-2
Fallback Strategies
Note
If you have stolen SYSOLDÕs datavgs, then prior to
fallback your system will be running on SYSNEW but
using the SYSOLD datavgs. SYSNEWÕs datavgs will
have been exported.
The Fallback Process
The steps carried out by the splitstate utility during fallback are:
1. Send a message to datavg applications on SYSNEW to
quiesce. (SYSOLD applications are never resumed, so there is
no need to quiesce them.)
2. ÒUnstealÓ SYSOLDÕs datavgs from SYSNEW, if applicable.
3. Send a message to nondatavg applications on SYSNEW to
quiesce.
4. Switch primary role back to SYSOLD.
5. Switch primary ethernet and IP addresses back to SYSOLD.
6. If SYSNEWÕs datavg is to be used in the fallback, steal it onto
SYSOLD.
7. Send a resume message to applications on SYSOLD.
8. Unsplit the system.
9. Insofar as possible, reintegrate all system components.
Any components that have not been reintegrated should be
integrated manually, using standard FX Series troubleshooting
procedures as described in Diagnosing and Troubleshooting your Fault
Tolerant System.
Overriding the Default Fallback Procedure
If for some reason you would like to manage the transition from
RESUMEDVGAPPS_SYSNEW to FT_START manually, or if you
would like to transition backward from
RESUMEDVGAPPS_SYSNEW to some system state other than
Problem Resolution and Fallback Strategies
6-3
6
FT_START, then you should remove the /var/ft/fallback file from
both SYSOLD and SYSNEW before initiating the backward
transition.
6
6-4
Fallback Strategies
Recovering from a System Failure
Overview
During the Split Mode process, FX Series systems operate in a
simplex mode, rather than in their usual fault tolerant mode. Thus,
they are vulnerable to single hardware faults and there is a chance
that either SYSNEW or SYSOLD will fail. Because of the
interdependencies built into the FX Series, it is possible that a
failure on one side may effect the other and that the system may
become unavailable. For example, while the system is split, any
attempt to reboot the primary system will result in the system
becoming unavailable.
The primary goal for recovering a system in which either SYSNEW
or SYSOLD (or both) is unresponsive is to return to Fault Tolerant
(FT) mode as quickly as possible. Doing so will allow you to use
standard FX Series diagnostic techniques while providing
application and user service.
Secondary goals for such a recovery include minimizing the
amount of system downtime needed to return to FT mode, and
recovering as much current data as possible.
The CATASTROPHIC_RECOVERY System State
A special CATASTROPHIC_RECOVERY ÒstateÓ exists in addition
to the standard Split Mode machine states. Running
splitstate -s CATASTROPHIC_RECOVERY
after the system has been rebooted following a failure causes the
splitstate utility to try to clear all Split Mode settings, to integrate
the two sides of the system, and to return the system to FT_START.
It is possible that the system will return to FT_START but not be
fully configured.
Problem Resolution and Fallback Strategies
6-5
6
Symptoms and Recovery:
The following table lists symptoms which correspond to failures on
SYSNEW and/or SYSOLD. The symptoms are ranked according to
severity, and you should use the recovery procedure for the first
one on the list that applies to your system. For example, if there is
no response on either the primary or secondary consoles, use the
ÒNo response on primary consoleÓ procedure.
Table 6-1. Failure Symptoms and Responses
6
Symptom
No response on primary
console
Possible Causes
¥ Primary CPU module
failure
Recovery Procedure
Go to ÒEstablishing a Master
CPU Module and Rebooting
to FT Simplex ModeÓ on
page 6-7.
¥ Other Primary System
failure
Primary console
unexpectedly displays FXBug prompt
6-6
¥ Secondary system failure
¥ You tried to reboot the
primary system
¥ Watchdog timer reset the
primary system
Go to ÒEstablishing a Master
CPU Module and Rebooting
to FT Simplex ModeÓ on
page 6-7.
Recovering from a System Failure
Table 6-1. Failure Symptoms and Responses (continued)
Symptom
Primary console is
responsive but system is
not working correctly
Possible Causes
Primary rootvg is ofßine.
No response on secondary
console
¥ Secondary CPU module
failed.
Secondary console
unexpectedly displays FXBug prompt
¥ Other Secondary system
failure
¥ Watchdog timer reset
the Secondary system
Recovery Procedure
Go to ÒEstablishing a Master
CPU Module and Rebooting
to FT Simplex ModeÓ on
page 6-7.
Go to ÒAttempting to Reach
FT Mode without
RebootingÓ on page 6-9.
¥ Reboot the Secondary
system:
6
pboot x y
where x is the boot diskÕs
CLUN and y is the boot
diskÕs DLUN as given by the
ioi bug utility.
Secondary console is
responsive but the
Secondary system is not
working correctly
Secondary rootvg is ofßine
If the situation recurs, go to
ÒAttempting to Reach FT
Mode without RebootingÓ
on page 6-9.
Go to ÒAttempting to Reach
FT Mode without
RebootingÓ on page 6-9.
Establishing a Master CPU Module and Rebooting to FT Simplex
Mode
1. Get to the FX-Bug prompt on the primary system:
¥ If console0 shows an FX-Bug prompt, then go to step 2.
¥ If console0 does not show an FX-Bug prompt, then do either
one of the following procedures:
Ð
Interrupt power to the system, or
Ð
Pull the latches on all CPU modules and then reseat them
one at a time.
Problem Resolution and Fallback Strategies
6-7
2. Booting and Recovering the System
Note
If during the following procedure, a CPU module
attempts to autoboot, do not allow the autoboot.
Instead, issue a BREAK to interrupt the autoboot
sequence.
¥ Determine which CPU module is the current master:
FX-Bug> master
note the response for use later in the process.
¥ Remove any mbus restrictions remaining from split mode:
6
FX-Bug> unsplit ;c
¥ Choose a disk to boot as the root volume group. Depending
on where you were in the Split Mode process when your
system failed, you may want to boot from the rootvg in
SYSOLDÕs domain, or the one in SYSNEWÕs domain.
FX-Bug> pboot x y
where x and y are the CLUN and DLUN for the disk you wish
to boot from, as shown by the ioi bug utility.
Ð If the pboot command is unsuccessful, first make sure that
you have chosen the correct disk. If so, try the pboot
command one more time.
Ð If it is still unsuccessful, choose another bootable disk.
Ð If the command is still unsuccessful, power down the
system, remove the CPU module that was master
(determined by master command done above), and start
over at step 2.
Ð If no master CPU module will boot the system and if
SYSNEWÕs CPU module was replaced as part of the Split
Mode procedure, place the old SYSNEW CPU module
back into the system and remove all other CPU modules.
Then start over at step 2.
3. Once the system reaches a login prompt, logon as root.
6-8
Recovering from a System Failure
4. Examine the g_FALLBACK_DATAVGS variable in the
/var/ft/split_cfg and /var/ft/split_cfg.ovr files. Edit or
create the g_FALLBACK_DATAVGS variable in the
split_cfg.ovr file to reflect the datavg you want mounted
during recovery.
5. Stop the ISC Service Provider:
console0: spstop
Although the ISC SP is not expected to be running, this
command will clean up after a previously-running ISC SP.
6. Restart the ISC SP:
6
spstart
7. Attempt to return the system to the FT_START state, using
the CATASTROPHIC_RECOVERY procedures:
splitstate -s CATASTROPHIC_RECOVER.
8. The system should now be in FT mode in the FT_START
state. Verify that proper user-application service is being
provided. You should then begin regular troubleshooting of
the system according to the procedures in Diagnosing and
Troubleshooting Your Fault Tolerant System.
9. If the system did not reach FT_START, attempt to determine
the cause from screen output. If the process seems to have
had problems mounting the datavg, you may want to edit the
/var/ft/split_cfg.ovr file again and then retry the transition:
splitstate -s CATASTROPHIC_RECOVER
Attempting to Reach FT Mode without Rebooting
If you know which CPU module is primary, use the following
procedure A below. Otherwise use procedure B.
Procedure A
1. Check the split status on the primary
ftctl -splitstatus
Problem Resolution and Fallback Strategies
6-9
If the primary system is unresponsive, abandon this
procedure and switch to the procedure under ÒNo response
on primary consoleÓ on page 6-6.
2. If the primary CPU module is part of SYSOLD, attempt to
return to the FT_START state:
splitstate -s FT_START.
3. If the primary CPU module is part of SYSNEW, attempt to go
forward to FT_COMPLETED state:
splitstate -s FT_COMPLETED
If any modules will not reintegrate, override the failure by
setting g_FORCEREINTEGRATE=TRUE in the
/var/ft/split_cfg.ovr file.
6
Procedure B
1. Identify the system state:
console0: splitstate -l
If the primary system is unresponsive, abandon this
procedure and switch to the procedure under ÒNo response
on primary consoleÓ on page 6-6.
2. If system is in a state between FT_START and
EXPORTEDVGS_SYSOLDs, attempt to return to FT_START
state:
splitstate -s FT_START
3. If system is in a state between SWITCHED and UNSPLIT,
attempt to transition to FT_COMPLETED state:
splitstate -s FT_COMPLETED
4. If any modules will not reintegrate, override the failure by
setting g_FORCEREINTEGRATE=TRUE in the /var/ft/split_cfg.ovr
file.
6-10
Recovering from a System Failure
Advanced Recovery
If the following procedures for system recovery failed to restore at
least partial service, then your system requires advanced recovery
techniques. Possible causes for such a situation include:
¥ Multiple hardware failures--such as the simultaneous failure
of multiple CPU modules
¥ Software failures involving damage to critical system files
¥ A rootvg failure on SYSOLD before critical configuration data
has been transferred back to SYSNEW after an OS upgrade.
6
The general strategy for recovery at this point is to
1. Establish a bootable master
2. Clear the masterÕs restart record by using the unsplit ;c
command at the FX-Bug prompt
3. Boot the system
4. Transition to the CATASTROPHIC_RECOVER state
If these strategies are unsuccessful, you may need to boot the
system from a backup tape.
For additional help, refer to ÒGetting Help for System ProblemsÓ on
page 1-8.
Problem Resolution and Fallback Strategies
6-11
Troubleshooting the Split Mode Process
Overview
This section provides information for interpreting and responding
to a variety of error messages which are output by the splitstate
utility. If you cannot find an error message similar to the one on
your system, it is recommended that you return your system to
FT_START and use standard FX techniques to diagnose and rectify
the problem
Additional information on standard FX administrative and
diagnostic procedures is available in Administering Your Fault
Tolerant System and in Diagnosing and Troubleshooting Your Fault
Tolerant System.
6
General Recovery Strategies
If an FX system encounters a critical error during a splitmode
transition, it will revert to the previous state. For example, if the
splitstate command is unable to successfully offline an MFIO
module on SYSOLD while exporting data volume groups
(datavgs), the transition to EXPORTEDVGS_SYSOLD will be
aborted and the system will be rolled back to an earlier state.
Depending on the value you have assigned to the g_FALLBACK_ONE
parameter in the /var/ft/split_cfg file, the system will fall back to
either the QUIESCEDAPPS_SYSOLD state or to the
EXPORTEDVGS_SYSNEW state.
When the error is discovered, the splitstate utility outputs an error
message which will be directed to stdout, if the g_VERBOSE parameter
in the /var/ft/split_cfg file includes the CRIT option.
This section contains typical error messages with recommended
recovery strategies. Depending on the nature of the error, you may
want to fix it and immediately continue the splitmode upgrade, or
you may want to return the system to FT_START prior to fixing the
problem.
6-12
Troubleshooting the Split Mode Process
Note
The specific text of your error message may vary from
the samples in this chapter.
If you are unable to rectify the problem yourself, refer to ÒGetting
Help for System ProblemsÓ on page 1-8 for information on how to
contact Motorola Technical Support representatives.
6
Problem Resolution and Fallback Strategies
6-13
Global Messages
The following table lists sample error messages, possible causes,
and recovery actions for a class of messages which may occur
during any splitstate transition.
Table 6-2. Global Messages
Sample Message
6
Interpretation
Recovery Action
ERROR: invalid
argument list
You have supplied the
wrong argument to the
splitstate command
Retype the command
using the proper options
(-l, -L, -s, -h).
ERROR:
Requested_State is
not a valid state
You speciÞed an incorrect
state as a splitstate
argument
Use splitstate -l to
display current system
state as well as possible
states.
ERROR: cannot
transition from
Current_State to
Requested_State
An error occurred during
the transition from
Current_State to
Requested_State
Look at the messages for
the appropriate transition
below.
ERROR: system not in
correct split-mode
state for state
transition to occur
The current system state
does not reßect the
splitstate state.
Refer to ÒRecovering from
a System FailureÓ on page
6-5.
ERROR: error
(retval=3) during
transition, falling
back to State
An error occurred during
the transition from
Current_State to
Requested_State
Look at the messages for
the appropriate transition
below
6-14
Troubleshooting the Split Mode Process
Transition from FT_START to CHECKED
The following table lists sample error messages that may occur
during the transition from FT_START to CHECKED, along with
their causes, and recommended recovery actions. If the system
encounters one of these errors, it will prevent the transition and the
system will remain in the FT_START state. You should fix the cause
of the error and attempt the transition again. Alternately, you can
force the transition to occur despite an error by setting the
g_FORCESPLIT variable to TRUE in the /var/ft/split_cfg.ovr file.
Table 6-3. FT_START to CHECKED
Sample Message
Interpretation
6
Recovery Action
ERROR: system cannot
support splitmode
The system is running a
pre-splitmode version of
AIX
ERROR: not enough
space in /var/ft for
temporary files,
need 500 free blocks
The /var Þle system is not
large enough
/var file system
ERROR: required
console port: s1
The console is not attached
to port0 on the CPU
personality module
Attach the console to
port0 or use SMIT to
reassign the console
ERROR: I/O-2 c1-f12
Defined *
should_be_on I/O
Module
A module, device, (or
volume group) is not
online (or mirrored)
Use SMIT (cms) to
reintegrate the
module/devices.
ERROR: unable to
determine FT daemon
status
One of the fault tolerant
software daemons is
inactive
Use Ôlssrc -g ftÕ to
determine the inactive
daemon, and use 'startsrc s <daemon>' to start it
ERROR: unable to
verify availability
of ICM-0
A module is not available
Use SMIT (cms) to
reintegrate the module
Problem Resolution and Fallback Strategies
Update the operating
system to AIX 4.1.5r3 using
standard installation
methods
Use SMIT to enlarge the
6-15
Table 6-3. FT_START to CHECKED (continued)
Sample Message
6
Interpretation
Recovery Action
ERROR: need at least
2 CPU modules to
enter split-mode
Only 1 CPU module is
present on the system
Add another CPU module
ERROR: invalid
setting(s) for
g_SYSOLD (2) and/or
g_SYSNEW (0)
/var/ft/split_cfg Þle
contains invalid entries for
g_SYSOLD and/or g_SYSNEW
Edit the
ERROR: faulttolerant volume
group testvg1 not
ft_full
A fault tolerant volume
group is not mirrored
Use fixvg to remirror the
volume group
ERROR: cannot
specify 'rootvg' as
volume group to
steal
The root volume group
cannot be stolen
/var/ft/split_cfg file
ERROR: testvg1 is
physically attached
to rootvg and cannot
be stolen
Volume groups with
hdisks physically attached
to rootvg hdisks (i.e. on the
same MFIO) cannot be
stolen
Remove the volume group
from the g_STEALVG
parameter in
/var/ft/ split_cfg, or
make the volume group
non-fault tolerant
ERROR: testvg3 not
found or volume
group not faulttolerant
1) The volume group does
not exist on the system
(but is speciÞed in the
g_STEALVG parameter), or
1) Remove the volume
group name from the
g_STEALVG parameter in
/var/ft/split_cfg, or
2) the volume group is not
mirrored
2) use SMIT to convert the
volume group to FT
The logical device does not
have a member1 physical
device assigned to it
Use SMIT to assign a
member1 to the logical
device
ERROR: ent0 missing
member1 (domain 1)
6-16
/var/ft/split_cfg file
and make necessary
changes
Edit the
and make necessary
changes.
Troubleshooting the Split Mode Process
Table 6-3. FT_START to CHECKED (continued)
Sample Message
ERROR: secondary CPU
module 'CPU-2' not
present
Interpretation
The g_SECONDARY
parameter in
/var/ft/split_cfg does
not contain a CPU that is
present on the system.
Recovery Action
1) Edit
/var/ft/split_cfg and
reassign g_SECONDARY or
2) Use SMIT (cms) to add
the missing CPU module.
The g_PRIMARY parameter
in /var/ft/split_cfg
contains a CPU that is not
present on the system.
1) Edit /var/ft/split_cfg
and reassign g_PRIMARY or
ERROR: both
g_PRIMARY and
g_SECONDARY must be
specified, or both
must be left
unspecified
The parameters g_PRIMARY
and g_SECONDARY in
/var/ft/ split_cfg must
be either set or left blank.
Edit /var/ft/split_cfg
and either set or clear the
g_PRIMARY and
g_SECONDARY parameters.
ERROR: primary and
secondary CPU
modules must be
different
The parameters g_PRIMARY
and g_SECONDARY are set to
the same value
Edit /var/ft/split_cfg
and either correctly set or
clear the g_PRIMARY and
g_SECONDARY parameters.
ERROR: secondary CPU
(CPU-0) is not
online
The CPU module is not
online.
Use SMIT (cms) to put the
CPU module online.
ERROR: NVRAM
autosplit_secondary
parameter set to
'1', should be '0'
The autosplit_secondary
parameter for the primary
CPU module is set to '1'.
Use restart(1) to clear the
autosplit_ secondary
parameter.
ERROR: primary CPU
module 'CPU-0' not
present
Problem Resolution and Fallback Strategies
2) Use SMIT (cms) and
add the missing CPU
module.
6
6-17
Transition from CHECKED to SIMPLEX
The following table lists sample error messages that may occur
during the transition from CHECKED to SIMPLEX, along with
their causes, and recommended recovery actions. If the system
encounters one of these errors, it will prevent the transition and the
system will return to the CHECKED state. You should fix the cause
of the error and attempt the transition again.
Table 6-4. CHECKED to SIMPLEX
6
Sample Message
Interpretation
Recovery Action
ERROR: failed to set
I/O-2
(condition=offline)
A module failed to change
to the correct state
Use standard FX
procedures to determine
why module/device failed
to change states correctly.
ERROR: testvg volume
group(s) failed to
offline
A volume group mirror
did not break correctly
Use fixvg to repair the
volume group, then retry
the splitstate command.
ERROR: modchange -r
-l CPU-0 failed
The modchange command
failed while trying to
reintegrate (-r) or ofßine
(-o) a module
Use standard FX
troubleshooting
procedures.
A CPU module failed to
come online
Use standard FX
troubleshooting
procedures to online or
ofßine the module.
or
ERROR: modchange -o
-l CPU-0 failed
or
ERROR: modchange -o
I/O-2 returned: 3
ERROR: unable to
online CPU-0
or
ERROR: CPU-0 failed
to go offline
6-18
A CPU module failed to
go ofßine
Troubleshooting the Split Mode Process
Transition from SIMPLEX to SPLIT
The following table lists sample error messages that may occur
during the transition from SIMPLEX to SPLIT, along with their
causes, and recommended recovery actions. If the system
encounters one of these errors, it will prevent the transition and the
system will return to the SIMPLEX state. You should fix the cause
of the error and attempt the transition again.
Table 6-5. SIMPLEX to SPLIT
Sample Message
Interpretation
Recovery Action
ERROR: failed to
disable autoboot
parameter <ab=N> for
CPU-0, autoboot
retval: 1
The autoboot command
failed to clear the autoboot
parameters for CPU-0.
If the CPU has been
upgraded, make sure that
it is correctly seated in the
system chassis.
If the CPU belongs to
SYSNEW, run standard On
Demand Diagnostics on
the CPU module.
If the CPU belongs to
SYSOLD, return the
system to FT_START and
use standard FX
troubleshooting
techniques.
Problem Resolution and Fallback Strategies
6-19
6
Table 6-5. SIMPLEX to SPLIT (continued)
Sample Message
Interpretation
Recovery Action
ERROR: failed to
copy NVRAM contents
from primary to
secondary, fvnvcp
retval=19
The fxnvcp command
failed to copy the NVRAM
contents.
If the CPU has been
upgraded, make sure that
it is correctly seated in the
system chassis.
If the CPU belongs to
SYSNEW, run standard On
Demand Diagnostics on
the CPU module.
6
If the CPU belongs to
SYSOLD, return the
system to FT_START and
use standard FX
troubleshooting
techniques.
ERROR: failed to set
date on CPU-2,
retval=19
The system was unable to
set the time and date on a
CPU module.
If the CPU has been
upgraded, make sure that
it is correctly seated in the
system chassis.
Run standard On Demand
Diagnostics on the
SYSNEW CPU module.
6-20
Troubleshooting the Split Mode Process
Table 6-5. SIMPLEX to SPLIT (continued)
Sample Message
ERROR: failed to set
restart record on
primary, restart
retval: 1
Interpretation
The restart command
failed to set the restart
record variables correctly.
Recovery Action
If the CPU has been
upgraded, make sure that
it is correctly seated in the
system chassis.
If the CPU belongs to
SYSNEW, run standard On
Demand Diagnostics on
the CPU module.
If the CPU belongs to
SYSOLD, return the
system to FT_START and
use standard FX
troubleshooting
techniques.
ERROR: ftctl -split
CPU-2 failed with: 1
The ftctl command
failed to split the system.
Problem Resolution and Fallback Strategies
Try the transition again.
If it fails a second time,
return to FT_START and
use standard FX
troubleshooting
procedures.
6-21
6
Transition from SPLIT to QUIESCEDAPPS_SYSNEW
The following table lists sample error messages that may occur
during the transition from SPLIT to QUIESCEDAPPS_SYSNEW,
along with their causes, and recommended recovery actions. If the
system encounters one of these errors, it will prevent the transition
and the system will return to the SPLIT state. You should fix the
6
6-22
Troubleshooting the Split Mode Process
cause of the error and attempt the transition again. Alternately, you
can force the transition to continue despite the errors by setting the
g_FORCESWITCH parameter to TRUE in the /var/ft/split_cfg.ovr file.
Table 6-6. SPLIT to QUIESCEDAPPS_SYSNEW
Sample Message
ERROR: app1,app2
QUIESCE request of
smmt on
SYSNEW_SECONDARY
failed with: 1
Interpretation
The applications speciÞed
in the
g_PRESWITCH_SYSNEW_APPS
parameter in the
/var/ft/split_cfg file
did not all respond within
the allowed time
(g_APPTIME) on the system
Recovery Action
1) ConÞrm that the
g_PRESWITCH_SYSNEW_APPS
parameter is set correctly
in /var/ft/split_cfg
2) ConÞrm that the
applications speciÞed in
the
g_PRESWITCH_SYSNEW_APPS
parameter are running on
SYSNEW as the
SECONDARY.
3) ConÞrm that the
applications are registered
with the Service Provider.
4) Set the g_APPTIME
parameter in
/var/ft/split_cfg to a
longer delay and retry the
transition.
5) If the transition fails a
second time, and you want
to force the transition, set
the g_FORCESWITCH
parameter in
/var/ft/split_cfg.ovr to
TRUE and retry the
transition.
Problem Resolution and Fallback Strategies
6-23
6
Transitions from QUIESCEDAPPS_SYSNEW to
EXPORTEDVGS_SYSNEW
The following table lists sample error messages that may occur
during the transition from QUIESCEDAPPS_SYSNEW to
EXPORTEDVGS_SYSNEW, along with their causes, and
recommended recovery actions. If the system encounters one of
these errors, it will prevent the transition and the system will return
to QUIESCEDAPPS_SYSNEW. You should fix the cause of the error
and attempt the transition again.
This transition exports the data volume groups to steal on SYSNEW
running as SECONDARY. If an error occurs, the operator should
add the "DEBUG2" flag to the g_VERBOSE parameter in the
/var/ft/split_cfg.ovr file, to turn debugging on and learn where
the error occurred.
6
Table 6-7. QUIESCEDAPPS_SYSNEW to
EXPORTEDVGS_SYSNEW
Sample Message
ERROR: error
(retval=2) during
transition, falling
back to state
QUIESCEDAPPS_SYSNEW
Interpretations
1) The Þle system(s) on the
data volume groups on
SYSNEW failed to
unmount
2) varyoffvg failed to vary
off a datavg
3) exportvg failed to
export a datavg
Recovery Action
1) Run fuser <directory>
to determine which
processes are using the
directory and stop the
processes.
2-4) Use standard AIX and
FX troubleshooting
procedures.
4) modchange failed to
ofßine an hdisk on
SYSNEW
6-24
Troubleshooting the Split Mode Process
Transition from EXPORTEDVGS_SYSNEW to
QUIESCEDAPPS_SYSOLD
The following table lists sample error messages that may occur
during the transition from EXPORTEDVGS_SYSNEW to
QUIESCEDAPPS_SYSOLD, along with their causes, and
recommended recovery actions. If the system encounters one of
these errors, it will prevent the transition and the system will return
to the EXPORTEDVGS_SYSNEW state. You should Þx the cause of
6
Problem Resolution and Fallback Strategies
6-25
the error and attempt the transition again. Alternately, you can force
the transition despite errors by setting the g_FORCESWITCH variable to
TRUE in the /var/ft/split_cfg.ovr file.
Table 6-8. EXPORTEDVGS_SYSNEW to
QUIESCEDAPPS_SYSOLD
Sample Message
6
ERROR: app1,app2
QUIESCE request of
smmt on
SYSOLD_PRIMARY
failed with: 1
Interpretation
Recovery Action
The applications speciÞed
in the
g_PRESWITCH_SYSOLD_APPS
g_PRESWITCH_SYSOLD_APPS
parameter in the
/var/ft/split_cfg file
did not all respond within
the allowed time
(g_APPTIME) on the system
running as SYSOLD
PRIMARY.
1) ConÞrm that the
parameter is set correctly
in /var/ft/split_cfg
2) ConÞrm that the
applications speciÞed in
the
g_PRESWITCH_SYSOLD_APPS
parameter are running on
SYSOLD as the PRIMARY.
3) ConÞrm that the
applications are registered
with the Service Provider.
4) Set the g_APPTIME
parameter in
/var/ft/split_cfg to a
longer delay and try the
transition again.
5) If the transition fails a
second time, and you want
to force the transition, set
the g_FORCESWITCH
parameter in
/var/ft/split_cfg.ovr to
TRUE and retry the
transition.
6-26
Troubleshooting the Split Mode Process
Transition from QUIESCEDAPPS_SYSOLD to
EXPORTEDVGS_SYSOLD
The following table lists sample error messages that may occur
during the transition from QUIESCEDAPPS_SYSOLD to
EXPORTEDVGS_SYSOLD, along with their causes, and
recommended recovery actions. If the system encounters one of
these errors, it will prevent the transition and the system will return
to the EXPORTEDVGS_SYSNEW state or to the
QUIESCEDAPPS_SYSOLD state (depending on the value of the
g_FALLBACK_ONE variable). You should fix the cause of the error and
attempt the transition again. Alternately, you can force the
transition despite errors by setting the g_FORCESWITCH variable to TRUE
in the /var/ft/split_cfg.ovr Þle.
This transition exports the data volume groups to steal on SYSOLD
running as PRIMARY. If an error occurs, the operator should add
the "DEBUG2" flag to the g_VERBOSE parameter in the
/var/ft/split_cfg.ovr file, to turn debugging on and learn where
the error occurred.
Table 6-9. QUIESCEDAPPS_SYSOLD to
EXPORTEDVGS_SYSOLD
Sample Message
ERROR: error
(retval=2) during
transition, falling
back to state
QUIESCEDAPPS_SYSOLD
Interpretation
1) The Þle systems(s) on
the data volume groups
on SYSOLD failed to
unmount
2) varyoffvg failed to vary
off a datavg
3) exportvg failed to export
a datavg
Problem Resolution and Fallback Strategies
Recovery Action
1) Run fuser <directory>
to determine which
processes are using the
directory and stop the
processes.
2) or 3) Use standard AIX
troubleshooting
procedures
6-27
6
Transition from EXPORTEDVGS_SYSOLD to SWITCHED
The following table lists sample error messages that may occur
during the transition from EXPORTEDVGS_SYSOLD to
SWITCHED, along with their causes, and recommended recovery
actions. If the system encounters one of these errors, it will prevent
the transition and the system will return to the
EXPORTEDVGS_SYSNEW state or to the
EXPORTEDVGS_SYSOLD state (depending on the value of the
g_FALLBACK_ONE variable). You should fix the cause of the error and
attempt the transition again.
6
Table 6-10. EXPORTEDVGS_SYSOLD to SWITCHED
Sample Message
Interpretation
1) ERROR: remote
switch failed with:
1
1) The ftctl -splitswitch
issued on the remote
system failed.
or
2) The ftctl -splitswitch
issued on the local system
failed.
2) ERROR: ftctl splitswitch failed
with: 251
ERROR: failed to set
restart record on
CPU-2, restart
retval: 3
6-28
The restart command
failed to set the restart
record variables correctly.
Recovery Action
Try the transition again.
If the transition fails a
second time, return to
FT_START and use
standard FX
troubleshooting
procedures.
Use the restart(1)
command to examine the
contents of the restart
record
Troubleshooting the Split Mode Process
Transition from SWITCHED to RESUMEDAPPS_SYSNEW
The following table lists sample error messages that may occur
during the transition from STOLEVGS to
RESUMEDAPPS_SYSNEW, along with their causes, and
recommended recovery actions. If the system encounters one of
these errors, it will prevent the transition and the system will return
6
Problem Resolution and Fallback Strategies
6-29
to the STOLEVGS state or to the EXPORTEDVGS_SYSNEW state
(depending on the value of the g_FALLBACK_ONE parameter). You
should Þx the cause of the error and attempt the transition again.
Table 6-11. SWITCHED to RESUMEDAPPS_SYSNEW
Sample Message
ERROR: app1,app2
RESUME request of
smmt on
SYSNEW_PRIMARY
failed with: 1
6
Interpretation
Recovery Action
The applications speciÞed
in the
g_POSTSWITCH_SYSNEW_APPS
g_POSTSWITCH_SYSNEW_APPS
parameter is set correctly in
parameter in the
/var/ft/split_cfg
/var/ft/split_cfg file did
not all respond
1) ConÞrm that the
2) ConÞrm that the
applications speciÞed in
the
g_POSTSWITCH_SYSOLD_APPS
parameter are running on
SYSNEW as the PRIMARY.
3) ConÞrm that the
applications are registered
with the Service Provider.
4) Set the g_APPTIME
parameter in
/var/ft/split_cfg to a
longer delay and try the
transition a second time.
5) If the transition fails a
second time, you may want
to set the g_FORCESWITCH
parameter in
/var/ft/split_cfg.ovr to
TRUE and retry the
transition.
6-30
Troubleshooting the Split Mode Process
Transition from RESUMEDAPPS_SYSNEW to STOLEVGS
The following table lists sample error messages that may occur
during the transition from RESUMEDAPPS_SYSNEW to
STOLEVGS, along with their causes, and recommended recovery
actions. If the system encounters one of these errors, it will prevent
the transition and the system will return to the
RESUMEDAPPS_SYSNEW state or to the
EXPORTEDVGS_SYSNEW state (depending on the value of the
g_FALLBACK_ONE parameter). You should fix the cause of the error and
attempt the transition again.
This transition imports the data volume groups to steal from
SYSOLD running as secondary to SYSNEW running as primary. If
an error occurs, the operator should add the "DEBUG2" flag to the
g_VERBOSE parameter in the /var/ft/split_cfg.ovr file, to turn
debugging on and learn where the error occurred.
Table 6-12. RESUMEDVGAPPS_SYSNEW to STOLEVGS
Sample Message
ERROR: error
(retval=2) during
transition, falling
back to state
RESUMEDAPPS_SYSNEW
Interpretation
1) One of the MFIO
modules containing datavg
hdisks failed to reintegrate
2) the data volume group
failed to import
Problem Resolution and Fallback Strategies
Recovery Action
Use standard FX Series
troubleshooting
procedures to manage the
datavg
6-31
6
Transition from STOLEVGS to RESUMEDVGAPPS_SYSNEW
The following table lists sample error messages that may occur
during the transition from STOLEVGS to
RESUMEDVGAPPS_SYSNEW, along with their causes, and
recommended recovery actions. If the system encounters one of
these errors, it will prevent the transition and the system will return
6
6-32
Troubleshooting the Split Mode Process
to the STOLEVGS state or to the EXPORTEDVGS_SYSNEW state
(depending on the value of the g_FALLBACK_ONE parameter). You
should Þx the cause of the error and attempt the transition again.
Table 6-13. STOLEVGS to RESUMEDVGAPPS_SYSNEW
Sample Message
ERROR: app1,app2
RESUME request of
smmt on
SYSNEW_PRIMARY
failed with: 1
Interpretation
Recovery Action
The applications speciÞed
in the
g_POSTSWITCH_SYSNEW_APPS
g_POSTSWITCH_SYSNEW_VGAP
PS parameter in the
/var/ft/split_cfg file did
not all respond
1) ConÞrm that the
parameter is set correctly in
/var/ft/split_cfg
2) ConÞrm that the
applications speciÞed in
the
6
g_POSTSWITCH_SYSOLD_VGAP
PSparameter are running
on SYSNEW as the
PRIMARY.
3) ConÞrm that the
applications are registered
with the Service Provider.
4) Set the g_APPTIME
parameter in
/var/ft/split_cfg to a
longer delay and try the
transition a second time.
5) If the transition fails a
second time, you may want
to set the g_FORCESWITCH
parameter in
/var/ft/split_cfg.ovr to
TRUE and retry the
transition.
Problem Resolution and Fallback Strategies
6-33
Transition from RESUMEDVGAPPS_SYSNEW to UNSPLIT
The following table lists sample error messages that may occur
during the transition from RESUMEDVGAPPS_SYSNEW to
UNSPLIT, along with their causes, and recommended recovery
actions. If the system encounters one of these errors, it will prevent
the transition and the system will return to the
RESUMEDAPPS_SYSNEW state. You should Þx the cause of the
error and attempt the transition again.
Table 6-14. RESUMEDVGAPPS_SYSNEW to UNSPLIT
Sample Message
6
ERROR: failed to
clear restart record
on primary, restart
retval: 3
6-34
Interpretation
The restart command
failed to clear the restart
record variables correctly
Recovery Action
Use the restart(1)
command to examine the
contents of the restart
record
Troubleshooting the Split Mode Process
Transition from UNSPLIT to FT_COMPLETED
The following table lists sample error messages that may occur
during the transition from UNSPLIT to FT_COMPLETED, along
with their causes, and recommended recovery actions. If the system
encounters one of these errors, it will prevent the transition and the
system will return to the UNSPLIT state. You should Þx the cause
of the error and attempt the transition again.
Table 6-15. UNSPLIT to FT_COMPLETED
Sample Message
ERROR: unable to
reintegrate I/O-0
Interpretation
Recovery Action
A module failed to
reintegrate or to go offline
Use standard FX Series
troubleshooting
procedures to reintegrate
or to ofßine the module as
appropriate.
The rootvg data volume
group failed to reestablish
the mirrors
Use fixvg to remirror the
volume group.
or
ERROR: I/O-0 failed
to go online
or
ERROR: modchange -r
-l I/O-0 failed
or
ERROR: I/O-0 failed
to go offline
or
ERROR: modchange -o
-l I/O-0 failed
ERROR: error while
remirroring rootvg
volume groups
or
ERROR: failed to
remirror rootvg
volume group
Problem Resolution and Fallback Strategies
6-35
6
Table 6-15. UNSPLIT to FT_COMPLETED (continued)
Sample Message
Interpretation
Recovery Action
ERROR: failed to
restore autoboot
parameter ab=Y for
CPU-0, autoboot
retval=2
The autoboot parameter
for the CPU was not reset.
Use the autoboot
command to examine the
autoboot parameters.
ERROR: error while
remirroring data
volume groups
The data volume groups
failed to reestablish the
mirrors
Use fixvg to remirror the
volume group.
6
6-36
Troubleshooting the Split Mode Process
7Writing Split Mode-Aware
Applications
7
Overview
As the procedures in Chapter 4 demonstrate, it is possible to run
split mode without adapting your application. Making your
application split mode aware, however, will allow you to automate
more of the procedures associated with split mode and will
minimize the service interruption that occurs at switchover.
This chapter discusses the basic steps to making your application
split mode aware in order to manage the switchover process. It also
gives a brief overview of the capabilities of the Inter-System
Communication (ISC) subsystem, which provides the tools for
maximizing your applicationsÕ effective use of the split mode
functionality. More complete descriptions of the ISC utilities is
available in the appropriate manpages.
Source code for a sample split mode aware application is provided
in Appendix A.
Managing Switchover
The most critical aspect of split mode from the application
perspective is switchover. Prior to switchover, it is likely that you
will have applications running in parallel on both sides of the
system. Applications on SYSOLD will be providing service while
those on SYSNEW are being run in order to test the upgraded
system. At switchover, applications on SYSOLD need to be
quiesced and those which are running on SYSNEW need to begin
providing actual service to applications and users.
This process is designed around the ISC Service Provider (ISC SP or
SP). In order to take full advantage of split mode, the applications
on both systems should be modified to receive and respond to
7-1
messages from the service provider via sockets. Alternately, a
single application can be rewritten to manage non-Split Modeaware applications through the split mode process.
The following discussion briefly describes the minimum steps
needed to make your applications split mode aware.
Registering with the Service Provider
When the SP is started, it looks for the /etc/ft/sm_apps file. This file
is a place in which you can list applications that you want to
communicate with the SP and the signals you want the sm_notify
script to use to alert each application that the SP has been started.
For example,
app1 TERM
7
app2 HUP
tells the SP to send a SIGTERM signal to Òapp1Ó and a SIGHUP
signal to Òapp2.Ó Additional options for signaling applications are
available in the sm_apps manpage. In order to prevent the signal
from killing the application, you should trap the signal early in the
application startup process.
Once the Service Provider is active, applications can register with it
by accessing a well-known socket address or registration socket,
ISC_RegSocket. Once the application accesses the registration
socket, the SP will establish a unique socket between itself and the
application. A separate service provider exists as a daemon process
on both SYSOLD and SYSNEW, and applications on each system
should register with their respective SP.
Note
In case the application is initiated after the SP has
already signaled applications to register, applications
should check for the socket automatically upon startup.
The Figure 7-1 illustrates the situation in which three applications
on SYSOLD and their counterparts on SYSNEW have all registered
with the service providers on their respective systems. Application
D is a new application which has been installed on SYSNEW.
7-2
Overview
SYSOLD
(Providing Service)
Application B
Application A
Application C
7
ISC SP
PRI
RAM
SYSNEW
(Testing Upgrades)
ISC SP
Application C’
Application A’
Application B’
Application D
Figure 7-1. Registering with the ISC SP
Writing Split Mode-Aware Applications
7-3
Receiving and Responding to the Switchover Notifications
Prior to switchover, the Service Providers on SYSOLD and
SYSNEW will send a message (the message may be set in the
/var/ft/split_cfg file with the default message being
REQ_QUIESCE) to registered applications notifying them of the
impending switchover and telling them to quiesce themselves. At
that point, each application has X seconds in which to respond (the
default application response message is RSP_QUIESCE), where X is
the value you specified in the /var/ft/split_cfg file. During this
response window, your applications should finish any current
actions and clean themselves up in order to quiesce themselves. If
one or more of the registered applications fail to respond, the
operating system will abort the switchover; quiesced applications
will receive signals to begin providing service and SYSOLD will
remain primary. If you want the system to switch regardless of
application responses, you should make the g_FORCESWITCH
option true in the /var/ft/split_cfg file (see ÒSet Global Split Mode
Variables in the split_cfg fileÓ on page 4-16).
7
As far as applications are concerned, there are two phases to the
switchover process. The first phase is marked by the SWITCHED
state, at which SYSNEW becomes primary. At this point,
applications which do not rely on the datavgs may begin to provide
service again. The SP sends a configurable signal to the applications
listed in the g_POSTSWITCH_SYSNEW_APPS variable in the
/var/ft/split_cfg file.
The second phase is marked by the STOLEVGS state and is the
point at which the remaining (datavg-dependent) applications can
begin providing service. The SP sends a configurable signal to the
applications listed in the g_POSTSWITCH_SYSNEW_VGAPPS
variable in the /var/ft/split_cfg file.
7-4
Overview
When the system reaches the RESUMEDVGAPPS_SYSNEW state,
all applications have begun providing service, as shown in Figure
7-2.
SYSOLD
(Standby)
ISC SP
7
PRI
RAM
SYSNEW
(Providing Service)
ISC SP
Application C’
Application A’
Application B’
Application D
Figure 7-2. Resuming Applications After Switchover
Applications should be written to handle the same process in
Writing Split Mode-Aware Applications
7-5
reverse, in order to quiesce and resume properly in response to a
fallback situation. If for some reason, the system needs to fallback
from RESUMEDAPPSVG_SYSNEW than the applications need to
be able to handle a g_PRESWITCH_SYSOLD_REQ_RESUME
signal.
Using the ISC to Communicate between Applications on
SYSOLD and on SYSNEW
The ISC Application ProgrammerÕs Interface (API) and the ISC
Utility functions provide a number of tools that allow applications
on one system to talk to those on the other. For example,
applications running on SYSNEW after the switchover are able to
interact with their peers on SYSOLD.
7
The following is an overview of the capabilities of the ISC
subsystem. For complete descriptions, see the appropriate
manpages.
ISC API functions
The following ISC API functions are declared in the ISC API header
file /usr/include/sys/iscapi.h with the code contained in the ISC
API library file /usr/ccs/lib/libiscapi.a. For complete descriptions
of the various functions, see the appropriate manpages.
7-6
ISC_Abort(3)
application connection abort request
ISC_Conn(3)
application connect request
ISC_Dereg(3)
ISC SP de-register request
ISC_Disc(3)
application disconnect request
ISC_Exec(3)
application execution request
ISC_ExecTerm(3)
application execution
termination request
ISC_LogMsg(3)
ISC SP log message request
ISC_Read(3)
application read data
ISC_Recv(3)
application receive message request
Overview
ISC_Reg(3)
ISC SP registration request
ISC_RegRecv(3)
application message callback
function registration request
ISC_Send(3)
application send message request
ISC_Status(3)
ISC SP status information request
ISC_Write(3)
application write data
Registering and Deregistering with the ISC SP
Applications must first register with the ISC SP before attempting
any communication with a peer via the ISC. This is accomplished
by using the ISC_Reg(3) ISC API function.
When all communication with a peer application or the ISC SP is no
longer needed, the application must de-register with the ISC SP via
the ISC_DeReg(3) ISC API function.
Sending/Receiving messages to/from a peer application
Once registered with the ISC SP, an application can send and
receive messages to/from a peer via the ISC_Send(3) and
ISC_Recv(3) ISC API functions, respectively.
An application can also register a callback function to receive
asynchronous messages from a peer via the ISC_RegRecv(3) ISC
API function.
Executing a program or script
Once registered with the ISC SP, an application can execute a
program or script remotely, locally, or on both systems via the
ISC_Exec(3) ISC API function. For example, an application on
SYSNEW can run a shell script on SYSOLD, or the same application
can use the API to run a shell script on SYSNEW in order to use the
ISC logs.
Once a program/script has been stared via the ISC_Exec(3) ISC API
function, an application can terminate it via the ISC_ExecTerm(3)
ISC API function.
Writing Split Mode-Aware Applications
7-7
7
Logging a message to the ISC SP's log Þle
Once registered with the ISC SP, an application can log a text
message to either the local or remote ISC SP's log file via the
ISC_LogMsg(3) ISC API function.
Retrieving status information from the ISC SP
Once registered with the ISC SP, an application can retrieve a list of
applications that have registered with both the local and remote ISC
SP via the ISC_Status(3) ISC API function.
Connecting or Disconnecting with a peer application
Once registered with the ISC SP, an application can connect with a
peer application to transfer data to or from it via the ISC_Conn(3)
ISC API function.
7
When transferring data with a peer application is no longer needed,
the application must disconnect with the peer via the ISC_Disc(3)
ISC API function.
Writing/Reading data to/from a peer application
Once registered with the ISC SP and connected to a peer
application, an application can write and read data to/from the
peer via the ISC_Write(3) and ISC_Read(3) ISC API functions,
respectively.
7-8
Overview
ISC Utility functions
The following ISC Utility functions are declared in the ISC Utility
header file /usr/include/sys/iscutil.h with the code contained in
the ISC Utility library file /usr/ccs/lib/libiscutil.a. The utility
functions call the API functions and provide higher level access to
the ISC functionality. For complete descriptions of the utilities, see
the appropriate manpages.
ISCU_broadcast_message(3)
broadcast message to
other applications
ISCU_log_message(3)
log a message to ISC SP's
log file
ISCU_send_message(3)
send directed message
to an application
ISCU_transfer_file(3)
read/write file from/to
remote system
ISCU_execute(3)
execute a program/script
remotely, locally, or both
7
Broadcasting messages
An application can broadcast a message locally, remotely, or both
and wait for a response from all via the
ISCU_broadcast_message(3) ISC Utility function.
Logging messages
An application can log a message to the local, remote, or both ISC
SP's log file via the ISCU_log_message(3) ISC Utility function.
Send a message
An application can send a directed message to either a local or
remote peer application via the ISCU_send_message(3) ISC Utility
function.
Writing Split Mode-Aware Applications
7-9
Transfer a Þle
An application can send or receive a file to/from the remote system
via the ISCU_transfer_file(3) ISC Utility function.
Execute a program/script
An application can execute a program/script locally, remotely, or
both via the ISCU_execute(3) ISC Utility function.
7
7-10
Overview
ASample Split Mode Aware
Application
A
Overview
This appendix contains source code for the sample split mode
aware application which is discussed in Chapter 7.
The sample shows one way of providing graceful communications
with between the application and the ISC Service Provider (SP) in
order to register with the SP and to handle quiesce and resume
requests and responses.
A-1
A
/*MH********************* MODULE HEADER *********************
**
** MODULE NAME:responder.c
**
** PROJECT:
SeriesFX Split Mode Inter-System Communication
**
Message Transmission Utility (SMMT)
**
** DESCRIPTION: This file contains code for the SMMT Utility
**
responding test utility
**
** CONTENTS:
It contains the following functions:
**
**
** COPYRIGHT:
(C) COPYRIGHT MOTOROLA, INC. 1998
**
ALL RIGHTS RESERVED
**
**
**
************************************************************/
/*
* Include Files
*/
#include <stdio.h>
#include <unistd.h>
#include <errno.h>
#include <locale.h>
#include <signal.h>
#include <sys/types.h>
#include <sys/iscapi.h>/* ISCS API Header */
#define USAGE
"Usage: %s -n connID [-D debug socket]\n"
#define FOREVER ((int *)-1)
char *name = NULL;
char *ME = NULL;
A-2
1
2
3
4
5
6
7
8
9
10
11
12
13
14
15
16
17
18
19
20
21
22
23
24
25
26
27
28
29
30
31
32
33
34
35
36
37
38
39
40
Overview
A
/*FH********************* FUNCTION HEADER *********************
**
** FUNCTION NAME:parse_args()
**
** DESCRIPTION:
**
This function parses the command line arguments and
**
validates input parameters. It also validates that the
**
mandatory arguments are present.
**
** PARAMETERS:
**
**
Input:
**
argc
- command line argument count
**
argv
- ptr to array of command line
**
arguments
**
**
Output:
The following flags may be set.
**
**
Returns:
none
**
** NOTES:
**
************************************************************/
void
parse_args(int argc, char **argv)
{
int c;
while ((c = getopt(argc, argv, "n:D:")) != EOF) {
switch(c){
case 'n':
/* name to call myself */
name = optarg;
break;
case 'D':
/* This is a DEBUG argument */
ISC_RegSocket = optarg;
break;
case '?':
/* getopt spits out decent error message */
exit(-1);
default:
fprintf(stderr, USAGE, ME);
Sample Split Mode Aware Application
41
42
43
44
45
46
47
48
49
50
51
52
53
54
55
56
57
58
59
60
61
62
63
64
65
66
67
68
69
70
71
72
73
74
75
76
77
78
79
80
81
82
83
84
85
86
A-3
A
exit(-1);
}
}
/* must supply at least his own name */
if (name == NULL) {
fprintf(stderr, USAGE, ME);
exit(-1);
}
/* check size of name */
if (strlen(name) >= ISC_MAX_CONN_ID) {
fprintf(stderr, USAGE, ME);
exit(-1);
}
}
volatile int SP_is_up = 0;
void
handler(int signo)
{
printf("%s: handler called\n", ME);
SP_is_up = 1;
}
int
main(int argc, char **argv)
{
char respbuf[ISC_MAX_MSG_DATA];
char sendbuf[ISC_MAX_MSG_DATA];
char srcID[ISC_MAX_CONN_ID];
int recv_flags;
int send_flags;
int count;
int send_length;
struct sigaction s;
/* who am I */
ME = argv[0];
/* parse command line arguments */
parse_args(argc, argv);
/* setup signal handler for ISC SP notification */
A-4
87
88
89
90
91
92
93
94
95
96
97
98
99
100
101
102
103
104
105
106
107
108
109
110
111
112
113
114
115
116
117
118
119
120
121
122
123
124
125
126
127
128
129
130
131
132
Overview
A
memset((void *)&s, 0, sizeof(s));
s.sa_handler = handler;
if (sigaction(SIGHUP, &s, NULL)) {
perror("sigaction");
exit(-1);
}
133
134
135
136
137
138
139
while (1) {
140
/* try to get to SP without the signal */
141
if (ISC_Reg(name, 0)) {
142
printf("%s: waiting for SIGHUP signal from SP\n", ME); 143
while(!SP_is_up)
144
sleep(600);
145
146
/* register with local SP */
147
printf("%s: got signal from SP--registering...\n", ME);
148
if (ISC_Reg(name, FOREVER)) {
149
printf("%s: unable to register with SP\n", ME); 150
SP_is_up = 0;
151
continue;
152
}
153
} else {
154
SP_is_up = 1;
155
}
156
printf("%s: registered...starting work\n", ME);
157
158
while (SP_is_up) {
159
160
/* wait for responses and deal with them accordingly */ 161
if ((count = ISC_Recv(name, respbuf, sizeof(respbuf),
162
srcID, &recv_flags, FOREVER)) < 0) {
163
if (errno == ENOTCONN) {
164
/* SP shutdown--try later */
165
SP_is_up = 0;
166
printf("%s: attempting to deregister\n",
167
ME);
168
ISC_Dereg(name, FOREVER);
169
continue;
170
}
171
/* something worse happened??? */
172
perror("ISC_Recv");
173
exit(-1);
174
}
175
respbuf[count] = '\0';
176
177
/*
178
Sample Split Mode Aware Application
A-5
A
* Expected messages:
179
*
180
* REQ_QUIESCE:we respond with "RSP_QUIESCE"
181
* REQ_RESUME:we exit with "RSP_RESUME"
182
* anything else:we ignore
183
*/
184
if (!strcmp(respbuf, "REQ_QUIESCE")) {
185
/*
186
* Got "REQ_QUIESCE", respond with
187
* "RSP_QUIESCE"
188
*/
189
sleep(getpid() % 3);
190
sprintf(sendbuf, "RSP_QUIESCE");
191
printf("%s: got '%s'--responding with '%s'\n", 192
ME,
193
respbuf, sendbuf);
194
} else if (!strcmp(respbuf, "REQ_RESUME")) {
195
/*
196
* Got "REQ_RESUME", respond with
197
* "RSP_RESUME"
198
*/
199
sleep(getpid() % 3);
200
sprintf(sendbuf, "RSP_RESUME");
201
printf("%s: got '%s'--responding with '%s'\n", 202
ME,
203
respbuf, sendbuf);
204
} else {
205
/*
206
* Anything else? Respond with nothing.
207
*/
208
sendbuf[0] = '\0';
209
printf("%s: got '%s'--ignoring\n", ME, respbuf); 210
}
211
212
/* see if there's anything to send */
213
send_length = strlen(sendbuf);
214
215
/* only send if we have something to send */
216
if (send_length) {
217
send_flags = recv_flags &
218
(ISC_MSG_LOCAL|ISC_MSG_REMOTE);
219
if ((count = ISC_Send(name, sendbuf,
220
send_length,
221
srcID,
222
send_flags, FOREVER)) < 0) {
223
if (errno == ENOTCONN) {
224
A-6
Overview
A
/* SP shutdown--try later */
SP_is_up = 0;
printf("%s: attempting to deregister\n",
ME);
ISC_Dereg(name, FOREVER);
continue;
}
/* something worse happened??? */
perror("ISC_Send");
exit(-1);
}
}
}
}
}
Sample Split Mode Aware Application
225
226
227
228
229
230
231
232
233
234
235
236
237
238
239
240
A-7
A
A-8
Overview